Arsenal defeated Tottenham Hotspur 4-1 in gameweek 12 of the 2025/2026 Premier League season.
A thoroughly dominant display from the Gunners saw them go six points clear at the top of the league table.
Meanwhile, Spurs stay at ninth place.
Eberechi Eze found the net three times in a scintillating display as an attacking midfielder; the Englishman has now made history as he is the first player to score a Premier League hat-trick in the London Derby.
Mikel Arteta’s run for Premier League glory has taken an interesting turn, as Manchester City dropped points away to Newcastle United.
Through this tactical analysis, we aim to understand the areas Arsenal dominated and where Spurs lacked solidity in the North London derby.
Watch Arsenal Tactical Analysis On YouTube
Arsenal Vs Tottenham Hotspur Lineups & Formations
Let’s look at how Mikel Arteta and Thomas Frank fielded their squads.
 Arsenal played in a 4-2-3-1 formation.
David Raya started between the sticks, behind a back four of Jurriën Timber (right-back), William Saliba (right centre-back), Piero Hincapié (left centre-back), and Riccardo Calafiori (left-back).
Cristhian Mosquera replaced Hincapié after 88 minutes, and Myles Lewis-Skelly came on for Calafiori at the 90’+2 mark.
Martín Zubimendi and Declan Rice played as the double pivot.
The front four comprised skipper Bukayo Saka (right-winger), Eberechi Eze (centre attacking midfielder), Leandro Trossard (left-winger), and Mikel Merino (striker).
Trossard made way for Noni Madueke at the 78th minute; meanwhile, Ethan Nwaneri came on for Merino at the 88th minute.
Tottenham lined up in a 3-4-2-1 formation.
Guglielmo Vicario started in goal.
The back three comprised Kevin Danso (right centre-back), captain Cristian Romero (centre centre-back), and Micky van de Ven (left centre-back).
Xavi Simons replaced Danso at the 46th minute.
Djed Spence (right) and Destiny Udogie (left) played as the wing-backs. João Palhinha and Rodrigo Bentancur played as the centre-midfielders.
Spence was subbed off for Pedro Porro after 78 minutes, and Bentancur made way for Randal Kolo Muani at the 66th minute.
Mohammad Kudus (right) and Wilson Odobert (left) played as the wingers right behind the striker Richarlison.
Kudus made way for Brennan Johnson (78′), and Odobert was replaced by Pape Matar Sarr (66′).
Arsenal Attacking Strengths
In this section, we will look at the areas where Arsenal dominated with the ball.
Arsenal Build-up & Progression
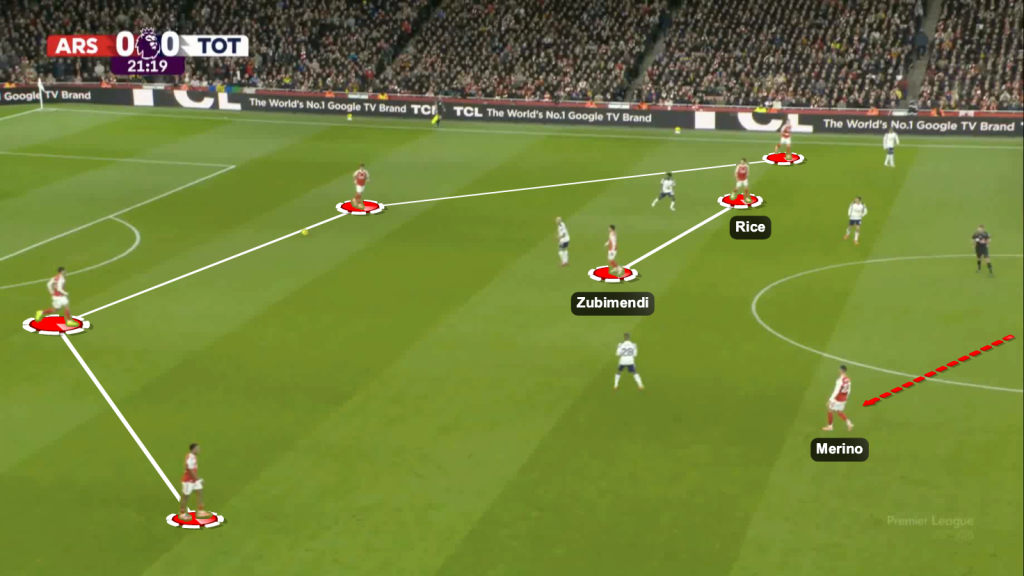
In the first phase of build-up, the Gunners maintained their 4-2 build-up shape.
Zubimendi and Rice were seen staying either behind the first line of opponent press or dropping outside the opponent structure to get on the ball.
In moments when Spurs stayed compact in the press, the hosts found space to move the ball to the wide areas.
The reason for staying compact was that Arsenal had players dropping deep, especially Mikel Merino, in the central zone.
Once the initial wave of press subsided, Arsenal got into their second phase of build-up, moving towards progression.
This involved creating overloads in the midfield third. Calafiori was seen inverting into the half-space.
A box of four or five Arsenal players was a common sight in the midfield.
This was reason enough for Thomas Frank’s side to stay compact, attempting to cut out passing lanes in the central channel.
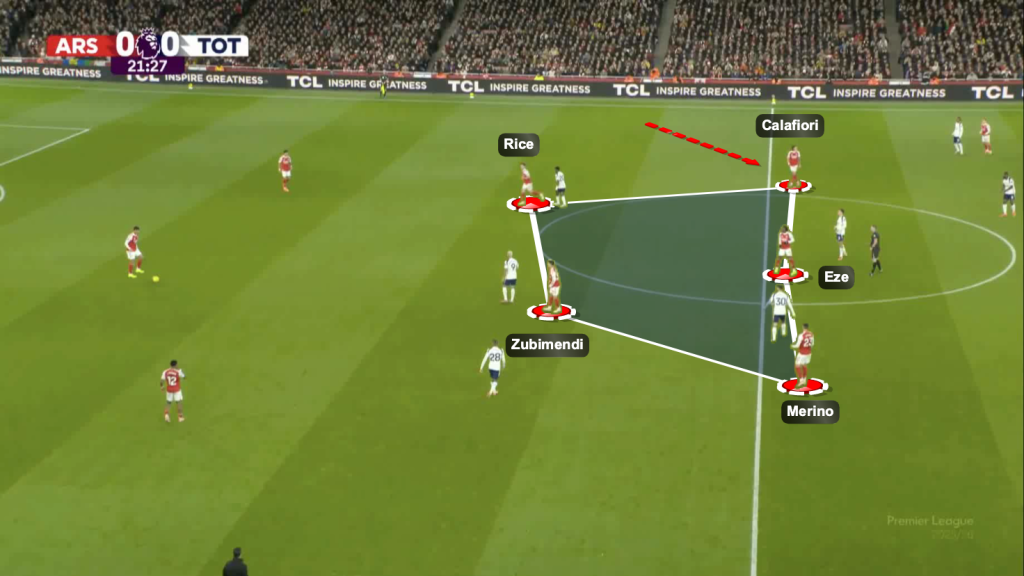
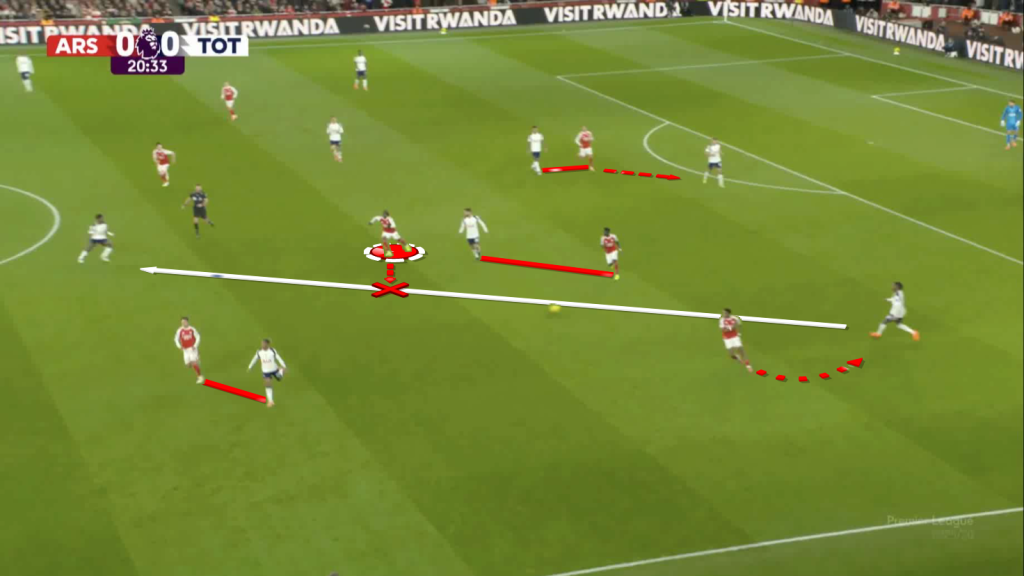
To address this and find solutions, Arsenal drew their opponents to one side and shifted play.
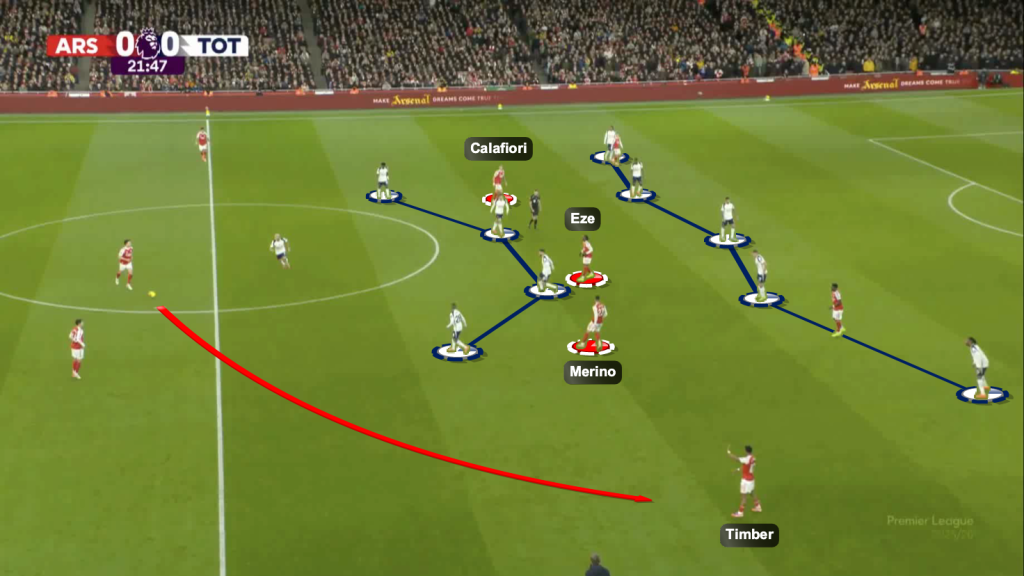
Zubimendi finds Eze for a bounce pass.
The four players around him are attracted, along with another player on the far side, who starts sliding across.
This opens space for Arsenal on the right flank, where Timber offers width.
It was particularly tedious for the Spurs players to keep track of their direct opponent, since Arteta’s side were seen making frequent positional rotations.
Here is an example of the same: Timber goes high and wide, which allows Saka to position himself centrally.
Merino leaves his striker spot to drop into the midfield third.
Zubimendi drops alongside the centre-backs to dictate play from deep.
Meanwhile, Rice, Trossard, and Calafiori make a three-way rotation; Calafiori inverts into midfield, Trossard takes up the left-back spot, and Rice pushes up alongside the Spurs backline.
Since it was difficult to track these rotations, Tottenham ensured the central channel was locked to prevent vertical passes.
This gave the Gunners enough space to play around the press, where Timber usually was an option.
The Dutchman had 75 touches on the ball, which was among the highest alongside Rice (76) and Zubimendi (76).
Additionally, Arsenal attacked much more from the right flank, indicating Timber’s involvement in the play.
 Calafiori, Eze, and Merino were the usual occupants between Tottenham’s lines.
Eberechi Eze Influence In Attacking Third
Once Arsenal entered the attacking third, Eze’s presence and off-the-ball running from Rice and Trossard made all the difference in terms of chance creation for the hosts.
Eze receives the ball in zone-14; while the Spurs defenders are all focused on him, Rice makes a blind-side run in-behind and receives a chipped pass.
Rice also inflicted a significant amount of pain on Frank’s side with his running as they conceded the third goal.
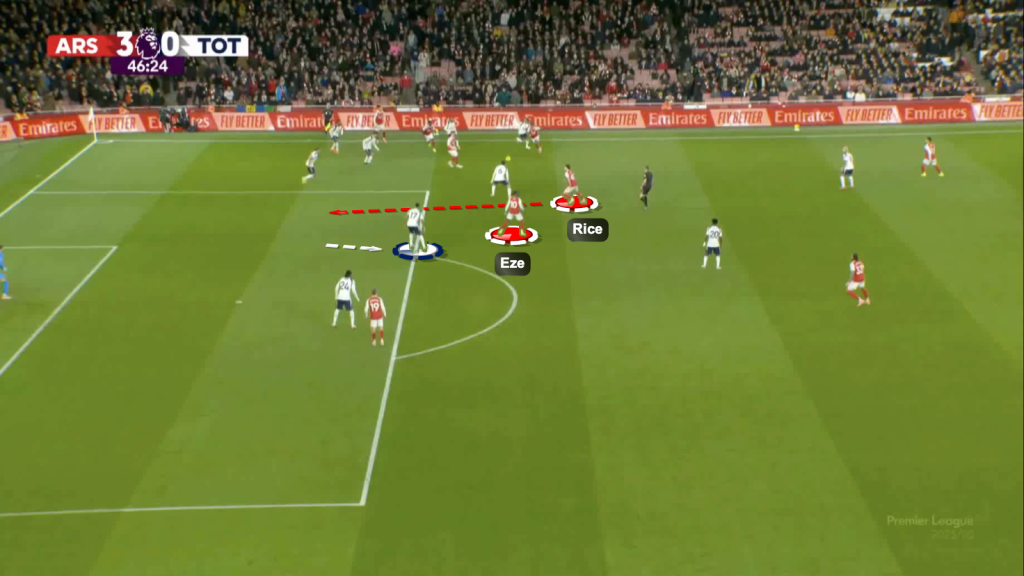
The Spurs defender is aware of Eze’s presence and positions himself closer to the Englishman.
Rice starts a vertical run in the half-space.
This is significant, as it disrupts Tottenham’s defensive structure.
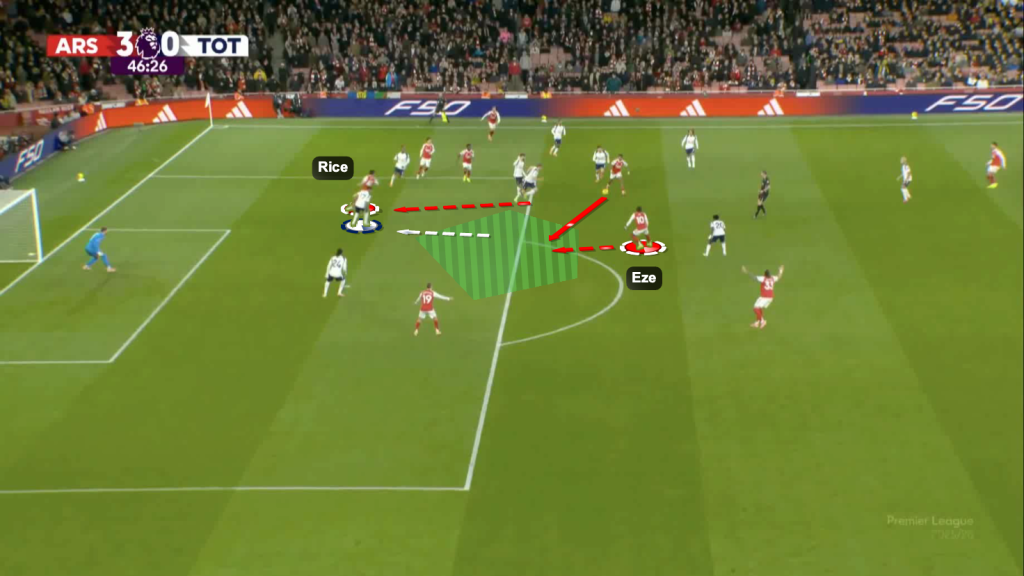
The continuation of the same situation: Rice is deep inside the penalty area, dragging the defender who was marking Eze.
Eze is left with enough space in zone-14 to take a touch to open up and finish in the far corner.
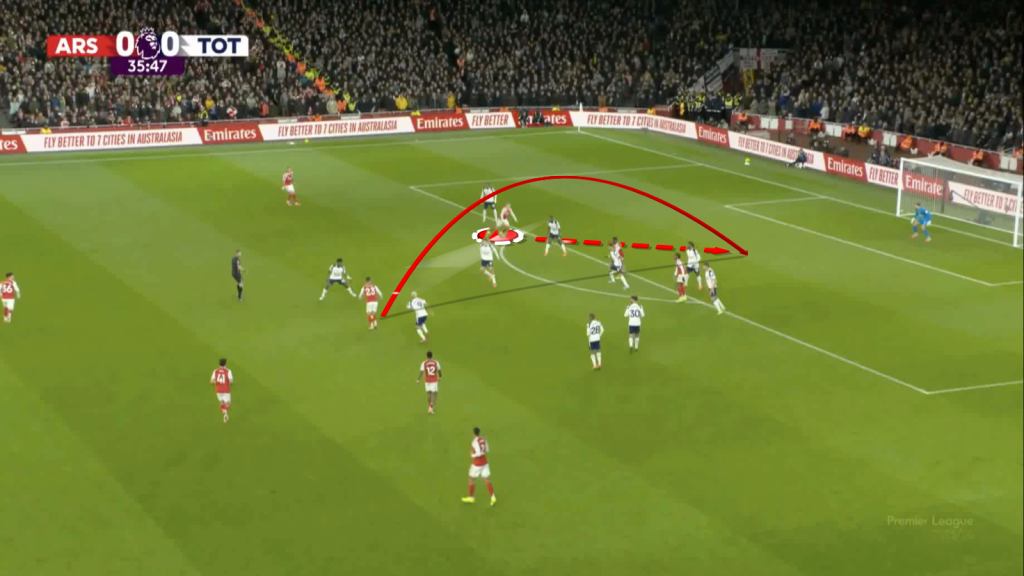
Eze also demonstrated brilliant composure in tight situations in the final third.
By taking a moment longer and manoeuvring the ball, he expertly shook off defenders and created enough space to find the finish.
It is aptly visible in Arsenal’s second goal.
When the ball travels to Eze, there appears to be space on his left shoulder.
However, with the defender charging in, he uses that space as bait to knock the ball across and get it on his stronger right foot.
Arsenal Defending Strengths
In this section, we will look at the areas where Arsenal dominated without the ball.
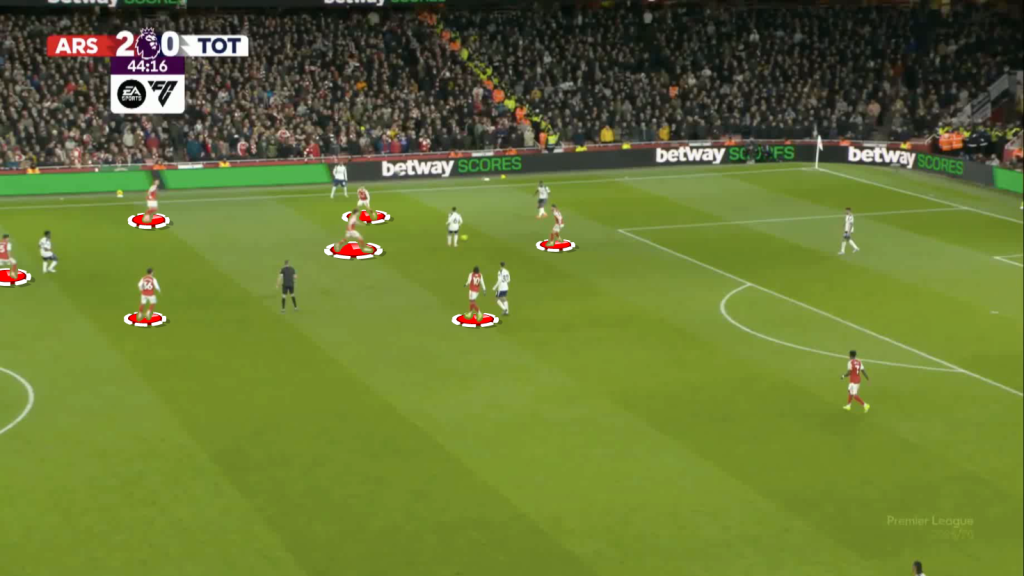
In moments where Spurs attempted to play out from the back, Arsenal pressed with numbers to cut out all short options.
This forced Thomas Frank’s side to play long.
If Spurs got the ball into the wide area and attempted to build from there, Arsenal made sure to squeeze them in that channel.
This forced Tottenham to either play it backwards to shift play or go long.
During dynamic restarts, the Arsenal players worked hard to cover ground and make interceptions.
For example, Eze makes an interception when Spurs try to play vertically.
It is noteworthy that all the other short options in the vicinity are man-marked.
Tottenham Hotspur Areas For Improvement
In this section, we will examine the errors Tottenham made and determine what they could have done to prevent them.
Spurs had 43% ball possession, which means they were defending for a major part of the game.
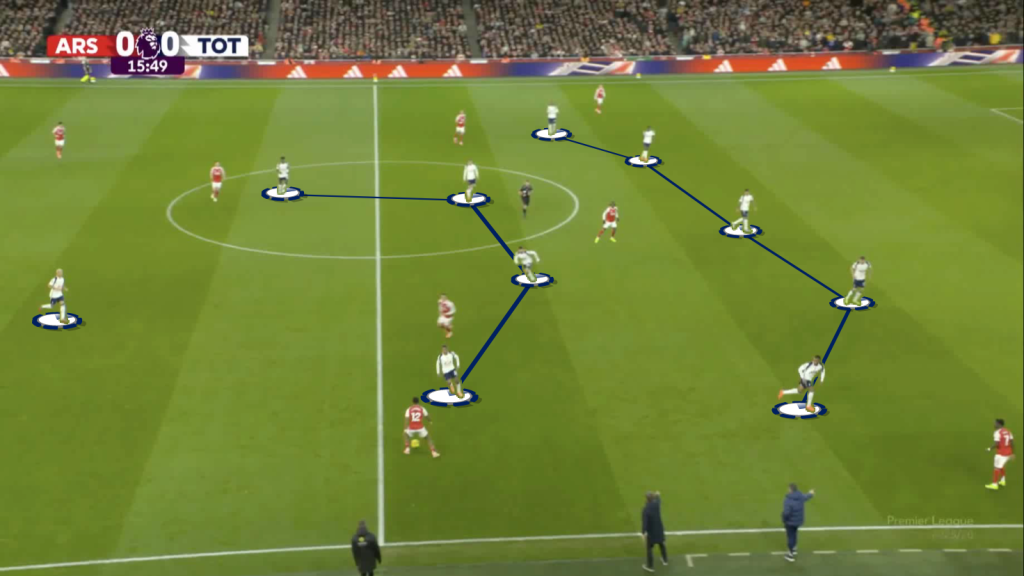
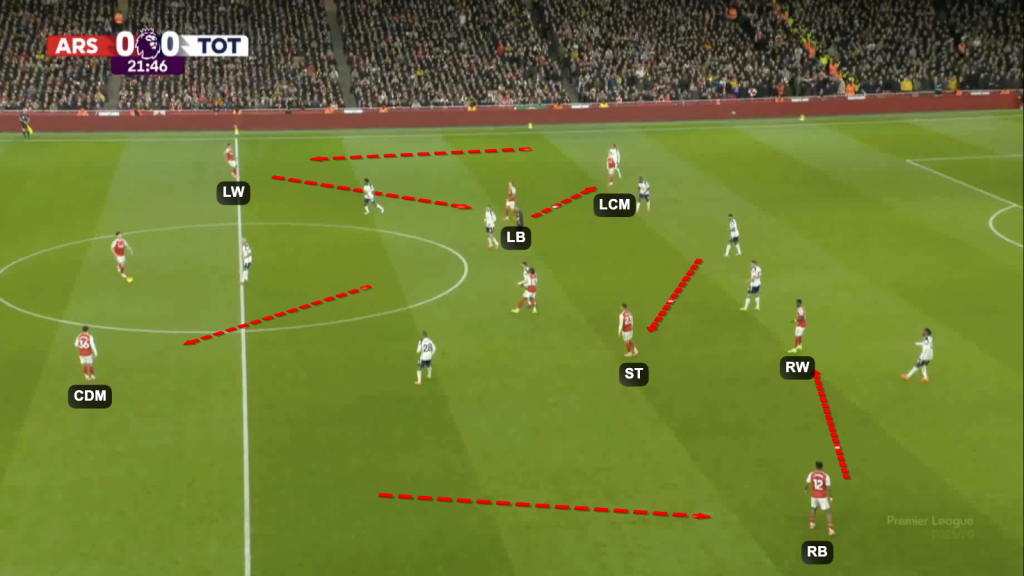
They were usually seen defending in a 5-4-1 shape.
The wing-backs dropped to make a back five; meanwhile, the wingers dropped alongside the centre-midfielders to form a midfield four.
Being horizontally compact in the mid-third, Spurs did decently well at cutting out central passing lanes, which forced Arsenal to go around the press.
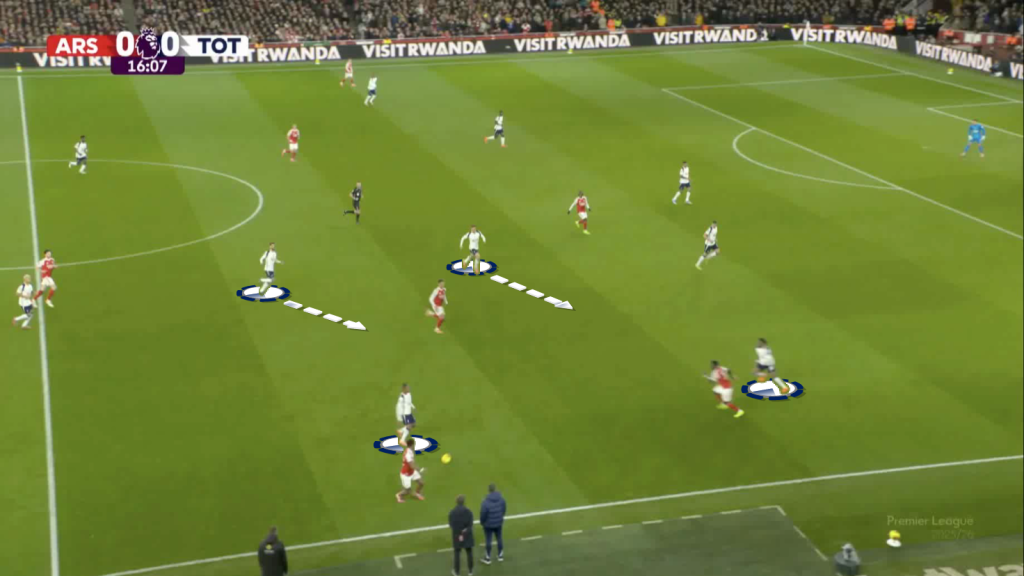
However, they struggled to maintain vertical compactness.
Arsenal time and again found space to operate between their midfield and defence.
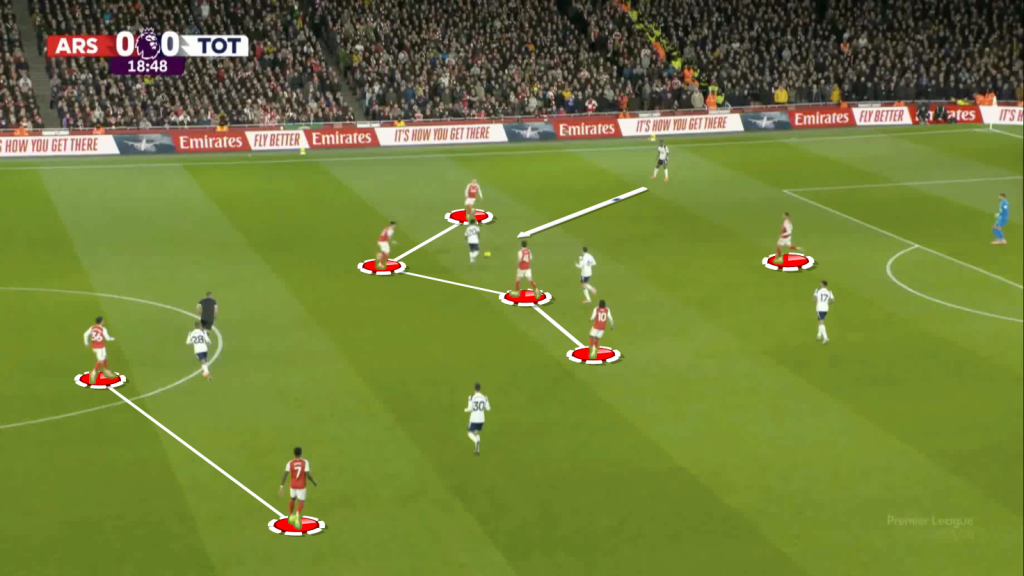
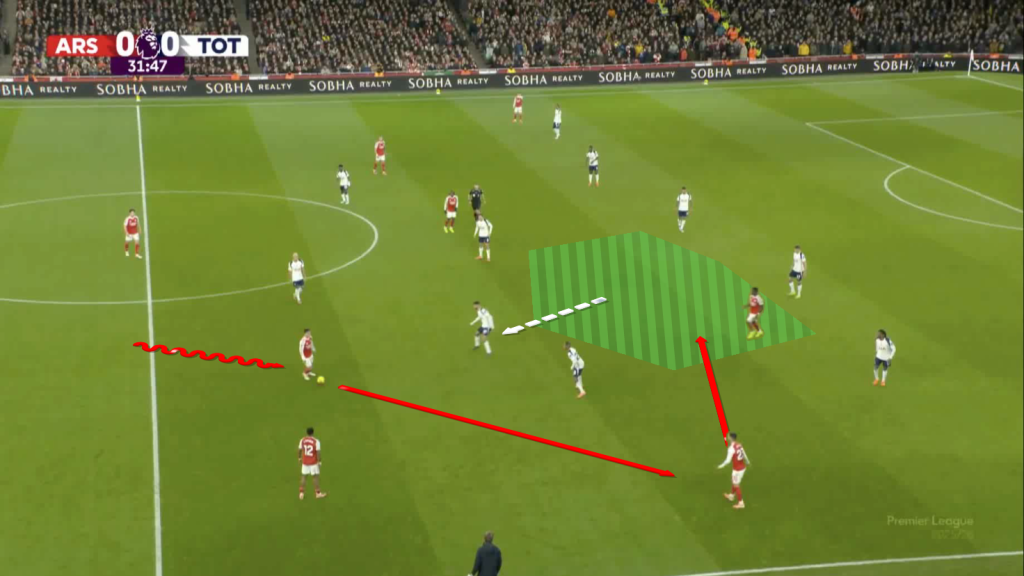
Although the central Arsenal options were cut out for vertical passes, there was space for the Arsenal players outside the structure to drive with the ball.
This attracted the Tottenham midfielders; they were seen jumping to engage in the midfield third.
However, owing to the vertical disconnect, Arsenal managed to go out to in (as shown in the image above).
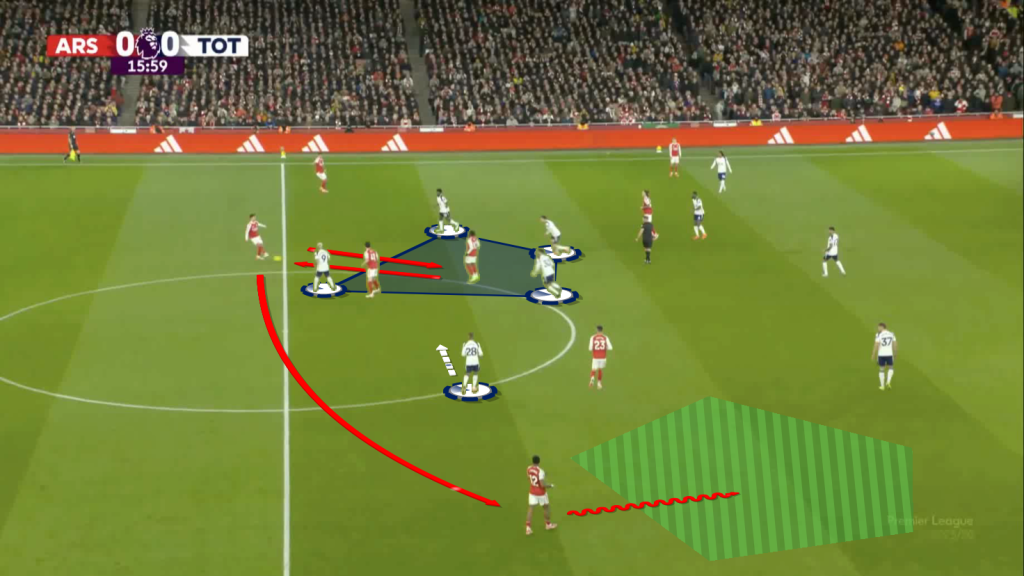
Spurs made attempts to defend with numbers ball-side.
However, these attempts backfired when they overcommitted, leaving space in the central channel.
Both the centre-midfielders (Bentancur and Palhinha) were seen sliding across to engage in the half-space, sometimes even the wide channel.
Eze and Merino exploited the space that opened up in the central channel on numerous occasions.

Arsenal’s first goal is an apt example of this deficit.
Both the centre-midfielders slide across ball-side, leaving space in the central area.
Eze and Merino interchange, which gives the latter more time and space on the ball.
Tottenham fail to close the Spaniard down in time; Trossard, who is in line with the Spurs defenders, makes a blind-side run to receive a chipped pass in-behind before executing a masterful turn and finish.
Although Frank’s side managed horizontal compactness in the mid-third, it did not carry on in the defensive third.
There were numerous situations in which they were exposed either in the half-spaces or the central channel.
In the build-up to the second Arsenal goal, four Tottenham players were engaging in the wide area.
The central players were late to slide across, resulting in a disconnection.
This space was used by Timber before finding an inside pass.
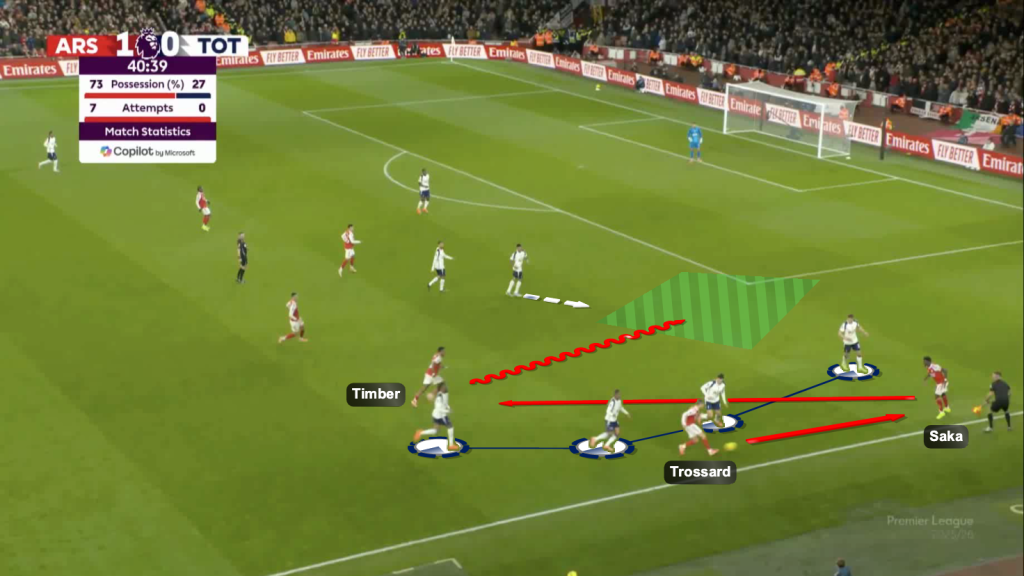
Tottenham’s lack of horizontal compactness in the defensive third hurt them for the final goal as well.
Once Merino received the ball, two Spurs defenders closed him down, leaving space behind; when he released Trossard, the Belgian took a forward touch, also attracting opponents.
When he squares the ball for Eze in the zone 14, he has space in front of him.
Udogie, who was disconnected from his line, rushes to cover that space.
Eze, using the space as bait, opens up on his back foot and finishes in the far corner.
Conclusion
Tottenham Hotspur maintained horizontal compactness in the midfield third, cutting out vertical passing lanes in the central channel.
However, they failed to maintain vertical compactness, which resulted in Arsenal going out to in and exploiting the space between Spurs’ lines of defence and midfield.
Additionally, there was a lack of horizontal compactness in the defensive third.
Thomas Frank’s side also overcommitted midfielders towards the half-space and the wide channel to engage with Arsenal’s numbers, which left space in the central channel, especially in zone 14.
Arsenal made positional rotations and created midfield and wide area overloads to create problems for Spurs.
In the attacking third, blind-side runs helped them attack the depth; meanwhile, when Eze received the ball between the lines, sacrificial runs from Rice created more space.
Whenever Spurs attempted to play out from the back, Arteta’s side made sure to press in numbers, cutting out the short options.
This forced them to either go backwards or play long.