Total Football Analysis
Once.Sport
  • Football Analysis
    • Data Analysis
    • Formations
      • 2-2-4 Formation
      • 2-3-5 Formation
      • 3-1-4-2 Formation
      • 3-2-2-3 Formation
      • 3-2-4-1 Formation
      • 3-1-6 Formation
      • 3-3-4 Formation
      • 3-4-1-2 Formation
      • 3-4-2-1 Formation
      • 3-4-3 Formation
      • 3-5-1-1 Formation
      • 3-5-2 Formation
      • 4-1-4-1 Formation
      • 4-2-2-2 Formation
      • 4-2-3-1 Formation
      • 4-2-4 Formation
      • 4-3-1-2 Formation
      • 4-3-3 Formation
      • 4-4-2 Formation
      • 4-5-1 Formation
      • 5-3-2 Formation
      • 5-4-1 Formation
      • 6-3-1 Formation
    • Head Coach Analysis
    • Match Analysis
    • Player Analysis
    • Recruitment Analysis
    • Set Piece Analysis
    • Tactical Theory
    • Tactical Preview
    • Team Analysis
    • Training Analysis
    • Tactical Analysis
    • Scouting Report
  • Competition
    • ALL Competitions
    • English Premier League
    • Champions League
    • La Liga
    • Bundesliga
    • Serie A
    • Ligue 1
    • Eredivisie
    • EFL Championship
    • FIFA World Cup 2022
    • WEURO 2022
    • Women’s Super League
    • NWSL
    • Belgian First Division A
    • A-League
    • Liga Profesional de Argentina
    • Austrian Bundesliga
    • Campeonato Brasileiro Série A
    • DFB Pokal
    • 1. HNL
    • Danish Superliga
    • EFL League One
    • EFL League Two
    • FA Cup
    • EFL Cup
    • Indian Super League
    • K-League
    • J1 League
    • Liga MX
    • Copa América 2021
    • Copa del Rey
    • MLS
    • Eliteserien
    • Euro 2020
    • Primeira Liga
    • Scottish Premiership
    • Allsvenskan
    • Europa League
    • UEFA Nations League
    • Liga AUF Uruguaya
  • Coaches
    • All Coaches
    • Alfred Schreuder
    • Ange Postecoglou
    • Antonio Conte
    • Arne Slot
    • Bo Svensson
    • Brendan Rodgers
    • Bruno Lage
    • Carlo Ancelotti
    • Christophe Galtier
    • Claude Puel
    • Claudio Ranieri
    • David Moyes
    • Dean Smith
    • Diego Simeone
    • Domenico Tedesco
    • Frank Lampard
    • Eddie Howe
    • Edin Terzić
    • Emma Hayes
    • Erik ten Hag
    • Ernesto Valverde
    • Gennaro Gattuso
    • Gerardo Seoane
    • Gian Piero Gasperini
    • Giovanni van Bronckhorst
    • Graham Potter
    • Igor Tudor
    • Imanol Alguacil
    • Jesse Marsch
    • Jonas Eidevall
    • Jorge Sampaoli
    • José Bordalás
    • José Mourinho
    • Julen Lopetegui
    • Julian Nagelsmann
    • Julien Stéphan
    • Jürgen Klopp
    • Luciano Spalletti
    • Lucien Favre
    • Manuel Pellegrini
    • Marcelo Bielsa
    • Marco Rose
    • Marco Silva
    • Massimiliano Allegri
    • Mauricio Pochettino
    • Maurizio Sarri
    • Mikel Arteta
    • Niko Kovač
    • Nuno Espírito Santo
    • Oliver Glasner
    • Patrick Vieira
    • Paulo Fonseca
    • Pep Guardiola
    • Peter Bosz
    • Rafa Benítez
    • Ralf Rangnick
    • Ralph Hasenhüttl
    • Roger Schmidt
    • Roy Hodgson
    • Sean Dyche
    • Sérgio Conceição
    • Simone Inzaghi
    • Sonia Bompastor
    • Stefano Pioli
    • Steffen Baumgart
    • Steven Gerrard
    • Thiago Motta
    • Thomas Frank
    • Thomas Tuchel
    • Unai Emery
    • Vincenzo Italiano
    • Xavi
  • Teams
    • ALL Teams
    • AC Milan
    • Ajax Amsterdam
    • Arsenal
    • AS Monaco FC
    • Atalanta
    • Atlético Madrid
    • FC Barcelona
    • FC Bayern Munich
    • Borussia Dortmund
    • Celtic FC
    • Chelsea FC
    • Everton F.C.
    • Inter Milan
    • Juventus F.C.
    • Leeds United F.C.
    • Liverpool FC
    • Manchester City
    • Manchester United FC
    • Paris Saint-Germain
    • Rangers FC
    • RB Leipzig
    • Real Madrid CF
    • Tottenham Hotspur
    • West Ham United
  • Players
    • ALL Players
    • Alisson Becker
    • Bukayo Saka
    • Erling Haaland
    • Harry Kane
    • Jack Grealish
    • John Stones
    • Julián Alvarez
    • Kalvin Phillips
    • Kevin De Bruyne
    • Kyle Walker
    • Kylian Mbappé
    • Lamine Yamal
    • Lionel Messi
    • Luis Díaz
    • Mohamed Salah
    • Phil Foden
    • Virgil Van Dijk
  • Contact
  • Write For TFA
No Result
View All Result
No Result
View All Result
Total Football Analysis
No Result
View All Result
Home Match Analysis

Italy Vs Norway [1–4] – 2026 FIFA World Cup Qualifiers: Why The Azzurri Collapsed Against Erling Haaland – Tactical Analysis

Vedant Kharakwal by Vedant Kharakwal
November 18, 2025
in Match Analysis, 4-3-3 Formation, 4-4-2 Formation, 5-3-2 Formation, Analysis, Erling Haaland, Gennaro Gattuso, Italy, Norway, Ståle Solbakken, Tactical Analysis, World Cup Qualifier
0
Italy Vs Norway [1–4] – 2026 FIFA World Cup Qualifiers: Why The Azzurri Collapsed Against Erling Haaland – Tactical Analysis

Italy were defeated at home by Norway 1-4 in their FIFA World Cup Qualifier, which saw them lose out on their chance for direct qualification, as Norway advanced, undefeated.

Although the Azzurri had more of the ball, they were outplayed by a hard-working Norwegian side led by Erling Haaland.

With the chance to make the playoffs, the Italians may still have an opportunity to advance.

In this tactical analysis, we will examine Italy’s deficit, the areas Norway dominated, and the changes Italy must make to get back on track.

Italy Vs Norway Lineups & Formations

Let’s examine how Gennaro Gattuso and Ståle Solbakken assembled their squads.

Italy vs Norway lineups

Italy Lineup & Formation

Gennaro Gattuso tactics lined up in a 4-4-2 formation.

Skipper Gianluigi Donnarumma was in goal, behind a back four of Giovanni Di Lorenzo (right-back), Gianluca Mancini (right centre-back), Alessandro Bastoni (left centre-back), and Federico Dimarco (left-back). Samuele Ricci replaced Bastoni at the 86th minute.

Matteo Politano, Davide Frattesi, Manuel Locatelli, and Nicoló Barella played in the midfield four. Frattesi was replaced by Bryan Cristante (68′), Locatelli by Gianluca Scamacca (79′), and Barella by Alessandro Buongiorno (86′).

Mateo Retegui and Francesco Pio Esposito were the two strikers.

Mattia Zaccagni replaced the latter after 79 minutes.

Norway Lineup & Formation

Ståle Solbakken tactics played in a 4-3-3 formation.

Ørjan Nyland started between the sticks.

The back four comprised Julian Ryerson (right-back), Kristoffer Ajer (right centre-back), Torbjørn Heggem (left centre-back), and David Möller Wolfe (left-back). Wolfe was taken off for Leo Østigård at the 89th minute.

Sander Berge started as the pivot, alongside centre-midfielders Patrick Berg and Kristian Thorstvedt. Morten Thorsby replaced Berg after 64 minutes, and Thelo Aasgaard replaced Thorstvedt after 75 minutes.

Antonio Nusa (left) and Alexander Sørloth (right) played as wingers. The latter was taken off for Oscar Bobb at the 76th minute.

Haaland started as the striker and was replaced by Jørgen Strand Larsen at the 89th minute.

Italy Tactical Problems

In this section, we will look at the major tactical issues in Italy’s play.

Italy Out Of Possession Issues

Italy were seen committing players to their high-press.

With the fixture being a must-win for them, they were under the compulsion to win possession on every occasion.

Italy high press

Here is how Gattuso’s side pressed the Norwegians.

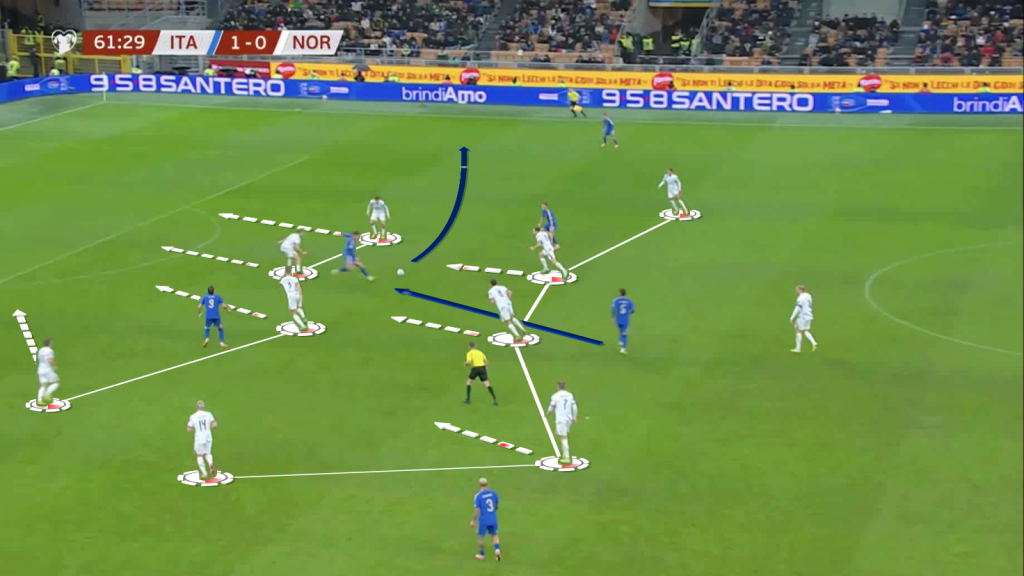
Whenever they pressed high, the first line of pressure was evident, going for man-orientations.

However, they struggled to maintain consistency in compactness.

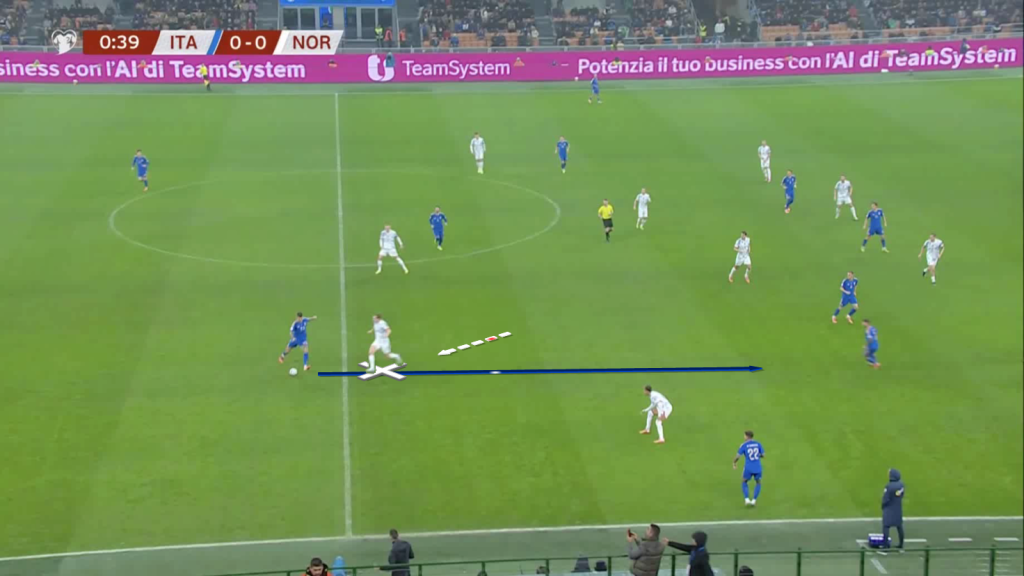
In the image above, Italy have cut out all short options for the Norway goalkeeper.

Thus, he is forced to go long.

The idea was to follow pressing triggers when their opponents had dynamic starts to their build-up.

The issue arose when the opponents found a way to bypass the first wave of pressure.

The second line was often disconnected, leaving Italy vulnerable.

Italy space behind strikers

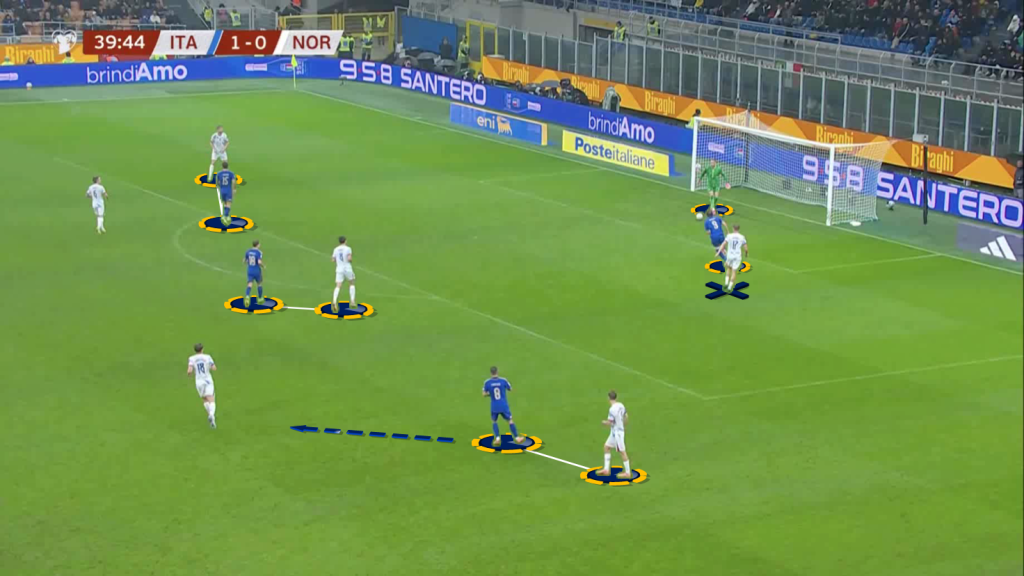
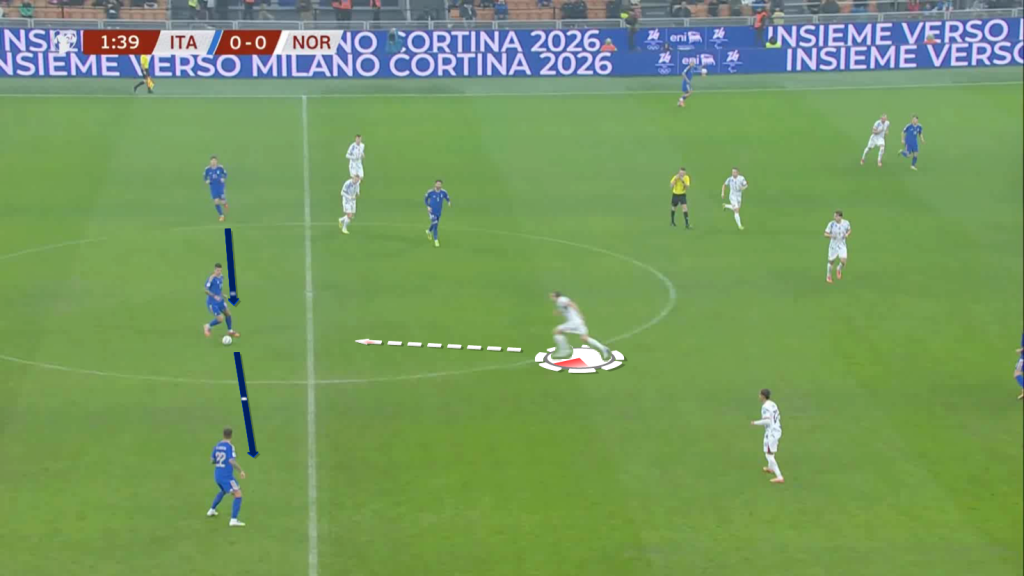
In this example, Italy are pressing with their front two.

However, they are not compact enough to cut vertical passing lanes.

The Norwegian centre-back finds the pivot, who has space to drive.

The second line of pressure in this scenario is disconnected, which takes the Italian strikers out of the game, since they cannot get back behind the ball in time.

In the midfield and the defensive thirds, Italy often found themselves being penetrated, as their struggle to find compactness continued in deeper areas.

Italy midfield penetrated II

Here is a situation where the Italian midfield is penetrated in the midfield third.

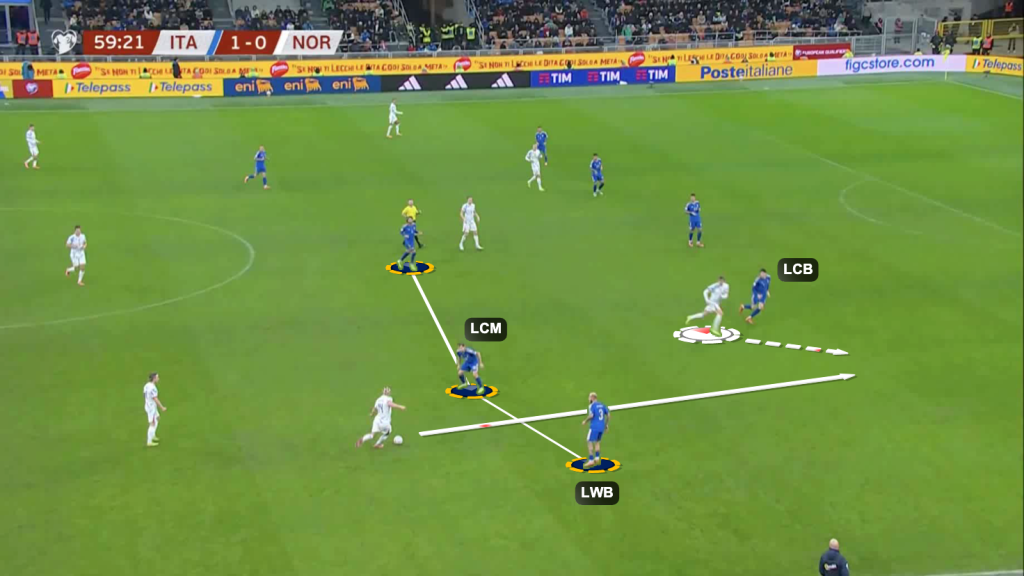
Defensively, they played in a 5-3-2. In this image, Dimarco (left wing-back) steps up alongside the left centre-midfielder (Barella).

This leaves space in-behind, which has to be covered by Bastoni (left centre-back).

Here, a Norwegian attacker makes a diagonal run into the half-space to receive a line-breaking pass from midfield.

Situations like these also resulted in Norway getting shots on target through isolated 1-v-1s or 2-v-2s.

Italy midfield penetrated

Looking at Norway’s fourth goal.

Italy’s midfield gets penetrated in the middle third.

With eight Italian players in the frame, Norway get into an advantageous position in a 2-v-2.

Lack of compactness

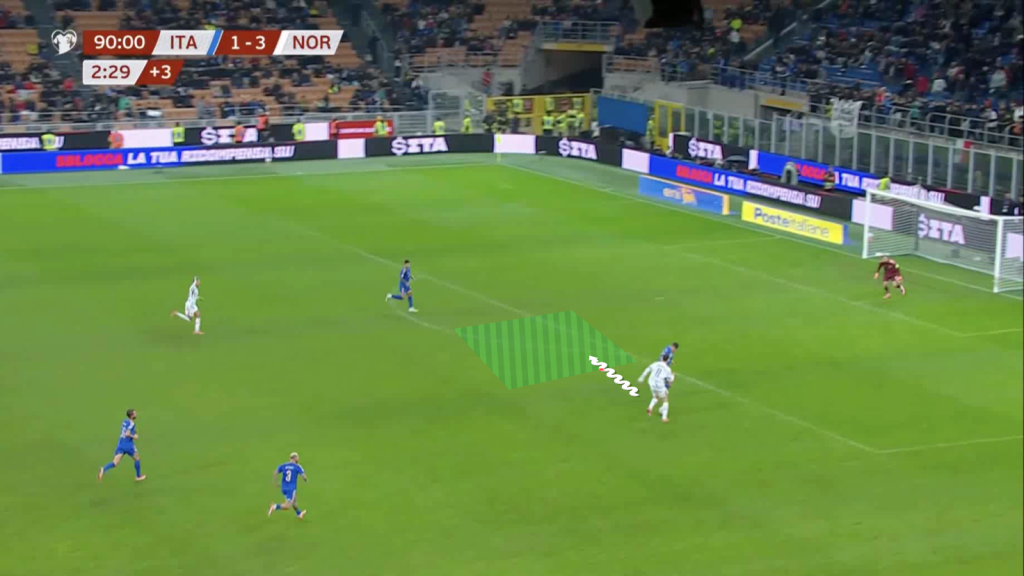
Here is the continuation of that move from Norway.

Since the far side defender is not in a compact covering position, Strand Larsen gets into an isolated 1-v-1 with the ball-side Italian defender.

The Norwegian gets enough space and time to cut inside and finish.

If the other defender slides across to cover the active defender, the opponent does not get enough space to shoot.

Haaland goal 2

This goal from Haaland is an example of the Italian defenders not sliding across.

Bastoni drifts outside to engage with the ball-carrier.

Since the far-side centre-back fails to stay connected, Haaland gets enough space to finish from the cross.

Italy In-Possession Issues

Italy were usually comfortable in the build-up phase.

However, they faced trouble once they entered the midfield third.

There were situations where the Italian defenders forced vertical passes, which ended up getting intercepted.

Italy forcing vertical pass

Here, Bastoni forces a line-breaking pass.

However, the Norwegian players have positioned themselves well to cut off the pass.

Norway cutting vertical pass

Here is another situation where Norway are able to cut out a vertical pass from Italy.

Upon finding players inside the opponent’s structure, they were often stuck.

With the lack of options, they had to play backwards in situations where little adjustments in positioning would have solved progression for Gattuso’s side.

Italy lack of options

Here, Italy find one of their midfielders inside a pocket in the mid-third.

However, he is forced to play it back.

In the same scenario, positional adjustments from either of the two teammates shown could have helped Italy progress the ball.

Italy lack of options II

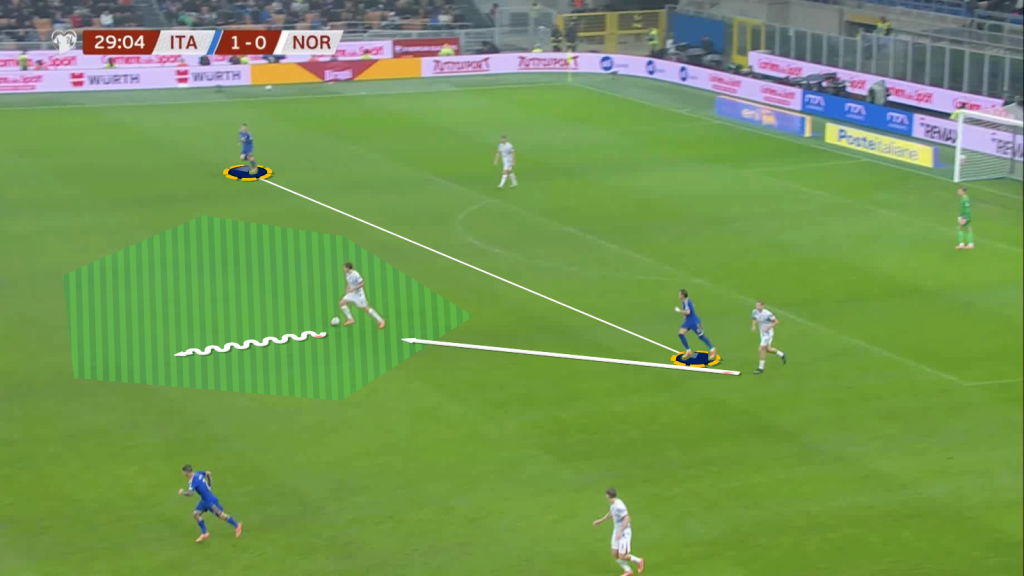
Here is another example: An Italian midfielder receives a flat pass from the wide area.

Since there are two opponents putting pressure on his first touch, he ends up misplacing the pass.

As shown, the most realistic adjustment would be for the fellow midfielder to step closer and offer support.

Italy were also guilty of forcing long passes without their wide players having enough space to work with.

https://totalfootballanalysis.com/wp-content/uploads/2025/11/Italy-diagonal-switch.mp4

Here is an example: Italy attempt to play a diagonal switch to the wide channel.

Initially, the opponent fullback has positioned himself infield.

However, the moment the pass is about to be played, the defender is aware of the danger in the wide area.

He quickly slides across to make the first contact.

https://totalfootballanalysis.com/wp-content/uploads/2025/11/Italy-long-switch.mp4

Here is another example: Italy play an accurate cross-field switch.

However, while the ball travels, the opponent full-back has enough time to slide across and put pressure on the attacker’s first touch.

Anticipating the pressure, the attacker attempts to make a first-touch cross and ends up mis-hitting it.

Norway Strengths Vs Italy

In this section, we will examine the areas where Norway demonstrated positive outcomes, thereby dominating the game.

Norway Defending Phase

Norway were seen engaging Italy in the midfield third, preventing vertical passes.

Forcing sideways pass

Here we can see a Norway player closing down an Italian centre-back on his first touch.

This forced him to offload the ball sideways.

Forcing the opponents away from dangerous areas was a pattern followed by Solbakken’s side.

This was the case when Italy tried to attack down the wide channels.

Overload defending wide channel

Here is an example: Italy are attacking through the wide channel.

As the winger attempts to dribble towards space, Norway double-team him to cut off incisive exit angles.

The only way he is allowed to go is down the line.

This way, they can deal with the least dangerous outcome: a rushed cross.

Overload defending II

Norway also ensured that they man-marked teammates who attempted to offer support to the isolated wide player.

In the situation above, we can see the Italy players moving to offer exit options to the player on the ball.

However, the Norwegian players in the vicinity are quick to shift positions to ensure they have a numerical advantage.

The ball-carrier has no option but to dribble down the line and play a rushed cross.

One collective action that Norway excelled at, outperforming Italy throughout the game, was dropping their defensive lines and staying compact when required.

This particular action made a huge difference for the visitors, as they conceded just one goal.

Norway dropping lines

Here is an example: Italy get the ball to the wide player in plenty of space.

The Norwegians are quick to realise and drop their lines at the earliest.

Norway defending cross

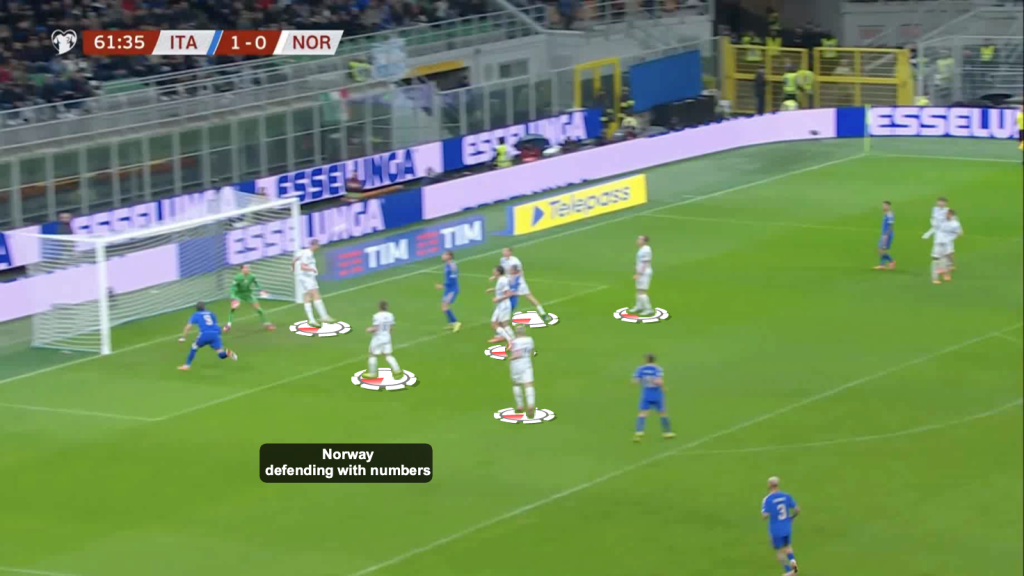
They maintain a compact shape and ensure they have enough players inside the penalty area.

By the time the cross comes, they get it away with ease.

Norway Attacking Phase

Norway’s attacking efficiency was a result of their exploitation of small spaces, paired with the quickness of their actions.

The goals they scored are good examples to illustrate this point.

https://totalfootballanalysis.com/wp-content/uploads/2025/11/Norway-equaliser.mp4

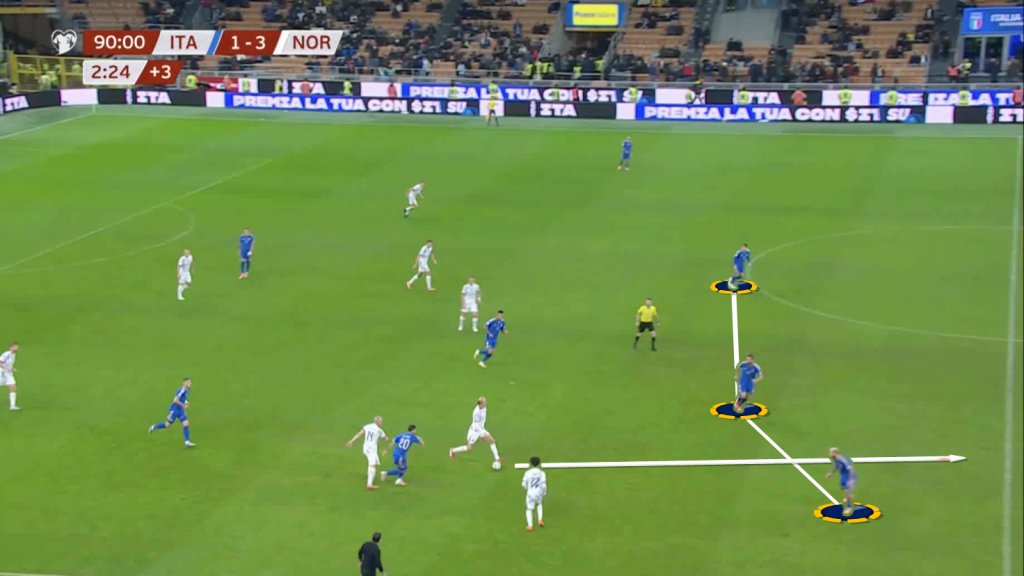
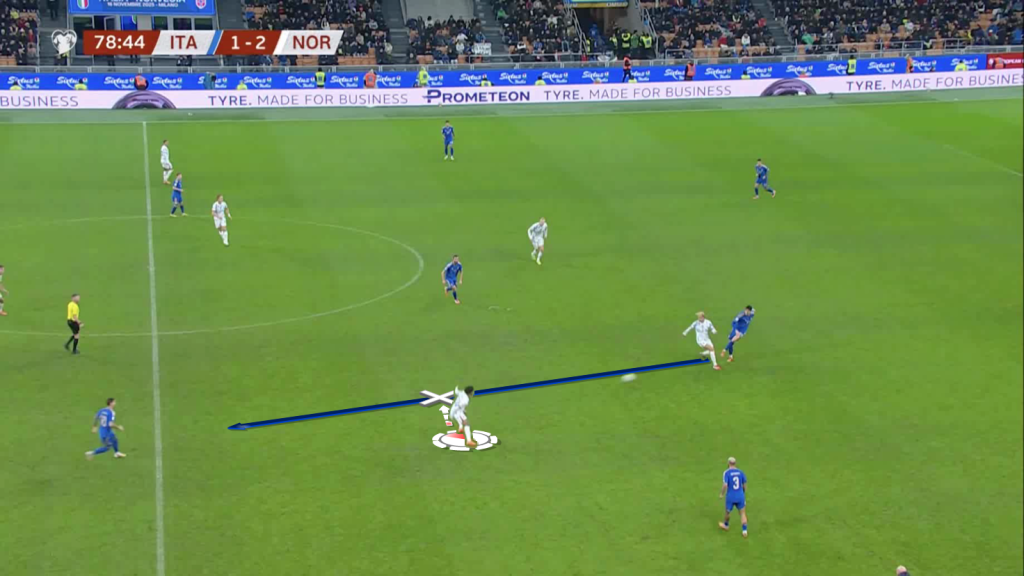
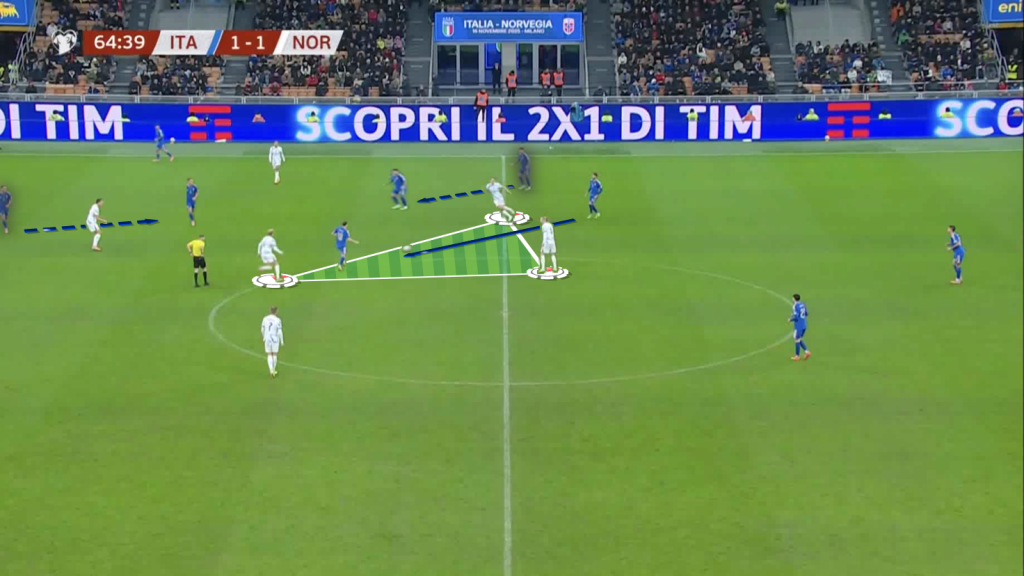
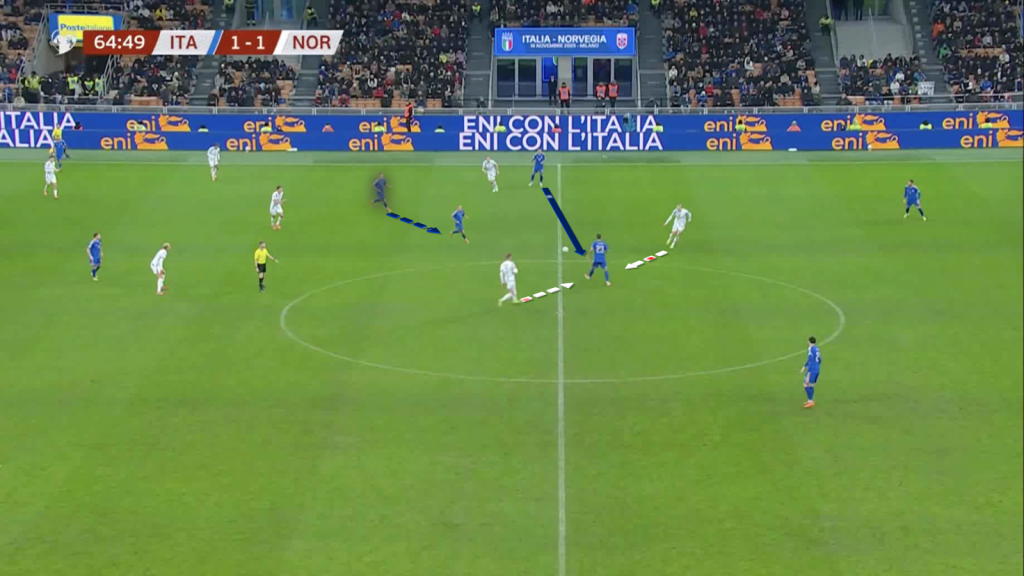
In the build-up to this equaliser scored by Norway, once the striker drops into midfield, one of the Italian centre-backs follows him.

This leaves space in-behind; to cover that space, the wing-back tucks inside.

This leaves space on the outside, which is exploited by the eventual goal-scorer.

These attacks would not end up in box entries without speed of thought and quickness of technical actions.

https://totalfootballanalysis.com/wp-content/uploads/2025/11/Haaland-goal-1.mp4

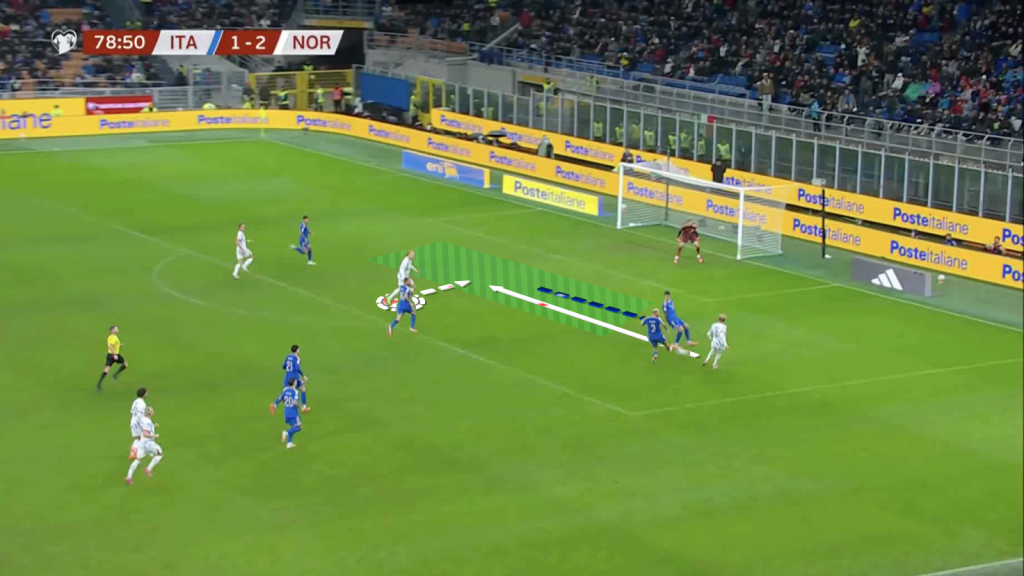
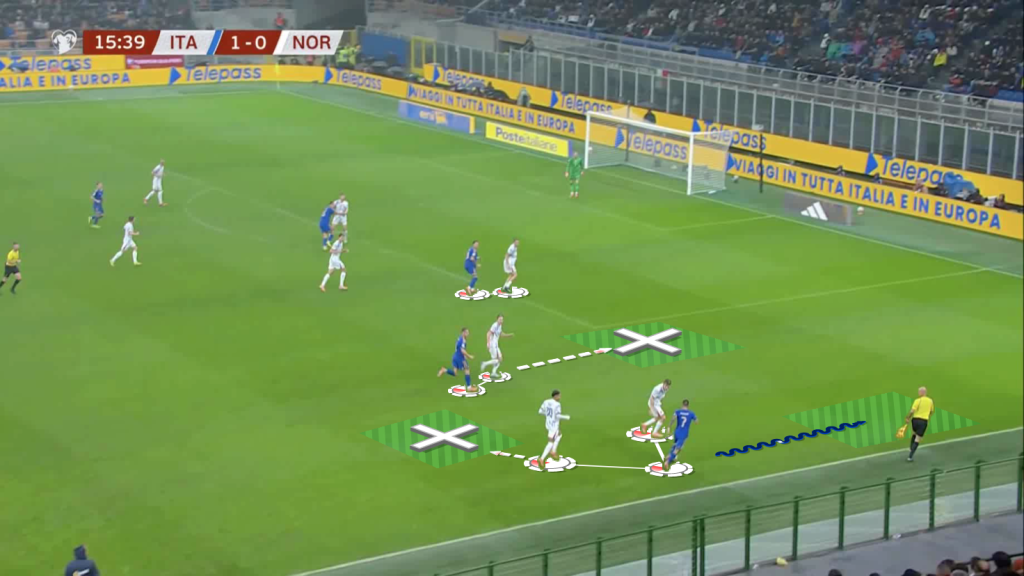
Haaland’s first goal is another testament to Norway’s quick usage of small pockets of space.

Once the winger makes the cutback, the small pocket of space opens up in the half-space momentarily.

It is expertly used by the Norwegian attacker in this situation, who baits the inside dribble to take it on the outside to put a chipped cross in for the Manchester City striker, who positions himself well to find the back of the net.

Conclusion

Italy struggled to keep their defensive structure intact owing to inadequate positioning in terms of covering for each other.

They left space between the lines when pressing high, which exposed them even further.

Staying compact and getting into good covering positions with respect to each other would solve this problem.

On the ball, they forced vertical passes and diagonal switches, which helped their opponents gain more control.

With a lack of options in the midfield third, they were often forced to play backwards.

Making slight adjustments to midfield positioning and increasing mobility can help resolve this issue.

Norway were compact in their defensive structure and prioritised forcing their opponents away from dangerous areas at all times; this helped them keep Italy away from their goal for a large part of the game.

In possession, the Norwegians made sure to utilise small pockets of space, executing their actions with speed and intent.

These details were the significant points of difference between the two sides.

Tags: Erling HaalandErling Haaland AnalysisErling Haaland NorwayErling Haaland Playing StyleErling Haaland Scout ReportGennaro GattusoGennaro Gattuso ItalyGennaro Gattuso Style Of PlayGennaro Gattuso Tactical AnalysisGennaro Gattuso TacticsItalyItaly FormationItaly LineupItaly Vs NorwayItaly World CupNorwayNorway FormationNorway LineupNorway World CupStåle SolbakkenStale Solbakken NorwayStale Solbakken Style Of PlayStale Solbakken Tactical AnalysisStale Solbakken TacticsTactical AnalysisWorld Cup Qualifier
Previous Post

Luis Díaz Scout Report At Bayern Munich 2025/2026: A Perfect Fit For Vincent Kompany Tactics – Player Analysis

Next Post

Raffaele Palladino Tactics At Atalanta 2025/2026: Can He Restore La Dea’s Spark? – Tactical Analysis

Next Post
Raffaele Palladino Tactics At Atalanta 20252026 - Analysis

Raffaele Palladino Tactics At Atalanta 2025/2026: Can He Restore La Dea’s Spark? - Tactical Analysis

  • About Total Football Analysis
  • Contact Total Football Analysis
  • Write For Total Football Analysis
  • Advertise
  • Privacy Policy
  • Cancellation / Refund Policy
  • Resources
  • Terms Of Service

© 2026 Total Football Analysis

No Result
View All Result
  • Football Analysis
    • Data Analysis
    • Formations
      • 2-2-4 Formation
      • 2-3-5 Formation
      • 3-1-4-2 Formation
      • 3-2-2-3 Formation
      • 3-2-4-1 Formation
      • 3-1-6 Formation
      • 3-3-4 Formation
      • 3-4-1-2 Formation
      • 3-4-2-1 Formation
      • 3-4-3 Formation
      • 3-5-1-1 Formation
      • 3-5-2 Formation
      • 4-1-4-1 Formation
      • 4-2-2-2 Formation
      • 4-2-3-1 Formation
      • 4-2-4 Formation
      • 4-3-1-2 Formation
      • 4-3-3 Formation
      • 4-4-2 Formation
      • 4-5-1 Formation
      • 5-3-2 Formation
      • 5-4-1 Formation
      • 6-3-1 Formation
    • Head Coach Analysis
    • Match Analysis
    • Player Analysis
    • Recruitment Analysis
    • Set Piece Analysis
    • Tactical Theory
    • Tactical Preview
    • Team Analysis
    • Training Analysis
    • Tactical Analysis
    • Scouting Report
  • Competition
    • ALL Competitions
    • English Premier League
    • Champions League
    • La Liga
    • Bundesliga
    • Serie A
    • Ligue 1
    • Eredivisie
    • EFL Championship
    • FIFA World Cup 2022
    • WEURO 2022
    • Women’s Super League
    • NWSL
    • Belgian First Division A
    • A-League
    • Liga Profesional de Argentina
    • Austrian Bundesliga
    • Campeonato Brasileiro Série A
    • DFB Pokal
    • 1. HNL
    • Danish Superliga
    • EFL League One
    • EFL League Two
    • FA Cup
    • EFL Cup
    • Indian Super League
    • K-League
    • J1 League
    • Liga MX
    • Copa América 2021
    • Copa del Rey
    • MLS
    • Eliteserien
    • Euro 2020
    • Primeira Liga
    • Scottish Premiership
    • Allsvenskan
    • Europa League
    • UEFA Nations League
    • Liga AUF Uruguaya
  • Coaches
    • All Coaches
    • Alfred Schreuder
    • Ange Postecoglou
    • Antonio Conte
    • Arne Slot
    • Bo Svensson
    • Brendan Rodgers
    • Bruno Lage
    • Carlo Ancelotti
    • Christophe Galtier
    • Claude Puel
    • Claudio Ranieri
    • David Moyes
    • Dean Smith
    • Diego Simeone
    • Domenico Tedesco
    • Frank Lampard
    • Eddie Howe
    • Edin Terzić
    • Emma Hayes
    • Erik ten Hag
    • Ernesto Valverde
    • Gennaro Gattuso
    • Gerardo Seoane
    • Gian Piero Gasperini
    • Giovanni van Bronckhorst
    • Graham Potter
    • Igor Tudor
    • Imanol Alguacil
    • Jesse Marsch
    • Jonas Eidevall
    • Jorge Sampaoli
    • José Bordalás
    • José Mourinho
    • Julen Lopetegui
    • Julian Nagelsmann
    • Julien Stéphan
    • Jürgen Klopp
    • Luciano Spalletti
    • Lucien Favre
    • Manuel Pellegrini
    • Marcelo Bielsa
    • Marco Rose
    • Marco Silva
    • Massimiliano Allegri
    • Mauricio Pochettino
    • Maurizio Sarri
    • Mikel Arteta
    • Niko Kovač
    • Nuno Espírito Santo
    • Oliver Glasner
    • Patrick Vieira
    • Paulo Fonseca
    • Pep Guardiola
    • Peter Bosz
    • Rafa Benítez
    • Ralf Rangnick
    • Ralph Hasenhüttl
    • Roger Schmidt
    • Roy Hodgson
    • Sean Dyche
    • Sérgio Conceição
    • Simone Inzaghi
    • Sonia Bompastor
    • Stefano Pioli
    • Steffen Baumgart
    • Steven Gerrard
    • Thiago Motta
    • Thomas Frank
    • Thomas Tuchel
    • Unai Emery
    • Vincenzo Italiano
    • Xavi
  • Teams
    • ALL Teams
    • AC Milan
    • Ajax Amsterdam
    • Arsenal
    • AS Monaco FC
    • Atalanta
    • Atlético Madrid
    • FC Barcelona
    • FC Bayern Munich
    • Borussia Dortmund
    • Celtic FC
    • Chelsea FC
    • Everton F.C.
    • Inter Milan
    • Juventus F.C.
    • Leeds United F.C.
    • Liverpool FC
    • Manchester City
    • Manchester United FC
    • Paris Saint-Germain
    • Rangers FC
    • RB Leipzig
    • Real Madrid CF
    • Tottenham Hotspur
    • West Ham United
  • Players
    • ALL Players
    • Alisson Becker
    • Bukayo Saka
    • Erling Haaland
    • Harry Kane
    • Jack Grealish
    • John Stones
    • Julián Alvarez
    • Kalvin Phillips
    • Kevin De Bruyne
    • Kyle Walker
    • Kylian Mbappé
    • Lamine Yamal
    • Lionel Messi
    • Luis Díaz
    • Mohamed Salah
    • Phil Foden
    • Virgil Van Dijk
  • Contact
  • Write For TFA
  • Login

© 2026 Total Football Analysis