Total Football Analysis
Once.Sport
  • Football Analysis
    • Data Analysis
    • Formations
      • 2-2-4 Formation
      • 2-3-5 Formation
      • 3-1-4-2 Formation
      • 3-2-2-3 Formation
      • 3-2-4-1 Formation
      • 3-1-6 Formation
      • 3-3-4 Formation
      • 3-4-1-2 Formation
      • 3-4-2-1 Formation
      • 3-4-3 Formation
      • 3-5-1-1 Formation
      • 3-5-2 Formation
      • 4-1-4-1 Formation
      • 4-2-2-2 Formation
      • 4-2-3-1 Formation
      • 4-2-4 Formation
      • 4-3-1-2 Formation
      • 4-3-3 Formation
      • 4-4-2 Formation
      • 4-5-1 Formation
      • 5-3-2 Formation
      • 5-4-1 Formation
      • 6-3-1 Formation
    • Head Coach Analysis
    • Match Analysis
    • Player Analysis
    • Recruitment Analysis
    • Set Piece Analysis
    • Tactical Theory
    • Tactical Preview
    • Team Analysis
    • Training Analysis
    • Tactical Analysis
    • Scouting Report
  • Competition
    • ALL Competitions
    • English Premier League
    • Champions League
    • La Liga
    • Bundesliga
    • Serie A
    • Ligue 1
    • Eredivisie
    • EFL Championship
    • FIFA World Cup 2022
    • WEURO 2022
    • Women’s Super League
    • NWSL
    • Belgian First Division A
    • A-League
    • Liga Profesional de Argentina
    • Austrian Bundesliga
    • Campeonato Brasileiro Série A
    • DFB Pokal
    • 1. HNL
    • Danish Superliga
    • EFL League One
    • EFL League Two
    • FA Cup
    • EFL Cup
    • Indian Super League
    • K-League
    • J1 League
    • Liga MX
    • Copa América 2021
    • Copa del Rey
    • MLS
    • Eliteserien
    • Euro 2020
    • Primeira Liga
    • Scottish Premiership
    • Allsvenskan
    • Europa League
    • UEFA Nations League
    • Liga AUF Uruguaya
  • Coaches
    • All Coaches
    • Alfred Schreuder
    • Ange Postecoglou
    • Antonio Conte
    • Arne Slot
    • Bo Svensson
    • Brendan Rodgers
    • Bruno Lage
    • Carlo Ancelotti
    • Christophe Galtier
    • Claude Puel
    • Claudio Ranieri
    • David Moyes
    • Dean Smith
    • Diego Simeone
    • Domenico Tedesco
    • Frank Lampard
    • Eddie Howe
    • Edin Terzić
    • Emma Hayes
    • Erik ten Hag
    • Ernesto Valverde
    • Gennaro Gattuso
    • Gerardo Seoane
    • Gian Piero Gasperini
    • Giovanni van Bronckhorst
    • Graham Potter
    • Igor Tudor
    • Imanol Alguacil
    • Jesse Marsch
    • Jonas Eidevall
    • Jorge Sampaoli
    • José Bordalás
    • José Mourinho
    • Julen Lopetegui
    • Julian Nagelsmann
    • Julien Stéphan
    • Jürgen Klopp
    • Luciano Spalletti
    • Lucien Favre
    • Manuel Pellegrini
    • Marcelo Bielsa
    • Marco Rose
    • Marco Silva
    • Massimiliano Allegri
    • Mauricio Pochettino
    • Maurizio Sarri
    • Mikel Arteta
    • Niko Kovač
    • Nuno Espírito Santo
    • Oliver Glasner
    • Patrick Vieira
    • Paulo Fonseca
    • Pep Guardiola
    • Peter Bosz
    • Rafa Benítez
    • Ralf Rangnick
    • Ralph Hasenhüttl
    • Roger Schmidt
    • Roy Hodgson
    • Sean Dyche
    • Sérgio Conceição
    • Simone Inzaghi
    • Sonia Bompastor
    • Stefano Pioli
    • Steffen Baumgart
    • Steven Gerrard
    • Thiago Motta
    • Thomas Frank
    • Thomas Tuchel
    • Unai Emery
    • Vincenzo Italiano
    • Xavi
  • Teams
    • ALL Teams
    • AC Milan
    • Ajax Amsterdam
    • Arsenal
    • AS Monaco FC
    • Atalanta
    • Atlético Madrid
    • FC Barcelona
    • FC Bayern Munich
    • Borussia Dortmund
    • Celtic FC
    • Chelsea FC
    • Everton F.C.
    • Inter Milan
    • Juventus F.C.
    • Leeds United F.C.
    • Liverpool FC
    • Manchester City
    • Manchester United FC
    • Paris Saint-Germain
    • Rangers FC
    • RB Leipzig
    • Real Madrid CF
    • Tottenham Hotspur
    • West Ham United
  • Players
    • ALL Players
    • Alisson Becker
    • Bukayo Saka
    • Erling Haaland
    • Harry Kane
    • Jack Grealish
    • John Stones
    • Julián Alvarez
    • Kalvin Phillips
    • Kevin De Bruyne
    • Kyle Walker
    • Kylian Mbappé
    • Lamine Yamal
    • Lionel Messi
    • Luis Díaz
    • Mohamed Salah
    • Phil Foden
    • Virgil Van Dijk
  • Contact
  • Write For TFA
No Result
View All Result
No Result
View All Result
Total Football Analysis
No Result
View All Result
Home Match Analysis

Manchester United Vs Fulham [3–2] – Premier League 2025/2026: How United Won Despite Structural Gaps – Tactical Analysis

Ahmed Osama by Ahmed Osama
February 3, 2026
in Match Analysis, 4-2-3-1 Formation, Analysis, Bruno Fernandes, Casemiro, Fulham FC, Manchester United FC, Marco Silva, Matheus Cunha, Michael Carrick, Premier League, Tactical Analysis
0
Arsenal 2-3 Man United - tactical analysis

Manchester United continued their winning run by defeating Fulham in Gameweek 24 of the 2025/2026 Premier League season.

The victory at Old Trafford ensured the Red Devils maintained their place inside the top four of the table.

Manchester United began Michael Carrick‘s tenure by defeating their city rivals, Manchester City, before following that result with an away victory against league leaders Arsenal at the Emirates Stadium.

Two major wins against leading title contenders set the tone ahead of the Fulham fixture.

This Manchester United vs Fulham tactical analysis will break down some of Michael Carrick’s tactical ideas to come away from Sunday’s game with another three points.

Manchester United Vs Fulham Lineups & Formations

manchester-united-fulham-premier-league-2025-2026-analysis-tactics

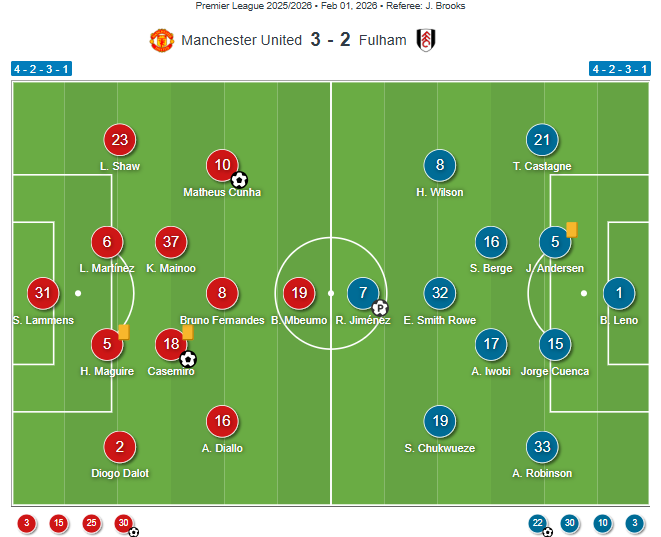
Manchester United lined up with a 4-2-3-1 formation.

Senne Lammens started in goal.

Manchester United’s back four was Harry Maguire and Lisandro Martínez as right and left centre-backs, with Diogo Dalot and Luke Shaw playing as right and left full-backs.

The defensive backline is behind two midfielders, Casemiro and Kobbie Mainoo, as the double pivot, who are behind the attacking midfielder, Bruno Fernandes.

Amad Diallo was Manchester United’s right winger, with Matheus Cunha on the left wing, and Bryan Mbeumo up front.

Michael Carrick made four substitutions in the match.

Benjamin Šeško (74′) came on for Cunha, Manuel Ugarte (75′) for Casemiro, Noussair Mazraoui (86’) for Dalot, and Leny Yoro (90′) came on for Mbeumo.

With a similar setup to Manchester United, Fulham lined up in a 4-2-3-1 formation.

Bernd Leno started between the sticks.

Fulham‘s back four consisted of Joachim Andersen and Jorge Cuenca at right and left centre-back, with Timothy Castagne and Antonee Robinson as right and left full-backs.

Their two midfielders were Alex Iwobi and Sander Berge, while Emile Smith Rowe played just ahead as a number ten.

Harry Wilson was Fulham‘s right winger with Samuel Chukwueze on the left and Raúl Jiménez up front.

Marco Silva also made four substitutions.

Ryan Sessegnon (71′) came on for Robinson, Kevin (71′) for Smith Rowe, Tom Cairney (79′) for Chukwueze, and Calvin Bassey (86′) came on for Cuenca.

Manchester United Build-Up

manchester-united-fulham-premier-league-2025-2026-analysis-tactics

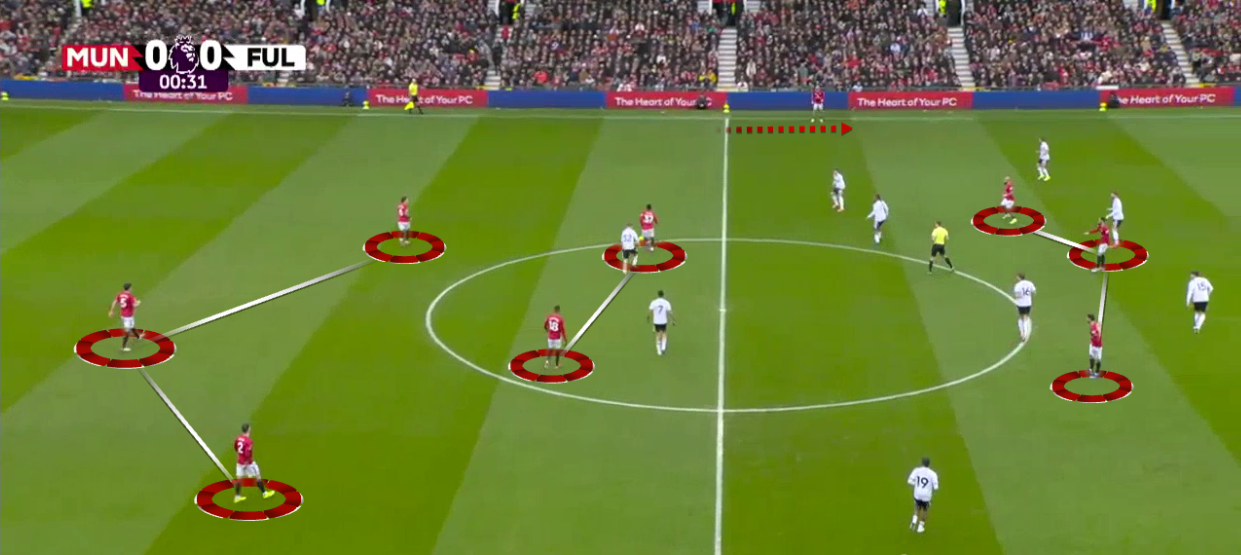
During their build-up from goal kicks, Manchester United adopted a 4-2 structure.

The first line consisted of the centre-backs and full-backs, with Harry Maguire and Lisandro Martínez positioned inside the box.

Both full-backs stayed wide, but at different heights (out of the picture).

Luke Shaw held a higher position on the left, while Diogo Dalot remained deeper on the right.

The second line was formed by Casemiro and Kobbie Mainoo, who operated as a double pivot.

manchester-united-fulham-premier-league-2025-2026-analysis-tactics

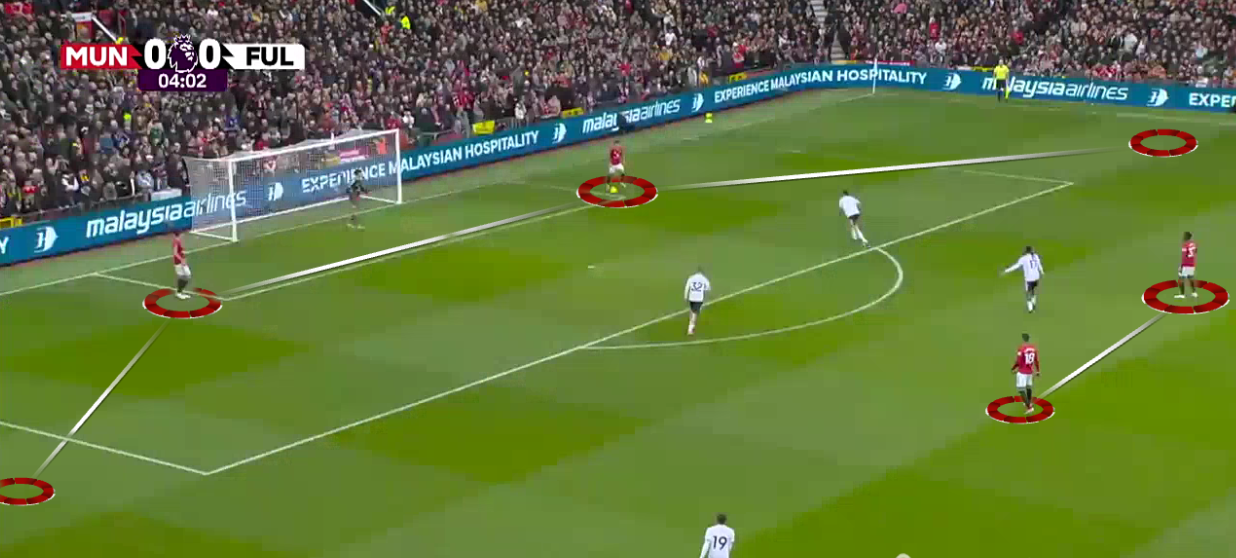
Fulham responded with a high press in a 4-1-3-2 shape.

Emile Smith Rowe and Raúl Jiménez pressed the two centre-backs, with Jiménez initiating the press on Martínez, while Smith Rowe waited for the ball to reach Maguire before stepping forward and blocking the passing lane to Casemiro.

Behind them, Alex Iwobi positioned himself between Manchester United’s double pivot, ready to press the player closest to the ball.

On the left, Samuel Chukwueze closed the channel in front of the centre-back, while also preparing to press Dalot if the ball was played to the right full-back.

manchester-united-fulham-premier-league-2025-2026-analysis-tactics

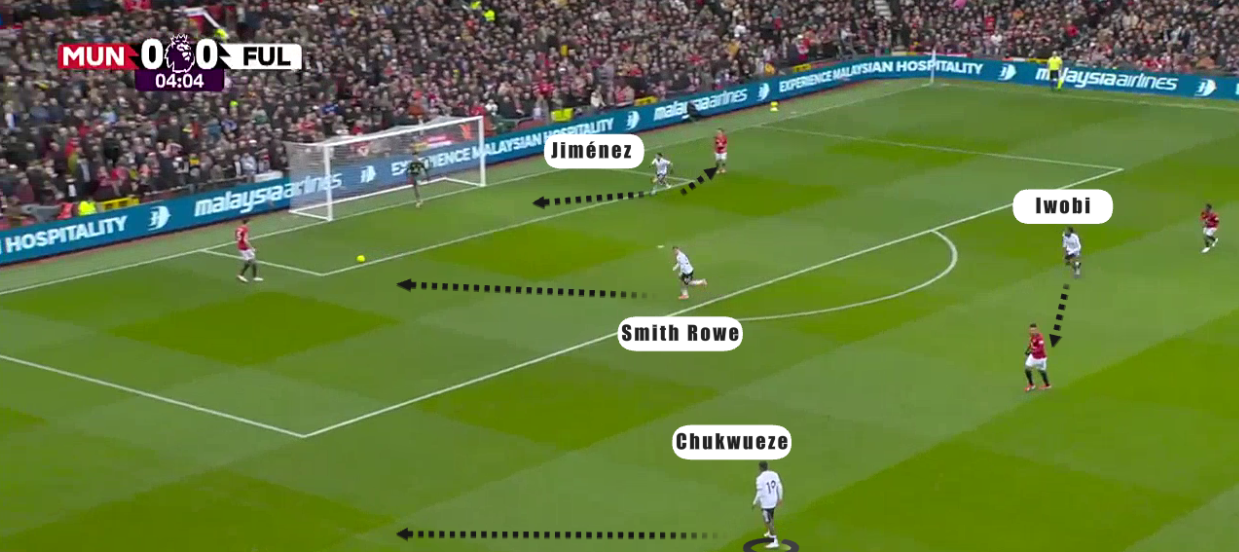
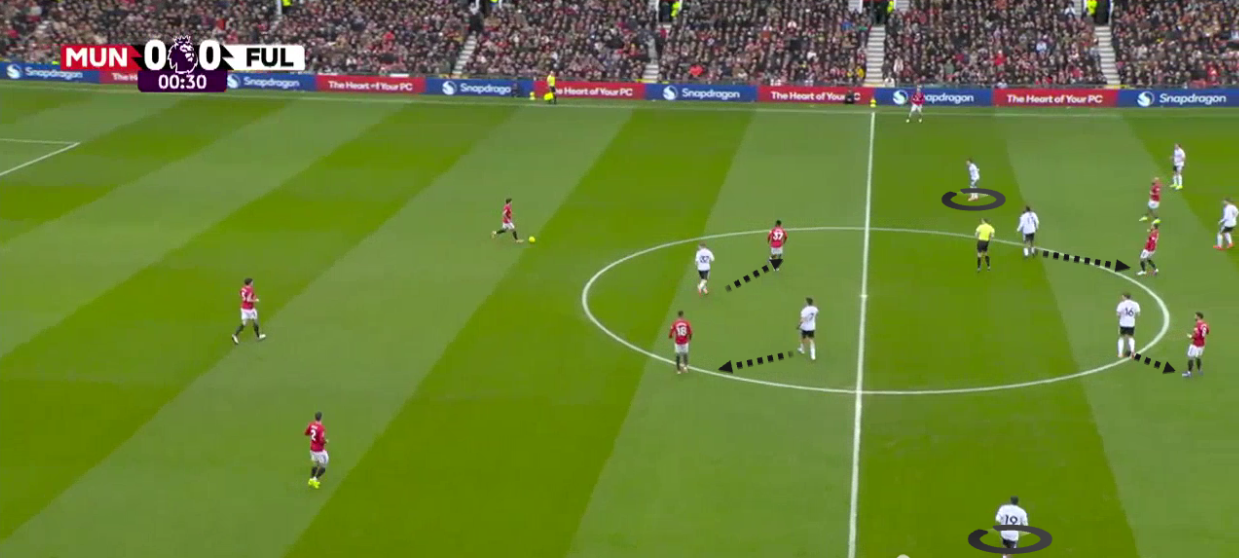
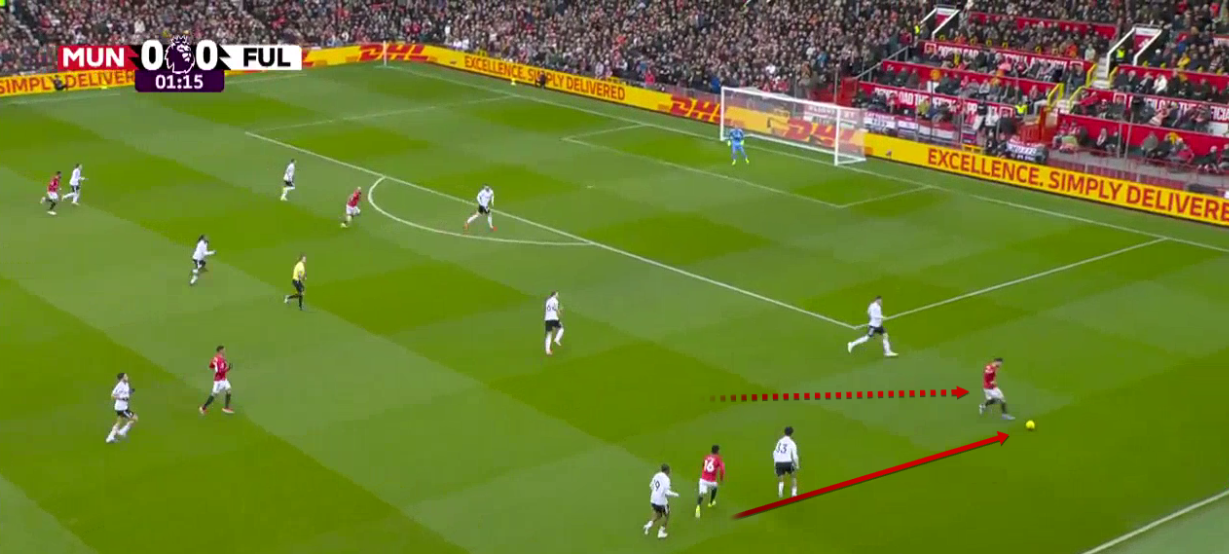
Manchester United’s idea was to use Casemiro to draw Iwobi out of position.

Iwobi followed the near-side holding midfielder wide, opening a passing lane from Dalot to Mainoo.

This was supported by Jiménez being close to the left centre-back or the goalkeeper, while Sander Berge, Fulham’s other holding midfielder, did not step in to assist.

manchester-united-fulham-premier-league-2025-2026-analysis-tactics

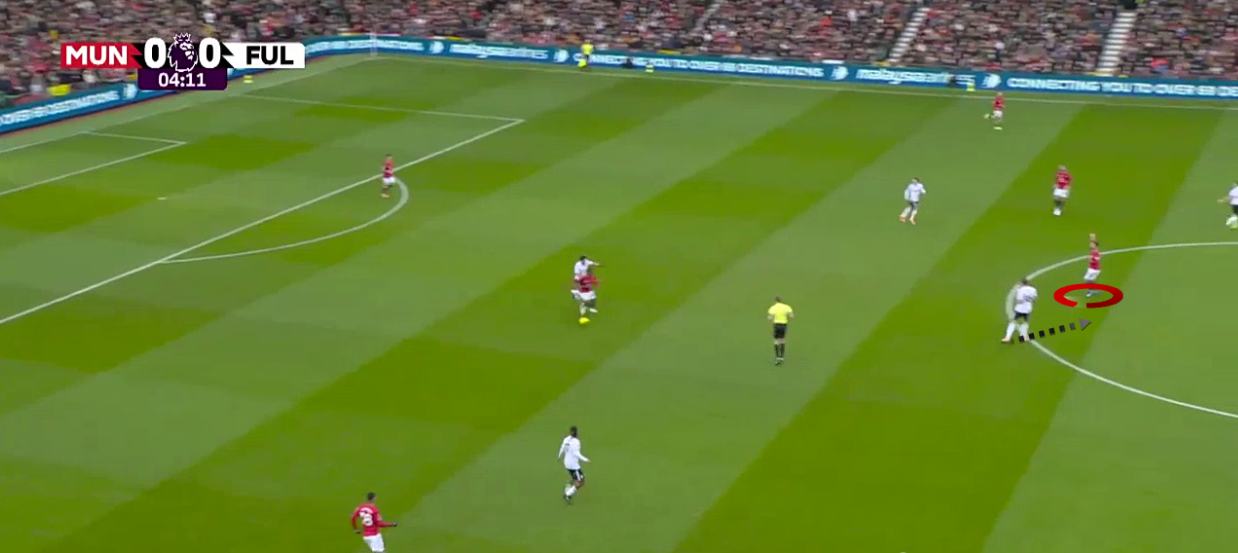
This sequence highlights why Berge did not push forward, as he was tasked with following Bruno Fernandes, who was positioned centrally.

manchester-united-fulham-premier-league-2025-2026-analysis-tactics

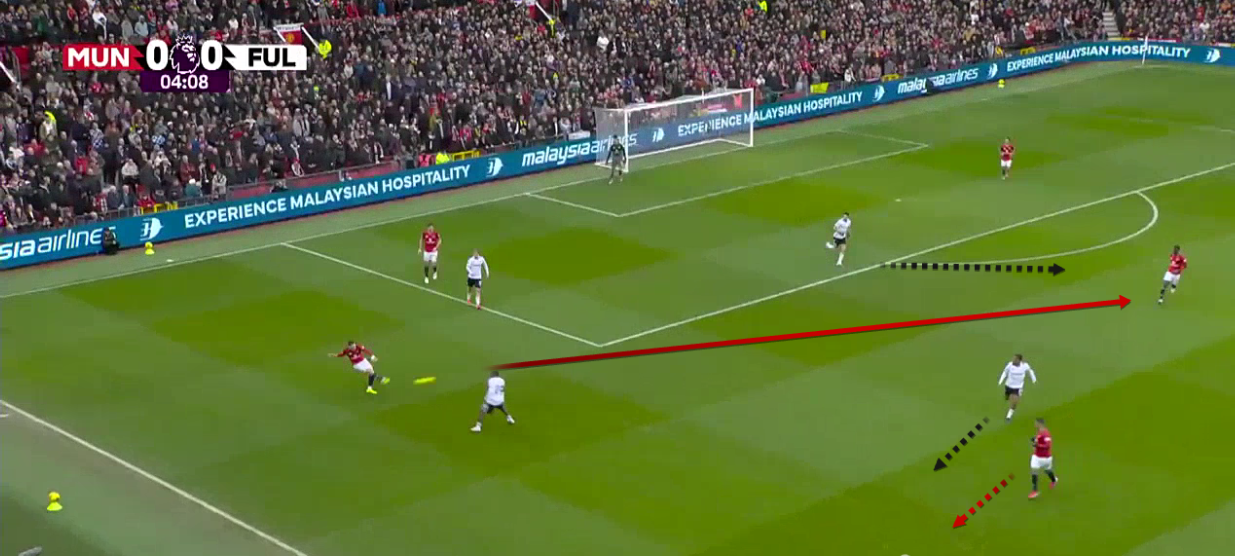
The move developed successfully, allowing Manchester United to break Fulham’s high press and advance up the pitch.

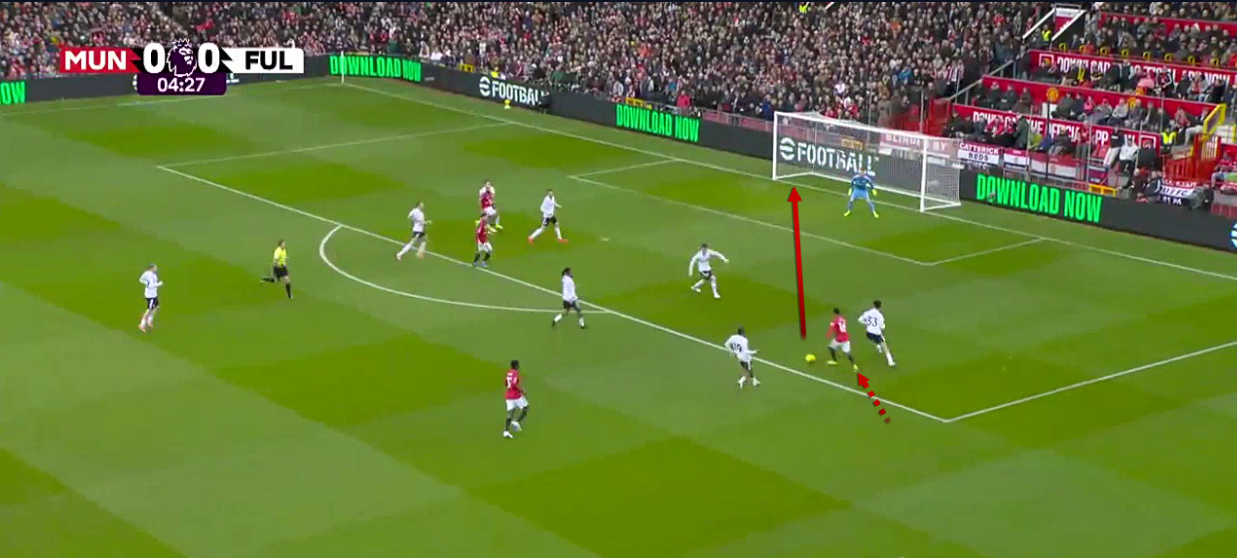
This led to a big chance created through Amad Diallo, who dribbled past Fulham’s left full-back before producing a shot on target.

Casemiro Problems In Possession

Although he scored the first Manchester United goal of the game, Casemiro has some problems that don’t help United get out from under pressure with the ball.

manchester-united-fulham-premier-league-2025-2026-analysis-tactics

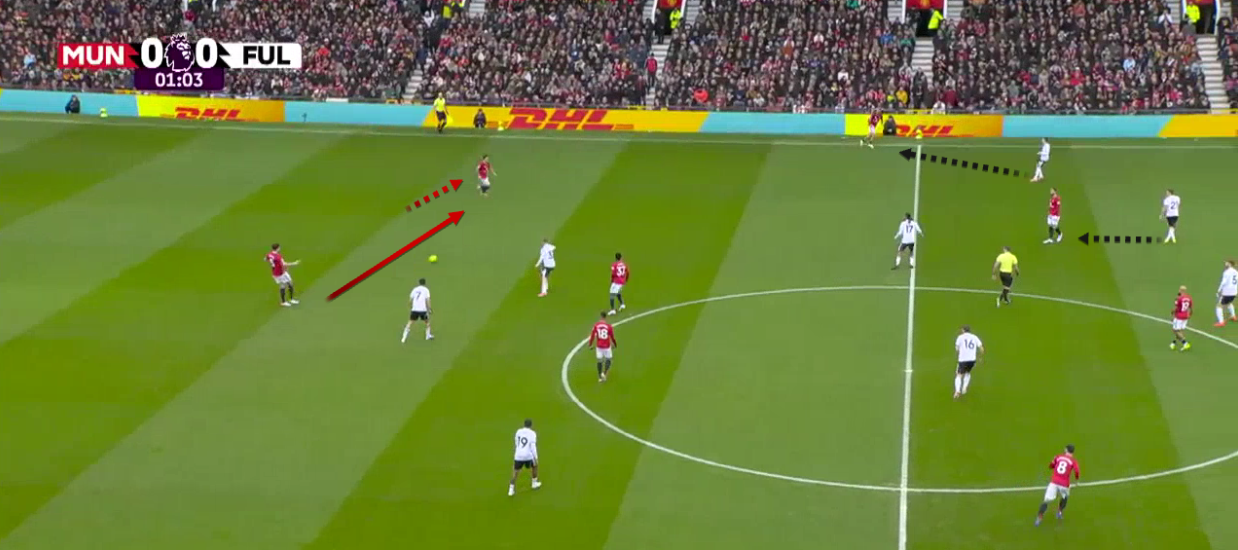
Another solution used by Manchester United emerged when Iwobi was unable to follow Casemiro.

Maguire, operating as the right centre-back, found an open passing lane into Casemiro, particularly when Casemiro positioned himself higher than Chukwueze.

This positioning allowed Casemiro to receive behind Fulham’s first line of pressure.

Maguire also used an effective body shape to influence Chukwueze into opening the channel, enabling the pass to Casemiro, who was positioned outside Smith Rowe’s cover shadow.

manchester-united-fulham-premier-league-2025-2026-analysis-tactics

The issue in this situation lay in Casemiro’s body shape while receiving the ball.

Taking the pass with a closed and square stance made it difficult for him to turn.

manchester-united-fulham-premier-league-2025-2026-analysis-tactics

This allowed Berge to shift his focus from Fernandes to Casemiro, ensuring that Casemiro was denied the opportunity to turn.

manchester-united-fulham-premier-league-2025-2026-analysis-tactics

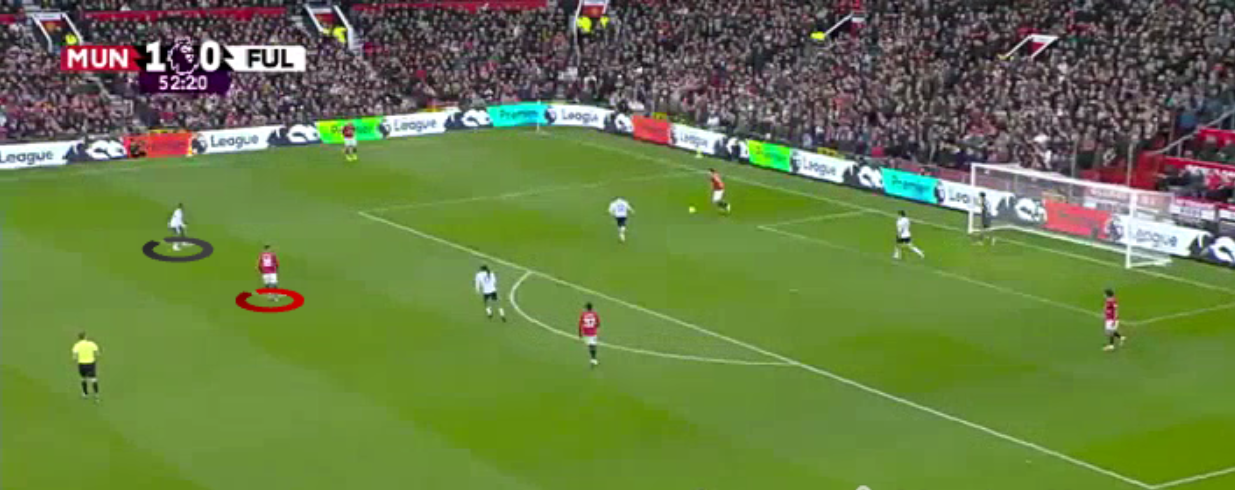
In the second half, Manchester United continued with the same approach.

Maguire again looked for the pass into Casemiro, but it was unavailable due to Casemiro holding the same height as Chukwueze.

Also, the Fulham winger maintained his position to close the channel and force play wide towards Dalot.

manchester-united-fulham-premier-league-2025-2026-analysis-tactics

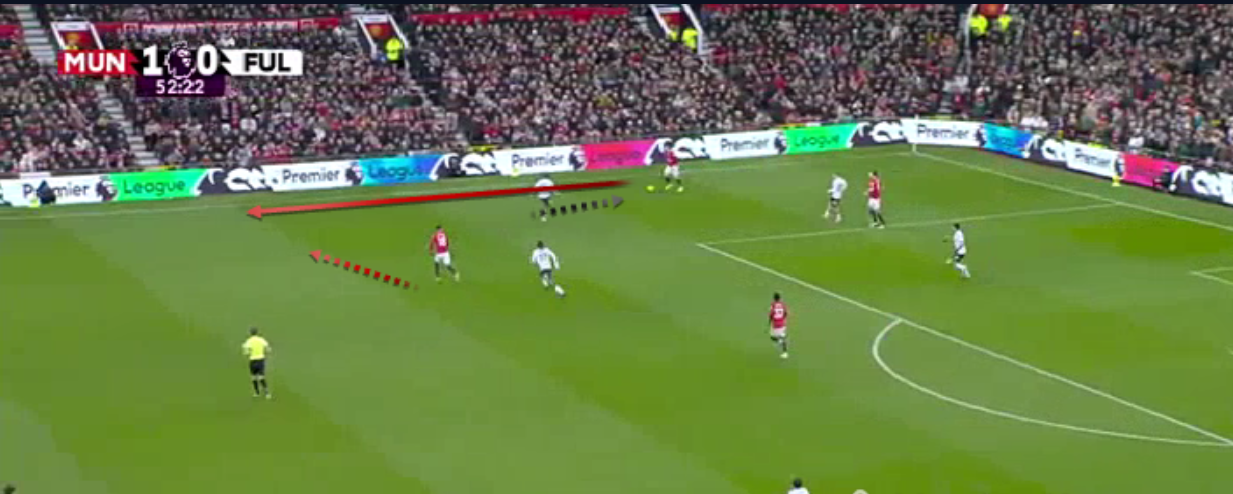
This time, Dalot chose not to play into Mainoo centrally and instead passed to Casemiro, who drifted wide into the space behind Chukwueze.

manchester-united-fulham-premier-league-2025-2026-analysis-tactics

Although Casemiro received the ball facing forward on this occasion, he failed to select an effective or simple pass, which prevented Manchester United from retaining possession.

Manchester United Progression & Final Third

manchester-united-fulham-premier-league-2025-2026-analysis-tactics

Against Fulham’s mid-press, Manchester United adopted a 3-2-5 structure.

Dalot formed the third player in the first line alongside Maguire and Martínez.

The second line remained unchanged, with Casemiro and Mainoo operating as a double pivot.

On the left, Cunha tucked inside to join Fernandes and Mbeumo in the central areas.

Shaw advanced high from left full-back to hold the width, while Diallo provided width on the right side.

manchester-united-fulham-premier-league-2025-2026-analysis-tacticsFulham defended in a 4-4-2 shape during their mid-press.

The two forwards focused on Manchester United’s holding midfielders, while the two central midfielders tracked Fernandes and Cunha.

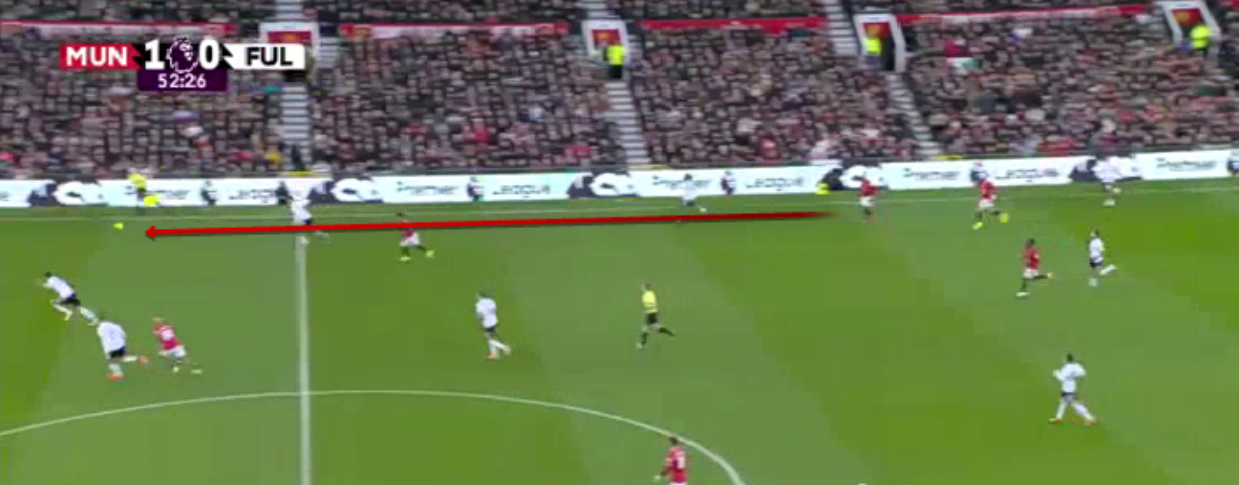
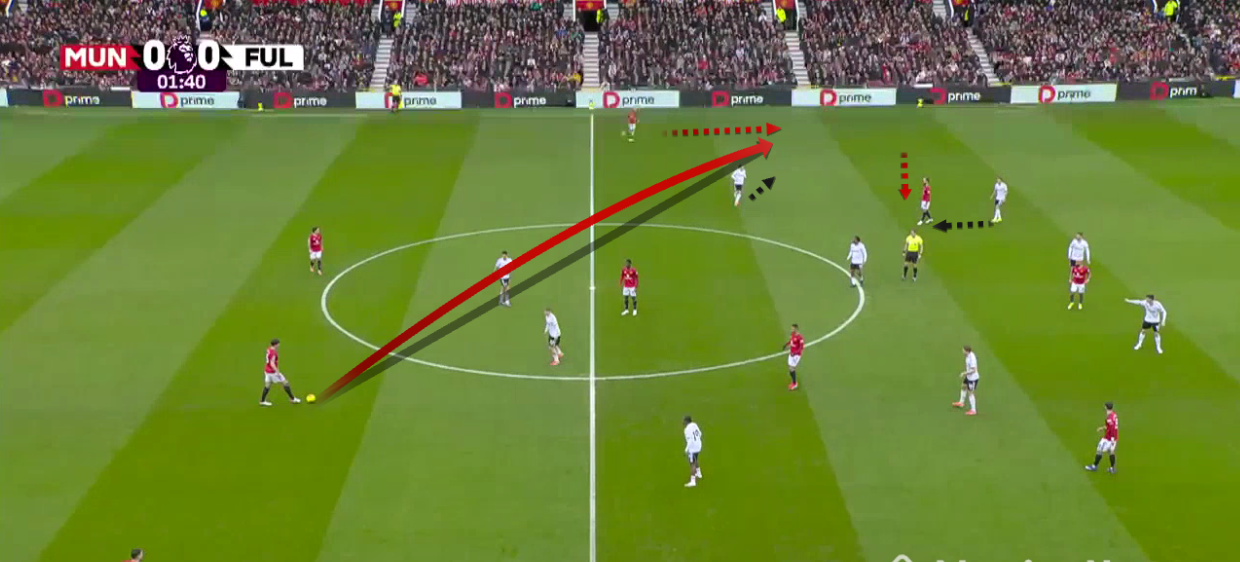
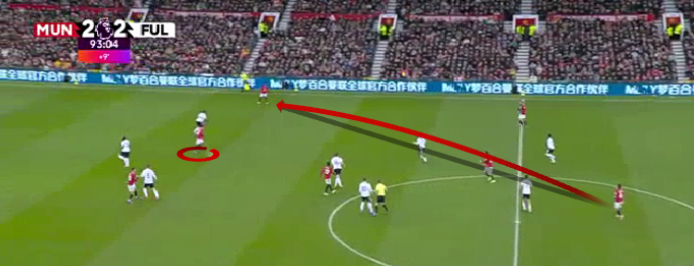
Harry Maguire Diagonal Long Ball To The Left Side

manchester-united-fulham-premier-league-2025-2026-analysis-tactics

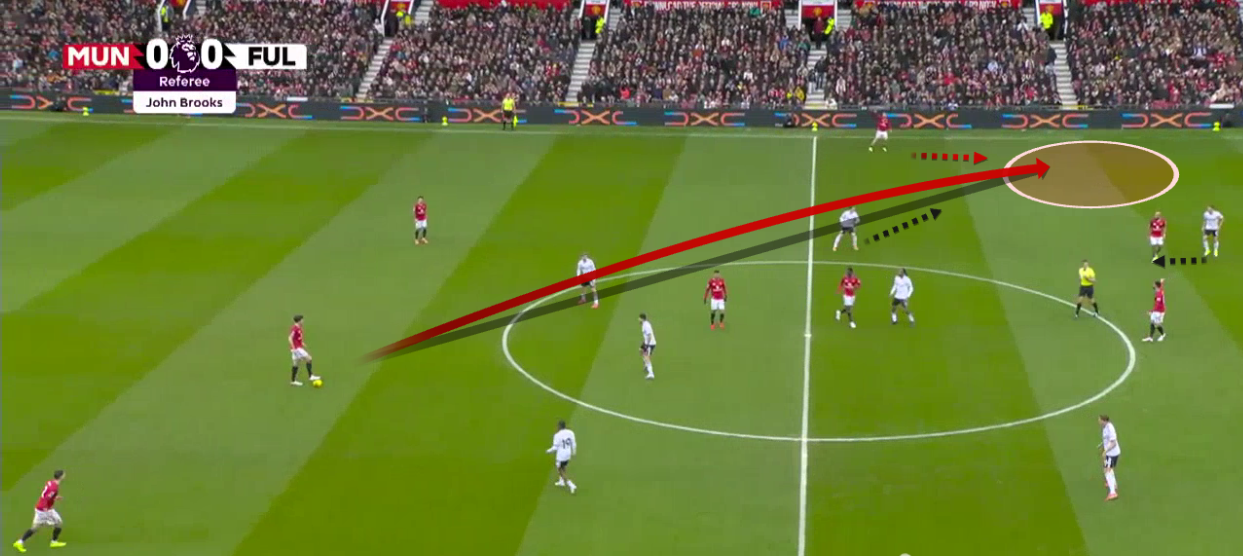
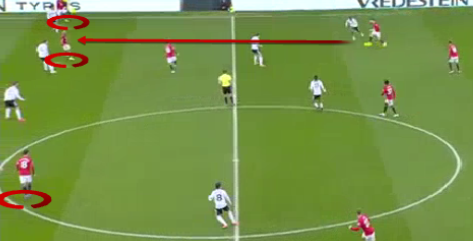
With Fulham’s full-back drawn out by Manchester United’s left winger, space opened up in front of Shaw.

Maguire is prepared to exploit this by playing a long diagonal pass in behind for Shaw to attack that space.

manchester-united-fulham-premier-league-2025-2026-analysis-tactics

The issue was the execution of the pass.

Maguire’s long ball was inaccurate and ended up behind Shaw, forcing him to run back towards the ball rather than receiving it while moving forward beyond Fulham’s defensive line.

manchester-united-fulham-premier-league-2025-2026-analysis-tactics

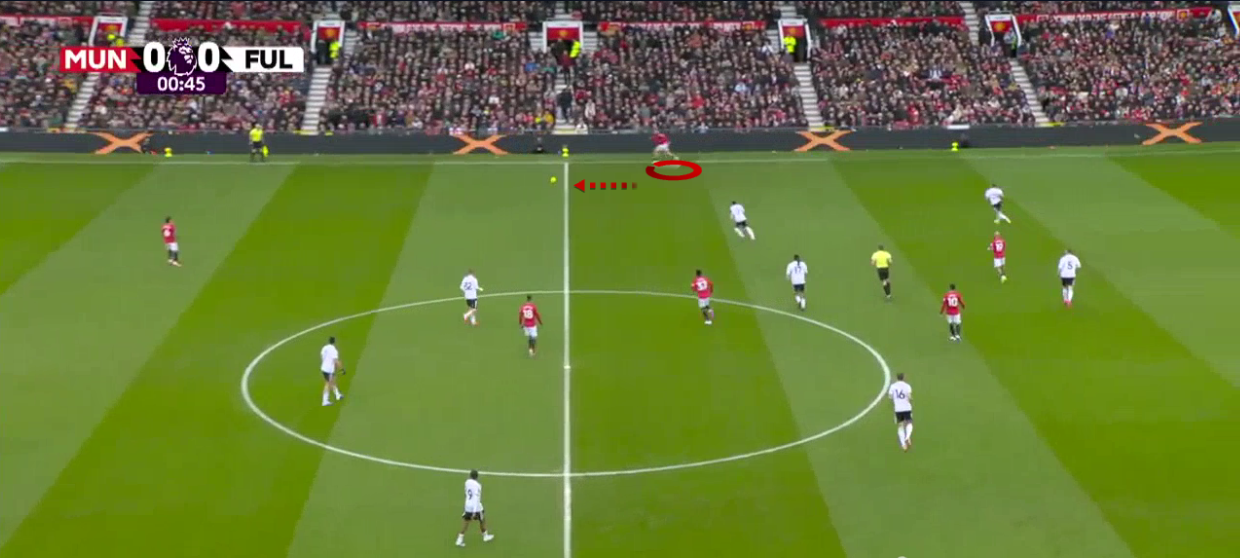
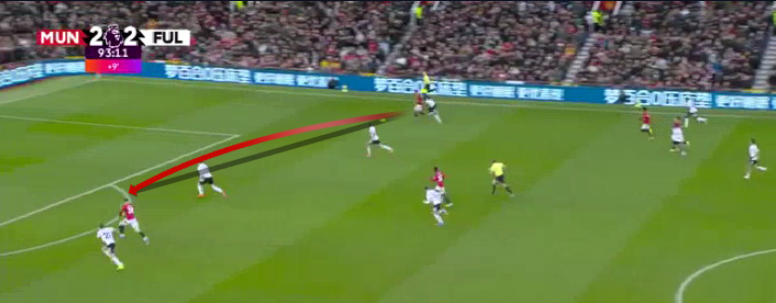
In another sequence, Maguire again attempted to target the space on Fulham’s right side with a pass towards Shaw.

manchester-united-fulham-premier-league-2025-2026-analysis-tactics

Once more, the pass lacked accuracy, and this time the ball ran completely out of play.

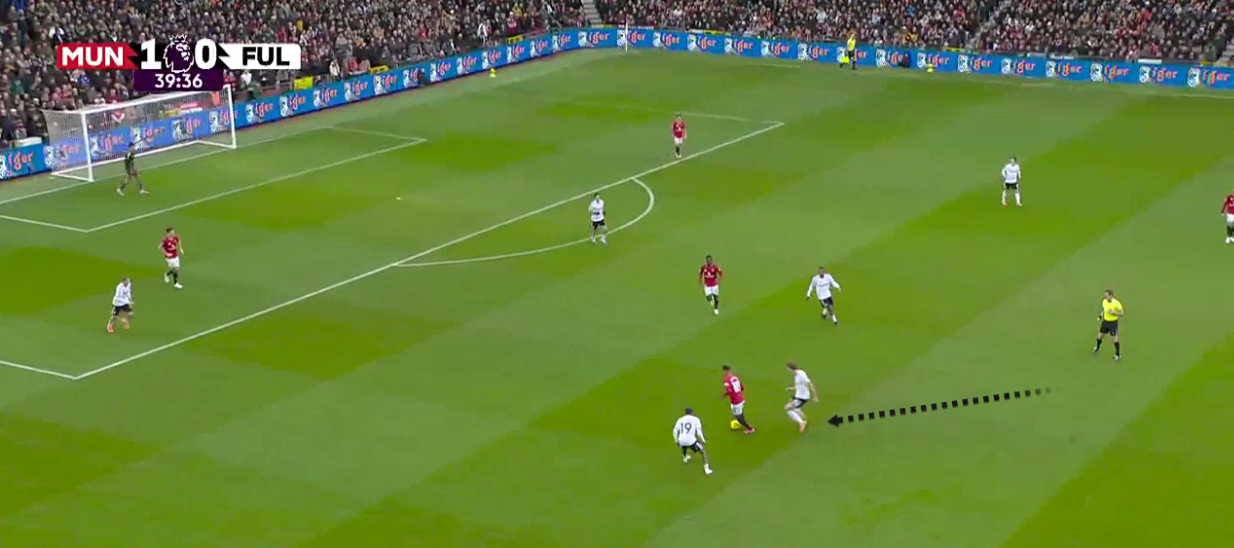
Switch The Play To Put Diallo In A 1v1 Situation

manchester-united-fulham-premier-league-2025-2026-analysis-tactics

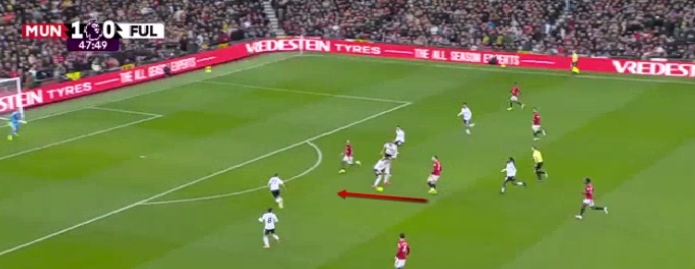
As the game progressed, Wilson began tracking Shaw more aggressively to close him down.

This allowed Martínez to move wider and receive a pass from Maguire in the space Wilson had vacated, creating an opportunity to advance.

With Iwobi also focused on blocking Cunha’s passing lane, this space became even larger.

manchester-united-fulham-premier-league-2025-2026-analysis-tactics

Martínez received the ball as Cunha dropped deeper, occupying Iwobi.

At the same time, Mainoo attempted to move out of Smith Rowe’s cover shadow to offer a passing option.

From this moment, Fernandes began to attack the space between Fulham’s centre-back and full-back.

manchester-united-fulham-premier-league-2025-2026-analysis-tactics

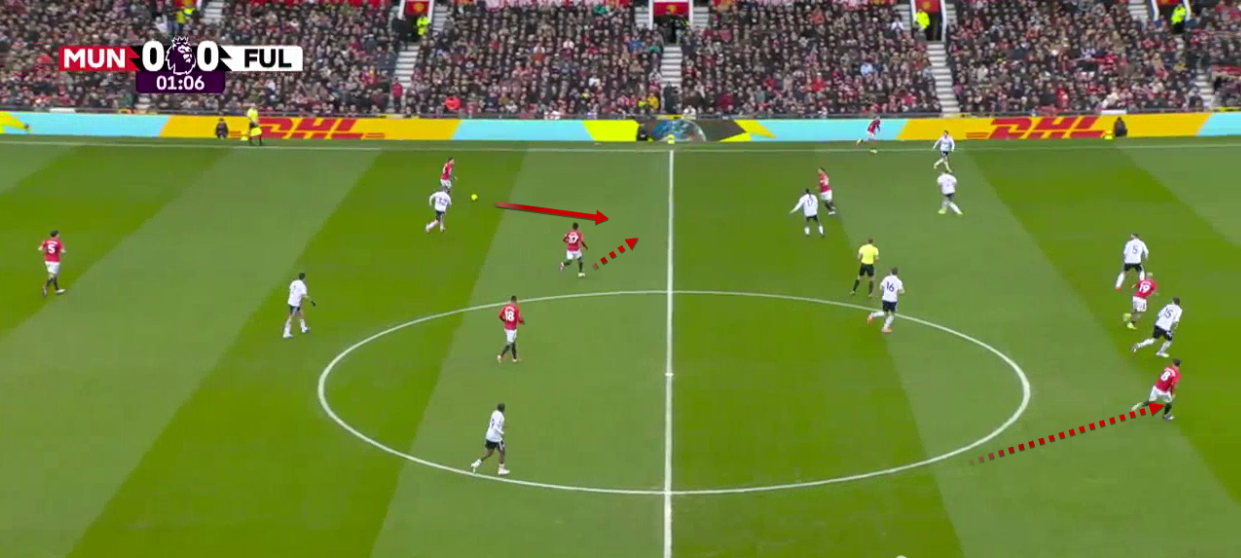
Another recurring idea for Manchester United was switching play to Diallo on the right wing, aiming to isolate him in one-versus-one situations, where he excels.

manchester-united-fulham-premier-league-2025-2026-analysis-tactics

Manchester United also looked to exploit runs from Fernandes in behind Fulham’s defensive line.

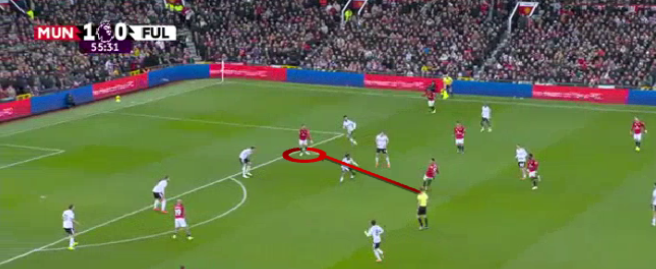
Distracting The Defensive Line

manchester-united-fulham-premier-league-2025-2026-analysis-tactics

Another important mechanism involved the positioning of the centre-forward Mbeumo, Cunha on the left, Diallo on the right, and Fernandes.

Diallo held the width, occupying Fulham’s left full-back.

Meanwhile, Mbeumo and Fernandes positioned themselves between the centre-backs and full-backs, making it more difficult for Fulham’s centre-backs to step out and engage them.

This sequence began with a pass from Dalot into Mbeumo, who was unmarked and able to link play to help Manchester United progress.

manchester-united-fulham-premier-league-2025-2026-analysis-tactics

This movement allowed Manchester United to break Fulham’s press and create a major chance, with Mbeumo receiving a pass in behind the defensive line inside the box.

manchester-united-fulham-premier-league-2025-2026-analysis-tactics

The same concept was evident in the second goal, with Cunha’s positioning before receiving the ball allowing him to direct the finish into the back of the net.

manchester-united-fulham-premier-league-2025-2026-analysis-tactics

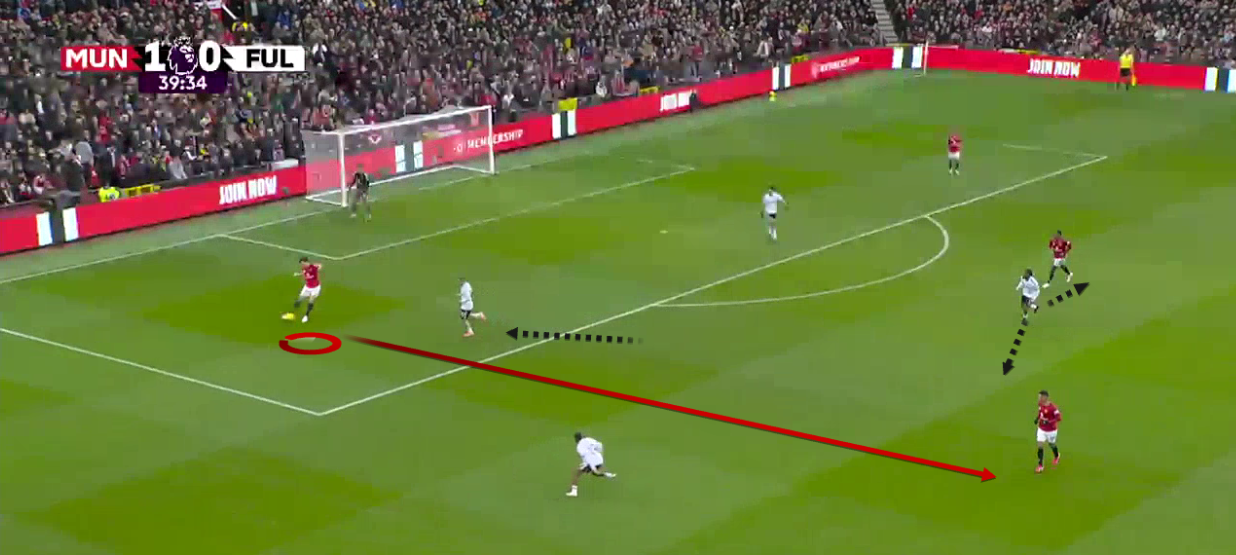
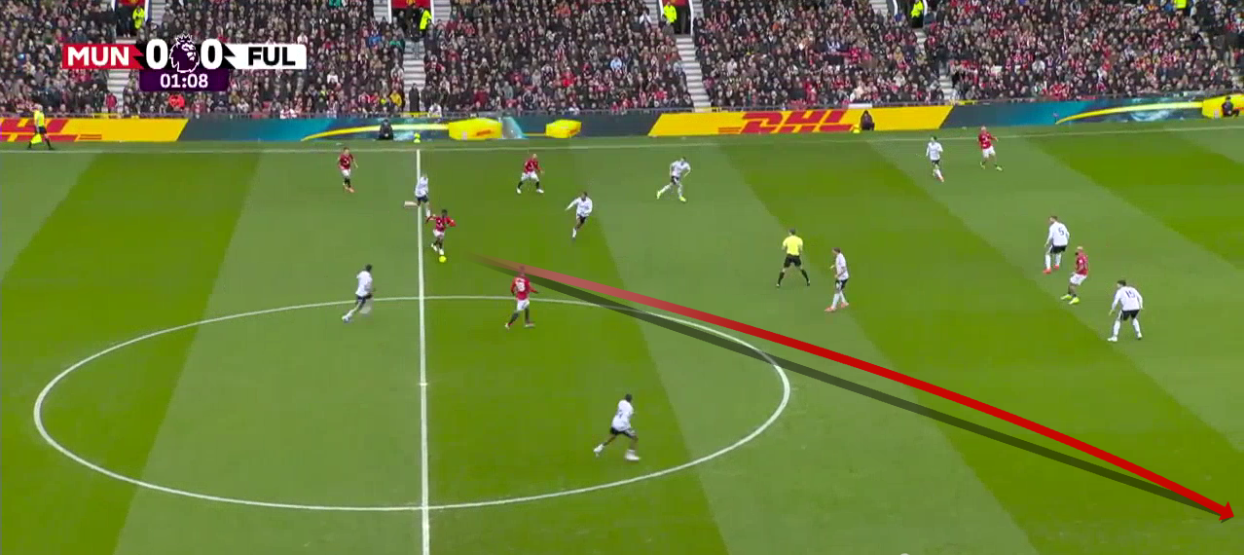
In the winning goal in the final minute, Manchester United once again relied on their most effective weapons throughout the match.

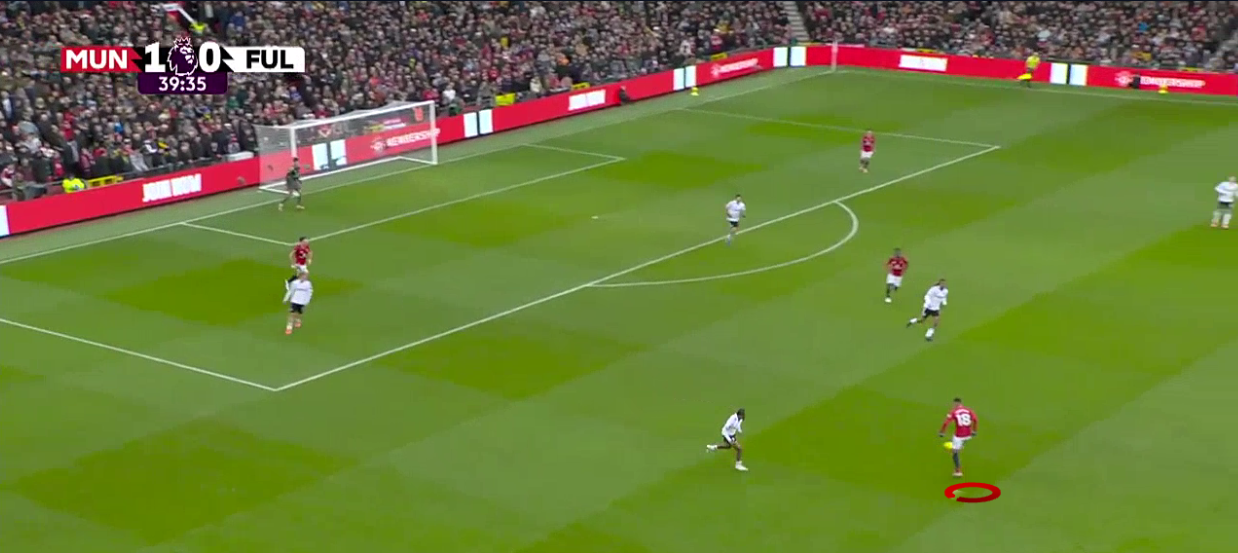
The move started with a long diagonal ball to Diallo, creating a 1v1 situation.

Fernandes’ starting position, between the full-back and centre-back, was also clear.

manchester-united-fulham-premier-league-2025-2026-analysis-tactics

Fernandes dragged the centre-back wide before attempting to receive a pass from Dalot.

manchester-united-fulham-premier-league-2025-2026-analysis-tactics

Fernandes then dribbled past the centre-back and delivered a cross to Šeško, who scored the winning goal at the final moment.

Conclusion

After overcoming the Cottagers, Manchester United find themselves in a strong position.

They sit fourth in the table, a UEFA Champions League qualifying spot, and have now recorded three consecutive league victories, all under Michael Carrick.

It is clear that Manchester United has a few ideas they are trying to implement, but a lack of detail remains evident.

At times, this comes down to individual technical execution, while in other moments it relates to the absence of clear tactical solutions during the match.

Despite securing all three points with a last-minute winner, there are still several areas where Manchester United needs to improve.

Tags: FulhamFulham FormationFulham LineupFulham NewsFulham Style Of PlayFulham Tactical AnalysisFulham TacticsManchester UnitedManchester United FormationManchester United LineupManchester United NewsManchester United Style Of PlayManchester United Tactical AnalysisManchester United TacticsManchester United Vs Fulham FormationManchester United Vs Fulham LineupManchester United Vs Fulham Tactical AnalysisManchester United Vs Fulham TacticsMarco SilvaMarco Silva Coaching StyleMarco Silva FormationMarco Silva Manager StyleMarco Silva NewsMarco Silva Style Of PlayMarco Silva Tactical AnalysisMarco Silva TacticsMichael CarrickMichael Carrick Coaching StyleMichael Carrick FormationMichael Carrick Manager StyleMichael Carrick NewsMichael Carrick Style Of PlayMichael Carrick Tactical AnalysisMichael Carrick TacticsPremier LeaguePremier League NewsPremier League Tactical AnalysisPremier League Tactics
Previous Post

Horst Steffen Tactics At Werder Bremen 2025/2026: Why The Experiment Failed – Tactical Analysis

Next Post

Jesús Rodríguez Scout Report At Como 2025/2026: Dribbling Brilliance, Raw Potential – Player Analysis

Next Post
Jesús Rodríguez At Como 1907 20252026

Jesús Rodríguez Scout Report At Como 2025/2026: Dribbling Brilliance, Raw Potential – Player Analysis

  • About Total Football Analysis
  • Contact Total Football Analysis
  • Write For Total Football Analysis
  • Advertise
  • Privacy Policy
  • Cancellation / Refund Policy
  • Resources
  • Terms Of Service

© 2026 Total Football Analysis

No Result
View All Result
  • Football Analysis
    • Data Analysis
    • Formations
      • 2-2-4 Formation
      • 2-3-5 Formation
      • 3-1-4-2 Formation
      • 3-2-2-3 Formation
      • 3-2-4-1 Formation
      • 3-1-6 Formation
      • 3-3-4 Formation
      • 3-4-1-2 Formation
      • 3-4-2-1 Formation
      • 3-4-3 Formation
      • 3-5-1-1 Formation
      • 3-5-2 Formation
      • 4-1-4-1 Formation
      • 4-2-2-2 Formation
      • 4-2-3-1 Formation
      • 4-2-4 Formation
      • 4-3-1-2 Formation
      • 4-3-3 Formation
      • 4-4-2 Formation
      • 4-5-1 Formation
      • 5-3-2 Formation
      • 5-4-1 Formation
      • 6-3-1 Formation
    • Head Coach Analysis
    • Match Analysis
    • Player Analysis
    • Recruitment Analysis
    • Set Piece Analysis
    • Tactical Theory
    • Tactical Preview
    • Team Analysis
    • Training Analysis
    • Tactical Analysis
    • Scouting Report
  • Competition
    • ALL Competitions
    • English Premier League
    • Champions League
    • La Liga
    • Bundesliga
    • Serie A
    • Ligue 1
    • Eredivisie
    • EFL Championship
    • FIFA World Cup 2022
    • WEURO 2022
    • Women’s Super League
    • NWSL
    • Belgian First Division A
    • A-League
    • Liga Profesional de Argentina
    • Austrian Bundesliga
    • Campeonato Brasileiro Série A
    • DFB Pokal
    • 1. HNL
    • Danish Superliga
    • EFL League One
    • EFL League Two
    • FA Cup
    • EFL Cup
    • Indian Super League
    • K-League
    • J1 League
    • Liga MX
    • Copa América 2021
    • Copa del Rey
    • MLS
    • Eliteserien
    • Euro 2020
    • Primeira Liga
    • Scottish Premiership
    • Allsvenskan
    • Europa League
    • UEFA Nations League
    • Liga AUF Uruguaya
  • Coaches
    • All Coaches
    • Alfred Schreuder
    • Ange Postecoglou
    • Antonio Conte
    • Arne Slot
    • Bo Svensson
    • Brendan Rodgers
    • Bruno Lage
    • Carlo Ancelotti
    • Christophe Galtier
    • Claude Puel
    • Claudio Ranieri
    • David Moyes
    • Dean Smith
    • Diego Simeone
    • Domenico Tedesco
    • Frank Lampard
    • Eddie Howe
    • Edin Terzić
    • Emma Hayes
    • Erik ten Hag
    • Ernesto Valverde
    • Gennaro Gattuso
    • Gerardo Seoane
    • Gian Piero Gasperini
    • Giovanni van Bronckhorst
    • Graham Potter
    • Igor Tudor
    • Imanol Alguacil
    • Jesse Marsch
    • Jonas Eidevall
    • Jorge Sampaoli
    • José Bordalás
    • José Mourinho
    • Julen Lopetegui
    • Julian Nagelsmann
    • Julien Stéphan
    • Jürgen Klopp
    • Luciano Spalletti
    • Lucien Favre
    • Manuel Pellegrini
    • Marcelo Bielsa
    • Marco Rose
    • Marco Silva
    • Massimiliano Allegri
    • Mauricio Pochettino
    • Maurizio Sarri
    • Mikel Arteta
    • Niko Kovač
    • Nuno Espírito Santo
    • Oliver Glasner
    • Patrick Vieira
    • Paulo Fonseca
    • Pep Guardiola
    • Peter Bosz
    • Rafa Benítez
    • Ralf Rangnick
    • Ralph Hasenhüttl
    • Roger Schmidt
    • Roy Hodgson
    • Sean Dyche
    • Sérgio Conceição
    • Simone Inzaghi
    • Sonia Bompastor
    • Stefano Pioli
    • Steffen Baumgart
    • Steven Gerrard
    • Thiago Motta
    • Thomas Frank
    • Thomas Tuchel
    • Unai Emery
    • Vincenzo Italiano
    • Xavi
  • Teams
    • ALL Teams
    • AC Milan
    • Ajax Amsterdam
    • Arsenal
    • AS Monaco FC
    • Atalanta
    • Atlético Madrid
    • FC Barcelona
    • FC Bayern Munich
    • Borussia Dortmund
    • Celtic FC
    • Chelsea FC
    • Everton F.C.
    • Inter Milan
    • Juventus F.C.
    • Leeds United F.C.
    • Liverpool FC
    • Manchester City
    • Manchester United FC
    • Paris Saint-Germain
    • Rangers FC
    • RB Leipzig
    • Real Madrid CF
    • Tottenham Hotspur
    • West Ham United
  • Players
    • ALL Players
    • Alisson Becker
    • Bukayo Saka
    • Erling Haaland
    • Harry Kane
    • Jack Grealish
    • John Stones
    • Julián Alvarez
    • Kalvin Phillips
    • Kevin De Bruyne
    • Kyle Walker
    • Kylian Mbappé
    • Lamine Yamal
    • Lionel Messi
    • Luis Díaz
    • Mohamed Salah
    • Phil Foden
    • Virgil Van Dijk
  • Contact
  • Write For TFA
  • Login

© 2026 Total Football Analysis