Total Football Analysis
Once.Sport
  • Football Analysis
    • Data Analysis
    • Formations
      • 2-2-4 Formation
      • 2-3-5 Formation
      • 3-1-4-2 Formation
      • 3-2-2-3 Formation
      • 3-2-4-1 Formation
      • 3-1-6 Formation
      • 3-3-4 Formation
      • 3-4-1-2 Formation
      • 3-4-2-1 Formation
      • 3-4-3 Formation
      • 3-5-1-1 Formation
      • 3-5-2 Formation
      • 4-1-4-1 Formation
      • 4-2-2-2 Formation
      • 4-2-3-1 Formation
      • 4-2-4 Formation
      • 4-3-1-2 Formation
      • 4-3-3 Formation
      • 4-4-2 Formation
      • 4-5-1 Formation
      • 5-3-2 Formation
      • 5-4-1 Formation
      • 6-3-1 Formation
    • Head Coach Analysis
    • Match Analysis
    • Player Analysis
    • Recruitment Analysis
    • Set Piece Analysis
    • Tactical Theory
    • Tactical Preview
    • Team Analysis
    • Training Analysis
    • Tactical Analysis
    • Scouting Report
  • Competition
    • ALL Competitions
    • English Premier League
    • Champions League
    • La Liga
    • Bundesliga
    • Serie A
    • Ligue 1
    • Eredivisie
    • EFL Championship
    • FIFA World Cup 2022
    • WEURO 2022
    • Women’s Super League
    • NWSL
    • Belgian First Division A
    • A-League
    • Liga Profesional de Argentina
    • Austrian Bundesliga
    • Campeonato Brasileiro Série A
    • DFB Pokal
    • 1. HNL
    • Danish Superliga
    • EFL League One
    • EFL League Two
    • FA Cup
    • EFL Cup
    • Indian Super League
    • K-League
    • J1 League
    • Liga MX
    • Copa América 2021
    • Copa del Rey
    • MLS
    • Eliteserien
    • Euro 2020
    • Primeira Liga
    • Scottish Premiership
    • Allsvenskan
    • Europa League
    • UEFA Nations League
    • Liga AUF Uruguaya
  • Coaches
    • All Coaches
    • Alfred Schreuder
    • Ange Postecoglou
    • Antonio Conte
    • Arne Slot
    • Bo Svensson
    • Brendan Rodgers
    • Bruno Lage
    • Carlo Ancelotti
    • Christophe Galtier
    • Claude Puel
    • Claudio Ranieri
    • David Moyes
    • Dean Smith
    • Diego Simeone
    • Domenico Tedesco
    • Frank Lampard
    • Eddie Howe
    • Edin Terzić
    • Emma Hayes
    • Erik ten Hag
    • Ernesto Valverde
    • Gennaro Gattuso
    • Gerardo Seoane
    • Gian Piero Gasperini
    • Giovanni van Bronckhorst
    • Graham Potter
    • Igor Tudor
    • Imanol Alguacil
    • Jesse Marsch
    • Jonas Eidevall
    • Jorge Sampaoli
    • José Bordalás
    • José Mourinho
    • Julen Lopetegui
    • Julian Nagelsmann
    • Julien Stéphan
    • Jürgen Klopp
    • Luciano Spalletti
    • Lucien Favre
    • Manuel Pellegrini
    • Marcelo Bielsa
    • Marco Rose
    • Marco Silva
    • Massimiliano Allegri
    • Mauricio Pochettino
    • Maurizio Sarri
    • Mikel Arteta
    • Niko Kovač
    • Nuno Espírito Santo
    • Oliver Glasner
    • Patrick Vieira
    • Paulo Fonseca
    • Pep Guardiola
    • Peter Bosz
    • Rafa Benítez
    • Ralf Rangnick
    • Ralph Hasenhüttl
    • Roger Schmidt
    • Roy Hodgson
    • Sean Dyche
    • Sérgio Conceição
    • Simone Inzaghi
    • Sonia Bompastor
    • Stefano Pioli
    • Steffen Baumgart
    • Steven Gerrard
    • Thiago Motta
    • Thomas Frank
    • Thomas Tuchel
    • Unai Emery
    • Vincenzo Italiano
    • Xavi
  • Teams
    • ALL Teams
    • AC Milan
    • Ajax Amsterdam
    • Arsenal
    • AS Monaco FC
    • Atalanta
    • Atlético Madrid
    • FC Barcelona
    • FC Bayern Munich
    • Borussia Dortmund
    • Celtic FC
    • Chelsea FC
    • Everton F.C.
    • Inter Milan
    • Juventus F.C.
    • Leeds United F.C.
    • Liverpool FC
    • Manchester City
    • Manchester United FC
    • Paris Saint-Germain
    • Rangers FC
    • RB Leipzig
    • Real Madrid CF
    • Tottenham Hotspur
    • West Ham United
  • Players
    • ALL Players
    • Alisson Becker
    • Bukayo Saka
    • Erling Haaland
    • Harry Kane
    • Jack Grealish
    • John Stones
    • Julián Alvarez
    • Kalvin Phillips
    • Kevin De Bruyne
    • Kyle Walker
    • Kylian Mbappé
    • Lamine Yamal
    • Lionel Messi
    • Luis Díaz
    • Mohamed Salah
    • Phil Foden
    • Virgil Van Dijk
  • Contact
  • Write For TFA
No Result
View All Result
No Result
View All Result
Total Football Analysis
No Result
View All Result
Home Match Analysis

Brighton Vs Everton [1–1] – Premier League 2025/2026: Build-Up Control Meets Direct Threat – Tactical Analysis

Vedant Kharakwal by Vedant Kharakwal
February 2, 2026
in Match Analysis, 4-2-3-1 Formation, 4-3-3 Formation, Analysis, Brighton & Hove Albion, David Moyes, Everton F.C., Fabian Hürzeler, Premier League, Tactical Analysis, Yasin Ayari
0
Brighton vs Everton

Brighton & Hove Albion hosted Everton in Gameweek 24 of the 2025/2026 edition of the Premier League.

The match ended in a 1-1 draw.

The hosts enjoyed more possession throughout.

However, it was in their favour only during the first half.

The second half was more evenly matched.

The Seagulls, known for their build-up play, produced several notable moments, while the Toffees relied on transitions for much of the game.

Despite Brighton controlling the game from the back, they recorded fewer final-third entries (50) than the visitors (57).

Through this tactical analysis, we aim to discuss the tactical features of Brighton’s play, their issues in the final third, and highlight Everton’s attacking strategy.

Brighton Vs Everton Lineups & Formations

Let us look at how Fabian Hürzeler and David Moyes fielded their squads.

Brighton vs Everton lineupsThe hosts, Brighton, played in a 4-3-3 formation.

Bart Verbruggen started between the sticks, behind the back four, namely Ferdi Kadıoğlu (right-back), Jan Paul van Hecke (right centre-back), skipper Lewis Dunk (left centre-back), and Maxim De Cuyper (left-back).

Joël Veltman replaced the latter at the 70th minute.

Carlos Baleba played as the defensive midfielder alongside centre-midfielders Pascal Groß and Yasin Ayari. Groß was replaced by James Milner at 90’+6.

Giorginio Rutter (right) and Kaoru Mitoma (left) operated as the wingers with Danny Welbeck as the striker.

Rutter made way for Yankuba Minteh (60’) and Welbeck for Charalampos Kostoulas (70’).

The visitors, Everton, played in a 4-2-3-1 formation.

Jordan Pickford started in goal.

The back four were Jake O’Brien (right-back), skipper James Tarkowski (right centre-back), Michael Keane (left centre-back), and Jarrad Branthwaite (left-back).

The latter came off for Nathan Patterson (89’).

James Garner and Idrissa Gueye played as the double pivot.

Tim Iroegbunam came on for Gueye at the 80th minute.

Kiernan Dewsbury-Hall played as the centre attacking midfielder, replaced by Carlos Alcaraz at the 79th minute.

Harrison Armstrong (right) and Iliman Ndiaye played as the wingers.

Tyler Dibling replaced Armstrong after 80 minutes.

Thierno Barry played as the striker and was replaced by Beto at the 89th minute.

Brighton Attacking Success

Brighton Build-Up

Everton space behind first line

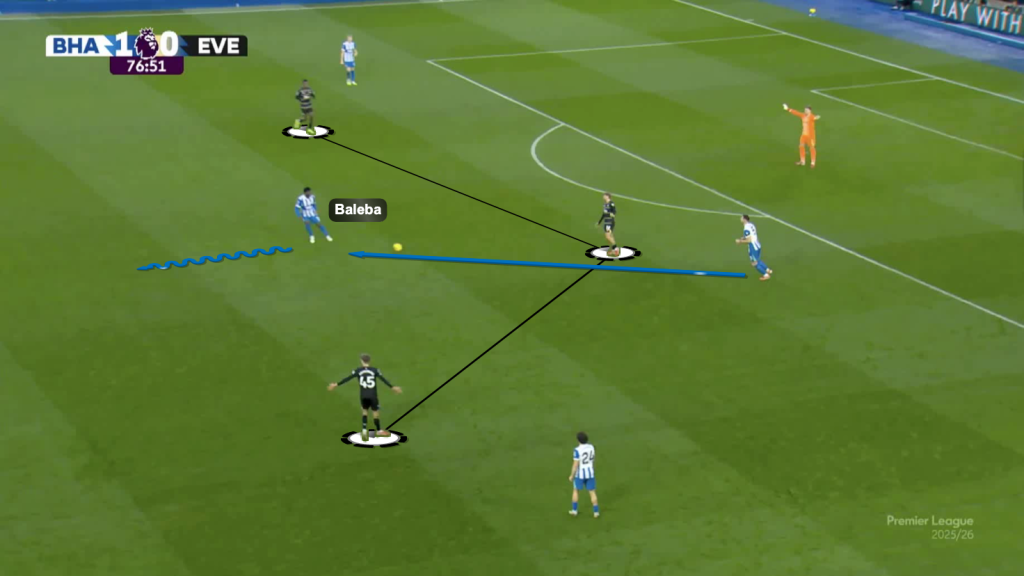
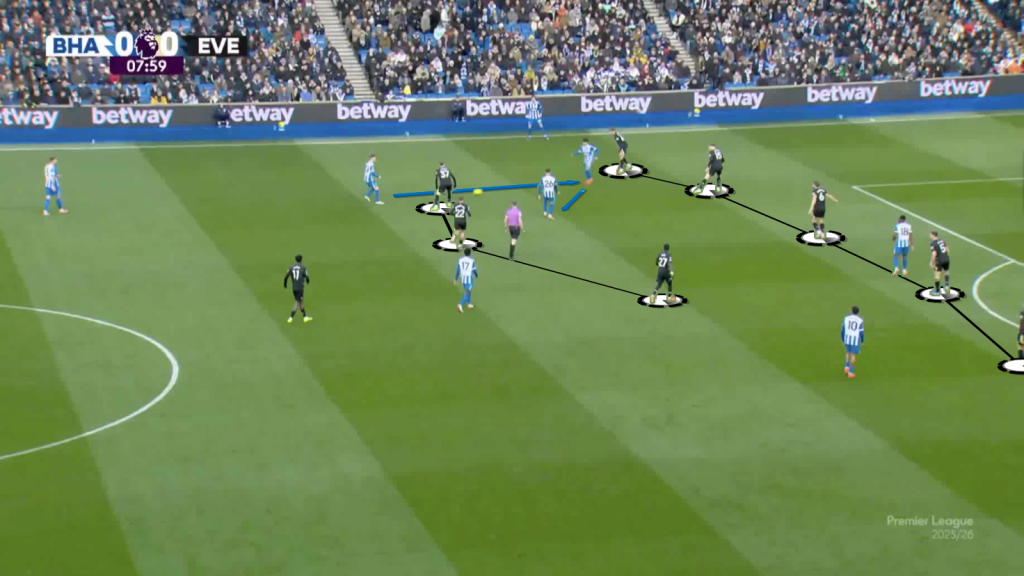
Brighton’s objective in the build-up was to bypass the first line of press by finding the midfielders inside the structure.

There were multiple occasions on which the first line of opponent press was zonally man-oriented against Brighton’s defenders, but the second line of press did not follow suit.

These situations enabled the centre-backs to identify the nearest midfielder.

In the image shown, Dunk finds Baleba, who receives the ball on the turn and carries it forward.

Getting through the first press

In moments where the pivot had blind-side pressure, a second passing option helped out.

The pass from the centre-back to the pivot was played to a supporting advanced midfielder.

This one-touch action between the lines helped the hosts get out of pressure.

Everton usually did not adopt high-pressure structures because Verbruggen (Brighton goalkeeper) was effective at releasing pressure.

GK plays LB

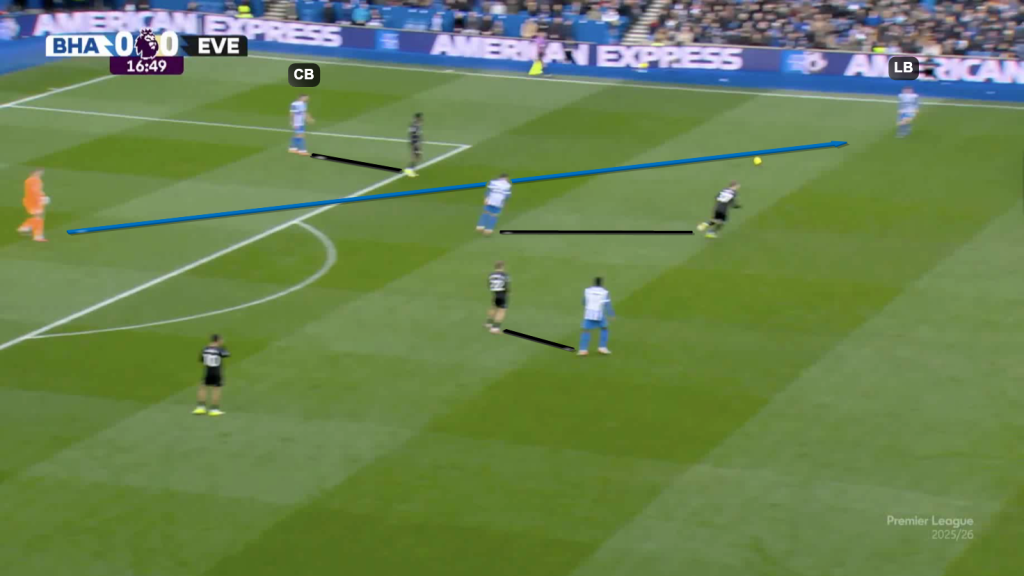
The opponents step high to mark the centre-back; Verbruggen plays it directly to the left-back.

Upon reaching the wide area, the Seagulls attempted to progress to the mid-third quickly.

However, Everton players were sliding across to cut passing lanes in the wide channel.

https://totalfootballanalysis.com/wp-content/uploads/2026/02/Attract-and-shift.mp4

While Brighton enjoyed a numerical advantage, they kept the ball in the wide channel, connecting short passes to draw opponents.

When multiple opponents committed to the press in the wide channel, they shifted play back to the centre-back.

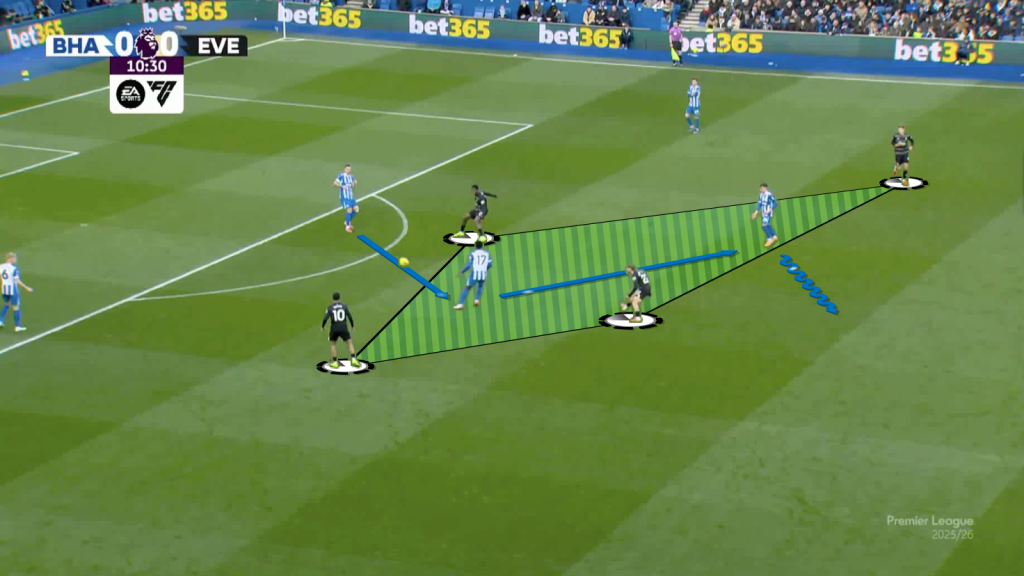
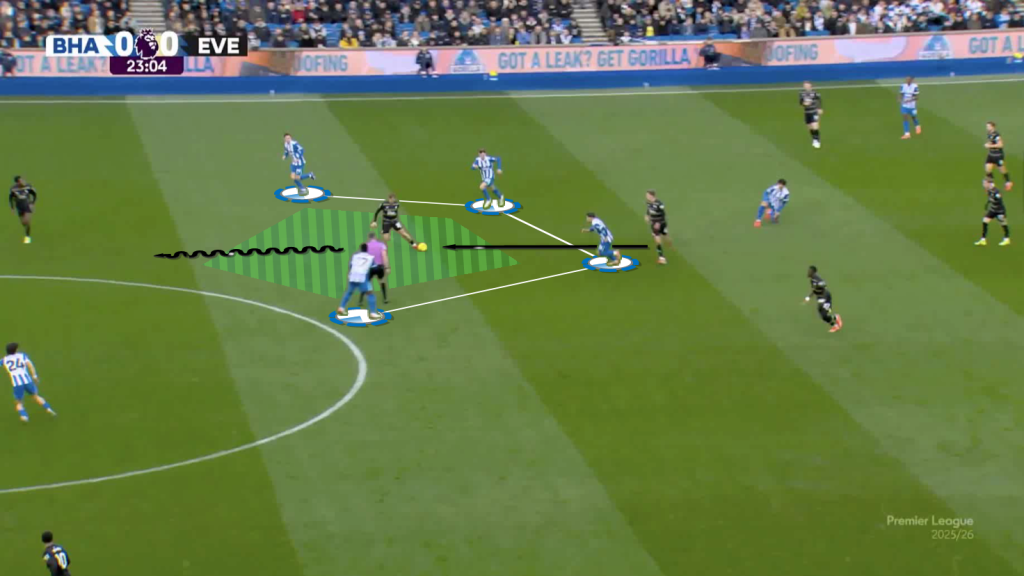
In situations in which the centre-back was closely marked to cut out the back pass, the pivot was available to receive outside the press.

Baleba receives outside press

De Cuyper and Dunk are pressed by three opponents, with Baleba offering support right outside the press.

The Cameroonian opens up and shifts play upon receiving.

There were situations where the centre-back could not receive a back pass from the full-back, and the inside pass into midfield also seemed risky.

In these scenarios, Brighton relied on positional rotations to get the ball out of pressure.

Rotation in build up

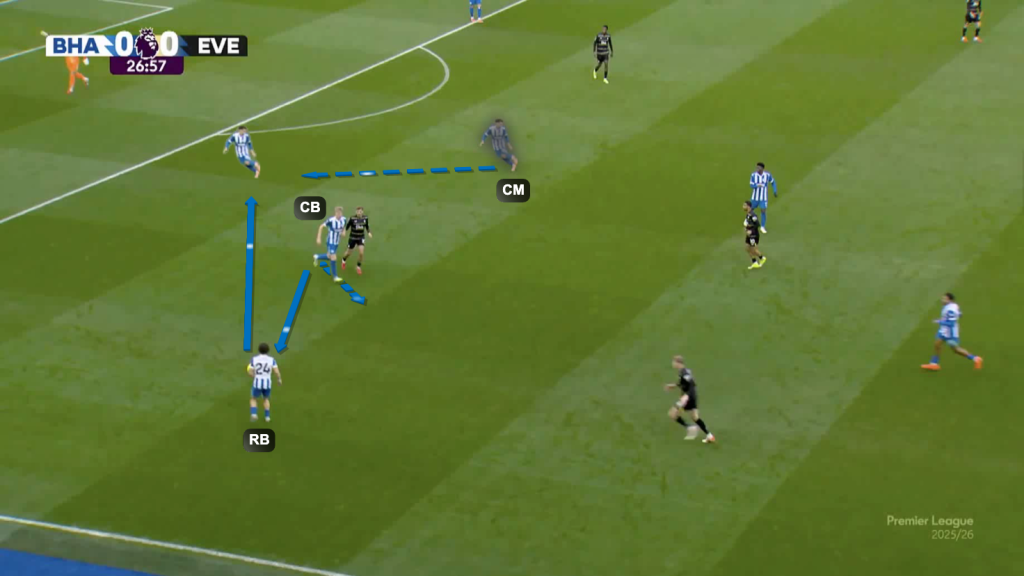
Van Hecke (CB) finds Kadıoğlu (RB); since the inside pass to Baleba (pivot) is cut out, Brighton use a rotation.

Van Hecke moves up, dragging his marker.

This leaves space for Ayari (CM) to drop into his spot to receive from Kadıoğlu.

After receiving the pass from the wide channel, he can shift play to the other side.

Brighton Progression & Chance Creation

Third man pass

When playing in the attacking half, Brighton’s objective was to find passes inside the opponent’s structure.

For this, they were seen playing third-man passes to find the intended target while he was facing the goal.

As it was difficult to find the player between the lines directly, it was helpful when a player from higher up dropped to lay it off to a slightly deeper player positioned between the lines.

https://totalfootballanalysis.com/wp-content/uploads/2026/02/van-Hecke-joins-attack.mp4

Another way Brighton sometimes achieved progression was through a deeper player adding a number in attack.

Van Hecke plays a forward pass to Rutter and follows it up by making an overlapping run.

As the winger cuts inside, he drags an opponent centre-back inside.

This creates space for van Hecke inside the penalty area; once he receives the ball, he has sufficient space and time to make a crucial pass into the penalty area.

Mitoma Welback combination

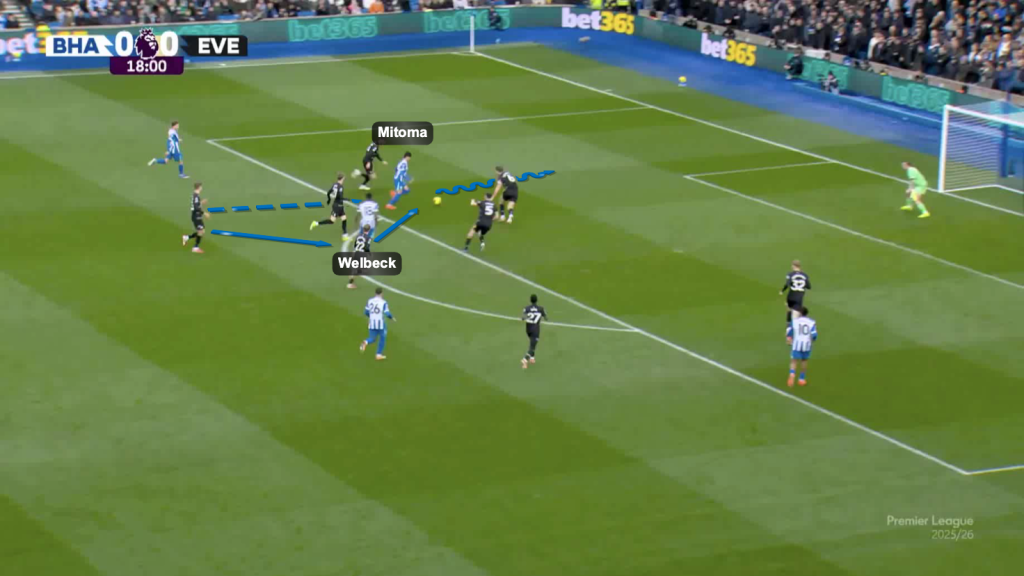
There were a few notable combination plays in the attacking third, through which the hosts almost scored.

Mitoma plays a neat one-two with Welbeck to get the ball inside the box as he goes one-on-one with the keeper.

Brighton’s goal is a good example of finding a teammate inside the structure to set up a finish.

https://totalfootballanalysis.com/wp-content/uploads/2026/02/Brighton-goal.mp4

Van Hecke finds Ayari in the half-space, who receives on the turn facing the touchline.

As the midfielder brings the ball on his dominant right foot, his direct opponent instinctively covers the space on his right to prevent a dribble down the line.

This leaves space to play an inside pass; the Swede does exactly that.

With two players staying close to one opponent’s defender, a dummy from the first player opens the way for Groß to execute an unopposed finish.

Brighton Errors In Attack

After showing several moments of success in the build-up, Brighton left more to be desired with their number of final third entries.

Their lack of patience once they got out of the build-up was showing an impact.

Brighton forcing forward pass

With the scoreline being goalless into the second half, it was evident that the Brighton players were getting desperate to break the deadlock.

They forced multiple forward passes in moments they did not need to.

This led to them being dispossessed more often than not.

Rutter dispossessed

Another way they lost the ball frequently was by receiving without awareness of blind-side pressure.

Here, Rutter receives in the half-space.

However, he is unaware of the direction from which the pressure originates.

He ends up losing the ball.

Getting outnumbered in a certain area of the pitch can halt a team’s progression.

2v3 underload wide channel

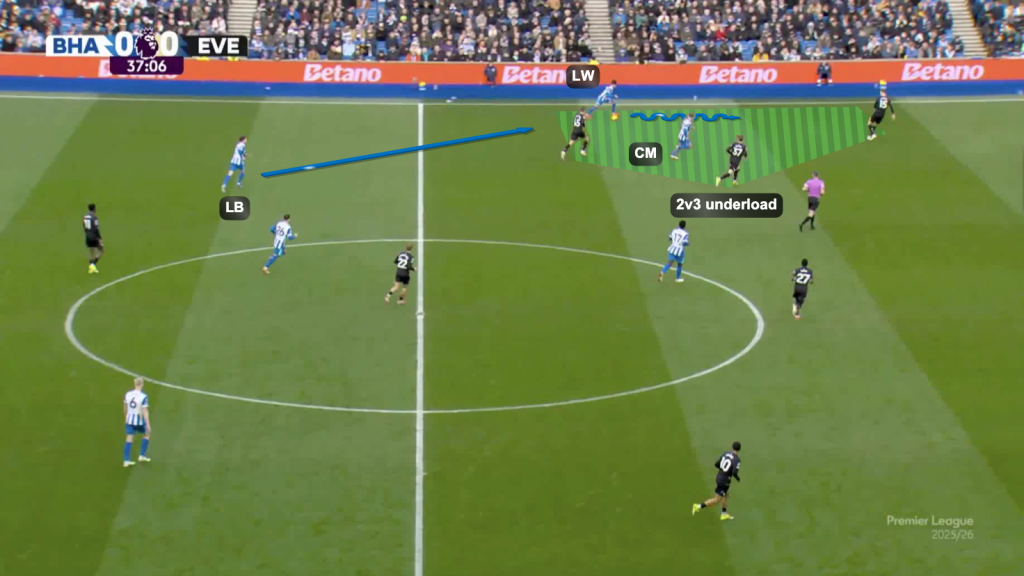
Mitoma receives from his full-back and starts driving.

Although he has Groß next to him, his side is outnumbered by three defenders running along.

He ends up losing the ball.

Everton Attacking Situations

A major part of Everton’s success in attack was due to their rapid execution of transition moments and the attacking phase.

Everton progression

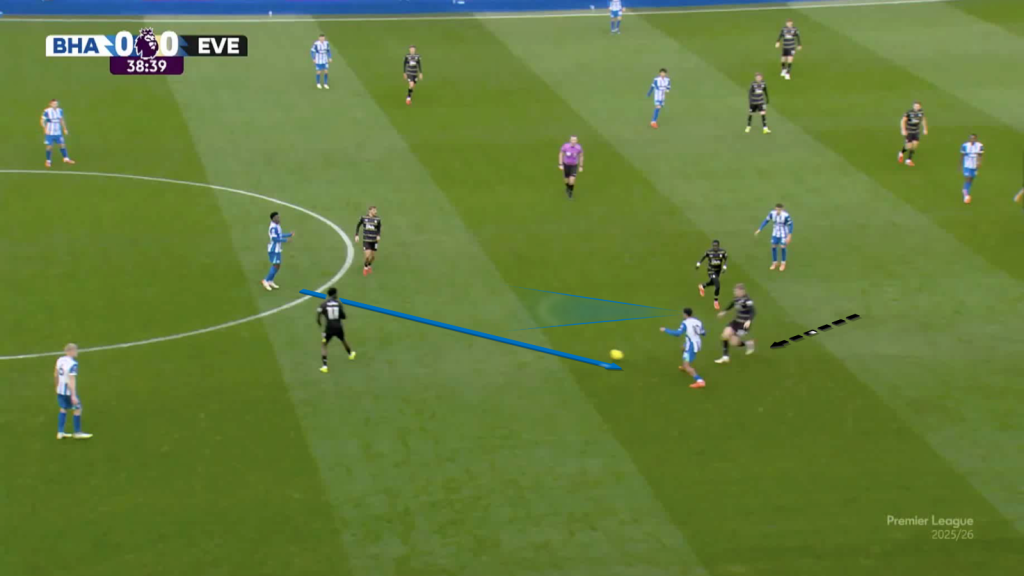
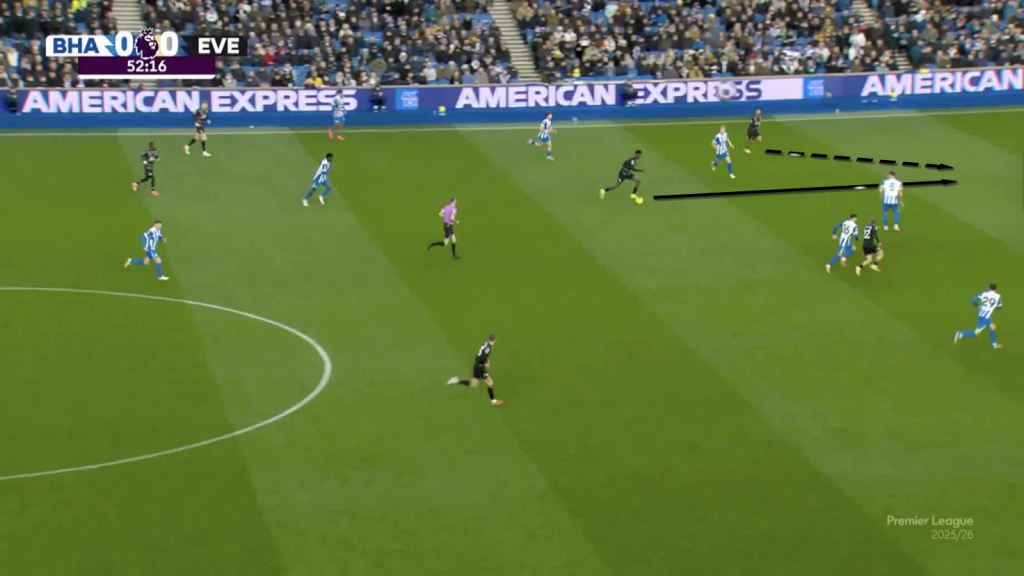
Here, Everton wins the ball and immediately launches an attack.

The ball goes to a teammate who has positioned himself behind the line of midfield, so he can receive on the turn and carry the ball as he wishes.

The moments of quick transition and progression came from these situations.

https://totalfootballanalysis.com/wp-content/uploads/2026/02/Everton-quick-progression.mp4

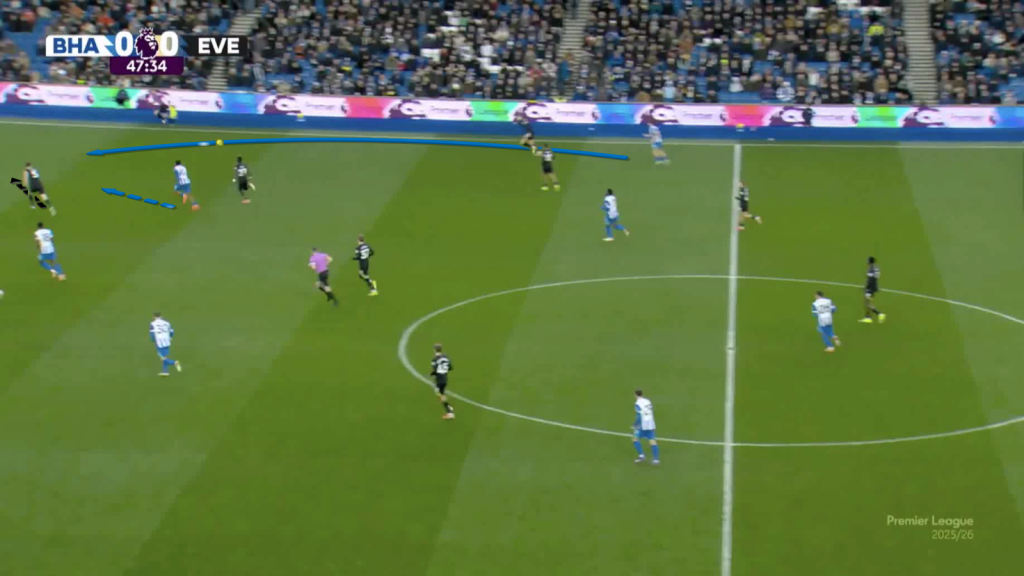
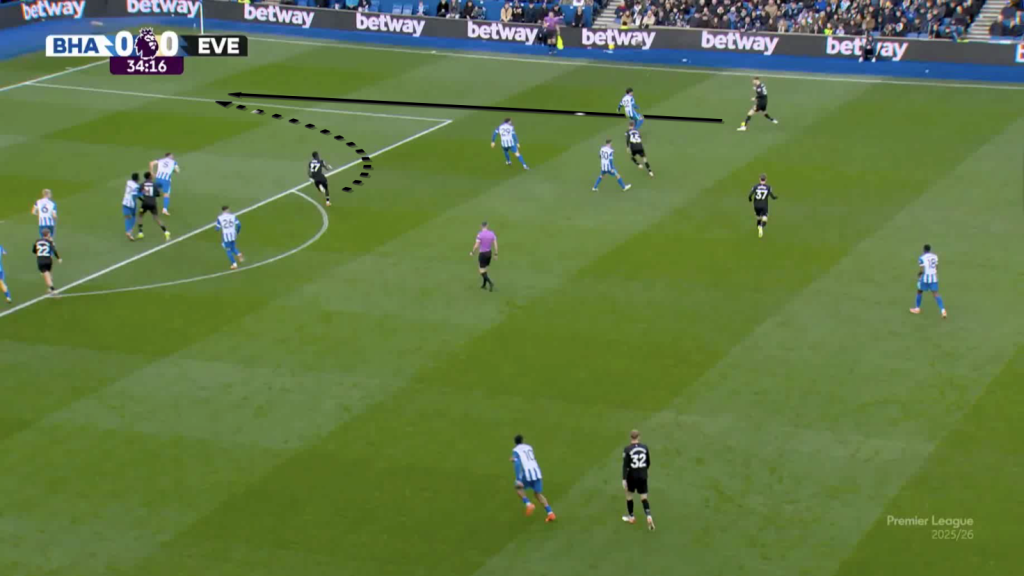
An example of Everton executing a quick transition.

The first forward pass breaks a line of three midfielders.

With the advanced player’s layoff, a space opens up for a direct pass to the striker.

At the end of the move, a shot from the attacking midfielder goes inches wide.

Everton players executed numerous underlapping and overlapping movements, with a single aim: crossing.

Everton overlap to cutback

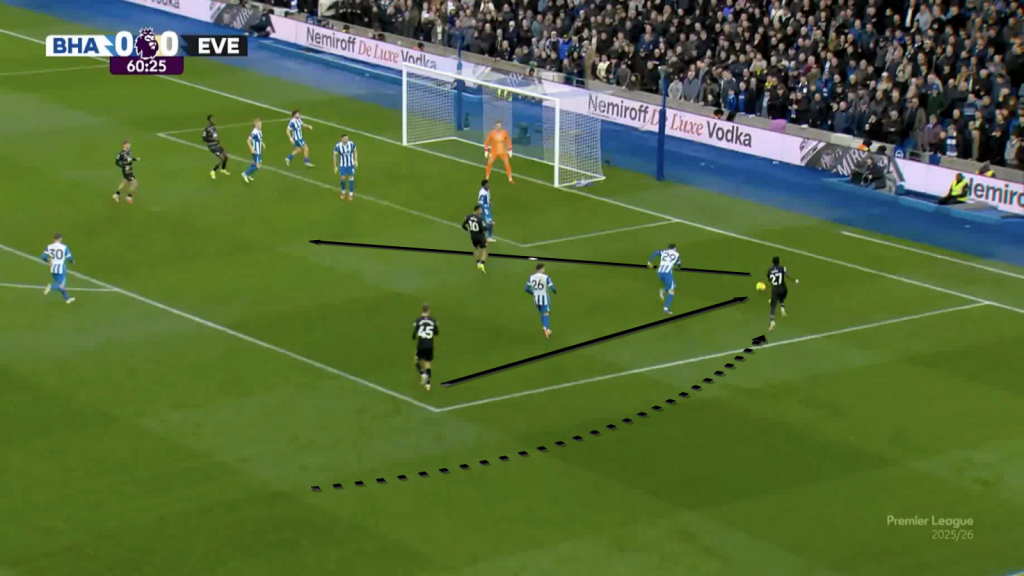
An example of an overlap that results in a cutback from the byline.

Everton underlap

Brighton full-back steps up to engage with the wide Everton player.

Since the midfielder does not drop to cover, the space in-behind is exploited by a runner making an underlapping run.

The result of this move is also a cross into the penalty area.

Ndiaye through pass

Everton’s direct play influenced the game in terms of flow and numbers.

It was a major reason they had more final-third entries than their opponents.

This also resulted in more passes behind the opponent, leading to more shots, crosses, and cutbacks.

The image above shows a situation where Ndiaye operates in the half-space, releasing a pass for the full-back to get in-behind for a cutback.

With their abundance of crosses and through passes, Everton built up enough momentum for an equaliser, which came towards the end of the second-half additional time.

https://totalfootballanalysis.com/wp-content/uploads/2026/02/Everton-goal.mp4

Although Brighton dealt with the initial cross, they failed to win the second ball that dropped inside their own penalty area.

The initial shot was saved, but the lack of proactivity in reaching the second ball for the second time within the same move punished the hosts.

The substitute striker was the first to react to the rebound and pushed it into the back of the net from point-blank range.

Conclusion

Brighton found success in build-up moments, which gave them control.

With steady progressions, they entered the attacking third several times before scoring the opener.

Although they were successful in their own half, they demonstrated a lack of patience in their progression once they reached the attacking half.

Getting caught in underloads, blind-side pressure, and forcing forward passes led to frequent dispossessions.

Everton approached the game with a lot of directness in their attack.

They moved the ball quickly and found progression.

They also made multiple overlapping and underlapping movements to get crosses in.

Tags: BrightonBrighton FormationBrighton LineupBrighton Style Of PlayBrighton Tactical AnalysisBrighton TacticsBrighton vs EvertonBrighton vs Everton ScoreBrighton vs Everton Tactical AnalysisBrighton vs Everton Formation Brighton vs Everton LineupBrighton vs Everton TacticsDavid MoyesDavid Moyes Coaching StyleDavid Moyes FormationDavid Moyes Manager StyleDavid Moyes Style Of PlayDavid Moyes Tactical AnalysisDavid Moyes TacticsEvertonEverton FormationEverton Lineup Everton Style Of PlayEverton Tactical AnalysisEverton TacticsFabian HürzelerFabian Hürzeler Coaching StyleFabian Hürzeler FormationFabian Hürzeler Manager StyleFabian Hürzeler Style Of PlayFabian Hürzeler Tactical AnalysisFabian Hürzeler TacticsPremier LeaguePremier League Tactical AnalysisPremier League Tactics
Previous Post

Adama Traoré Scout Report At Fulham 2025/2026: Can He Save West Ham United? – Player Analysis

Next Post

Why Football Fans Gravitate Toward Gaming

Next Post
Horst Steffen Werder Bremen Bundesliga 20252026

Horst Steffen Tactics At Werder Bremen 2025/2026: Why The Experiment Failed – Tactical Analysis

  • About Total Football Analysis
  • Contact Total Football Analysis
  • Write For Total Football Analysis
  • Advertise
  • Privacy Policy
  • Cancellation / Refund Policy
  • Resources
  • Terms Of Service

© 2026 Total Football Analysis

No Result
View All Result
  • Football Analysis
    • Data Analysis
    • Formations
      • 2-2-4 Formation
      • 2-3-5 Formation
      • 3-1-4-2 Formation
      • 3-2-2-3 Formation
      • 3-2-4-1 Formation
      • 3-1-6 Formation
      • 3-3-4 Formation
      • 3-4-1-2 Formation
      • 3-4-2-1 Formation
      • 3-4-3 Formation
      • 3-5-1-1 Formation
      • 3-5-2 Formation
      • 4-1-4-1 Formation
      • 4-2-2-2 Formation
      • 4-2-3-1 Formation
      • 4-2-4 Formation
      • 4-3-1-2 Formation
      • 4-3-3 Formation
      • 4-4-2 Formation
      • 4-5-1 Formation
      • 5-3-2 Formation
      • 5-4-1 Formation
      • 6-3-1 Formation
    • Head Coach Analysis
    • Match Analysis
    • Player Analysis
    • Recruitment Analysis
    • Set Piece Analysis
    • Tactical Theory
    • Tactical Preview
    • Team Analysis
    • Training Analysis
    • Tactical Analysis
    • Scouting Report
  • Competition
    • ALL Competitions
    • English Premier League
    • Champions League
    • La Liga
    • Bundesliga
    • Serie A
    • Ligue 1
    • Eredivisie
    • EFL Championship
    • FIFA World Cup 2022
    • WEURO 2022
    • Women’s Super League
    • NWSL
    • Belgian First Division A
    • A-League
    • Liga Profesional de Argentina
    • Austrian Bundesliga
    • Campeonato Brasileiro Série A
    • DFB Pokal
    • 1. HNL
    • Danish Superliga
    • EFL League One
    • EFL League Two
    • FA Cup
    • EFL Cup
    • Indian Super League
    • K-League
    • J1 League
    • Liga MX
    • Copa América 2021
    • Copa del Rey
    • MLS
    • Eliteserien
    • Euro 2020
    • Primeira Liga
    • Scottish Premiership
    • Allsvenskan
    • Europa League
    • UEFA Nations League
    • Liga AUF Uruguaya
  • Coaches
    • All Coaches
    • Alfred Schreuder
    • Ange Postecoglou
    • Antonio Conte
    • Arne Slot
    • Bo Svensson
    • Brendan Rodgers
    • Bruno Lage
    • Carlo Ancelotti
    • Christophe Galtier
    • Claude Puel
    • Claudio Ranieri
    • David Moyes
    • Dean Smith
    • Diego Simeone
    • Domenico Tedesco
    • Frank Lampard
    • Eddie Howe
    • Edin Terzić
    • Emma Hayes
    • Erik ten Hag
    • Ernesto Valverde
    • Gennaro Gattuso
    • Gerardo Seoane
    • Gian Piero Gasperini
    • Giovanni van Bronckhorst
    • Graham Potter
    • Igor Tudor
    • Imanol Alguacil
    • Jesse Marsch
    • Jonas Eidevall
    • Jorge Sampaoli
    • José Bordalás
    • José Mourinho
    • Julen Lopetegui
    • Julian Nagelsmann
    • Julien Stéphan
    • Jürgen Klopp
    • Luciano Spalletti
    • Lucien Favre
    • Manuel Pellegrini
    • Marcelo Bielsa
    • Marco Rose
    • Marco Silva
    • Massimiliano Allegri
    • Mauricio Pochettino
    • Maurizio Sarri
    • Mikel Arteta
    • Niko Kovač
    • Nuno Espírito Santo
    • Oliver Glasner
    • Patrick Vieira
    • Paulo Fonseca
    • Pep Guardiola
    • Peter Bosz
    • Rafa Benítez
    • Ralf Rangnick
    • Ralph Hasenhüttl
    • Roger Schmidt
    • Roy Hodgson
    • Sean Dyche
    • Sérgio Conceição
    • Simone Inzaghi
    • Sonia Bompastor
    • Stefano Pioli
    • Steffen Baumgart
    • Steven Gerrard
    • Thiago Motta
    • Thomas Frank
    • Thomas Tuchel
    • Unai Emery
    • Vincenzo Italiano
    • Xavi
  • Teams
    • ALL Teams
    • AC Milan
    • Ajax Amsterdam
    • Arsenal
    • AS Monaco FC
    • Atalanta
    • Atlético Madrid
    • FC Barcelona
    • FC Bayern Munich
    • Borussia Dortmund
    • Celtic FC
    • Chelsea FC
    • Everton F.C.
    • Inter Milan
    • Juventus F.C.
    • Leeds United F.C.
    • Liverpool FC
    • Manchester City
    • Manchester United FC
    • Paris Saint-Germain
    • Rangers FC
    • RB Leipzig
    • Real Madrid CF
    • Tottenham Hotspur
    • West Ham United
  • Players
    • ALL Players
    • Alisson Becker
    • Bukayo Saka
    • Erling Haaland
    • Harry Kane
    • Jack Grealish
    • John Stones
    • Julián Alvarez
    • Kalvin Phillips
    • Kevin De Bruyne
    • Kyle Walker
    • Kylian Mbappé
    • Lamine Yamal
    • Lionel Messi
    • Luis Díaz
    • Mohamed Salah
    • Phil Foden
    • Virgil Van Dijk
  • Contact
  • Write For TFA
  • Login

© 2026 Total Football Analysis