Brighton & Hove Albion consistently finds ways to exploit depth against well-structured, compact opponents while maintaining exceptional resistance to pressing.
But how do Brighton manage to create so much verticality without losing the ball in dangerous areas?
This article will analyse Brighton’s tactical approach to vertical play under Fabian Hürzeler.
Usually starting from a nominal 4-4-2 formation, Brighton adjust their shape dynamically.
The 4-4-2 offers the advantage of allowing short, simple movements to shift into various shapes depending on the opponent and the situation.
This season, Brighton have demonstrated a wide range of formations, including a 4-2-4 in build-up play against high pressing, a 4-1-2-3 with a focus on occupying the deep half-spaces, and a 4-2-2-2 with dropping strikers.
Against deeper opponents employing a mid-block, Brighton often transition to shapes like a 3-3-4, facilitated by the dropping of the defensive midfielder, or a 2-3-2-3 with inverted full-backs, among others.
It quickly becomes evident that Hürzeler’s tactical approach is no longer tied to specific formations but rather to the occupation of certain spaces and the players’ behaviour within these zones.
Fabian Hürzeler Overloads In Possession
This flexibility allows adaptation to the opponent’s press.
Depending on the required zone, specific areas can be overloaded to create challenges for the opposition.
Classic examples under Hürzeler are overloading the build-up line by dropping the defensive midfielder centrally against two pressing forwards, overloading the central area with inverted full-backs and a dropping striker, or overloading the opponent’s defensive line with an advancing central midfielder when the opposition’s backline holds a high position.
When Ayari, for example, overloads the last line as a midfielder, he forces his marker into a dilemma: either allow an underload in the last line or leave more space in central areas.
Similarly, when the full-backs overload the centre, their opponents face the choice between creating an underload in the middle or leaving passing lanes open to the flanks.
The overloads force the opponent to adapt their pressing to Brighton’s game.
This alone gives Brighton an advantage in build-up play and contributes to their ability to resist pressure.
Moreover, overloads in advanced areas make it significantly easier to exploit gaps between defensive lines, given the numerical superiority in those zones.
Brighton frequently capitalises on this by playing line-breaking passes, often finding depth effectively.
However, these line-breaking passes must be carefully prepared, even when overloads are present.
Countermovements are particularly effective in creating openings in the opponent’s defensive structure.
Accordingly, this article will examine the typical patterns of counter-movements frequently employed by Brighton to create depth in possession.
Brighton Strikers Against High Pressing
In deep build-up play against high opposition pressing, Brighton generally operates in a flexible 4-2-4 structure.
The four attackers occupy the opponent’s last defensive line, creating significant space in midfield.
The wingers position themselves as wide and deep as possible to stretch the opposition and open passing lanes.
The attackers are then highly flexible in exploiting and attacking the spaces that emerge.
This flexibility is particularly evident in their movement patterns.
A common observation is the countermovement of Brighton’s two strikers.
The role of Danny Welbeck, who is both quick and physically strong, suits him well as a target man.
He often secures deep balls in one-on-one situations with his back to the defender, allowing him to lay off passes after bypassing one or more defensive lines.
When the opposition employs man-marking on the last line, both strikers often drop deeper simultaneously, creating space behind the centre-backs or numerical superiority in the centre.
The wingers can exploit these spaces by making diagonal runs or by creating numerical superiority in central areas.
This adjustment results in the previously mentioned 4-2-2-2 shape, with wide-positioned wingers and strikers operating deeper.

Another commonly used variation is overloading one side when in possession, with a wider centre-back in a three-man backline, by shifting both strikers to the ball-near side.
The dropping striker occupies the deep half-space, while the higher striker often positions himself slightly more centrally.
Here, too, the opponent is forced to react and adjust their pressing, which often leads to assignment issues.

A key aspect of Hürzeler’s system is having a technically skilled goalkeeper; this is definitely the case with Verbruggen.
Against opposition high pressing, Verbruggen creates +1 numerical superiority and is, therefore, heavily involved in the build-up play.
Without him, the team’s pronounced press resistance would be nearly impossible.
Brighton’s Vertical Play Against Midfield Pressing
Against opposition midfield pressing, Hürzeler relies on a flexible build-up combined with the previously mentioned overloads of the backline or central areas.
This flexibility is evident in the varying build-up shapes.
For example, against Arsenal, Hürzeler used inverted full-backs, creating a pressing-resistant 2-3-2-3 shape with wide wingers.
This shape with inverted full-backs is often used only intermittently to avoid pulling the opposing wingers too centrally, which could make it predictable and easier to defend on the now-open flanks.
Against the central-heavy Manchester City, Hürzeler preferred a less risky build-up from a wider 4-1 shape with flat full-backs, drawing various passing lanes and openings.
The behaviour of the midfielders and wingers is similar across Brighton’s different games.
The wingers provide the necessary width, positioning themselves as deep and wide as possible.
In the build-up line, one of the defensive midfielders pushes slightly higher to the number 8 position, while the other midfielder stays deeper and joins the first build-up line.
It is also frequently observed that when a centre-back dribbles out wide, the defensive midfielder drops centrally to act as an anchor.
Meanwhile, the advancing number 8 often makes runs into depth, creating problems for the already tightly bound defensive line.
These positional movements and countermovements effectively disrupt the opponent’s defensive structure.
Counter-Movements
In order to pull apart compact or man-oriented opponents and create passing lanes, countermovements are required.
Countermovements are especially effective in overloaded zones, as the opposing defenders (at a numerical disadvantage) are forced into dilemmas.
Brighton’s vertical play is effective because they frequently employ these types of movements.
A classic principle of play states that the closer to the ball, the higher the dynamics of the surrounding players.
This creates passing options near the ball, particularly evident in Brighton’s counterattacks.
A few of the most typical patterns of counter-movements in Brighton’s play to create depth are illustrated below and briefly explained:
- Scene:
Often from a 4-1-2-3 (also 2-3-2-3) shape, the striker (usually Welbeck) drops deeper, while the number 8 moves into the deep half-space.
The striker typically draws the opposing centre-back a few steps out of position.
This creates space that can be exploited by the number 8, as the centre-back is forced to accelerate alternately (initial sprint forward, then retreat).
This creates an advantage in the footrace for a deep ball, or Welbeck, acting as the striker, becomes a playable option for a lay-off.
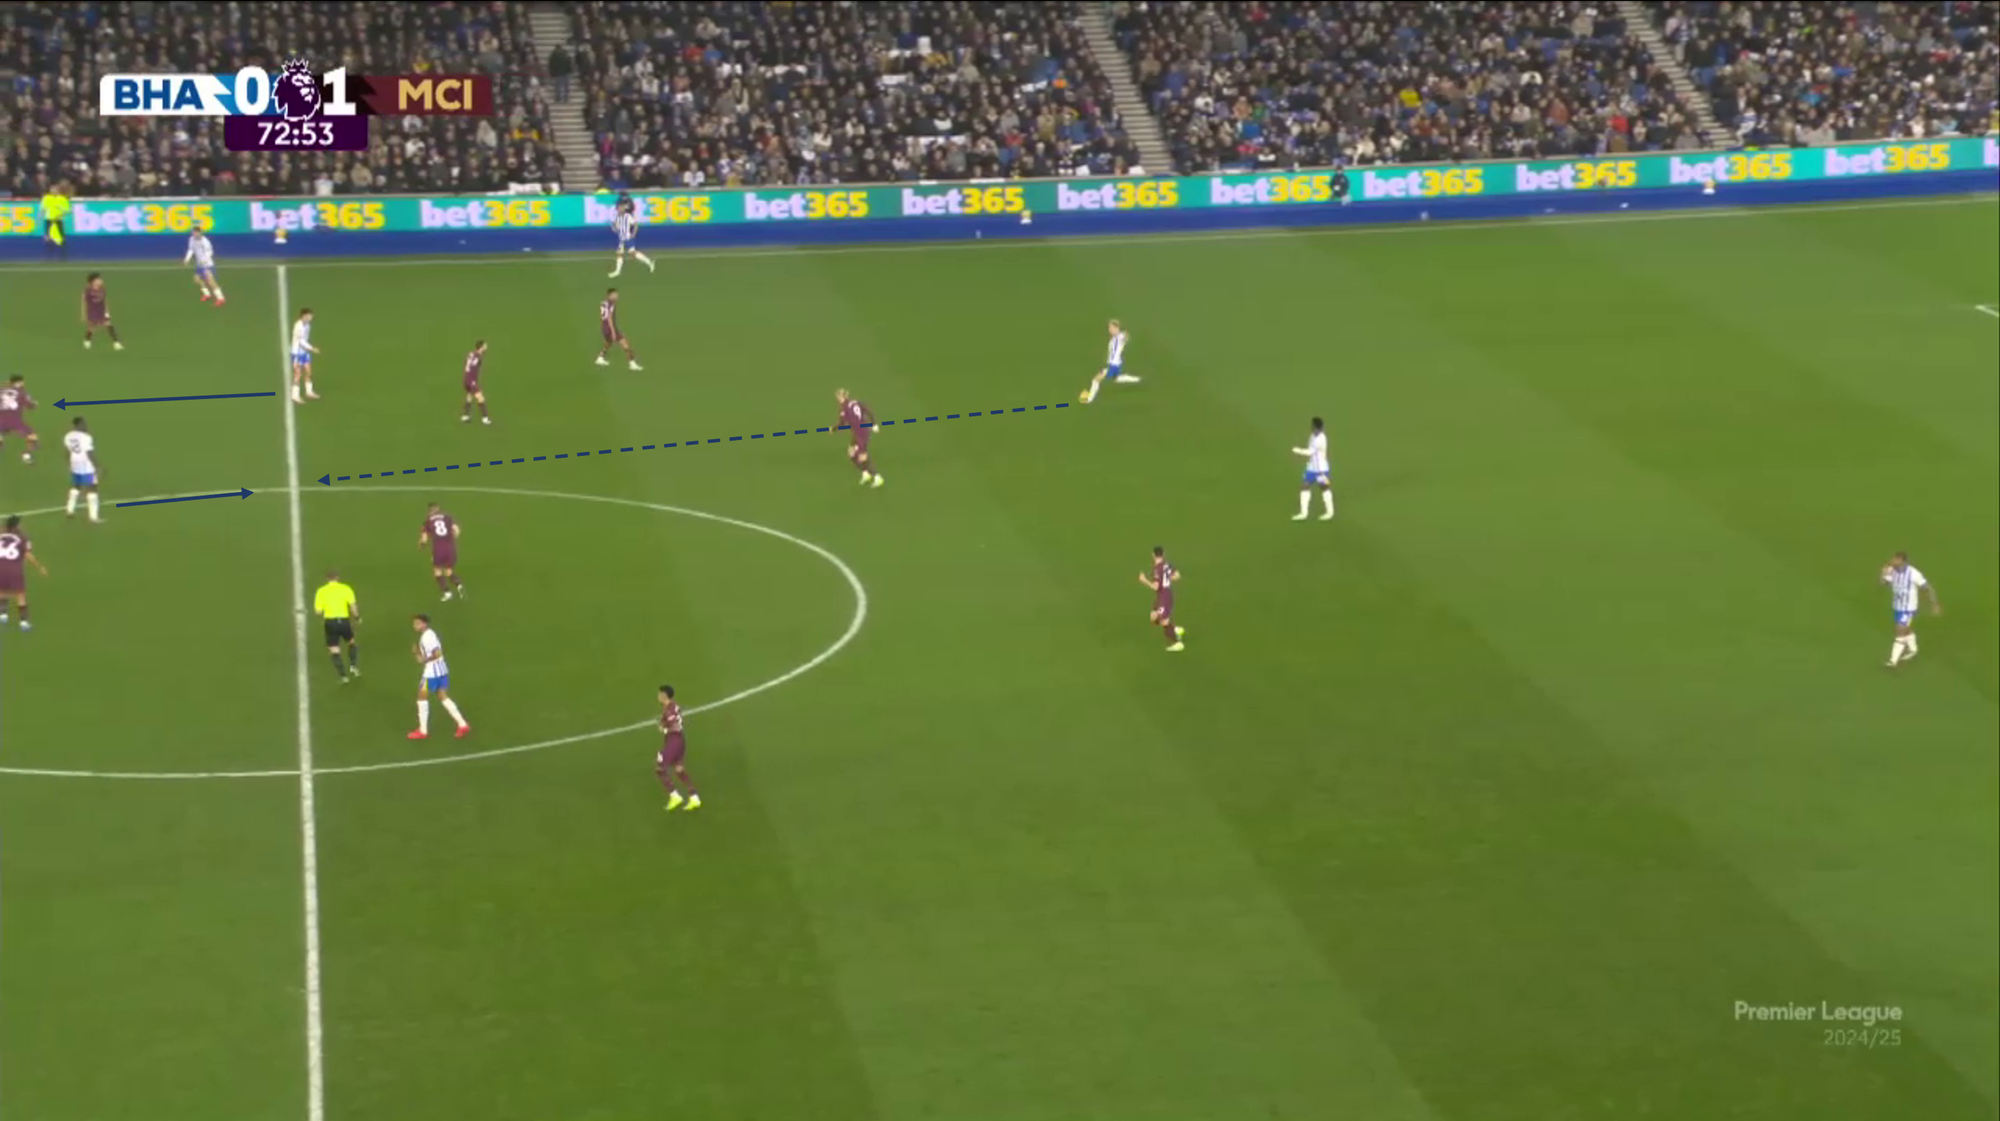
- Scene:
When a centre-back dribbles wide from a three-man backline with a dropping defensive midfielder, the full-back advances along the touchline while the winger drops into half-space.
Again, the defender is forced into the same dilemma.
While this may not be an extraordinary countermovement, its alternation with the next described movement makes it very difficult for the opposing winger to defend.
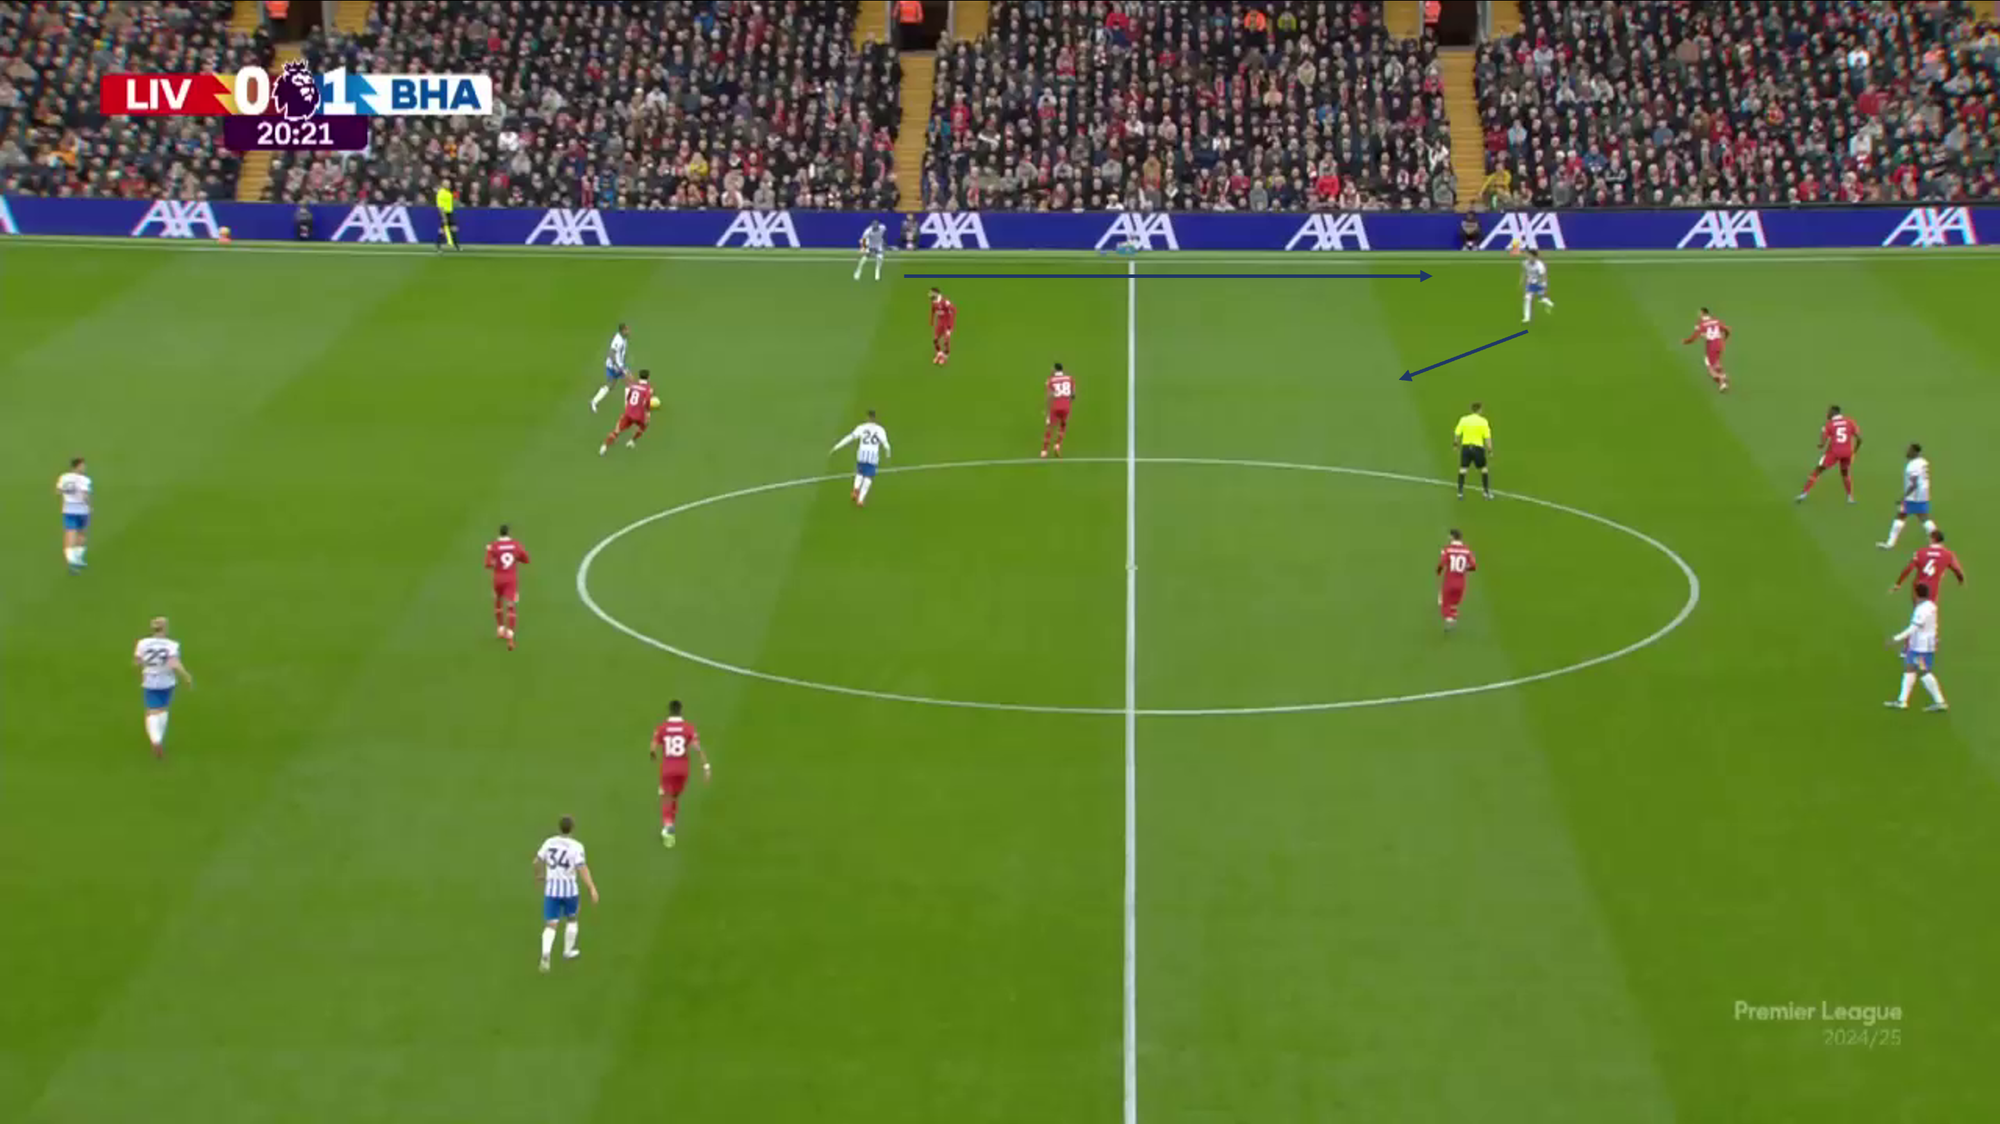
- Scene:
While the central players drop deeper, the ball-near full-back inverts into the deep half-space.

The dropping central players pull the opposing midfield line out of position, creating a large space between the defensive and midfield lines.
The ball-near full-back then moves into this space, allowing the ball to bypass the entire pressing structure.

It is especially difficult for the opposing winger to react to the full-back’s alternating direction of runs, which gives the full-back a constant time advantage.

- Scene:
This variation is particularly effective when overloading one side.
The ball-far full-back moves into the deep half-space while the ball-far striker drops deeper.
Due to the fewer players on the underloaded side, the subsequent switch of play into depth can exploit the entire team.
Additionally, the drawn-out centre-back, starting from his blind spot, pays less attention to the full-back due to his angle to the ball on the overloaded side.
However, this variation occurs least frequently, as the timing in the long runs must be perfectly synchronised.

Brighton’s Lay-Off Play
After bypassing a defensive line with a line-breaking pass, Brighton immediately creates further passing options to progress (with numerical superiority) to the next line.
To achieve this, movements are made to prepare for lay-off options, which are particularly pronounced in Brighton’s play.
In Brighton’s shape, it is clear that deep passing options are generally positioned at different heights.
Even small variations in height positioning already create the desired effect.
After a deep pass to a dropping player, diagonal passing options are immediately created as lay-off options.
Players in the vicinity of the ball generate high dynamism by moving into the next passing lanes in the space between the lines, becoming immediately available for a pass.
Additionally, it is noticeable that players who have bypassed the previous opposition line continue their runs into the next line.
This allows Brighton to take numerical superiority into the next defensive line and create additional passing options for otherwise isolated teammates receiving deep passes.
This is particularly visible with the number 8s operating in the half-spaces from the 4-1-2-3 or 2-3-2-3 formations.
A prime example of Brighton’s excellent implementation of lay-off play in their attacking strategy is the 2-1 goal against Manchester City.
The deep ball to the dropping Welbeck bypasses the first two pressing lines.
Even before the pass is made, we can see how João Pedro positions himself diagonally to the left of his marker on the midfield line, which will be bypassed.
He prepares to make a dynamic run into the space between the lines and become immediately available for a lay-off.

At the same time, O’Riley positions himself ahead of his marker to create a deep passing option.

By playing into the pressure and executing movements before the deep pass, Brighton generates a high dynamism that the opponent’s midfield cannot match.
This creates a 5v4 situation in favour of Brighton.

Conclusion
In Brighton’s play, spaces are repeatedly occupied by different players.
Unlike traditional relational play, however, the possession game is not based on intuitive movements from the ball-near overload players but on planned and rehearsed patterns.
The opponent is confronted with significant challenges in pressing through various overloads and countermovements.
As a result, Brighton can consistently find depth and combine quickly toward the opponent’s goal.
Unlike many other teams known for their vertical play, Brighton do not create depth from transitional moments but from their own “structured” possession phases.
Hürzeler’s ability to adapt possession patterns to his players’ individual strengths is particularly commendable, enabling them to perform much better.
This naturally aligns perfectly with Brighton, who, with their innovative, data-driven scouting model, statistically evaluate not only players but also coaches.