Chelsea were defeated by Aston Villa 2-1 at Stamford Bridge in Gameweek 18 of the 2025/2026 Premier League season.
It was a game of two halves, where Chelsea controlled the first 45 minutes, having a lion’s share of ball possession (71%).
They had 10 shots compared to none from their opponents, out of which seven were from inside the penalty area.
The Blues ended up scoring their solitary goal from a corner-kick.
The second half saw a different Villa side, especially after the triple substitution at the hour mark; one of the introductions, Ollie Watkins, ended up being the driving force behind the comeback.
The Villans had a total of 11 shots in the second half, seven more than the hosts; seven of those shots were from inside the penalty area, and eight were on target.
This indicates a staggering difference compared to the first half.
Through this tactical analysis, we aim to identify the causes of the two halves being so significantly different in attacking flow, i.e., the first half being in Chelsea’s favour and the second in Villa’s favour.
Chelsea Vs Aston Villa Lineups & Formations
Let’s look at how Enzo Maresca and Unai Emery fielded their squads.

The hosts, Chelsea, played in a 4-2-3-1 formation.
Robert Sánchez started in goal, behind a back four of skipper Reece James (right-back), Trevoh Chalobah (right centre-back), Benoît Badiashile (left centre-back), and Marc Cucurella (left-back).
Malo Gusto replaced the latter after 69 minutes.
Moisés Caicedo and Enzo Fernández played as the double pivot.
Pedro Neto (right) and Alejandro Garnacho (left) were the wingers.
The latter made way for Jamie Gittens (69’).
Cole Palmer (centre attacking midfielder) operated behind João Pedro (striker).
They were substituted for Estêvão (72’) and Liam Delap (69’) respectively.
The visitors, Aston Villa, played in a 4-4-2 formation.
Emiliano Martínez started between the sticks.
The back four were Matty Cash (right-back), Ezri Konsa (right centre-back), Victor Lindelöf (left centre-back), and Ian Maatsen (left-back).
Lucas Digne (83’) came on for Maatsen.
Boubacar Kamara and Youri Tielemans played as the centre-midfielders.
The former made way for Lamare Bogarde (83’).
Skipper John McGinn (right) and Emiliano Buendía (left) played as the wingers.
They were substituted for Amadou Onana (59’) and Ollie Watkins (58’) respectively.
Donyell Malen and Morgan Rogers played as the two strikers.
Jadon Sancho replaced the former at the 59th minute.
Dominant First Half From Chelsea
Chelsea took control of the game right from the get-go.
They were comfortable in possession and dictated the play, giving Aston Villa minimal opportunity to retain it.
Chelsea Build-Up Structure & Positioning
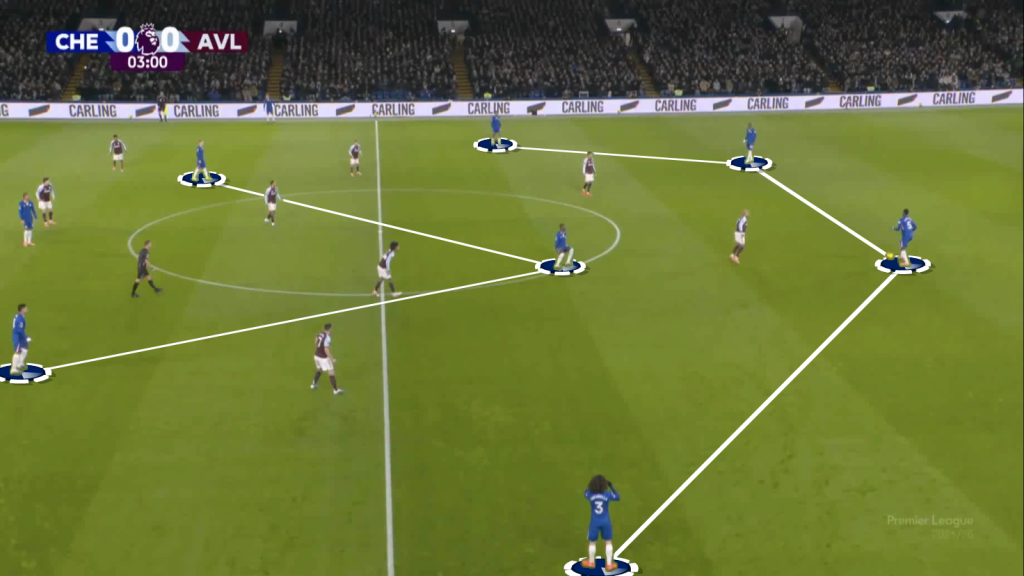
With Enzo Fernández moving up inside the opponent structure, Chelsea were seen building out in a 4-3-3 shape.
In this initial phase, the full-backs stayed wide, offering width.
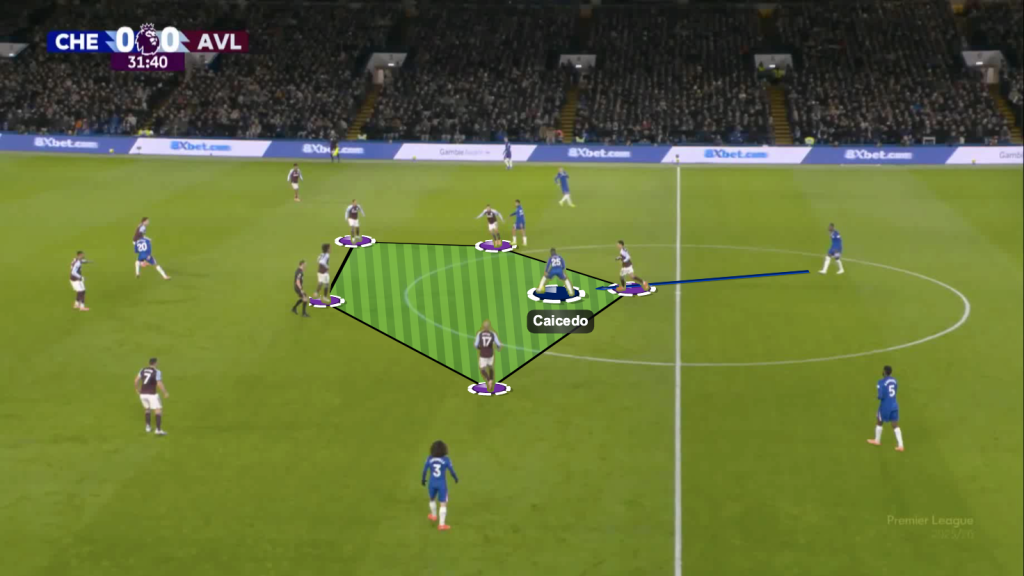
Caicedo stayed as the single pivot behind the first line of Aston Villa pressure.
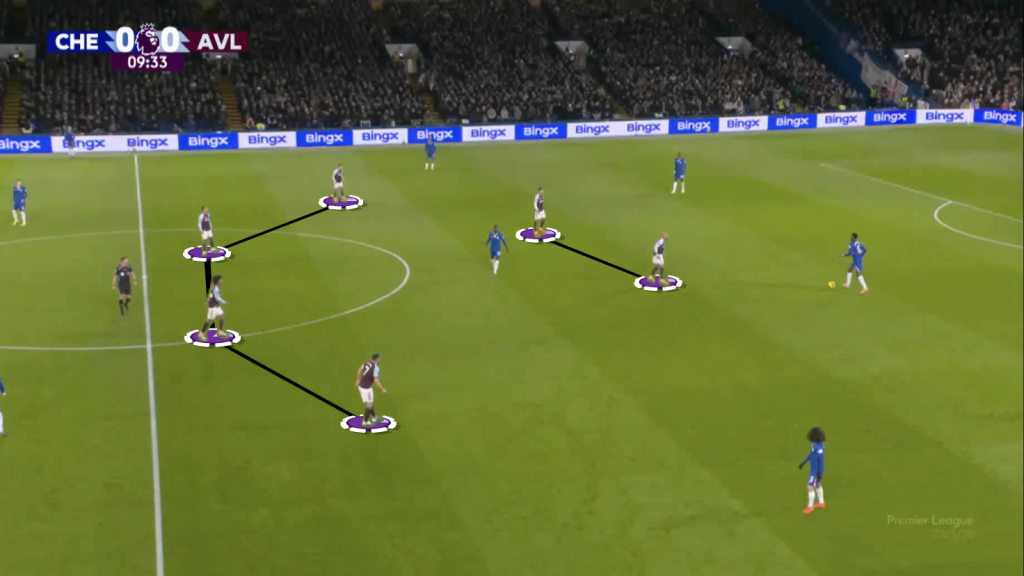
Villa stayed in a compact 4-4-2 shape while defending.
For the majority of the first half, their press lacked intensity, making the build-up a fairly simple affair for Chelsea.
However, in situations where their front two stepped up to engage, Caicedo dropped between the centre-backs to assert numerical superiority in the build-up.
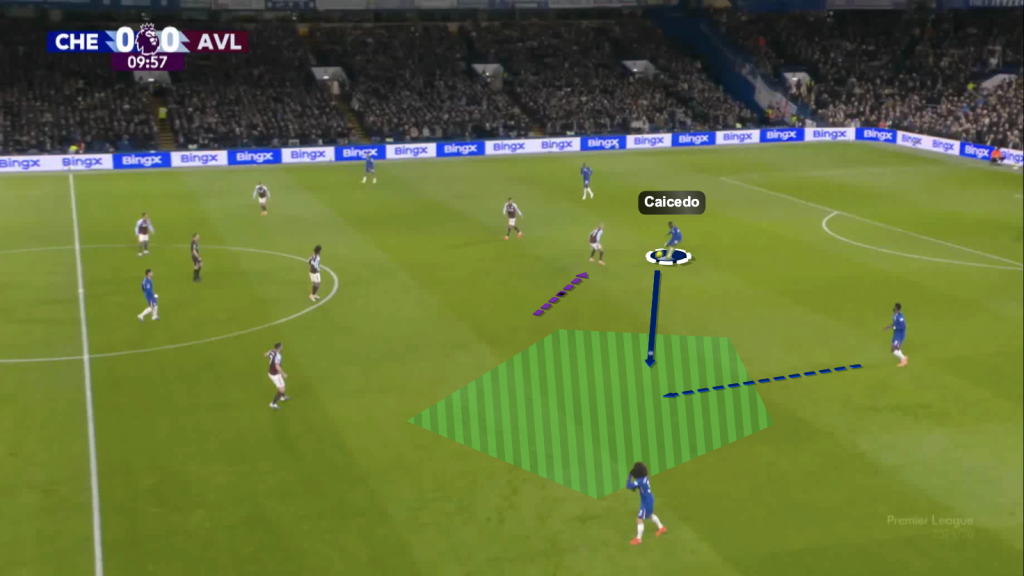
When Caicedo drops in line with the centre-backs, one of the opponent strikers steps out to press him.
This is when the space opens up in the left half-space for Chelsea, and the Ecuadorian finds his left centre-back, who uses the space to carry the ball forward.
This also opens the possibility of overloading the wide channel and bypassing the closest opponent.
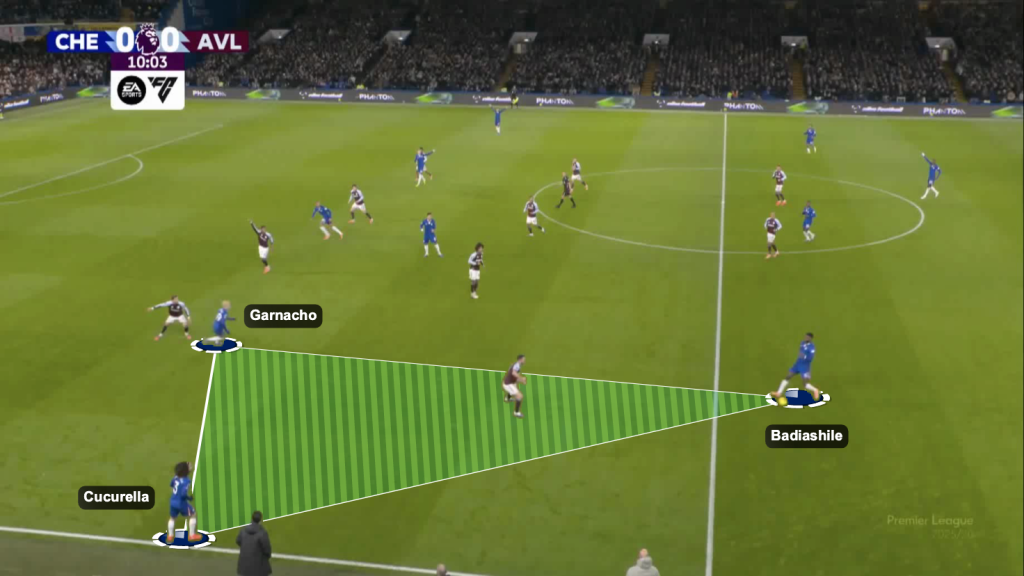
A few seconds down the line, Chelsea form a passing triangle in the wide channel.
The winger (Garnacho) pins the opponent full-back, which leaves space for Cucurella.
The opponent winger has to decide to cut either the inside or the outside pass.
Since he stays to cut the passing lane to Garnacho, the pass is played to Cucurella.
Once the ball progressed to the midfield third, Maresca’s full-backs were seen inverting into the half-spaces.
This was the case with Reece James more commonly, compared to Cucurella.
The Spaniard’s involvement was seen in a wide area, even in the mid-third.
The reason for this was that Garnacho was seen operating in the half-space during the progression phase.
When Enzo Fernández occupied the half-space, the Argentinian winger drifted wide, which usually happened when Chelsea were progressing into the attacking third.
The story was a bit different on the other flank.
Neto consistently hugged the touchline.
Since Palmer operated mostly in the right half-space, the Portuguese was not required in the half-space.
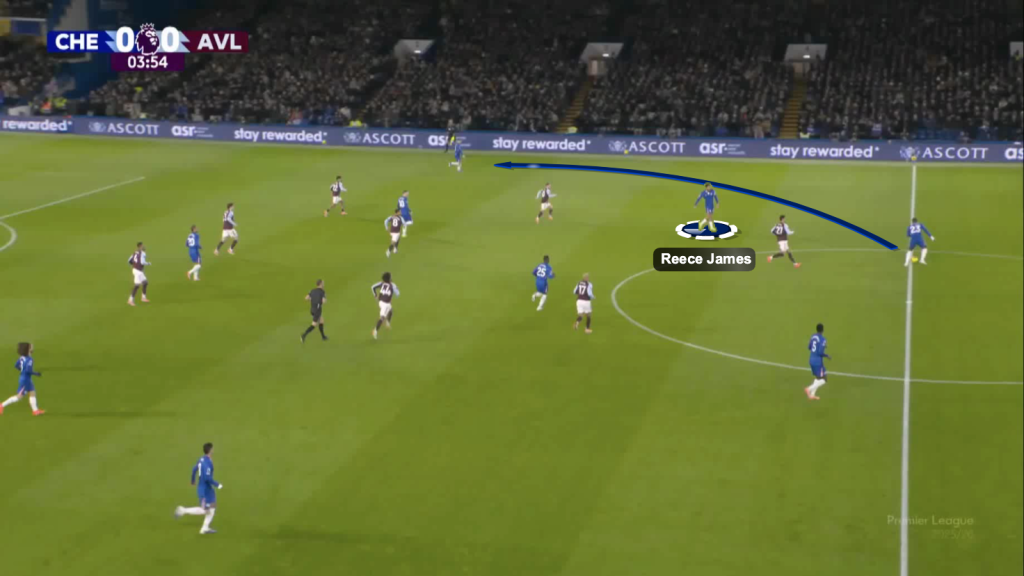
Reece James stayed inverted alongside Caicedo to open Chalobah’s passing lane to Neto.
Chelsea Chance Creation
A significant number of the Blues’ chances came from crossing situations.
Both the wingers looked to bring the ball to their stronger feet to play inverted crosses.
In 1-v-1 situations, the wingers found it feasible to find a yard of space to cross.
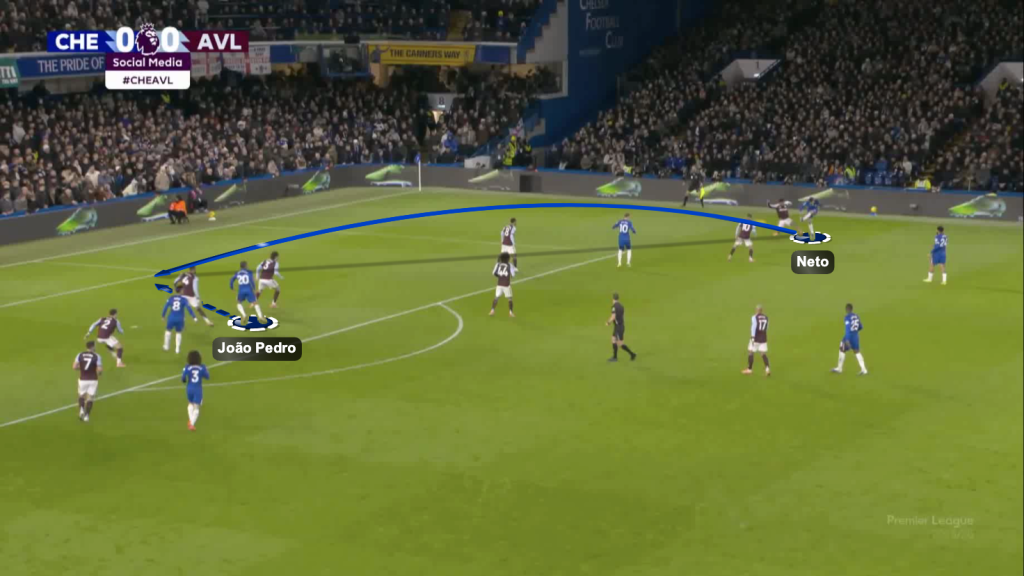
However, Villa recognised the threat and began double-teaming the Chelsea wingers.
In this case, they (especially Neto) put pressure on Reece James and played lay-offs for unopposed crosses.
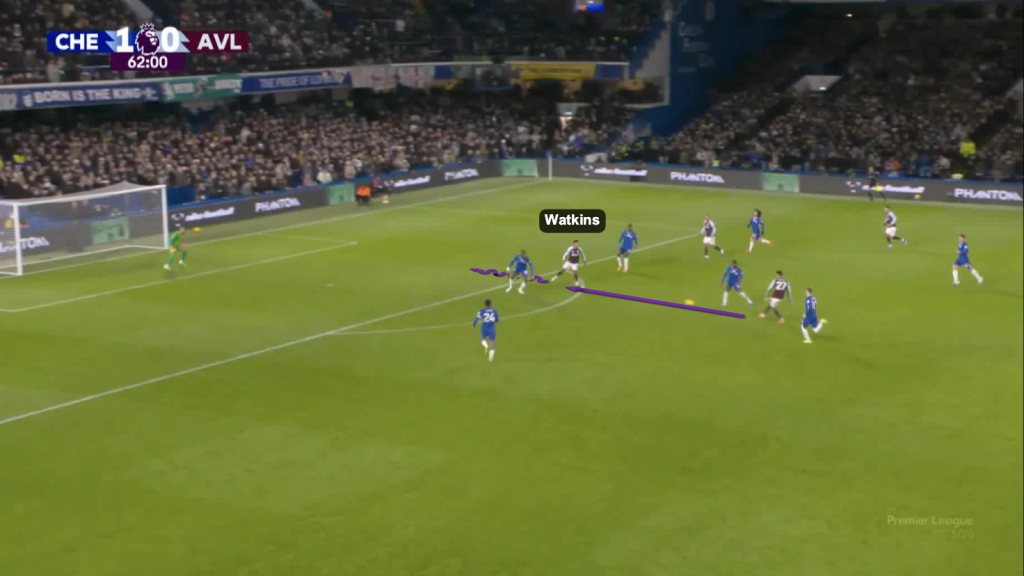
In situations where the Villans overcompensated in wide-area defending, the hosts were momentarily afforded space in the central channel and, sometimes, in the half-spaces.
They made sure to capitalise on this.
Caicedo often received inside opponent structure.
Villa offered him enough time to receive on the half-turn and pick out vertical passes.
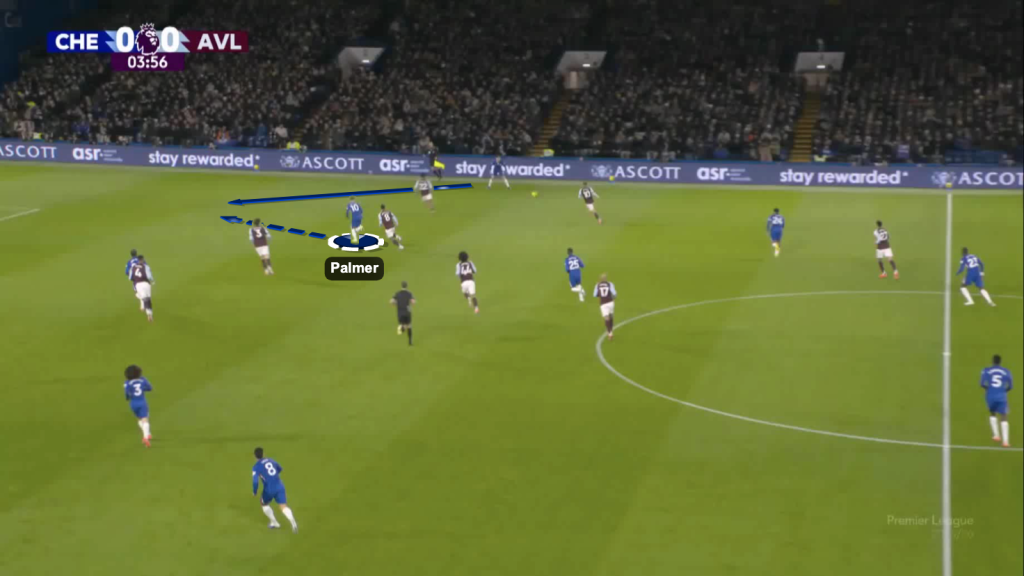
This is how Palmer got onto the ball in the central channel.
Caicedo finds the Englishman, who receives it on the turn and starts carrying the ball into space.
His action drags multiple defenders out of position, which opens space in zone-14.
He plays a pass to Garnacho, which attracts all the attention to him.
Nobody tracks Enzo Fernández.
Therefore, he gets enough time for a touch before he takes a shot from the edge of the box.
Palmer also offered support in the half-space by making blind-side runs.
Palmer capitalises on the Villa back line being disconnected.
He makes a half-space run to receive the ball in-behind.
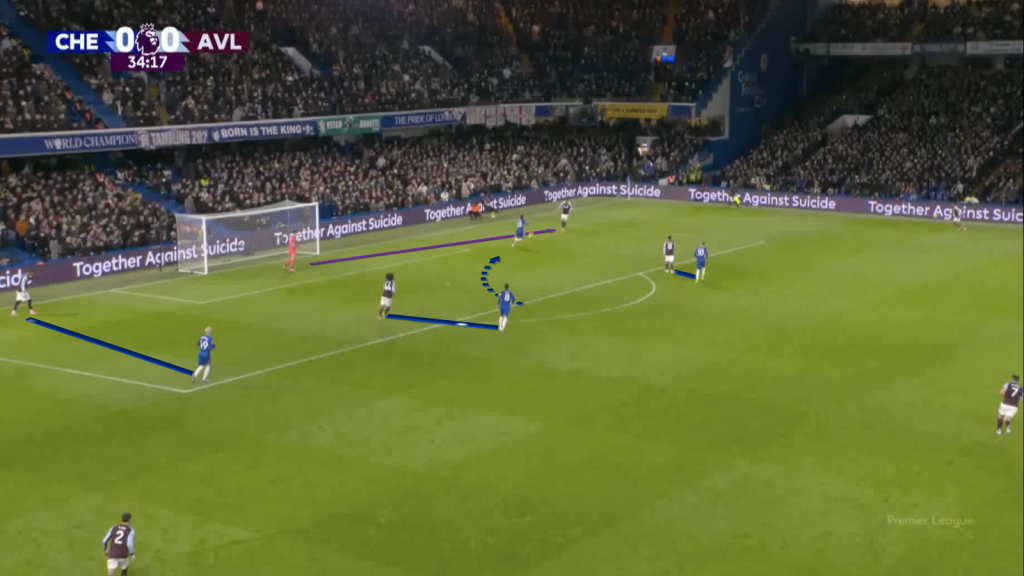
He was also, among his other teammates, involved in third-man combinations.
In the video above, there is congestion in the area around Palmer initially.
However, space opens up once he offloads the ball to Reece James and starts moving vertically.
His movement is masked by James’ passing to Caicedo, which attracts two Villa players to step up.
With a weighted first-touch pass from the defensive midfielder and impressive technical skill to bring it down from Palmer, the Englishman gets enough space to have a shot away.
Villa were relatively lethargic in closing these spaces down during the first half.
Chelsea First Half Defensive Performance
Maresca’s side pressed their opponents high, forcing them to either play one side or play long.
Whenever their opponents had static starts to their build-up, Chelsea pressed them to direct one side.
This usually entailed the striker (João Pedro) curving his pressing run once the goalkeeper found one of the centre-backs; his objective was to prevent the pass back to the goalkeeper, so as to go into the wide area.
Once the ball reached the wide area, the Blues committed numbers to squeeze them shut, which forced the opponents to either make quick decisions or play it long.

They committed as many as seven players in this instance.
There were situations in positive transition where Villa got isolated opportunities to create chances.
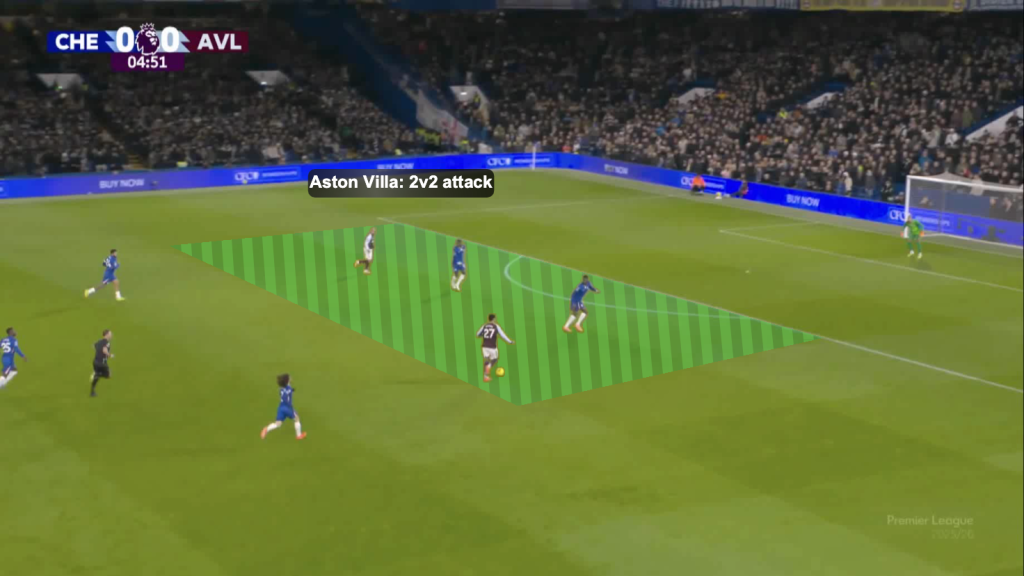
The visitors get a 2-v-2 attacking situation in transition.
However, they do not make full use of it.
Aston Villa Second Half Turnaround
A big part of Aston Villa’s comeback in the second half can be attributed to Unai Emery’s triple substitution at the hour mark, with the most influential one being Ollie Watkins.
Aston Villa Change In Formation
Having played 4-4-2 during the first half, they switched to a 4-3-3 with Onana operating as the single pivot.
This gave Kamara and Tielemans more freedom to go forward.
A three-man midfield also meant that there were more options and angles to play the ball into.
The advantages were evident as Villa began to penetrate Chelsea more often, even in the central channel.
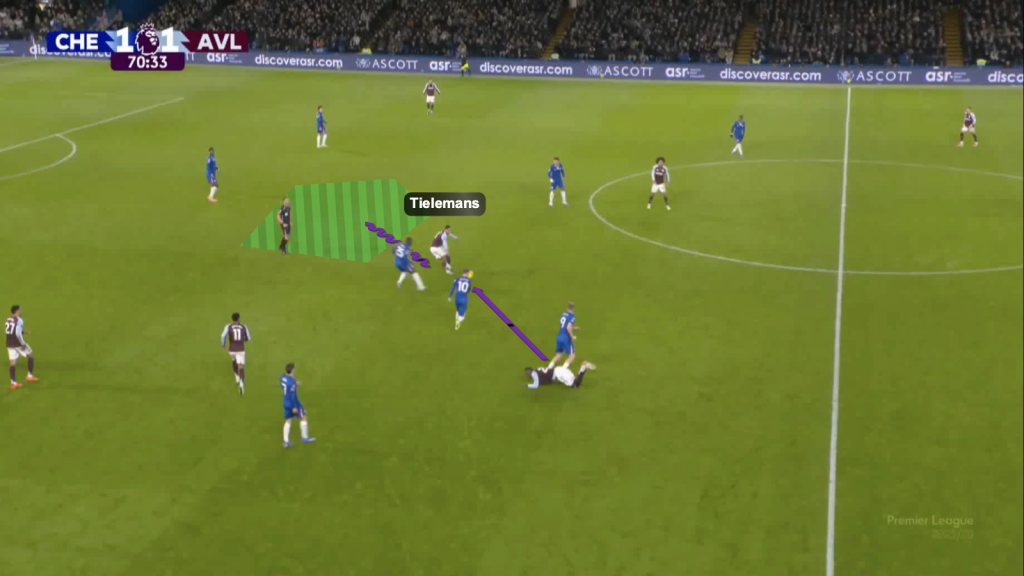
Chelsea left space between the lines, which Tielemans exploited as he turned into the space and carried the ball forward.
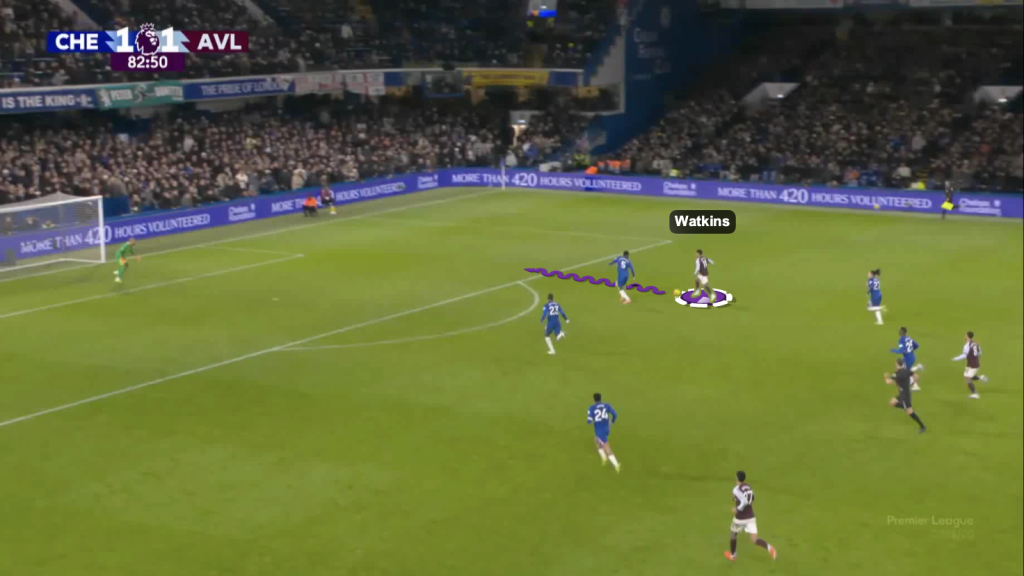
Aston Villa Runs In-Behind
The second half saw a lot more running in-behind from Emery’s players.
This was one of the first actions from Villa after Watkins came on.
The visitors play quick passes to progress the ball in transition.
Watkins’ movement is notable here, as he drifts wide and drags the Chelsea defender, which opens space for Kamara to make an underlapping run in-behind.
The striker releases the Frenchman, whose shot is saved by the Chelsea goalkeeper.
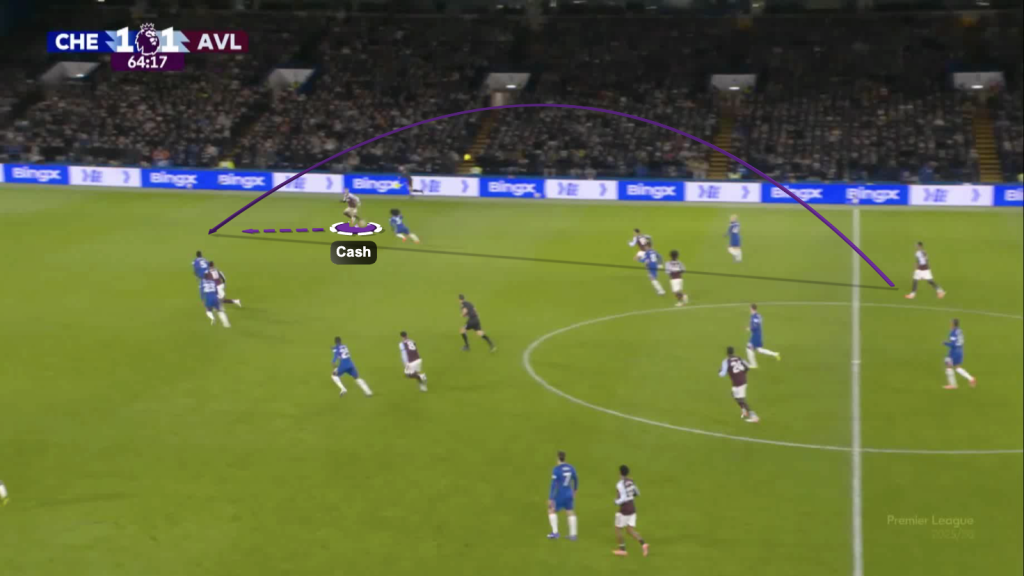
Cash makes a run in-behind.
Watkins was also immediately involved in forward runs after coming on.
![]()
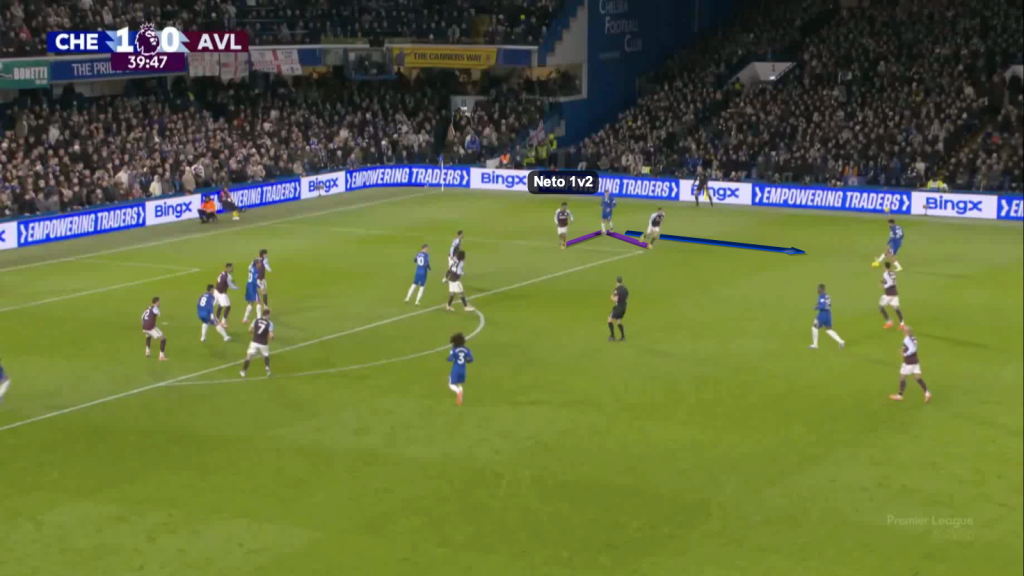
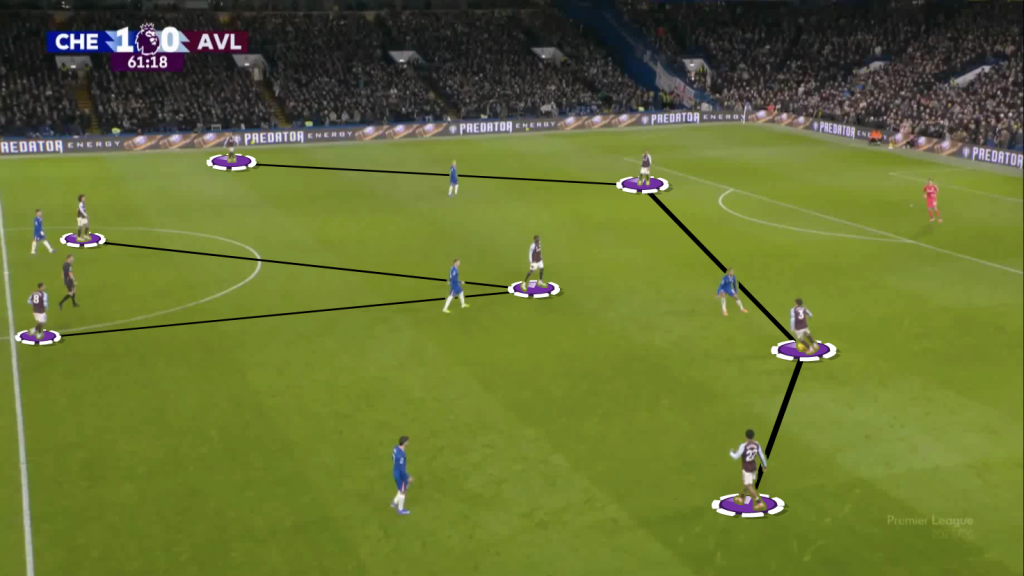
After they equalised, Villa attacked in numbers to find the winner.
They were keen on creating overloads to isolate Chelsea defenders.
In the example above, Rogers receives a pass from midfield, which puts him 1-v-1 with the opponent full-back.
Maatsen makes an overlapping run to ensure numerical advantage and receives the lay-off to get a shot on target.
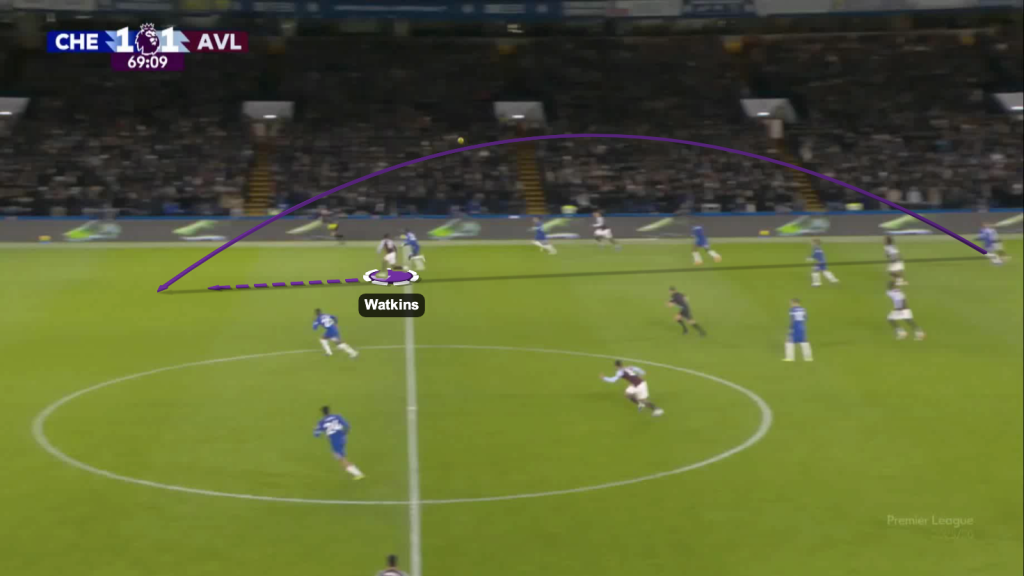
Ollie Watkins Goals
The equaliser came from a transition moment.
Chelsea lost the ball in an attempt to play vertically from a build-up situation in the defensive third.
The Blues’ effort to get back into a compact shape was futile, as Watkins received on his back foot to get past his direct opponent.
With his initial shot saved, he somehow managed to get it over the line.
This is the situation that led to the corner-kick, which handed Unai Emery the three points.
Watkins gets past the opposition centre-back and attempts to play a cut-back, which gets blocked and goes out of play.
Watkins starts from a deeper position and starts his movement as the ball is kicked from the corner.
He gives a slight nudge to his direct opponent, which gives him enough space and time for a free header.
Conclusion
The game was drastically different in the two halves, with Chelsea dominating possession and chances in the first half.
They failed to score more than once, which came back to bite them.
Aston Villa struck back in the second half; the impact came with a triple substitution, including the introduction of Ollie Watkins, whose influence not only brought goals but also more counterattacking opportunities.
Keeping the result aside, Chelsea displayed creativity, with multiple ideas to penetrate their opponents.
Meanwhile, Aston Villa focused their energy on finding runners in-behind, which paid off in the end.