Total Football Analysis
  • Football Analysis
    • Data Analysis
    • Formations
      • 2-2-4 Formation
      • 2-3-5 Formation
      • 3-1-4-2 Formation
      • 3-2-2-3 Formation
      • 3-2-4-1 Formation
      • 3-1-6 Formation
      • 3-3-4 Formation
      • 3-4-1-2 Formation
      • 3-4-2-1 Formation
      • 3-4-3 Formation
      • 3-5-1-1 Formation
      • 3-5-2 Formation
      • 4-1-4-1 Formation
      • 4-2-2-2 Formation
      • 4-2-3-1 Formation
      • 4-2-4 Formation
      • 4-3-1-2 Formation
      • 4-3-3 Formation
      • 4-4-2 Formation
      • 4-5-1 Formation
      • 5-3-2 Formation
      • 5-4-1 Formation
      • 6-3-1 Formation
    • Head Coach Analysis
    • Match Analysis
    • Player Analysis
    • Recruitment Analysis
    • Set Piece Analysis
    • Tactical Theory
    • Tactical Preview
    • Team Analysis
    • Training Analysis
    • Tactical Analysis
    • Scouting Report
  • Competition
    • ALL Competitions
    • English Premier League
    • Champions League
    • La Liga
    • Bundesliga
    • Serie A
    • Ligue 1
    • Eredivisie
    • EFL Championship
    • FIFA World Cup 2022
    • WEURO 2022
    • Women’s Super League
    • NWSL
    • Belgian First Division A
    • A-League
    • Liga Profesional de Argentina
    • Austrian Bundesliga
    • Campeonato Brasileiro Série A
    • DFB Pokal
    • 1. HNL
    • Danish Superliga
    • EFL League One
    • EFL League Two
    • FA Cup
    • EFL Cup
    • Indian Super League
    • K-League
    • J1 League
    • Liga MX
    • Copa América 2021
    • Copa del Rey
    • MLS
    • Eliteserien
    • Euro 2020
    • Primeira Liga
    • Scottish Premiership
    • Allsvenskan
    • Europa League
    • UEFA Nations League
    • Liga AUF Uruguaya
  • Coaches
    • All Coaches
    • Alfred Schreuder
    • Ange Postecoglou
    • Antonio Conte
    • Arne Slot
    • Bo Svensson
    • Brendan Rodgers
    • Bruno Lage
    • Carlo Ancelotti
    • Christophe Galtier
    • Claude Puel
    • Claudio Ranieri
    • David Moyes
    • Dean Smith
    • Diego Simeone
    • Domenico Tedesco
    • Frank Lampard
    • Eddie Howe
    • Edin Terzić
    • Emma Hayes
    • Erik ten Hag
    • Ernesto Valverde
    • Gennaro Gattuso
    • Gerardo Seoane
    • Gian Piero Gasperini
    • Giovanni van Bronckhorst
    • Graham Potter
    • Igor Tudor
    • Imanol Alguacil
    • Jesse Marsch
    • Jonas Eidevall
    • Jorge Sampaoli
    • José Bordalás
    • José Mourinho
    • Julen Lopetegui
    • Julian Nagelsmann
    • Julien Stéphan
    • Jürgen Klopp
    • Luciano Spalletti
    • Lucien Favre
    • Manuel Pellegrini
    • Marcelo Bielsa
    • Marco Rose
    • Marco Silva
    • Massimiliano Allegri
    • Mauricio Pochettino
    • Maurizio Sarri
    • Mikel Arteta
    • Niko Kovač
    • Nuno Espírito Santo
    • Oliver Glasner
    • Patrick Vieira
    • Paulo Fonseca
    • Pep Guardiola
    • Peter Bosz
    • Rafa Benítez
    • Ralf Rangnick
    • Ralph Hasenhüttl
    • Roger Schmidt
    • Roy Hodgson
    • Sean Dyche
    • Sérgio Conceição
    • Simone Inzaghi
    • Sonia Bompastor
    • Stefano Pioli
    • Steffen Baumgart
    • Steven Gerrard
    • Thiago Motta
    • Thomas Frank
    • Thomas Tuchel
    • Unai Emery
    • Vincenzo Italiano
    • Xavi
  • Teams
    • ALL Teams
    • AC Milan
    • Ajax Amsterdam
    • Arsenal
    • AS Monaco FC
    • Atalanta
    • Atlético Madrid
    • FC Barcelona
    • FC Bayern Munich
    • Borussia Dortmund
    • Celtic FC
    • Chelsea FC
    • Everton F.C.
    • Inter Milan
    • Juventus F.C.
    • Leeds United F.C.
    • Liverpool FC
    • Manchester City
    • Manchester United FC
    • Paris Saint-Germain
    • Rangers FC
    • RB Leipzig
    • Real Madrid CF
    • Tottenham Hotspur
    • West Ham United
  • Players
    • ALL Players
    • Alisson Becker
    • Bukayo Saka
    • Erling Haaland
    • Harry Kane
    • Jack Grealish
    • John Stones
    • Julián Alvarez
    • Kalvin Phillips
    • Kevin De Bruyne
    • Kyle Walker
    • Kylian Mbappé
    • Lamine Yamal
    • Lionel Messi
    • Luis Díaz
    • Mohamed Salah
    • Phil Foden
    • Virgil Van Dijk
  • Guides
    • Best Betting Sites
      • World Cup Betting Sites
      • World Cup Free Bets
      • World Cup Betting Promotions
      • Betting Sites Not on GamStop
      • European Bookmakers
      • Betting Apps
      • Footbal Betting Sites
      • New Betting Sites
      • Betting Bonuses
      • Free Bets
    • Online Casinos
      • Non GamStop Casinos
      • Crypto Casinos
      • Offshore Casinos
      • Real Money Slots
  • Contact
No Result
View All Result
No Result
View All Result
Total Football Analysis
No Result
View All Result
Home Analysis Formations 4-2-3-1 Formation

Brentford Vs Chelsea [2-2] Premier League 2025/2026: Enzo Maresca Midfield Patterns & Defensive Weaknesses – Tactical Analysis

Vedant Kharakwal by Vedant Kharakwal
September 16, 2025
in 4-2-3-1 Formation, 5-3-2 Formation, Analysis, Brentford FC, Chelsea FC, Cole Palmer, Enzo Fernández, Enzo Maresca, Facundo Buonanotte, João Pedro, Jordan Henderson, Jorrel Hato, Keith Andrews, Marc Cucurella, Match Analysis, Moisés Caicedo, Premier League, Reece James, Tactical Analysis, Wesley Fofana
0
Brentford Vs Chelsea 20252026

Brentford hosted Chelsea in matchweek 4 of the 2025/2026 Premier League season, which ended in a 2-2 draw.

However, this matchup was far from monotonous, as fans witnessed end-to-end action; with four goals on the night, the fixture delivered on its promise to be exciting.

The Bees opened the scoring without reply in the first half.

However, the visitors made a riveting comeback by scoring two in the space of 25 minutes, only to be stunned by a late equaliser in additional time.

There are positive takeaways for Enzo Maresca from this game, especially with the introduction of a few new faces.

He will be disappointed by the result, as his side drops points for the second time this season.

Through this Brentford vs Chelsea tactical analysis, we aim to understand how the Blues operated against Keith Andrews tactics and shed some light on the tactical features of the game.

Brentford Vs Chelsea Lineups & Formations

Let’s start by looking at how Keith Andrews and Enzo Maresca fielded their squads.

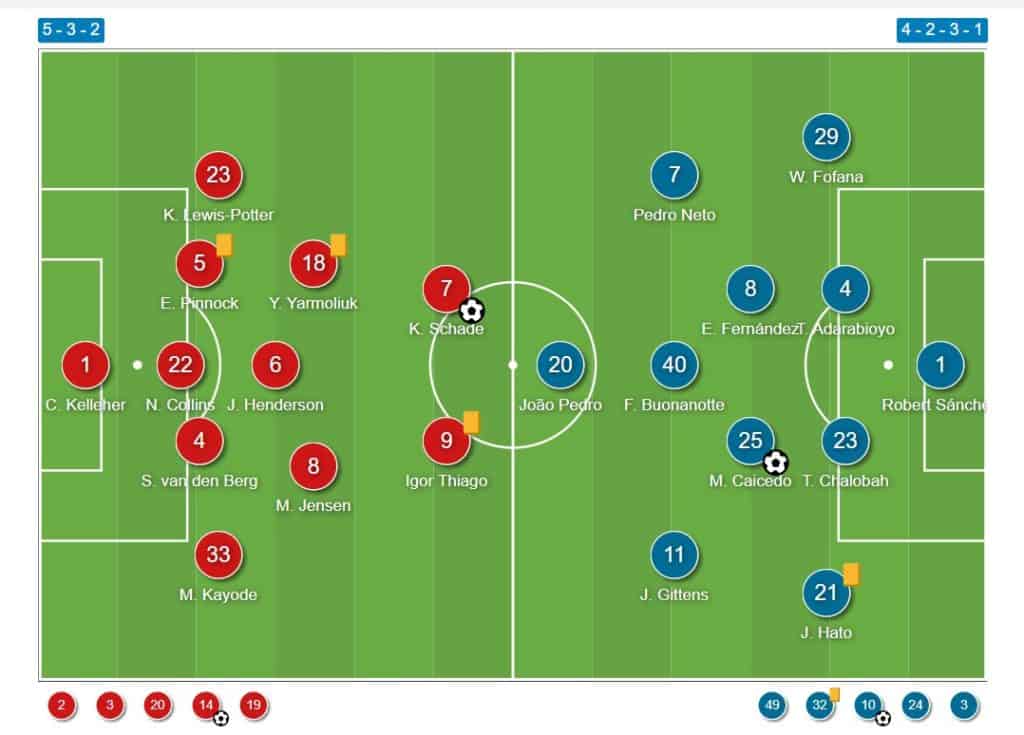
Brentford Lineup Vs Chelsea

The hosts, Brentford, played in a 5-3-2 formation.

Caoimhin Kelleher started in goal.

The back five had Michael Kayode (right wing-back), Sepp van den Berg (right centre-back), skipper Nathan Collins (central centre-back), Ethan Pinnock (left centre-back), and Keane Lewis-Potter (left wing-back).

Kristoffer Ajer (83′) and Fabio Carvalho (90′) replaced Pinnock and Lewis-Potter, respectively.

The midfield had Jordan Henderson as the defensive midfielder, and Mathias Jensen and Yehor Yarmolyuk as centre-midfielders.

Jensen was taken off for Dango Ouattara after 73 minutes.

Igor Thiago and Kevin Schade operated as the two strikers.

Thiago was replaced by Rico Henry in the 73rd minute.

Chelsea Lineup Vs Brentford

The visitors, Chelsea, played in a 4-2-3-1 formation.

Robert Sánchez played between the sticks right behind a back four of Wesley Fofana (right-back), Tosin Abarabioyo (right centre-back), Trevoh Chalobah (left centre-back), and Jorrel Hato (left-back).

Both fullbacks were replaced in the 46th minute by Reece James (right-back) and Marc Cucurella (left-back).

Skipper Enzo Fernández and Moisés Caicedo played as the double pivot.

The front four comprised Pedro Neto (right-winger), Facundo Buonanotte (centre attacking midfielder), Jamie Gittens (left-winger), and João Pedro (striker).

Tyrique George replaced Buonanotte at the 46th minute mark, Cole Palmer came on for Gittens after 56 minutes, and Alejandro Garnacho came on for João Pedro in the 79th minute.

Chelsea Attacking Tactics

In this section, we will look at the attacking features of Chelsea’s play.

Chelsea Build-Up Positioning & Progression

Although they were deployed in a 4-2-3-1, Chelsea’s shape in build-up was different.

With staggered fullbacks, they operated with a back three.

The right-back (Fofana) stayed deep to play as a third centre-back.

Meanwhile, Hato (left-back) pushed higher up to operate in the half-space.

Chelsea build-up

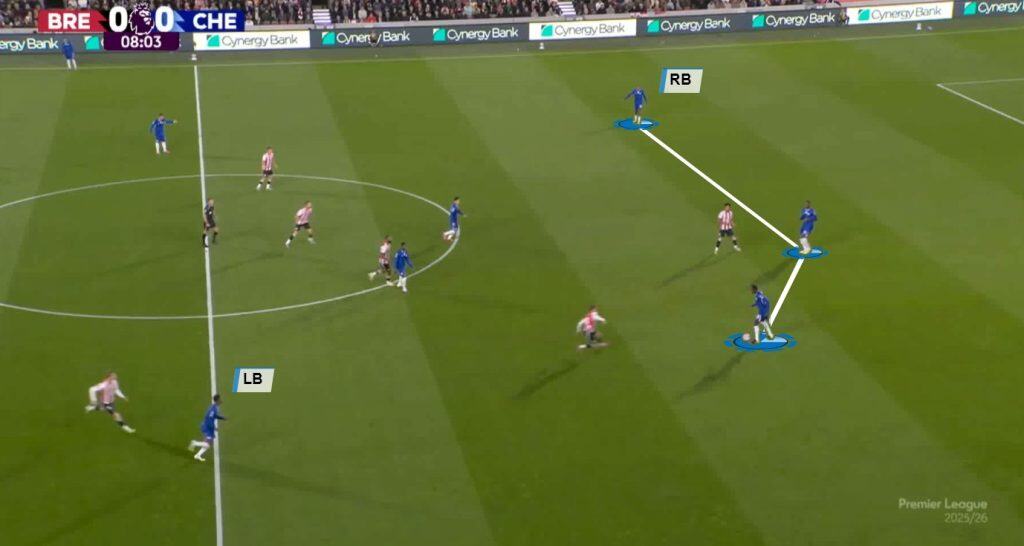
We can see the same in the image given here.

Tosin Abarabioyo takes the central role in the back three as Hato pushes up.

The midfield three are also visible in the frame, with the double pivot deeper than the attacking midfielder (Buonanotte).

However, Buonanotte was not always higher up.

He often dropped deep to receive inside small pockets of space.

Here, the Argentinian drops in his own half to receive in a pocket.

This meant that Enzo Fernández and Moisés Caicedo were not fixed to being the deepest midfielders at all times.

It opened the room for positional rotations in midfield.

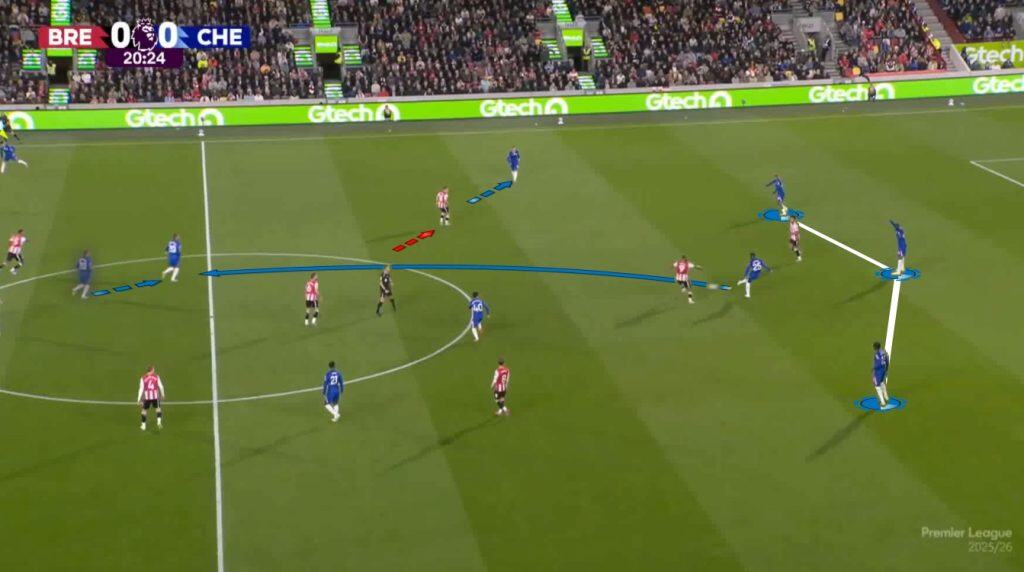
This is the moment when Enzo Fernández started drifting wider towards the right.

With Neto hugging the touchline higher up and Fofana operating as a third centre-back, the captain occupied the space in between to circulate the ball.

Here, Enzo can be seen operating in the half-space.

Fofana (right-back) operates deeper, while Hato (left-back) is positioned higher up in the left half-space.

As the skipper drifted off-centre, Caicedo had to sit deep and act as the anchor above the defenders.

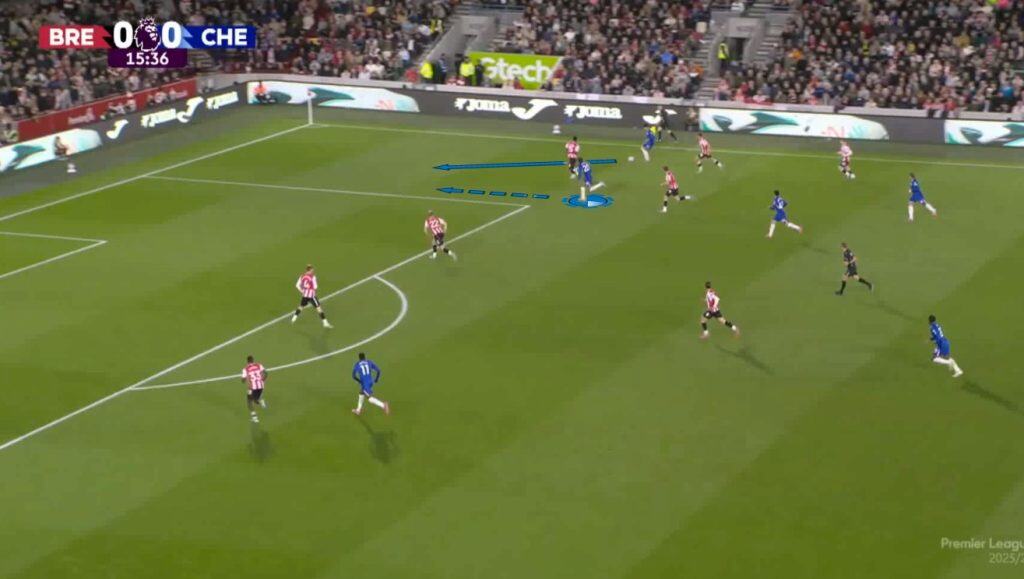
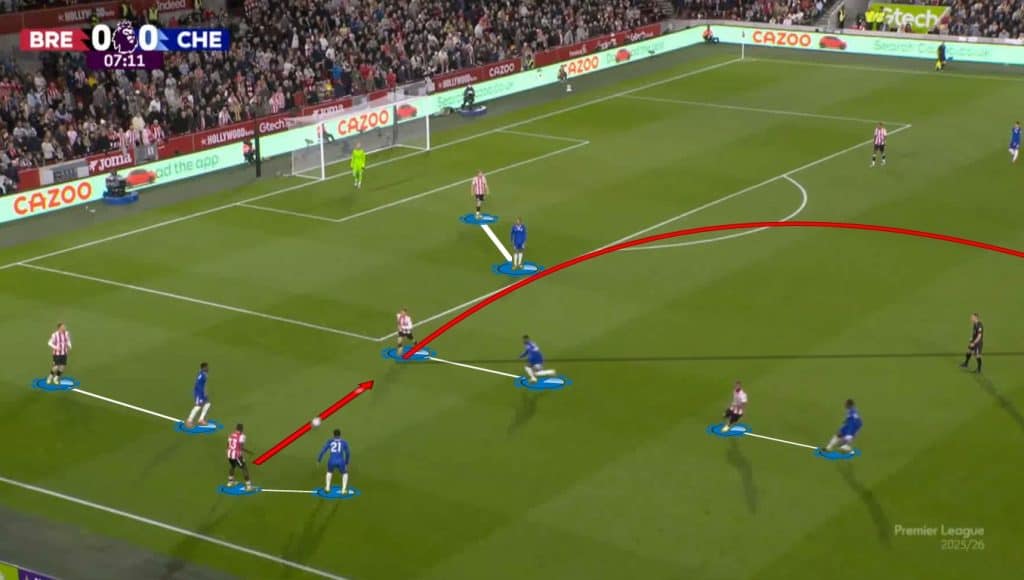
Since Enzo operated more in the half-space, he often attracted opponents to follow him into that zone, opening up a vertical passing lane in the central channel.

This was an opportunity to cherish for João Pedro, who prefers dropping deep to help out in the possession phase.

Here is an example: Enzo peeling wide attracts an opponent.

The passing lane from Caicedo to João Pedro is open, which is exploited quickly.

The Brazilian striker dropped not only centrally but also in the half-spaces.

Having such heavy involvement from a striker is what gives Chelsea a lot of variation in attack.

Here, we can see João Pedro dropping into the left half-space.

When he dropped out of his striker position, other players like Buonanotte or Hato would occupy his position.

These rotations created confusion for the Brentford defenders.

This, in turn, made it simpler for Chelsea to penetrate the first two lines of pressure.

Numerical Superiority In Midfield

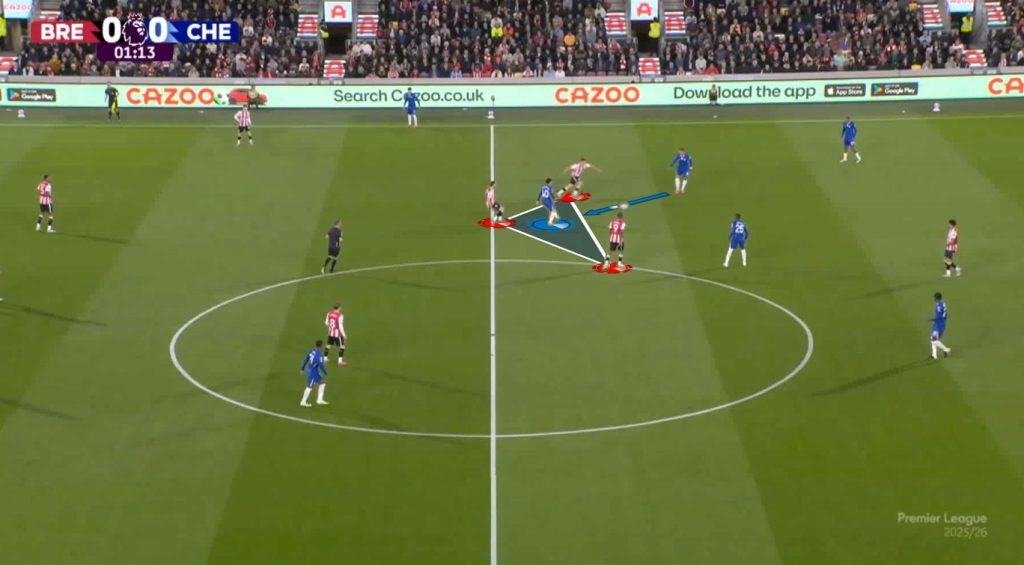
Chelsea displayed a constant trend of overloading the midfield third.

With the full-backs inverting and the striker dropping, it became tedious for the Brentford midfielders to keep track.

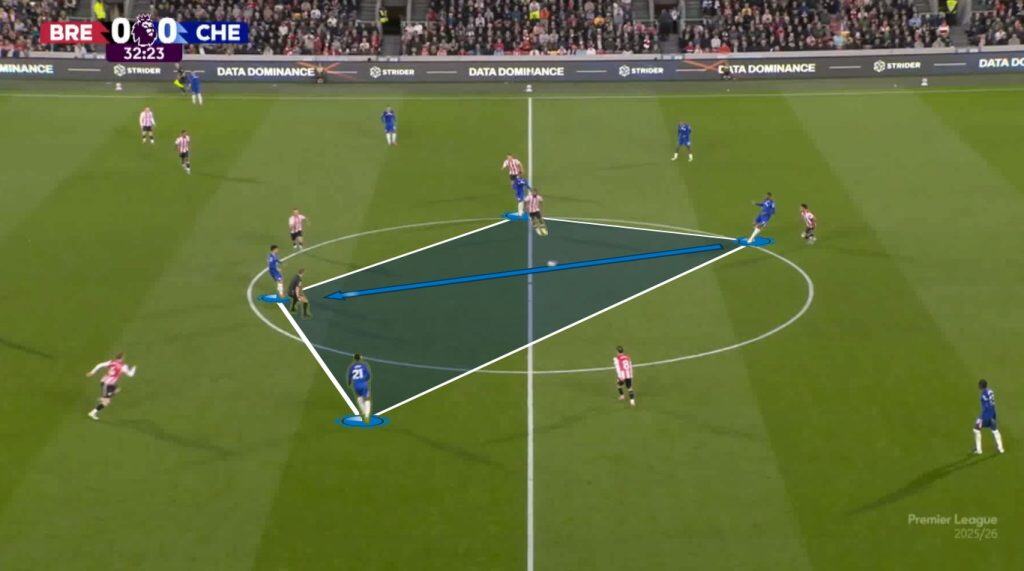
It was very common for these diamonds to be formed in the middle of the park.

As the players on the sides of the diamond stretched the Brentford midfield, the vertical pass to the central player dropping in was very prominently seen.

When Reece James came on in the second half, he took the double pivot spot alongside Caicedo, as Enzo was wider regularly.

As Cucurella also slotted in the left half-space, it kept the central numbers a significant advantage for the Blues.

Here is another Chelsea diamond with Reece James at the base.

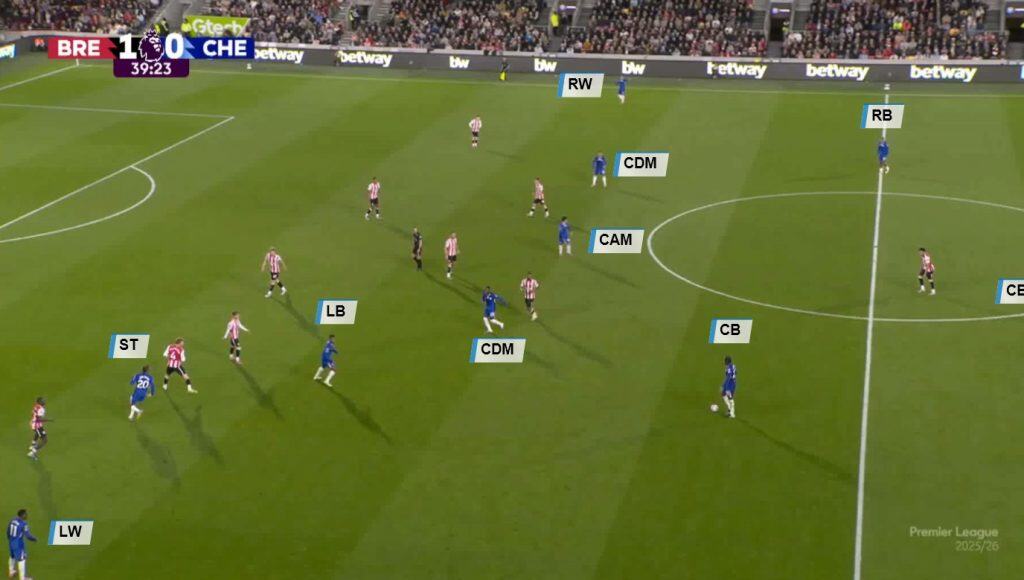
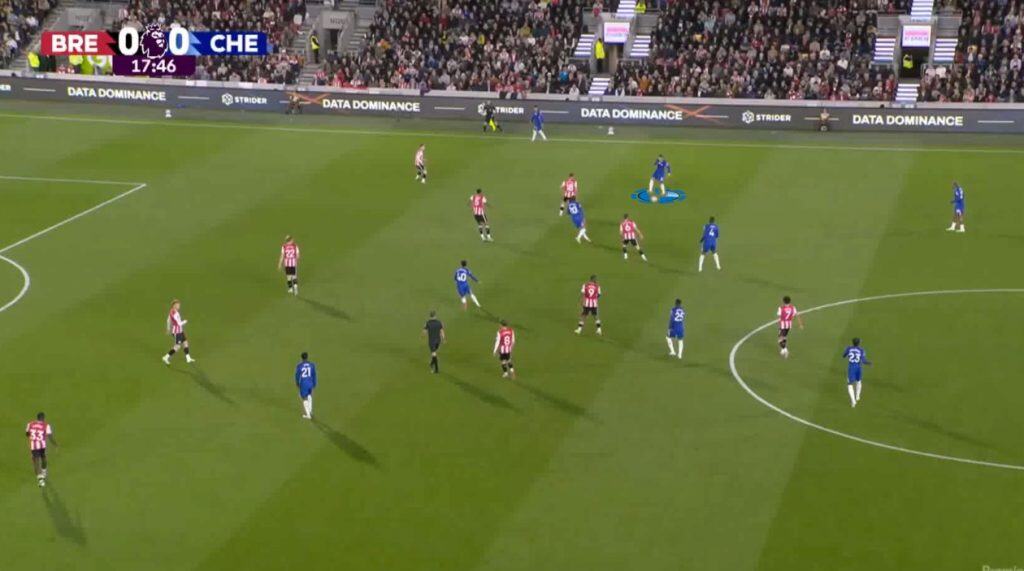
Here, we can see the positioning of Chelsea players in possession.

The wingers are offering width; the fullbacks have occupied the half-spaces in staggered positioning.

The midfield three are all in the central channel.

Meanwhile, the striker floats around and occupies pockets of space.

This setup gives Chelsea a lot of superiority in terms of progression.

It was difficult for Brentford to track all the players, as doing so would disrupt their defensive structure.

Entering The Attacking Third

As much as they achieved progression, Chelsea were inconsistent in entering Brentford’s penalty area to create high-quality chances.

However, they found ways to make final third entries.

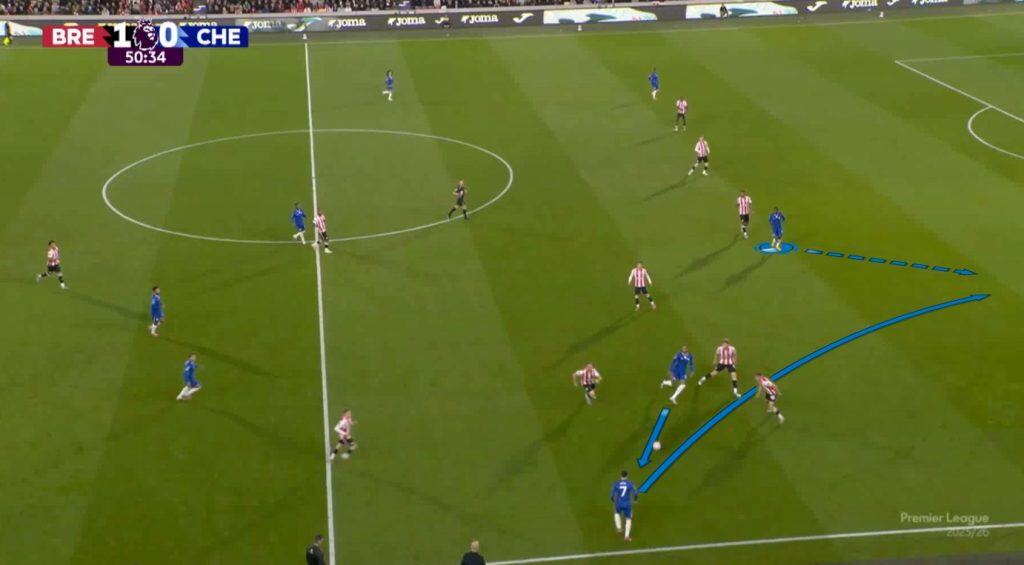
Playing third-man passes was a common trend to achieve progression.

They used it to find runners in-behind as well.

In the example above, we can see a third-man combination.

João Pedro plays it to Pedro Neto, who plays a first-time ball-behind for Tyrique George, who is making a diagonal run into the half-space.

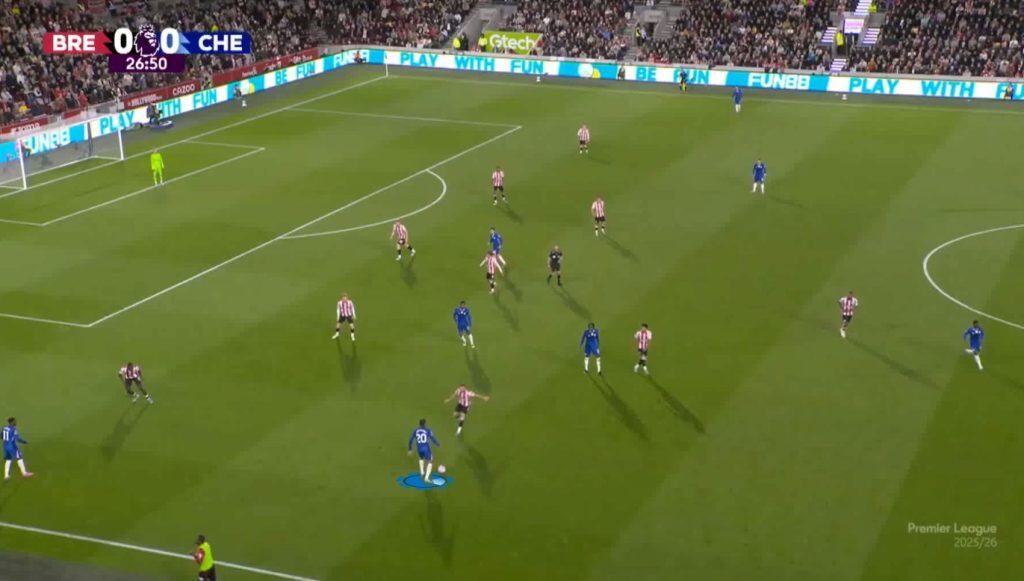
Runs like these helped Chelsea in getting more crosses into the box.

João Pedro was an active runner and was significantly dynamic in Chelsea’s attacking and possession moments.

Here, he is making a half-space run in the final third.

This also contributed to a crossing opportunity.

Chelsea Goal Moments

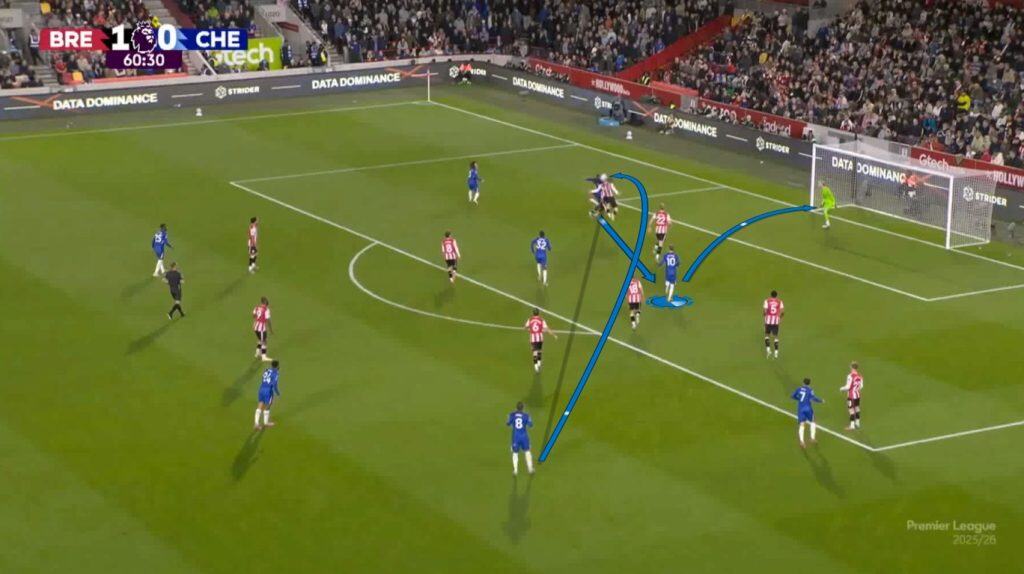
Here is the first goal from Chelsea; Enzo plays a cross from the edge of the box to find João Pedro, who heads it down to Cole Palmer.

The latter wastes no time in finding the net.

This was made possible due to the pull of João Pedro.

As the cross is played, the Brentford defenders move to cover the space near him.

This leaves Palmer with enough space and time once the ball drops at his feet.

Let us understand how Caicedo scored this goal.

Chelsea players made sure to swarm the Brentford box with numbers whenever they got the ball in a good crossing position.

This affected their opponents as they dropped to mark all the Chelsea players inside their penalty area.

This left enough space in zone 14 for any late runners.

Here, Caicedo gets onto a second ball, which is a headed clearance from a Brentford defender.

As none of the opponents are close enough to put pressure on him, he takes the chance and smashes it into the goal to hand his side the lead.

Chelsea Defending Tactics

In this section, we will examine the defensive aspects of Chelsea’s play.

Defending In Opponent Half

Chelsea attempted to press their opponents high, hoping to force them into playing long.

In this image, Brentford’s midfielder is being closed down.

Since all the nearby options are blocked off, he is forced to play long.

However, the pressing structure was not air-tight at all times.

There were several times when Chelsea’s lines of pressure were not connected.

Brentford exploited this on multiple occasions.

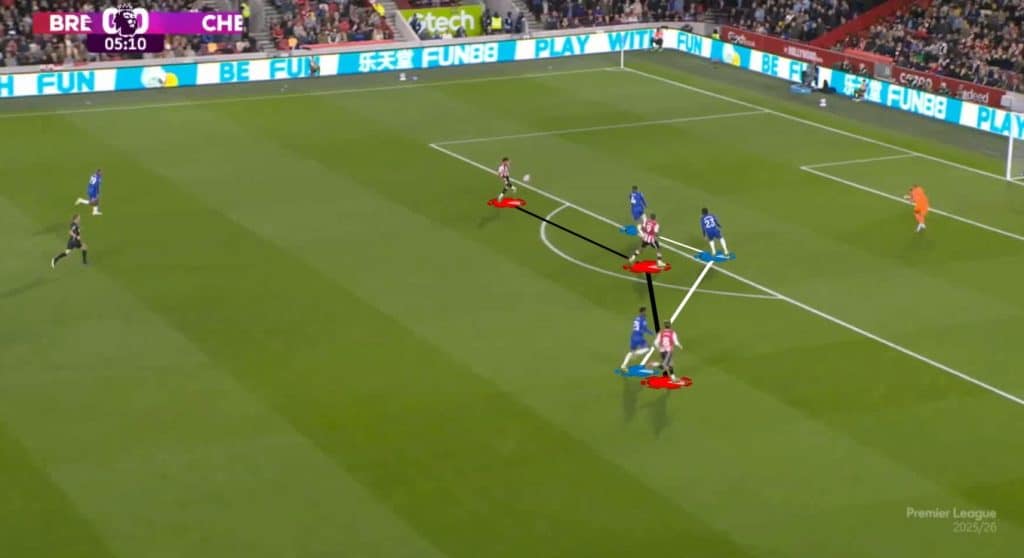
Here, the Blues have their first line of pressure high into their opponent’s box.

However, the second line of pressure is not connected.

The Brentford midfielder receives and progresses with ease.

This was the issue in Brentford’s first goal.

https://totalfootballanalysis.com/wp-content/uploads/2025/09/Brentford-I-goal.mp4

Here, Jordan Henderson receives the ball with little pressure from Chelsea.

He gets enough time to play a long ball to Kevin Schade, who gets past his direct opponent to slot it into the far corner.

If Chelsea’s second line of pressure had been tighter, Henderson would have played a different and less dangerous pass.

This issue persisted even in the midfield third.

This is why Chelsea failed to take the pace out of the game.

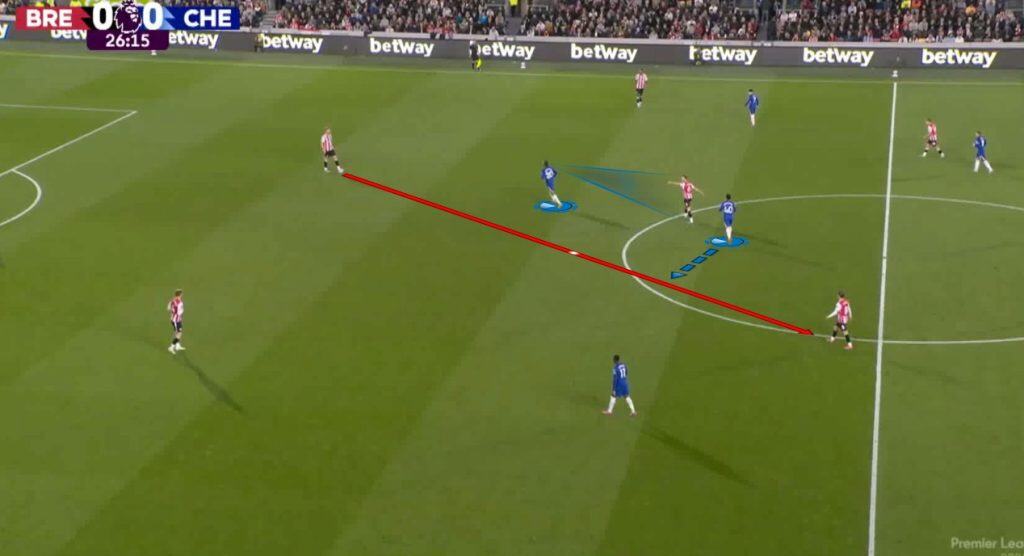
Here is an example: João Pedro has kept Henderson in his cover shadow.

Therefore, there is no need for Buonanotte to be on his blindside.

Instead, he should be sliding left to cut a different passing lane.

However, he fails to realise it in time, and the pass is played, which takes out four Chelsea players from the game.

Inconsistencies like these will cost them against tougher opponents, especially in the UEFA Champions League.

The front four should refrain from pressing if the second line of pressure is disconnected.

Defending In Own Half

Maresca’s side had a few lapses in terms of defending in their own half.

Since Brentford preferred playing long balls for quick attacks, the tracking back from Chelsea’s outfield players left more to be desired.

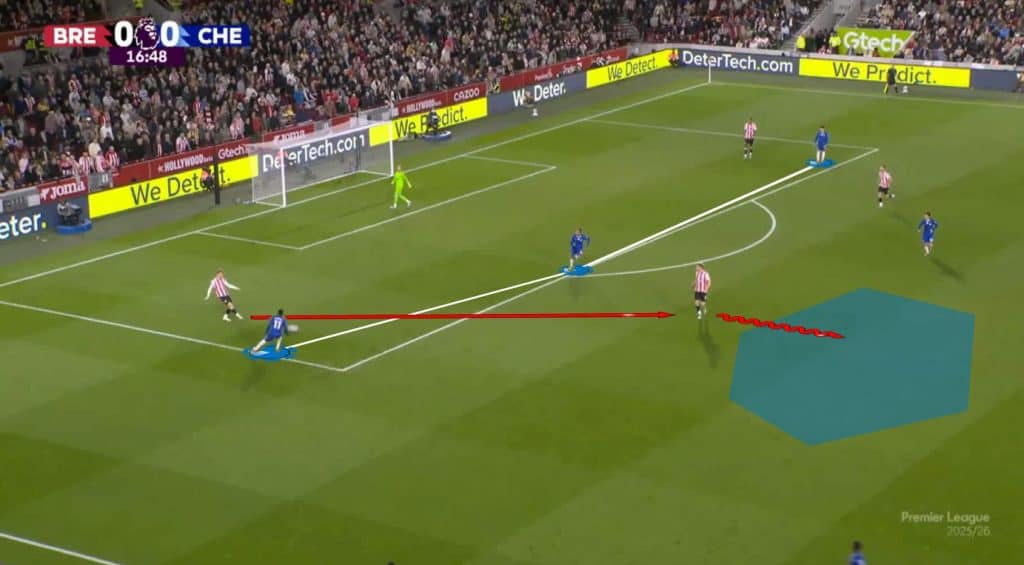
Here is an implication of this.

Since there is a gap between the lines, a long ball from Brentford puts their attackers in a 3-v-3 with Chelsea’s defenders.

In such isolated situations with the amount of space, the attacking team is usually at an advantage.

This is another factor why the game was moving so fast in the dying stages.

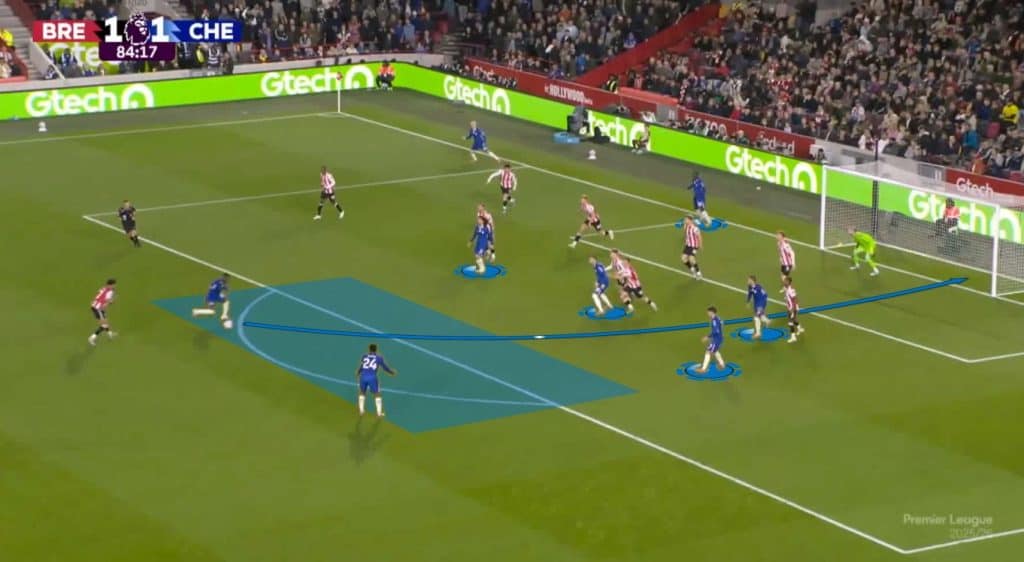
The Brentford defenders’ decision to crowd up for a cross was a mistake that led to Palmer’s goal.

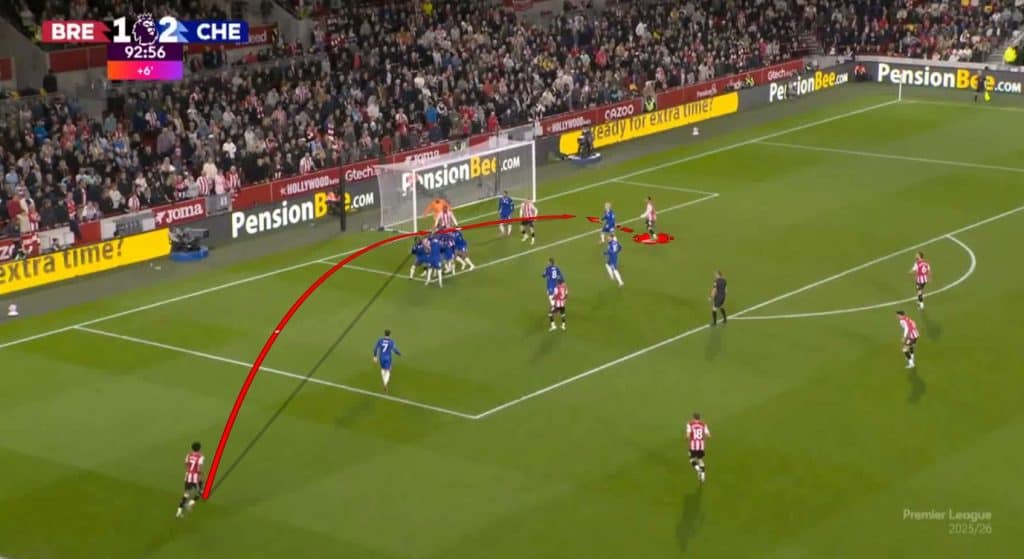
This is what happened in the build-up to Brentford’s equaliser as well.

As the cross is played in, multiple Chelsea defenders flock at the near post, but are unable to prevent the flick-on.

None of them tracks Fabio Carvalho emerging at the far post, as he manages to be on everyone’s blindside.

Conclusion

Chelsea had interesting patterns in possession, achieving consistent progression through positional rotations and overloads in the midfield third.

Although not getting a large number of penalty area entries, they managed to score two goals, owing to deficits in Brentford’s defending.

However, Enzo Maresca’s side were inconsistent defensively, with their first and second lines of press being disconnected; they were frequently penetrated and exploited by their opponents.

Their inability to control the pace of the game ultimately cost them, as Brentford scored a late equaliser to share the points.

Tags: 4-2-3-1 Formation4-2-3-1 Tactics5-3-2 FormationBrentfordBrentford TacticsBrentford Vs ChelseaChelseaChelsea Attacking TacticsChelsea Defending TacticsChelsea TacticsEnzo MarescaEnzo Maresca TacticsFacundo Buonanotte AnalysisKeith AndrewsKeith Andrews TacticsPremier League AnalysisPremier League TacticsTactical Analysis
Previous Post

Jamie Vardy Scout Report At Cremonese 2025/2026: Can The 38 Year Old Leicester City Legend Thrive In Serie A? – Player Analysis

Next Post

August De Wannemacker Scout Report At Jong Genk 2025/2026: The Next Kevin De Bruyne In The Making? – Player Analysis

Next Post
August De Wannemacker Scout Report At Jong Genk 2025/2026: The Next Kevin De Bruyne In The Making? – Player Analysis

August De Wannemacker Scout Report At Jong Genk 2025/2026: The Next Kevin De Bruyne In The Making? – Player Analysis

Premier League tactical clusters data visualization showing three team archetypes

Premier League Tactical Archetypes: What Clustering Reveals

June 4, 2026
PSG’s Control Of Arsenal In The Champions League Final – Tactical Analysis

PSG’s Control Of Arsenal In The Champions League Final – Tactical Analysis

June 3, 2026
Femi Azeez

Femi Azeez Scout Report At Millwall 2025/2026: A High-Output Transition Winger – Player Analysis

April 17, 2026
  • About Total Football Analysis
  • Contact Total Football Analysis
  • Advertise
  • Privacy Policy
  • Cancellation / Refund Policy
  • Resources
  • Terms Of Service

© 2026 Total Football Analysis

No Result
View All Result
  • Football Analysis
    • Data Analysis
    • Formations
      • 2-2-4 Formation
      • 2-3-5 Formation
      • 3-1-4-2 Formation
      • 3-2-2-3 Formation
      • 3-2-4-1 Formation
      • 3-1-6 Formation
      • 3-3-4 Formation
      • 3-4-1-2 Formation
      • 3-4-2-1 Formation
      • 3-4-3 Formation
      • 3-5-1-1 Formation
      • 3-5-2 Formation
      • 4-1-4-1 Formation
      • 4-2-2-2 Formation
      • 4-2-3-1 Formation
      • 4-2-4 Formation
      • 4-3-1-2 Formation
      • 4-3-3 Formation
      • 4-4-2 Formation
      • 4-5-1 Formation
      • 5-3-2 Formation
      • 5-4-1 Formation
      • 6-3-1 Formation
    • Head Coach Analysis
    • Match Analysis
    • Player Analysis
    • Recruitment Analysis
    • Set Piece Analysis
    • Tactical Theory
    • Tactical Preview
    • Team Analysis
    • Training Analysis
    • Tactical Analysis
    • Scouting Report
  • Competition
    • ALL Competitions
    • English Premier League
    • Champions League
    • La Liga
    • Bundesliga
    • Serie A
    • Ligue 1
    • Eredivisie
    • EFL Championship
    • FIFA World Cup 2022
    • WEURO 2022
    • Women’s Super League
    • NWSL
    • Belgian First Division A
    • A-League
    • Liga Profesional de Argentina
    • Austrian Bundesliga
    • Campeonato Brasileiro Série A
    • DFB Pokal
    • 1. HNL
    • Danish Superliga
    • EFL League One
    • EFL League Two
    • FA Cup
    • EFL Cup
    • Indian Super League
    • K-League
    • J1 League
    • Liga MX
    • Copa América 2021
    • Copa del Rey
    • MLS
    • Eliteserien
    • Euro 2020
    • Primeira Liga
    • Scottish Premiership
    • Allsvenskan
    • Europa League
    • UEFA Nations League
    • Liga AUF Uruguaya
  • Coaches
    • All Coaches
    • Alfred Schreuder
    • Ange Postecoglou
    • Antonio Conte
    • Arne Slot
    • Bo Svensson
    • Brendan Rodgers
    • Bruno Lage
    • Carlo Ancelotti
    • Christophe Galtier
    • Claude Puel
    • Claudio Ranieri
    • David Moyes
    • Dean Smith
    • Diego Simeone
    • Domenico Tedesco
    • Frank Lampard
    • Eddie Howe
    • Edin Terzić
    • Emma Hayes
    • Erik ten Hag
    • Ernesto Valverde
    • Gennaro Gattuso
    • Gerardo Seoane
    • Gian Piero Gasperini
    • Giovanni van Bronckhorst
    • Graham Potter
    • Igor Tudor
    • Imanol Alguacil
    • Jesse Marsch
    • Jonas Eidevall
    • Jorge Sampaoli
    • José Bordalás
    • José Mourinho
    • Julen Lopetegui
    • Julian Nagelsmann
    • Julien Stéphan
    • Jürgen Klopp
    • Luciano Spalletti
    • Lucien Favre
    • Manuel Pellegrini
    • Marcelo Bielsa
    • Marco Rose
    • Marco Silva
    • Massimiliano Allegri
    • Mauricio Pochettino
    • Maurizio Sarri
    • Mikel Arteta
    • Niko Kovač
    • Nuno Espírito Santo
    • Oliver Glasner
    • Patrick Vieira
    • Paulo Fonseca
    • Pep Guardiola
    • Peter Bosz
    • Rafa Benítez
    • Ralf Rangnick
    • Ralph Hasenhüttl
    • Roger Schmidt
    • Roy Hodgson
    • Sean Dyche
    • Sérgio Conceição
    • Simone Inzaghi
    • Sonia Bompastor
    • Stefano Pioli
    • Steffen Baumgart
    • Steven Gerrard
    • Thiago Motta
    • Thomas Frank
    • Thomas Tuchel
    • Unai Emery
    • Vincenzo Italiano
    • Xavi
  • Teams
    • ALL Teams
    • AC Milan
    • Ajax Amsterdam
    • Arsenal
    • AS Monaco FC
    • Atalanta
    • Atlético Madrid
    • FC Barcelona
    • FC Bayern Munich
    • Borussia Dortmund
    • Celtic FC
    • Chelsea FC
    • Everton F.C.
    • Inter Milan
    • Juventus F.C.
    • Leeds United F.C.
    • Liverpool FC
    • Manchester City
    • Manchester United FC
    • Paris Saint-Germain
    • Rangers FC
    • RB Leipzig
    • Real Madrid CF
    • Tottenham Hotspur
    • West Ham United
  • Players
    • ALL Players
    • Alisson Becker
    • Bukayo Saka
    • Erling Haaland
    • Harry Kane
    • Jack Grealish
    • John Stones
    • Julián Alvarez
    • Kalvin Phillips
    • Kevin De Bruyne
    • Kyle Walker
    • Kylian Mbappé
    • Lamine Yamal
    • Lionel Messi
    • Luis Díaz
    • Mohamed Salah
    • Phil Foden
    • Virgil Van Dijk
  • Guides
    • Best Betting Sites
      • World Cup Betting Sites
      • World Cup Free Bets
      • World Cup Betting Promotions
      • Betting Sites Not on GamStop
      • European Bookmakers
      • Betting Apps
      • Footbal Betting Sites
      • New Betting Sites
      • Betting Bonuses
      • Free Bets
    • Online Casinos
      • Non GamStop Casinos
      • Crypto Casinos
      • Offshore Casinos
      • Real Money Slots
  • Contact
  • Login

© 2026 Total Football Analysis