Borussia Dortmund started their 2025/2026 Bundesliga campaign dropping points against St. Pauli.
However, they’ve kicked on for the second matchday by recording a comfortable three-nil victory over Union Berlin.
This win took Die Schwarzgelben to fourth place on the table, exactly where they finished the previous season after an impressive uphill climb.
Niko Kovač fielded a slightly different lineup with a change in formation, which paid off for the Croatian manager.
Filippo Mané, who saw red during the last game, was replaced at right centre-back.
The midfield was also altered, resulting in a single-striker setup.
Union will be disappointed.
They started their season with a narrow win over the DFB-Pokal champions, VfB Stuttgart.
A loss means that they need to regroup and find solutions for their upcoming tie against TSG Hoffenheim.
Through this Borussia Dortmund vs Union Berlin tactical analysis, we aim to understand how Borussia Dortmund were able to defeat Union Berlin.
Borussia Dortmund Vs Union Berlin Lineups & Formations
Let us have a look at how Niko Kovač and Steffen Baumgart fielded their squads.

The winners, BVB, played in a 3-4-3 formation.
Gregor Kobel started between the sticks, with a back three of Aaron Anselmino (right centre-back), Waldemar Anton (central centre-back), and Ramy Bensebaini (left centre-back).
Julian Ryerson came on for Anselmino in the 76th minute.
The midfield had Yan Couto (right wing-back) and Daniel Svensson (left wing-back) as the wide players, and Marcel Sabitzer and Jobe Bellingham as the centre-midfielders.
The centre-midfielders were replaced by Felix Nmecha (71’) and Pascal Groß (86’).
Nmecha scored the third goal for BVB.
The front three comprised skipper Julian Brandt (right-winger), Maximilian Beier (left-winger), and Serhou Guirassy (striker).
Beier was subbed off for Carney Chukwuemeka in the 77th minute, and Karim Adeyemi came on for Guirassy in the 87th minute.
Union Berlin played in a 5-3-2 formation.
In goal was Frederik Rønnow, right behind the back five of skipper Christopher Trimmel (right wing-back), Danilho Doekhi (right centre-back), Leopold Querfeld (central centre-back), Tom Rothe (left centre-back), and Robert Skov (left wing-back).
Both the wing-backs were replaced by Tim Skarke (64’) and Derrick Köhn (70’).
The midfield consisted of Rani Khedira (centre defensive midfielder), Janik Haberer, and Alex Král.
Jeong Woo-yeong came on for Alex Král in the 64th minute, and Aljoscha Kemlein replaced Janik Haberer after 82 minutes.
Andrej Ilić and Ilyas Ansah were the two strikers, with Oliver Burke replacing the latter after 70 minutes.
Borussia Dortmund Attacking Tactics
In this section, we will look at the attacking features of Borussia Dortmund’s play.
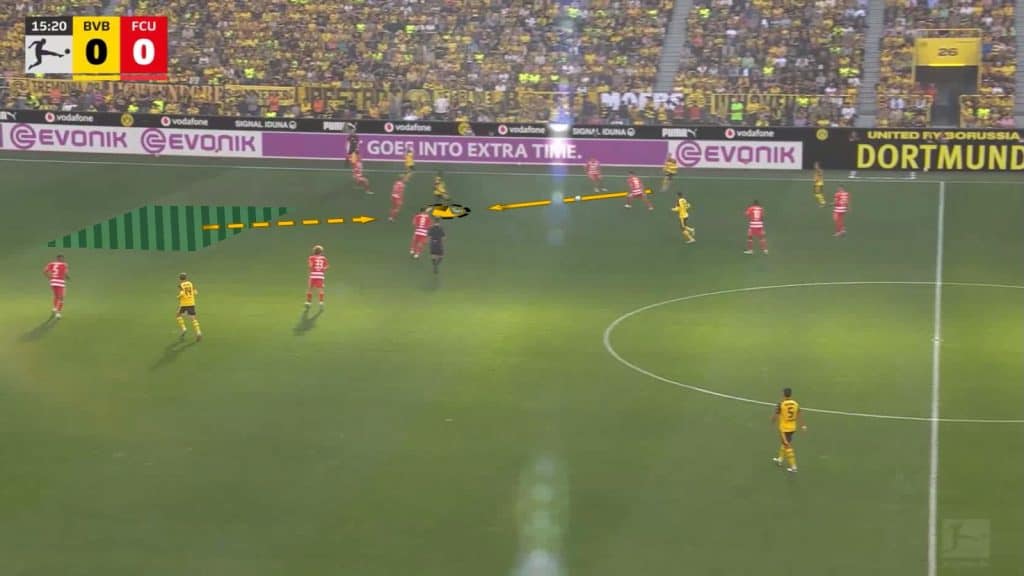
Beating The Waves Of Press
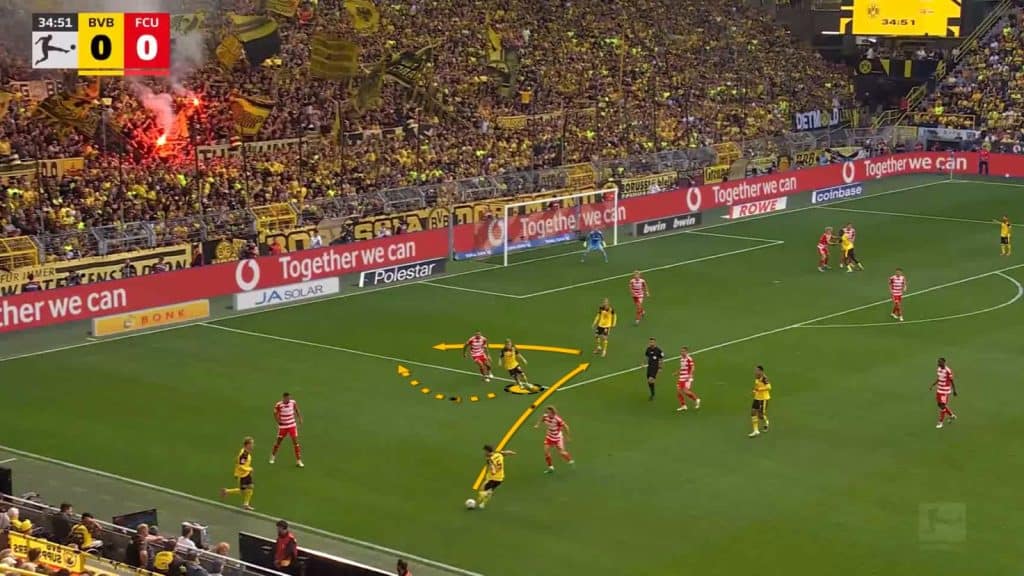
Dortmund carried out their build-up with a back three, with the two centre-midfielders staying inside the opponent’s defensive structure.
The objective was to find the midfielders inside the structure to progress the ball.
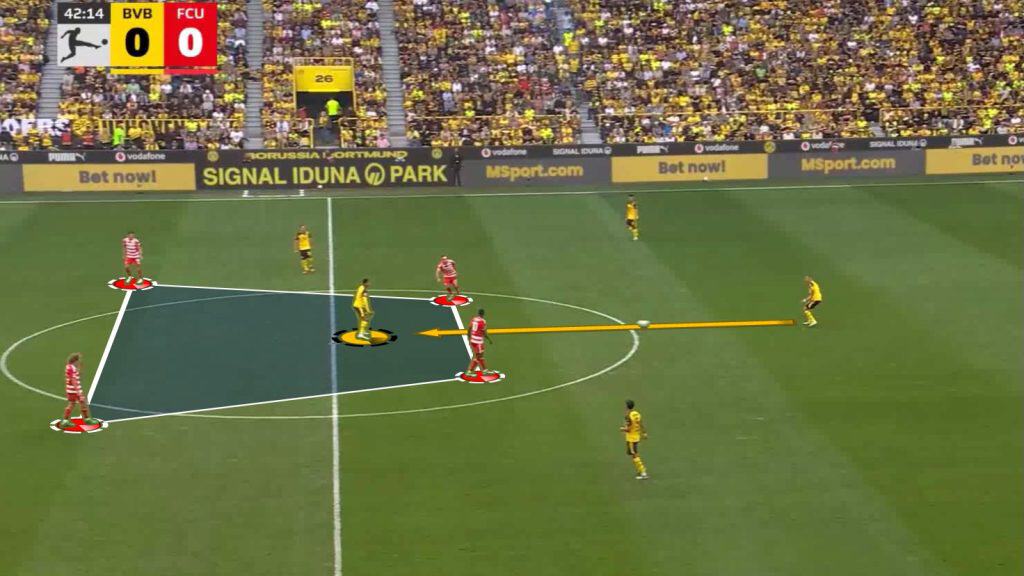
In this image, we can see Bellingham receiving a vertical pass from Anton.
These situations helped Dortmund play through either central zones or lay it off to the wide zones.
Sabitzer and Bellingham would take turns creating space for each other to receive vertical passes and advance the ball.
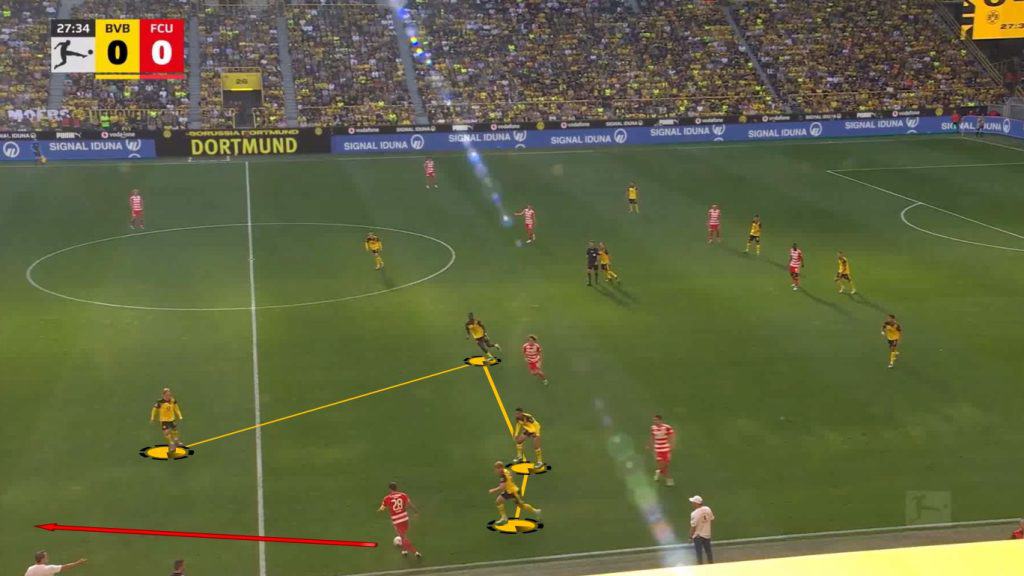
Bensebaini was consistent in breaking the lines with his penetrative passes.
In the example shown above, he breaks two lines of opponent pressure with a single vertical pass into Bellingham.
Actions like these helped Borussia Dortmund in starting attacks from deep inside their own half.
Dortmund were not the most incisive consistently; however, they made sure to utilise their progression opportunities.
In the moments when progression was not available, Dortmund were happy to keep possession and slow the game down.
This helped them gain more control of the game and create more chances.
This is aptly reflected in their possession statistics, with the hosts having 65% of the ball.
They completed 642 passes, compared to just 291 by their opponents.
Dortmund’s highest concentration of play was in the midfield third.
The reason for this was their patience with the ball.
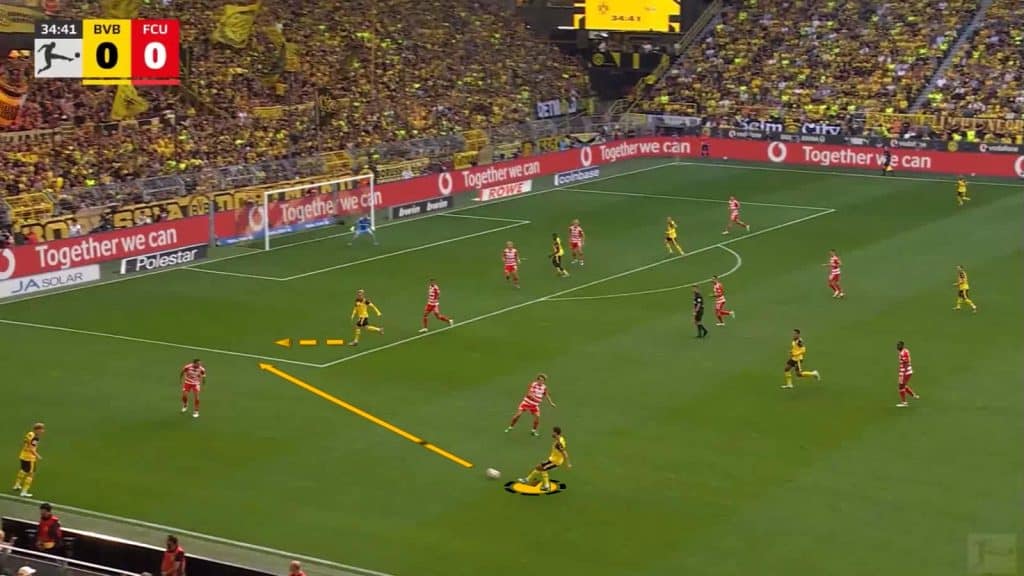
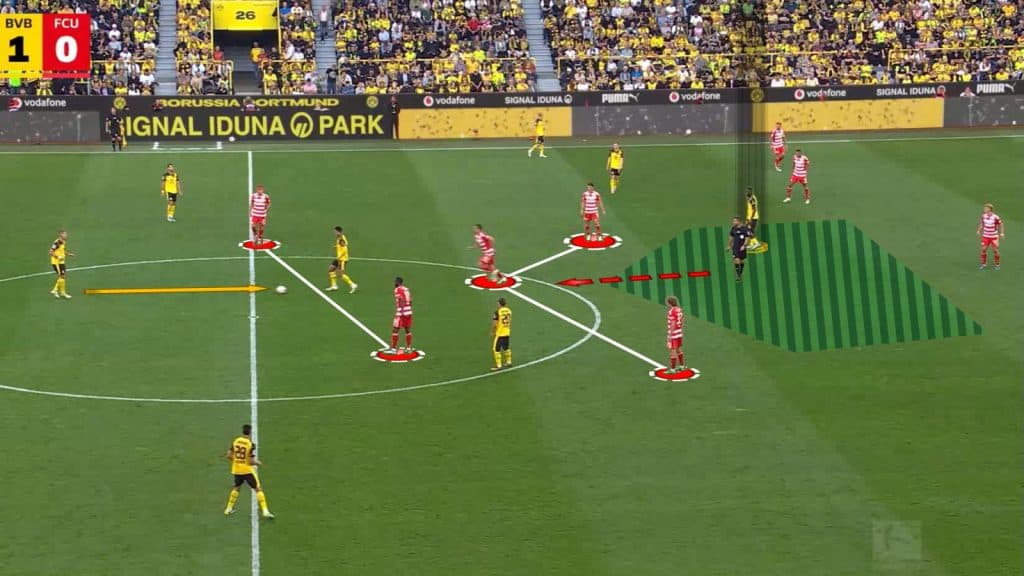
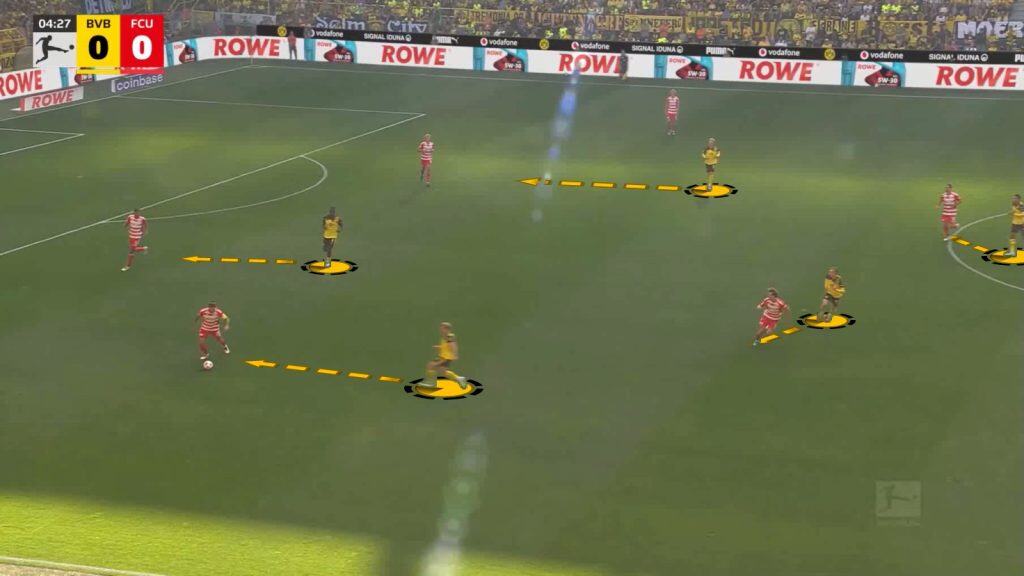
In the example shown above, the hosts have the ball in the wide channel.
However, multiple opponents close them down in that zone.
They showcase their patient approach by playing backwards and shifting the play.
Through this, they got plenty of space on the other side of the pitch, which they used to progress the ball forward.
The opponent pressed in a block of three midfielders and two strikers.
This left space in the wide zone and usually in the half-spaces as well.
This was a good opportunity for the BVB players to exploit that space and achieve progression.
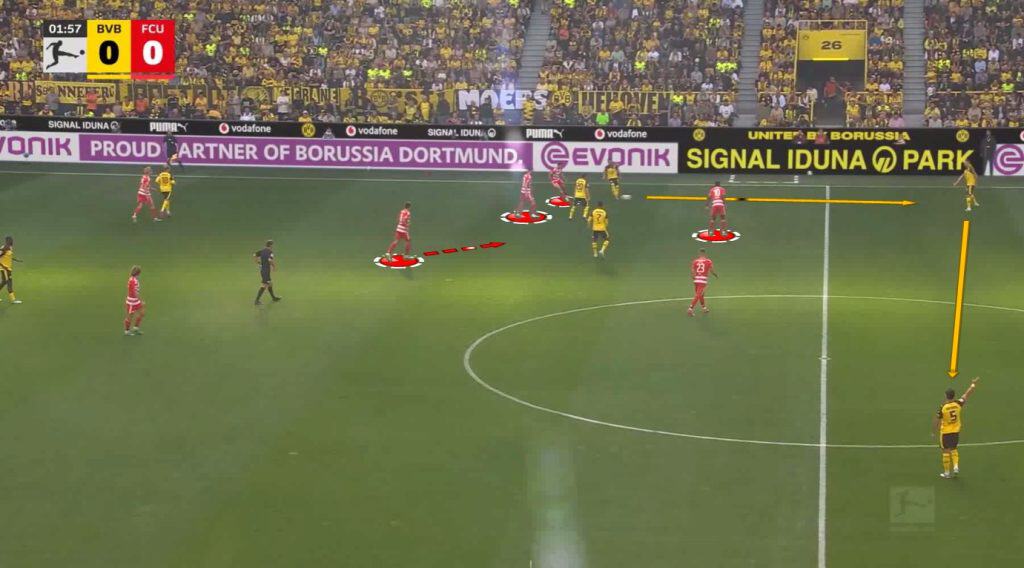
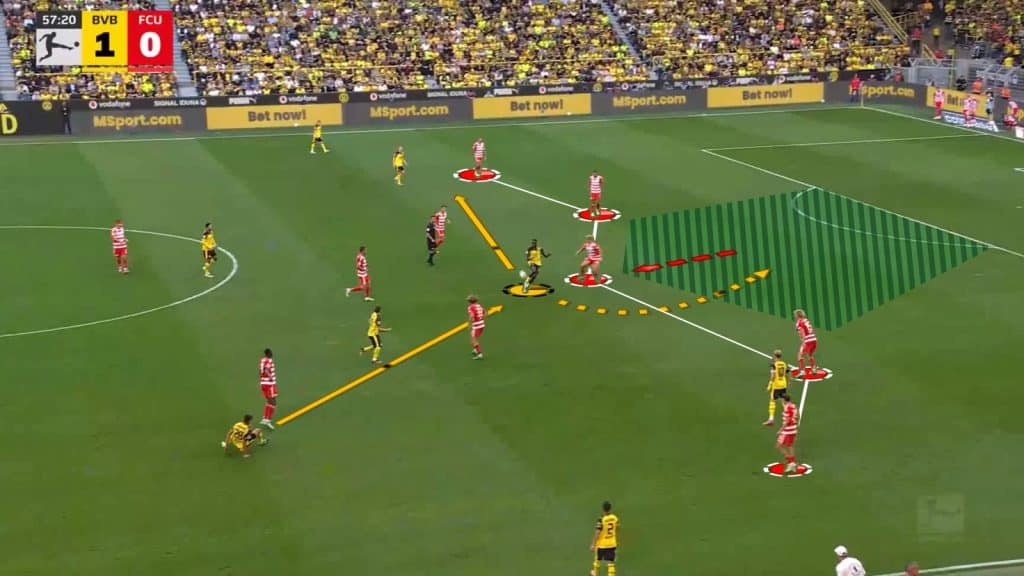
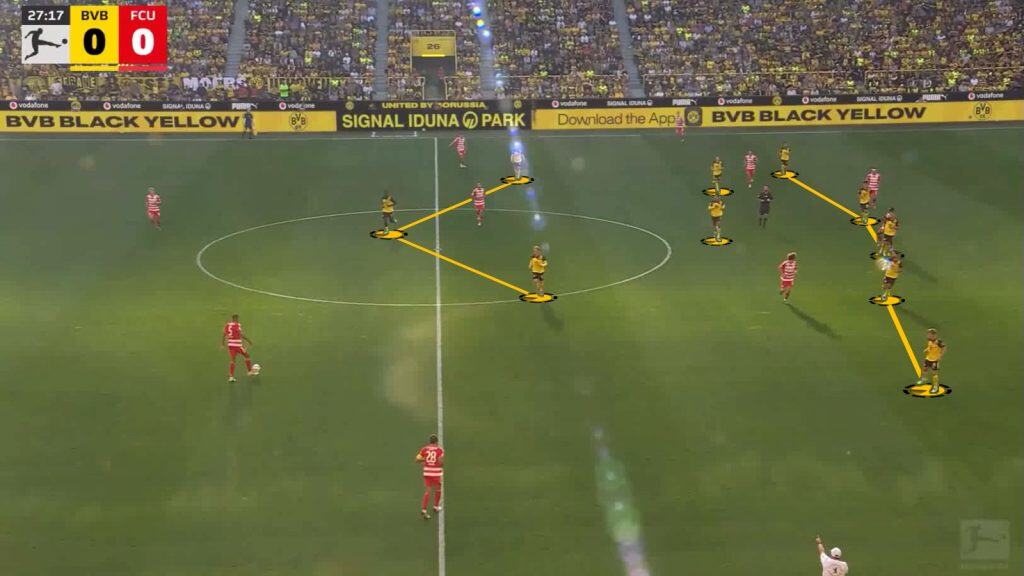
Here, Union Berlin are in their compact block in the central zone.
This leaves enough space in the half-space for Anselmino to drive into.
Situations like these forced the Union attackers to aggressively slide across the pitch to cover those spaces.
Whenever they failed to shift across as a block, they would leave space in the central areas for the hosts to exploit.
Here is an example: Two Union players slide across to block progression from Borussia Dortmund’s right side.
However, the other players fail to slide in time.
This leaves enough space in the central channel for the centre-backs to find a midfielder.
In this case, Anton plays it to Bellingham.
Once the ball reached either the opponent’s half or beyond the first line of pressure, Dortmund found different ways to attack, keeping Union guessing throughout the game.
The centre-midfielders playing line-breaking passes was one of Dortmund’s features in attack.
Here, Bellingham operates between the first and second lines of pressure.
He finds a teammate behind Union’s midfield line, which was the quickest way for BVB to enter the attacking third.
However, central progression was not the most frequent.
Borussia Dortmund’s use of half-space was key to getting the ball to the final third.
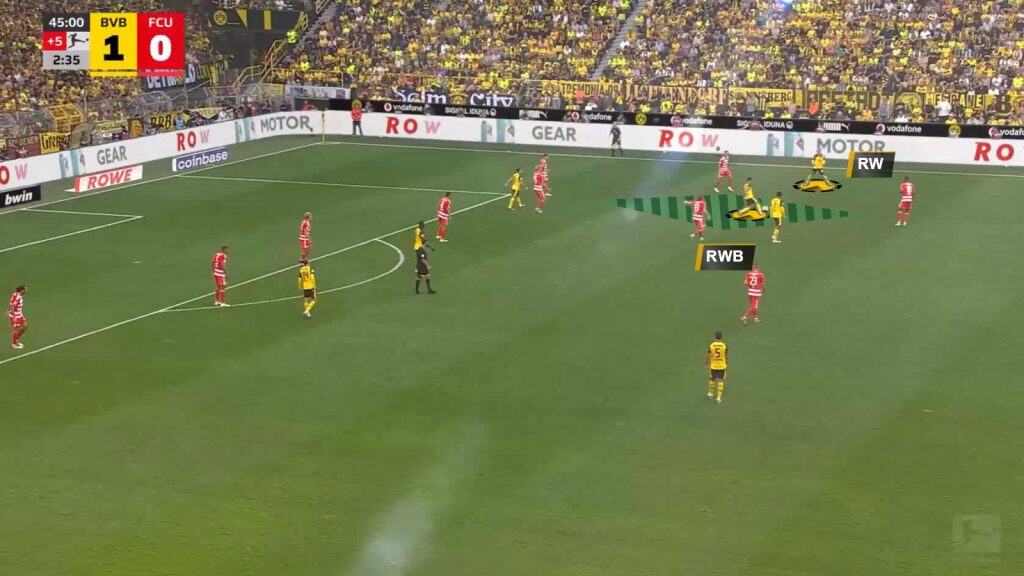
Half-Space Occupation In Opponent Half
The wingers (Brandt and Beier) operated in the half-space whenever the wing-backs provided width.
On other occasions, Guirassy also dropped into the half-spaces, sometimes even peeling wide.

Here is an example of Brandt receiving in the half-space.
Svensson (right wing-back) offers width, which allows the skipper to occupy the half-space.
Brandt’s receiving in these areas helped his side find final passes, shift play, and combination play.
Yan Couto was seen interchanging with Brandt many times.
Here, we can see that the BVB captain has occupied the wide zone.
Meanwhile, Couto receives in the half-space.
Rotations like this were difficult for the opponents to track.
This gave BVB more time and space to play forward.
On many occasions, Guirassy also dropped into the half-spaces to link play.
Here, we can see the striker dropping into the right half-space.
A defender usually followed him, opening space behind the Union backline.
Ramy Bensebaini Incisive Passing
The Algerian defender was keen on playing vertically whenever the opportunity presented itself.
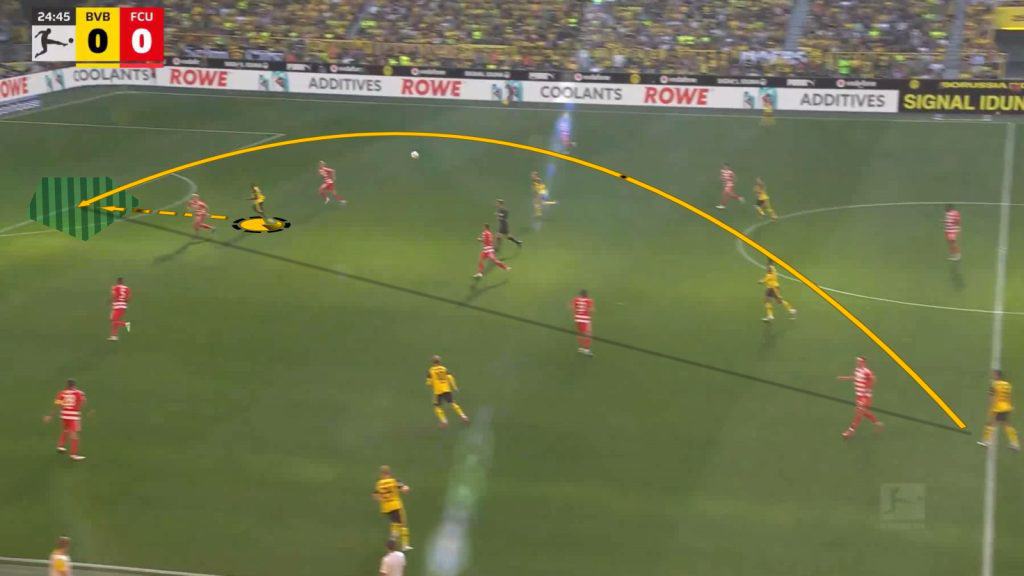
Playing long passes was never out of the question.
The left-footed centre-back attempted to connect with his attackers, who were making forward runs.
In the image above, the Algerian finds his striker, Guirassy, who makes a blind-side run to get to the ball first. On this particular occasion, his first touch lets him down.
However, it is noteworthy that he received the pass very close to the penalty spot.
Here is another example of Bensebaini playing a penetrative pass, this time to Julian Brandt, moving towards the half-space.
These passes coming from the left side were key in Borussia Dortmund pushing Union further down their own half.
Borussia Dortmund Runs In Behind
Although not the most common, Borussia Dortmund recorded runners in-behind, who were able to give more depth to their attack.
The runs usually were a part of third-man combinations seen across the pitch.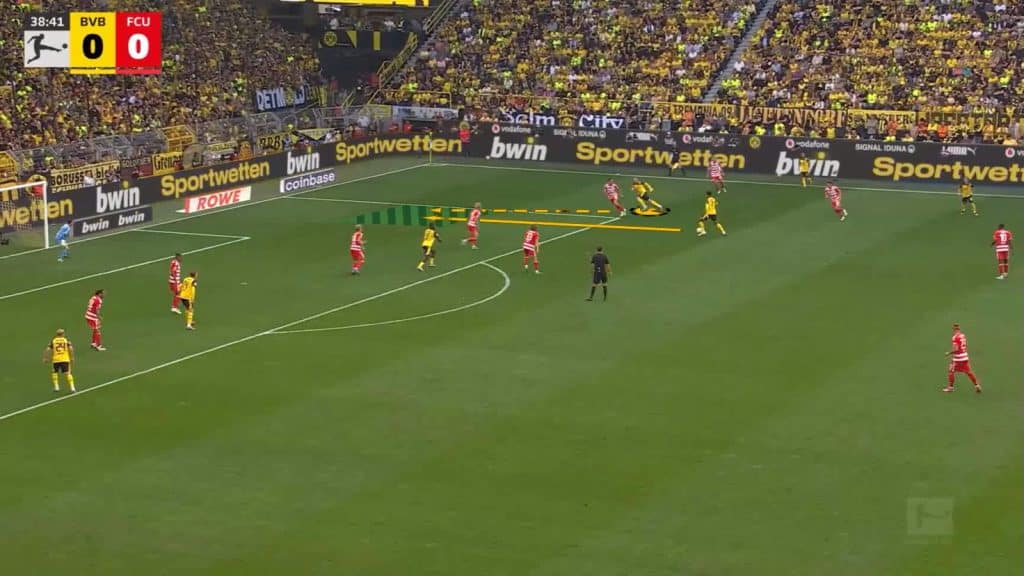 Here is an example.
Bellingham receives from the wide channel.
As he shapes up to pass, Brandt makes a well-timed run on the defender’s blindside to receive in-behind.
These combinations generated either low crosses across the face of the goal or cut-backs for players arriving late.
Borussia Dortmund Overloads In Attacking Third
Dortmund regularly created overloads as their attacking players, especially Brandt, tended to move across the pitch to add numbers to the other side.
Here, both Brandt and Beier are on the same side in the attacking phase.
The skipper, who moved across the pitch to create an overload, gets more time and space to pick out a pass.
These actions from the Dortmund players forced the opponent to make a decision: either defend that side with fewer numbers or commit more defenders to that side and leave fewer numbers on the other side.
Here is another example of the same. Here, a third-man combination is being played.
More importantly, we can also see Brandt, Beier, and Svensson all on the same side, attempting to create an overload.
Through these actions, Dortmund’s objective was to get more crosses in for their poacher Serhou Guirassy.
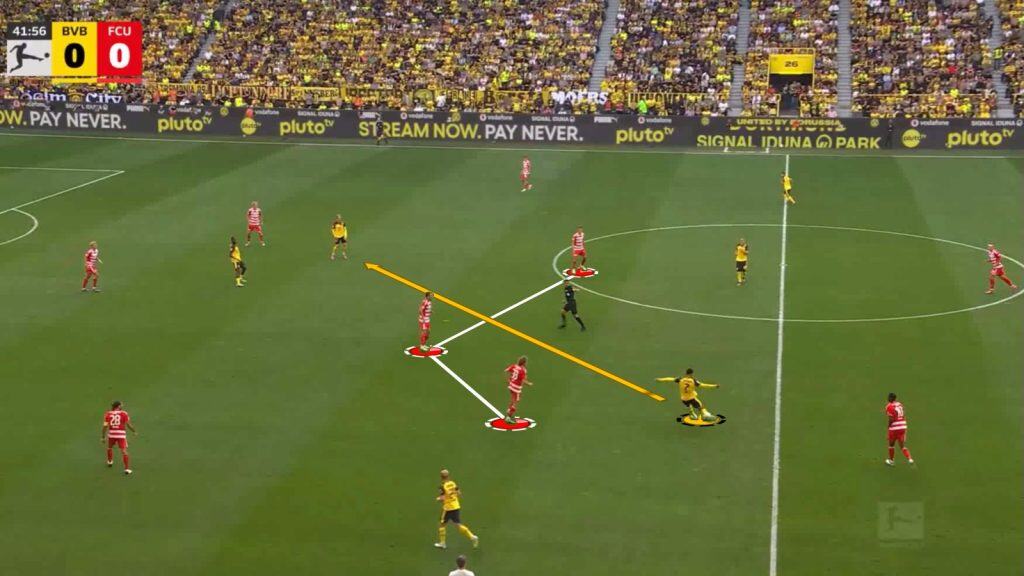
Borussia Dortmund Moving Opponents Through Passes
Borussia Dortmund did considerably well in terms of moving their opposition by moving the ball to certain spaces and getting it back out.
Union players got drawn out of their defensive positions to follow the press, which opened space behind them.
Dortmund effectively utilised these spaces, particularly for their second goal.
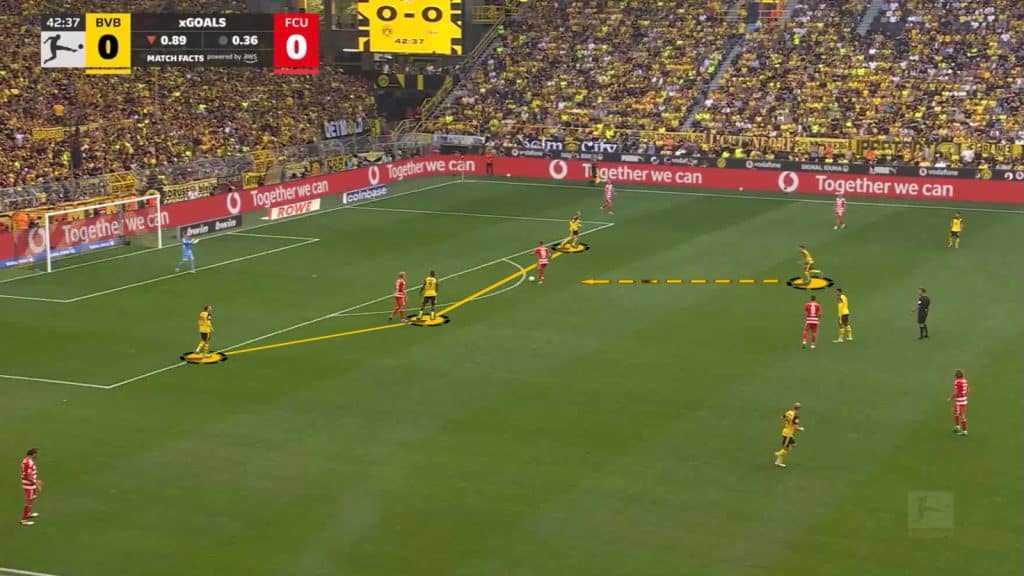
Bellingham receives the ball, which entices Union’s midfielder to press.
As he steps, he leaves space behind him, which is later exploited by Guirassy (black spotlight).
As the pass is played into Guirassy, a centre-back from the Union backline steps to close him down.
Here, the Guinean lays it off to Beier on a one-touch pass.
Once he starts his run, it is too late for the defender to cover the space left behind.
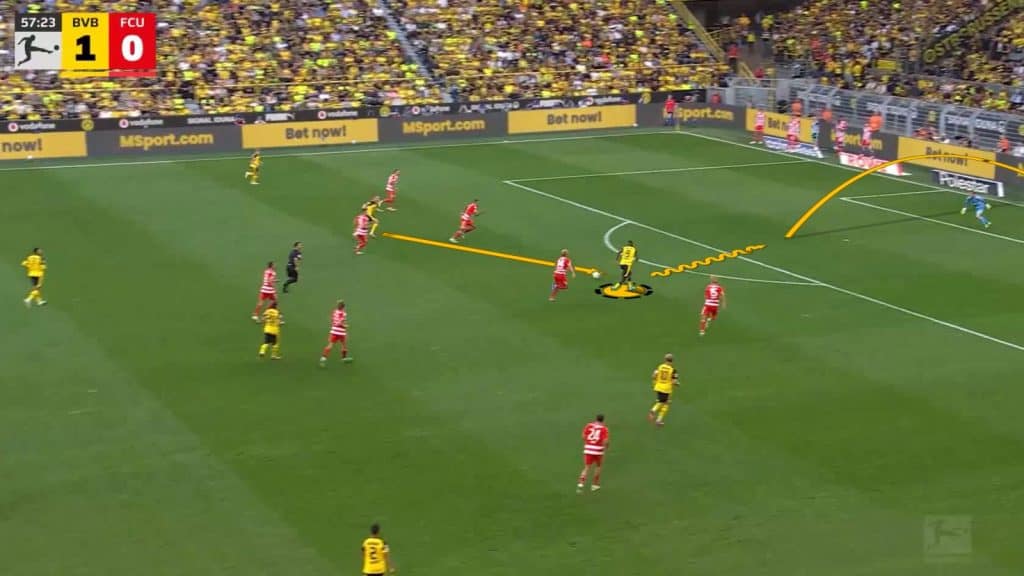
Guirassy receives the return pass and goes one-on-one with the goalkeeper.
He chips it to put the cherry on the cake.
Borussia Dortmund Defending Tactics
In this section, we will examine how Dortmund defended to maintain a clean sheet.
Defending In Opponent’s Half
Like any other dominant side, Dortmund also started the game by pressing high, forcing their opponents to either play long or make build-up mistakes.
We can see man-orientations in the high press as BVB attempted to cut out any short option available.
Their back three was efficient in winning the first contact from any long balls.
The first line of pressure comprised Guirassy, who was pressing the central centre-back, and Brandt and Beier, who pressed the wide centre-backs.
The BVB midfielders acted as the second line of press.
Whenever the first line was breached, we could see Sabitzer and Bellingham step to force the Union midfielders backwards or sideways.
In the image above, we can see Sabitzer step up to press Union’s midfielder, who receives on the edge of the penalty area.
The Borussia Dortmund wingbacks pressed the opposing wingbacks.
This left Union’s front two against Dortmund’s back three.
This was a contest BVB rarely lost.
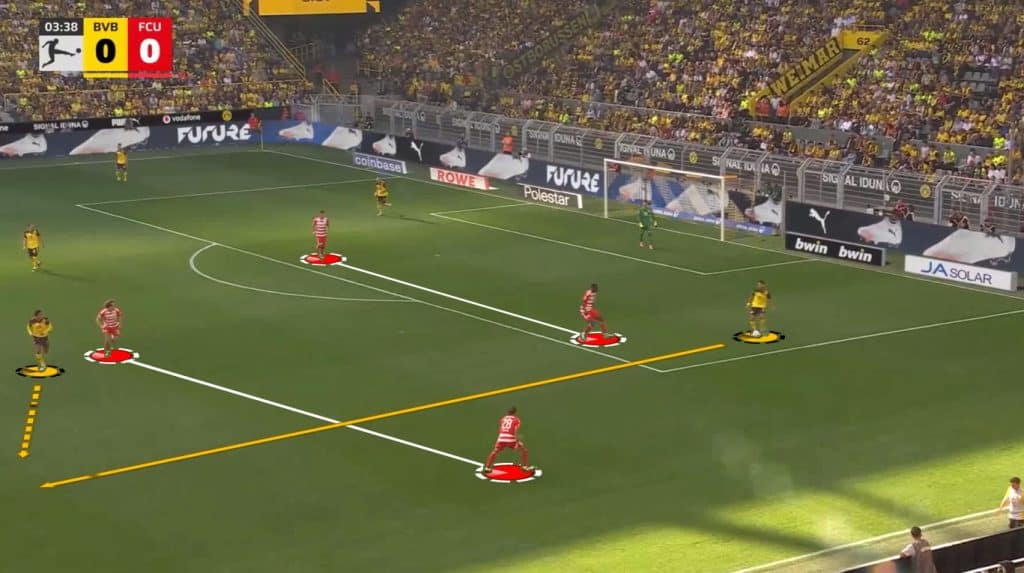
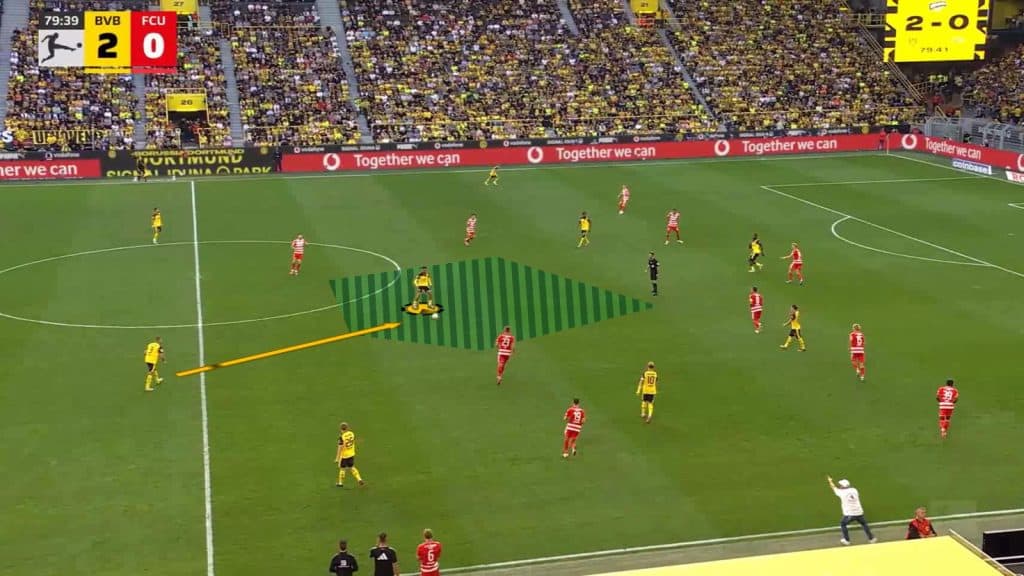
Borussia Dortmund Mid Block
Although they pressed high, Kovač’s side were seen defending in a mid-block shape for long periods.
Their defensive shape was slightly different from how they operated in possession.
The 3-4-3 changed into a 5-2-3 as the wing-backs dropped to join the backline.
In this shape, they did not commit to aggressive pressing.
Rather, they focused on maintaining their structure and cutting passing lanes by shifting as a block.
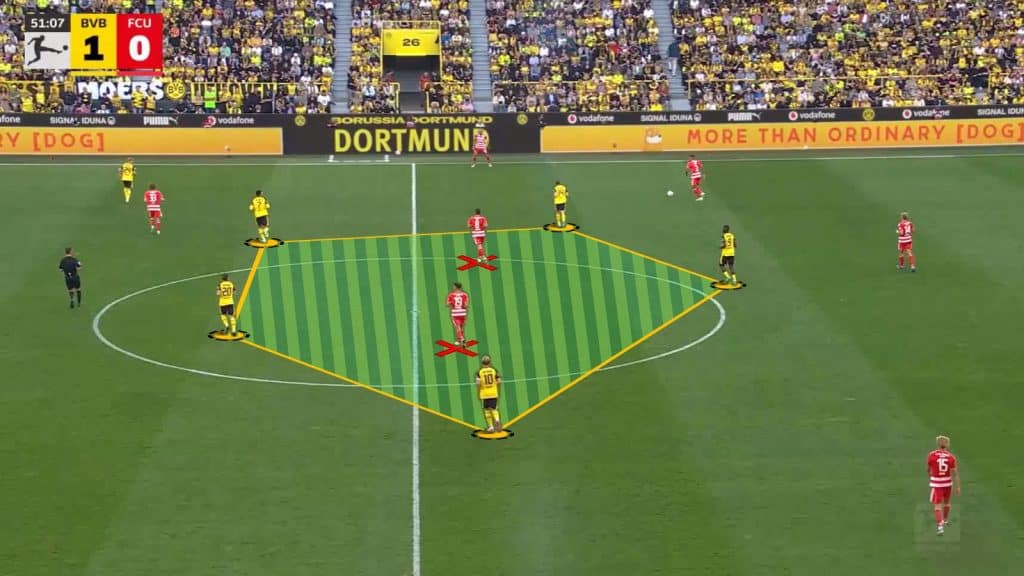
Between their front three and midfield two, they attempted to maintain a compact shape to prevent the Union midfielders from receiving the ball within their structure.
The visitors ended up playing around the structure on most occasions.
With a compact and narrow structure upfront, BVB were also susceptible to leaving space in the half-space higher up.
To tackle this, they ensured that they moved as a block and cut passing lanes in the half-space and the wide channel.
Here is an example.
The opponents are trying to attack from the wide area.
However, the Dortmund players shift across in a block, cutting off all forward and sideways options.
In these situations, the wing-backs also stepped up when they got enough cover from the side centre-backs.
This resulted in Union attacks getting slowed down.
Hence, they did not create any real danger for the hosts.
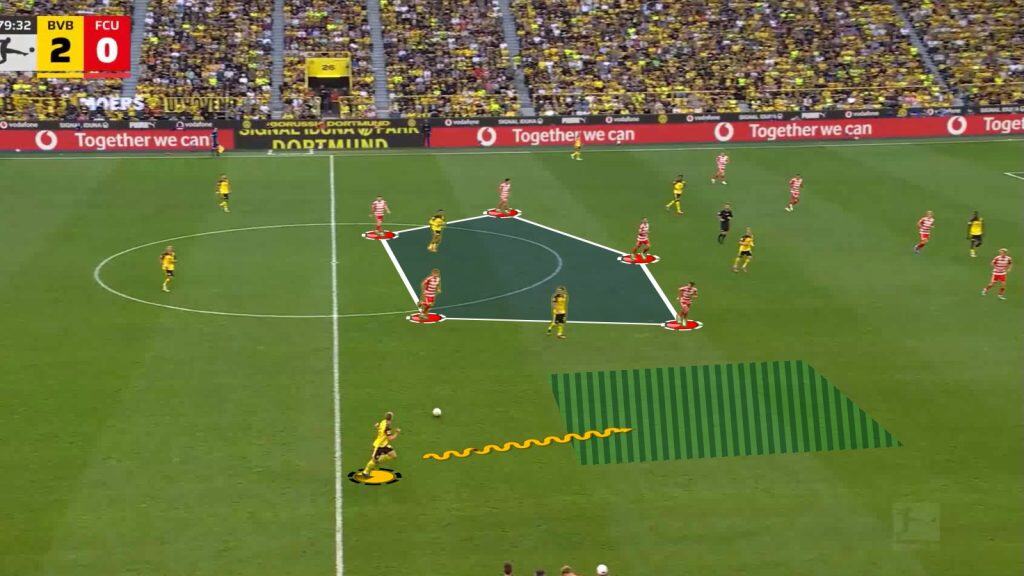
Conclusion
Borussia Dortmund were patient in their build-up, shifting play to exploit space and beating the first line of pressure.
Once they reached the opponent’s half, they employed third-man combinations, in-behind runs, long balls, line-breaking passes, and moved the ball to draw opponents and create penetration opportunities.
In the defensive phase, they pressed high in phases to force their opponents into playing long.
Meanwhile, they stayed in a mid-block for extended periods to force opponents to go around their defensive structure.
They also squeezed their opponents in the wide channel in an attempt to prevent penetration.