Total Football Analysis
  • Football Analysis
    • Data Analysis
    • Formations
      • 2-2-4 Formation
      • 2-3-5 Formation
      • 3-1-4-2 Formation
      • 3-2-2-3 Formation
      • 3-2-4-1 Formation
      • 3-1-6 Formation
      • 3-3-4 Formation
      • 3-4-1-2 Formation
      • 3-4-2-1 Formation
      • 3-4-3 Formation
      • 3-5-1-1 Formation
      • 3-5-2 Formation
      • 4-1-4-1 Formation
      • 4-2-2-2 Formation
      • 4-2-3-1 Formation
      • 4-2-4 Formation
      • 4-3-1-2 Formation
      • 4-3-3 Formation
      • 4-4-2 Formation
      • 4-5-1 Formation
      • 5-3-2 Formation
      • 5-4-1 Formation
      • 6-3-1 Formation
    • Head Coach Analysis
    • Match Analysis
    • Player Analysis
    • Recruitment Analysis
    • Set Piece Analysis
    • Tactical Theory
    • Tactical Preview
    • Team Analysis
    • Training Analysis
    • Tactical Analysis
    • Scouting Report
  • Competition
    • ALL Competitions
    • English Premier League
    • Champions League
    • La Liga
    • Bundesliga
    • Serie A
    • Ligue 1
    • Eredivisie
    • EFL Championship
    • FIFA World Cup 2022
    • WEURO 2022
    • Women’s Super League
    • NWSL
    • Belgian First Division A
    • A-League
    • Liga Profesional de Argentina
    • Austrian Bundesliga
    • Campeonato Brasileiro Série A
    • DFB Pokal
    • 1. HNL
    • Danish Superliga
    • EFL League One
    • EFL League Two
    • FA Cup
    • EFL Cup
    • Indian Super League
    • K-League
    • J1 League
    • Liga MX
    • Copa América 2021
    • Copa del Rey
    • MLS
    • Eliteserien
    • Euro 2020
    • Primeira Liga
    • Scottish Premiership
    • Allsvenskan
    • Europa League
    • UEFA Nations League
    • Liga AUF Uruguaya
  • Coaches
    • All Coaches
    • Alfred Schreuder
    • Ange Postecoglou
    • Antonio Conte
    • Arne Slot
    • Bo Svensson
    • Brendan Rodgers
    • Bruno Lage
    • Carlo Ancelotti
    • Christophe Galtier
    • Claude Puel
    • Claudio Ranieri
    • David Moyes
    • Dean Smith
    • Diego Simeone
    • Domenico Tedesco
    • Frank Lampard
    • Eddie Howe
    • Edin Terzić
    • Emma Hayes
    • Erik ten Hag
    • Ernesto Valverde
    • Gennaro Gattuso
    • Gerardo Seoane
    • Gian Piero Gasperini
    • Giovanni van Bronckhorst
    • Graham Potter
    • Igor Tudor
    • Imanol Alguacil
    • Jesse Marsch
    • Jonas Eidevall
    • Jorge Sampaoli
    • José Bordalás
    • José Mourinho
    • Julen Lopetegui
    • Julian Nagelsmann
    • Julien Stéphan
    • Jürgen Klopp
    • Luciano Spalletti
    • Lucien Favre
    • Manuel Pellegrini
    • Marcelo Bielsa
    • Marco Rose
    • Marco Silva
    • Massimiliano Allegri
    • Mauricio Pochettino
    • Maurizio Sarri
    • Mikel Arteta
    • Niko Kovač
    • Nuno Espírito Santo
    • Oliver Glasner
    • Patrick Vieira
    • Paulo Fonseca
    • Pep Guardiola
    • Peter Bosz
    • Rafa Benítez
    • Ralf Rangnick
    • Ralph Hasenhüttl
    • Roger Schmidt
    • Roy Hodgson
    • Sean Dyche
    • Sérgio Conceição
    • Simone Inzaghi
    • Sonia Bompastor
    • Stefano Pioli
    • Steffen Baumgart
    • Steven Gerrard
    • Thiago Motta
    • Thomas Frank
    • Thomas Tuchel
    • Unai Emery
    • Vincenzo Italiano
    • Xavi
  • Teams
    • ALL Teams
    • AC Milan
    • Ajax Amsterdam
    • Arsenal
    • AS Monaco FC
    • Atalanta
    • Atlético Madrid
    • FC Barcelona
    • FC Bayern Munich
    • Borussia Dortmund
    • Celtic FC
    • Chelsea FC
    • Everton F.C.
    • Inter Milan
    • Juventus F.C.
    • Leeds United F.C.
    • Liverpool FC
    • Manchester City
    • Manchester United FC
    • Paris Saint-Germain
    • Rangers FC
    • RB Leipzig
    • Real Madrid CF
    • Tottenham Hotspur
    • West Ham United
  • Players
    • ALL Players
    • Alisson Becker
    • Bukayo Saka
    • Erling Haaland
    • Harry Kane
    • Jack Grealish
    • John Stones
    • Julián Alvarez
    • Kalvin Phillips
    • Kevin De Bruyne
    • Kyle Walker
    • Kylian Mbappé
    • Lamine Yamal
    • Lionel Messi
    • Luis Díaz
    • Mohamed Salah
    • Phil Foden
    • Virgil Van Dijk
  • Guides
    • Best Betting Sites
      • World Cup Betting Sites
      • World Cup Free Bets
      • World Cup Betting Promotions
      • Betting Sites Not on GamStop
      • Crypto Betting Sites
      • No KYC Betting Sites
      • European Bookmakers
      • Betting Apps
      • Footbal Betting Sites
      • New Betting Sites
      • Betting Bonuses
      • Free Bets
      • Cash Out Betting Sites
    • Online Casinos
      • Non GamStop Casinos
      • Crypto Casinos
      • Offshore Casinos
      • Real Money Slots
  • Contact
No Result
View All Result
No Result
View All Result
Total Football Analysis
No Result
View All Result
Home Analysis Formations 5-4-1 Formation

Thomas Frank Tactics At Brentford 2024/2025: Set-Piece Coach Keith Andrews’ Long Throw-Ins – Analysis

Karim El-Shesheiny by Karim El-Shesheiny
February 12, 2025
in 5-4-1 Formation, Analysis, Brentford FC, Bryan Mbeumo, Christian Nørgaard, Ethan Pinnock, Keith Andrews, Kevin Schade, Mathias Jensen, Nathan Collins, Premier League, Set Piece Analysis, Tactical Analysis, Thomas Frank, Yoane Wissa
0
Thomas Frank Tactics at Brentford Set-Piece Analysis 2024-2025

Welcome to part five of Total Football Analysis’s throw-in series.

In the previous four parts, we have presented all the variables necessary to understand the unique nature of throw-ins and the factors that influence throw-in strategies for different teams and coaches.

We have also conducted a two-part interview with the expert throw-in coach, Thomas Grønnemark, asking him to discuss those variables and his opinion about many tactics in detail.

After that, we decided to track some teams’ throw-ins in a specific third of the pitch against different opponents, identifying the variations they used against various opponents and considering the strengths and weaknesses we found, as in any comprehensive and coherent analysis.

In the previous analysis, we discussed Liverpool’s attacking tactics for throw-ins in the final third of the 2024/25 Premier League season, with their new coach, Arne Slot, and their new set-piece coach, Aaron Briggs.

Brentford‘s throw-ins in the final third will be today’s case study, but today’s team has a different purpose than Liverpool’s.

Thomas Frank‘s side always wants to send crosses, so they rely heavily on long throw-ins.

In this tactical analysis, we will discuss Brentford’s tactics in long throw-ins and the short variables related to them under the new set-piece coach, Keith Andrews.

Throw-In Set Up

First of all, we need to know that Mathias Jensen is the main thrower (from right to left), while his substitutes are Kevin Schade, Ethan Pinnock, and Christian Nørgaard, in that order.

To set the scene, they put their five best headers in the box: the two centre-backs (usually Nathan Collins and Ethan Pinnock), the left winger (Kevin Schade), the striker (Yoane Wissa) and Christian Nørgaard (the 8 or 6).

Bryan Mbeumo (the right winger) always runs towards the thrower to drag the full-back (or the wing-back) near them.

Then, he becomes a rebound defender on the edge of the box, noting that he does this in case the throw-in is on the right or left side.

One of the remaining three will join Mbeumo to receive the second ball, while the other two will stay at the back for counterattacks.

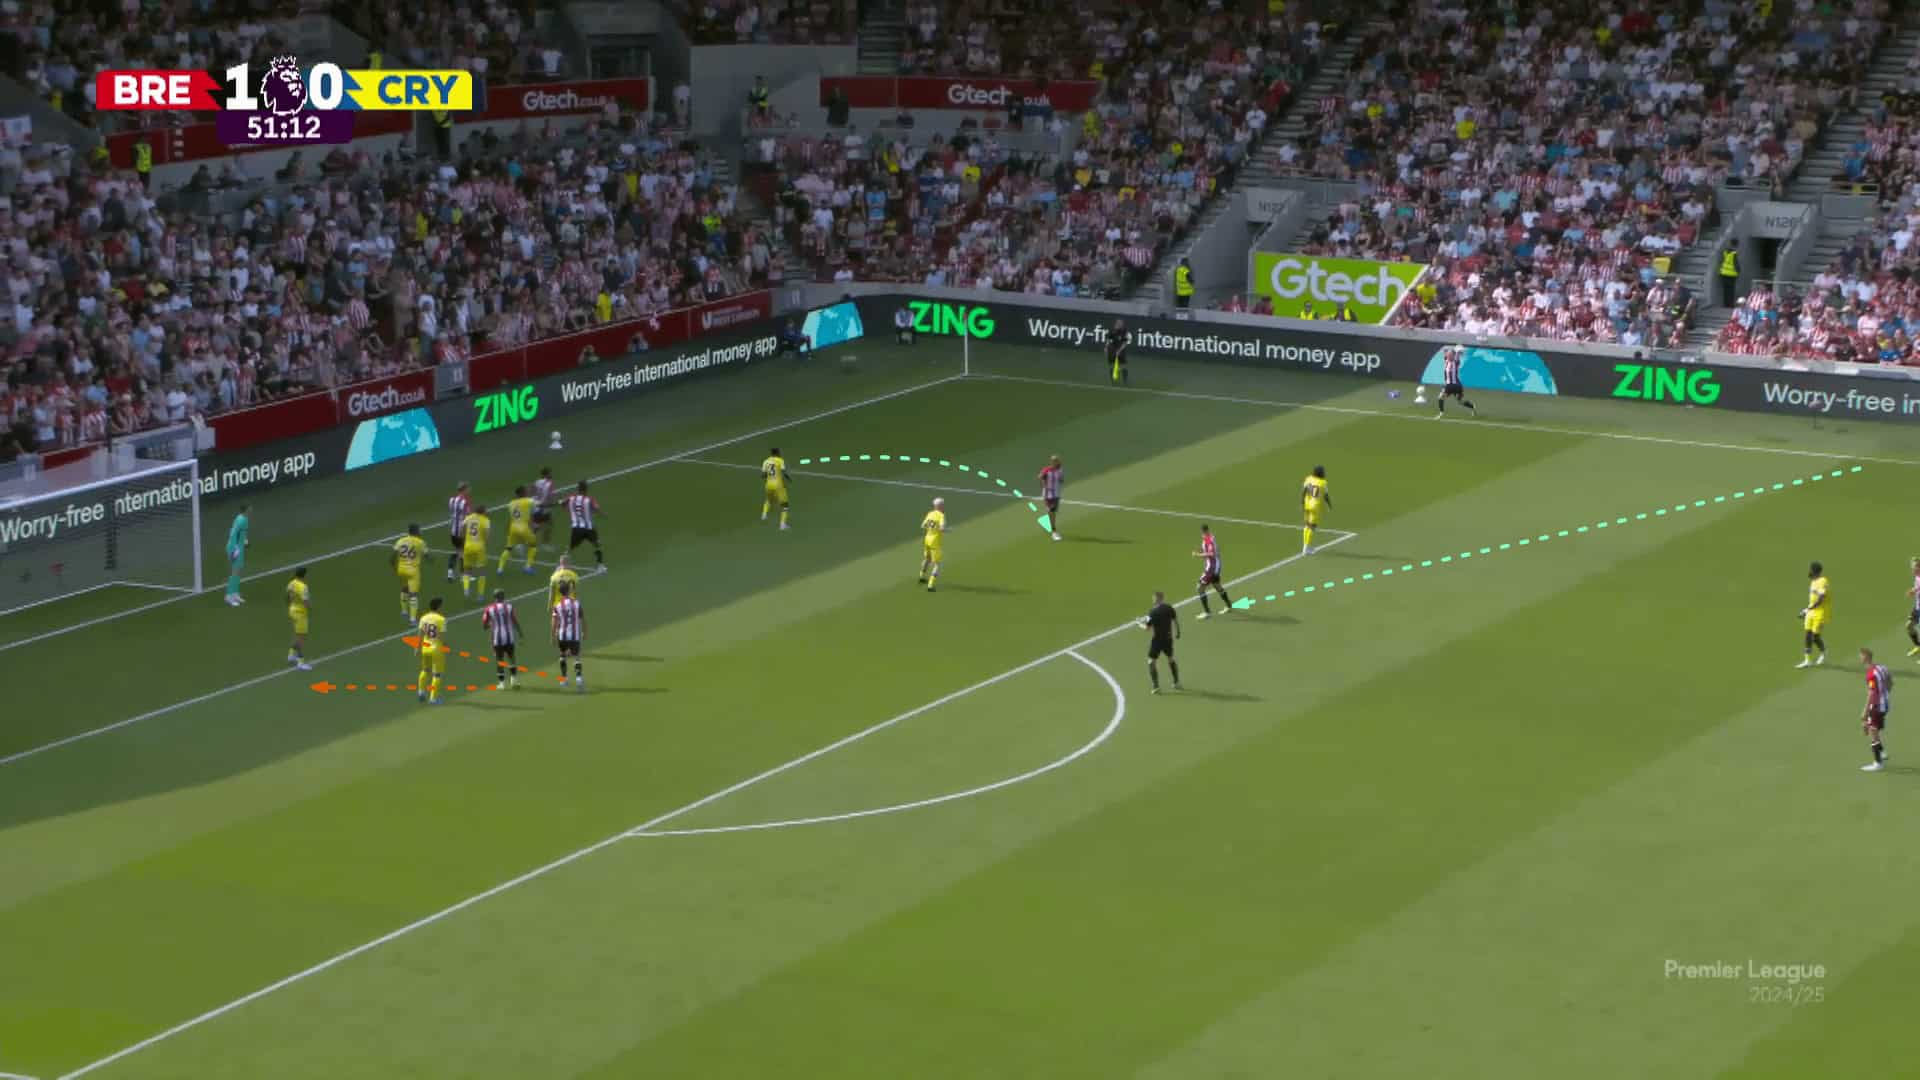
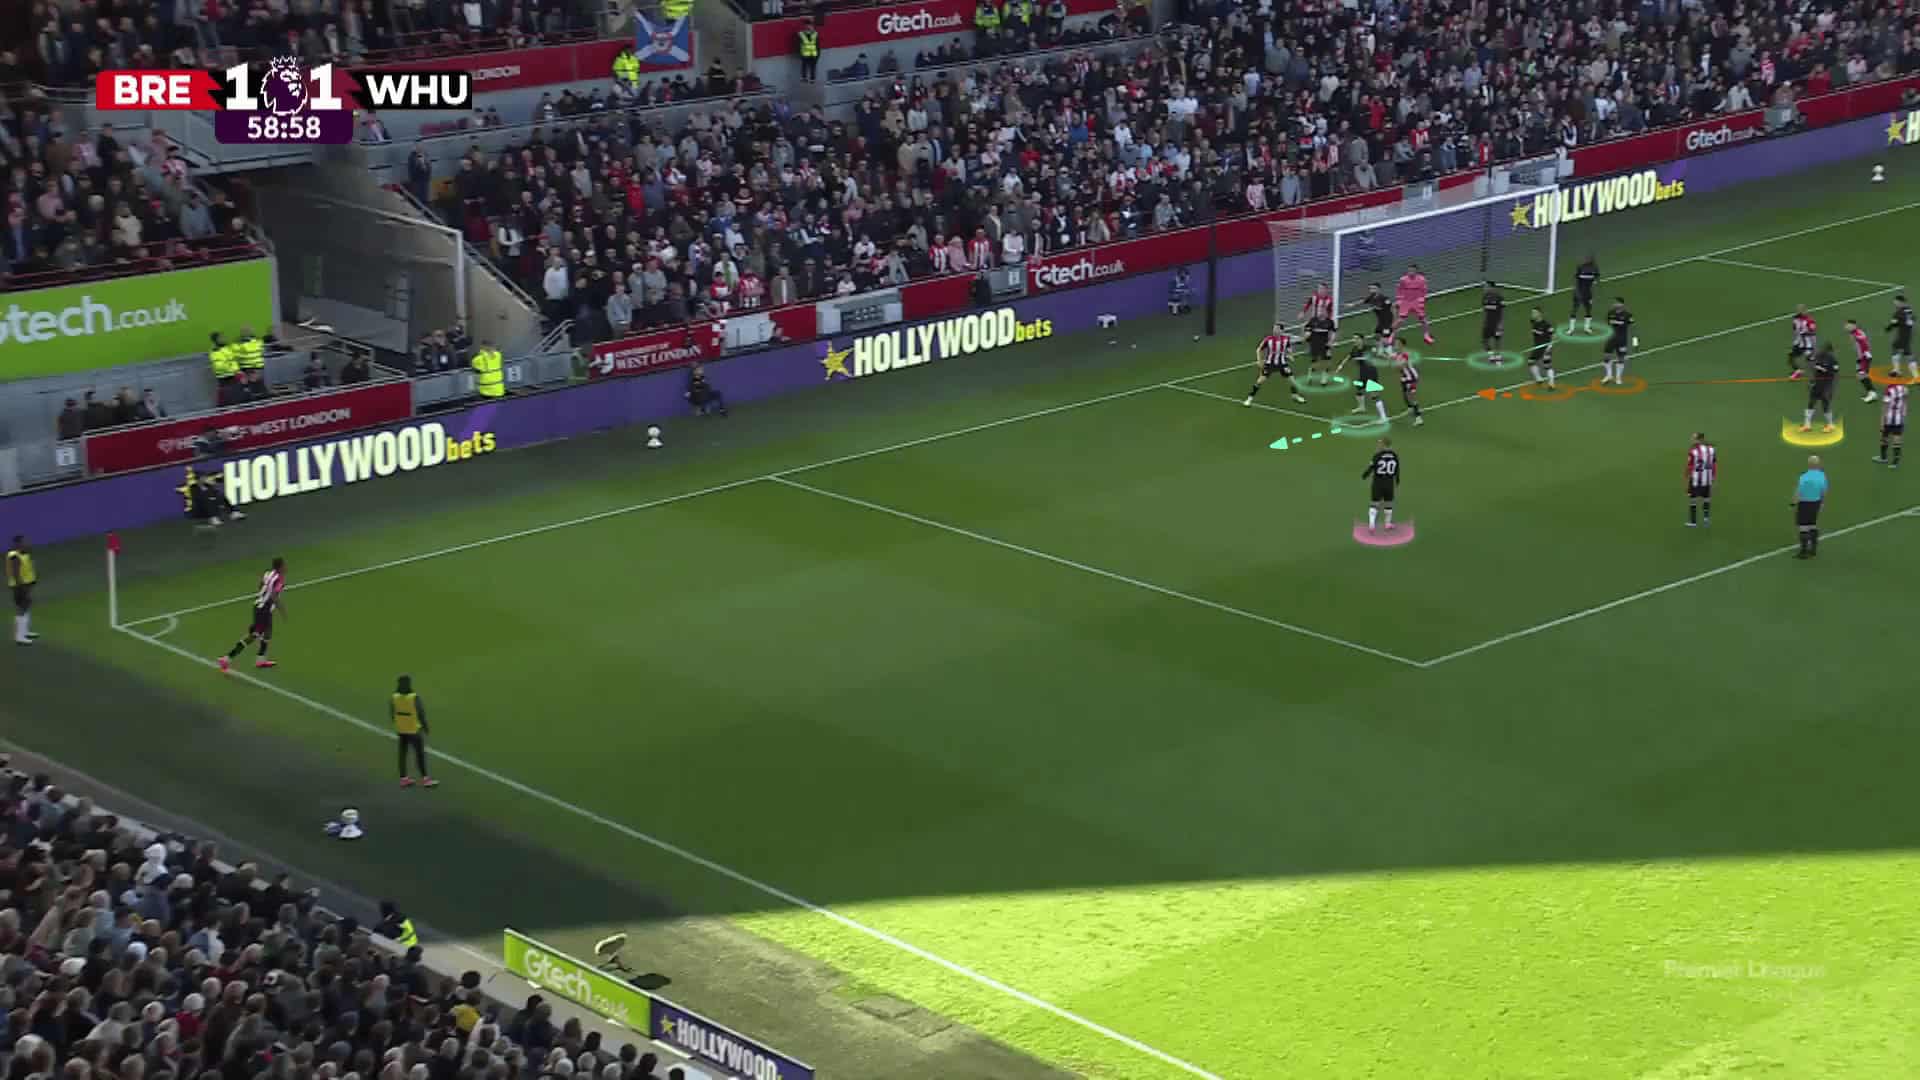
In the photo below, Crystal Palace defend with a 5(green)-4(blue)-1(orange) formation while Mbuemo runs towards the thrower to drag the left wing-back to evacuate the area behind him.

At the same time, the sixer (Vitaly Janelt) stands as a short option on the left of the thrower and then runs to be a rebound defender when the thrower moves to play it long.

This also drags the winger and the midfielder towards them in the beginning, which evacuates the box more.

The three targeted players run in a curved path from the middle, coming from the first defender’s blind side.

This gives them an advantage, as they can exploit the fact that there is no offside in throw-ins.

Running before jumping also provides them with a dynamic disadvantage over the first two stationary defenders and allows them to measure the ball in the air within their path.

throw-in-series-brentford-long-throw-in-tactics-explained-tactics

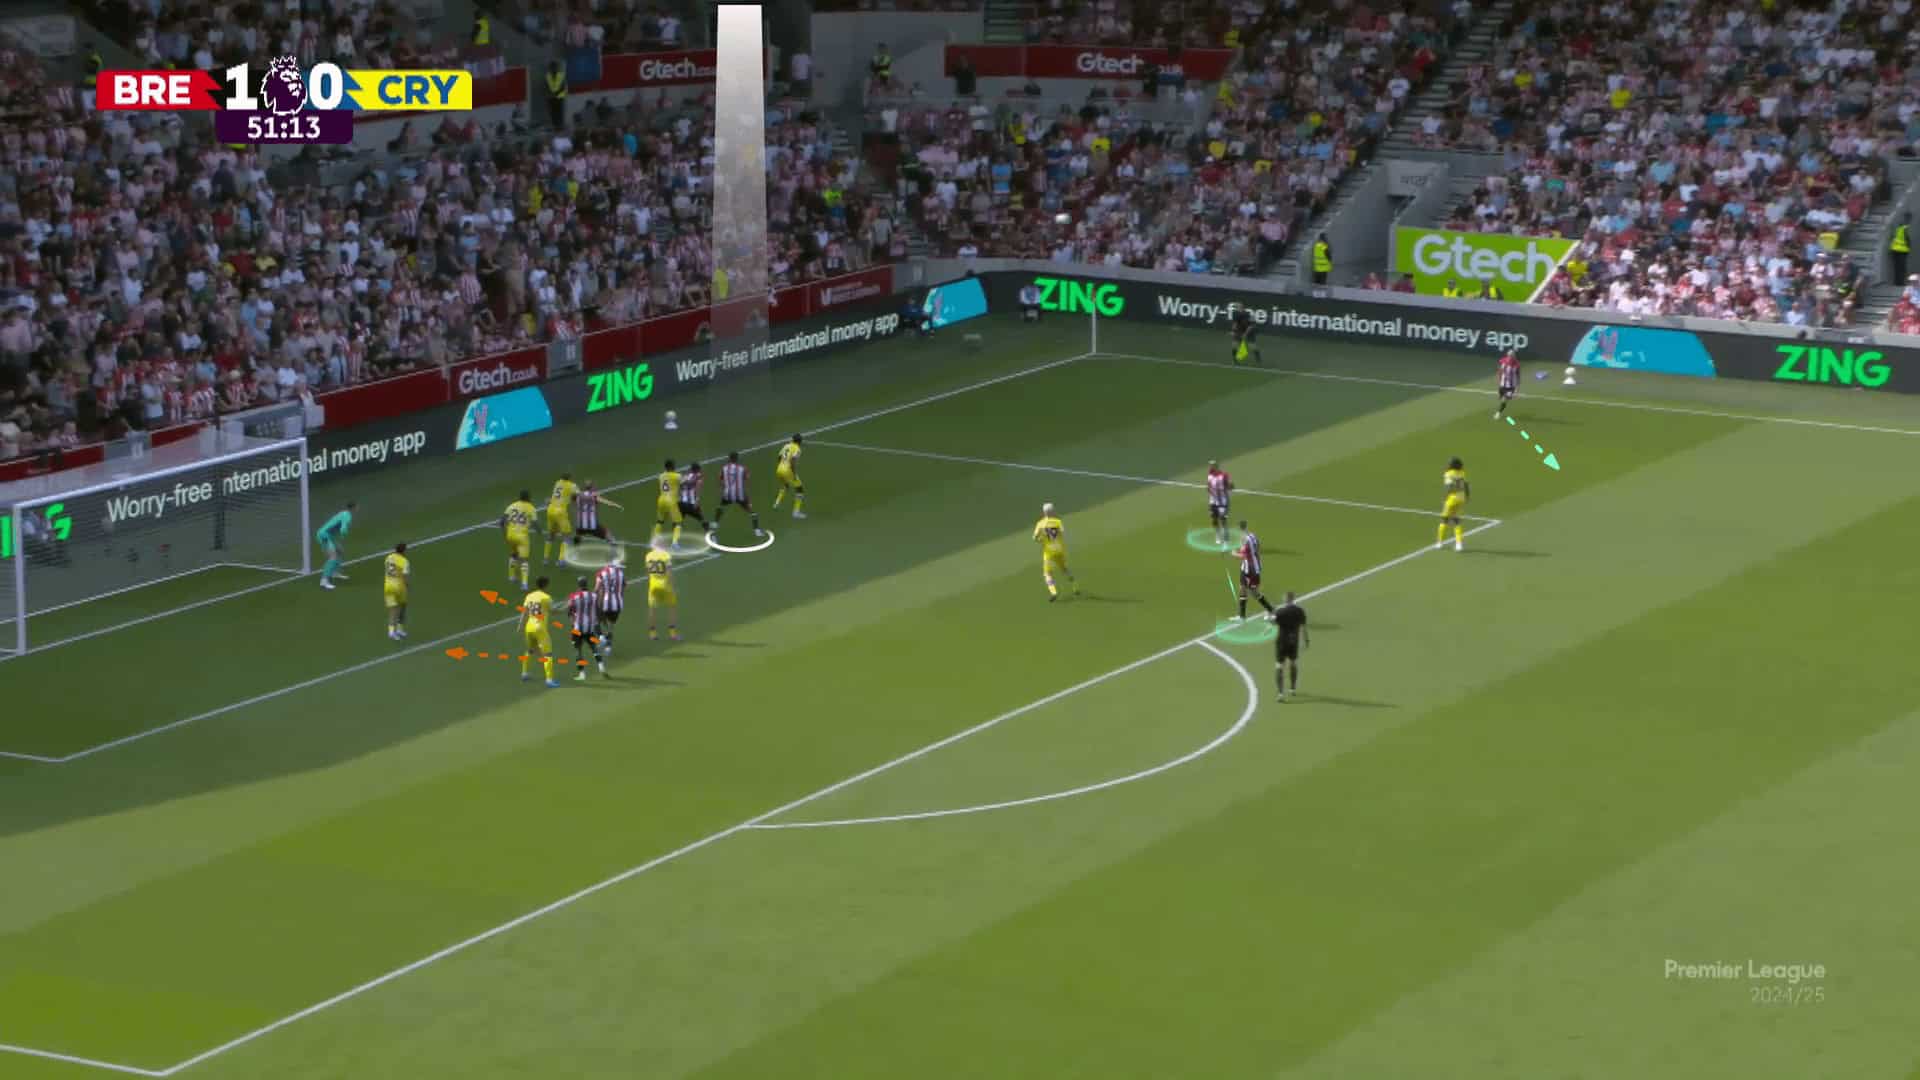
As shown below, Mbeumo becomes a rebound player after dragging the left wing-back while Janelt joins them.

In orange, Christian Nørgaard and Yoane Wissa frame the goal to receive the headed pass (the flick), increasing their opportunity to get the ball even if the plan isn’t optimal.

Having players around the frame of the goal, particularly in the six-yard area, always gives them a chance to get to any loose ball, or even secure it with a second or third touch during the fight for possession.

throw-in-series-brentford-long-throw-in-tactics-explained-tactics

As shown below, two of the three targeted players block the first two defenders coming from their back, while the third one is free; however, the ball is a bit far from him.

throw-in-series-brentford-long-throw-in-tactics-explained-tactics

Tactics Against Man-Marking Systems

From the previous example, it appears that dealing with these long throw-ins in a normal manner isn’t the best solution, so teams began addressing them in a defensive scheme similar to corners.

The first defensive strategy applied against them that we will discuss is man-marking defensive systems with just two zonal defenders.

pic.twitter.com/7rchPWY3Rb

— Footie Clips (@FootieClips) February 11, 2025

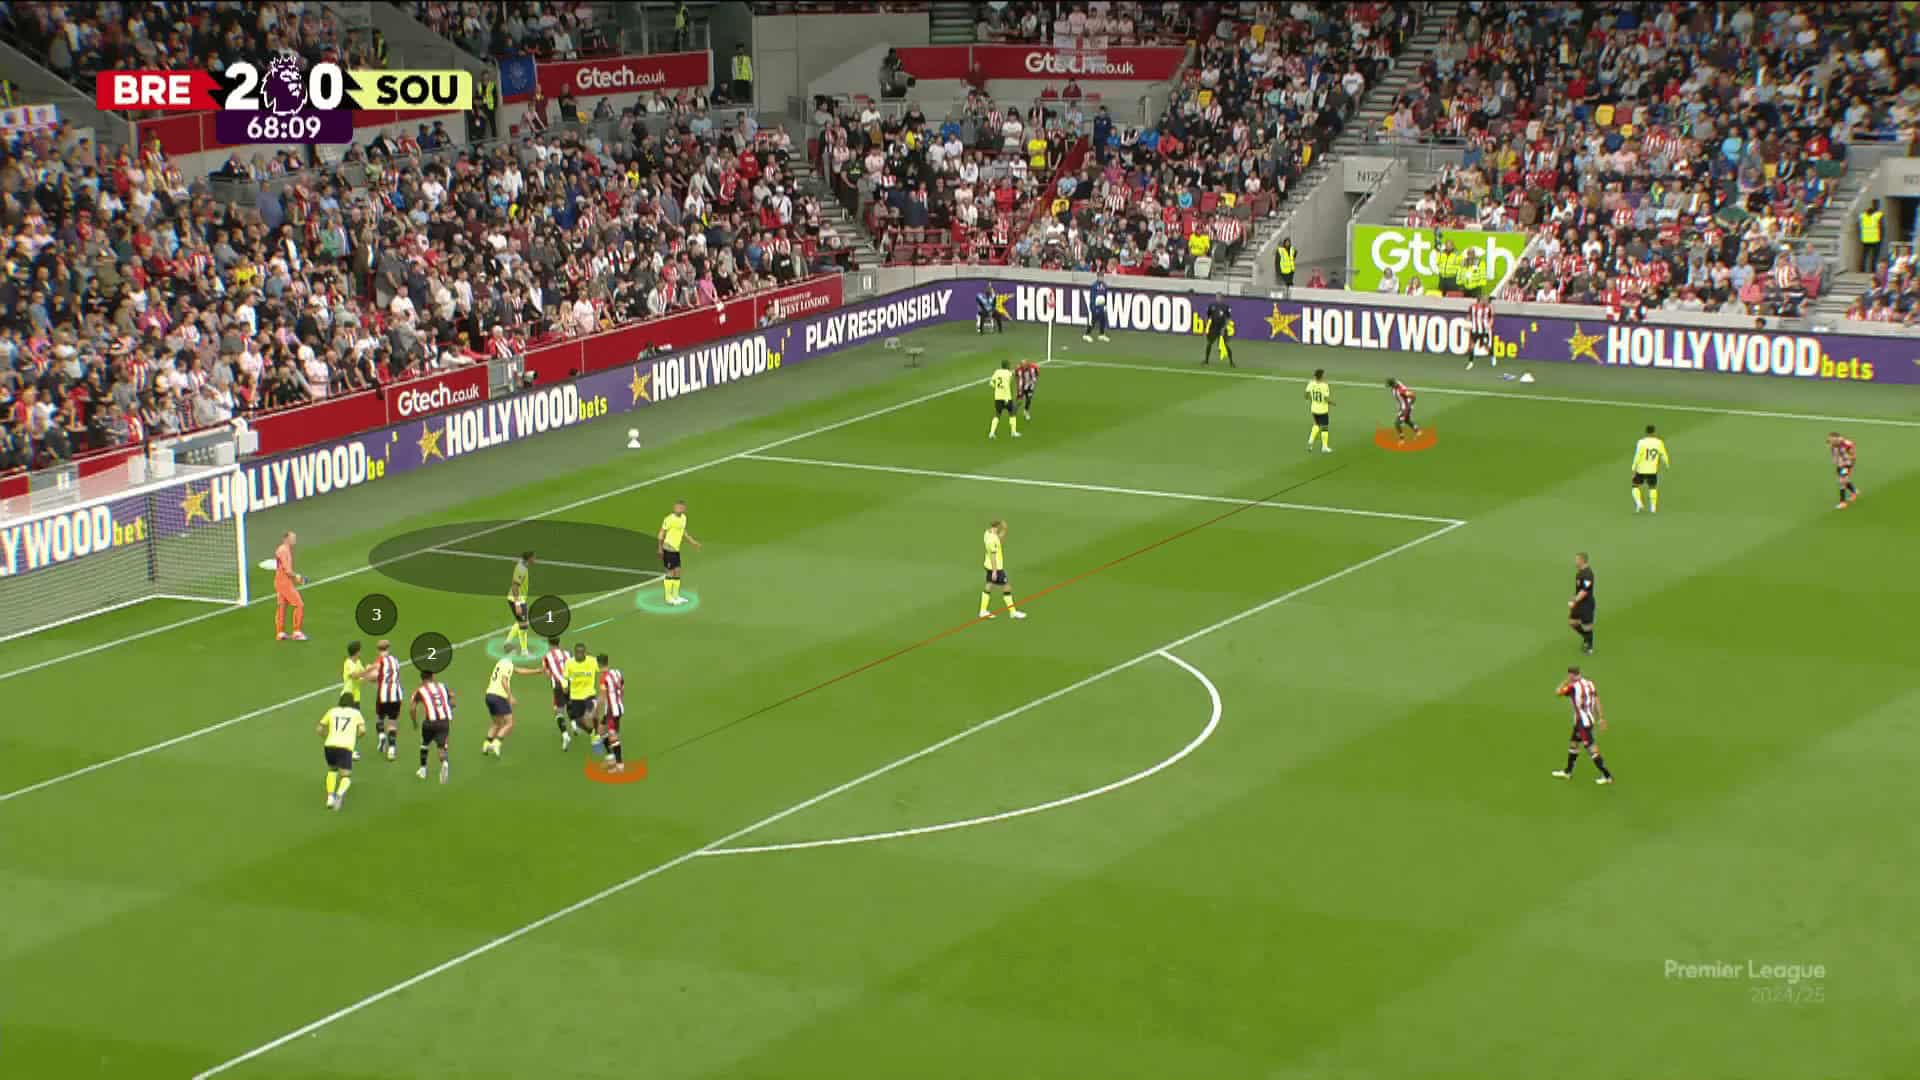
In the photo below, Southampton defends using a man-marking system with just two zonal defenders (green), while Brentford targets the same three players in the same area.

However, there is an important note about Wissa’s starting position—he ultimately scored the goal from this position.

As usual, he will go to the far post to frame the goal, but his starting position makes it difficult for the player behind him to drag him back all that distance.

throw-in-series-brentford-long-throw-in-tactics-explained-tactics

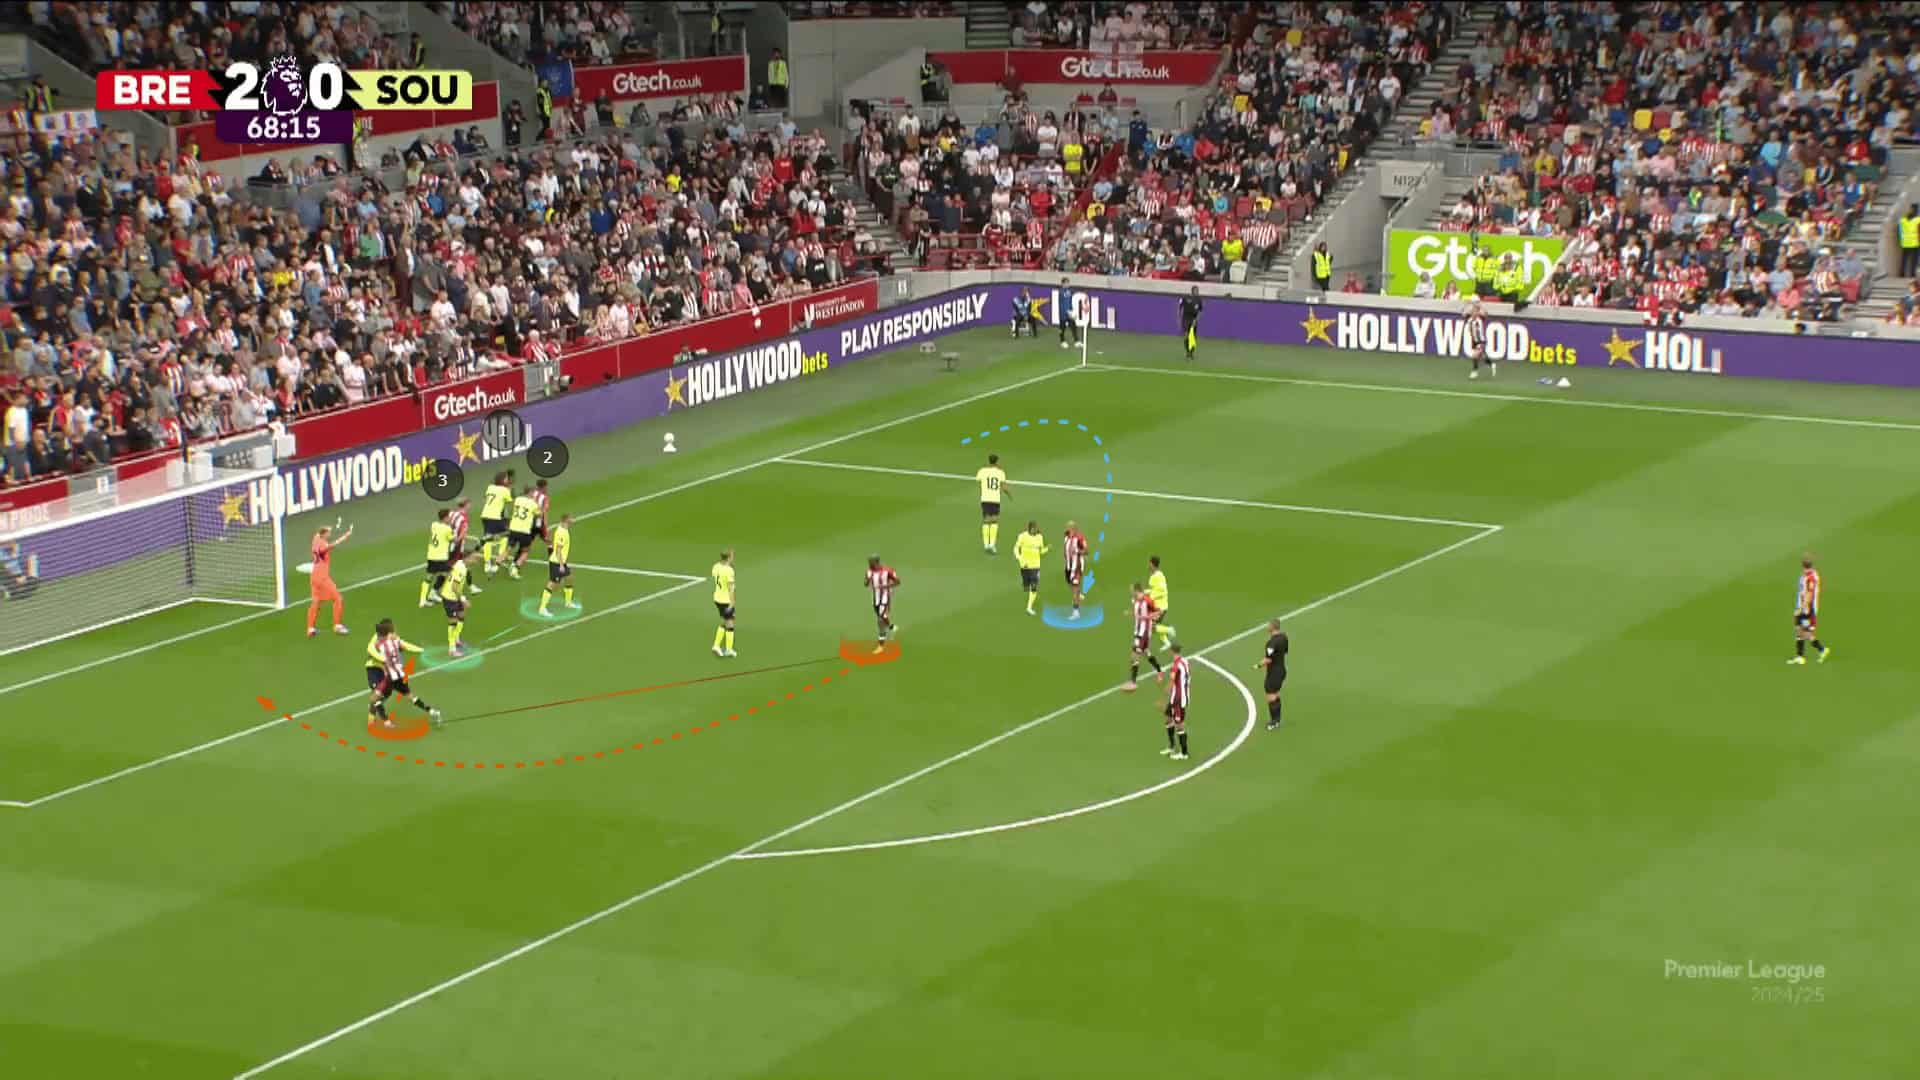
As shown below, Bryan Mbeumo (blue) makes his usual run after evacuating the targeted area.

You can also notice that the three targeted players preceded their man markers, who were chasing them from the middle.

This causes the attackers to come first, give their backs to their markers, and stop them until they measure the landing point ball and go for it.

It’s also noted that the targeted area is near the goal line, which is totally behind the two zonal defenders, who are useless in this case.

The first zonal defender tries to check his shoulder to see what happens at his back.

The plan works, and the result is a goal.

throw-in-series-brentford-long-throw-in-tactics-explained-tactics

Tactics Against Zonal Marking Systems

Regarding the other defending scheme, some teams rely on the deep zonal system, which is very similar to the corner defending scheme.

pic.twitter.com/0GLPUjrtCY

— Footie Clips (@FootieClips) February 11, 2025

As shown in the photo below, West Ham United defend with five zonal defenders in the six-yard (green), three second-line zonal defenders (orange), a short-option defender (pink) and a rebound defender (yellow).

First, three deep zonal defenders around the goalmouth are shifted toward the near post.

Being deep kills Brentford’s advantage of coming from their blind side.

In front of them, there are two zonal defenders in different depths.

The first one is allowed to chase the first ball while the other covers the area behind him, knowing that the near second-line zonal defender also helps to fill any gaps.

This was a successful defence system.

throw-in-series-brentford-long-throw-in-tactics-explained-tactics

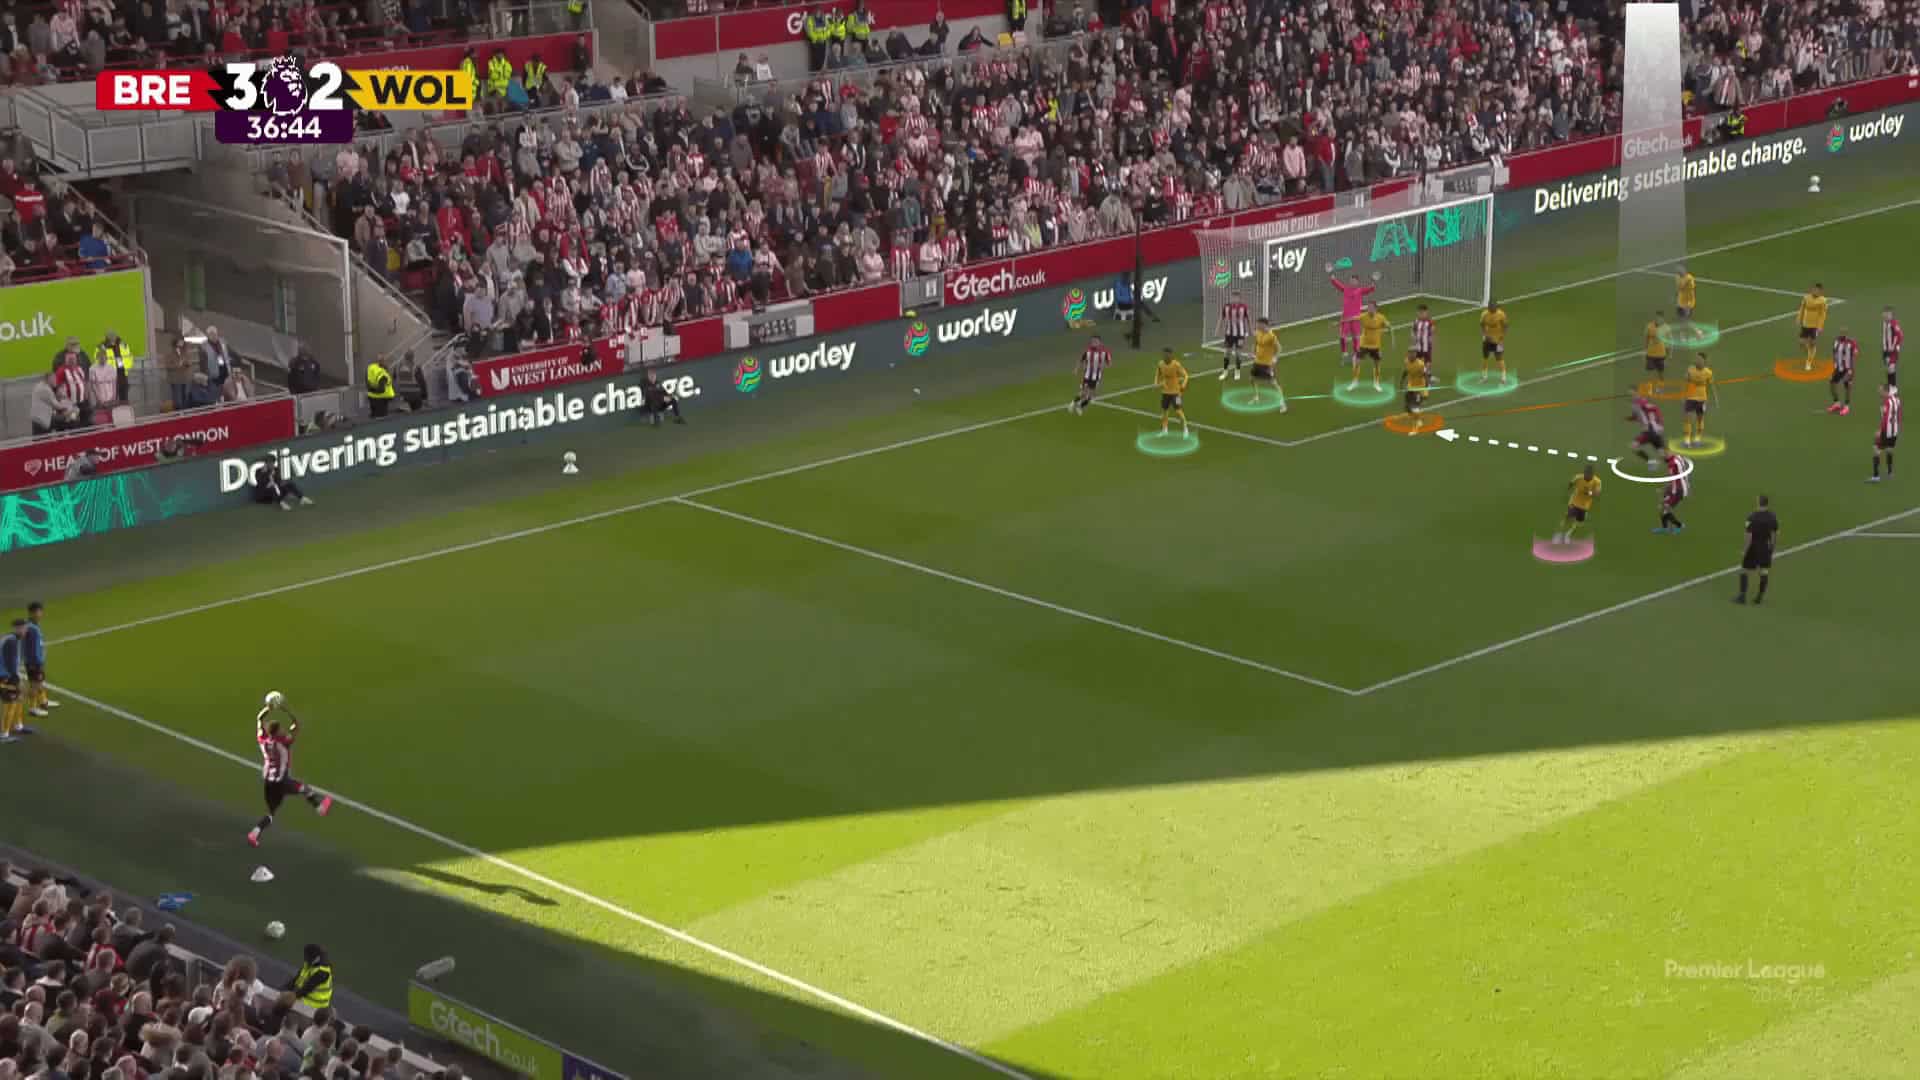
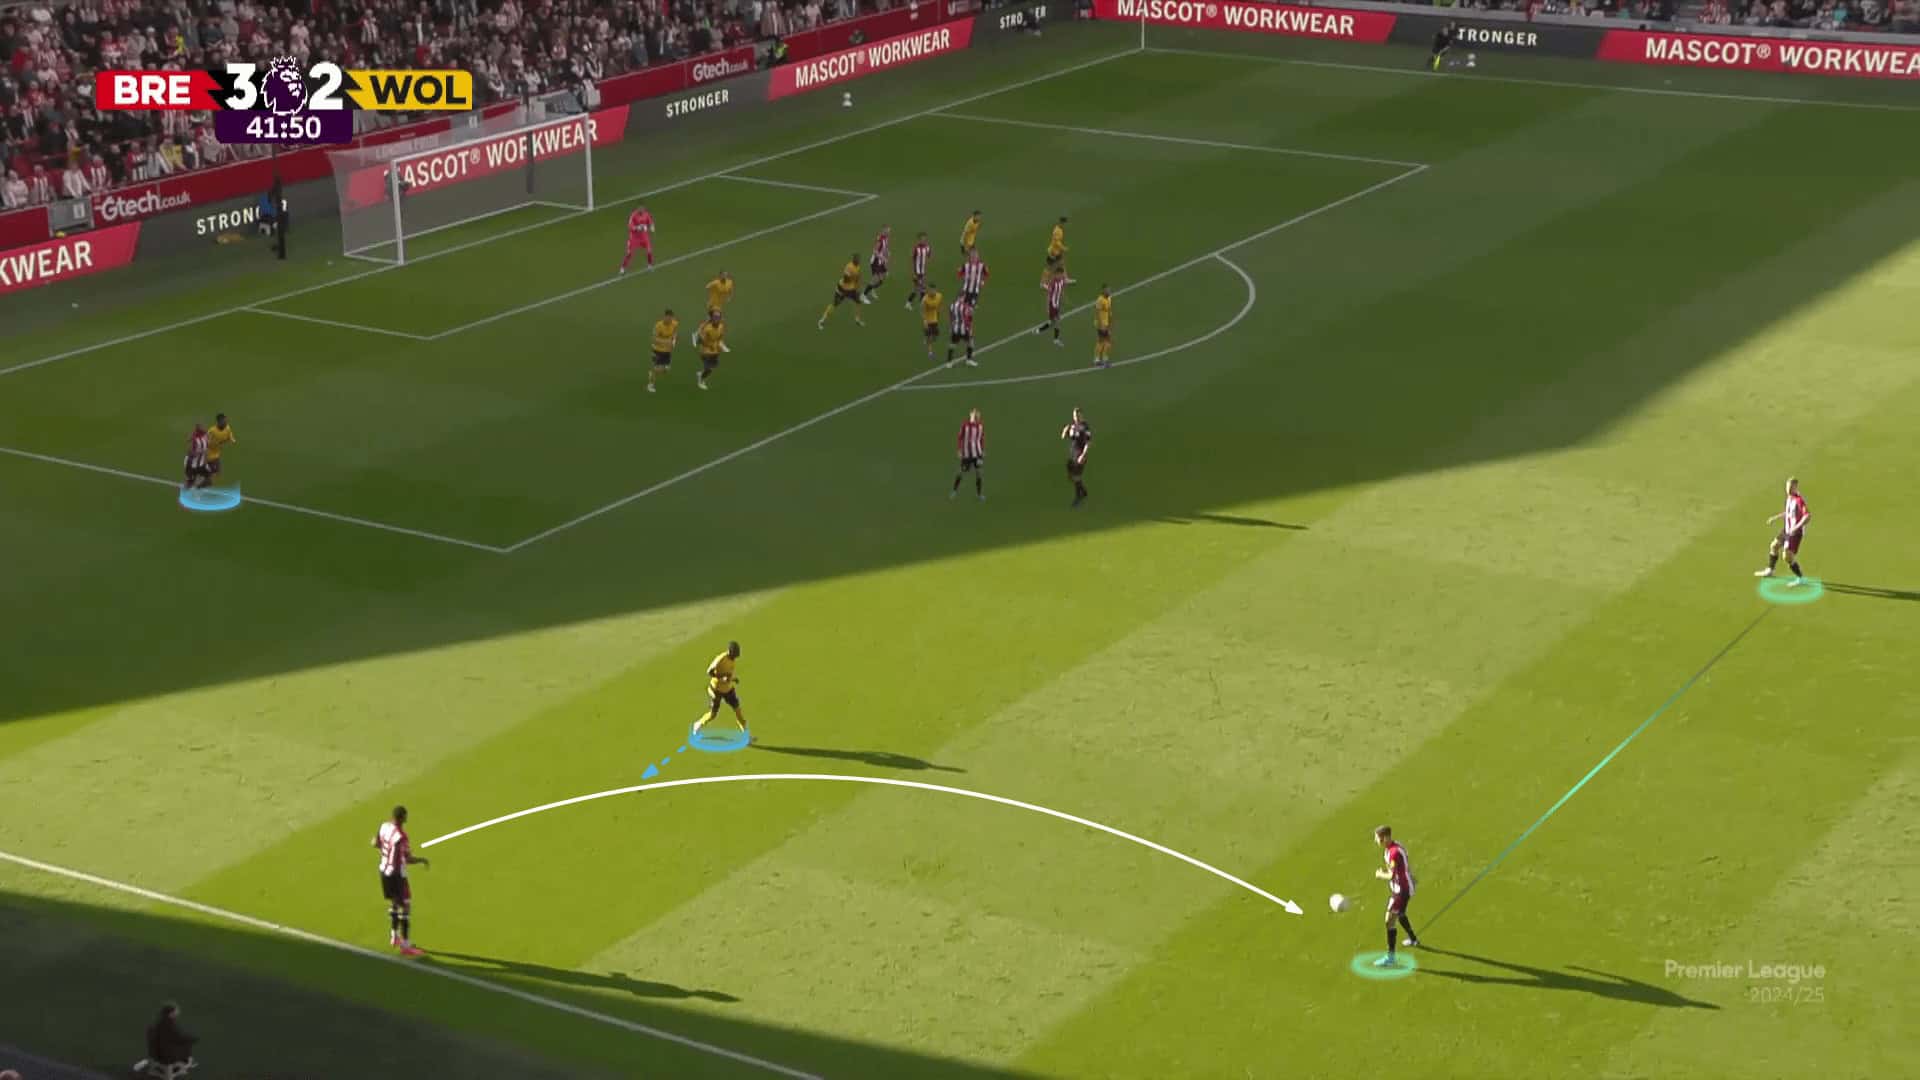
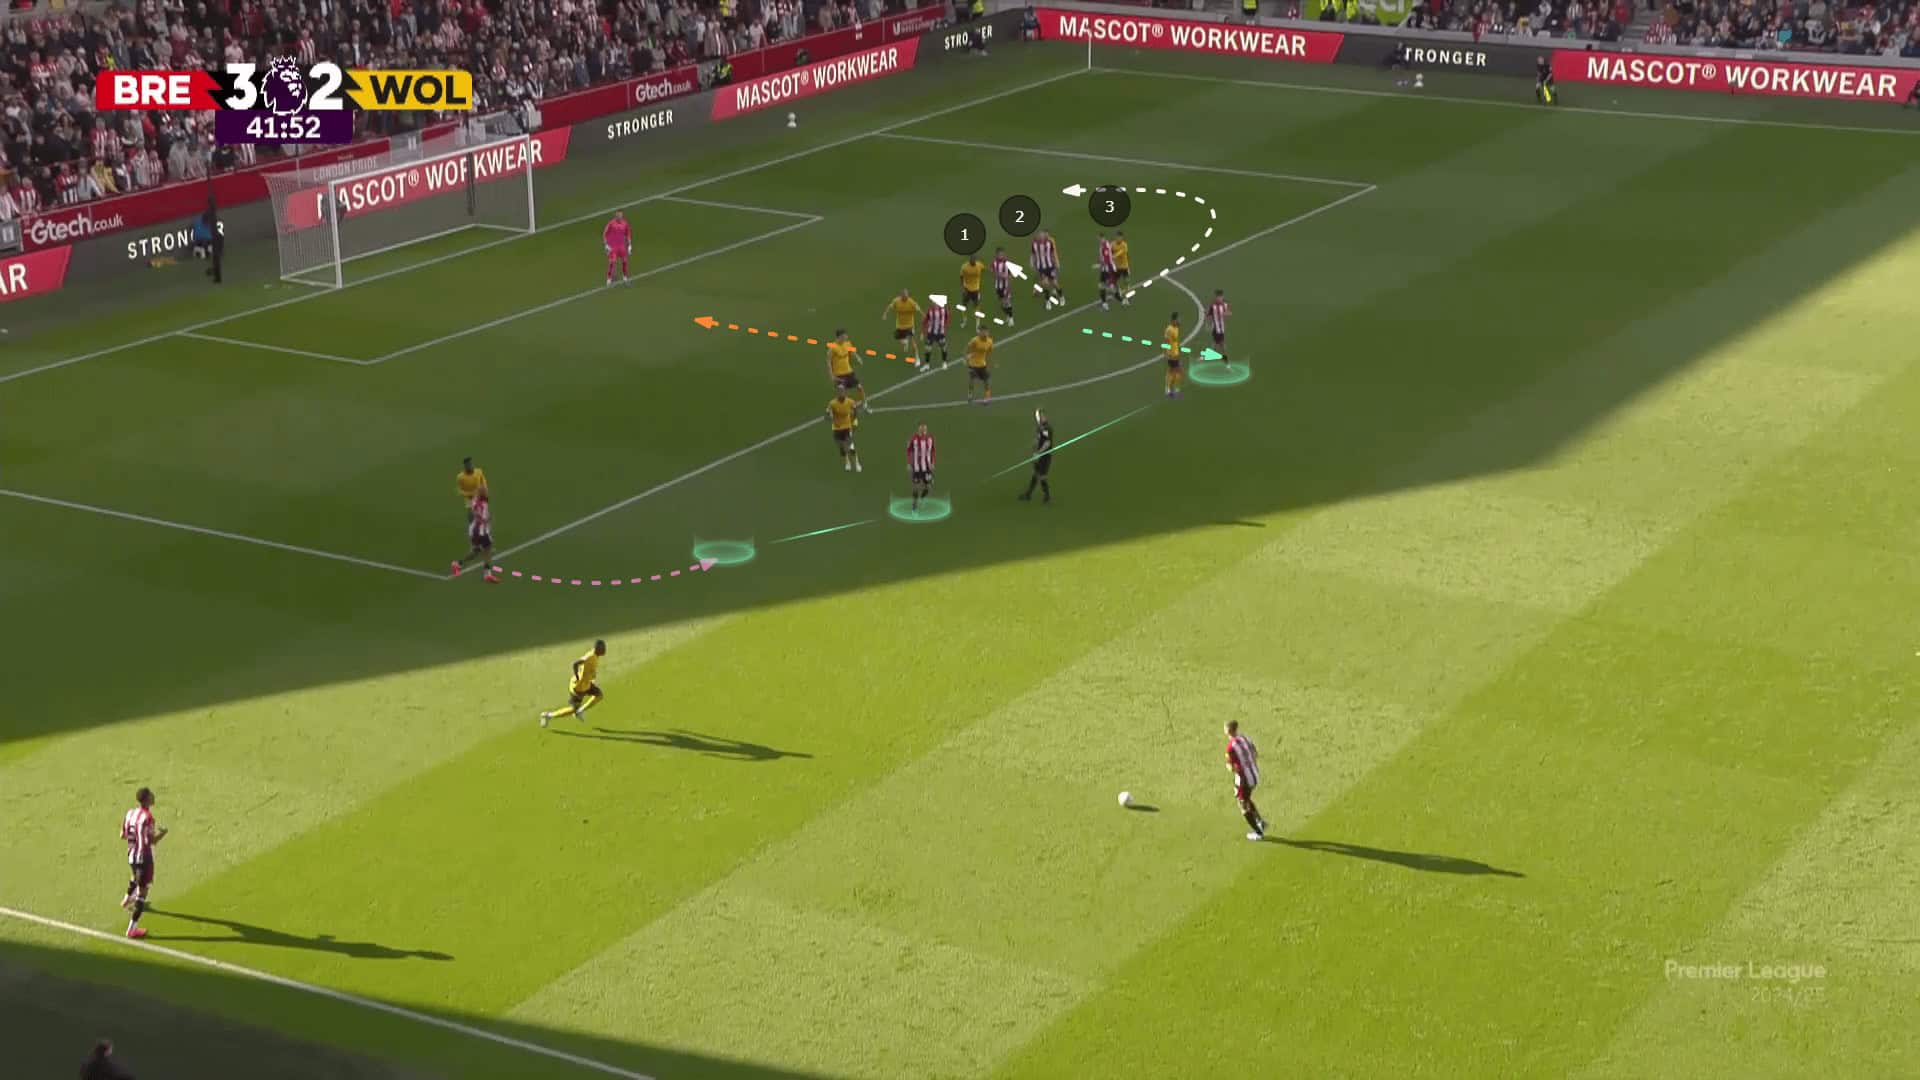
After that, they faced Wolverhampton Wanderers, who employed a similar defensive strategy.

pic.twitter.com/gARJtDg4Pc

— Footie Clips (@FootieClips) February 11, 2025

As shown below, Brentford attempts to find a solution against this tight defensive scheme, so they add a fourth targeted player (circled in white) who starts to run early from a late point, acting as if he is a rebounding defender trying to come from the first-second line zonal defender’s blind side.

This trick also allows him to run enough space before jumping, which can help him jump higher than the stationary defence, called a “dynamic mismatch”.

In the end, the cross coming behind him wasn’t accurate.

throw-in-series-brentford-long-throw-in-tactics-explained-tactics

The Rebound

From the beginning, we emphasise the importance of the rebound players in getting the second ball and killing the counterattacks.

However, one of the best uses of these long throw-ins is exploiting the unorganised defence, which focuses on defending the ball dragged in the box to get and shoot the second ball, as in the video below.

pic.twitter.com/NoayPCwkCr

— Footie Clips (@FootieClips) February 11, 2025

In addition, they are always ready to receive the second, third, or even the fourth touch during the fight in the box, thanks to framing the ball, as mentioned above in the video below.

pic.twitter.com/LRf5oyKywd

— Footie Clips (@FootieClips) February 11, 2025

It’s essential to recognise that long throw-ins are regarded as high-risk, high-reward activities in football.

Football is about opinions and identity, and everything has advantages and disadvantages.

Hence, the same “rebound” advantage can be a disadvantage because you make the match like a ping pong game with a high tempo and continuous crosses, so if you can’t get the second ball, you may be in trouble against excellent teams at counterattacks, as in the video below.

pic.twitter.com/SyaThfXsbx

— Footie Clips (@FootieClips) February 11, 2025

You can say that they succeeded in getting the ball, and this is right, but some coaches prefer not to take that risk.

Short Variations

Teams try to protect the box perfectly against them, so they might exaggerate, e.g., leaving the short area near the taker empty or reorganising themselves and shrinking inside the box.

Therefore, they should have some variations to surprise the opponents.

They also need these variations against teams who are good at defending long throw-ins.

As mentioned above, Mbeumo runs toward the taker in both cases (the throw-in is on the right or left side) so he can quickly receive the ball in dangerous areas.

pic.twitter.com/F9UlbVQVPu

— Footie Clips (@FootieClips) February 11, 2025

In the case below, Brentford uses his quick run behind the entire defence to target him behind the line as a variation, exploiting the fact that there is no offside in throw-ins.

throw-in-series-brentford-long-throw-in-tactics-explained-tactics

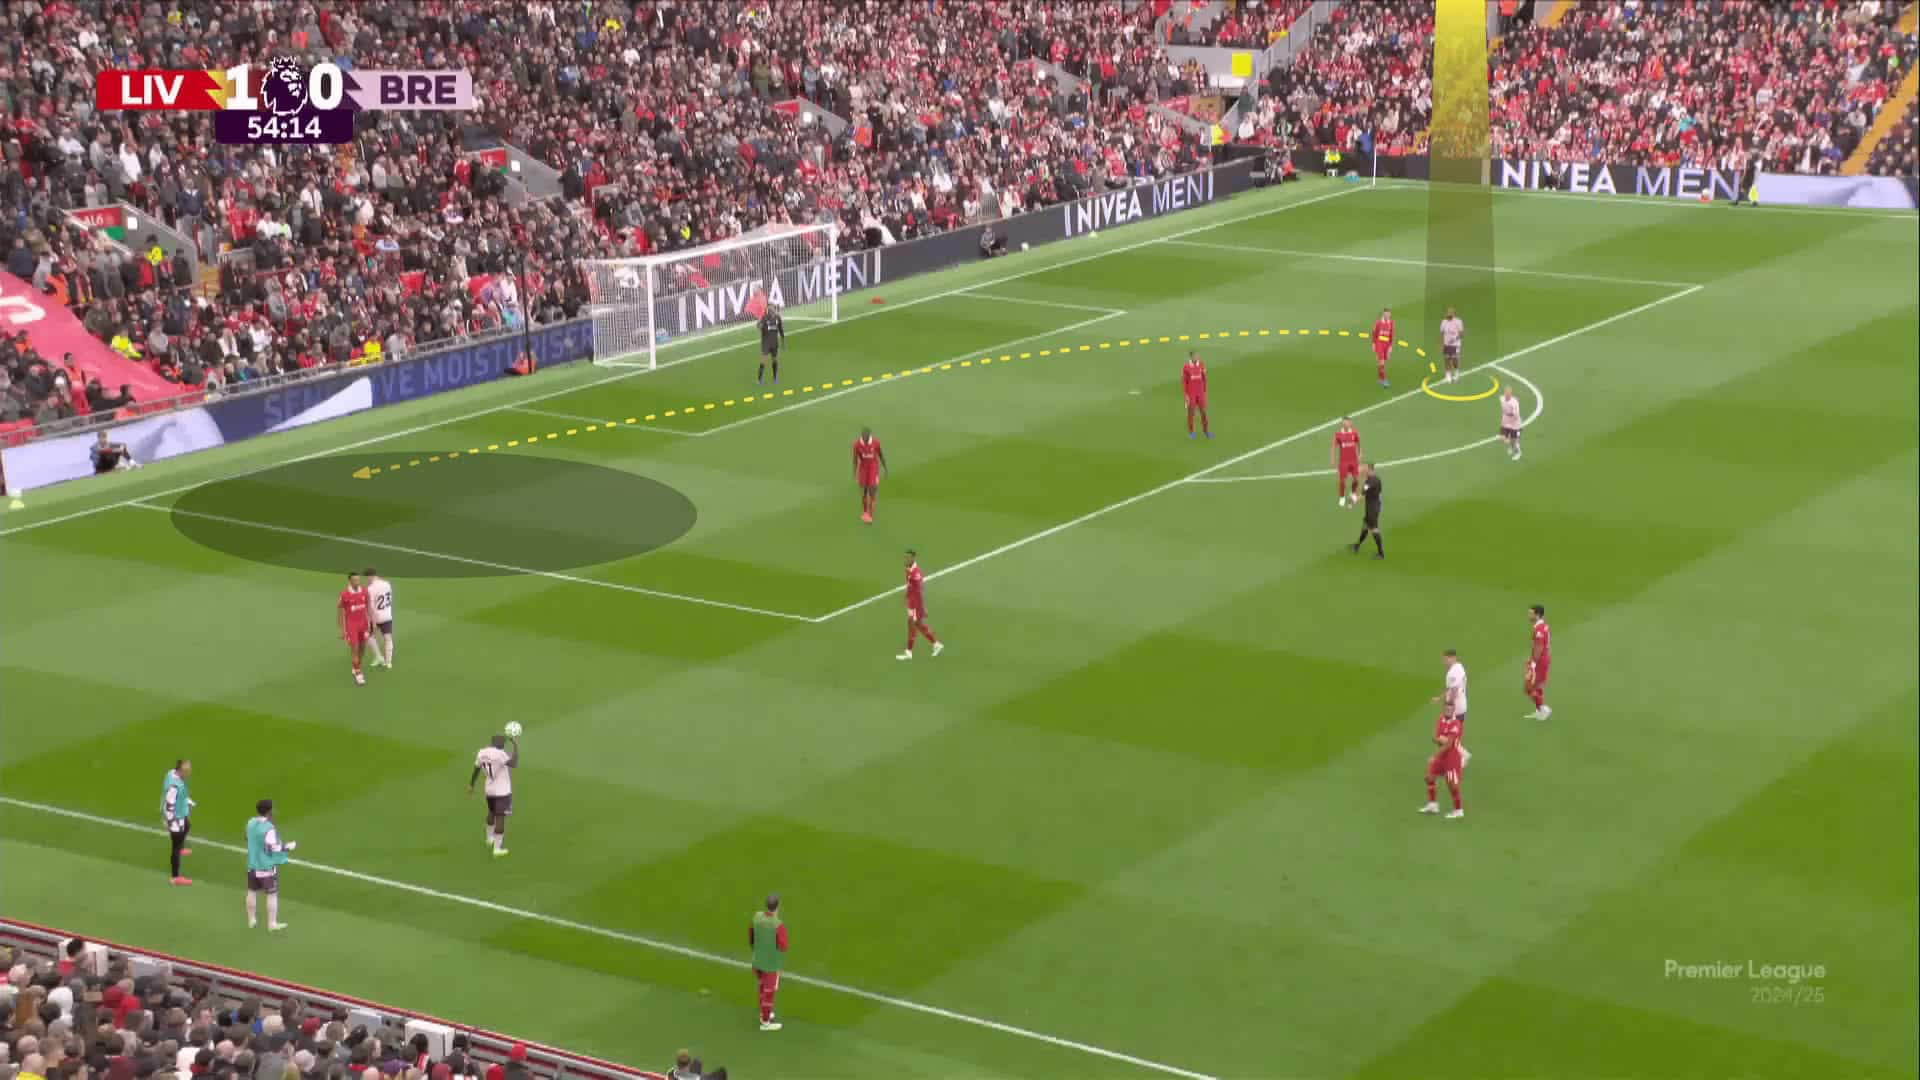
When the throw-in is on the right side, he can quickly receive the ball and send the cross while the opponents reorganise.

pic.twitter.com/V5RPJk9306

— Footie Clips (@FootieClips) February 11, 2025

Going to other variations (not quick), they exploit the numerical superiority near the throwers when teams overcompensate in defending the box.

pic.twitter.com/YOCmdlwHI1

— Footie Clips (@FootieClips) February 11, 2025

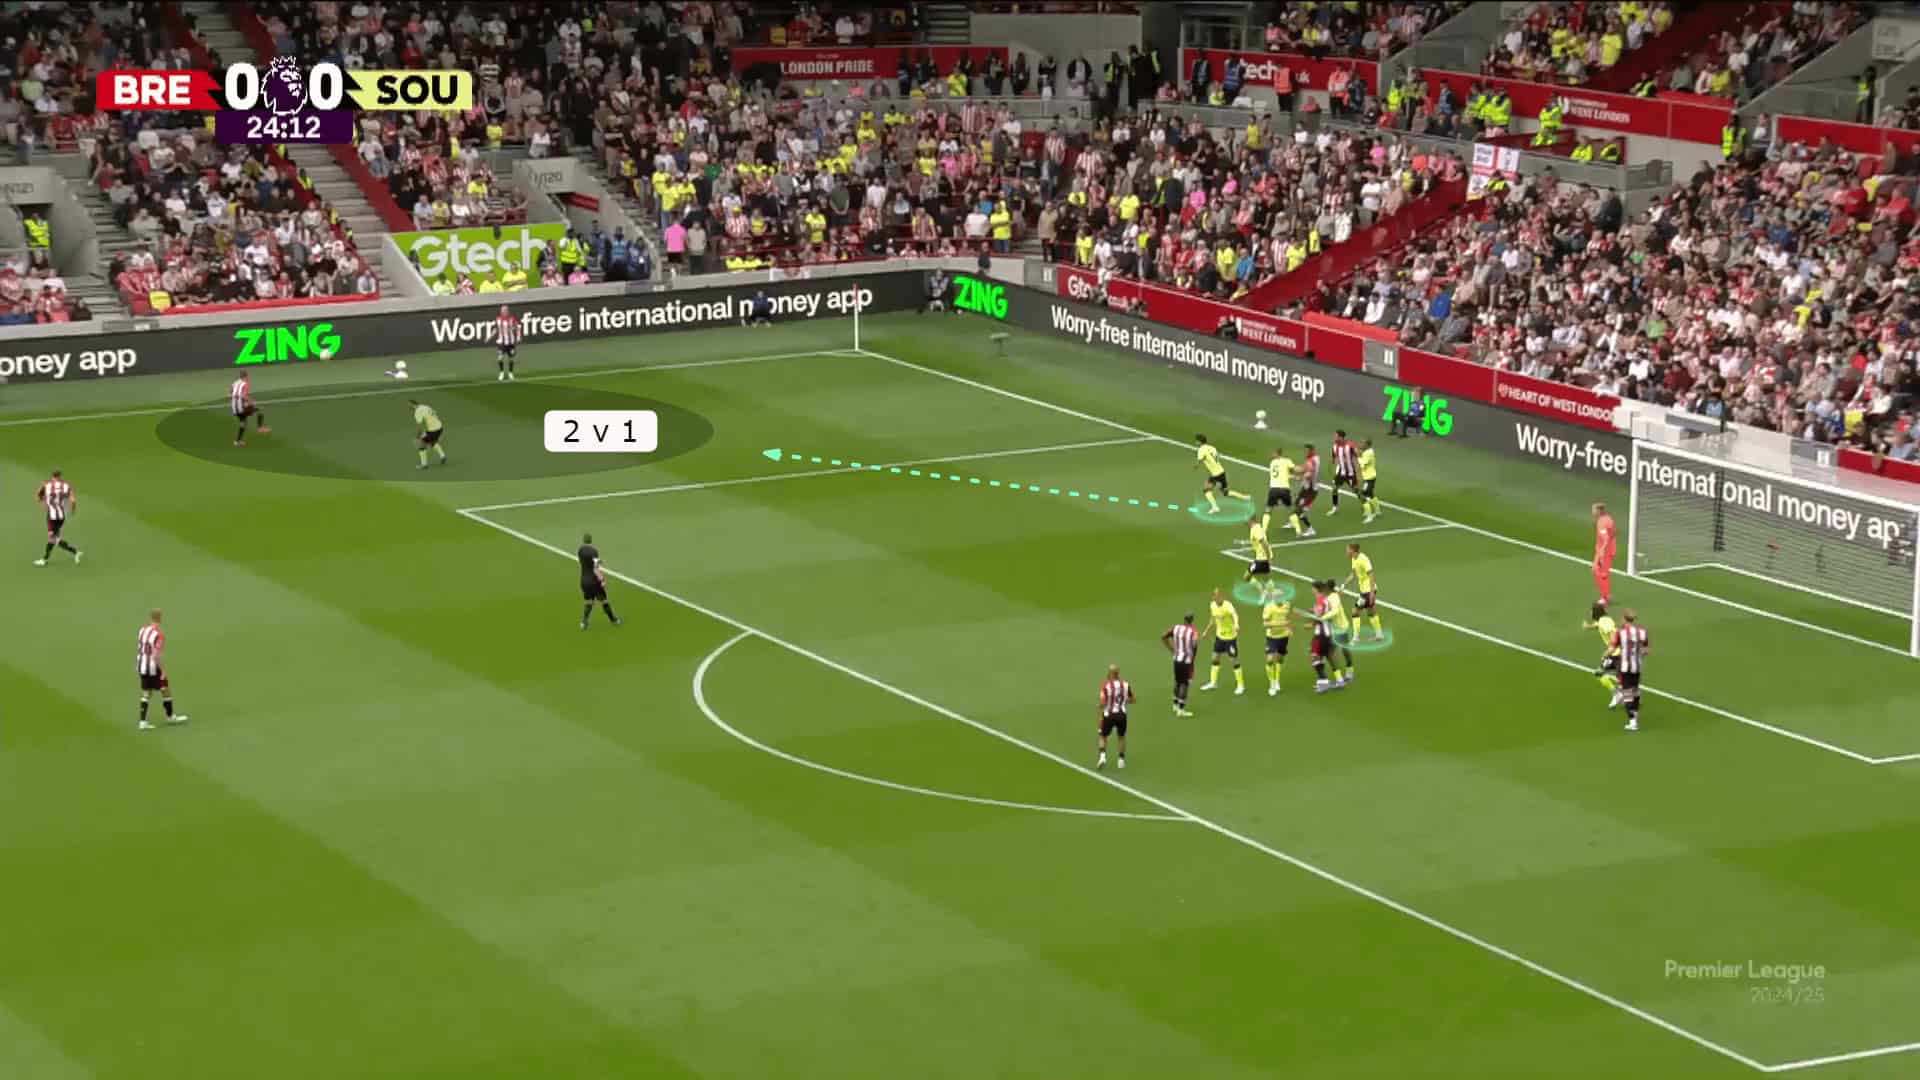
As shown below, Southampton defend the short area with only one player in this case (after Wissa and Mbeumo dragged two players).

The thrower throws the ball shortly in a 2v1 situation because the one who comes to help needs to cut a long distance.

After that, they send a cross while the two-man markers ahead of the near post might be a problem because leaving their men free to push up to implement the offside trap is difficult.

throw-in-series-brentford-long-throw-in-tactics-explained-tactics

The thrower sometimes throws it to one of the two players at the back, not even to the short option, in case he is marked.

pic.twitter.com/CHvgm79HfU

— Footie Clips (@FootieClips) February 11, 2025

The player near the taker is marked, so he throws the ball back to one of the two security players who will send the cross.

throw-in-series-brentford-long-throw-in-tactics-explained-tactics

Focusing on what happens in the box, three attackers (white arrows) turn around to attack the blind side of the backline while a player (orange) frames the ball to get the second pass.

Meanwhile, a player (green arrow) goes back to join the rebound group.

throw-in-series-brentford-long-throw-in-tactics-explained-tactics

Conclusion

In this analysis, we have discussed Brentford’s attacking tactics in long throw-ins and how they dealt with different defending strategies.

In this set-piece analysis, we have also shown the short variations they used to manipulate the opponents, who focused too much on defending the box and neglected the area around the thrower.

Finally, we have shown that long throw-ins are considered high-risk, high-reward in football.

This shows that football is about opinions and identity; everything has advantages and disadvantages.

Previous Post

Arsenal’s Rising Stars And Injury Comebacks: A Mid-Season Update

Next Post

Do Rebuilds Actually Work? The Impact Of New Signings Vs Table Position (Part 2) – Premier League Data Analysis

Next Post
EPL Data Analysis - transfers vs table ranking

Do Rebuilds Actually Work? The Impact Of New Signings Vs Table Position (Part 2) - Premier League Data Analysis

Premier League tactical clusters data visualization showing three team archetypes

Premier League Tactical Archetypes: What Clustering Reveals

June 4, 2026
PSG’s Control Of Arsenal In The Champions League Final – Tactical Analysis

PSG’s Control Of Arsenal In The Champions League Final – Tactical Analysis

June 3, 2026
Femi Azeez

Femi Azeez Scout Report At Millwall 2025/2026: A High-Output Transition Winger – Player Analysis

April 17, 2026
  • About Total Football Analysis
  • Contact Total Football Analysis
  • Advertise
  • Privacy Policy
  • Cancellation / Refund Policy
  • Resources
  • Terms Of Service

© 2026 Total Football Analysis

No Result
View All Result
  • Football Analysis
    • Data Analysis
    • Formations
      • 2-2-4 Formation
      • 2-3-5 Formation
      • 3-1-4-2 Formation
      • 3-2-2-3 Formation
      • 3-2-4-1 Formation
      • 3-1-6 Formation
      • 3-3-4 Formation
      • 3-4-1-2 Formation
      • 3-4-2-1 Formation
      • 3-4-3 Formation
      • 3-5-1-1 Formation
      • 3-5-2 Formation
      • 4-1-4-1 Formation
      • 4-2-2-2 Formation
      • 4-2-3-1 Formation
      • 4-2-4 Formation
      • 4-3-1-2 Formation
      • 4-3-3 Formation
      • 4-4-2 Formation
      • 4-5-1 Formation
      • 5-3-2 Formation
      • 5-4-1 Formation
      • 6-3-1 Formation
    • Head Coach Analysis
    • Match Analysis
    • Player Analysis
    • Recruitment Analysis
    • Set Piece Analysis
    • Tactical Theory
    • Tactical Preview
    • Team Analysis
    • Training Analysis
    • Tactical Analysis
    • Scouting Report
  • Competition
    • ALL Competitions
    • English Premier League
    • Champions League
    • La Liga
    • Bundesliga
    • Serie A
    • Ligue 1
    • Eredivisie
    • EFL Championship
    • FIFA World Cup 2022
    • WEURO 2022
    • Women’s Super League
    • NWSL
    • Belgian First Division A
    • A-League
    • Liga Profesional de Argentina
    • Austrian Bundesliga
    • Campeonato Brasileiro Série A
    • DFB Pokal
    • 1. HNL
    • Danish Superliga
    • EFL League One
    • EFL League Two
    • FA Cup
    • EFL Cup
    • Indian Super League
    • K-League
    • J1 League
    • Liga MX
    • Copa América 2021
    • Copa del Rey
    • MLS
    • Eliteserien
    • Euro 2020
    • Primeira Liga
    • Scottish Premiership
    • Allsvenskan
    • Europa League
    • UEFA Nations League
    • Liga AUF Uruguaya
  • Coaches
    • All Coaches
    • Alfred Schreuder
    • Ange Postecoglou
    • Antonio Conte
    • Arne Slot
    • Bo Svensson
    • Brendan Rodgers
    • Bruno Lage
    • Carlo Ancelotti
    • Christophe Galtier
    • Claude Puel
    • Claudio Ranieri
    • David Moyes
    • Dean Smith
    • Diego Simeone
    • Domenico Tedesco
    • Frank Lampard
    • Eddie Howe
    • Edin Terzić
    • Emma Hayes
    • Erik ten Hag
    • Ernesto Valverde
    • Gennaro Gattuso
    • Gerardo Seoane
    • Gian Piero Gasperini
    • Giovanni van Bronckhorst
    • Graham Potter
    • Igor Tudor
    • Imanol Alguacil
    • Jesse Marsch
    • Jonas Eidevall
    • Jorge Sampaoli
    • José Bordalás
    • José Mourinho
    • Julen Lopetegui
    • Julian Nagelsmann
    • Julien Stéphan
    • Jürgen Klopp
    • Luciano Spalletti
    • Lucien Favre
    • Manuel Pellegrini
    • Marcelo Bielsa
    • Marco Rose
    • Marco Silva
    • Massimiliano Allegri
    • Mauricio Pochettino
    • Maurizio Sarri
    • Mikel Arteta
    • Niko Kovač
    • Nuno Espírito Santo
    • Oliver Glasner
    • Patrick Vieira
    • Paulo Fonseca
    • Pep Guardiola
    • Peter Bosz
    • Rafa Benítez
    • Ralf Rangnick
    • Ralph Hasenhüttl
    • Roger Schmidt
    • Roy Hodgson
    • Sean Dyche
    • Sérgio Conceição
    • Simone Inzaghi
    • Sonia Bompastor
    • Stefano Pioli
    • Steffen Baumgart
    • Steven Gerrard
    • Thiago Motta
    • Thomas Frank
    • Thomas Tuchel
    • Unai Emery
    • Vincenzo Italiano
    • Xavi
  • Teams
    • ALL Teams
    • AC Milan
    • Ajax Amsterdam
    • Arsenal
    • AS Monaco FC
    • Atalanta
    • Atlético Madrid
    • FC Barcelona
    • FC Bayern Munich
    • Borussia Dortmund
    • Celtic FC
    • Chelsea FC
    • Everton F.C.
    • Inter Milan
    • Juventus F.C.
    • Leeds United F.C.
    • Liverpool FC
    • Manchester City
    • Manchester United FC
    • Paris Saint-Germain
    • Rangers FC
    • RB Leipzig
    • Real Madrid CF
    • Tottenham Hotspur
    • West Ham United
  • Players
    • ALL Players
    • Alisson Becker
    • Bukayo Saka
    • Erling Haaland
    • Harry Kane
    • Jack Grealish
    • John Stones
    • Julián Alvarez
    • Kalvin Phillips
    • Kevin De Bruyne
    • Kyle Walker
    • Kylian Mbappé
    • Lamine Yamal
    • Lionel Messi
    • Luis Díaz
    • Mohamed Salah
    • Phil Foden
    • Virgil Van Dijk
  • Guides
    • Best Betting Sites
      • World Cup Betting Sites
      • World Cup Free Bets
      • World Cup Betting Promotions
      • Betting Sites Not on GamStop
      • Crypto Betting Sites
      • No KYC Betting Sites
      • European Bookmakers
      • Betting Apps
      • Footbal Betting Sites
      • New Betting Sites
      • Betting Bonuses
      • Free Bets
      • Cash Out Betting Sites
    • Online Casinos
      • Non GamStop Casinos
      • Crypto Casinos
      • Offshore Casinos
      • Real Money Slots
  • Contact
  • Login

© 2026 Total Football Analysis