Total Football Analysis
  • Football Analysis
    • Data Analysis
    • Formations
      • 2-2-4 Formation
      • 2-3-5 Formation
      • 3-1-4-2 Formation
      • 3-2-2-3 Formation
      • 3-2-4-1 Formation
      • 3-1-6 Formation
      • 3-3-4 Formation
      • 3-4-1-2 Formation
      • 3-4-2-1 Formation
      • 3-4-3 Formation
      • 3-5-1-1 Formation
      • 3-5-2 Formation
      • 4-1-4-1 Formation
      • 4-2-2-2 Formation
      • 4-2-3-1 Formation
      • 4-2-4 Formation
      • 4-3-1-2 Formation
      • 4-3-3 Formation
      • 4-4-2 Formation
      • 4-5-1 Formation
      • 5-3-2 Formation
      • 5-4-1 Formation
      • 6-3-1 Formation
    • Head Coach Analysis
    • Match Analysis
    • Player Analysis
    • Recruitment Analysis
    • Set Piece Analysis
    • Tactical Theory
    • Tactical Preview
    • Team Analysis
    • Training Analysis
    • Tactical Analysis
    • Scouting Report
  • FIFA World Cup 2026
    • World Cup Betting Sites
    • World Cup Betting Promotions
    • World Cup Free Bets
    • World Cup Golden Glove Odds
    • World Cup Top Scorer Odds
    • World Cup Player of the Tournament Odds
  • Competitions
    • English Premier League
    • Champions League
    • La Liga
    • Bundesliga
    • Serie A
    • Ligue 1
    • Eredivisie
    • EFL Championship
    • Women’s Super League
    • NWSL
    • Belgian First Division A
    • A-League
    • Liga Profesional de Argentina
    • Austrian Bundesliga
    • Campeonato Brasileiro Série A
    • DFB Pokal
    • 1. HNL
    • Danish Superliga
    • EFL League One
    • EFL League Two
    • FA Cup
    • EFL Cup
    • Indian Super League
    • K-League
    • J1 League
    • Liga MX
    • Copa del Rey
    • MLS
    • Eliteserien
    • Allsvenskan
    • Primeira Liga
    • Scottish Premiership
    • Europa League
    • UEFA Nations League
    • Liga AUF Uruguaya
  • Coaches
    • All Coaches
    • Alfred Schreuder
    • Ange Postecoglou
    • Antonio Conte
    • Arne Slot
    • Bo Svensson
    • Brendan Rodgers
    • Bruno Lage
    • Carlo Ancelotti
    • Christophe Galtier
    • Claude Puel
    • Claudio Ranieri
    • David Moyes
    • Dean Smith
    • Diego Simeone
    • Domenico Tedesco
    • Frank Lampard
    • Eddie Howe
    • Edin Terzić
    • Emma Hayes
    • Erik ten Hag
    • Ernesto Valverde
    • Gennaro Gattuso
    • Gerardo Seoane
    • Gian Piero Gasperini
    • Giovanni van Bronckhorst
    • Graham Potter
    • Igor Tudor
    • Imanol Alguacil
    • Jesse Marsch
    • Jonas Eidevall
    • Jorge Sampaoli
    • José Bordalás
    • José Mourinho
    • Julien Stéphan
    • Julen Lopetegui
    • Julian Nagelsmann
    • Jürgen Klopp
    • Luciano Spalletti
    • Lucien Favre
    • Manuel Pellegrini
    • Marcelo Bielsa
    • Marco Rose
    • Marco Silva
    • Massimiliano Allegri
    • Mauricio Pochettino
    • Maurizio Sarri
    • Mikel Arteta
    • Niko Kovač
    • Nuno Espírito Santo
    • Oliver Glasner
    • Patrick Vieira
    • Paulo Fonseca
    • Pep Guardiola
    • Peter Bosz
    • Rafa Benítez
    • Ralf Rangnick
    • Ralph Hasenhüttl
    • Roger Schmidt
    • Roy Hodgson
    • Sean Dyche
    • Sérgio Conceição
    • Simone Inzaghi
    • Sonia Bompastor
    • Stefano Pioli
    • Steffen Baumgart
    • Steven Gerrard
    • Thiago Motta
    • Thomas Frank
    • Thomas Tuchel
    • Unai Emery
    • Vincenzo Italiano
    • Xavi
  • Teams
    • ALL Teams
    • AC Milan
    • Ajax Amsterdam
    • Arsenal
    • AS Monaco FC
    • Atalanta
    • Atlético Madrid
    • FC Barcelona
    • FC Bayern Munich
    • Borussia Dortmund
    • Celtic FC
    • Chelsea FC
    • Everton F.C.
    • Inter Milan
    • Juventus F.C.
    • Leeds United F.C.
    • Liverpool FC
    • Manchester City
    • Manchester United FC
    • Paris Saint-Germain
    • Rangers FC
    • RB Leipzig
    • Real Madrid CF
    • Tottenham Hotspur
    • West Ham United
  • Players
    • ALL Players
    • Alisson Becker
    • Bukayo Saka
    • Erling Haaland
    • Harry Kane
    • Jack Grealish
    • John Stones
    • Kevin De Bruyne
    • Julián Alvarez
    • Kalvin Phillips
    • Kyle Walker
    • Kylian Mbappé
    • Luis Díaz
    • Lamine Yamal
    • Mohamed Salah
    • Lionel Messi
    • Virgil Van Dijk
    • Phil Foden
  • Guides
    • Betting Sites
      • Betting Apps
      • Betting Bonuses
      • Betting Exchanges
      • Betting Sites Not on GamStop
      • Cash Out Betting Sites
      • Crypto Betting Sites
      • European Bookmakers
      • Footbal Betting Sites
      • Free Bets
      • New Betting Sites
      • No KYC Betting Sites
      • Live Betting Sites
    • Online Casinos
      • Casino Apps
      • Credit Card Casinos
      • Crypto Casinos
      • Fast Payout Casinos
      • Non GamStop Casinos
      • Offshore Casinos
      • Slots Casinos
      • Irish Online Casinos
    • International
      • Betting Sites Ireland
  • Contact
No Result
View All Result
No Result
View All Result
Total Football Analysis
No Result
View All Result
Home Analysis

Mastering Throw-In Tactics: Defensive Strategies That Work At All Levels

Karim El-Shesheiny by Karim El-Shesheiny
October 15, 2024
in Analysis, Arsenal, Brighton & Hove Albion, Liverpool FC, Premier League, Set Piece Analysis, West Ham United
0
Mastering Throw-In Tactics: Defensive Strategies That Work At All Levels

Differences Between Throw-In Tactics & Set Piece Tactics

Throw-ins are a crucial set piece, often overlooked despite their frequent occurrence during matches.

For example, the average number of throw-ins in the Premier League last season was about 35 per game.

Throw-in tactics are somewhat different from other set pieces affected by these three factors:

1. The purposes vary for different teams executing and receiving the throw-ins according to:

2. The different locations on the field from which the throw-in is taken which leads to:

3. The importance of using different techniques and the speed of executing the throw-in exploiting many factors, such as throwing with the hands, which allows for easier control than kicking with the feet and the absence of offsides, for example.

To recognise that, imagine that a team whose essential purpose in attacking throw-ins is to retain possession and maintain control of the ball wants to create space to escape the pressure applied by the opponent, using the sideline as a factor to help them in the throwers’ defensive third (location).

The location matters because it is harder for the opponent to press you when you are in the middle of the field, where the area is wide and open, and you can play either far left or right.

In contrast, as you approach the corners of the field, you become more confined, particularly next to your penalty area, where the horizontal and vertical lines (touch and goal lines) can easily suffocate you. 

Thus, it is crucial to execute this throw-in technique quickly before your opponent can fully implement their plan to confine you.

Additionally, the technique of the throw itself may help you in several ways.

For example:

1- If the ball bounces on the ground, it can travel faster to reach a teammate over a longer distance.

2—The manner in which it reaches your teammate’s foot rather than their head or chest is also significant in making them react more quickly.

3- The direction may be necessary because some research suggests that the chances of receiving a first touch are higher when the throw is directed backwards rather than lateral or forward, as the opponent will naturally prioritise securing their defensive positioning first.

4- The thrower’s feinting to throw forward and then suddenly pivoting to throw backwards can provide a slight and surprising time advantage.

Thus, the purposes differ based on the location, leading to variations in the technique used, ultimately resulting in a specific tactic being employed.

For example, in your attacking third, your purpose and technique may differ; you might play the throw-in long and direct or look to create impactful spaces.

After all of that, we now know that tactics are created according to these three factors, forming many off-the-ball movements.

So, now we need to know the attacking tactics affected by these three factors, but we should start first with the different primary defending purposes and systems.

In this tactical analysis, we will start with the primary defending purposes and systems in general.

After that, we will discuss when a specific team aims for a particular defensive purpose using a specific strategy against different attacking purposes, locations, and techniques, showing study cases and analysing a match showing coaches’ reactions against each other in a pure tactical analysis.

Different Purposes

To understand the defending purposes, we need to understand the logical attacking purposes and counter them.

Many articles focus on teams’ different attacking purposes, which can naturally include a direct goal threat, more progression with the ball, retaining possession, or just not conceding chances.

Not conceding chances is an attacking common purpose because defending teams exploit a siege situation by trying to press and then threaten your goal.

We should remember that nearly 25% of Premier League throw-ins last season were in the throwing team’s defensive third, which is where they can be confined.

On the contrary, defending teams have many purposes, such as protecting their goal from any threat, stopping the opponent’s progression or pressing before then taking possession and trying to threaten the opponent’s goal. 

Different Systems & Strategies For Throw-Ins

We will demonstrate the different defending systems in throw-ins like any set-piece.

These strategies may differ from one location and opponent to another, but we will mention the general main systems and discuss specific cases later.

Man-Marking

As in any man-marking defending system, the defenders are man-oriented.

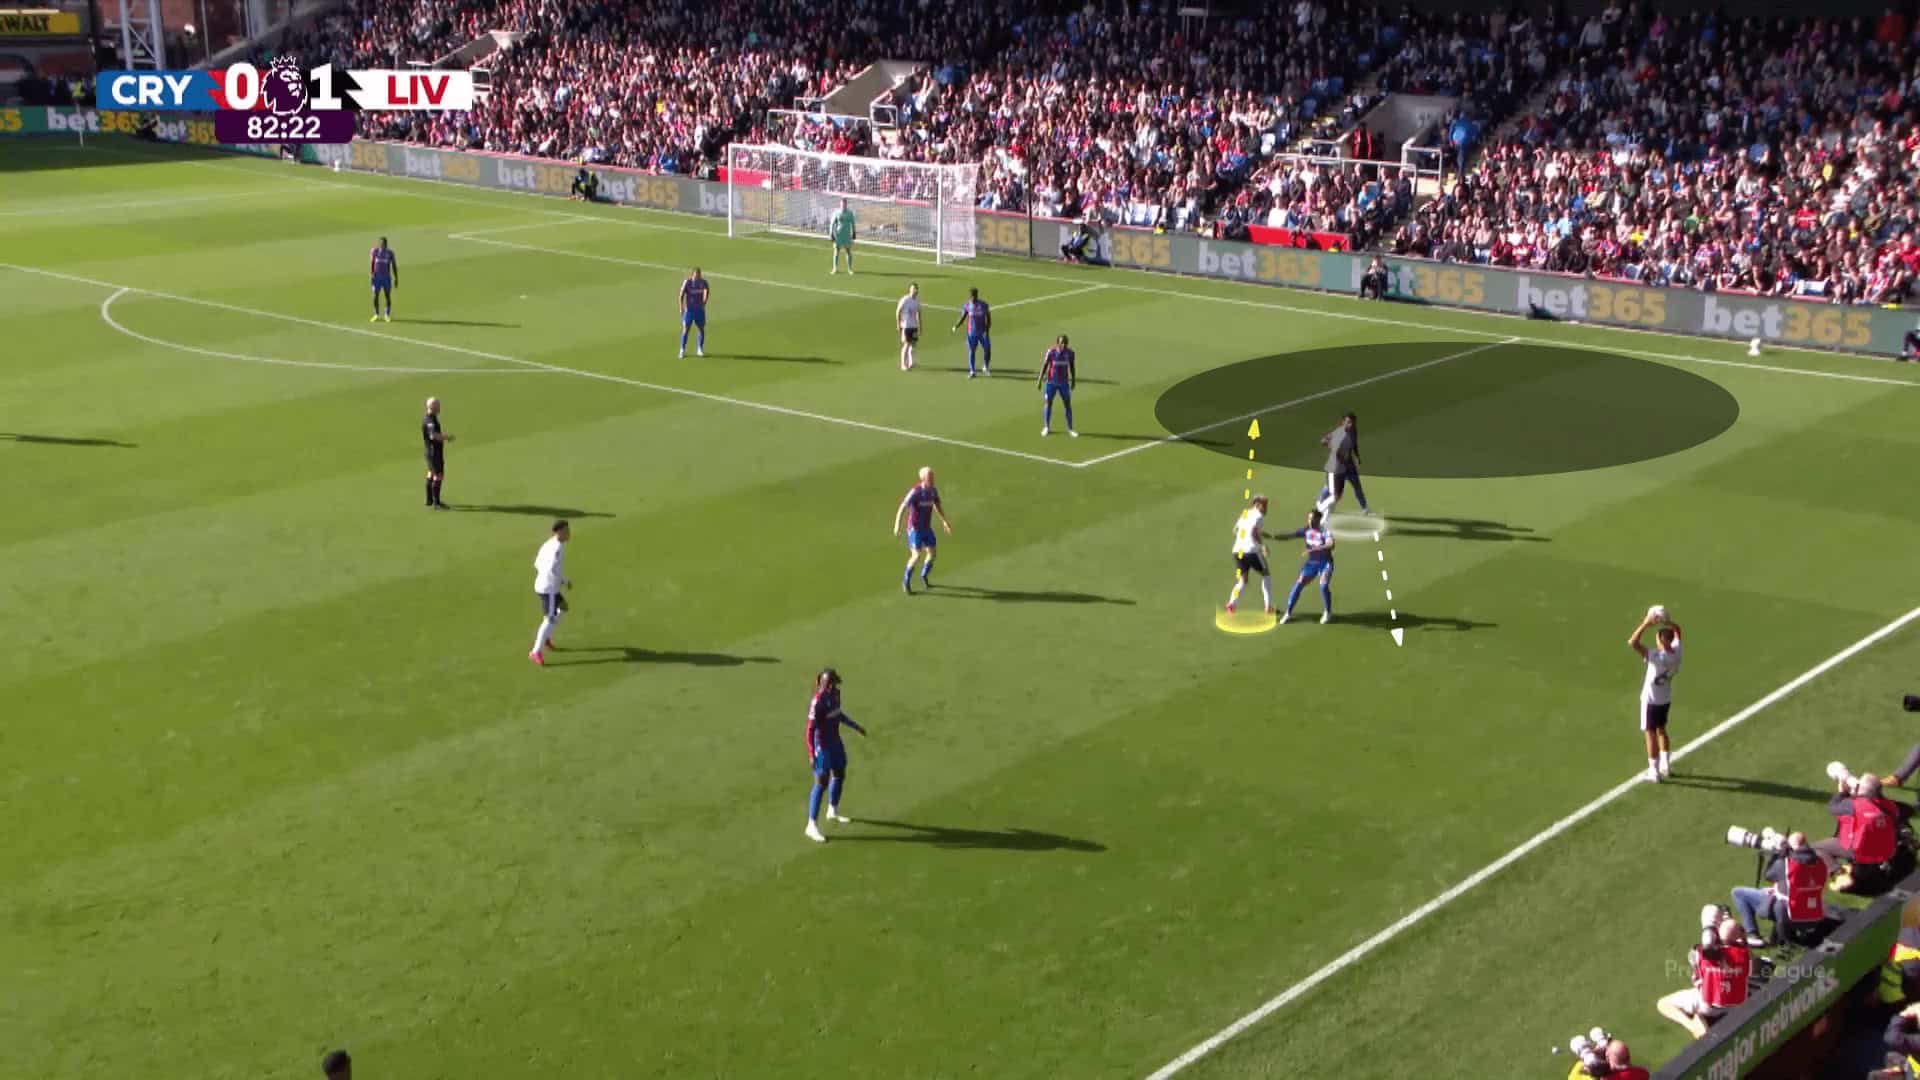
As you can see below, Crystal Palace, with a 5-4-1 formation, defended against Liverpool’s throw-in.

Trent Alexander-Arnold is the thrower, Luis Díaz (yellow) is the targeted player, and Dominik Szoboszlai (white) is next to him.

throw-ins-series-defence-goals-and-systems-set-piece-analysis-tactics

This system prioritises man-marking over protecting specific areas, so some rotations, switches, and screens can create suitable spaces in dangerous areas.

Indeed, Luis Díaz turns around Dominik Szoboszlai to get some separation from his marker while Szoboszlai tries to block it.

He moves him towards Díaz’s marker and tries to slow him down, giving Díaz time.

throw-ins-series-defence-goals-and-systems-set-piece-analysis-tactics

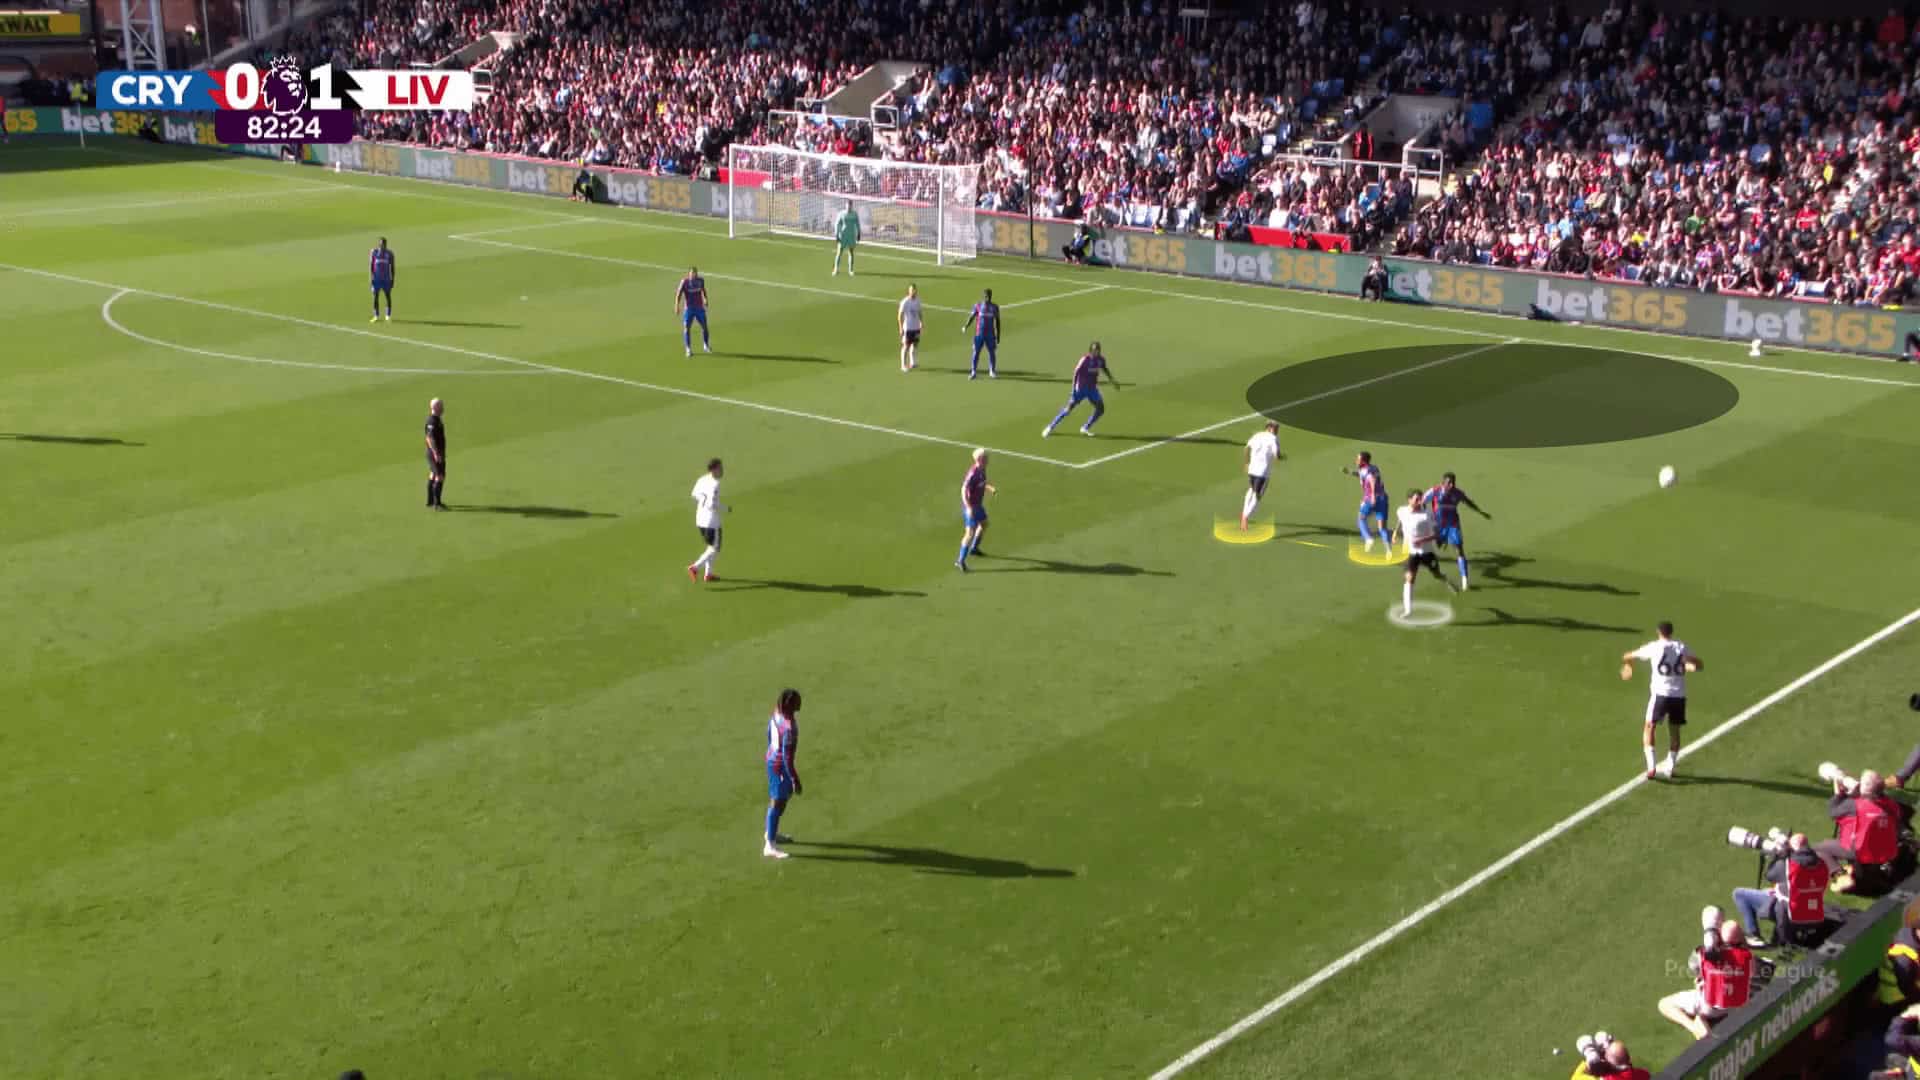
However, the marker could escape from this trap.

Here, Liverpool uses the backward switch to help Díaz escape from his marker, running toward this dangerous, empty area.

throw-ins-series-defence-goals-and-systems-set-piece-analysis-tactics

Díaz’s marker is forced to turn around, giving his back to the ball, and then run, which makes it challenging to catch Díaz, who can exploit this empty area.

throw-ins-series-defence-goals-and-systems-set-piece-analysis-tactics

Zonal Marking

Regarding zonal marking, teams prioritise protecting specific zones rather than marking players.

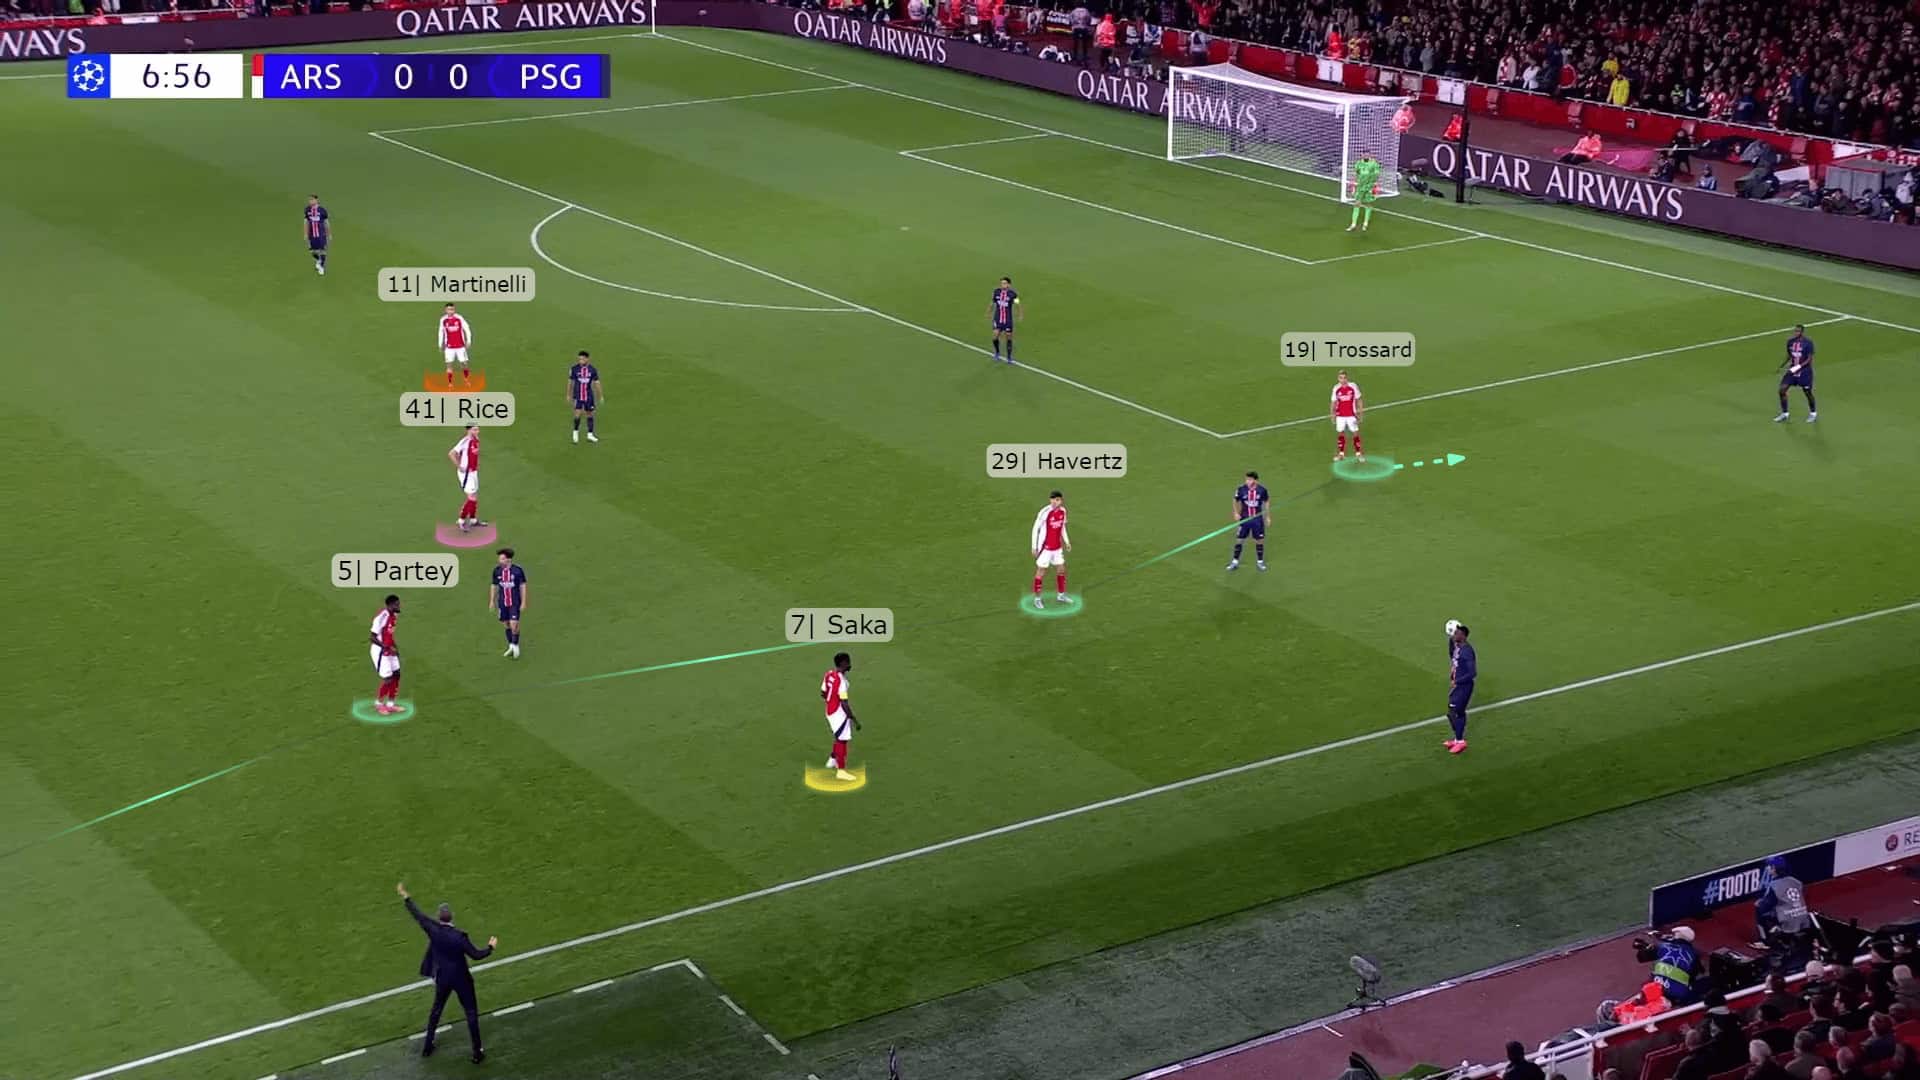
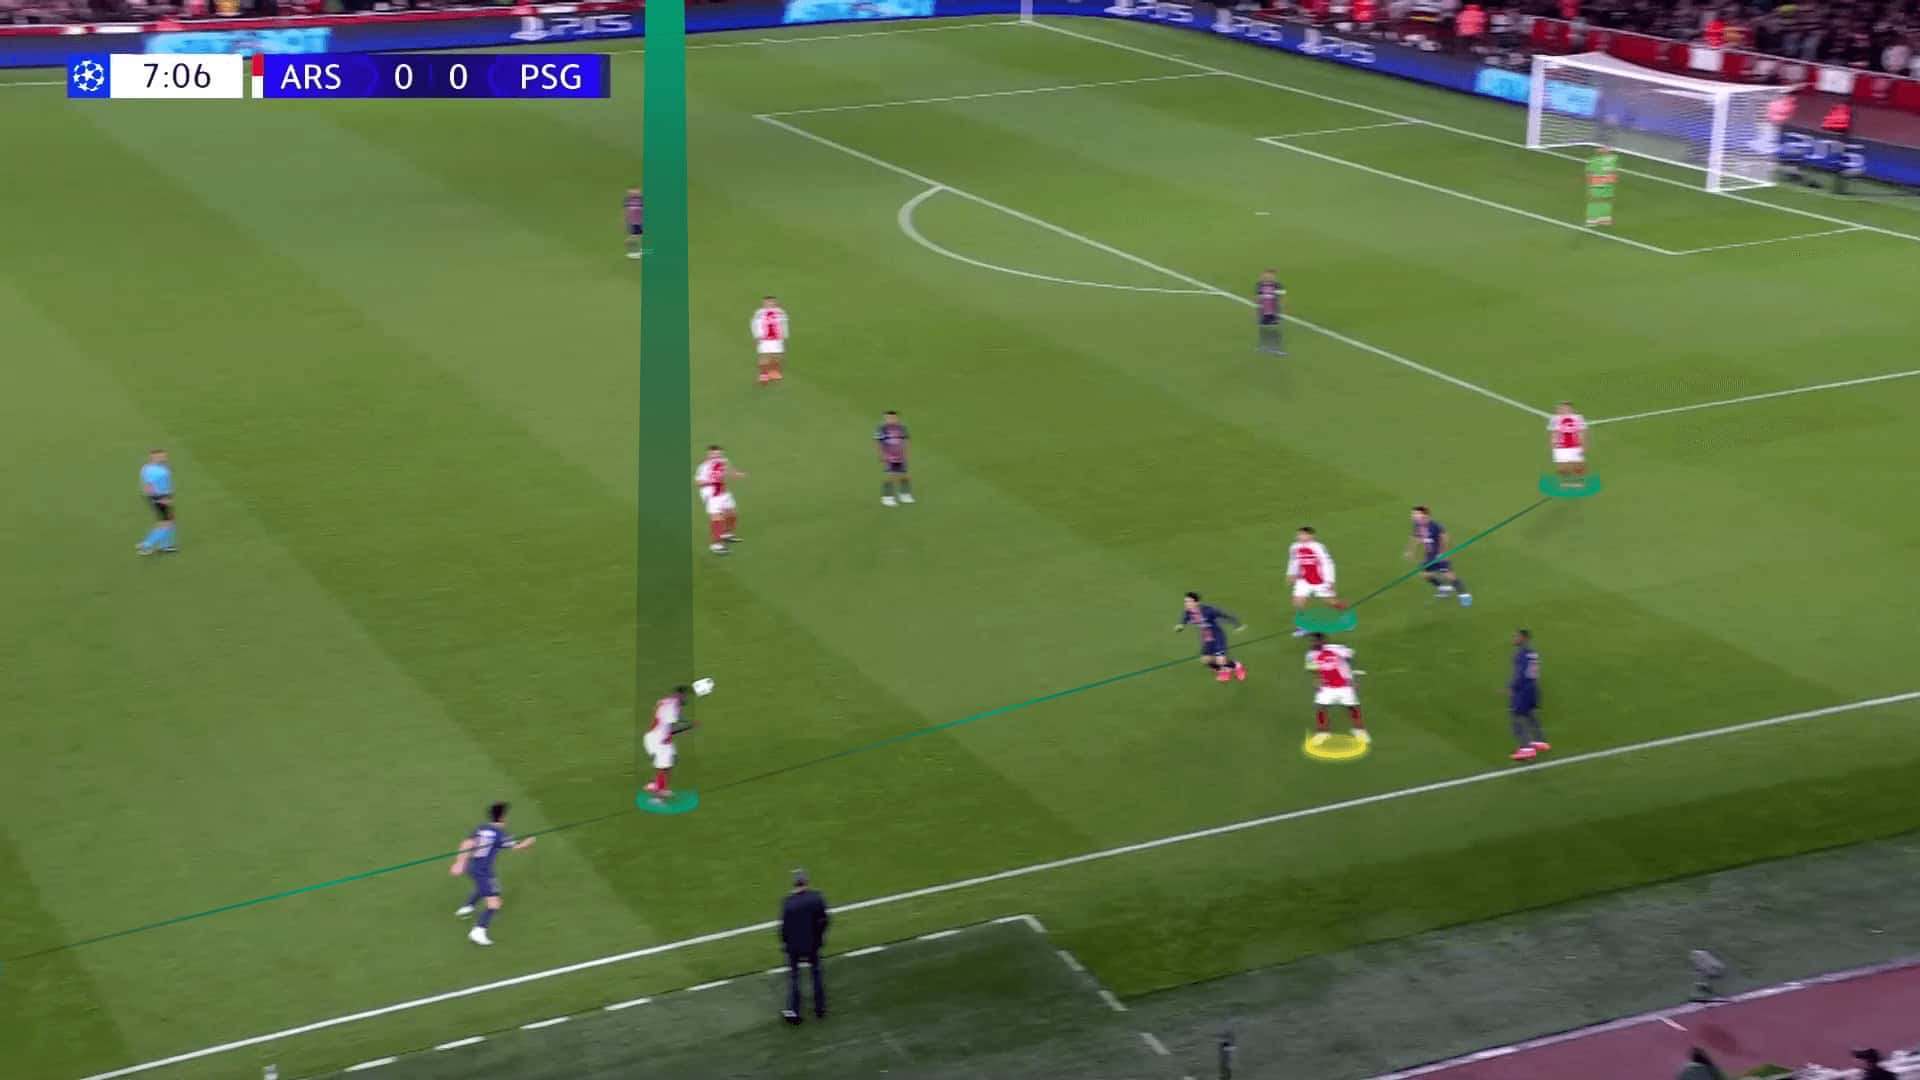
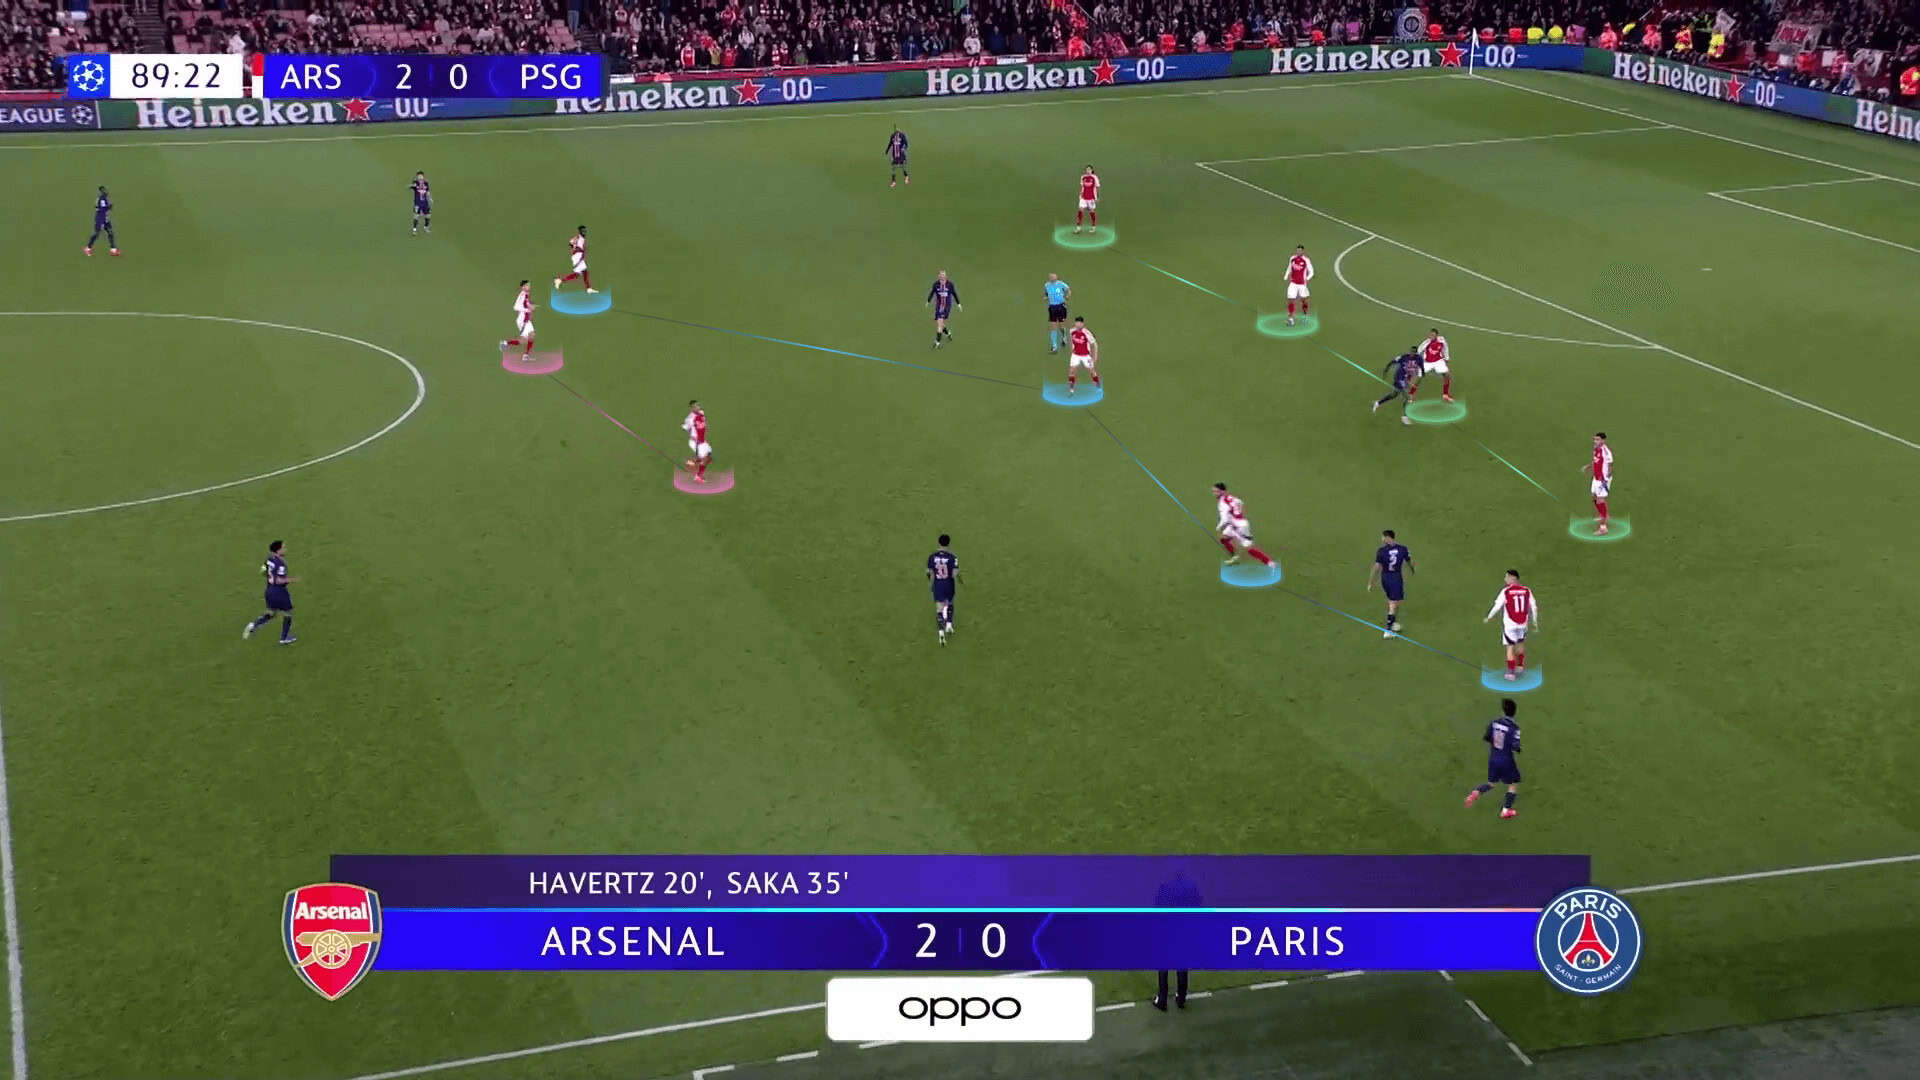
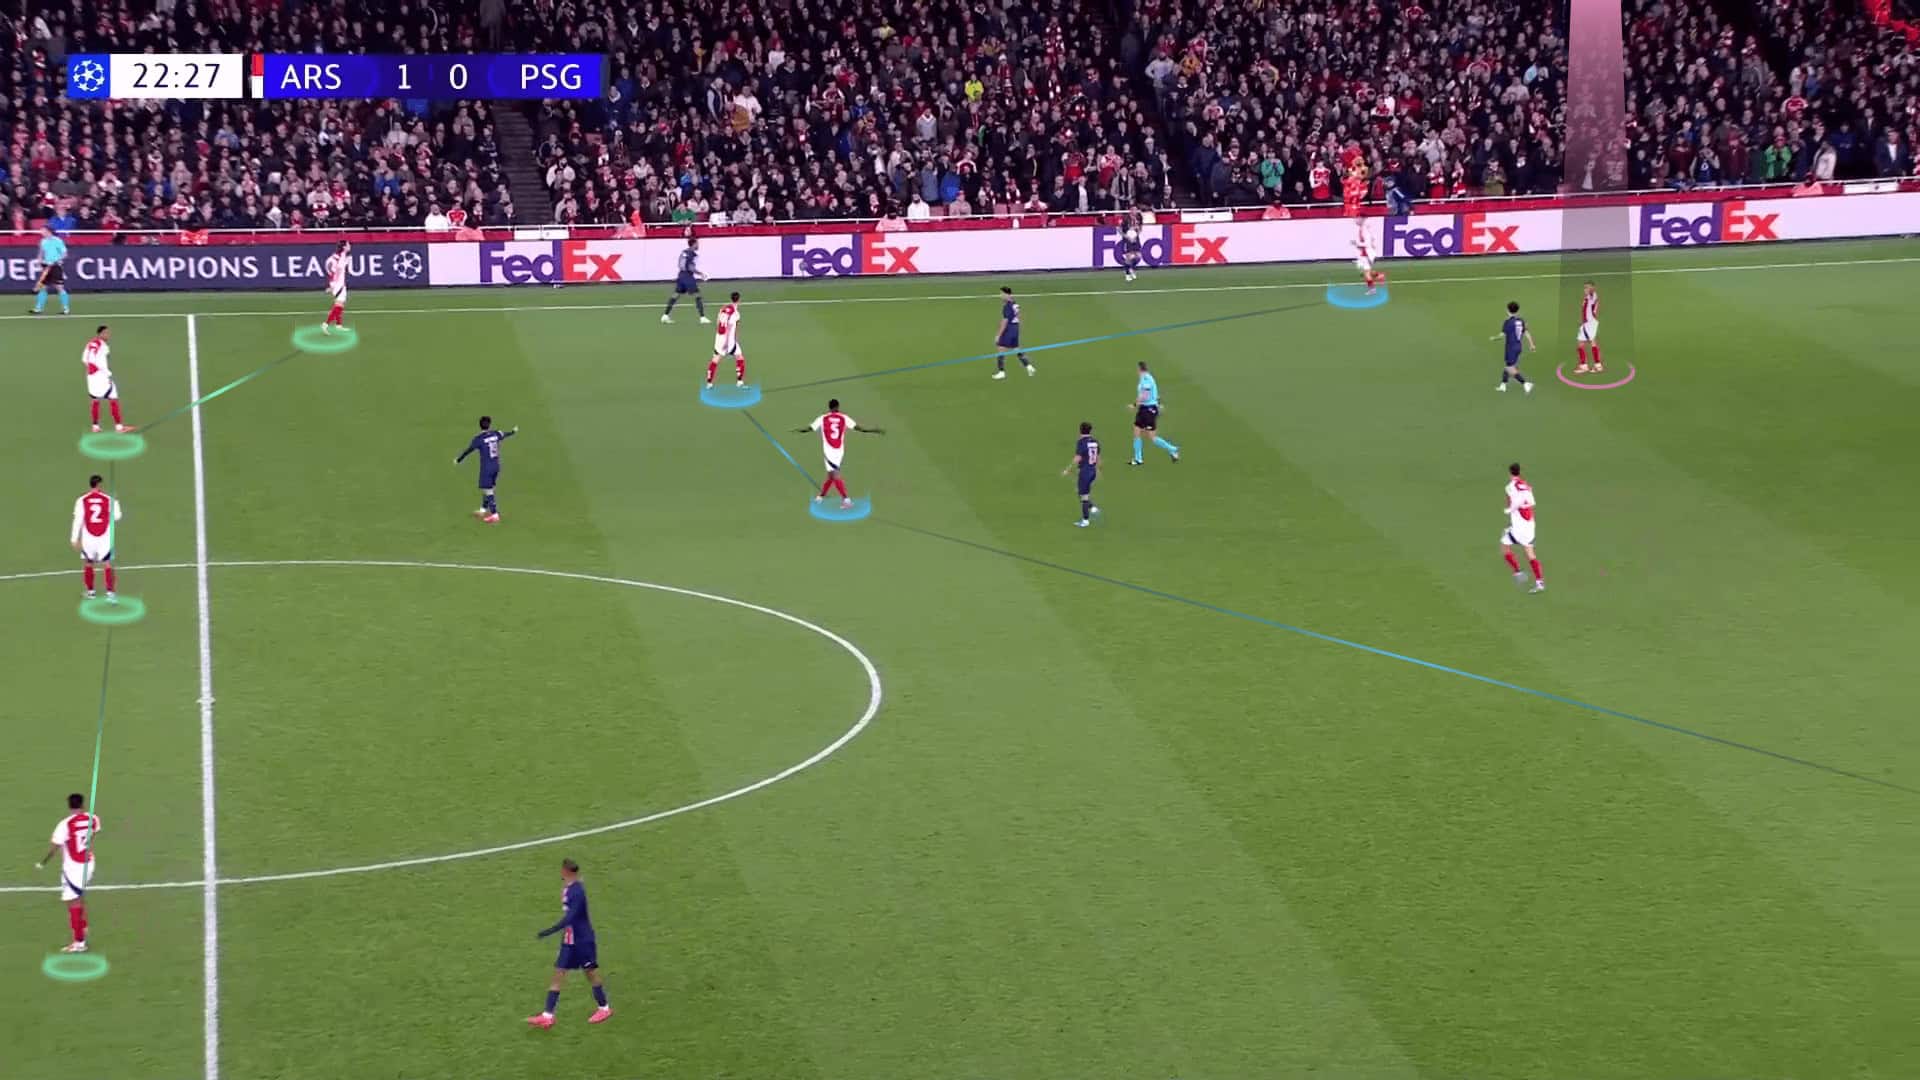
As an example below, Arsenal try to confine the opponents with the help of the touchline by asking four players to form a curved zonal line (green): Leandro Trossard (the striker), who closes very near and gets ready to press, the back passing option, Kai Havertz (the right central midfielder in attacking and the near striker defensively), Thomas Partey (the ‘6’), and Jurrien Timber (the right full-back).

Ahead of them, Bukayo Saka (the near winger) stands to face the thrower when he joins the game after receiving a wall pass, for example, and to protect the area ahead of the zonal line against any opponent entering it.

Behind them, Declan Rice (the far midfielder) is ready to cover any gap behind the zonal line or get near in case of any overloading.

Gabriel Martinelli (the far winger) stands nearer, covering behind them and ready to press in case of any trial of a switch of play.


throw-ins-series-defence-goals-and-systems-set-piece-analysis-tactics

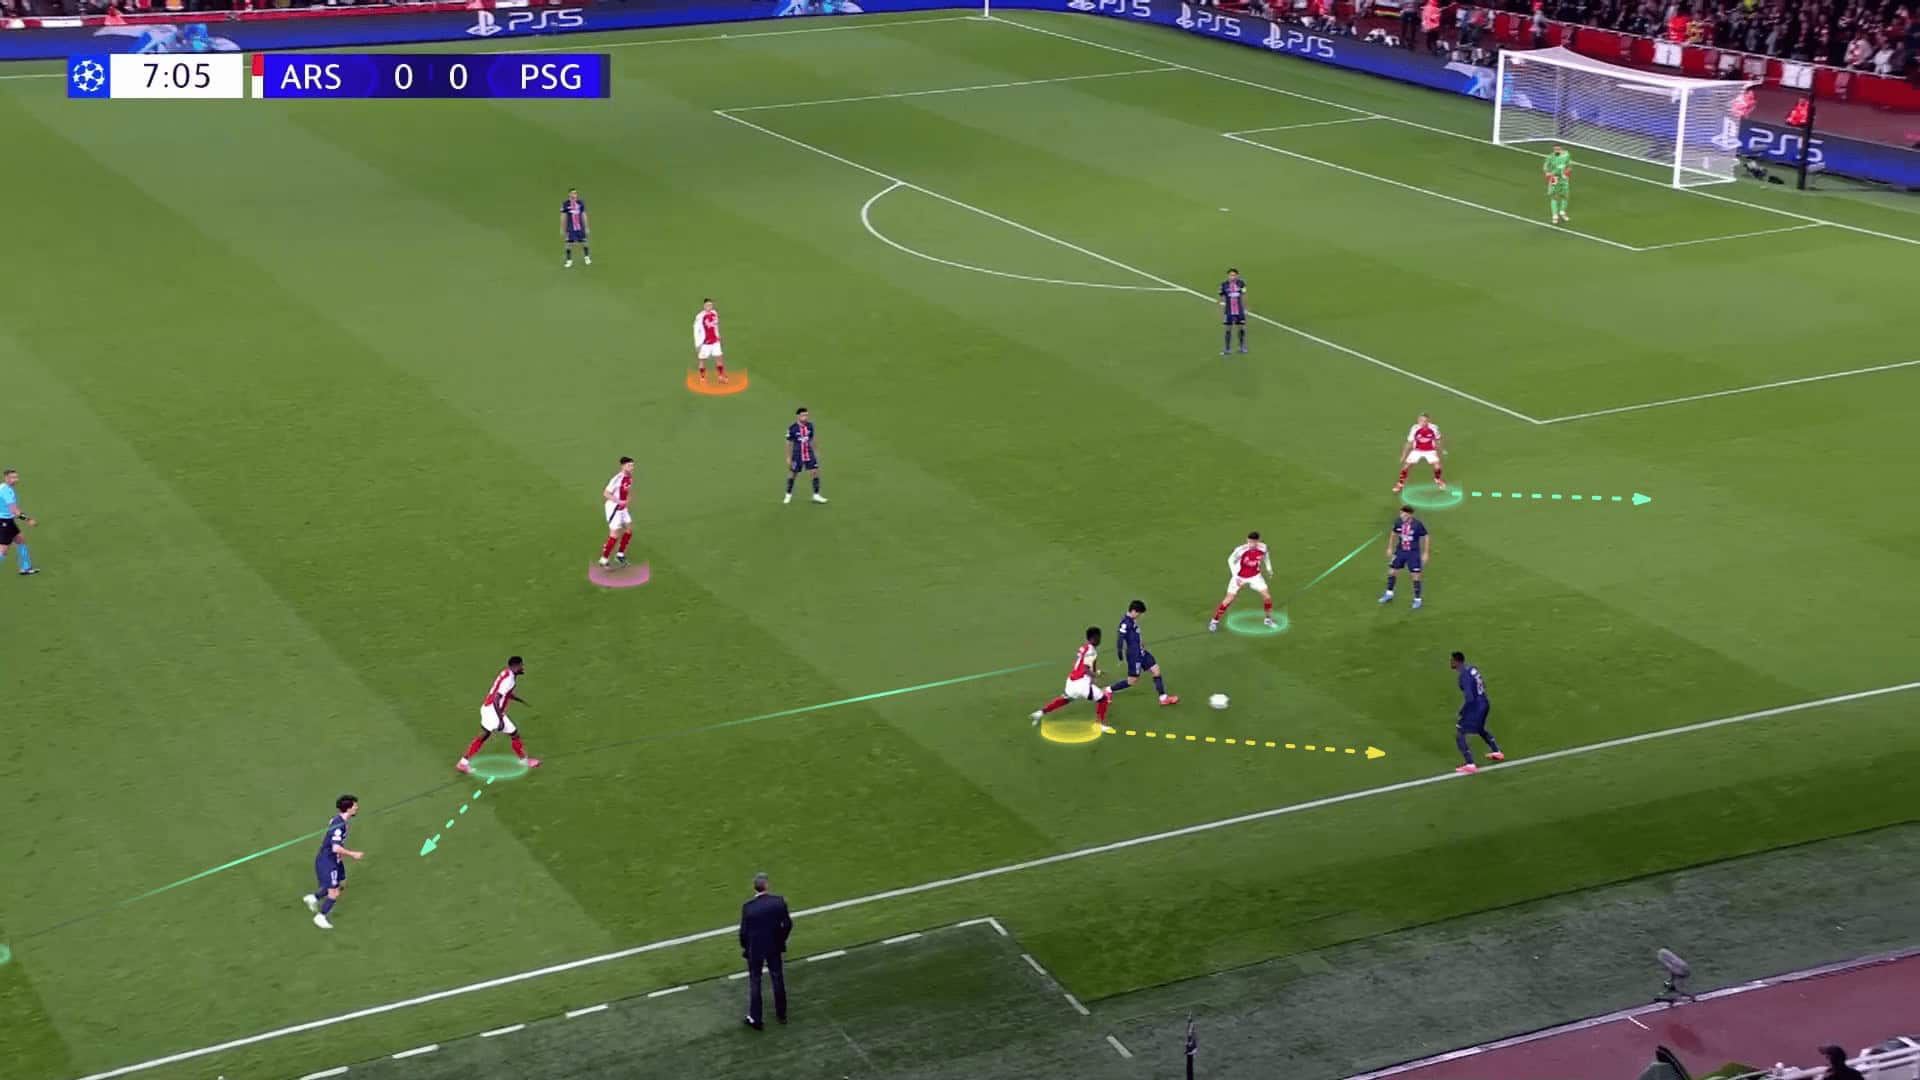
The opponent’s plan is to use the white attacker to drag Partey a little away while the striker (green) suddenly comes to receive inside the circular zonal line. 

throw-ins-series-defence-goals-and-systems-set-piece-analysis-tactics

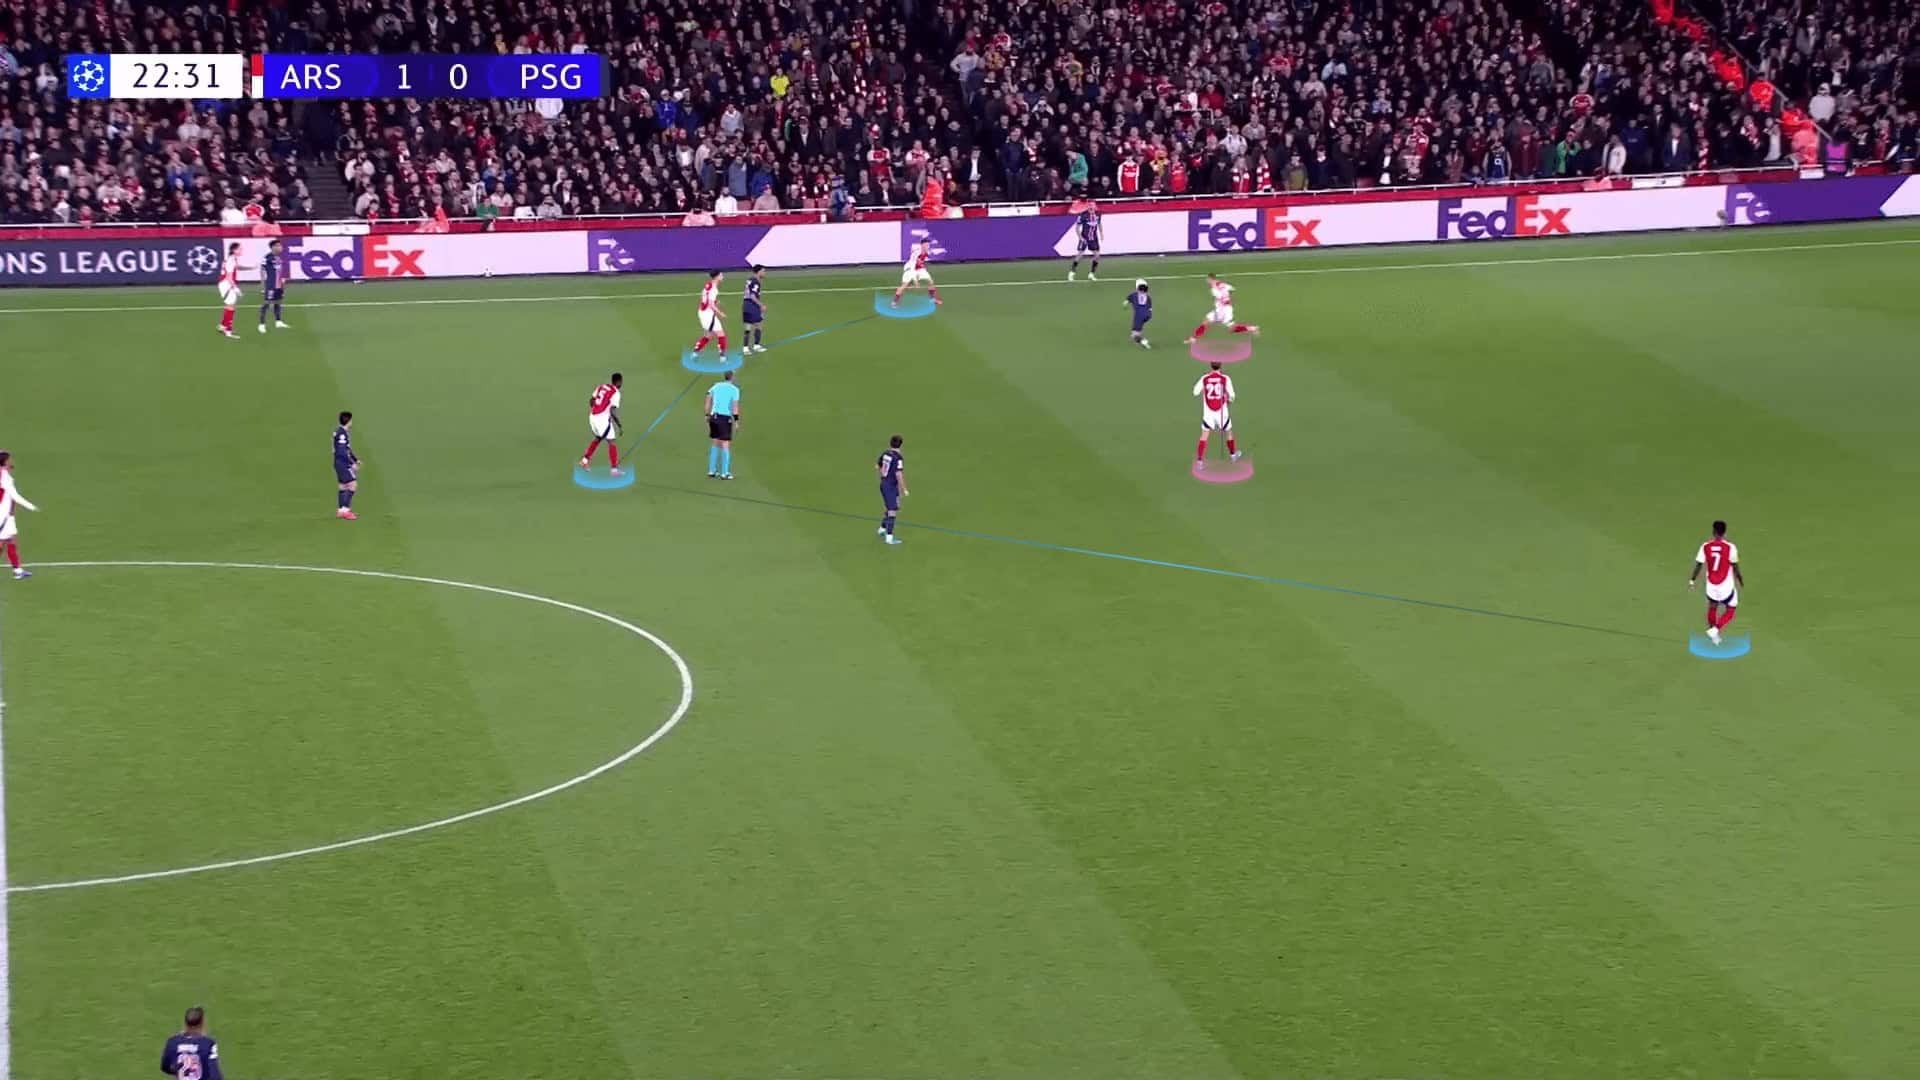
But Saka is here pressing the thrower after receiving the wall pass from the striker.

As the circular line gets nearer, it chokes the opponent.

You can notice the movements of Partey and Trossard, while Rice and Martinelli still cover behind them.

throw-ins-series-defence-goals-and-systems-set-piece-analysis-tactics

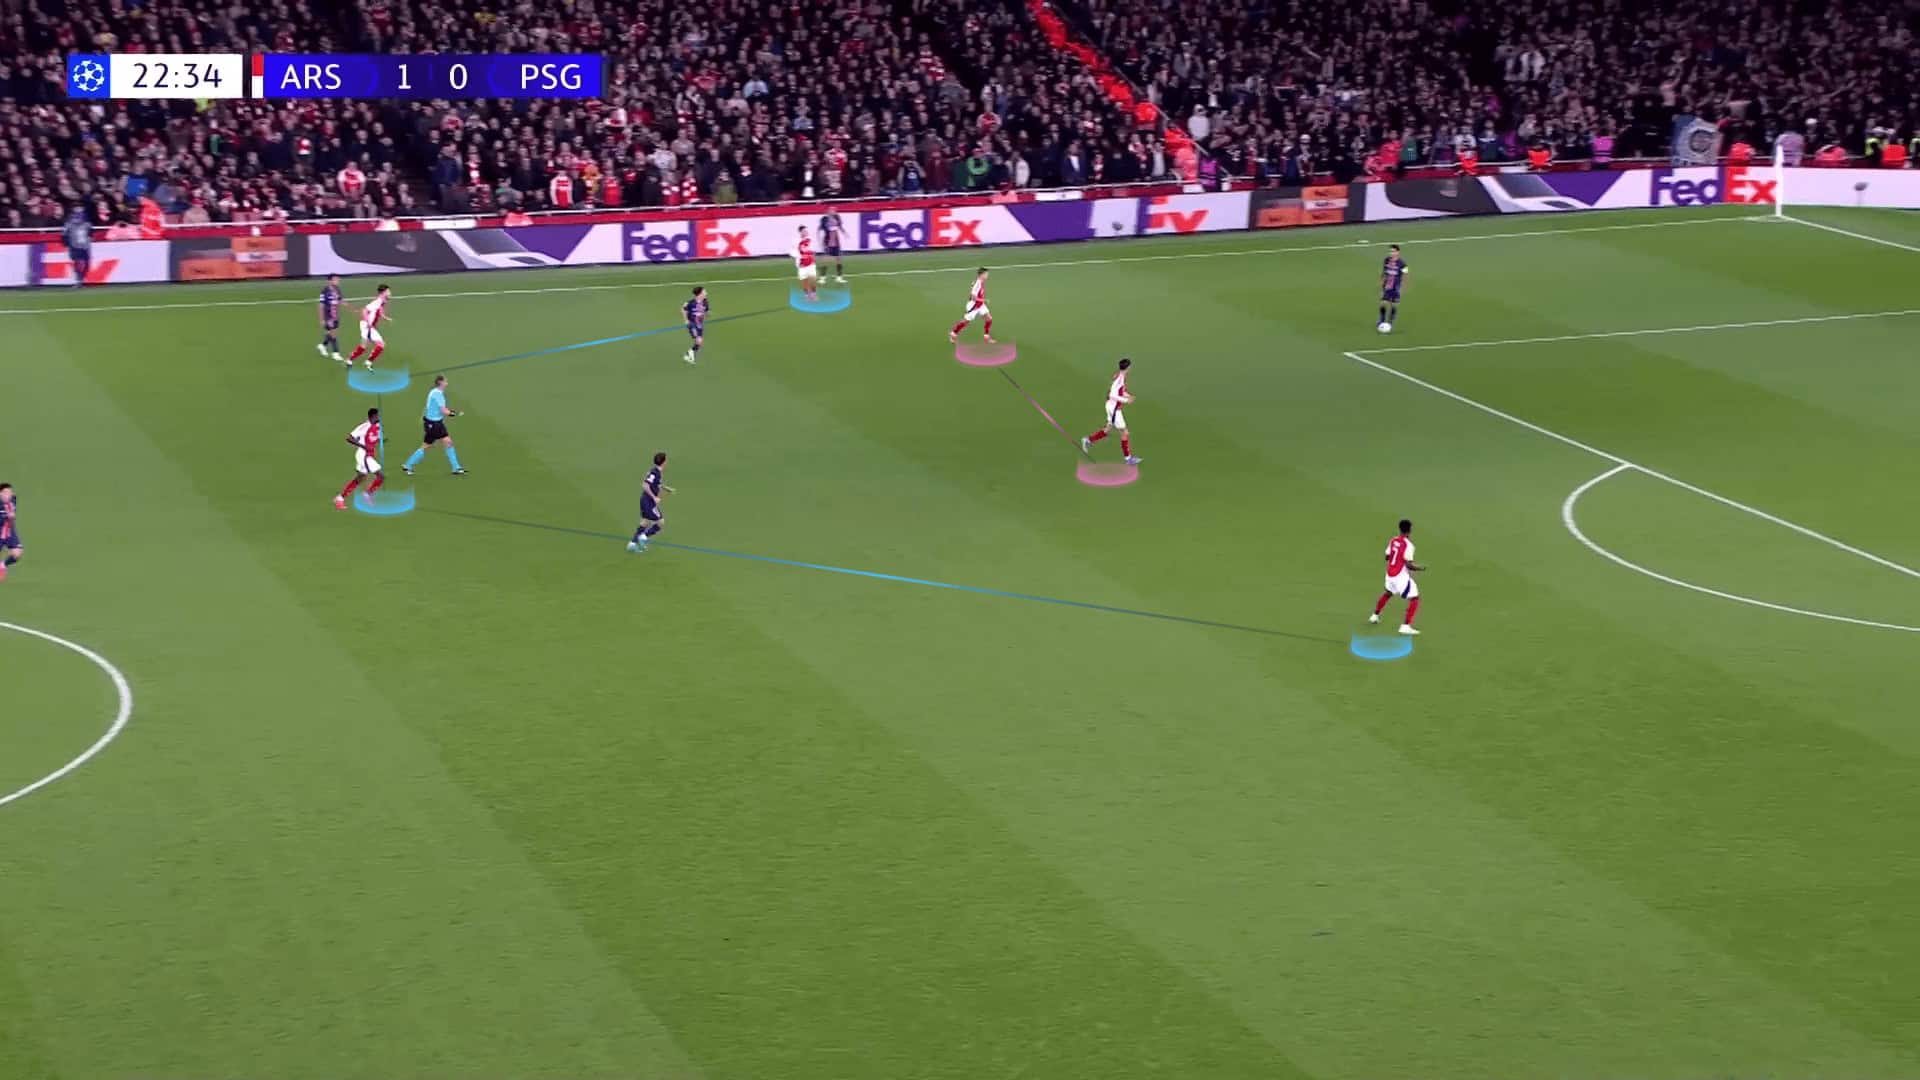
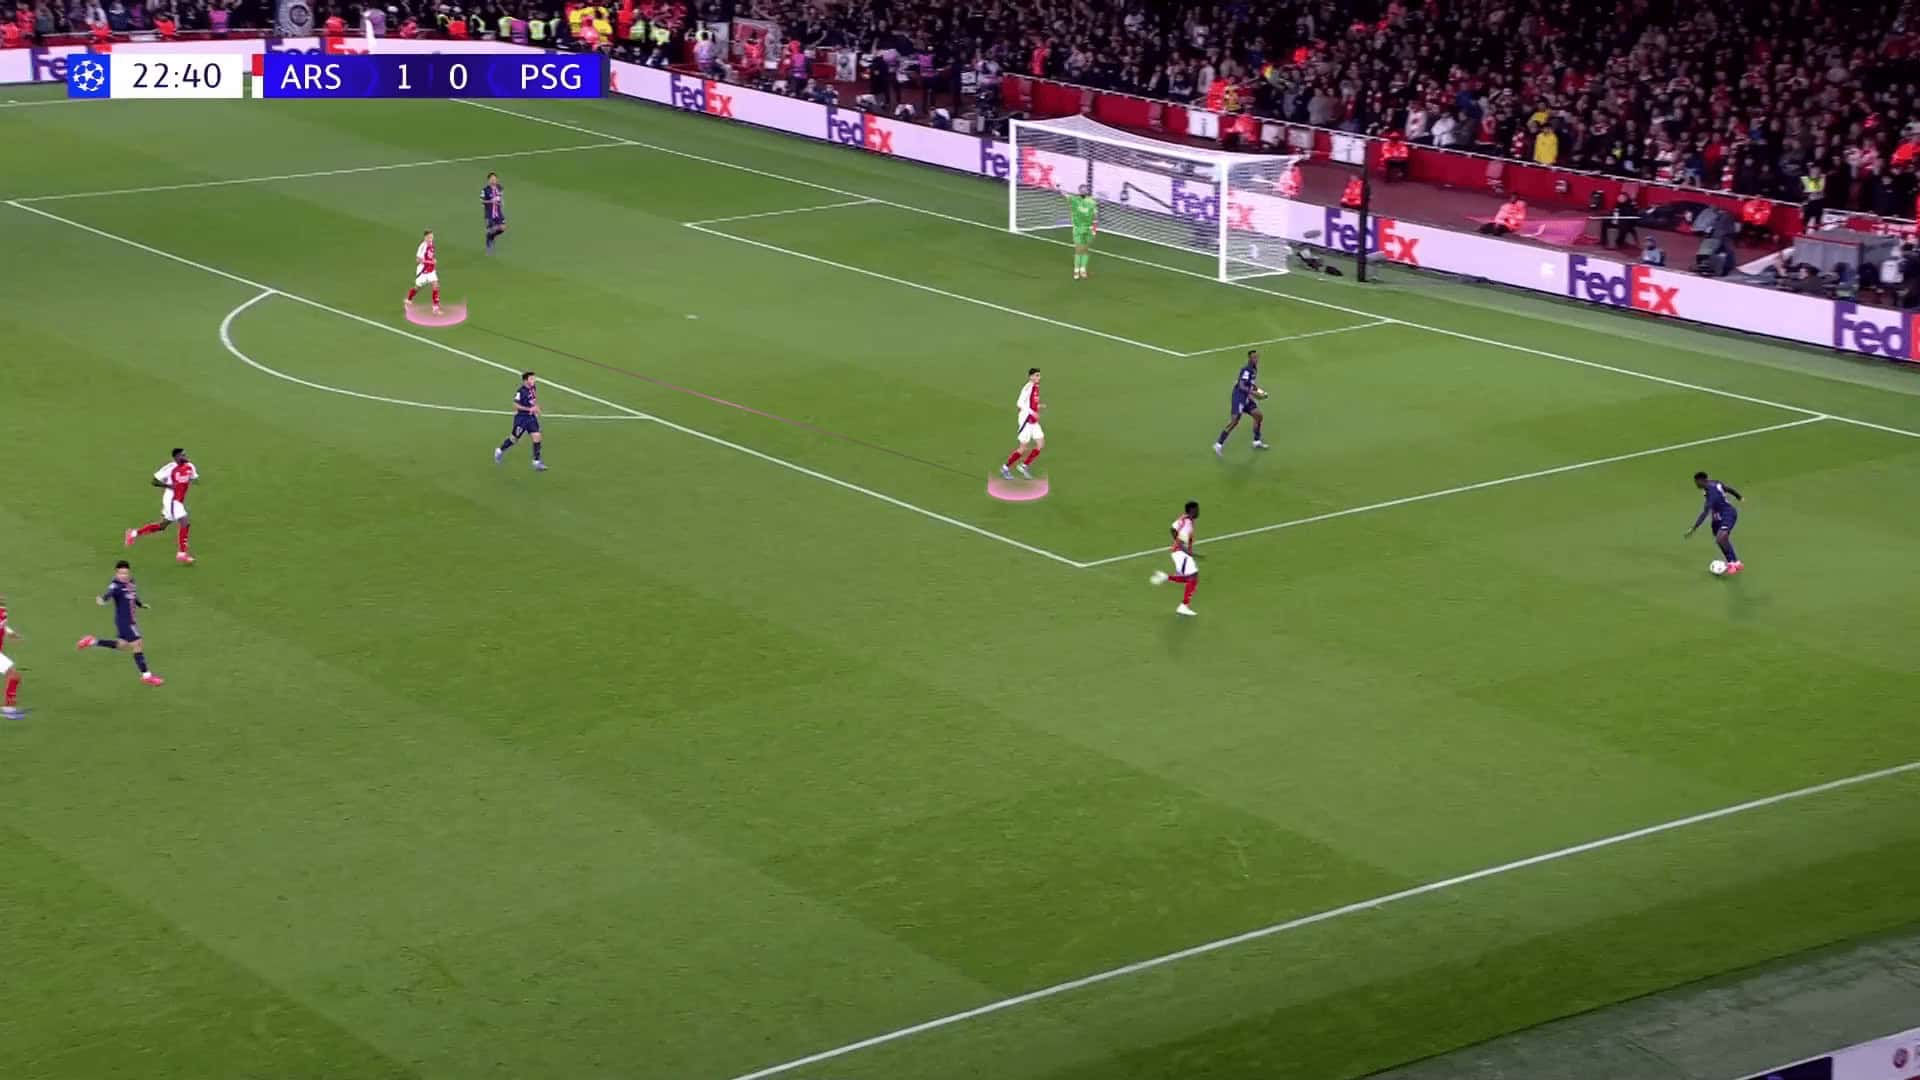
The plan works, and Partey receives the cleared ball, as shown below.

Many attacking ideas, such as switching the direction of play, can be implemented against this defending strategy, and we will discuss those later in future articles.

throw-ins-series-defence-goals-and-systems-set-piece-analysis-tactics

Returning Behind The Ball, Adhering To The Defensive Structure

Many teams leave the back-passing option open for the opponent, preferring to stand in their low, mid, or even high block, letting the pass go backwards, and then going to press.

This strategy is more common in the defensive team’s half, as Arsenal shows below.

They stand in their 4-4-2 low block with the winger near the ball, Bukayo Saka, standing behind the taker to be ready against any wall pass to the taker again, preventing the numerical superiority the thrower achieves after joining the game.

The full-back behind him stands deep, which we will understand a few seconds later. 

throw-ins-series-defence-goals-and-systems-set-piece-analysis-tactics

Now, a normal low-press begins.

throw-ins-series-defence-goals-and-systems-set-piece-analysis-tactics

We want to confirm that the defending team must quickly achieve that depth on the throw-in side.

As we see below, Arsenal’s left-back sprints after losing the ball to be ready against any quick long-range throw-in.

Keep remembering that there is no offside at throw-ins!

throw-ins-series-defence-goals-and-systems-set-piece-analysis-tactics

Arsenal could manage the situation by having all the players drop behind the ball.

throw-ins-series-defence-goals-and-systems-set-piece-analysis-tactics

Elite teams usually apply this approach in their defensive third because it is easy for opponents to throw the ball into the area below near the corner with no offside.

In the photo below, West Ham’s left back, Aaron Wan-Bissaka (green), decides to press forward because no opponent is present at the back, leaving this dangerous area empty.

throw-ins-series-defence-goals-and-systems-set-piece-analysis-tactics

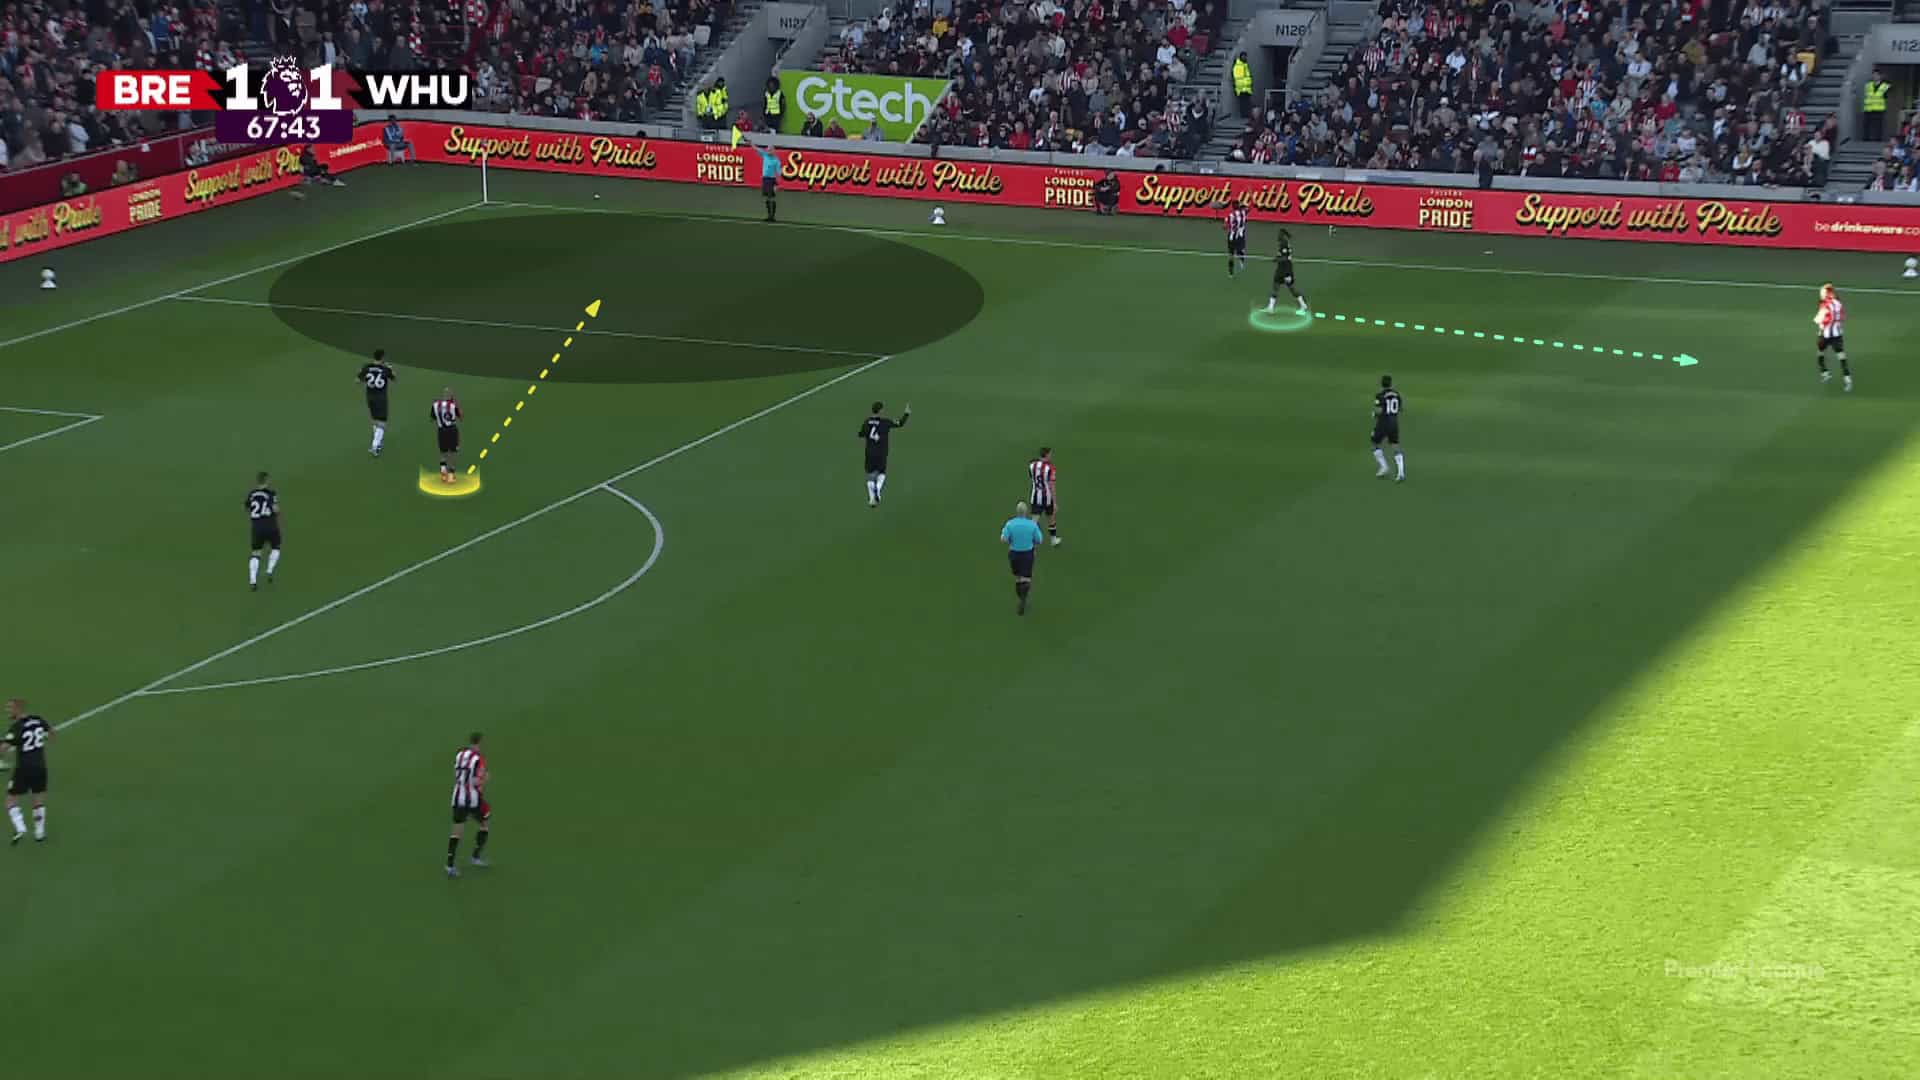
Brentford exploits this area by passing the ball to the striker directly.

The striker can also do a wall pass to the free-taker, who doesn’t have an additional defender standing with him, as the winger near the ball does for Arsenal.

throw-ins-series-defence-goals-and-systems-set-piece-analysis-tactics

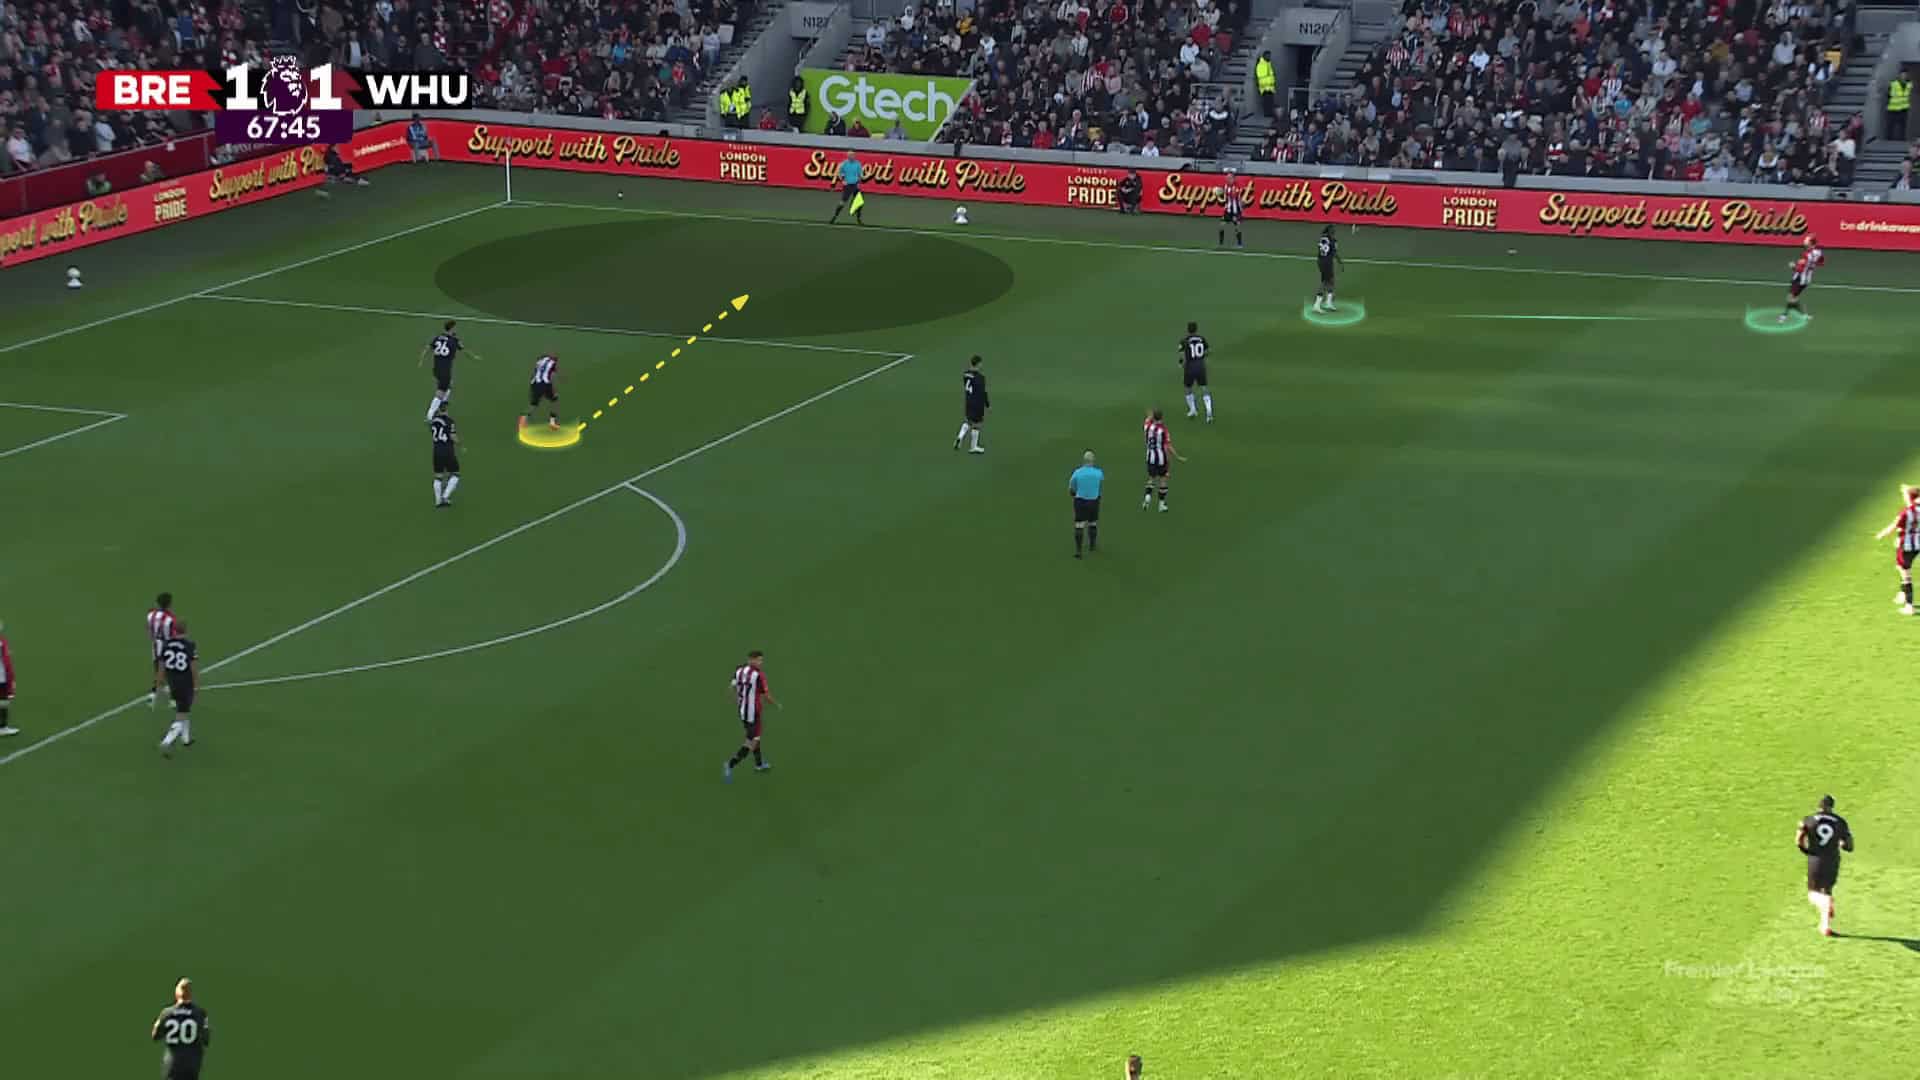
With a similar idea, Brentford always targets this area quickly; that’s why we have mentioned the importance of dropping back quickly in this third.

throw-ins-series-defence-goals-and-systems-set-piece-analysis-tactics

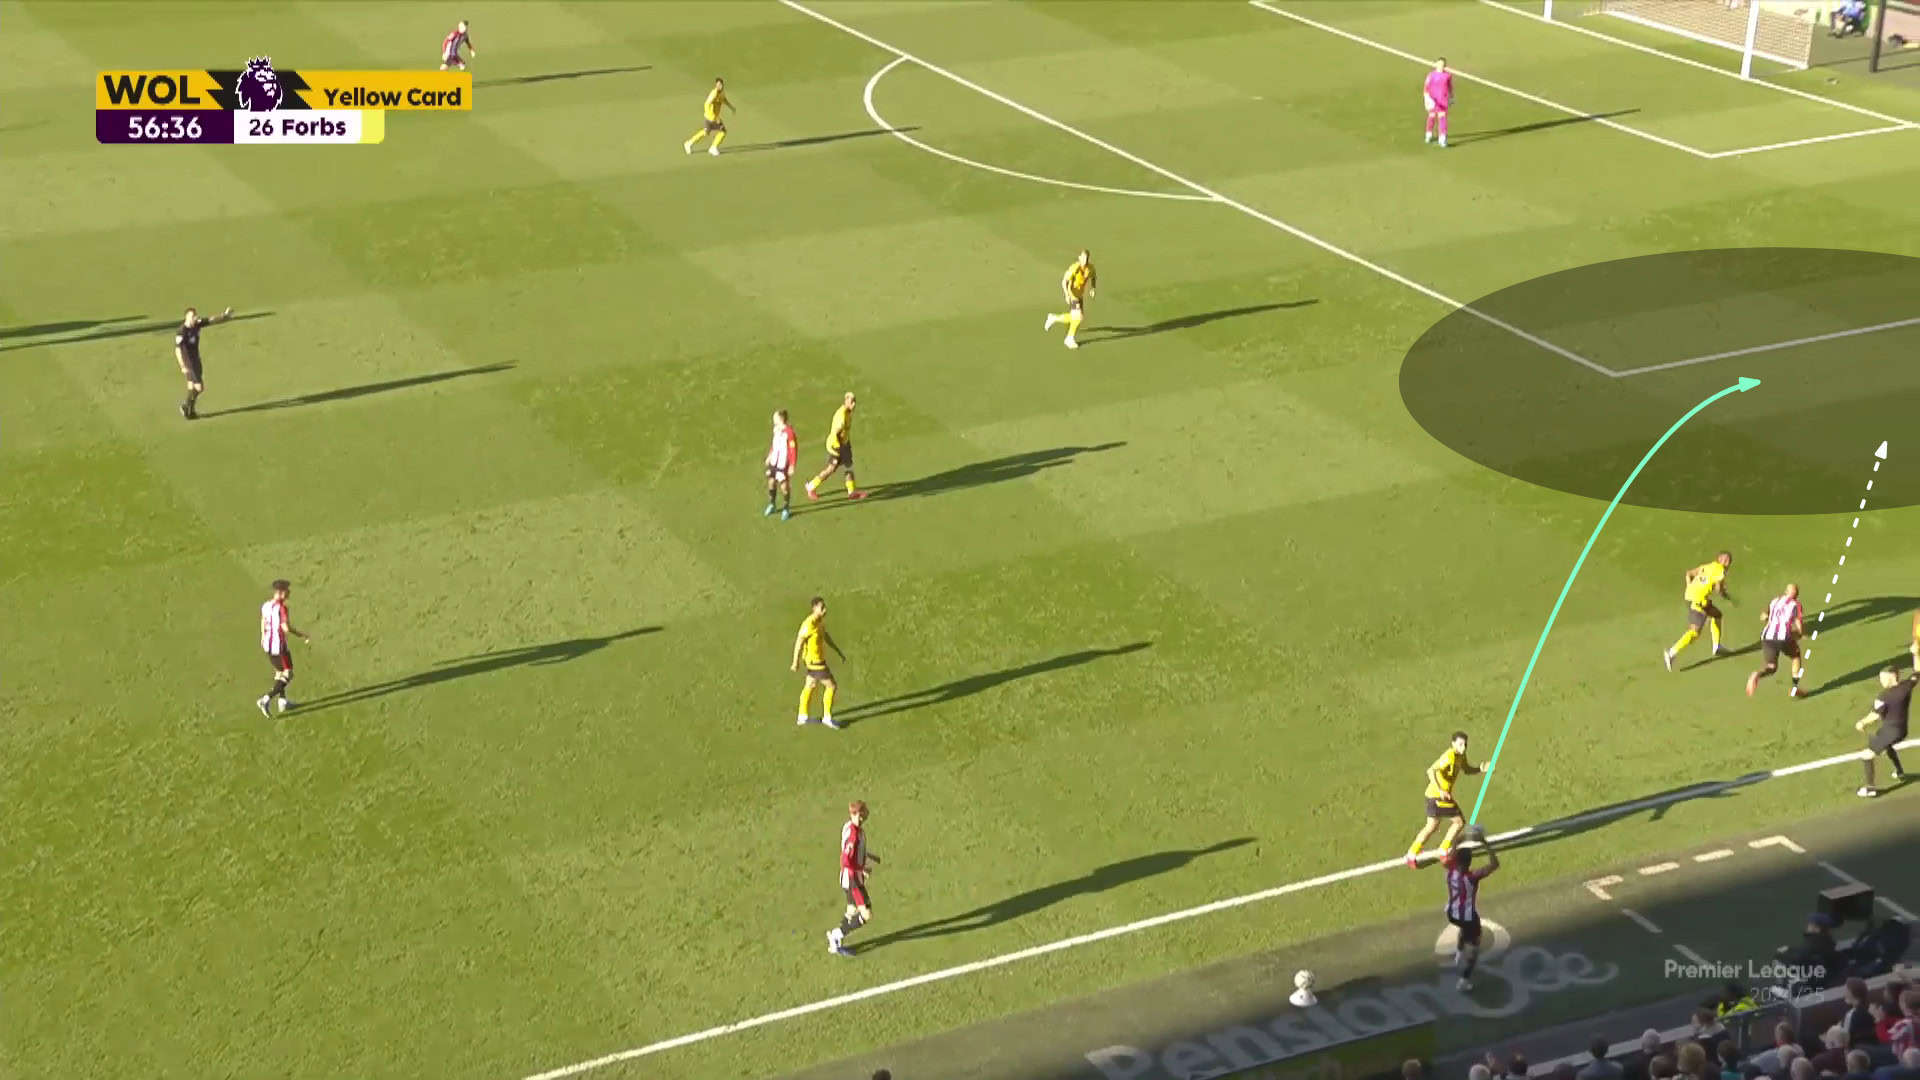
The same strategy is sometimes applied in the attacking third by standing in a high-press shape, letting centre-backs free while being ready to press them, forcing them to the other side, as in the two photos below.

throw-ins-series-defence-goals-and-systems-set-piece-analysis-tactics


throw-ins-series-defence-goals-and-systems-set-piece-analysis-tactics

Fluidity In Positioning

As we mentioned in the beginning, throw-ins are a special kind of set piece, so defending throw-ins should be speedy and fluid.

This means that any team that wants to apply any previous approach should do that quickly or in a flexible way that gives players a simple, quick starting point, making them safe at first and then allowing them to apply the approach they want.

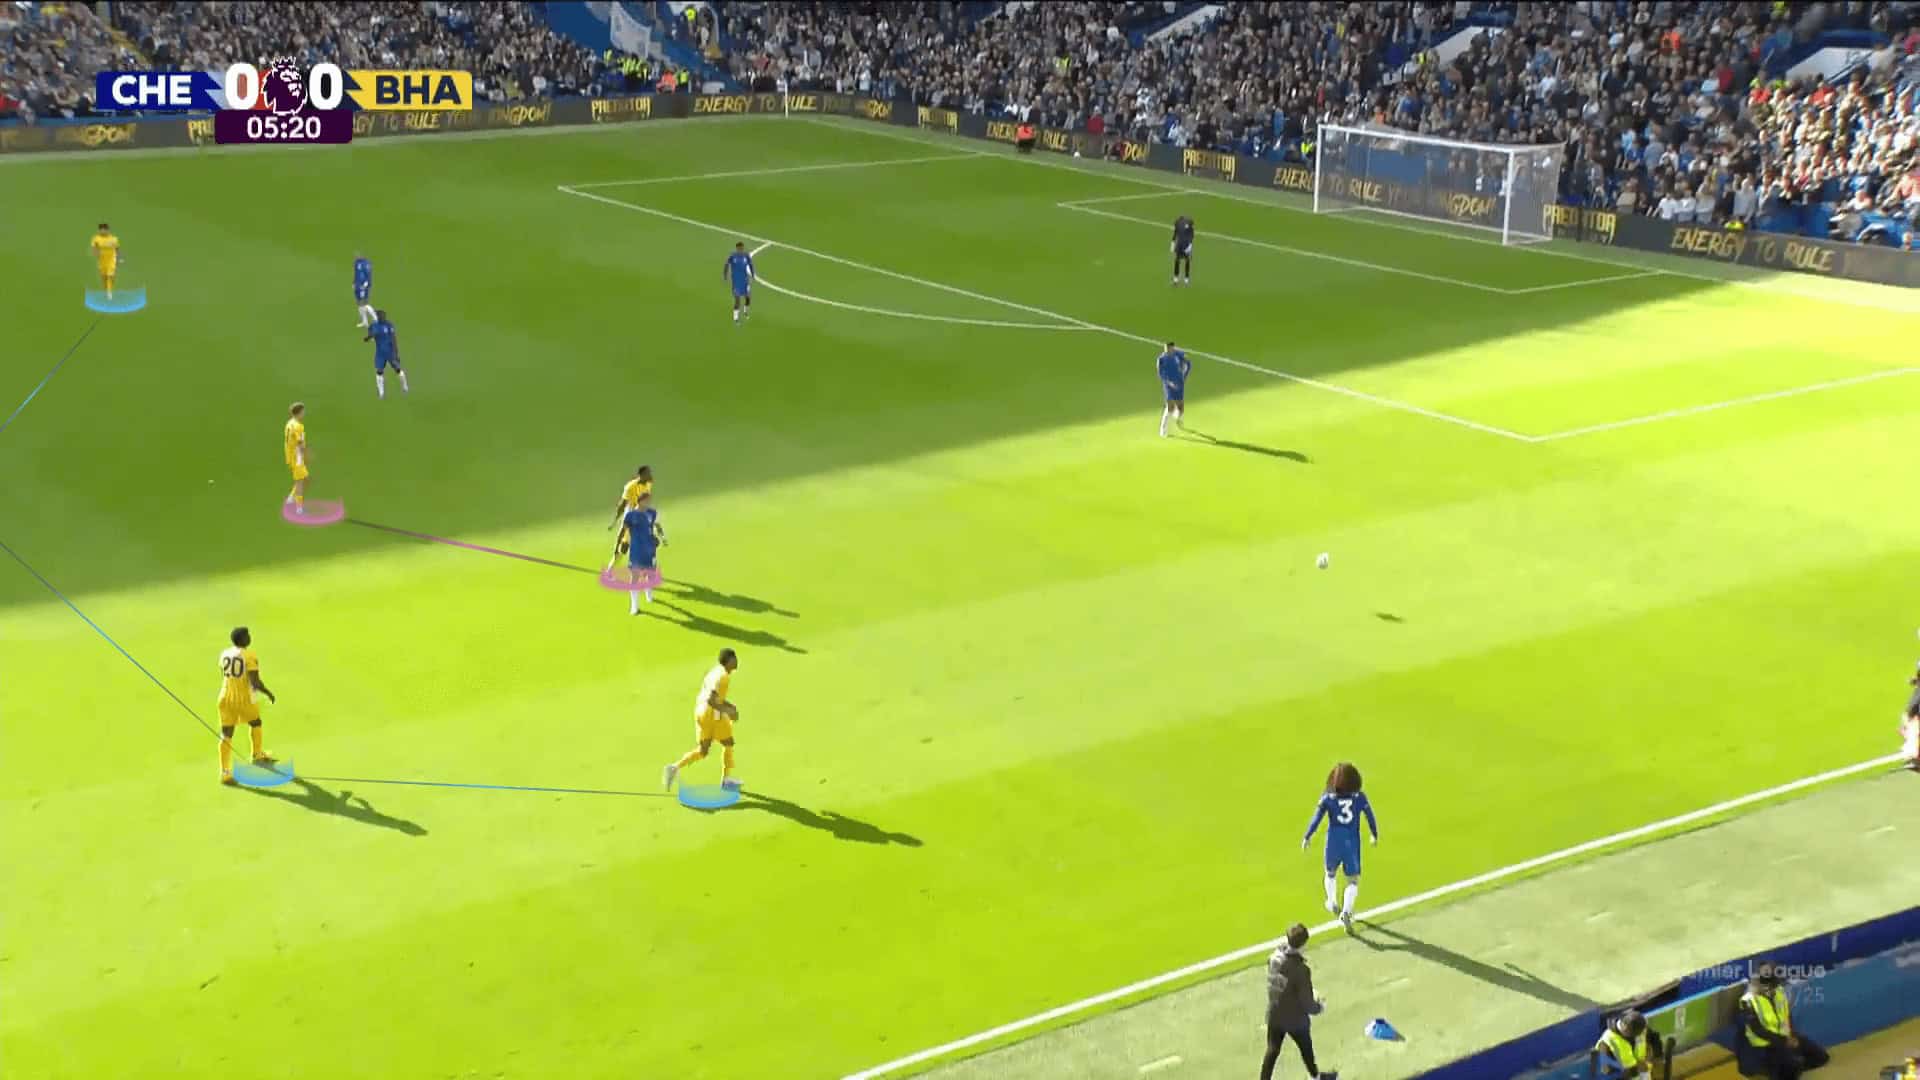
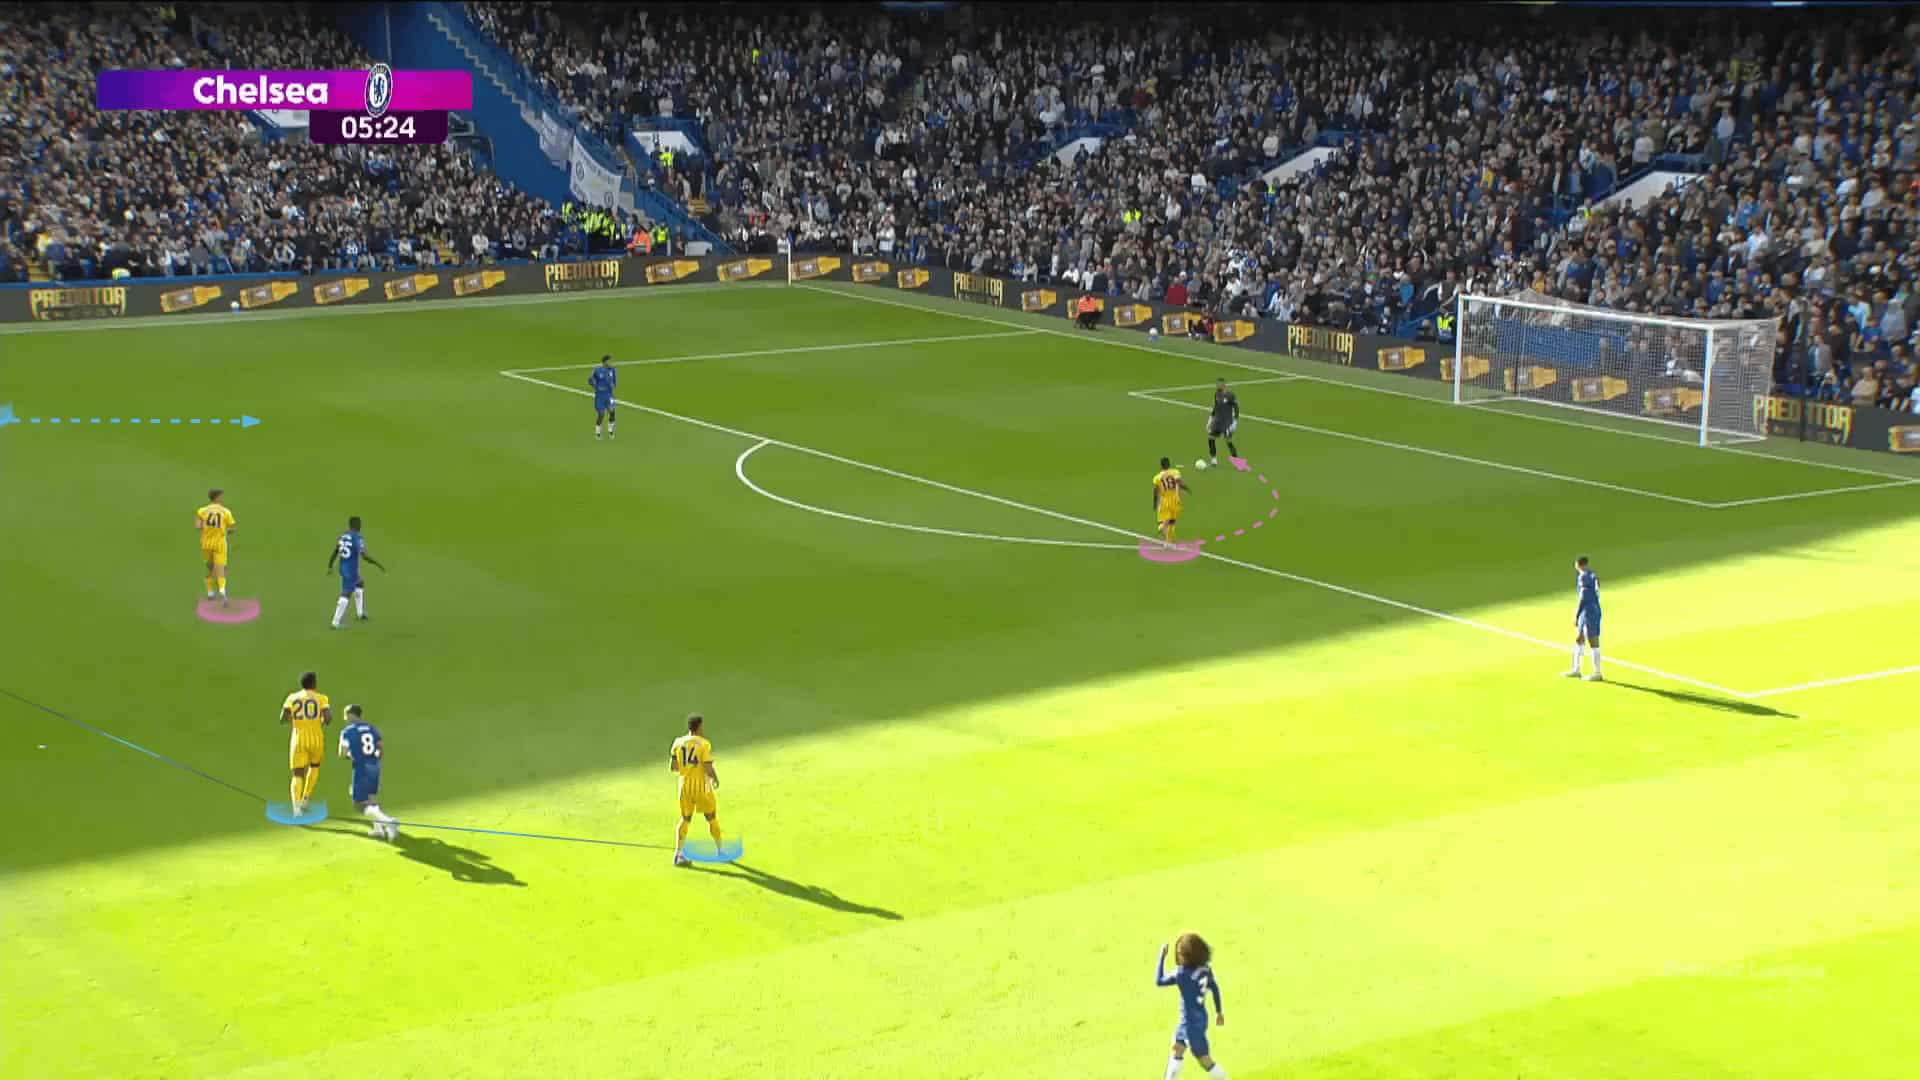
In the photo below, Nottingham Forest stands back in a 4-4-1-1 low block.

At the same time, the striker is so high, out of the shot, and closes the backward option to the centre-back, trying to confine the opponent, but it seems that there is a miscommunication.

The players can’t deal with that quick, tight situation in which the far winger is too far to press Chelsea’s free player, who will receive a quick pass.

You can see them below, signalling to each other.

throw-ins-series-defence-goals-and-systems-set-piece-analysis-tactics

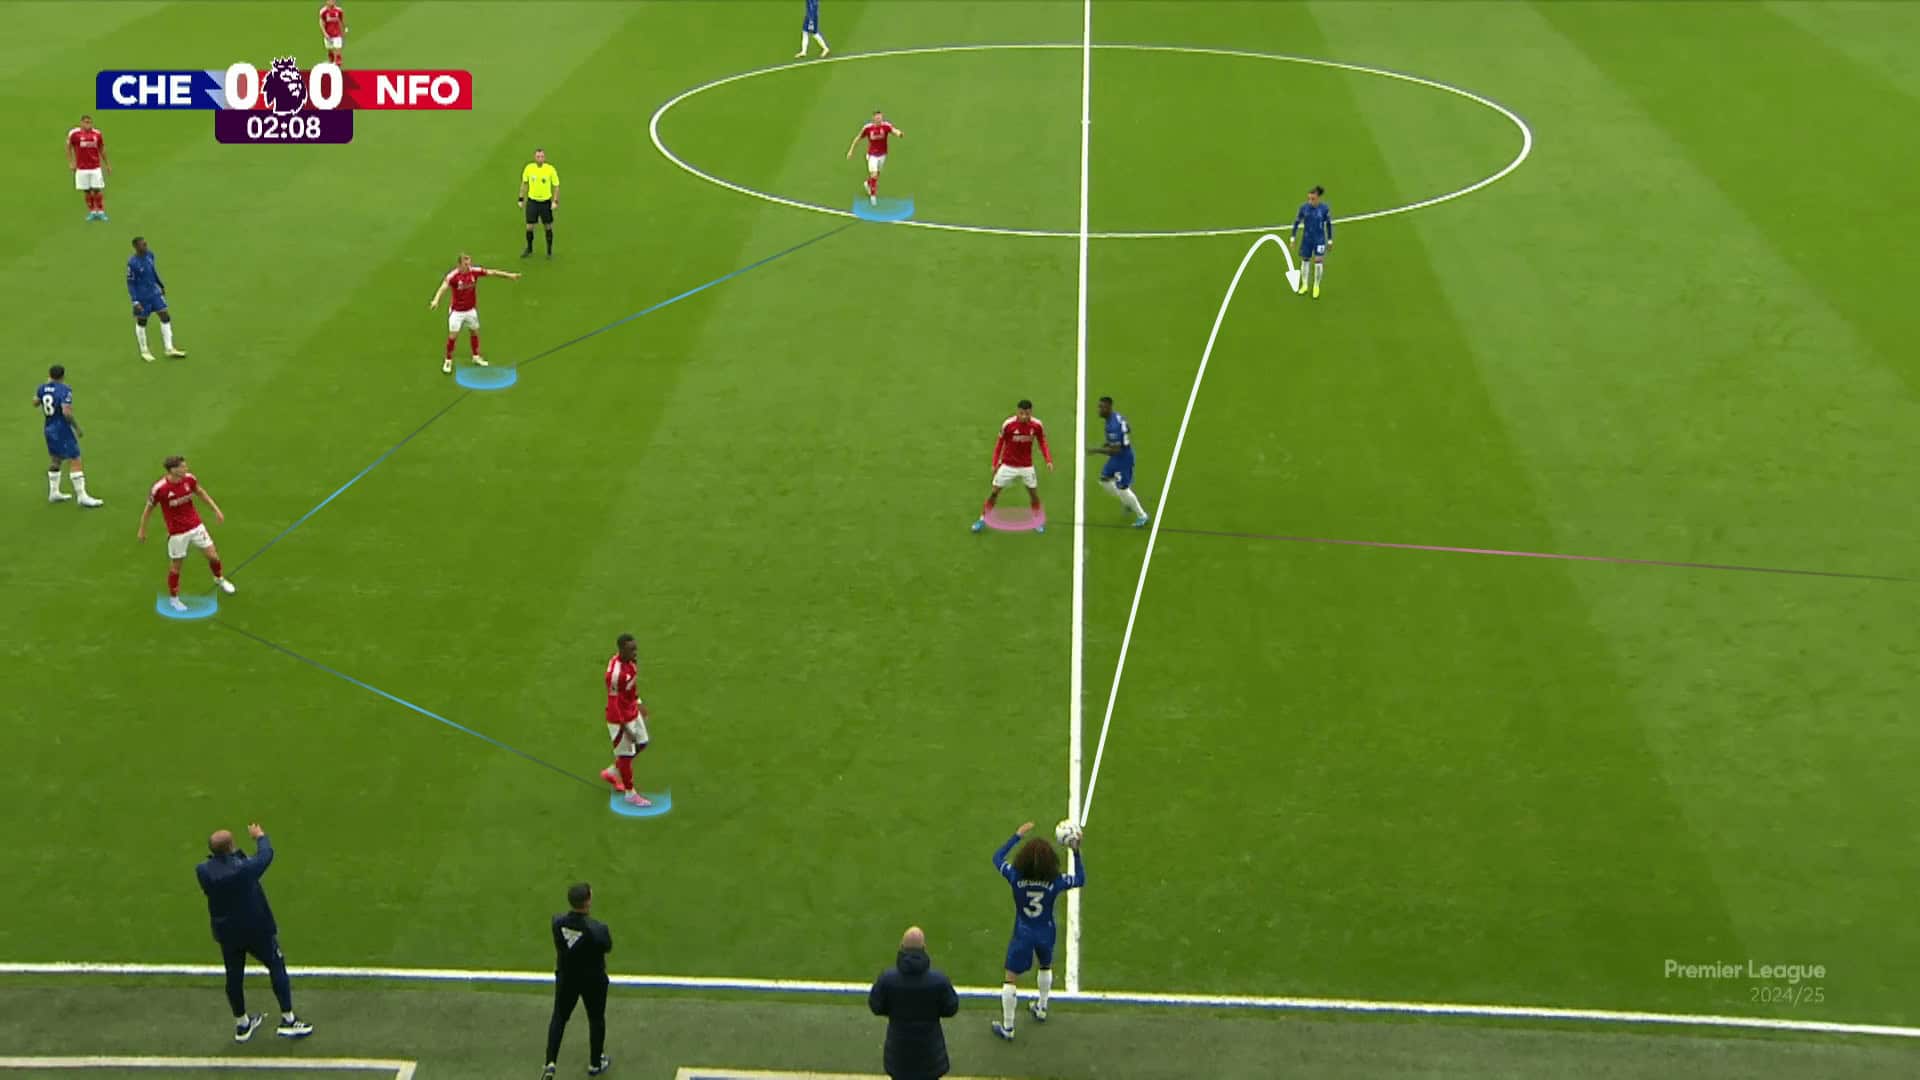
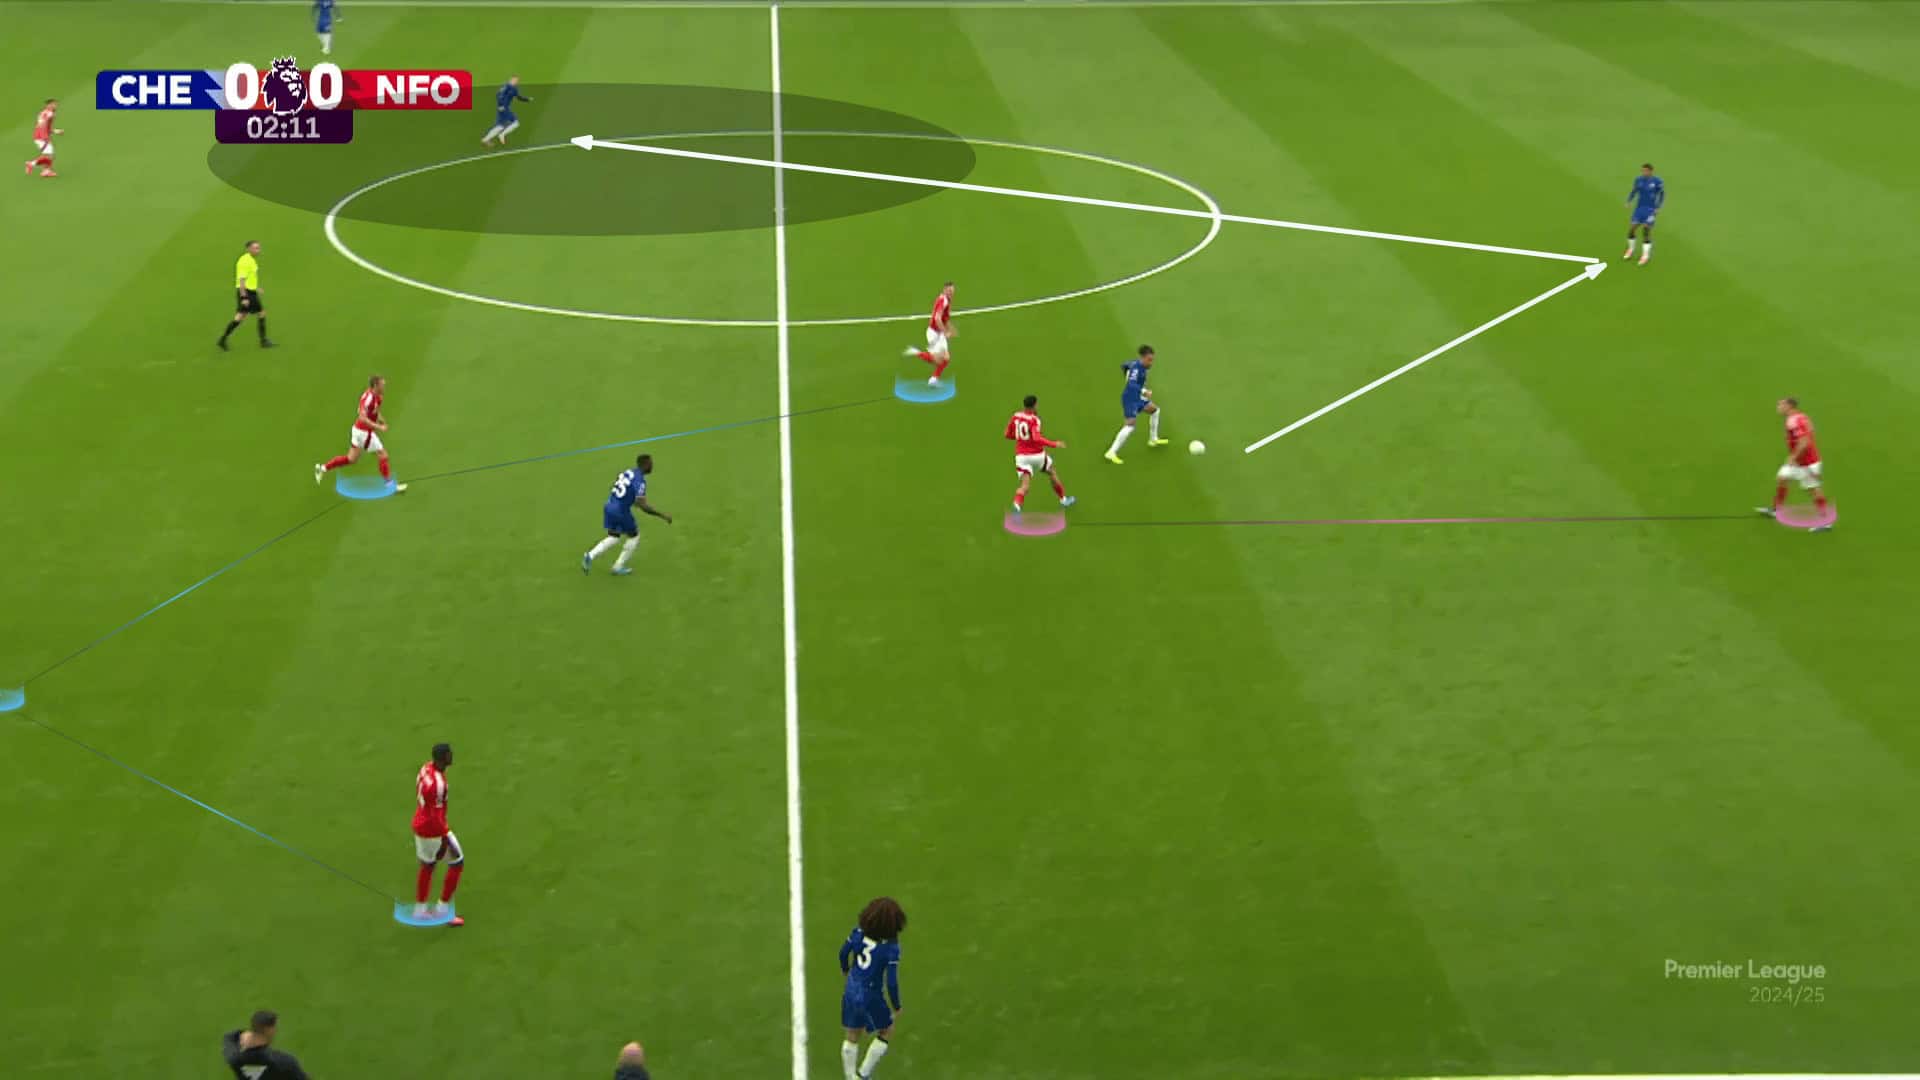
This leads to a late press from the far winger, which leads to a bad defending situation, as shown below.

So, you should be safe before thinking about confining the opponent, but how can teams naturally do that with simple movements?

throw-ins-series-defence-goals-and-systems-set-piece-analysis-tactics

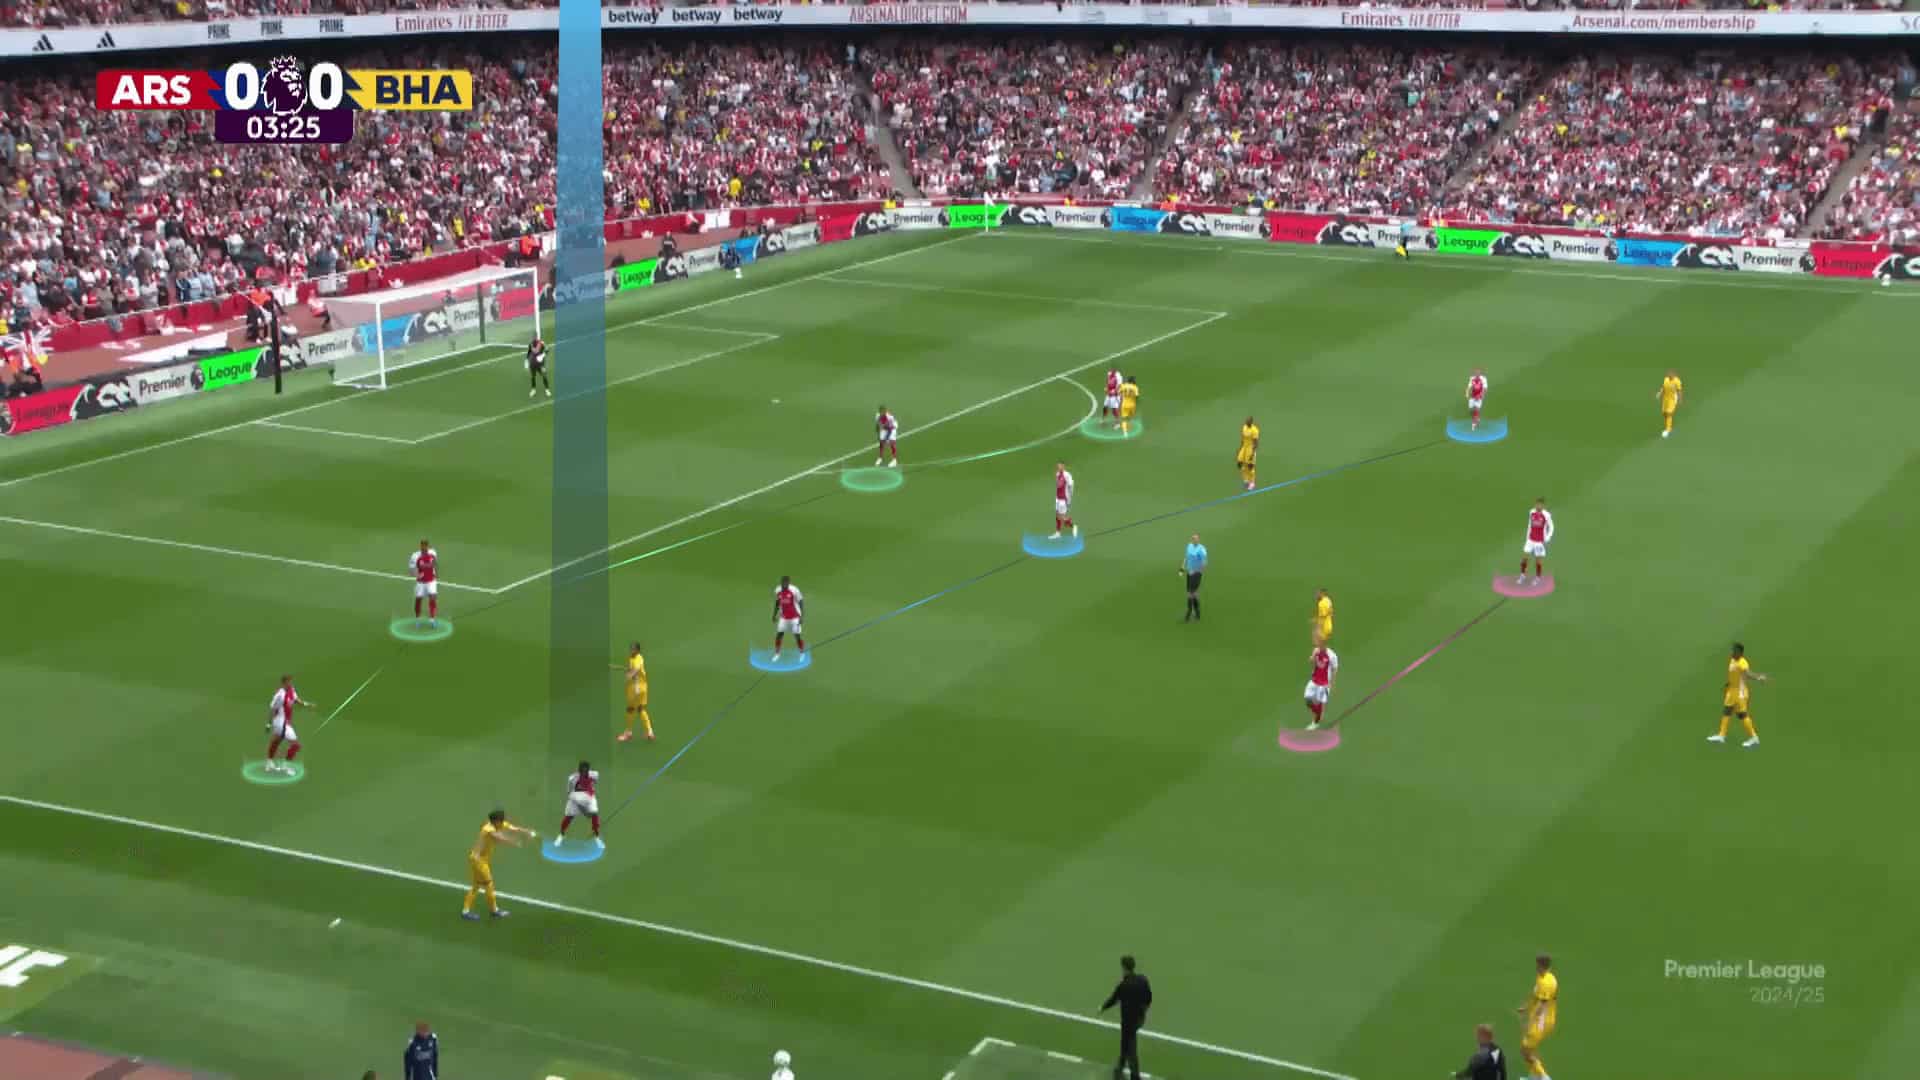
To understand what we mean, you can see Arsenal’s flexible behaviour below.

They always ask the winger to run quickly behind the taker, with the whole block forming their 4-4-2 pressing shape.

Then, if they get the time, they can apply their zonal approach to confine the opponent.

That is clear below when you see Leandro Trossard calling Kai Havertz to stand on his left while he closes the backwards option, forming the usual zonal circular shape to confine the opponent with the help of the touchline.

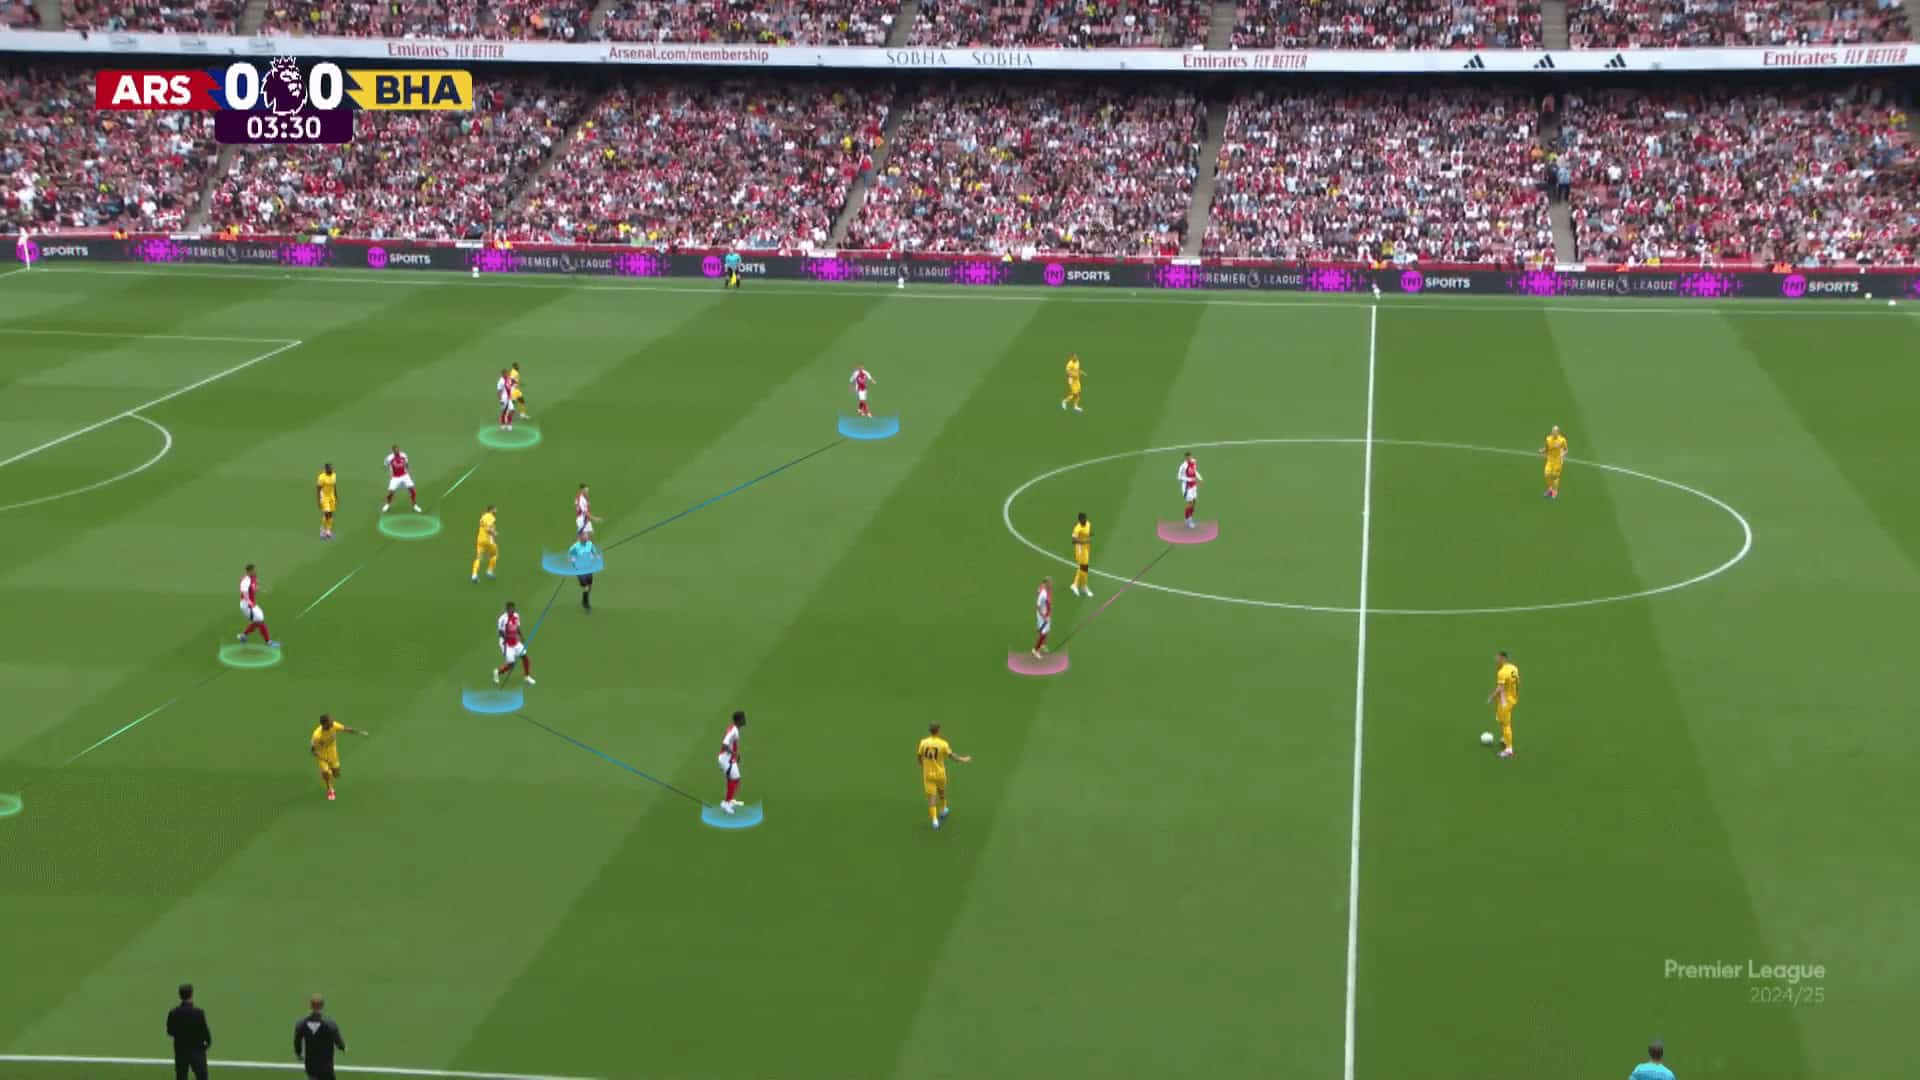
Havertz doesn’t have enough time, so they keep their 4-4-2 pressing scheme, their starting point, by Havertz getting narrower beside Trossard and Gabriel Martinelli running back to be behind the taker in a ready, safe 4-4-2 shape from which they can behave.

throw-ins-series-defence-goals-and-systems-set-piece-analysis-tactics

You can see Gabriel Martinelli behind the taker, joining the 4-4-2 scheme, while Trossard chooses to close the centre first on the defensive side, letting the back pass option open.

throw-ins-series-defence-goals-and-systems-set-piece-analysis-tactics

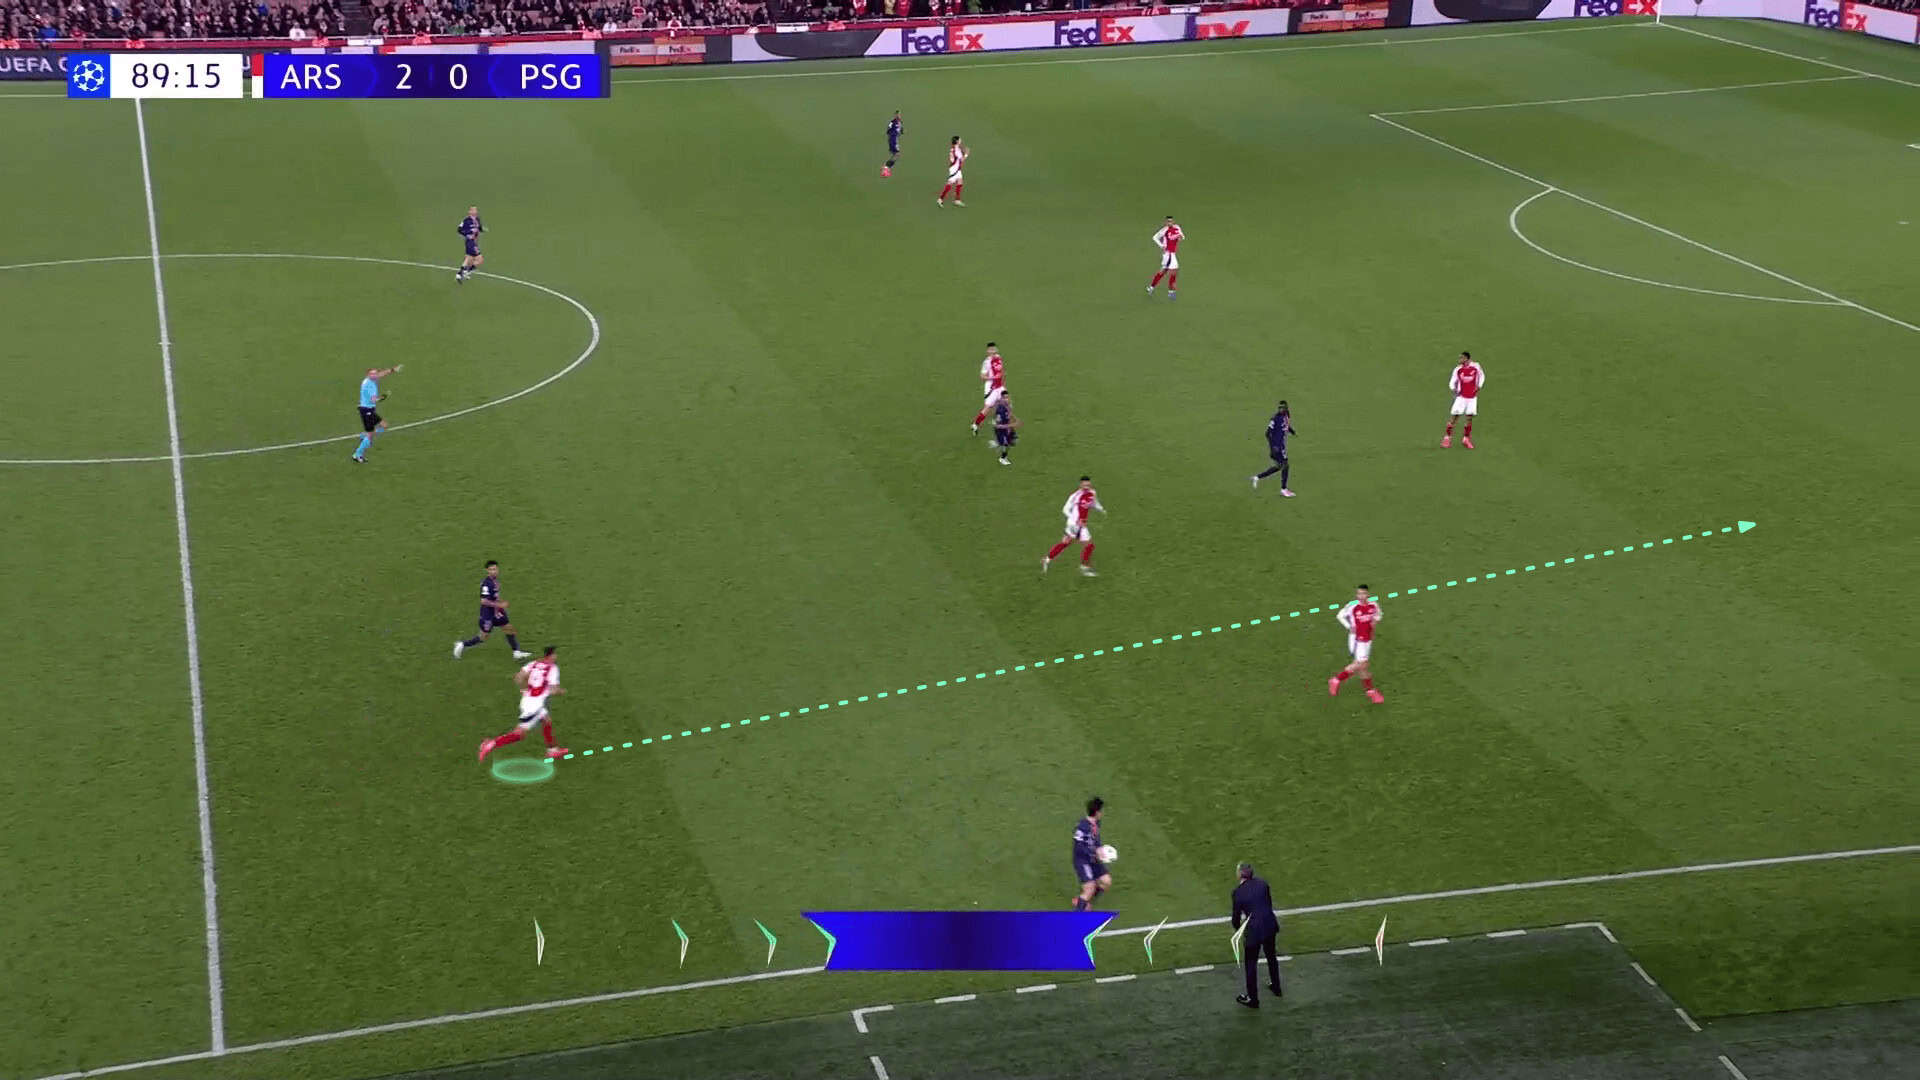
This forces the opponent to play the ball back, and then Arsenal can apply side pressing on the other side of the pitch, forcing the opponent to clear the ball away, as shown in the two photos below. 

throw-ins-series-defence-goals-and-systems-set-piece-analysis-tactics


throw-ins-series-defence-goals-and-systems-set-piece-analysis-tactics

Conclusion

In this analysis, we have started our throw-ins series by explaining the different purposes for which teams aim while defending throw-ins by using various strategies in various positions on the pitch.

In this set-piece analysis, we have mentioned that throw-ins are a different kind of set-piece for which technique is essential because of many variables like the inexistence of offsides and the better ability to control the ball with your hand.

In the following articles in this throw-ins series, we will start to explain specific total study cases by mentioning what a particular team does in various positions on the pitch against multiple teams and showing the different attacking strategies after already knowing the defending ones.

We will also deal with throw-ins as a phase of play that needs to be analysed in a match, seeing how a coach could overcome the other, like any other game analysis.


Previous Post

Counter-Attacking Football: The Perfect Strategy for Underdogs

Next Post

Why Udinese’s Direct Tactics & Aerial Power Give Them A Winning Edge Under Kosta Runjaić Tactics – Tactical Analysis

Next Post
Team Analysis Kosta Runjaić Tactics At Udinese 202425

Why Udinese’s Direct Tactics & Aerial Power Give Them A Winning Edge Under Kosta Runjaić Tactics - Tactical Analysis

Match ball on centre spot of floodlit pitch at dusk, geometric shadows, stadium lighting, cool-blue and warm-gold atmospheric haze.

Germany vs Curaçao Prediction: World Cup 2026 Preview & Best Bets

June 11, 2026
Floodlit football pitch at dusk with match ball on penalty spot, dramatic stadium shadows, cool-warm colour grade.

Netherlands vs Japan Prediction: World Cup 2026 Preview & Best Bets

June 11, 2026
Overhead stadium view during evening kickoff: floodlit pitch, mixed-nation crowd colours, match ball on halfway line, dramatic shadows.

World Cup 2026 Group H Winner: Odds, Predictions & Best Bets

June 11, 2026
  • About Total Football Analysis
  • Contact Total Football Analysis
  • Advertise
  • Privacy Policy
  • Cancellation / Refund Policy
  • Resources
  • Terms Of Service

© 2026 Total Football Analysis

No Result
View All Result
  • Football Analysis
    • Data Analysis
    • Formations
      • 2-2-4 Formation
      • 2-3-5 Formation
      • 3-1-4-2 Formation
      • 3-2-2-3 Formation
      • 3-2-4-1 Formation
      • 3-1-6 Formation
      • 3-3-4 Formation
      • 3-4-1-2 Formation
      • 3-4-2-1 Formation
      • 3-4-3 Formation
      • 3-5-1-1 Formation
      • 3-5-2 Formation
      • 4-1-4-1 Formation
      • 4-2-2-2 Formation
      • 4-2-3-1 Formation
      • 4-2-4 Formation
      • 4-3-1-2 Formation
      • 4-3-3 Formation
      • 4-4-2 Formation
      • 4-5-1 Formation
      • 5-3-2 Formation
      • 5-4-1 Formation
      • 6-3-1 Formation
    • Head Coach Analysis
    • Match Analysis
    • Player Analysis
    • Recruitment Analysis
    • Set Piece Analysis
    • Tactical Theory
    • Tactical Preview
    • Team Analysis
    • Training Analysis
    • Tactical Analysis
    • Scouting Report
  • FIFA World Cup 2026
    • World Cup Betting Sites
    • World Cup Betting Promotions
    • World Cup Free Bets
    • World Cup Golden Glove Odds
    • World Cup Top Scorer Odds
    • World Cup Player of the Tournament Odds
  • Competitions
    • English Premier League
    • Champions League
    • La Liga
    • Bundesliga
    • Serie A
    • Ligue 1
    • Eredivisie
    • EFL Championship
    • Women’s Super League
    • NWSL
    • Belgian First Division A
    • A-League
    • Liga Profesional de Argentina
    • Austrian Bundesliga
    • Campeonato Brasileiro Série A
    • DFB Pokal
    • 1. HNL
    • Danish Superliga
    • EFL League One
    • EFL League Two
    • FA Cup
    • EFL Cup
    • Indian Super League
    • K-League
    • J1 League
    • Liga MX
    • Copa del Rey
    • MLS
    • Eliteserien
    • Allsvenskan
    • Primeira Liga
    • Scottish Premiership
    • Europa League
    • UEFA Nations League
    • Liga AUF Uruguaya
  • Coaches
    • All Coaches
    • Alfred Schreuder
    • Ange Postecoglou
    • Antonio Conte
    • Arne Slot
    • Bo Svensson
    • Brendan Rodgers
    • Bruno Lage
    • Carlo Ancelotti
    • Christophe Galtier
    • Claude Puel
    • Claudio Ranieri
    • David Moyes
    • Dean Smith
    • Diego Simeone
    • Domenico Tedesco
    • Frank Lampard
    • Eddie Howe
    • Edin Terzić
    • Emma Hayes
    • Erik ten Hag
    • Ernesto Valverde
    • Gennaro Gattuso
    • Gerardo Seoane
    • Gian Piero Gasperini
    • Giovanni van Bronckhorst
    • Graham Potter
    • Igor Tudor
    • Imanol Alguacil
    • Jesse Marsch
    • Jonas Eidevall
    • Jorge Sampaoli
    • José Bordalás
    • José Mourinho
    • Julien Stéphan
    • Julen Lopetegui
    • Julian Nagelsmann
    • Jürgen Klopp
    • Luciano Spalletti
    • Lucien Favre
    • Manuel Pellegrini
    • Marcelo Bielsa
    • Marco Rose
    • Marco Silva
    • Massimiliano Allegri
    • Mauricio Pochettino
    • Maurizio Sarri
    • Mikel Arteta
    • Niko Kovač
    • Nuno Espírito Santo
    • Oliver Glasner
    • Patrick Vieira
    • Paulo Fonseca
    • Pep Guardiola
    • Peter Bosz
    • Rafa Benítez
    • Ralf Rangnick
    • Ralph Hasenhüttl
    • Roger Schmidt
    • Roy Hodgson
    • Sean Dyche
    • Sérgio Conceição
    • Simone Inzaghi
    • Sonia Bompastor
    • Stefano Pioli
    • Steffen Baumgart
    • Steven Gerrard
    • Thiago Motta
    • Thomas Frank
    • Thomas Tuchel
    • Unai Emery
    • Vincenzo Italiano
    • Xavi
  • Teams
    • ALL Teams
    • AC Milan
    • Ajax Amsterdam
    • Arsenal
    • AS Monaco FC
    • Atalanta
    • Atlético Madrid
    • FC Barcelona
    • FC Bayern Munich
    • Borussia Dortmund
    • Celtic FC
    • Chelsea FC
    • Everton F.C.
    • Inter Milan
    • Juventus F.C.
    • Leeds United F.C.
    • Liverpool FC
    • Manchester City
    • Manchester United FC
    • Paris Saint-Germain
    • Rangers FC
    • RB Leipzig
    • Real Madrid CF
    • Tottenham Hotspur
    • West Ham United
  • Players
    • ALL Players
    • Alisson Becker
    • Bukayo Saka
    • Erling Haaland
    • Harry Kane
    • Jack Grealish
    • John Stones
    • Kevin De Bruyne
    • Julián Alvarez
    • Kalvin Phillips
    • Kyle Walker
    • Kylian Mbappé
    • Luis Díaz
    • Lamine Yamal
    • Mohamed Salah
    • Lionel Messi
    • Virgil Van Dijk
    • Phil Foden
  • Guides
    • Betting Sites
      • Betting Apps
      • Betting Bonuses
      • Betting Exchanges
      • Betting Sites Not on GamStop
      • Cash Out Betting Sites
      • Crypto Betting Sites
      • European Bookmakers
      • Footbal Betting Sites
      • Free Bets
      • New Betting Sites
      • No KYC Betting Sites
      • Live Betting Sites
    • Online Casinos
      • Casino Apps
      • Credit Card Casinos
      • Crypto Casinos
      • Fast Payout Casinos
      • Non GamStop Casinos
      • Offshore Casinos
      • Slots Casinos
      • Irish Online Casinos
    • International
      • Betting Sites Ireland
  • Contact
  • Login

© 2026 Total Football Analysis