Bayer Leverkusen hosted Arsenal in the first leg of the UEFA Champions League Round of 16 at BayArena, in an important game that ended in a 1-1 draw.
It was predicted that the game would be easier for Mikel Arteta‘s side, who entered the game in good form, leading the Premier League with a six-point difference above Man City.
On the other hand, Kasper Hjulmand‘s side isn’t in a good position in the Bundesliga table, where they sit in sixth position with 45 points, with a 22-point difference between them and the first, Bayern Munich.
It was also a surprise for some fans that Bayer Leverkusen scored a goal from a set-piece, a corner kick, while Arsenal couldn’t do so.
On the other hand, Arsenal were threatening from set-pieces, as usual, but Bayer Leverkusen had a good defensive plan that reduced their threat.
In this set-piece analysis, we will explain both teams’ attacking tactics at corners and how the other reacted in the first leg, and then try to see how both may react in the second leg, based on their previous reactions in similar situations.
Bayer Leverkusen Attacking Corners Vs Arsenal
Starting with the side that scored from a set-piece, Bayer Leverkusen had two corners; they scored from one of them and showed a good idea on the other, indicating a good performance in this important aspect of the game.
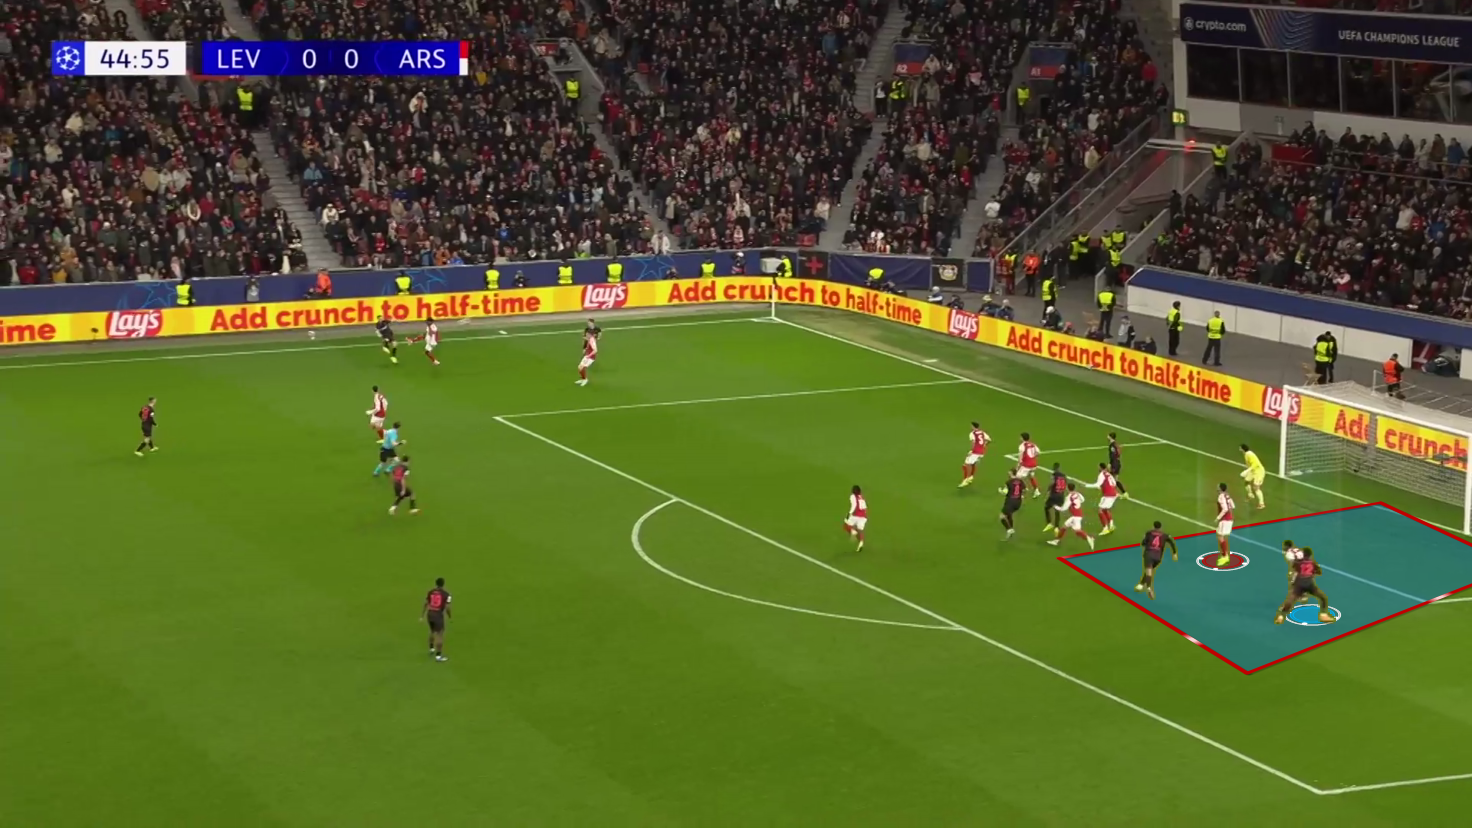
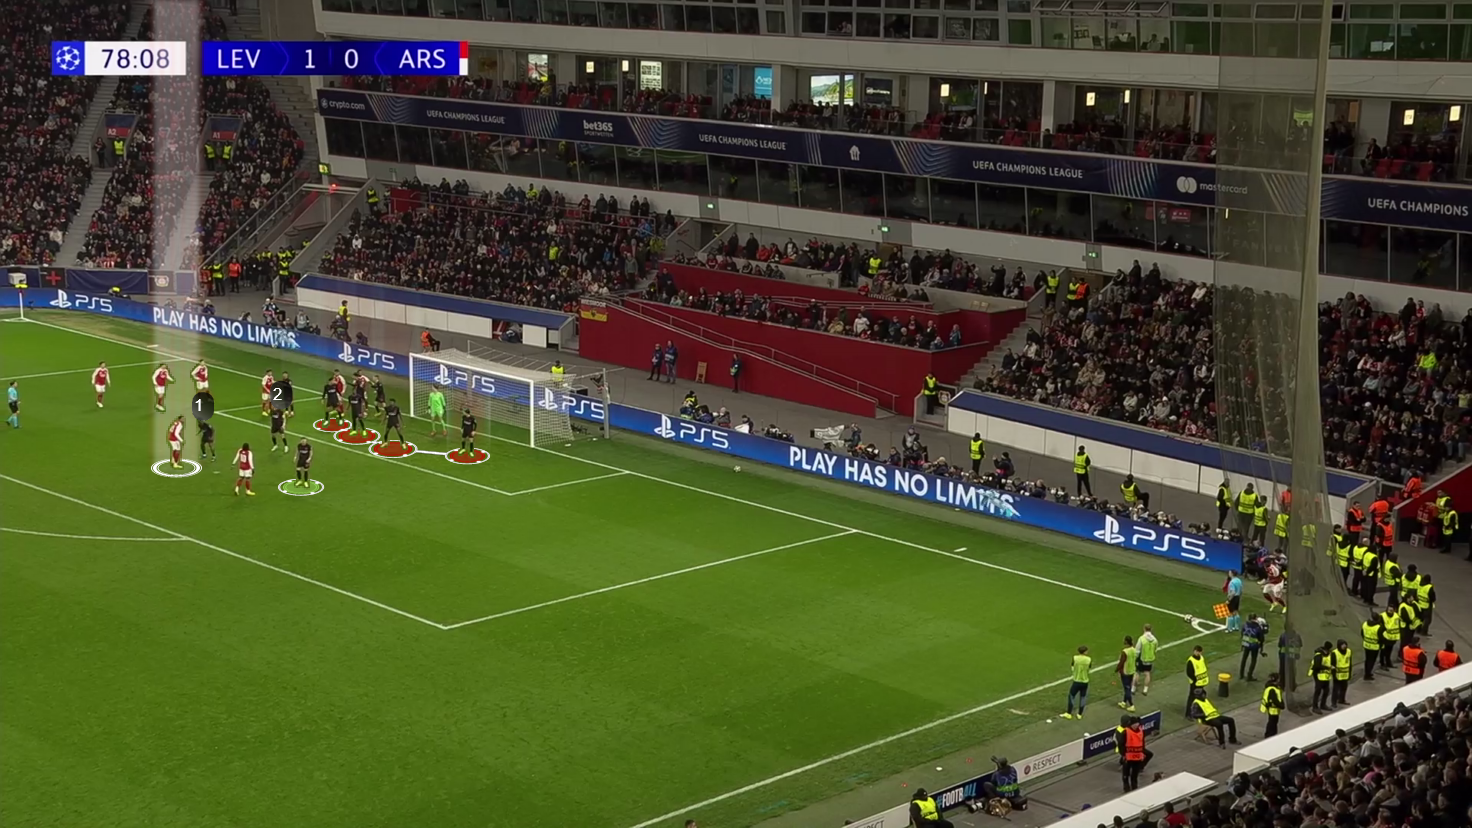
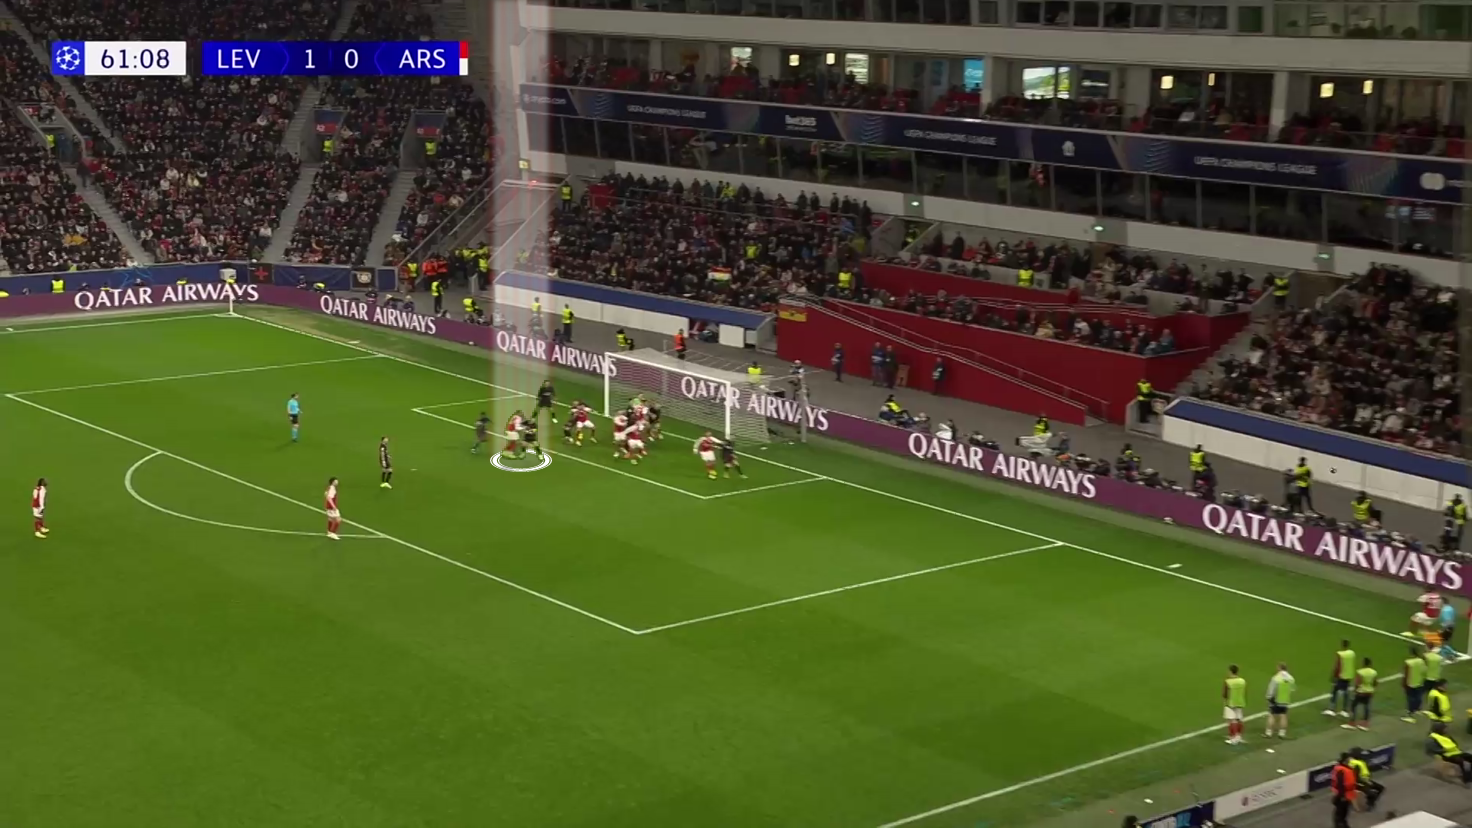
Figure 1 below shows how Arsenal defended corner kicks against Bayer Leverkusen, with the corner that led to the hosts’ goal.
They defended with a hybrid defending system, having five zonal defenders (yellow), four man markers (blue), and a player (green) to defend the rebound, ready to defend short corners.
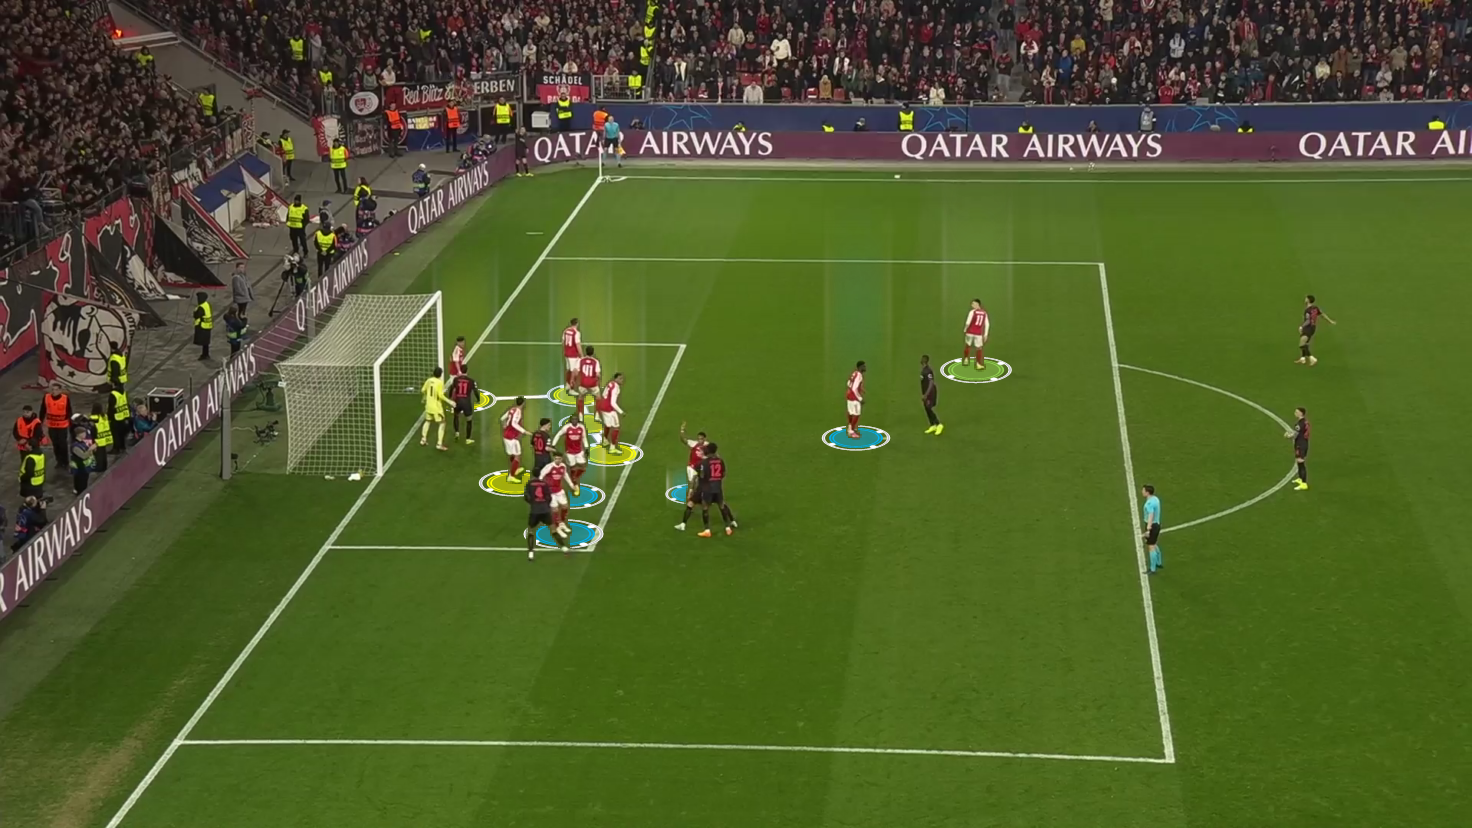
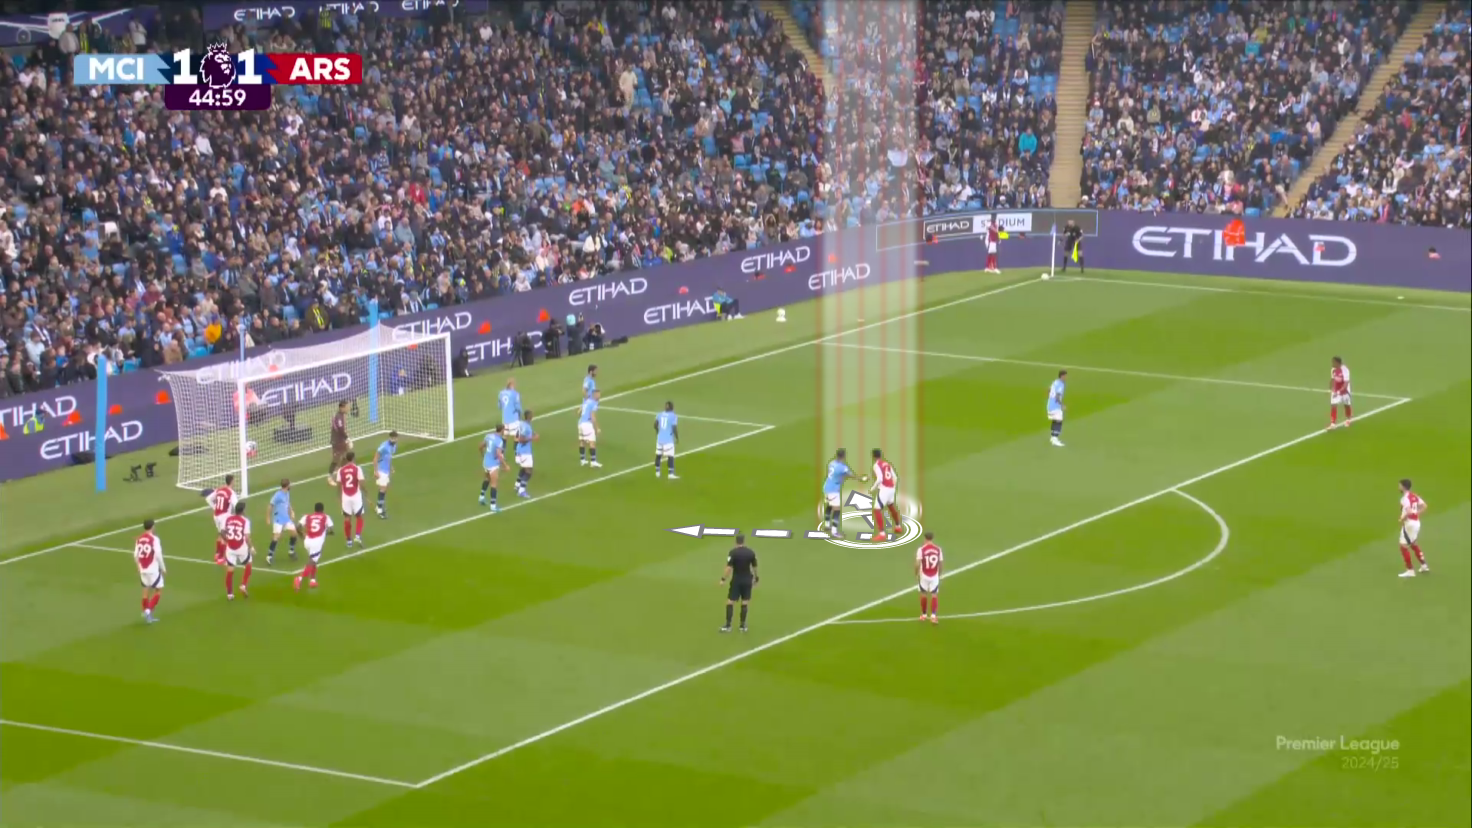
Figure 2 below shows that the German side targeted the far post with the player in white, who had many options in this area: the goalkeeper, the last zonal defender, and the man marker who marks the targeted player.
Bayer Leverkusen dealt with these obstacles carefully, so they asked the yellow-arrowed player to start near the goalkeeper and go on a decoy run to drag David Raya a little bit forward, making it hard for him to step back and claim the ball before reaching the far post.
The green-arrowed player had an important role in blocking the last zonal defender.

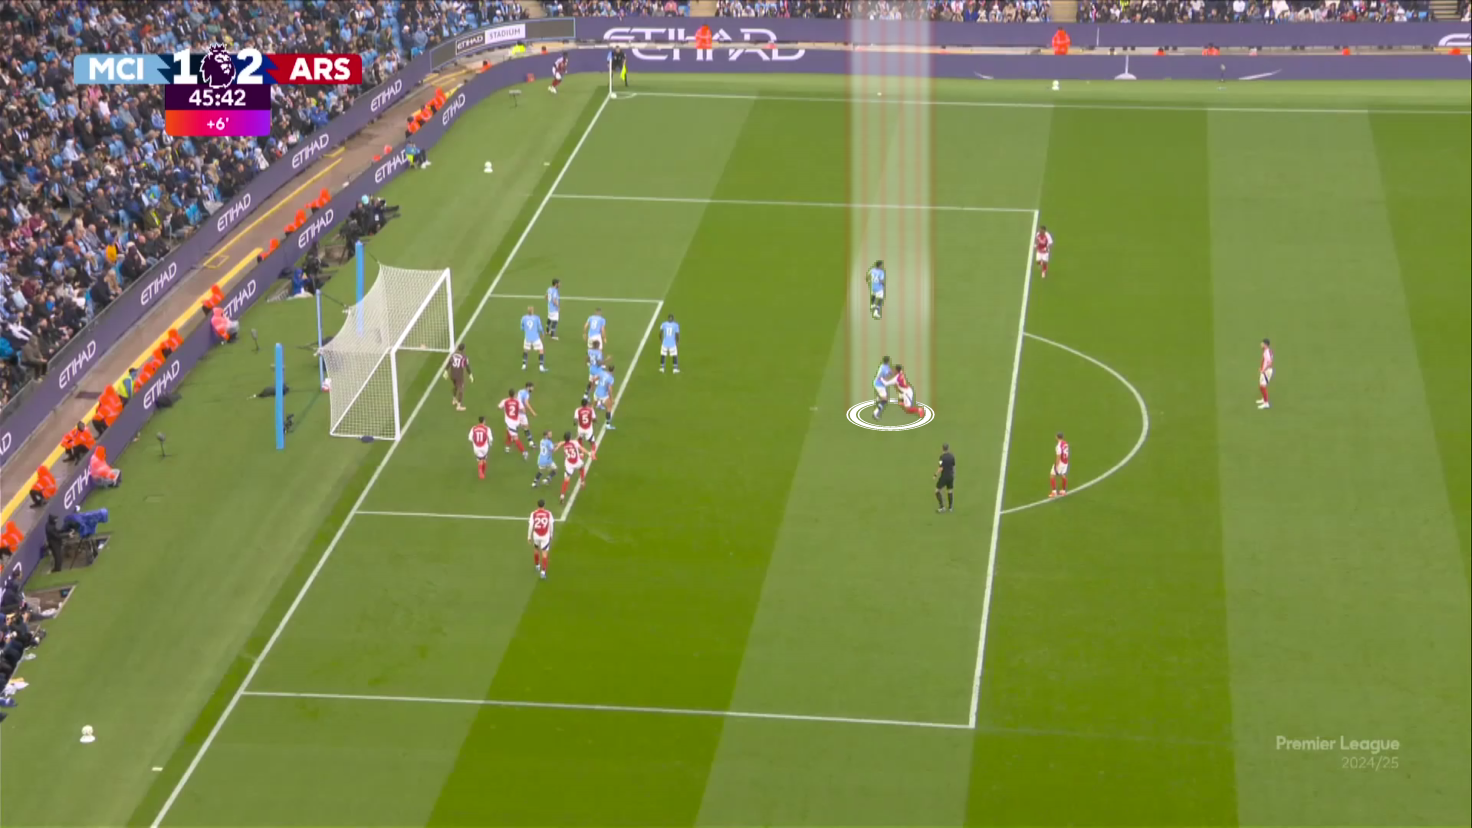
Figure 3 shows how the targeted player (white) dealt with the last obstacle, his man marker.
The player in blue runs first toward the near post to drag the targeted player’s man marker and free him, while the red player also makes a run toward the near post to drag his man marker away from the far post and also to be ready in case the targeted player nods the ball back to the near post.

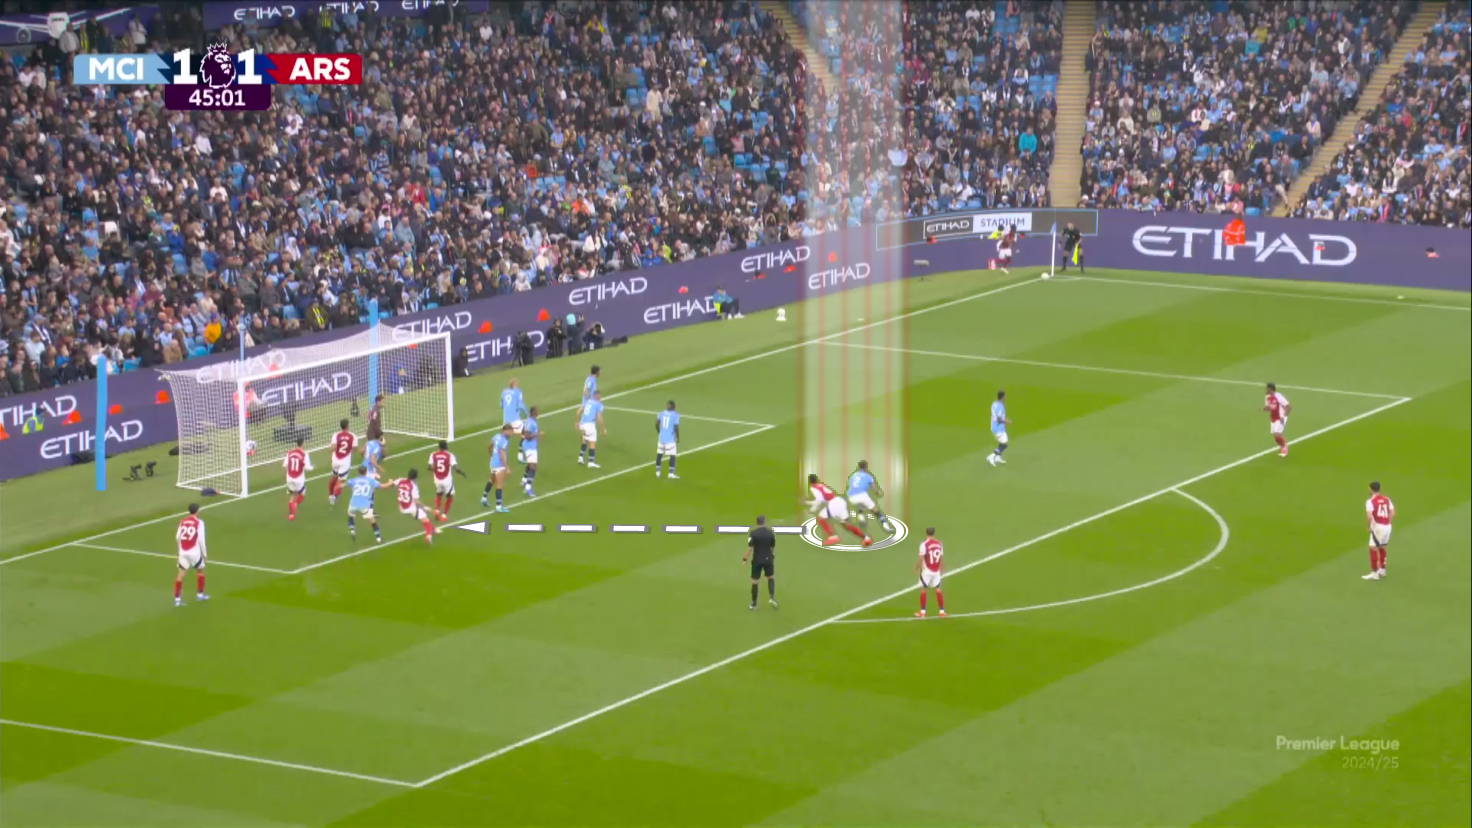
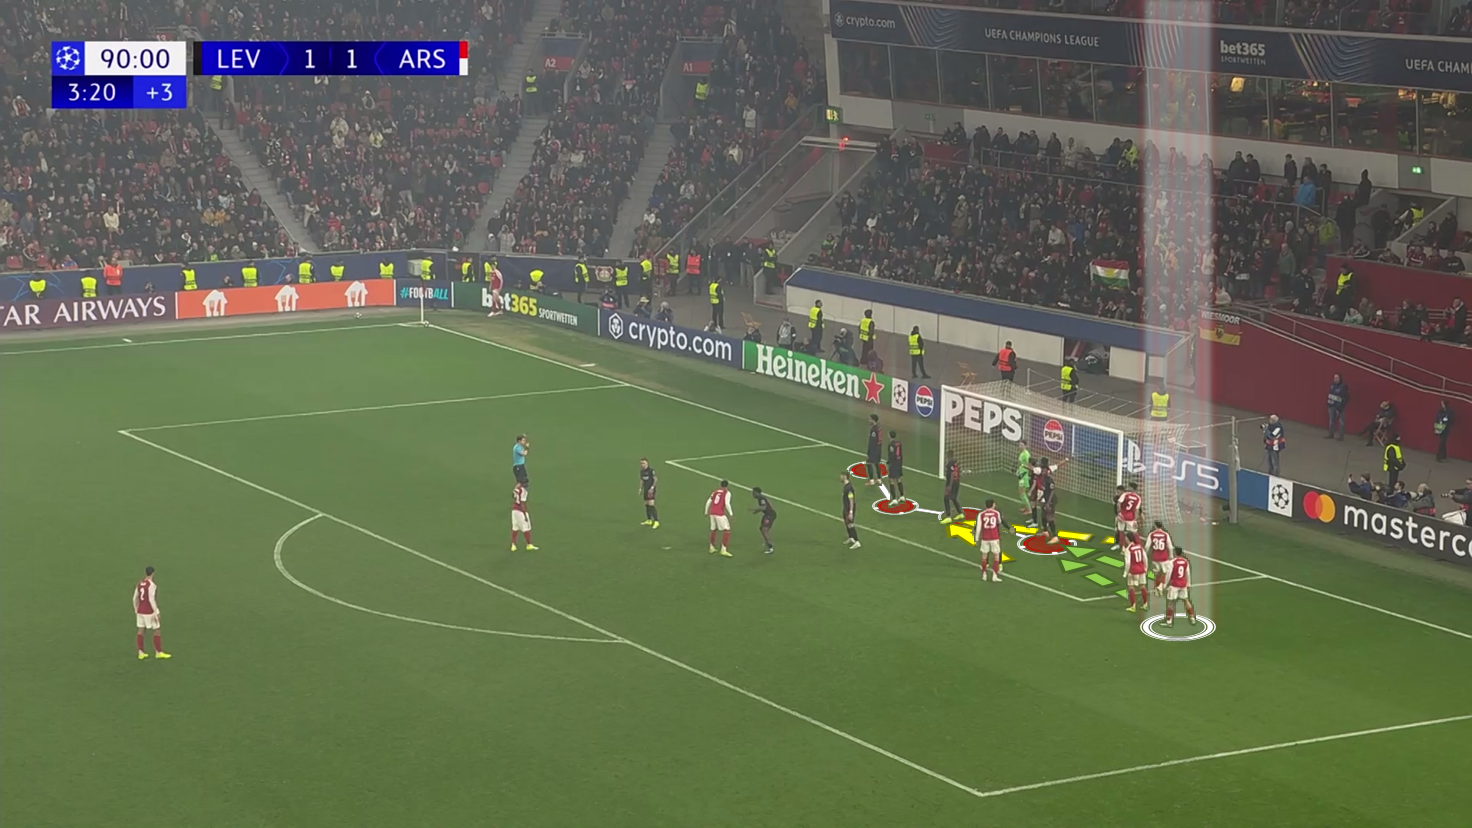
Figure 4 below shows the final moment when all is set, so you can see Raya (yellow) step toward the near post, which made it difficult for him to claim this floated cross to the far post.
You can also see two green blocks: one for the last zonal defender and the other for the last man marker on the far post.
You can also see that the targeted player is free now because the blue runner drags the man marker with him.
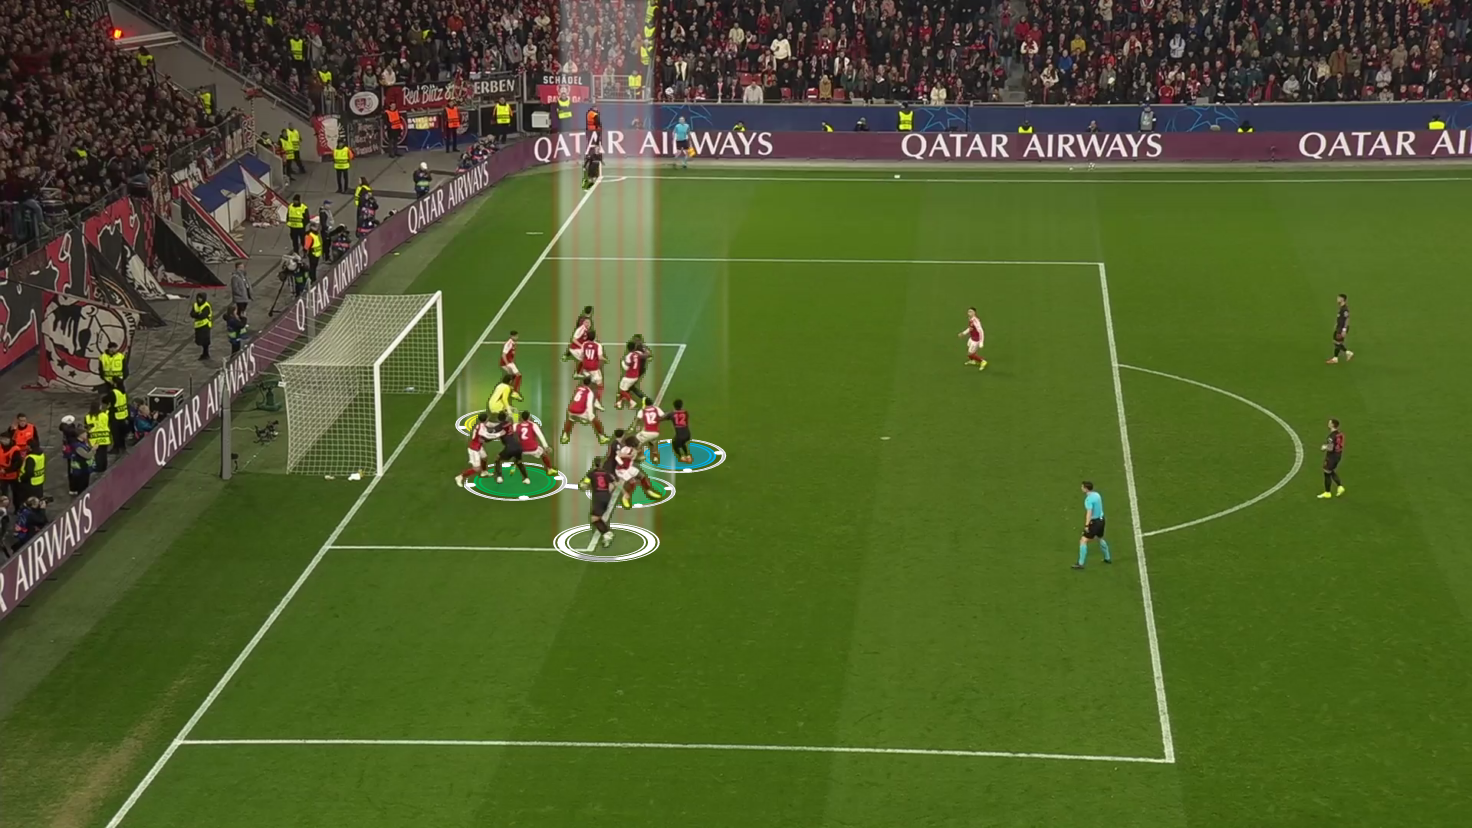
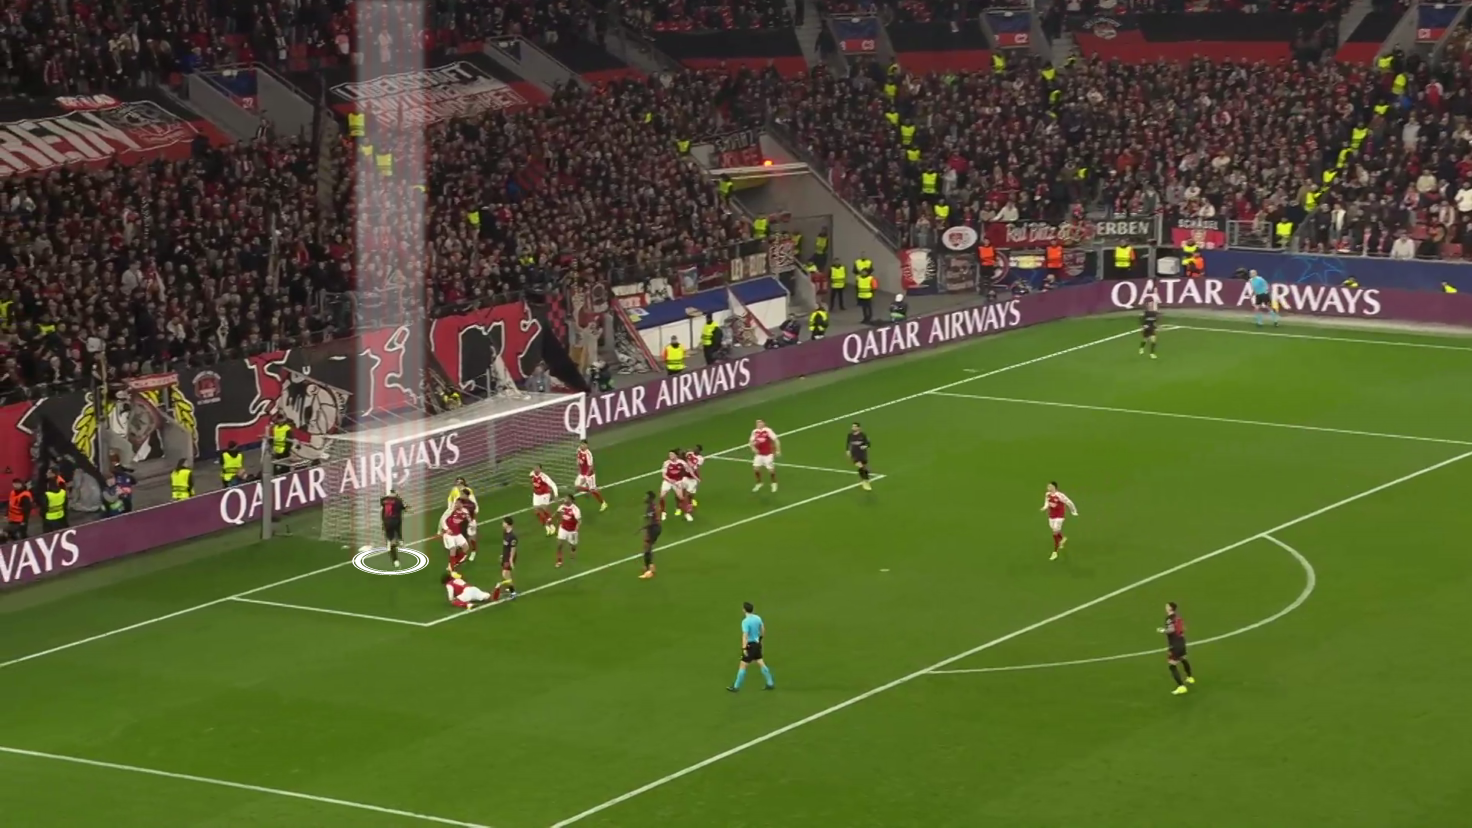
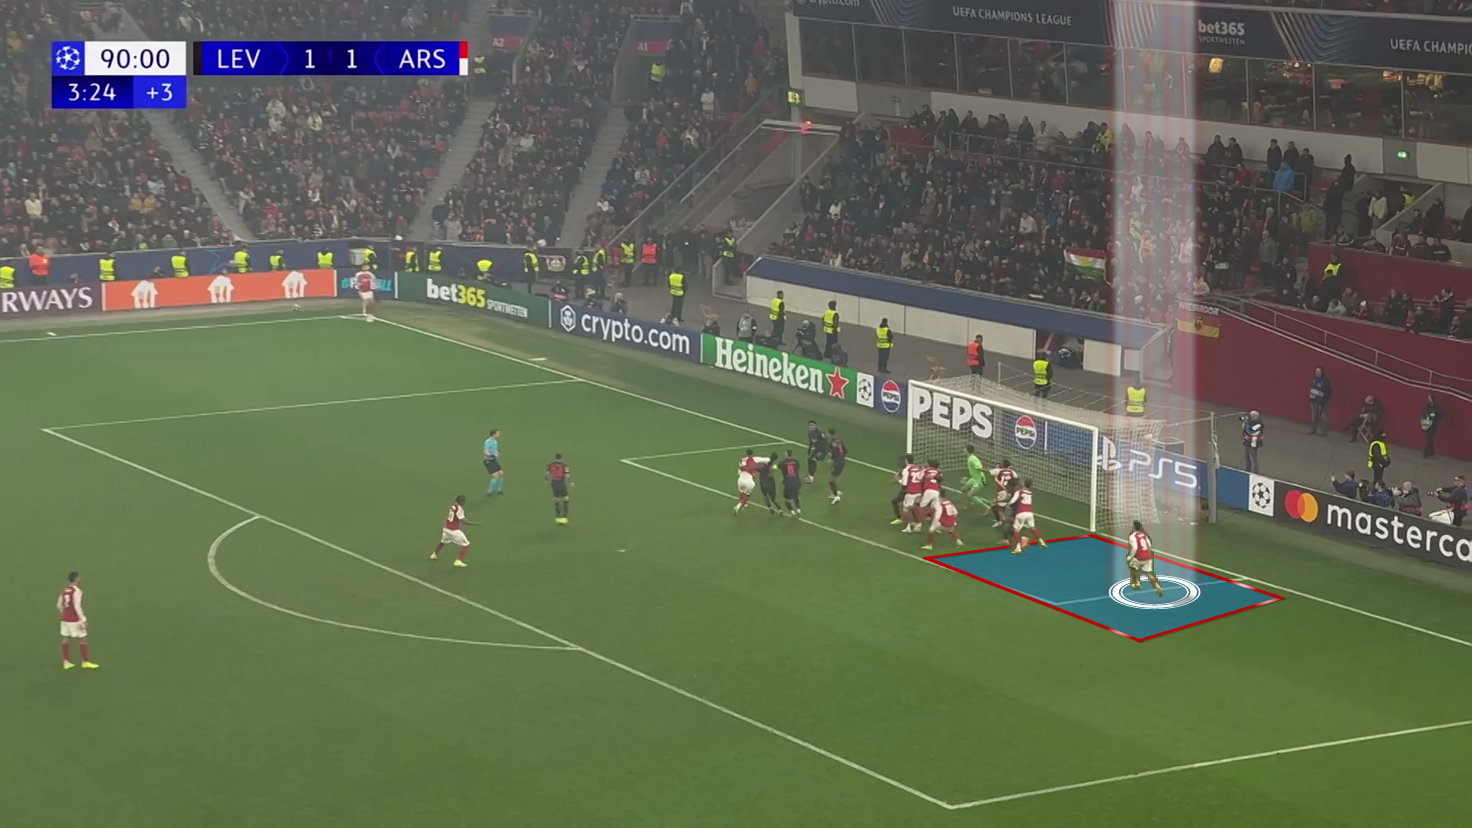
In the end, all is set, and it ended with a goal, as shown in Figure 5.
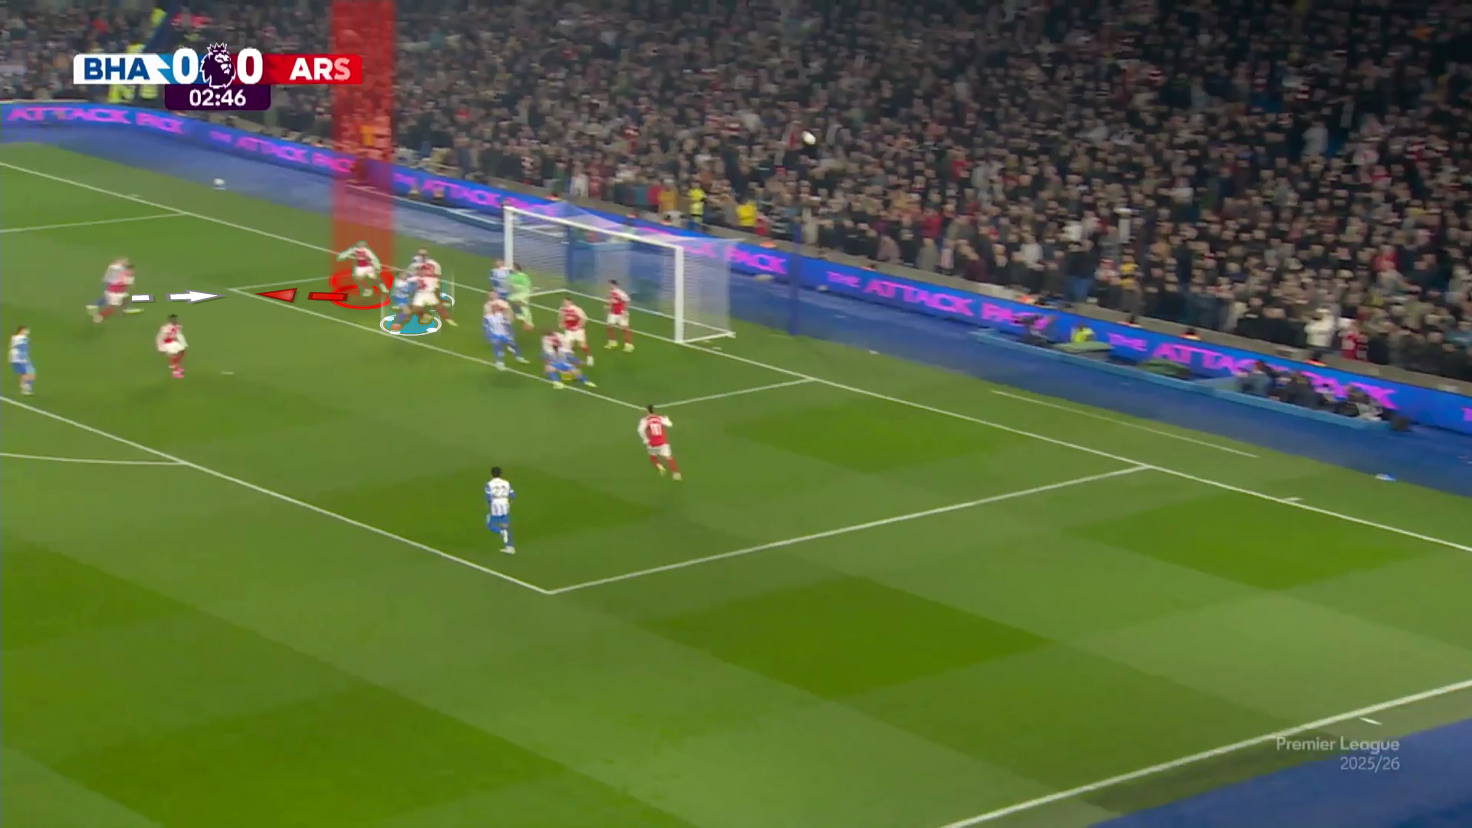
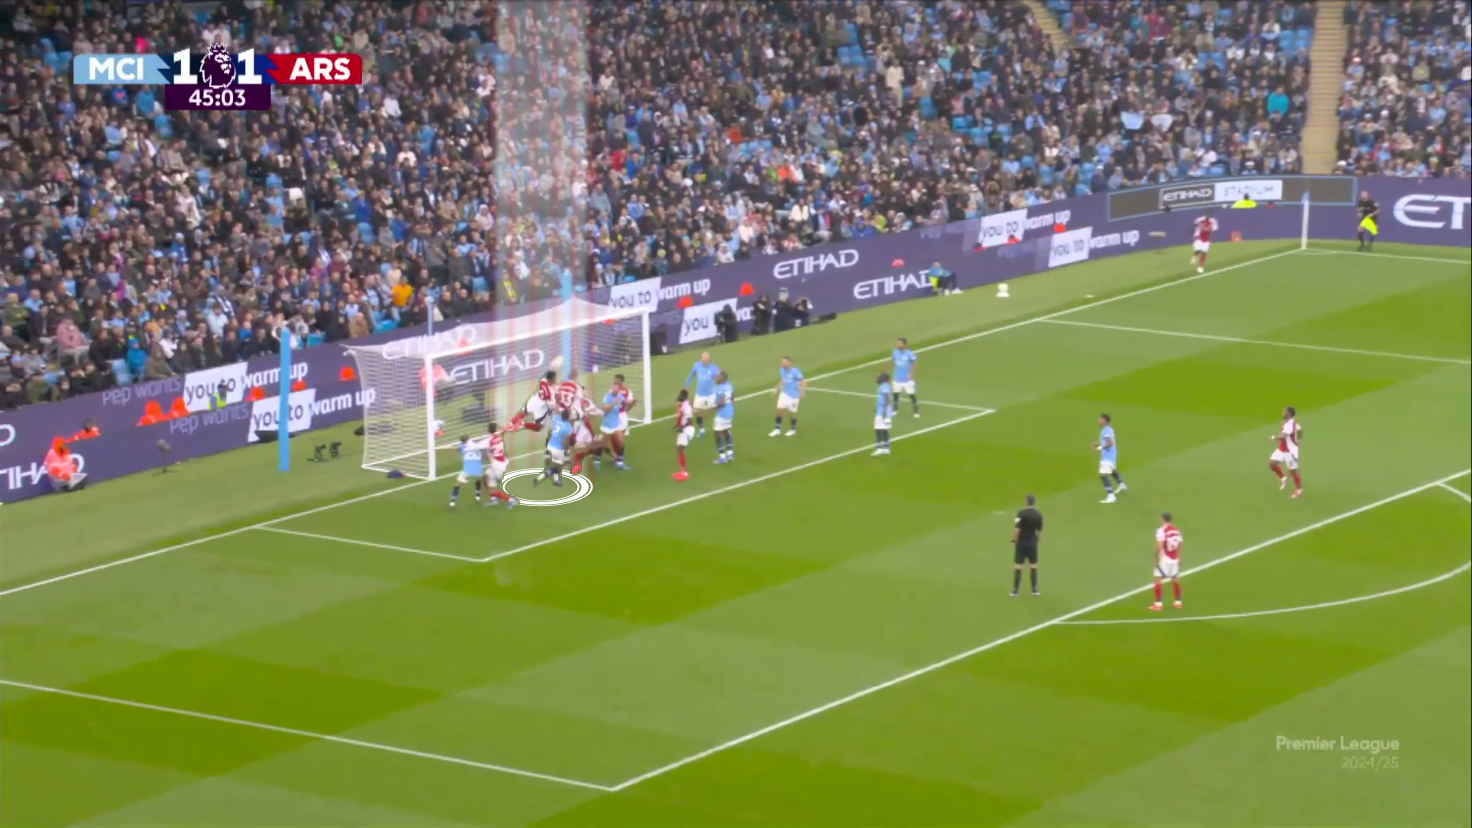
Depending on Arsenal’s previous reaction to teams that are good at attacking the area beyond the far post, we can see how Arsenal defended corners against Brighton, as shown in Figure 6 below.
Arsenal defended with six zonal defenders (red) in that game, and you can notice that the sixth one is beyond the far post.
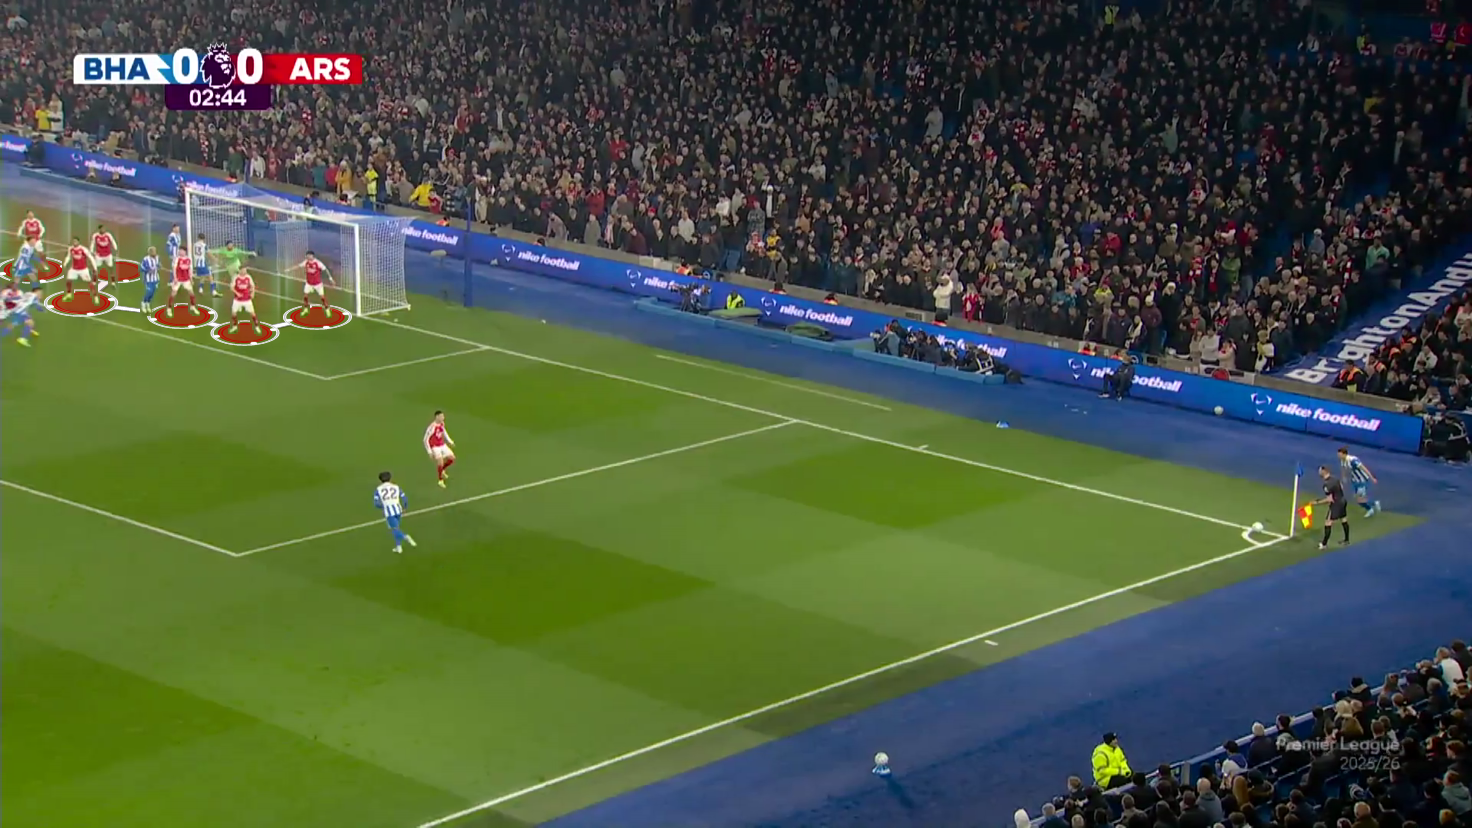
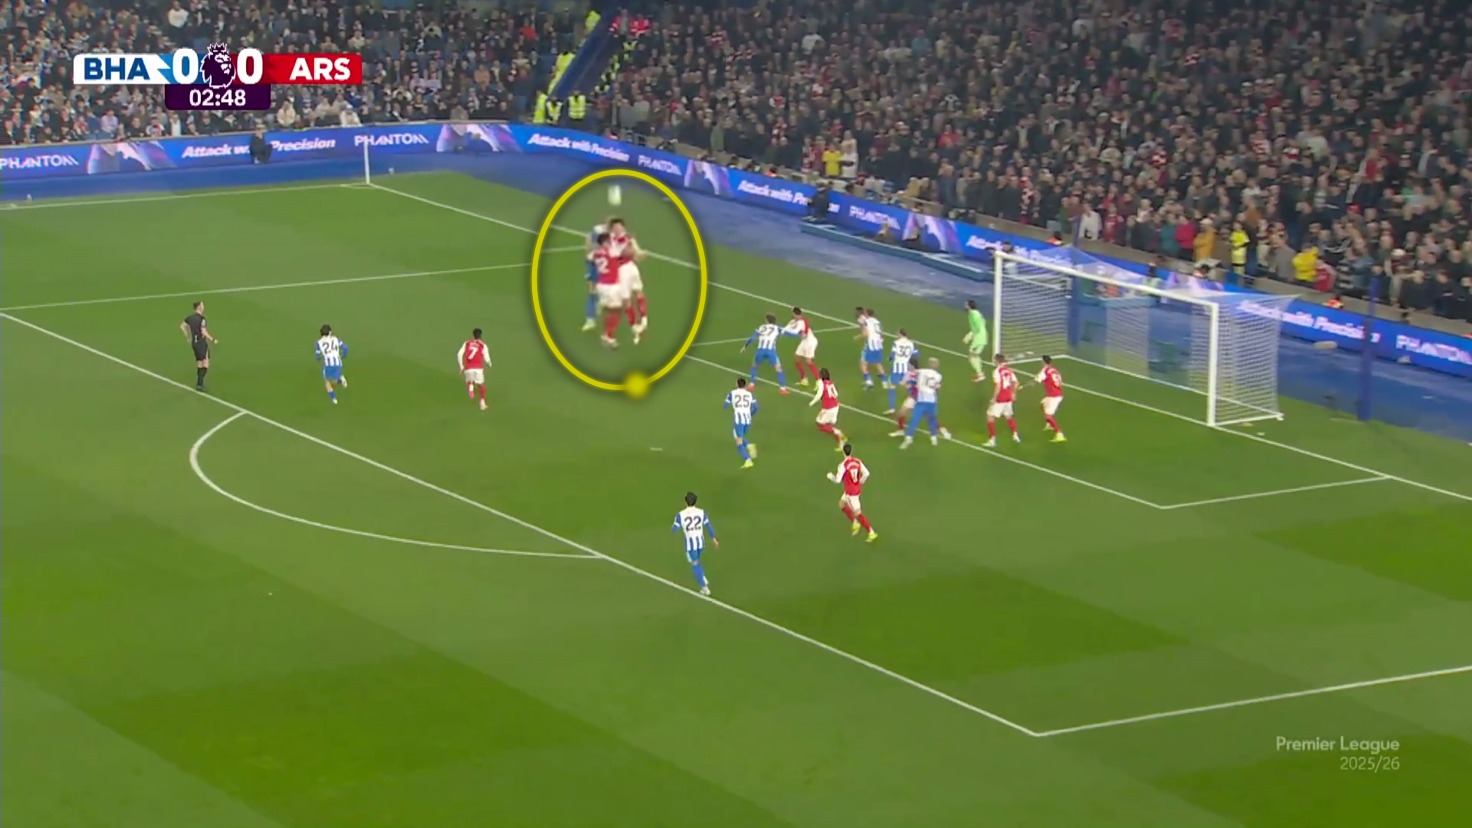
Hence, there are nearly three zonal defenders ready to defend the far post, so if the opponent blocks the two zonal defenders (blue), the last defender (red) can go out to defend the cross against the threat coming from the white-arrowed attacker to help the man marker, as shown in figures 7 and 8.
In the other corner (the first one), they tried a short-corner routine with a short-option attacker close to the taker who passes the ball and overlaps while a player moves from the edge of the box toward the ball to drag the rebound defender (green), as shown below.
That forces the first zonal defender (red) to help in this 2v1, but he has to travel some distance, which allows the taker to receive the pass and cross from a better position.
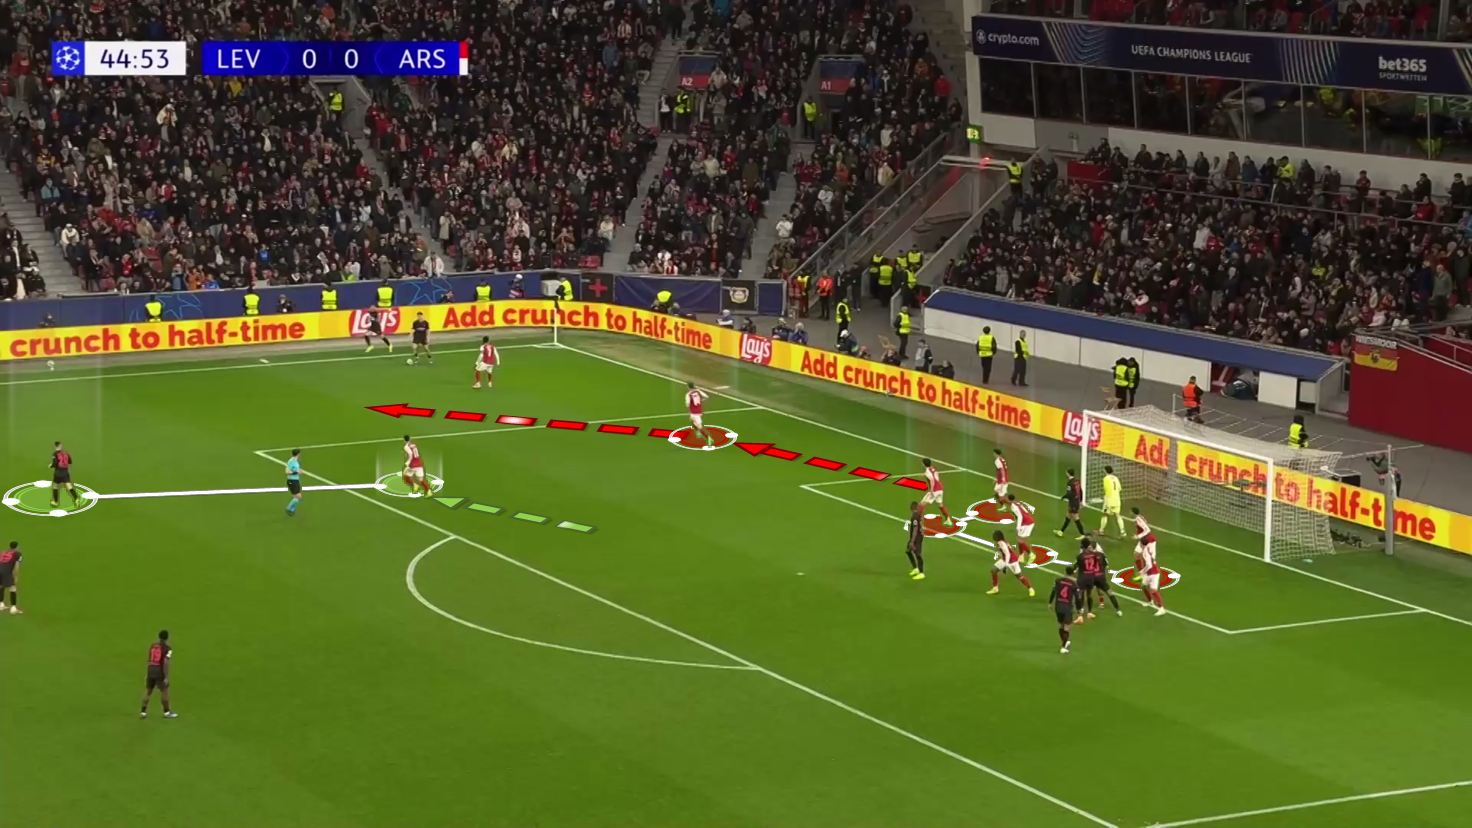
Figure 10 below shows the battle inside the box.
A man marker (yellow) is forced to close down the rebound option on the edge of the box, which leaves just two man markers inside the box (blue).
One of them will be dragged to the near post, leaving just one man marking against two attackers at the far post.
This can also tell us that Bayer Leverkusen may target the edge of the box directly in the second leg by blocking all the man-markers from getting out to defend it, or, let’s say, it is an option.
In the end (figure 11), it was a dangerous situation with two attackers against one man marker and the last zonal defender on the far post, but Raya claimed the cross.
Bayer Leverkusen also have an opportunity to learn from Sunderland.
They asked the first short-option attacker to run diagonally to the box to drag the short-option defender with him.
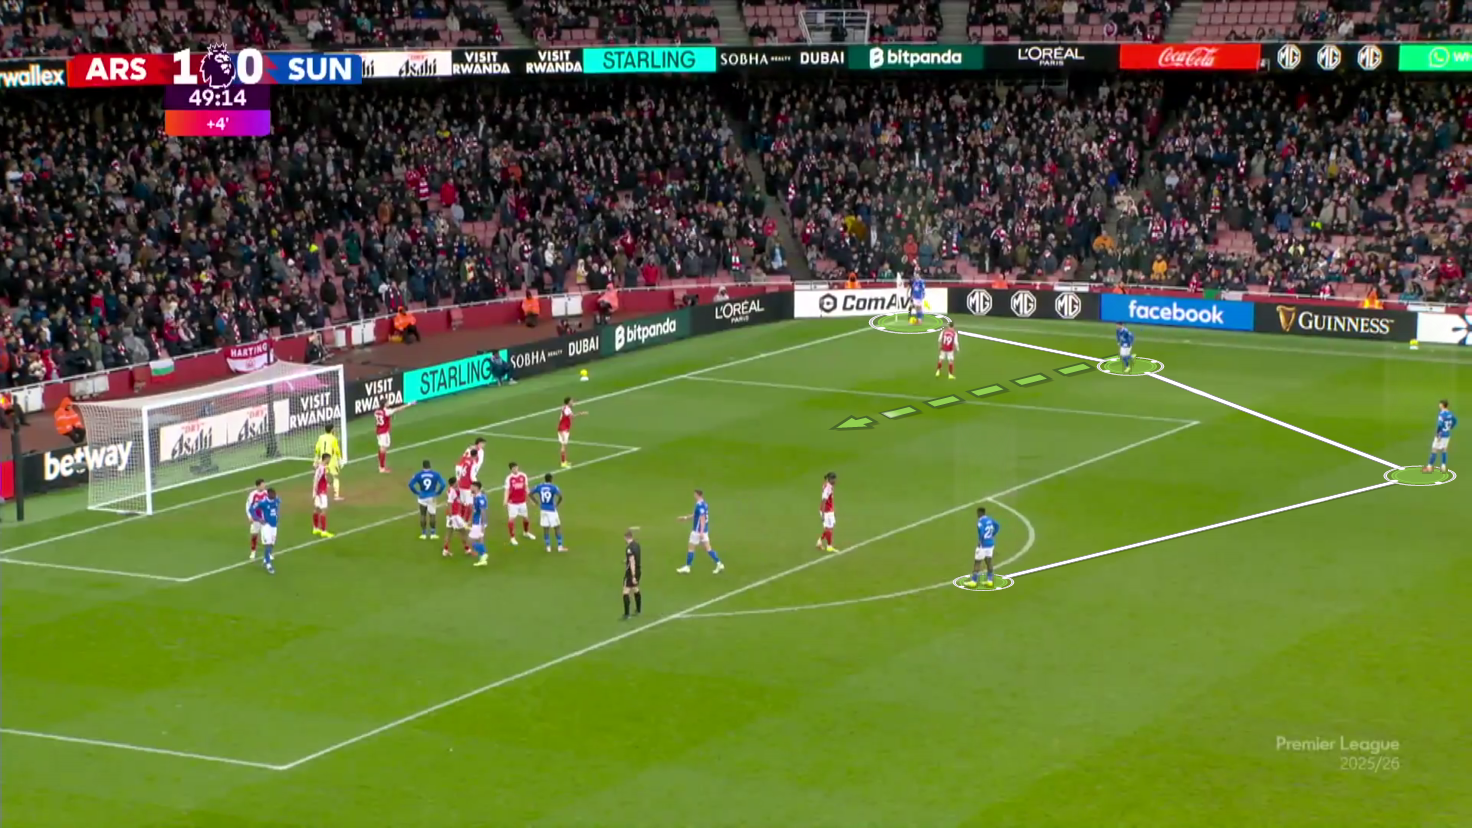
Figure 13 shows that the far short-option attacker is now free to receive the ball and send a cross, while the first zonal defender (green) has a long way to chase him, and there is an attacker fixing the edge-of-the-box defender.
Inside the box, the far late runner (white) targets the far post and starts free because the three-man markers (blue) are busy with three attackers.
Hence, the white free attacker targets the far post.
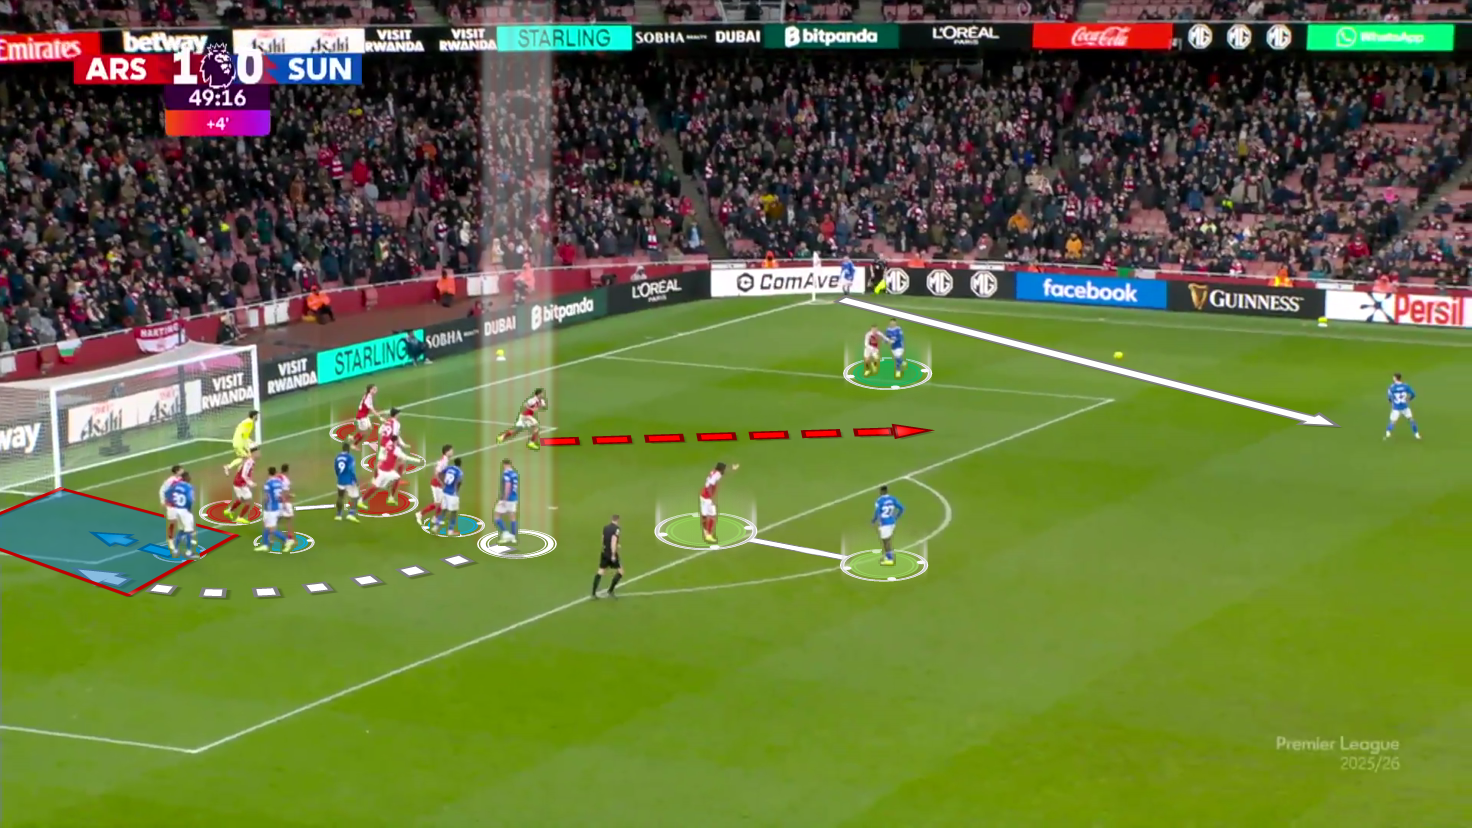
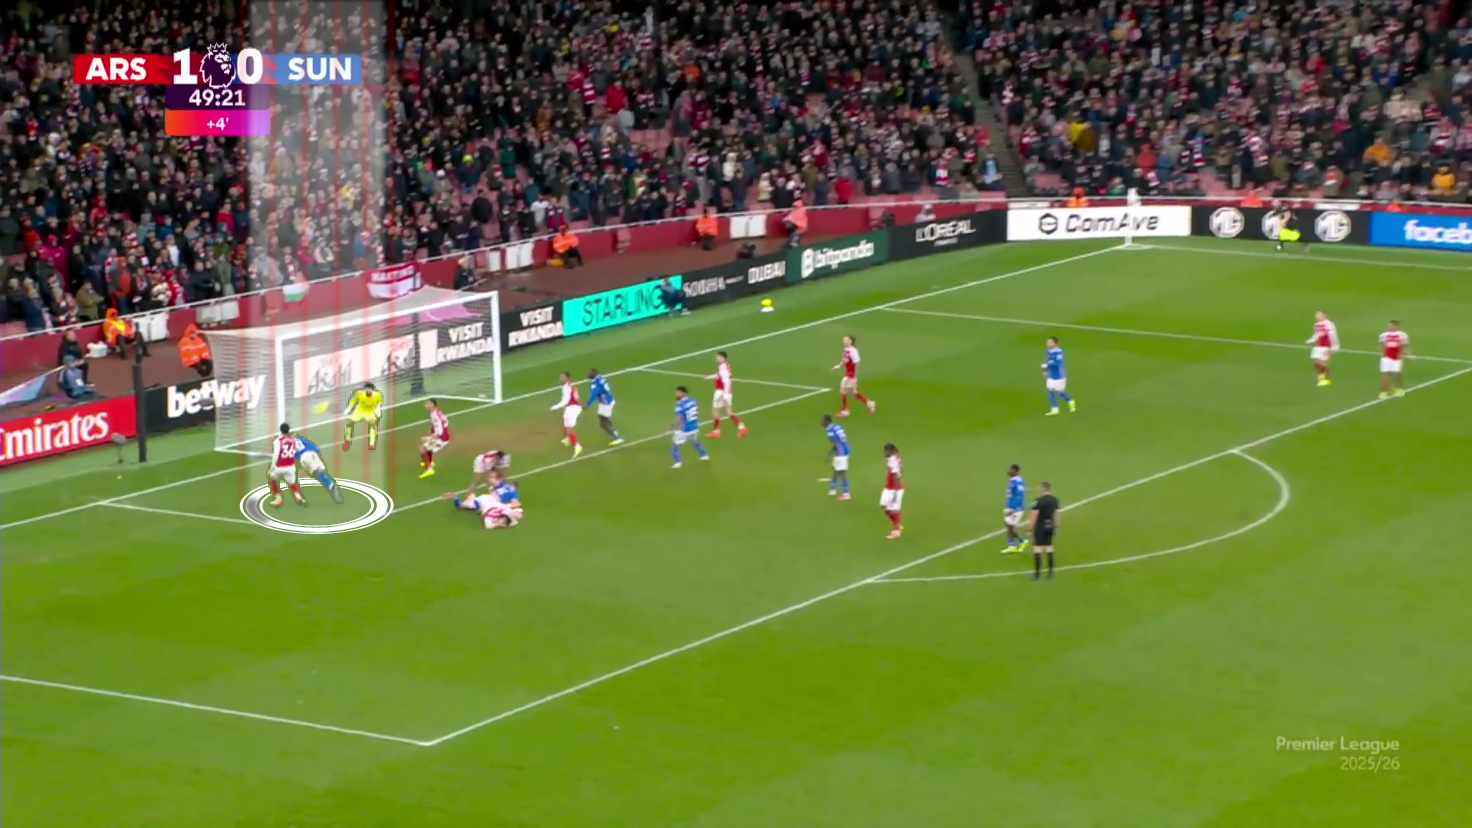
A man marker realised that and went to mark him; he fell to the ground, but the other attacker was close to scoring a goal, as shown in Figure 14 below.
Arsenal Attacking Corners Vs Bayer Leverkusen
Bayer Leverkusen defended with four zonal defenders (red), a player (green) to defend rebounds and short corners, and the other five as man markers, as in Figure 15.
The first important tip is that they had two man markers for Gabriel Magalhães: one close to him, while the other stood behind him, ready in case Gabriel escaped the first.
Hence, we should mention why they utilised this approach, and we will explain how Gabriel usually gets rid of his man marker.
As shown below, Gabriel starts near the penalty spot and quickly feints to the front, then to the back of his marker.
The marker should make a decision in this critical moment when the taker starts to move: Either watch the ball or watch Gabriel.
In Figure 18 below, the marker chooses to keep watching the ball, so he loses contact with Gabriel, who is free now and can run all the way to the six-yard line before jumping, which allows him to jump very high because of the dynamic mismatch over the stationary zonal defenders, as in Figures 18 and 19.
If the man marker decides to follow him, he will lose contact with the ball, as in Figure 20 below.
At some point, the defender may want to take a look at the ball, which causes him to lose Gabriel as well, as shown in Figure 21 below.
Hence, we can see Gabriel’s dilemma due to his feint and central starting position; of course, he is also a monster in aerial duels, even if the opponent does everything optimally.
Going back to our match, Gabriel succeeded in escaping from the first man marker as usual, but the second man marker was awaiting and ready to stop him from achieving a dynamic mismatch over the zonal line, as in Figures 22 and 23 below.
Because we are talking about Arsenal, they are always flexible in their reaction to the opponent, so we may see them targeting the near post more in the second leg or continue doing the same good routine that they did in the last minute of the match.
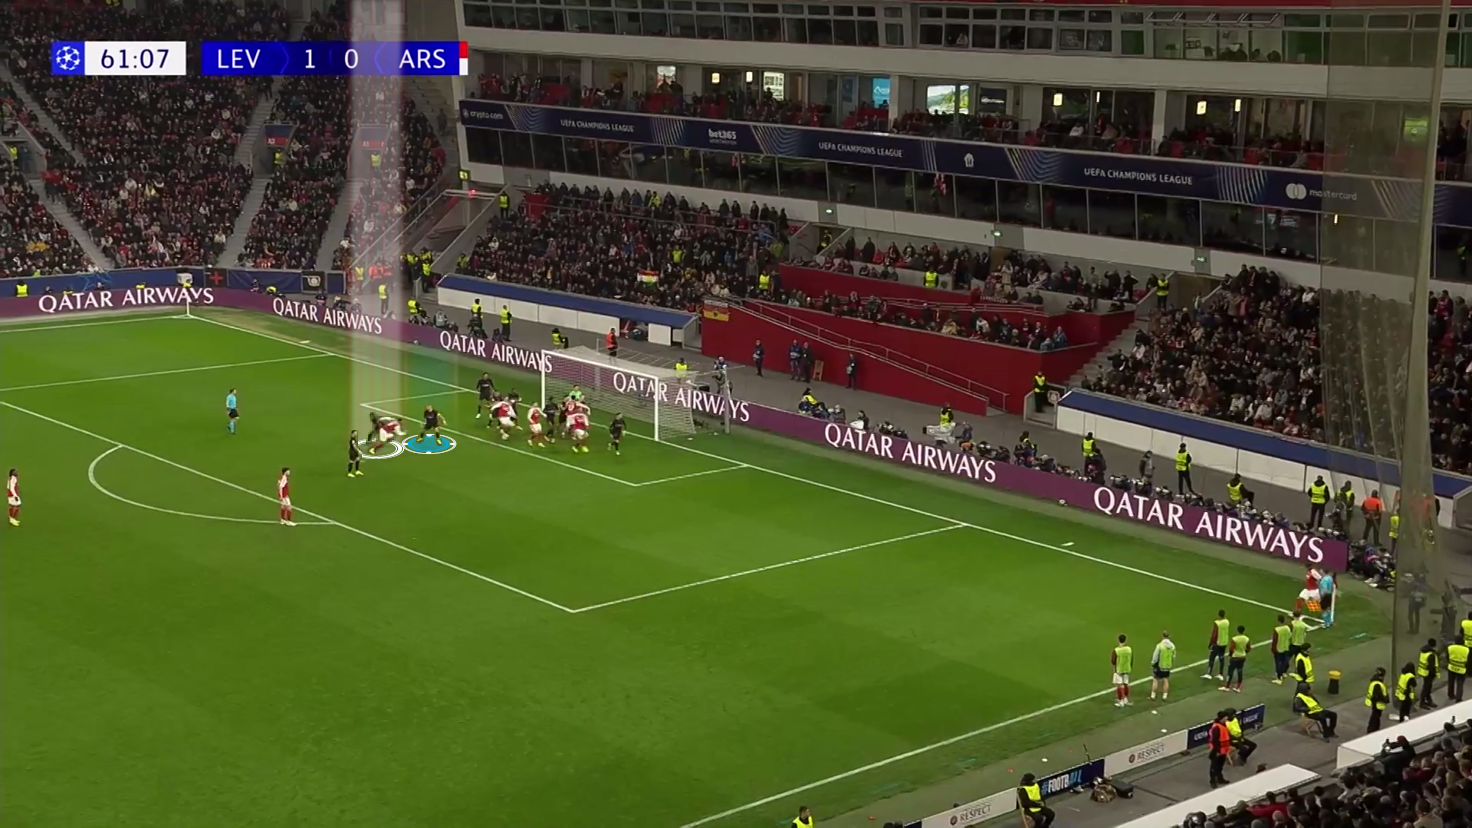
In Figure 24 below, they target the last player (white) in the pack beyond the far post, asking four players to act as blockers (green and yellow), blocking the last two zonal defenders and dragging the man markers with them to make the last player free.
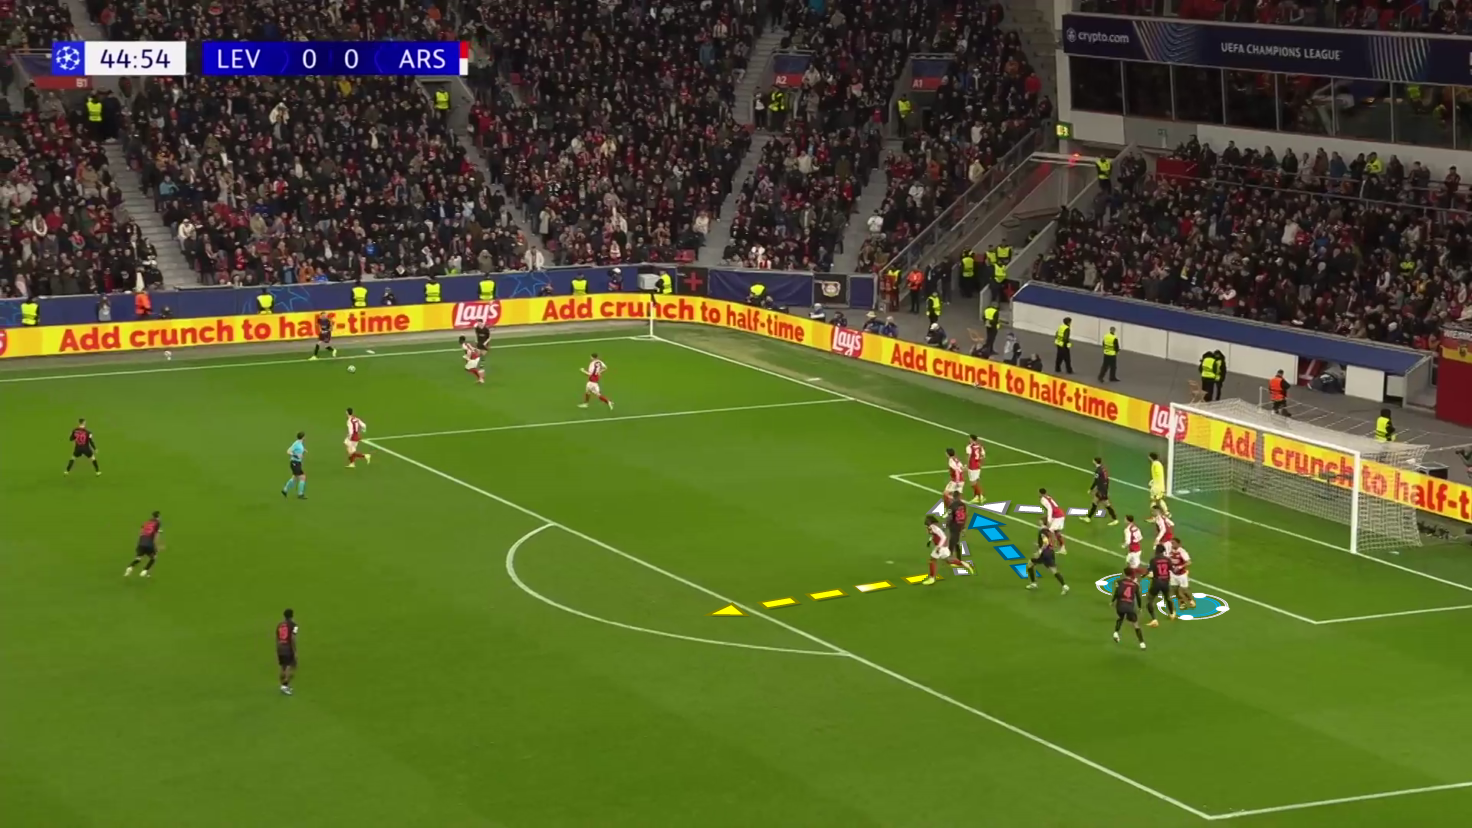
As shown below, the idea succeeded, leading to a dangerous chance, but we need to mention that Arsenal’s blockers need to be more careful, especially in the UCL, and leave the defender free as quickly as they can, because the referee whistled a foul against the last blocker.
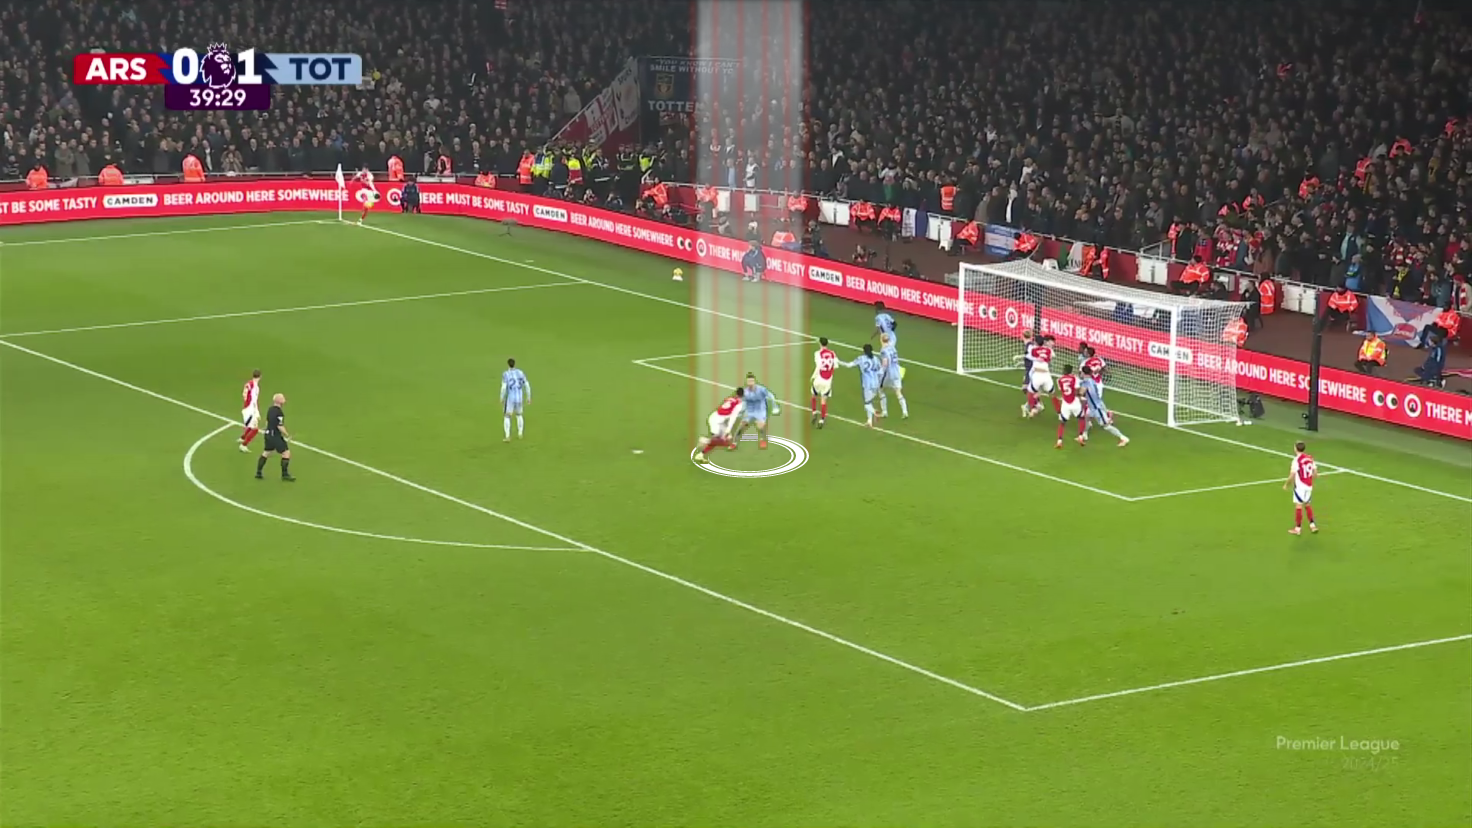
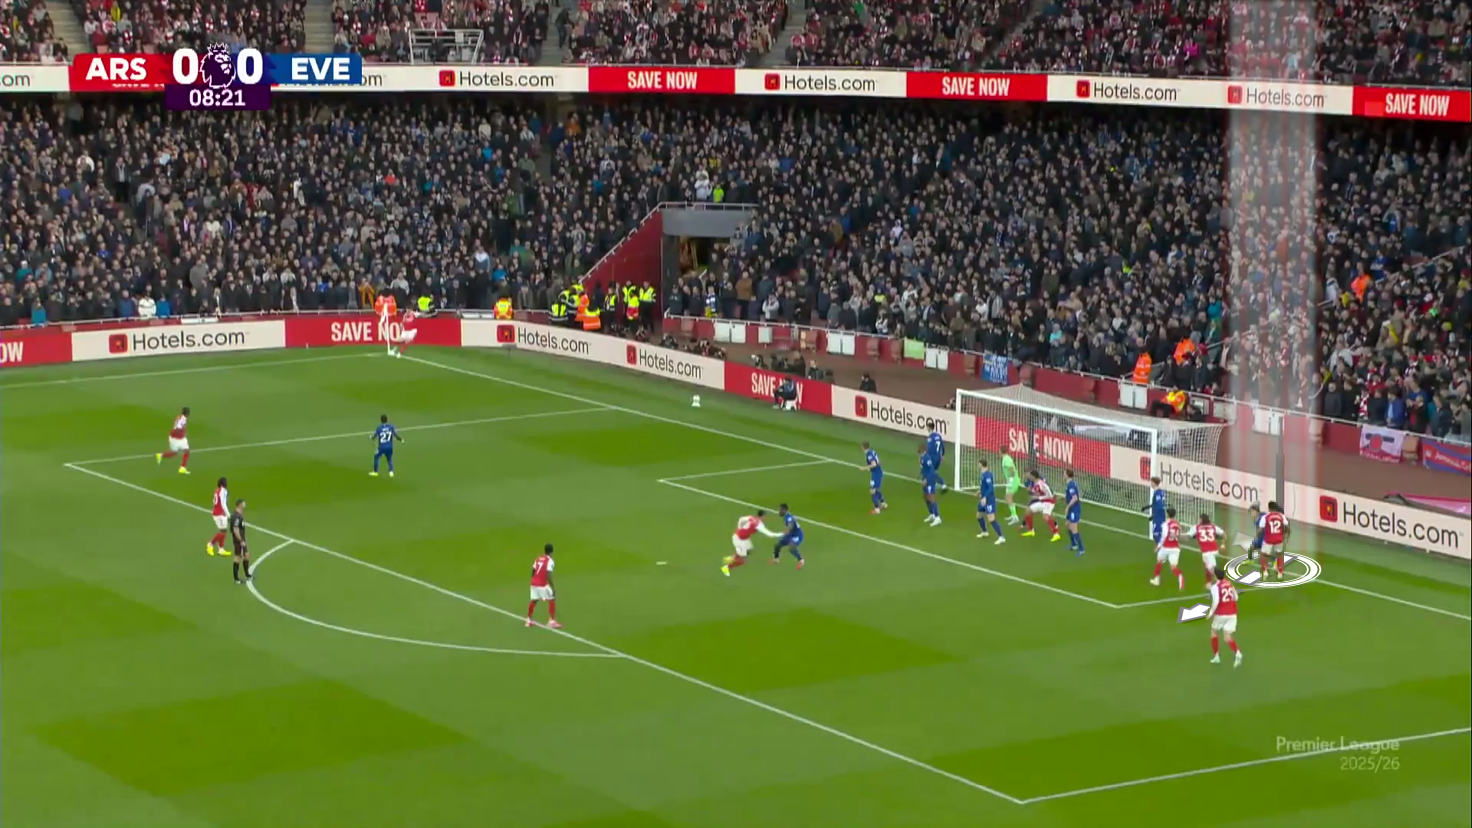
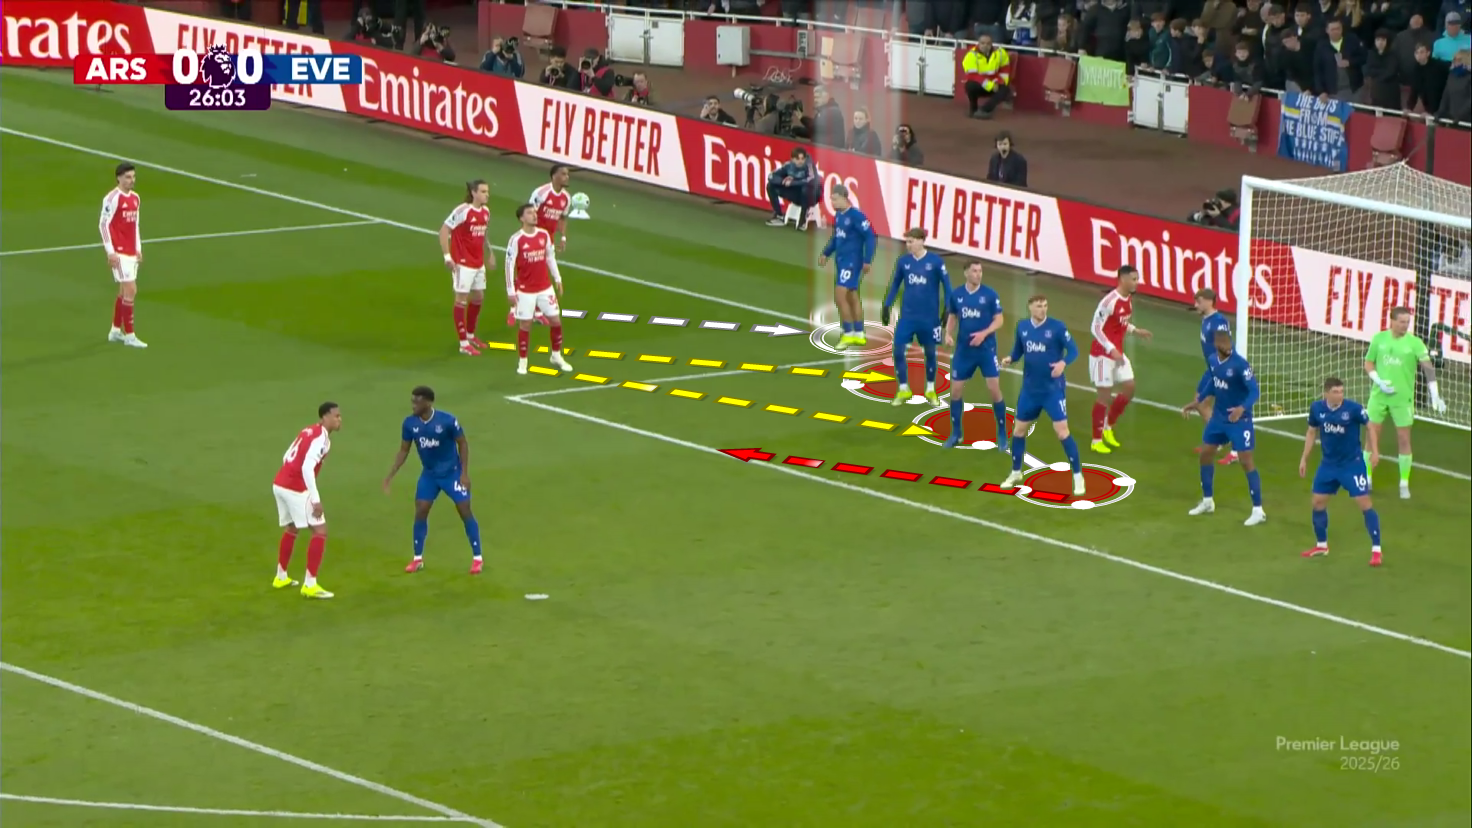
Bayer Leverkusen may use Everton‘s defending trick that they showed in the last Premier League game for Arsenal, which is using six zonal defenders (three of them more toward the far post) and a man marker (white) who stands on the line in an open body shape like a zonal defender in the beginning, as in Figure 26 below.
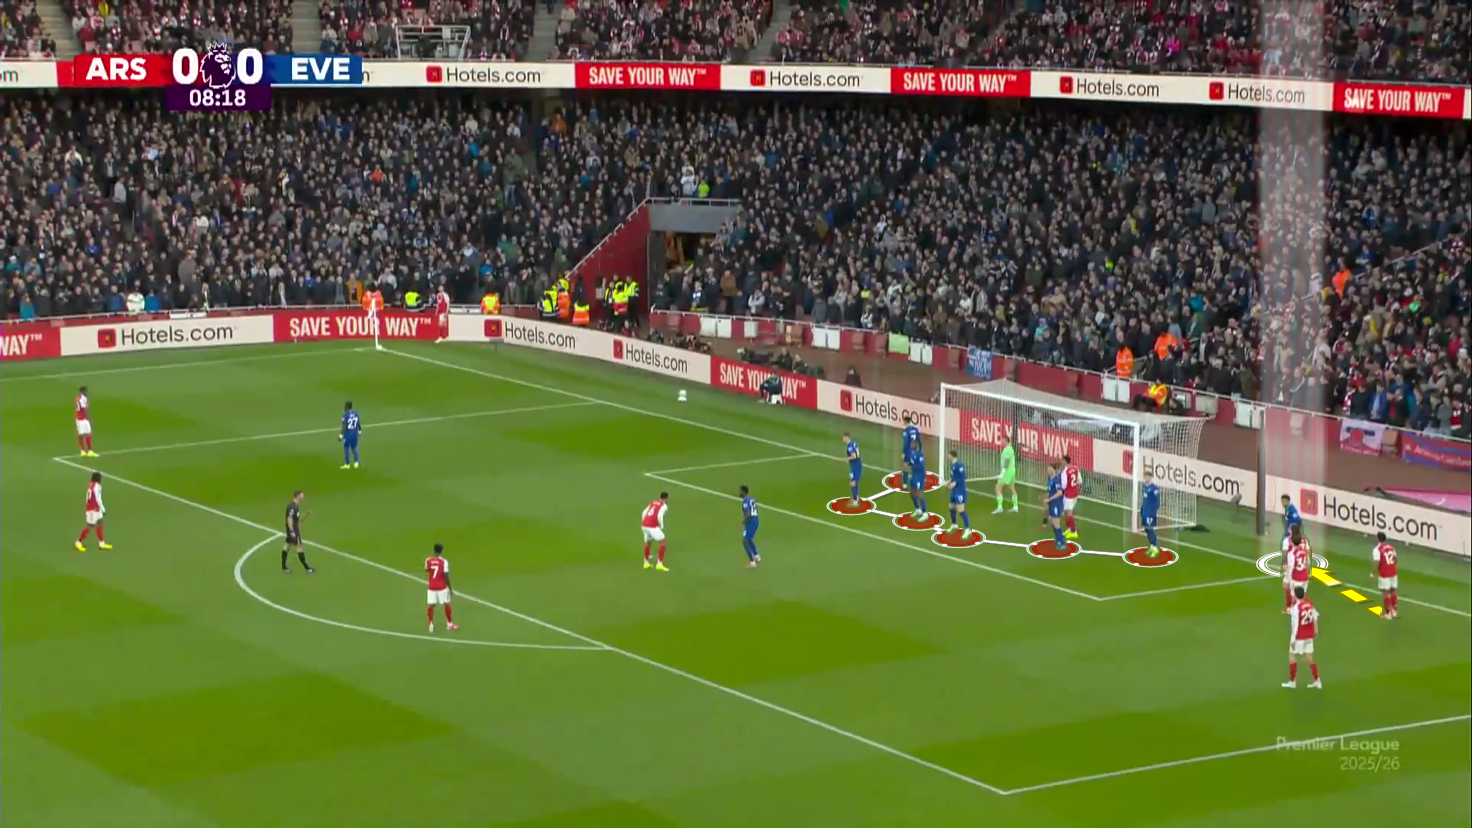
As shown below, Arsenal’s blocker goes to block him, but he surprises him with a body feint and then goes to mark the last late runner, as in Figures 27 and 28.
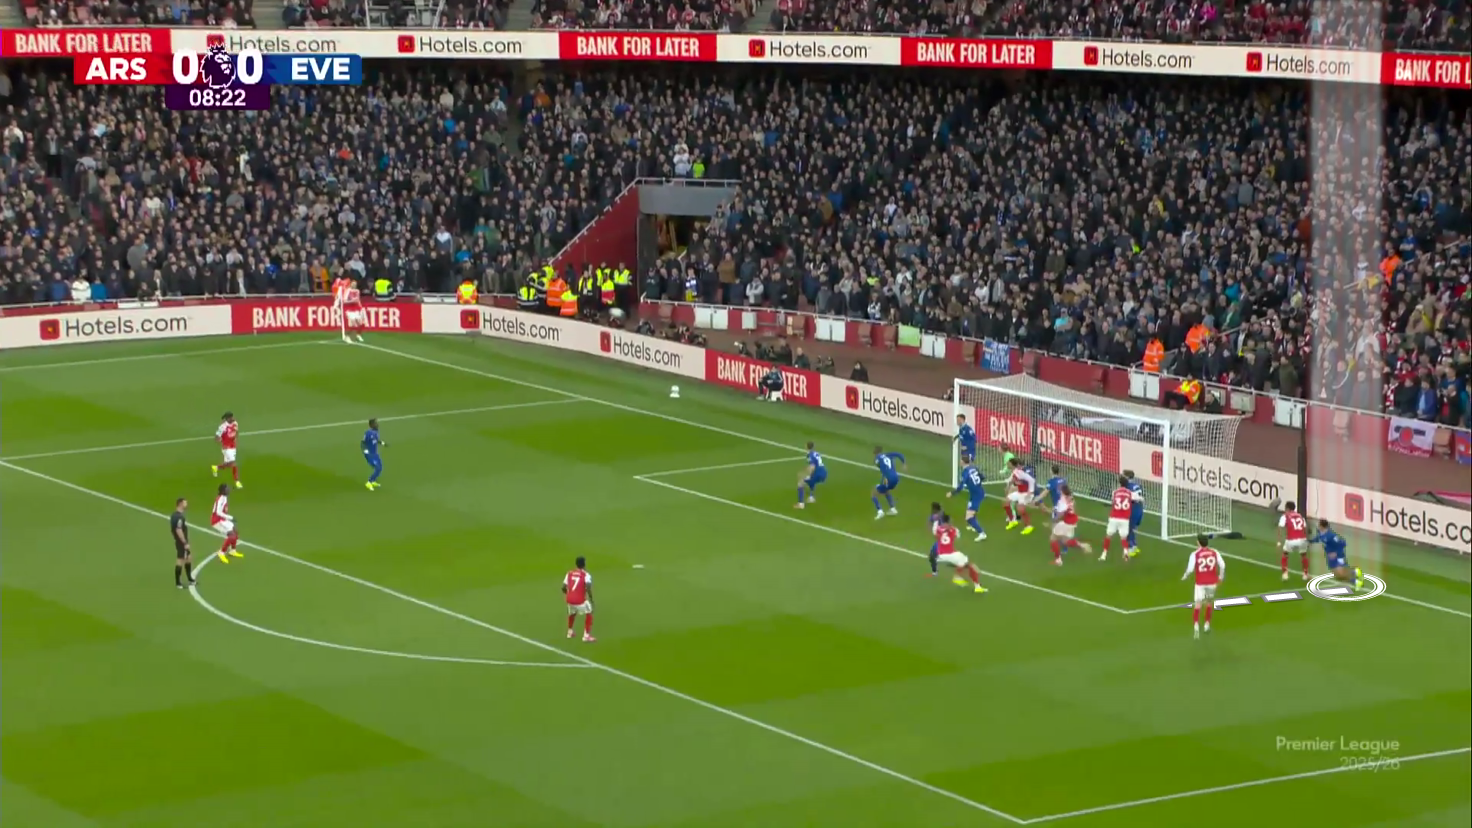
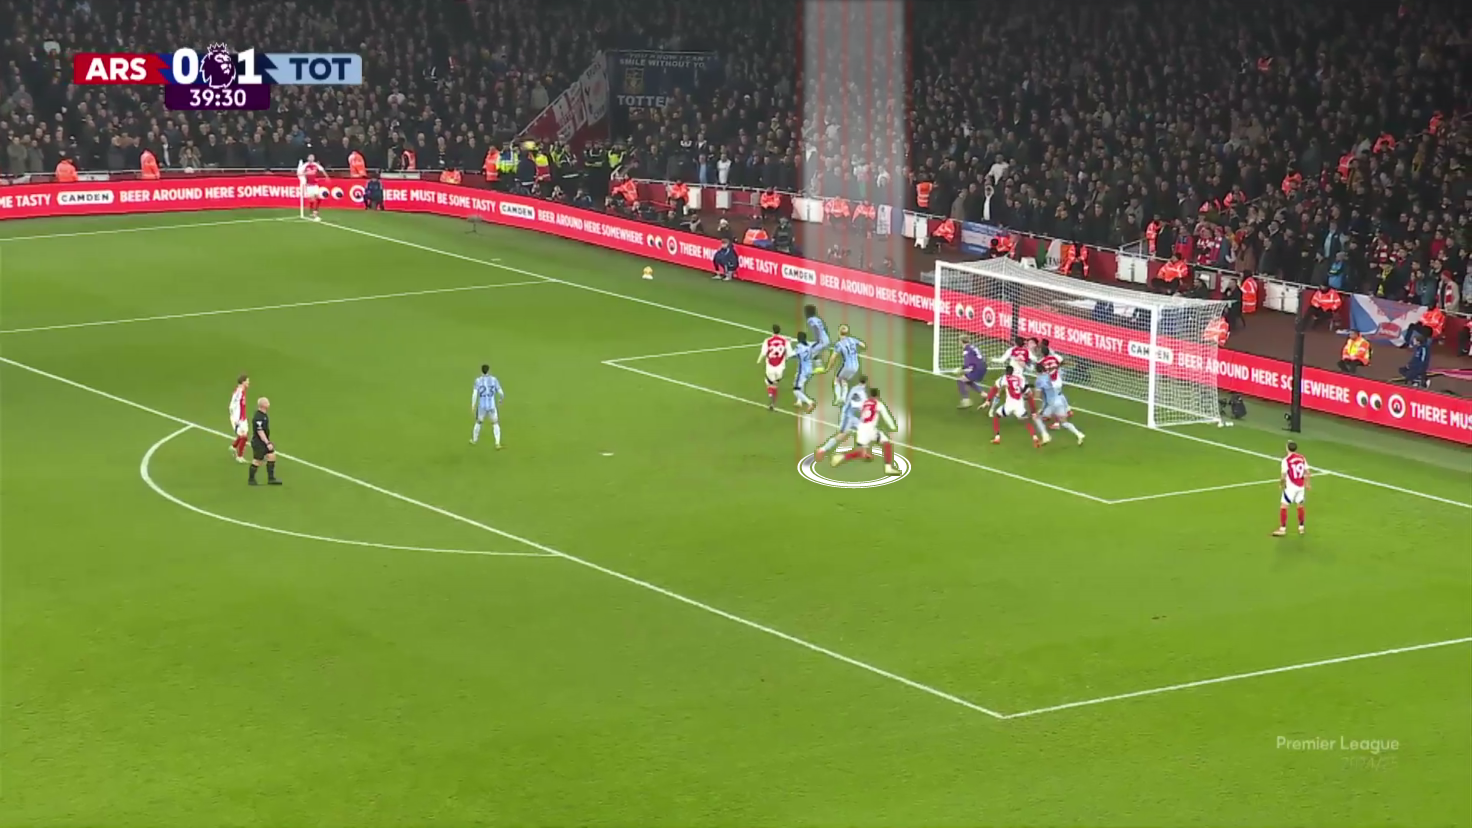
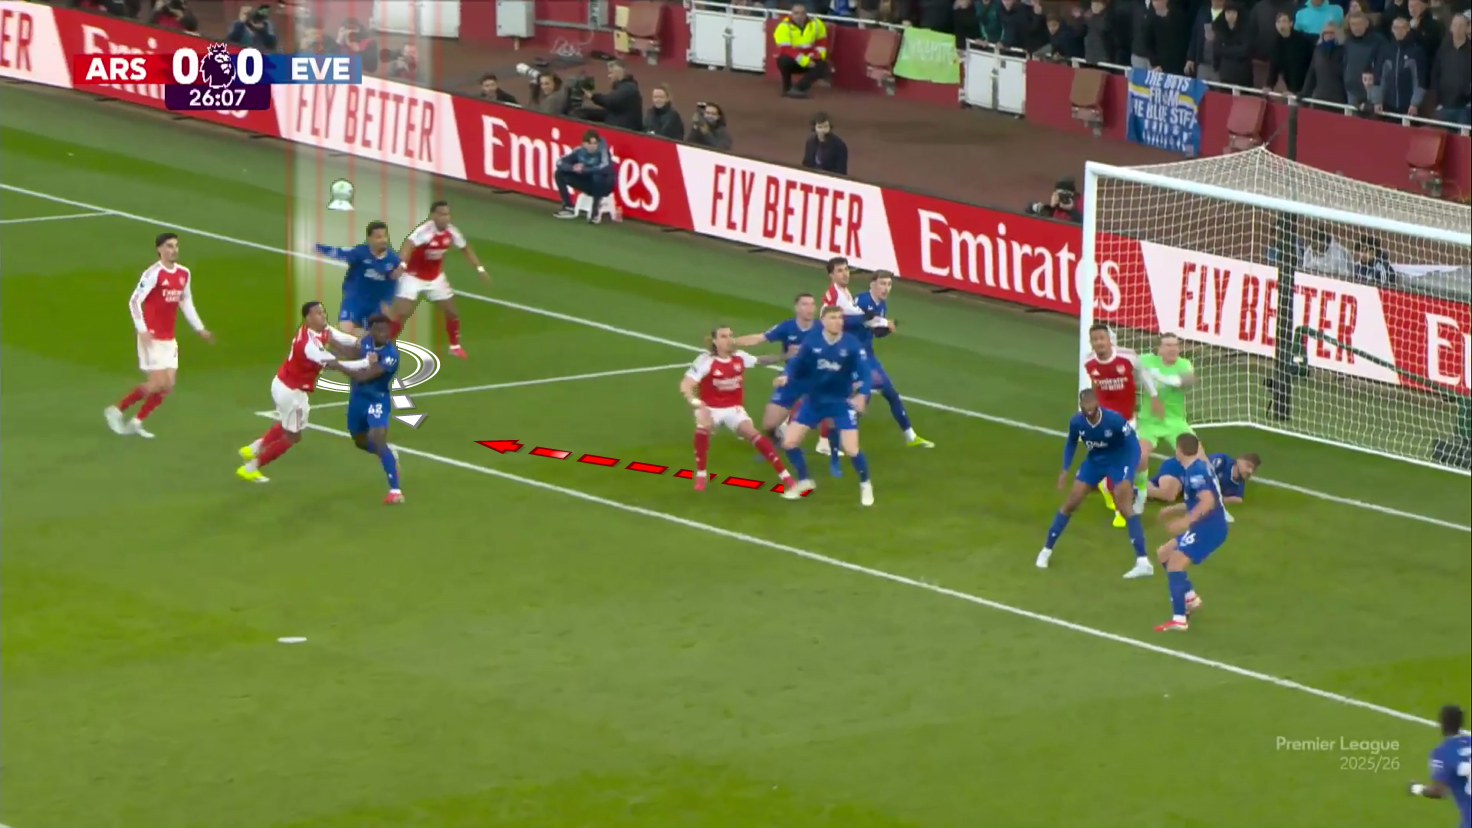
In the same match, we have another example showing how each of the last three zonal defenders (red) is ready to leave their zone diagonally to defend the cross because the other two are blocked (yellow), as in Figure 29 below, where the third-to-last zonal defender goes to defend the area beyond the far post because the last two zonal defenders are blocked.
In the end, the white man marker is ready to defend the last runner (Kai Havertz) while the third-to-last zonal defender is ready to go to the area beyond the far post on behalf of the last two blocked defenders, as shown in Figure 30.
Conclusion
In this set-piece analysis, we examined the previous set-piece battle between Bayer Leverkusen and Arsenal, showing how both teams tried to exploit the offensive corners in innovative ways.
We have also tried to predict how both teams may react in the second leg to address weaknesses that appeared on their side in the first leg or to exploit the other team’s weaknesses in new, varied ways.
Hence, we can observe the second leg more actively to see how both teams will react.