Juventus defeated Inter Milan 1-0 on Sunday in a crucial and decisive match in both teams’ Serie A campaigns.
This result saw Napoli take sole possession of the league’s top spot with 56 points, two points ahead of Inter, while Juventus climbed to fourth place with 46 points.
Inter Milan put on a strong performance in an exciting match and came very close to scoring, particularly in the first half.
On the other hand, we can observe that Juventus’ improvement in the second half was due to several tactical interventions by Thiago Motta, which allowed Juventus to become a strong contender in the match.
In this tactical analysis, we will explain Simone Inzaghi‘s tactics that enabled Inter to dominate in the first half and how Thiago Motta attempted to shift the balance of the match in the second half.
Juventus Vs Inter Milan Lineups & Formations
Juventus used the main 4-2-3-1 formation.
RB: Timothy Weah
RCB: Federico Gatti
LCB: Renato Veiga
LB: Nicolò Savona
RCM: Teun Koopmeiners
LCM: Khéphren Thuram
CAM: Weston McKennie
LW: Nicolás González
Inter Milan used the main 5-3-2 shape, which, as we will explain, had many variations depending on the game phase.
GK: Yann Sommer
RWB: Denzel Dumfries
RCB: Benjamin Pavard
CB: Francesco Acerbi
LCB: Alessandro Bastoni
LWB: Federico Dimarco
RCM: Nicolò Barella
CM: Hakan Çalhanoğlu
LCM: Henrikh Mkhitaryan
RS / LS: Lautaro Martínez and Mehdi Taremi
Inter Milan Tactics In-Possession Vs Juventus Tactics Out Of Possession
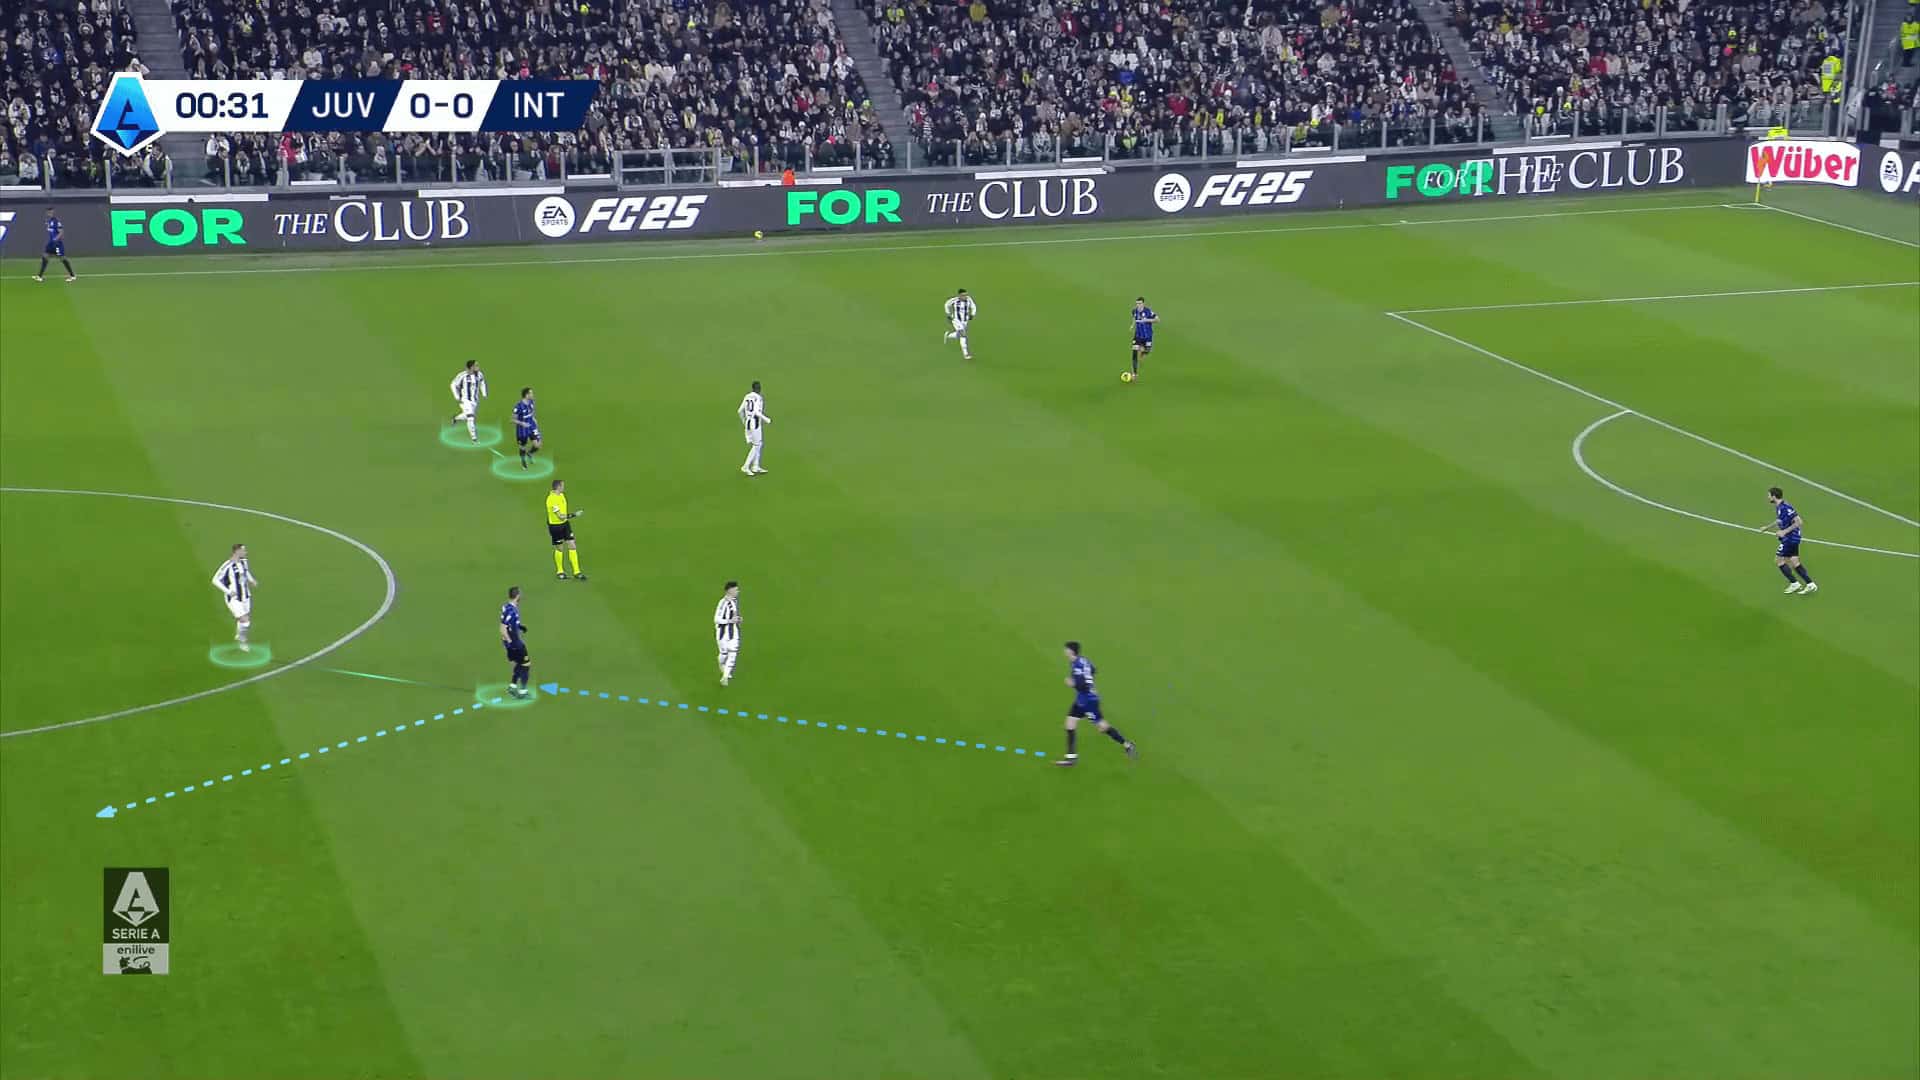
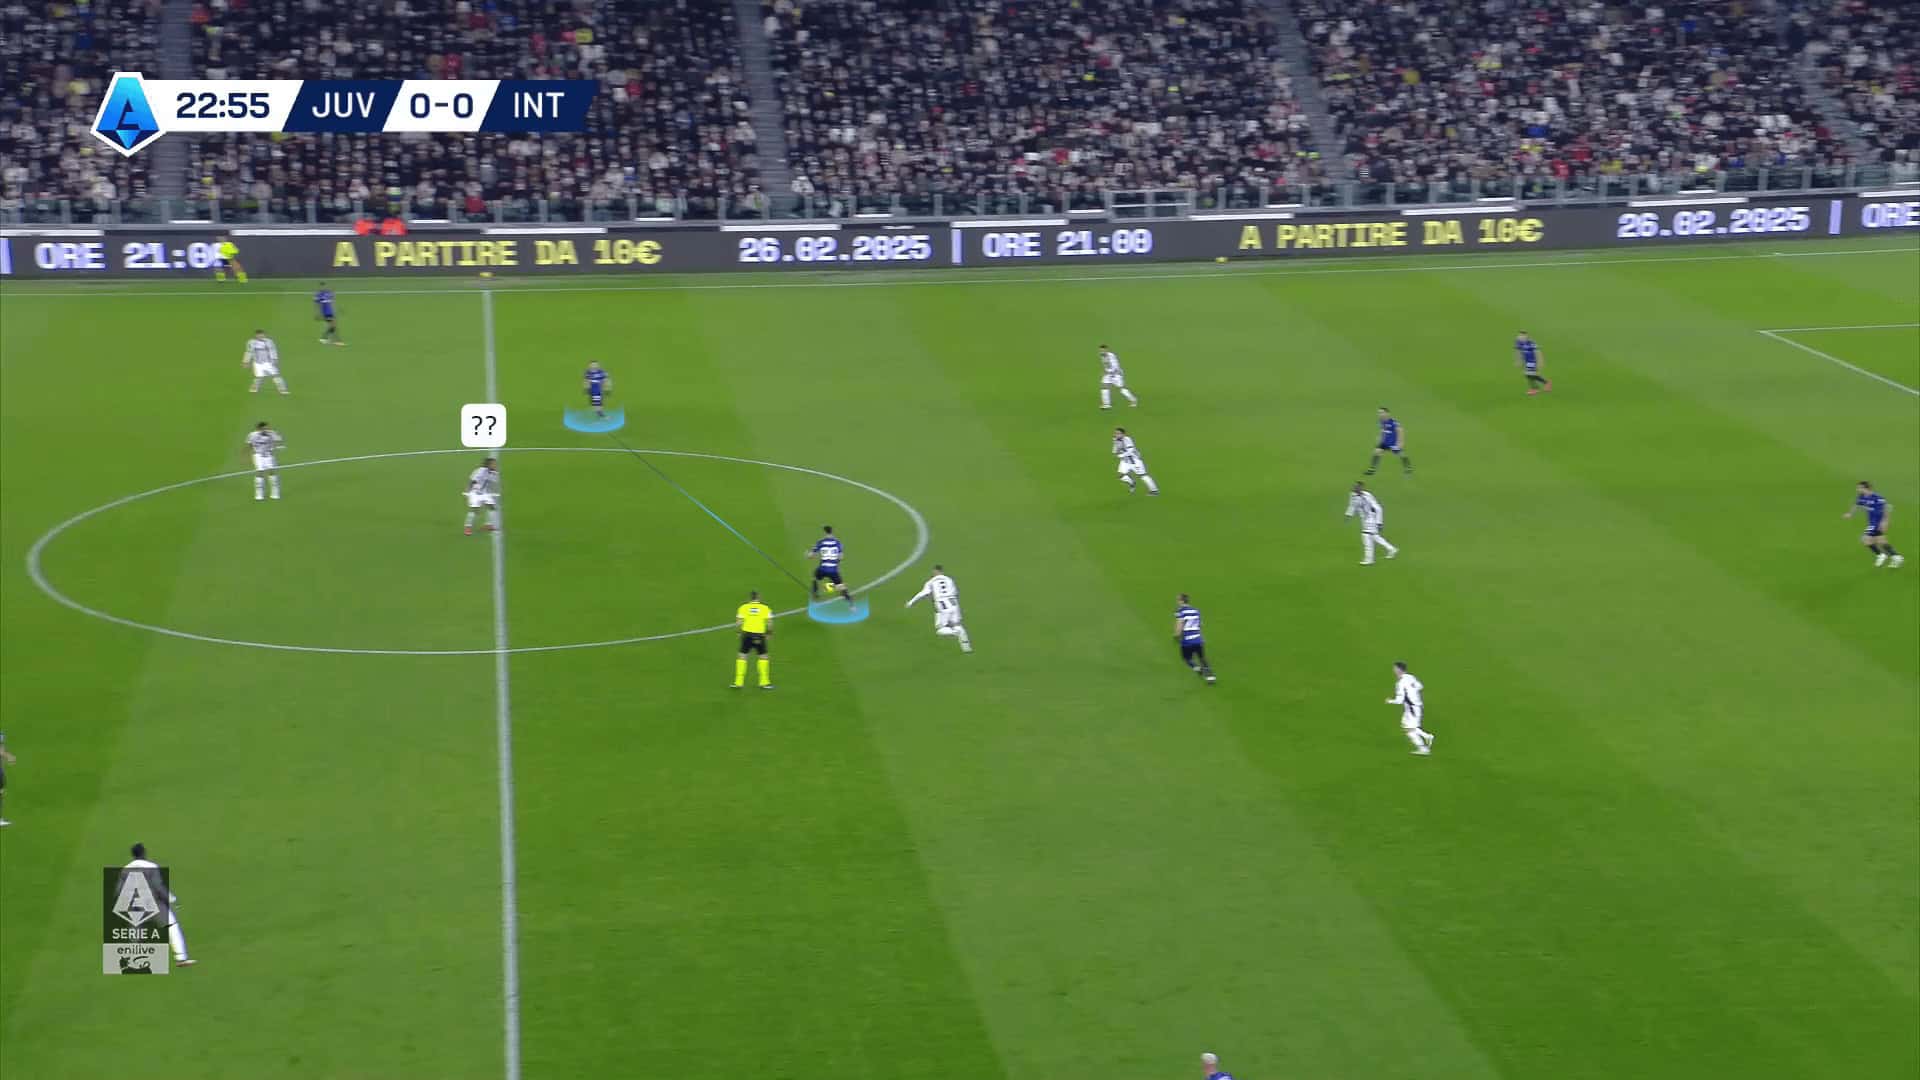
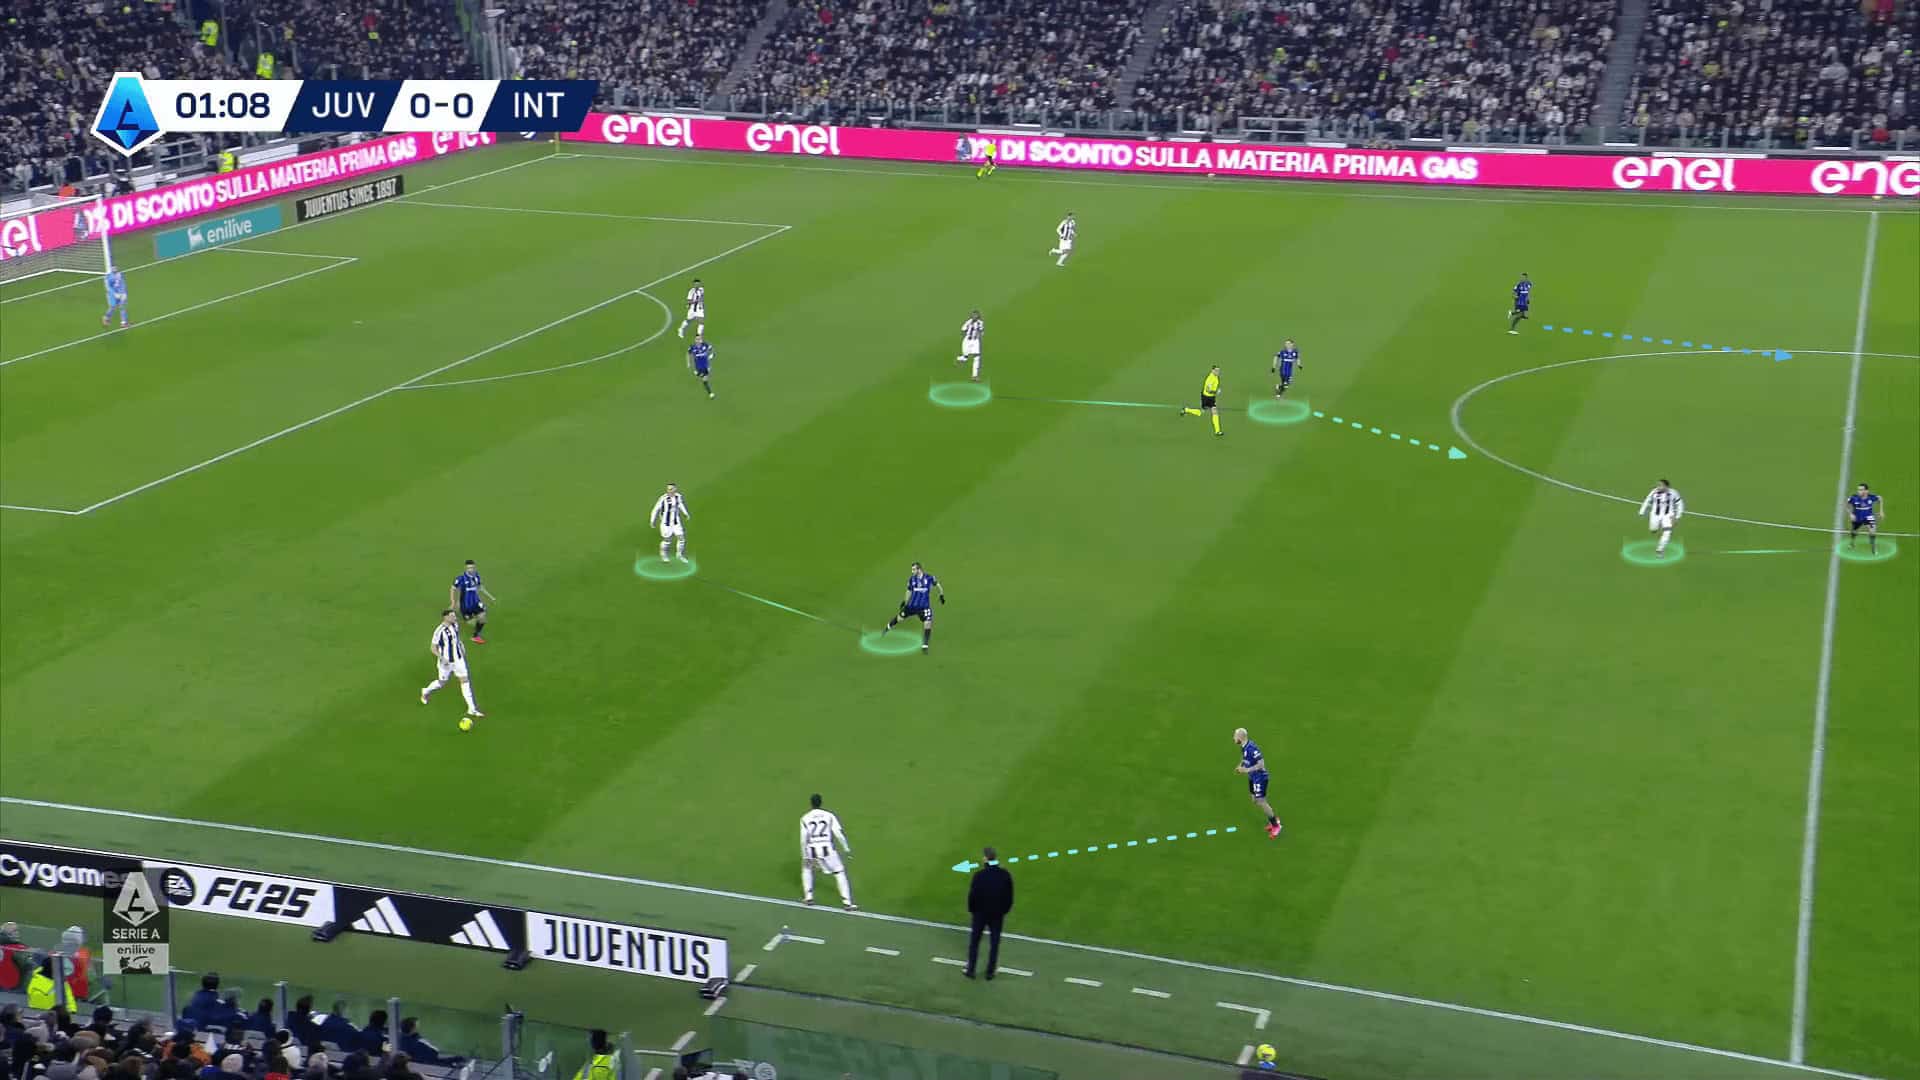
As shown below, Juventus relied heavily on a mid-press in the first half with their 4-2-3-1 shape, while Inter Milan progressed with the 3-3-2 shape.
When the ball is with Inter Milan’s left centre-back, Juventus’ right winger presses him with a curved run, trying to close the passing lane toward the left wing-back.
At the same time, the two midfielders (CAM and RCM, near the ball) mark two midfielders of Inter Milan in the middle so that Juventus’ LCM marks the striker who drops to the midfield.
The most important aspect of this scheme is the narrow positions of Juventus’ two wingers, which enables them to cover the shadow of Inter’s midfielders in the beginning, especially the far winger (LW in this case).
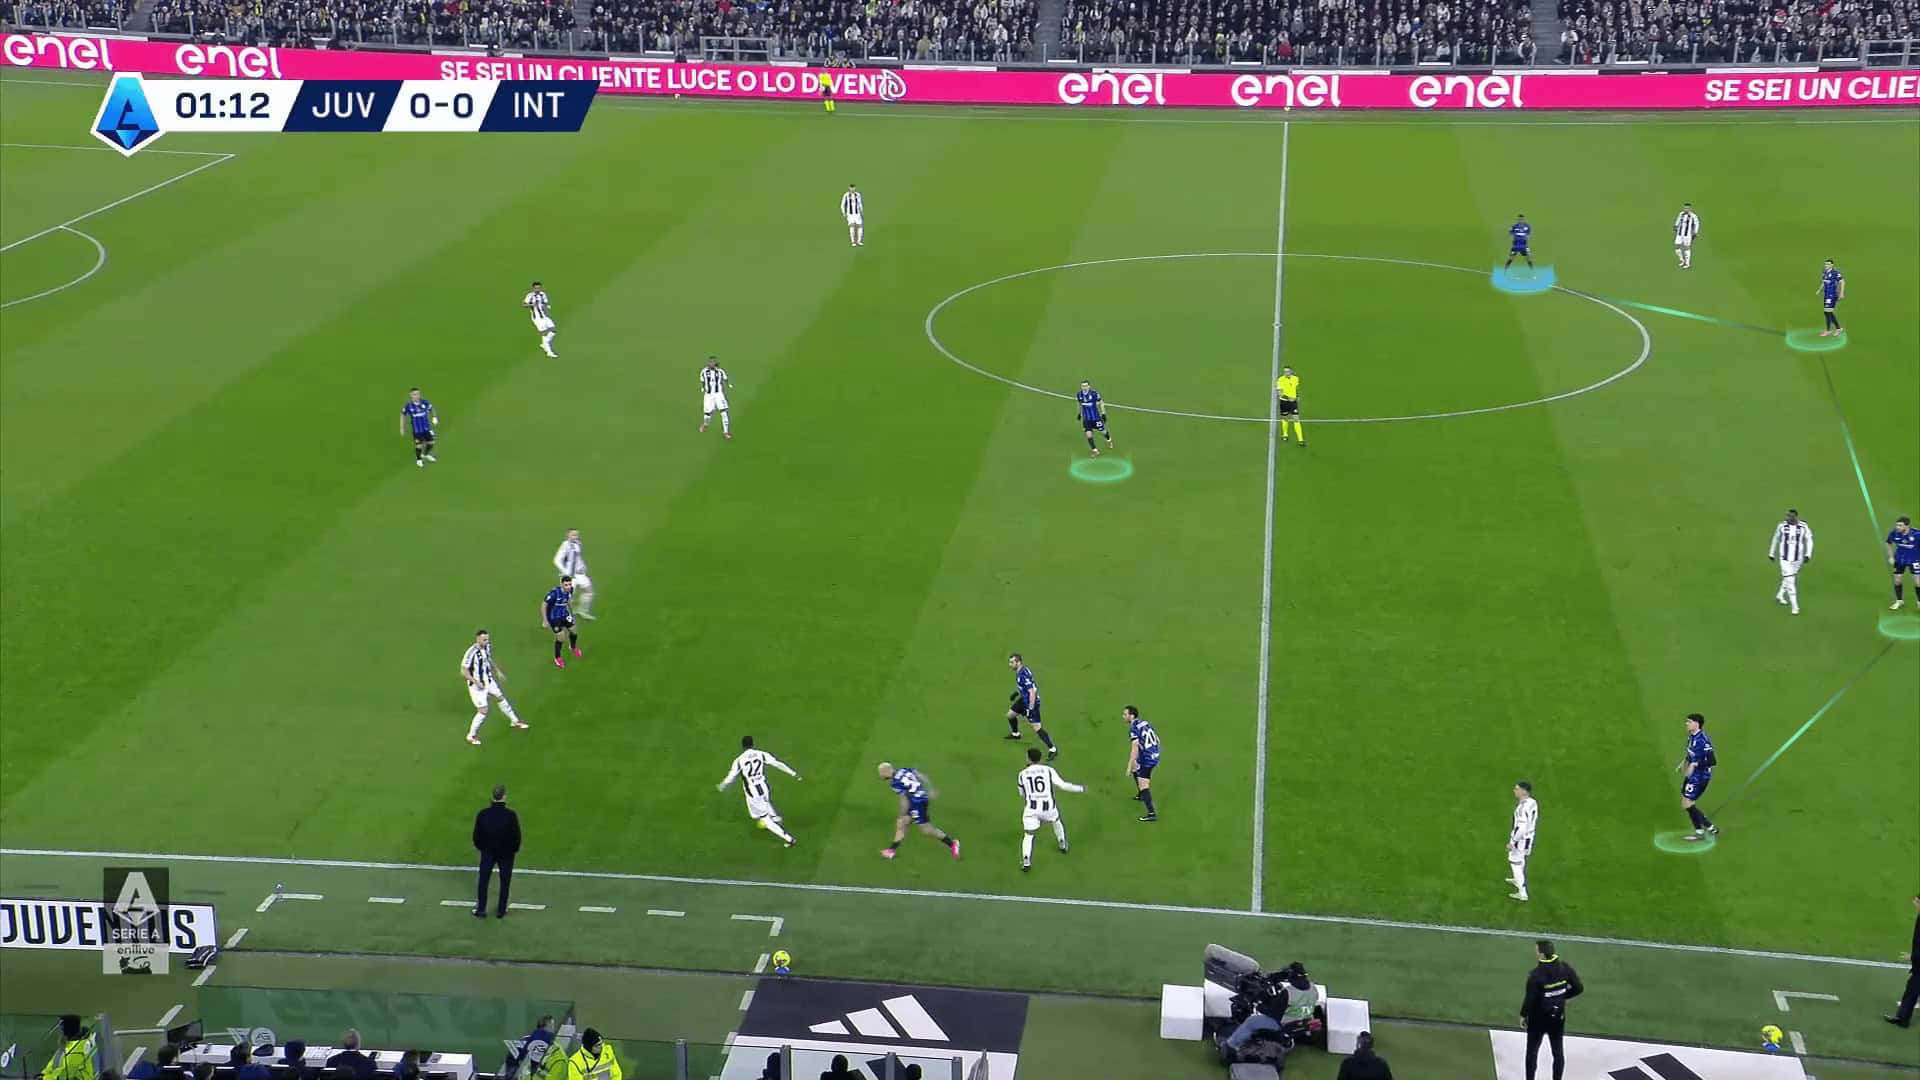
When the ball is switched, the LCM presses Inter’s right midfielder to allow the LW to press, while the RCM is responsible for returning to the striker.

After learning about Juventus’s scheme, let’s learn how they failed to face Inter Milan’s continuous dynamics.
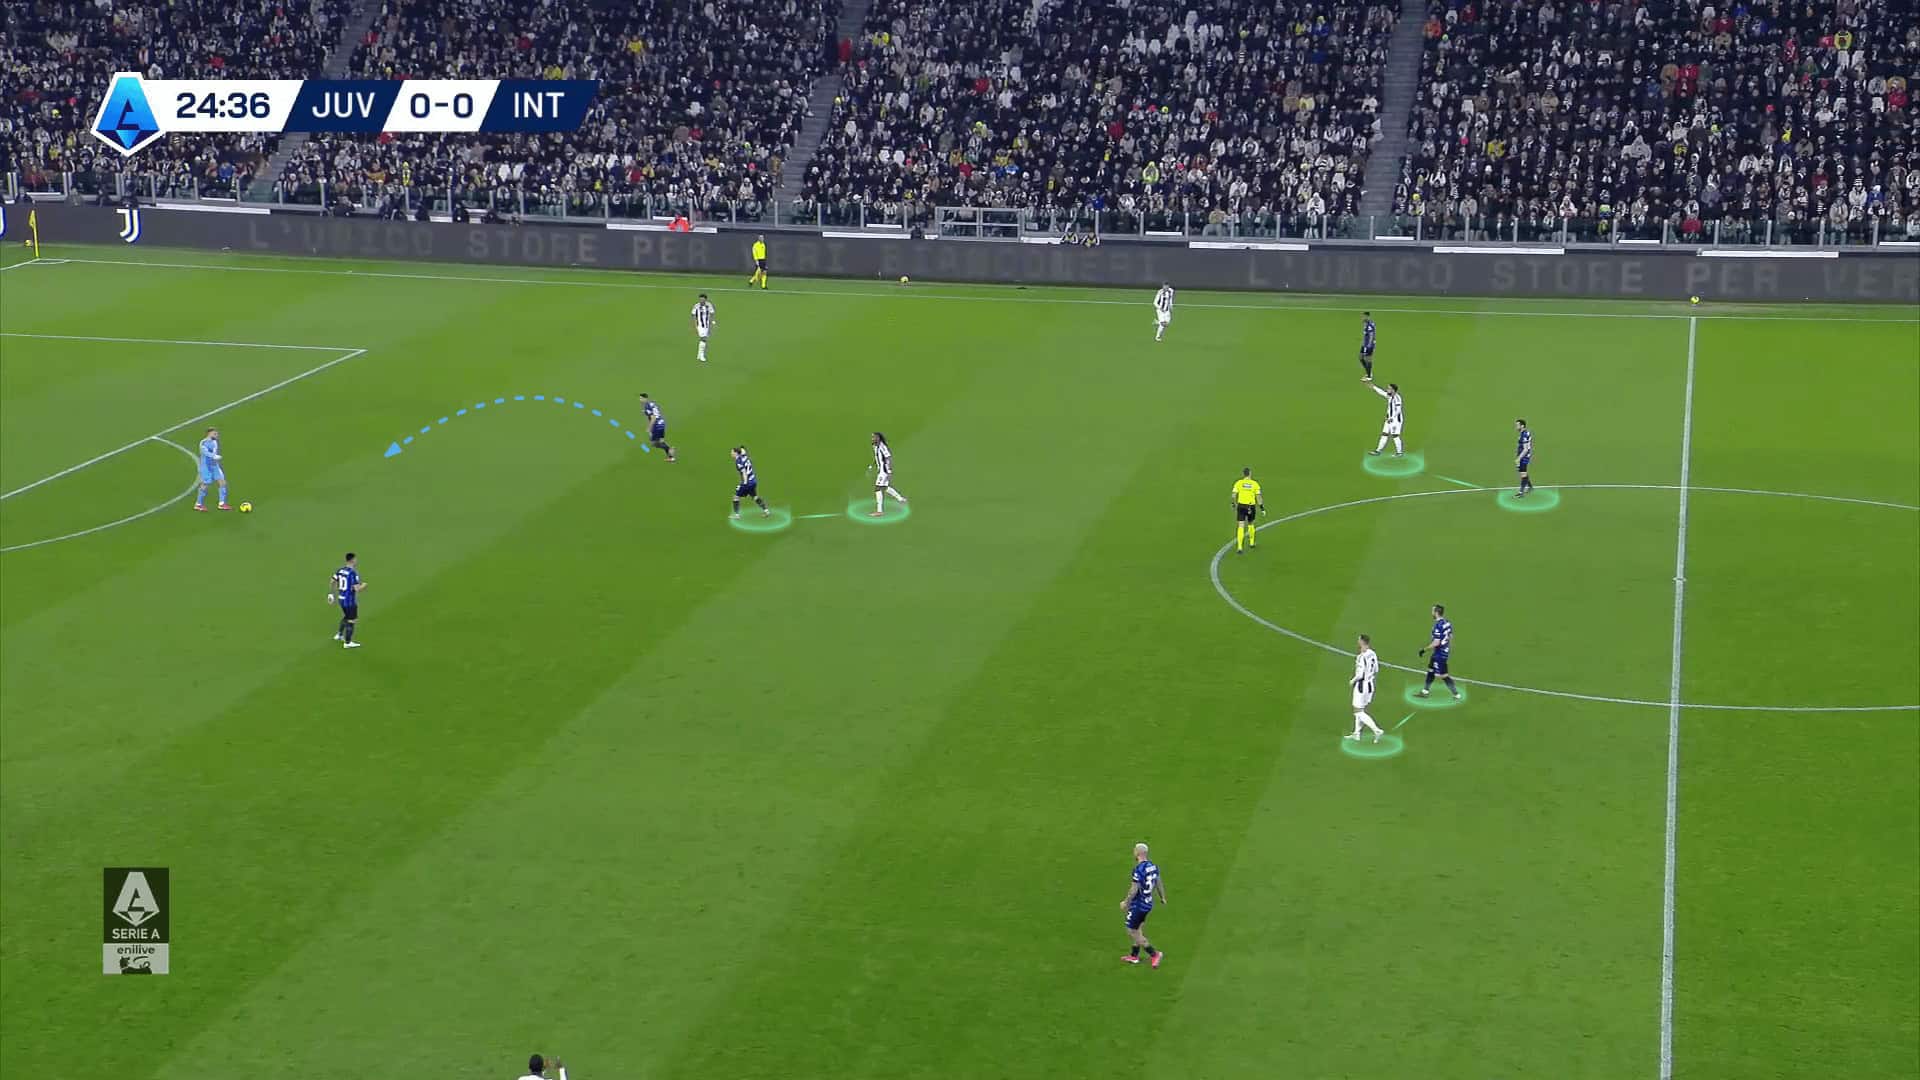
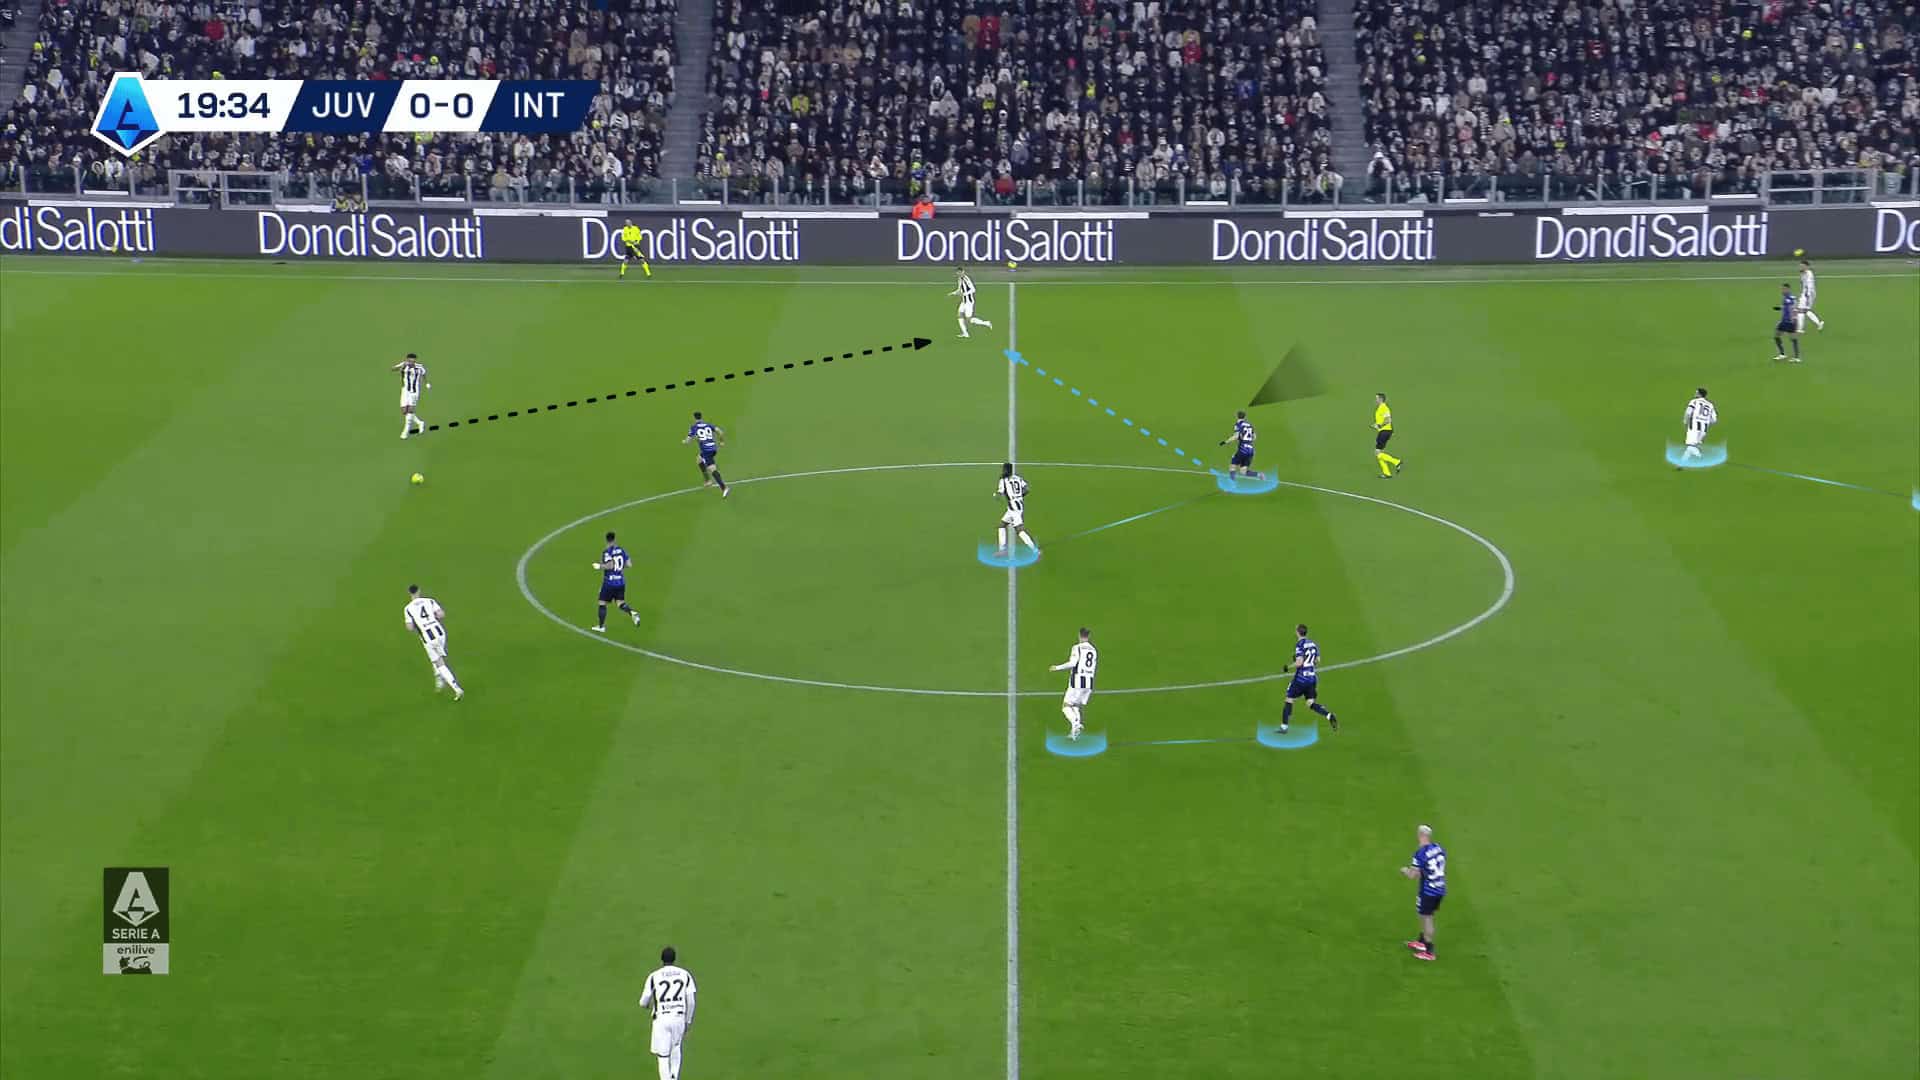
The photo below shows the first dynamic against which they couldn’t behave: Bastoni going diagonally while switching the ball.
As shown below, the situation is good for Juventus, especially with the midfielders.
However, Mkhitaryan goes diagonally behind Juventus’ right back while Bastoni goes instead of him.
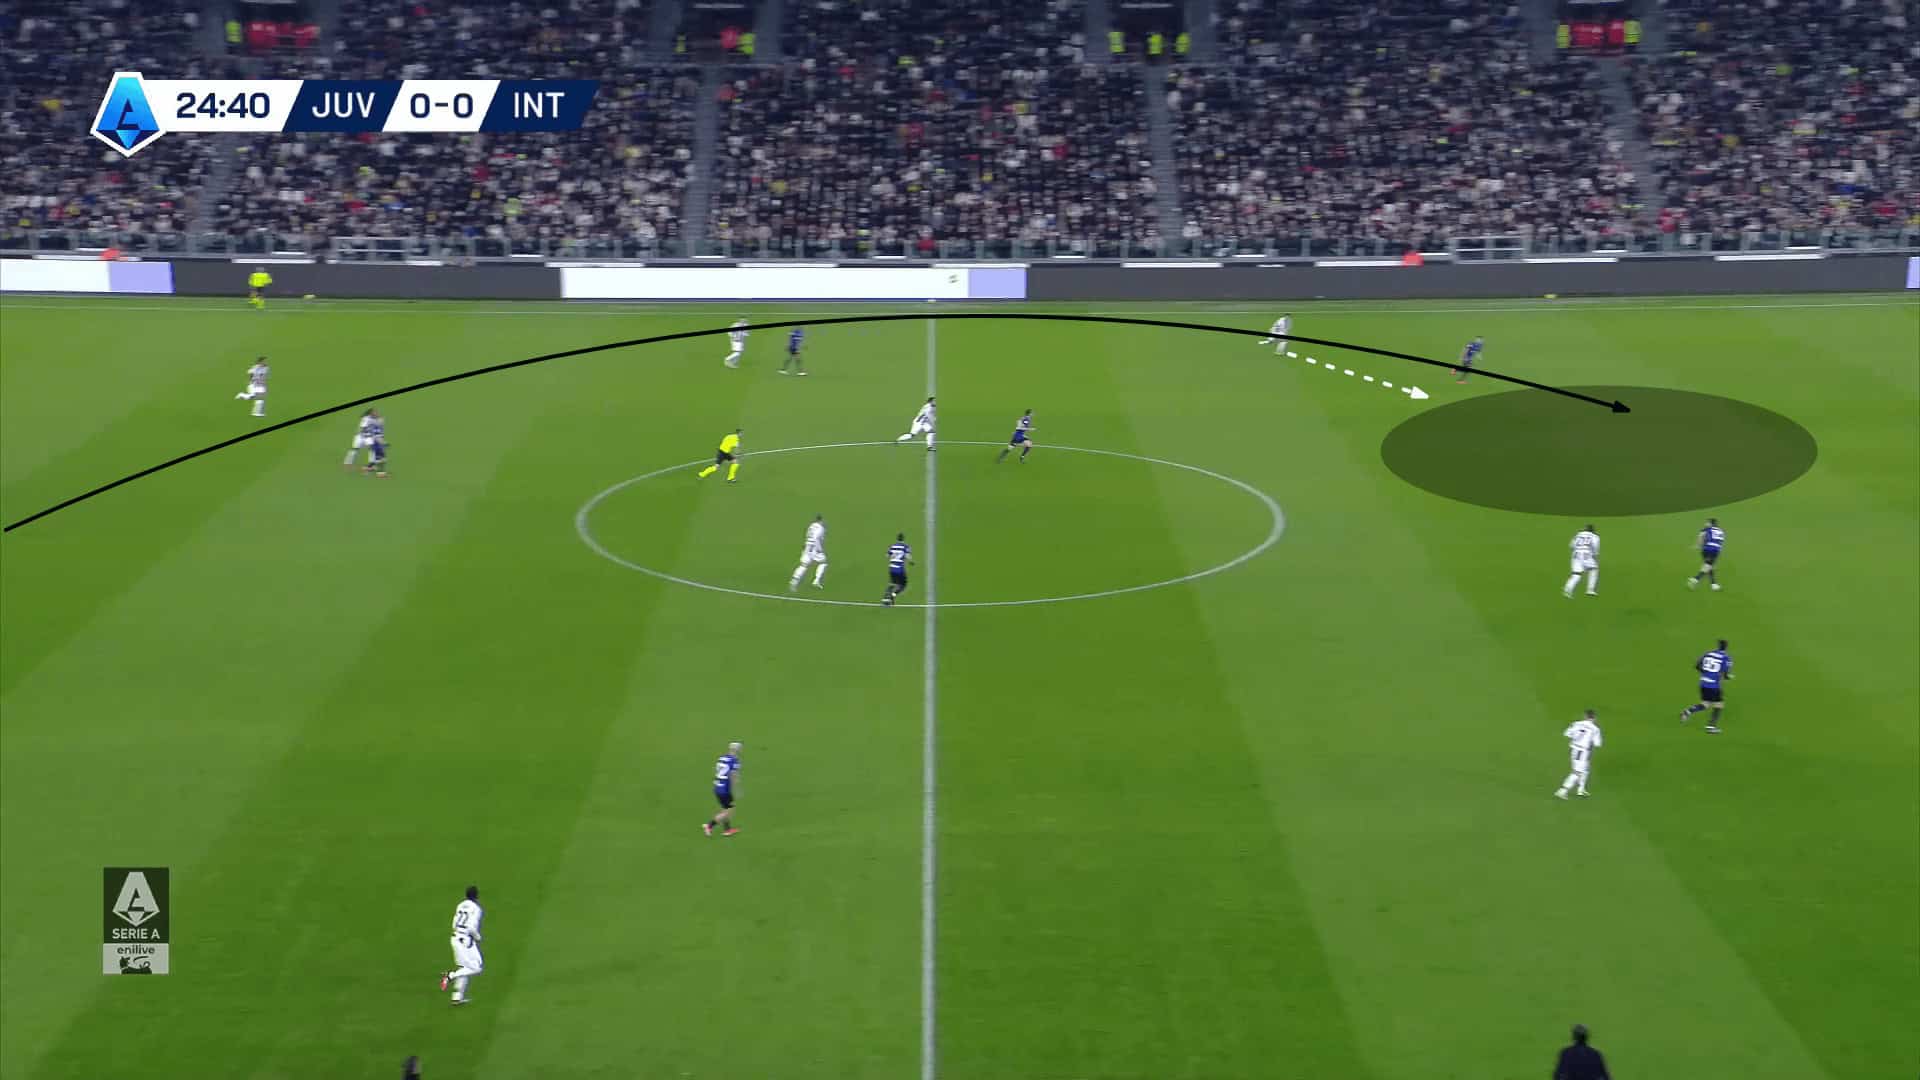
As shown below, the right winger (who was supposed to press Bastoni) finds himself against two options to do:
1- Cutting the passing lane to Bastoni, who stands in a large free area thanks to Mkhitaryan’s movement, which dragged Juventus’ midfielder with him
2- Going to Dimarco.
We should also note that Juventus’ right back hesitates to press Dimarco because of Mkhitaryan’s run behind him.
The second idea, which was difficult for Juventus to defend, was dropping strikers, which had many forms.
Let’s start with the first form, which is the sudden switch between the two strikers.
As shown below, Juventis’ six marks the dropping striker, but he runs suddenly toward the defensive line in sync with the second striker’s drop.
As shown below, Juventus’ centre-back and six can’t make this quick switch, so the defender is dragged by the running striker, which frees the dropping striker while the six still hasn’t realised or reacted.

The second form is the dropping-striker issue, which is shown below.
As shown below, the dropping striker drops too much to be in the same line as Barella, forcing Juventus’ six to choose which one he will press in a difficult and quick test.
As shown below, he chooses to press Barellla, so the striker receives the ball in a large area and turns around.
In the second half, Juventus are instructed to press high in an aggressive high press, giving Inter Milan no time on the ball.
Juventus’ high-press scheme in the second half is ready for any centre-back going to the midfield and can provide a free player to deal with the dropping striker (the two previous problems in mid-press).
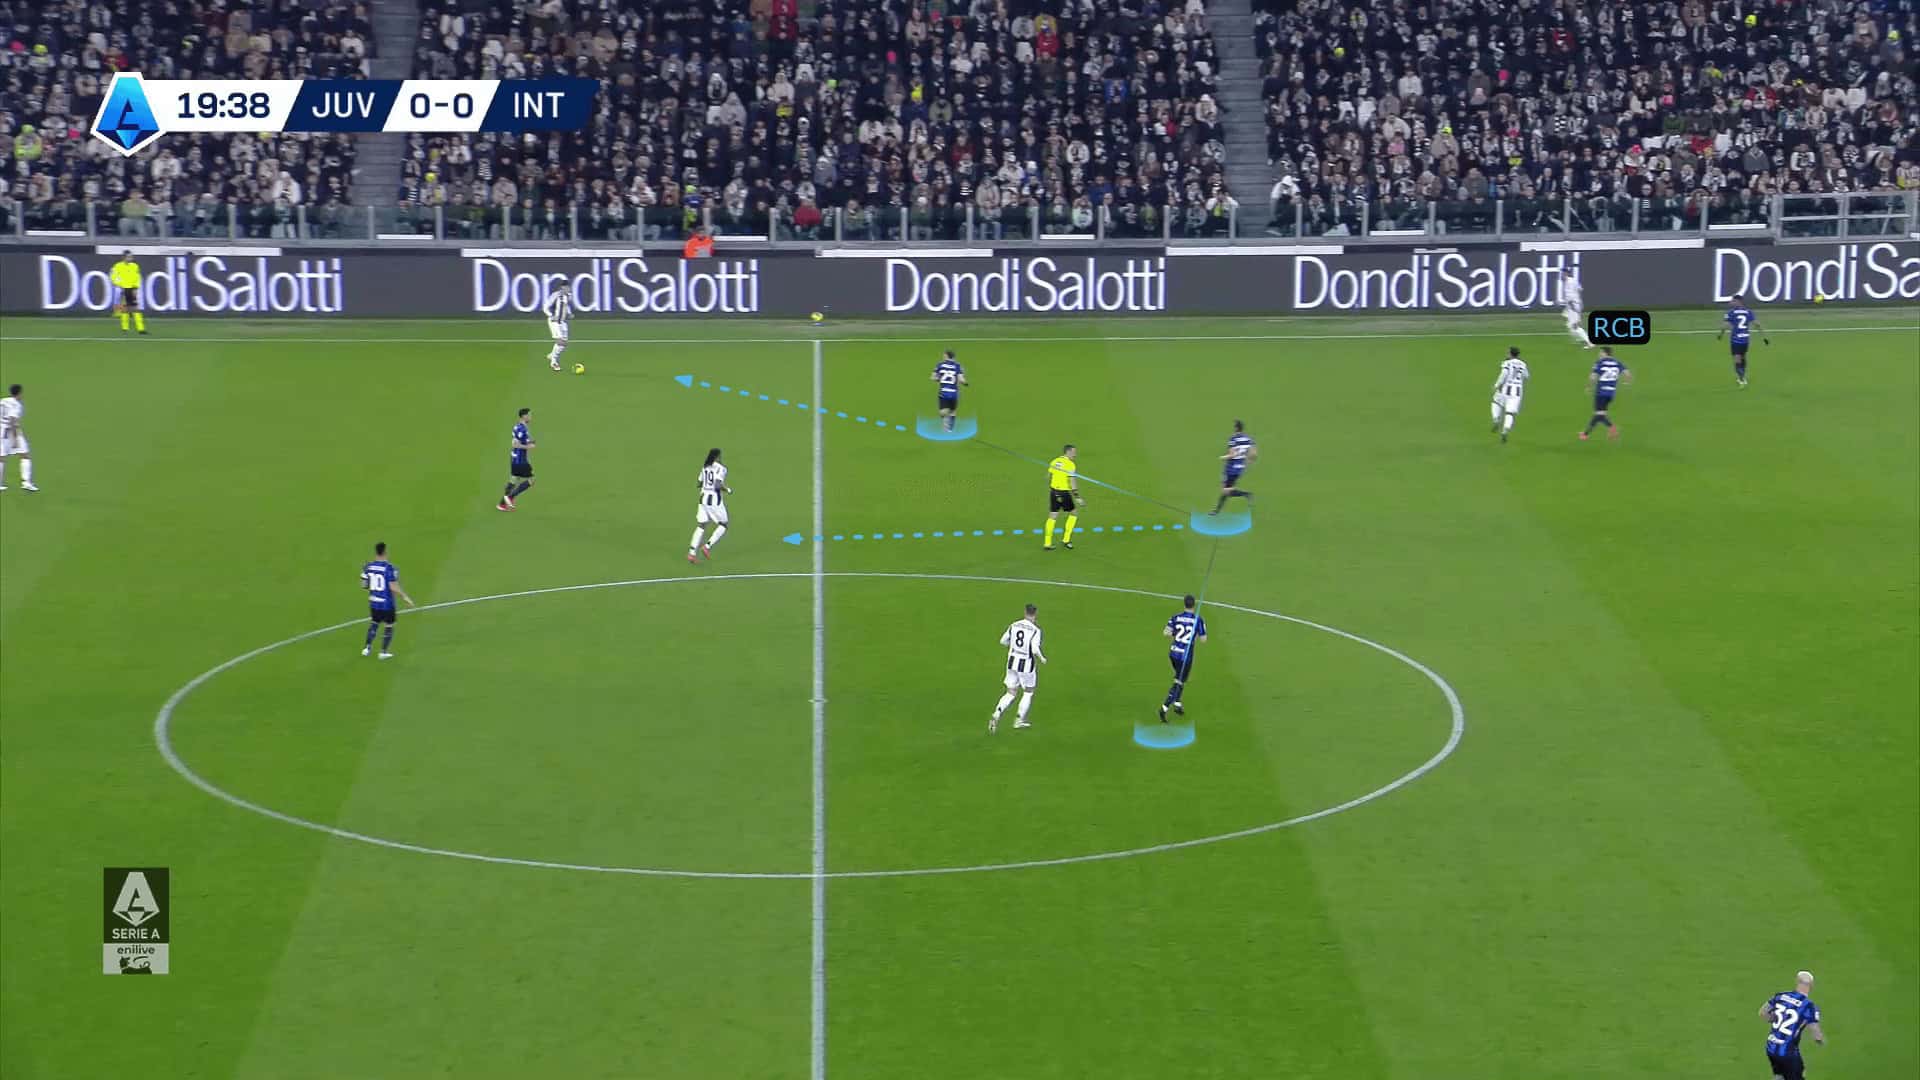
In the photo below, it is clear that Inter Mian push a centre-back up during the build-up phase while Dimarco drops to receive and Dumfries is high.
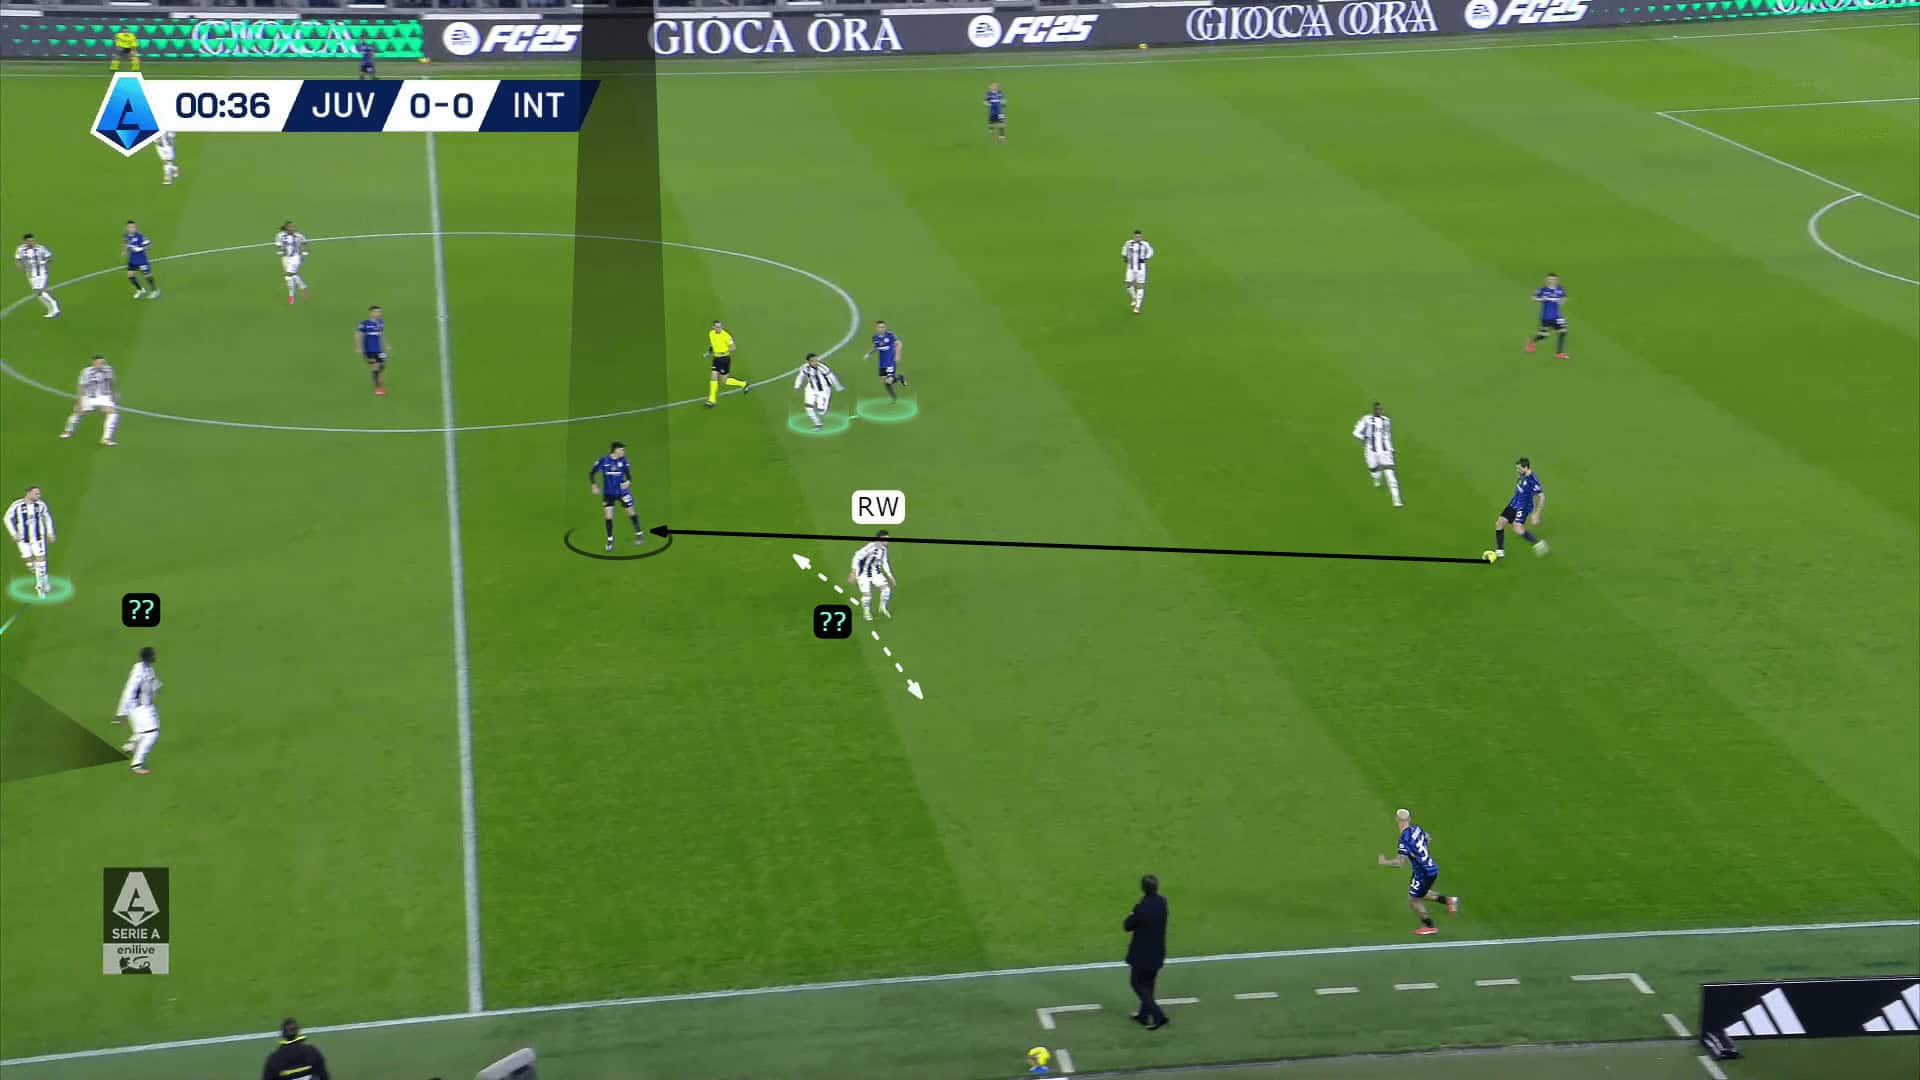
On the other hand, Juventus’ striker presses in a curved run to force the play into one direction, which makes the goalkeeper pass to the LCB.
Then, the RW presses the LCB, the CAM presses the forward CB, and the far winger presses Barella to keep the LCM free and ready to go back to help the defenders against the strikers.
Note: The RCM is with Mkhitaryan out of the shot (green).
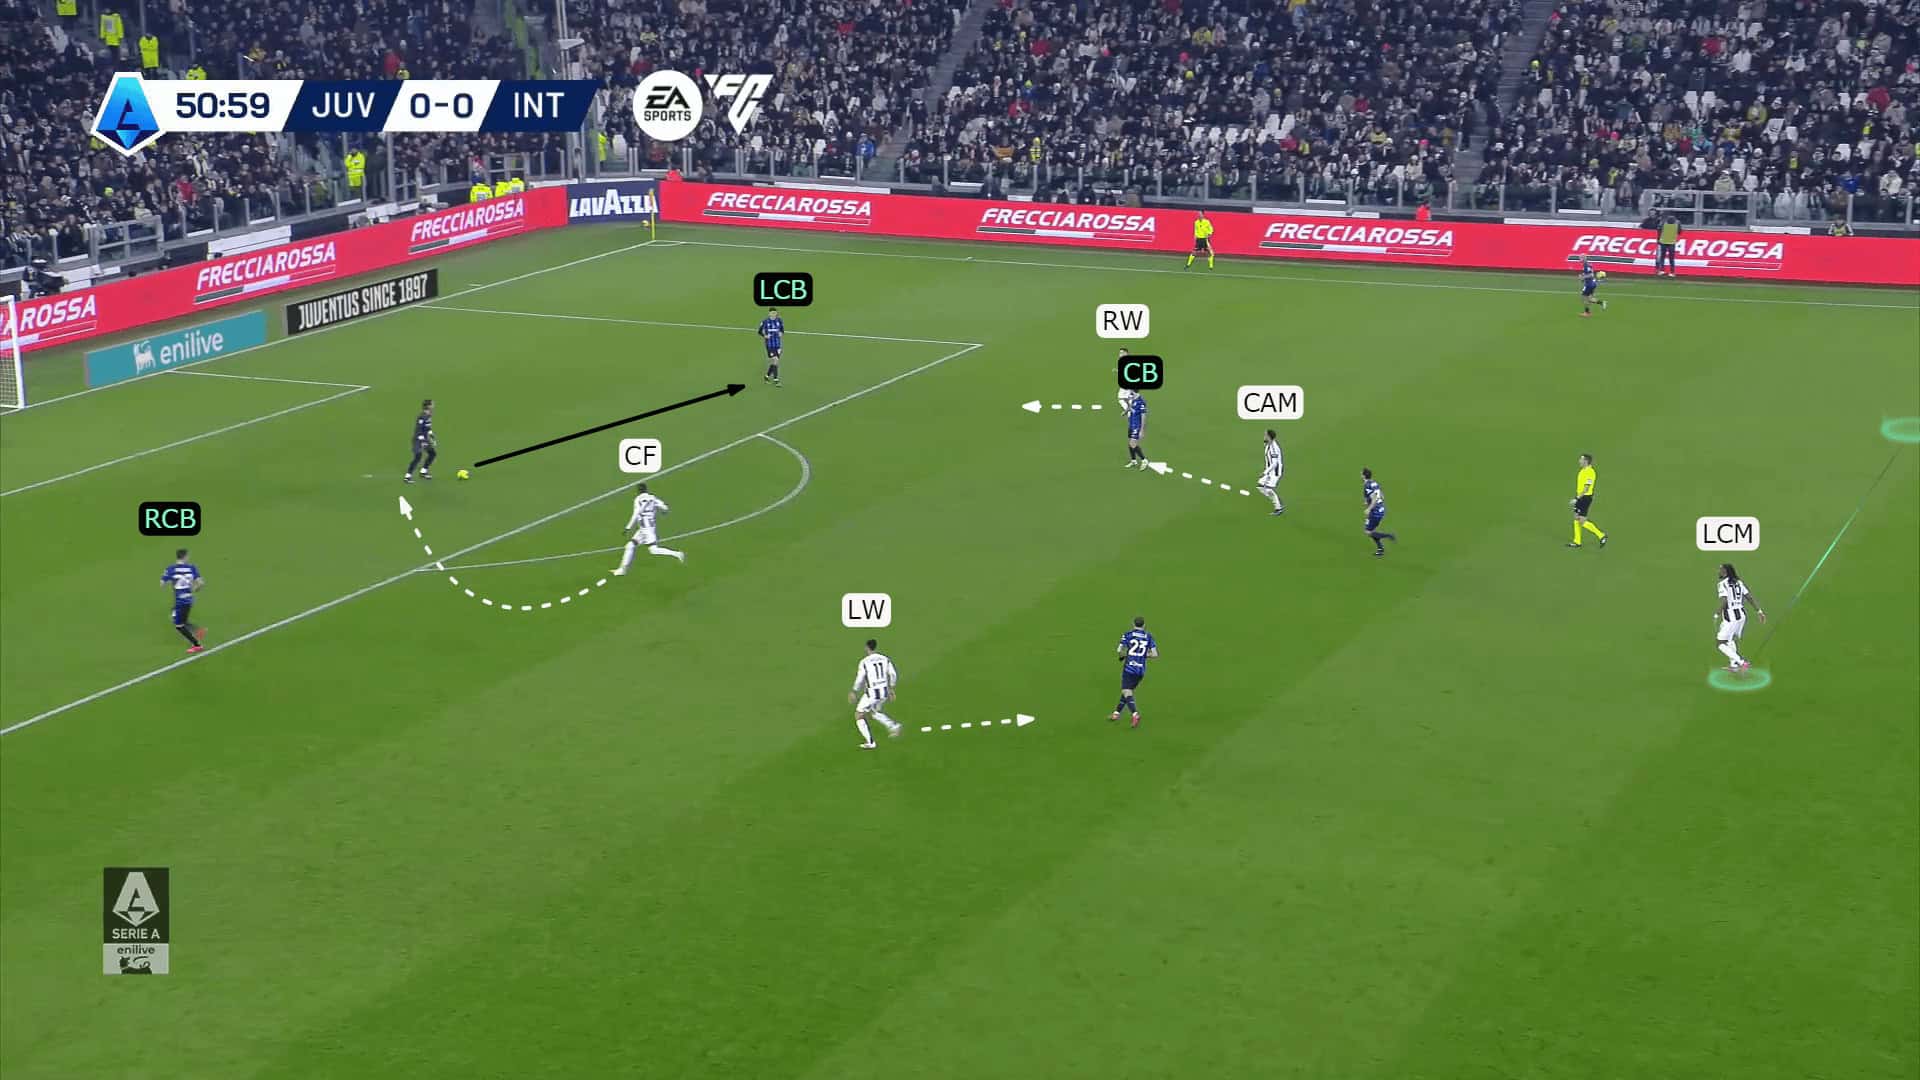
As a result, the ball goes to the side, implementing side pressing, allowing the far winger to press Barella to help the free six (highlighted in black) drop back to help the two centre-backs against two strikers.
Juventus Tactics In-Possession Vs Inter Milan Tactics Out Of Possession
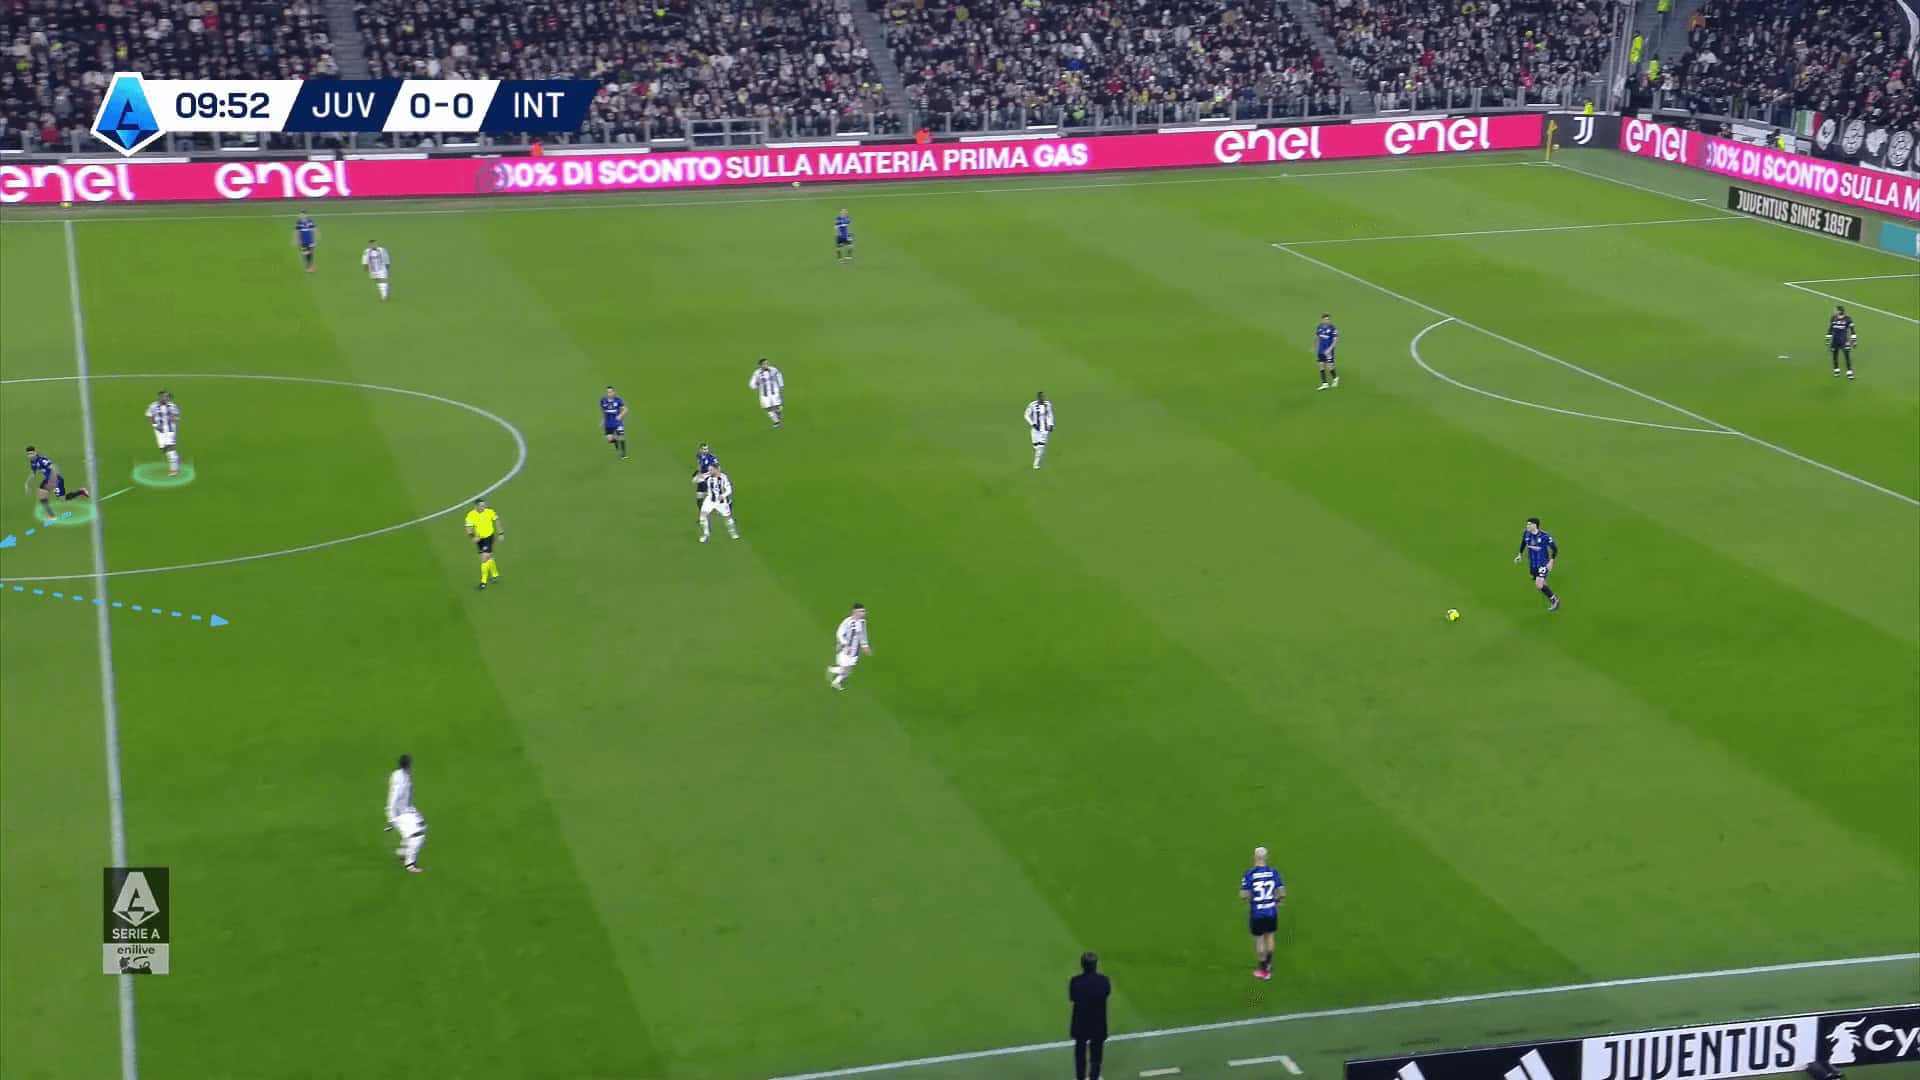
Inter intended to press highly from the beginning of the game, with the two strikers covering the shadow of Juventus’ two midfielders and pressing the two centre-backs, as shown below.
At the same time, Inter Milan’s three midfielders mark Juventus’ three midfielders.
After that, the wing-back near the ball presses Juventus’ full-back while the far wing-back drops back to be the fourth in the backline, as shown below.
During this shifting, the far midfielder (Barella) also shifts to cover the middle area, as shown in the two photos below.
Juventus found no solution against Inter Milan’s high-press scheme except for some hopeless long balls in the first half.
As shown below, the same scheme is applied, with the three midfielders marking the three midfielders while the two wing-backs are high, waiting to know the side to which the ball will be played and then shifting.
The right striker starts narrow and then presses the goalkeeper in a curved run to close the passing lane to the left centre-back, forcing the goalkeeper to send a long ball.
As shown below, Juventus wanted to exploit this there-against-three situation at the back to send long balls, but it didn’t usually lead to dangerous chances.
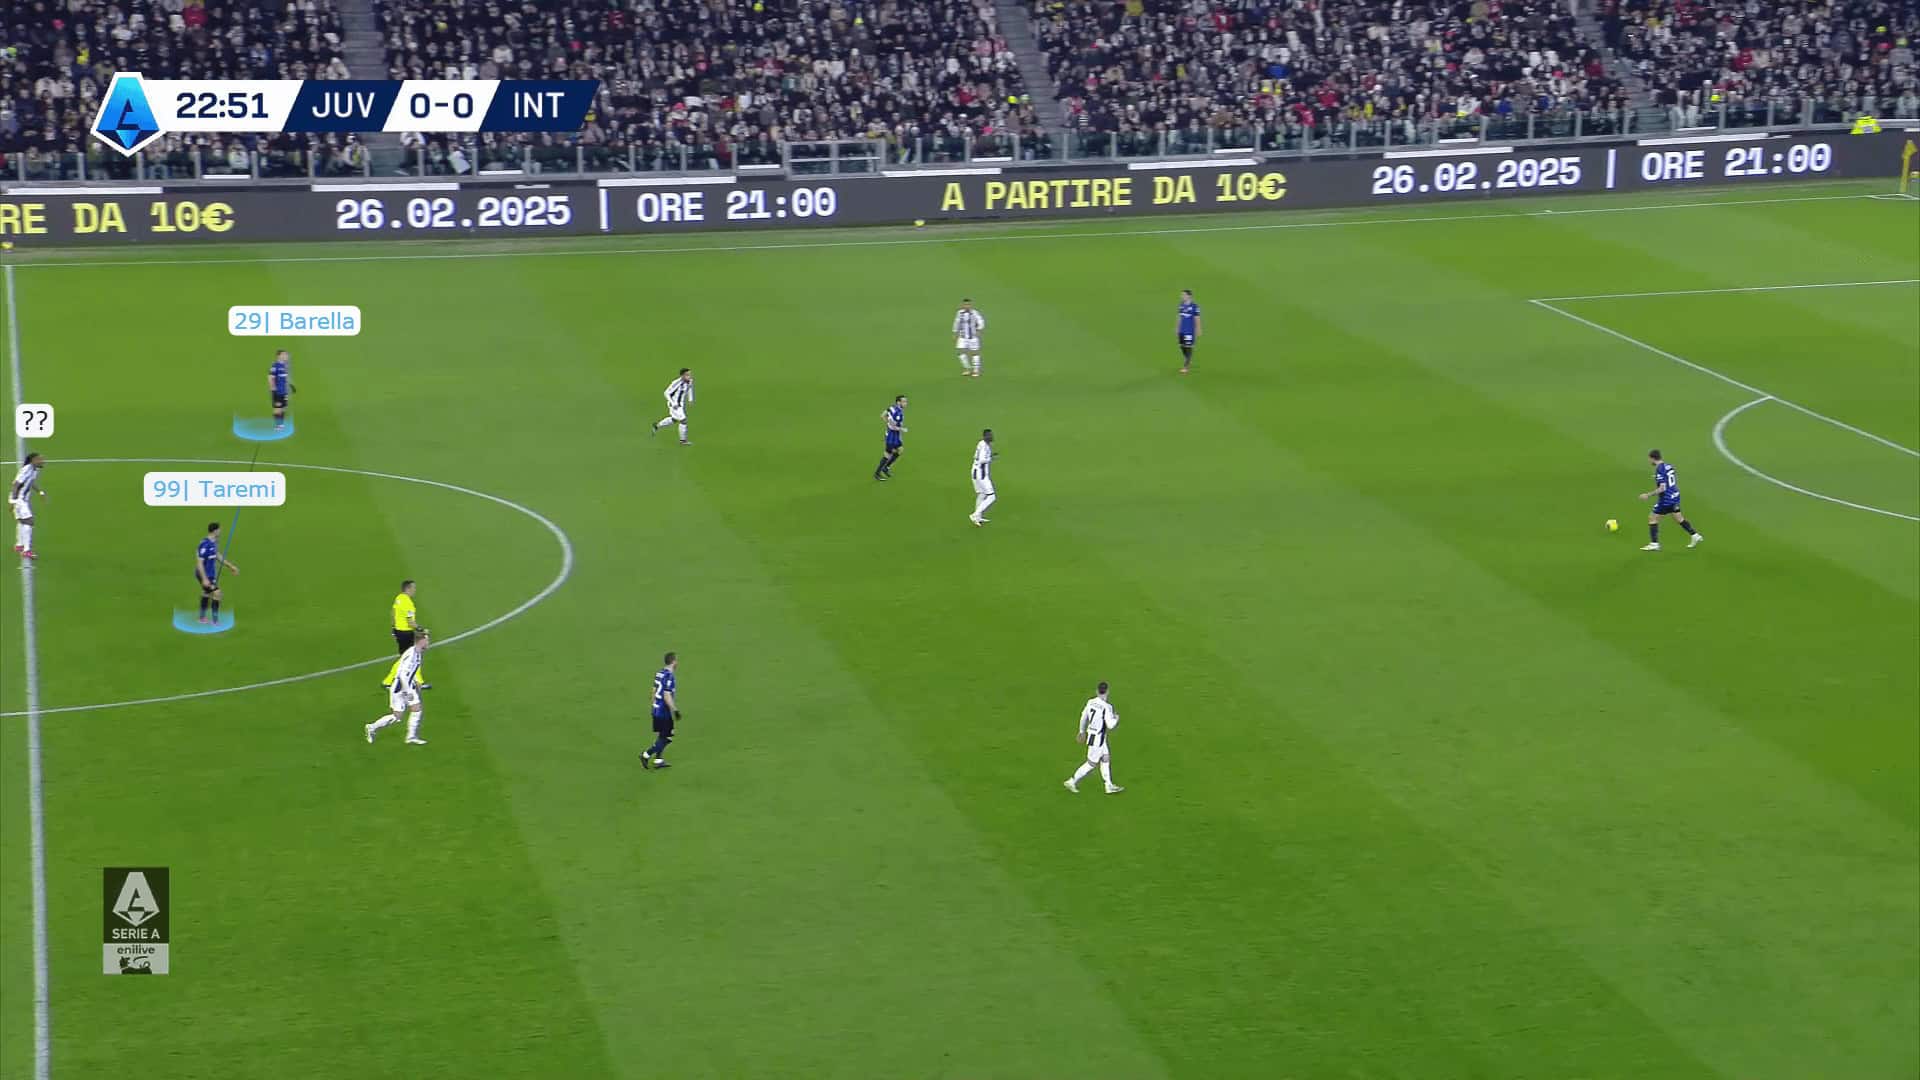
As an important note, Barella has a vital role in pressing the left full-back in case Dumfries doesn’t have time or can’t push up to press the full-back, especially in the mid-press phase.
As shown below, the ball is about to be played to the left full-back, so Barella checks his shoulder to see Dumfries finding out that he can’t go up all that distance, so he presses the left full-back.
In this case, Inter’s six pushes up to press Juventus’ left midfielder instead of Barella, which causes the right centre-back to track Juventus’ CAM, as shown below.
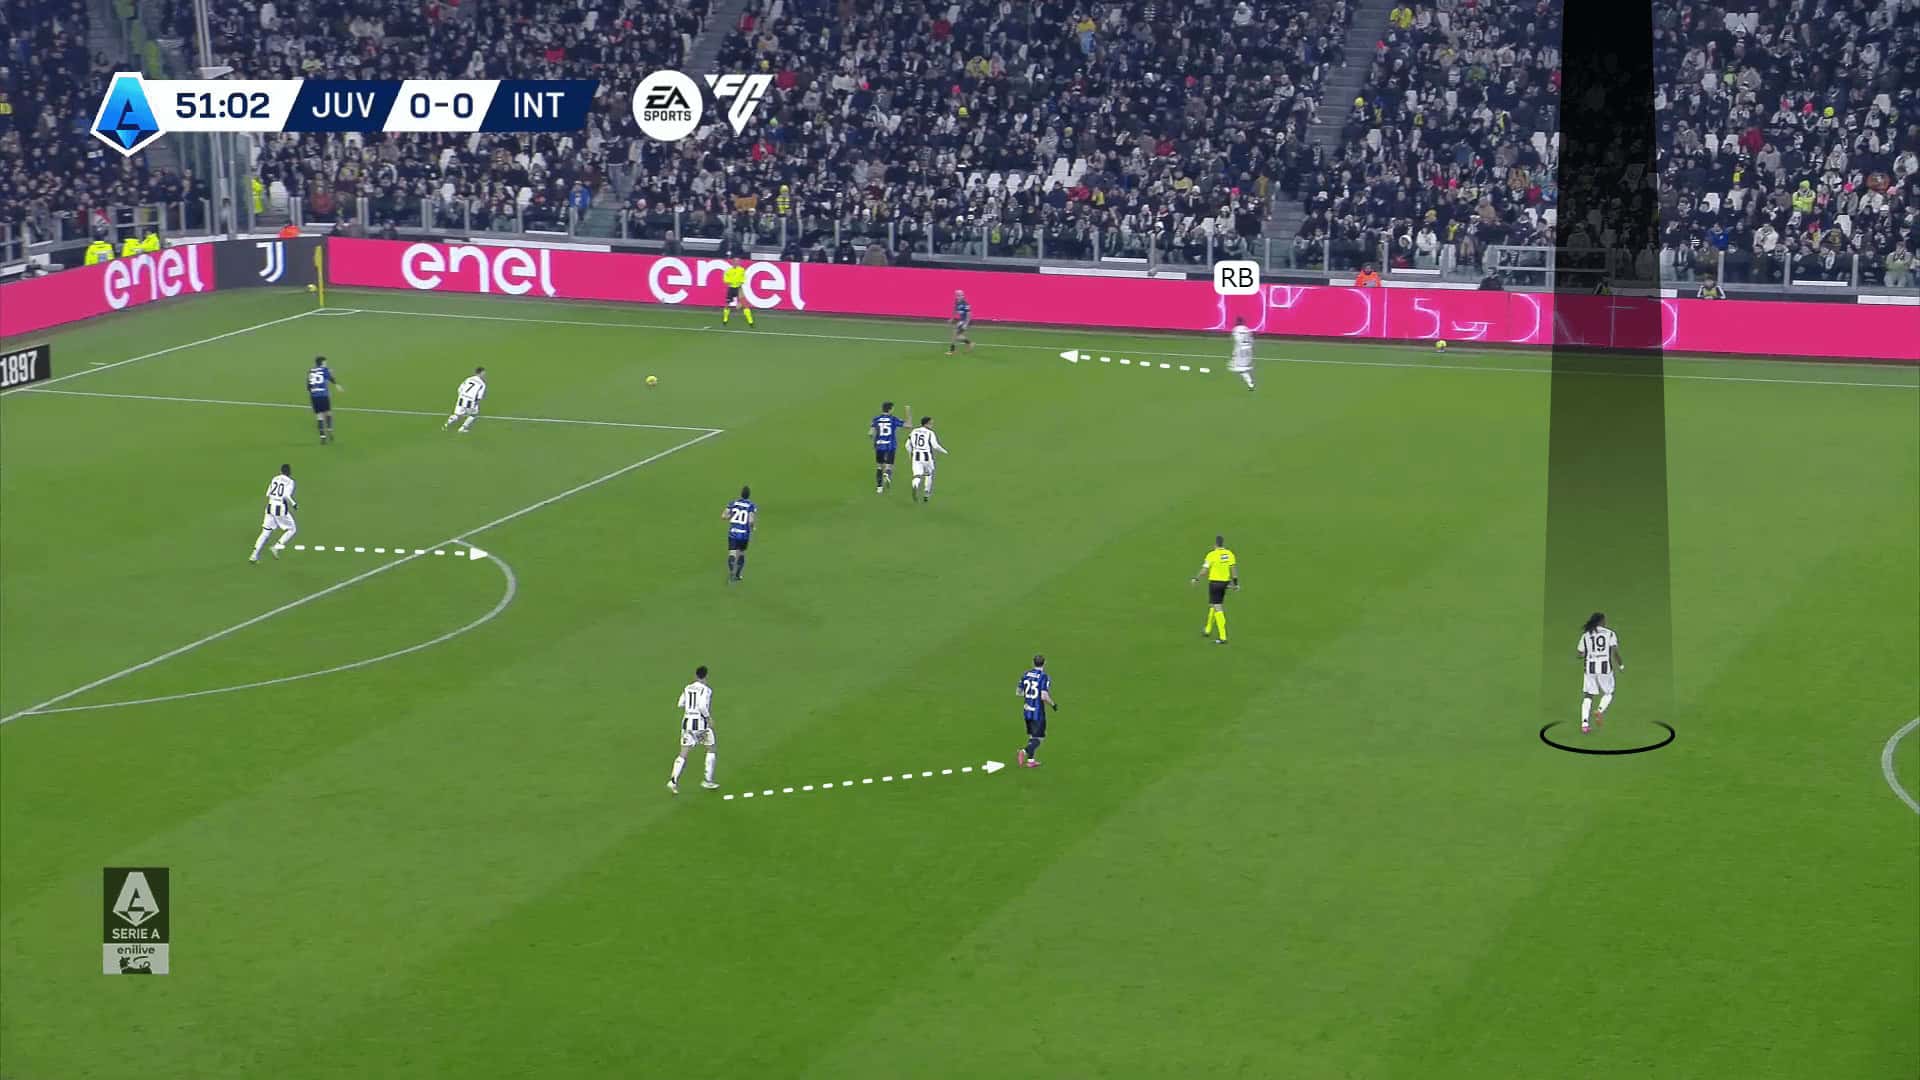
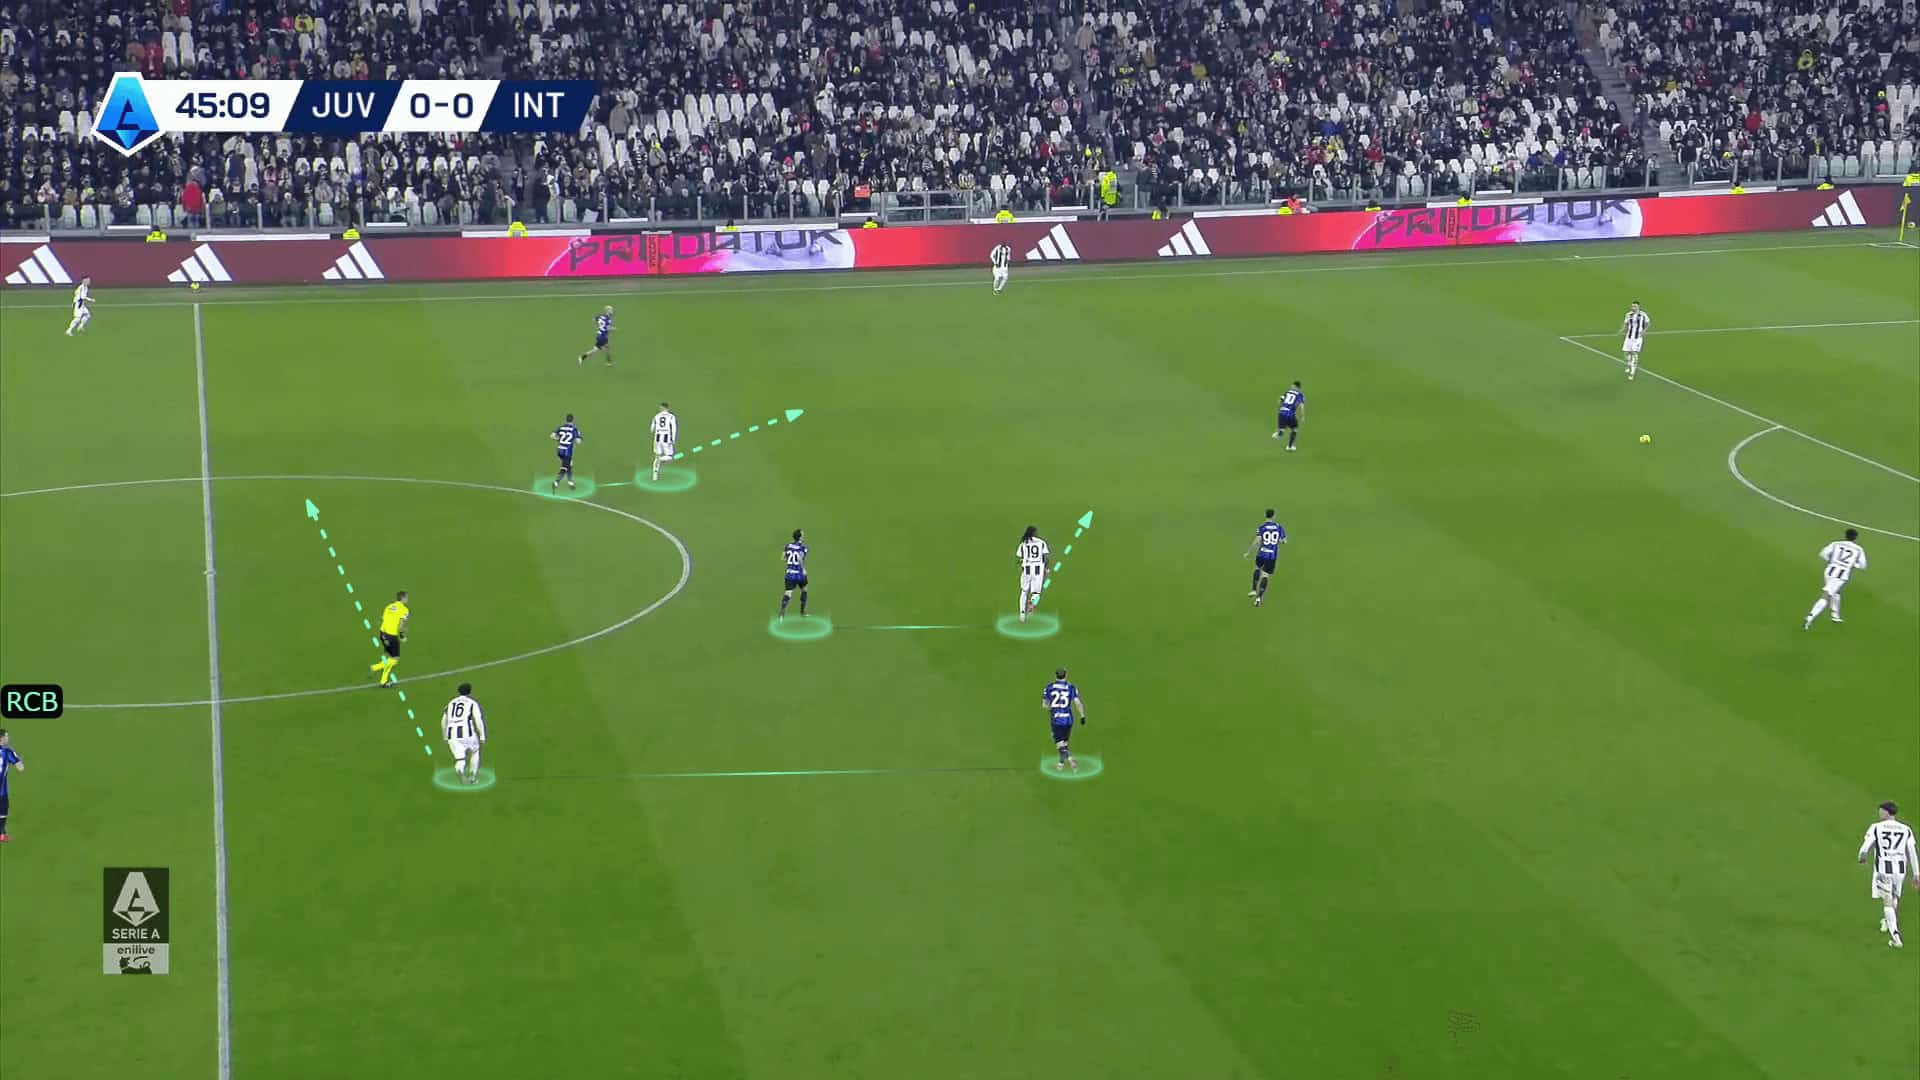
In the second half, Juvent implemented a tactic to exploit the gaps in this process.
As shown below, the situation is good initially, while Inter’s middle midfielder asks Barella to step back with Juventus’ CAM, so he closes the passing lane to him.

In the photo below, the ball is shifted to the other side while the CAM is in a position between Barella and the RCB, which suggests that he may be under control.
The trick is that the two other midfielders go so close to the ball while the CAM will run all this distance horizontally to receive the ball behind them.
This makes it impossible for Barella to leave the right side to track him, and it is also difficult for the RCB to leave his position at this distance horizontally.
This led to two results.
The first one shows him free to receive the ball in a large area because it takes time for the centre-back (Acerbi) to press him, as in the two photos below.
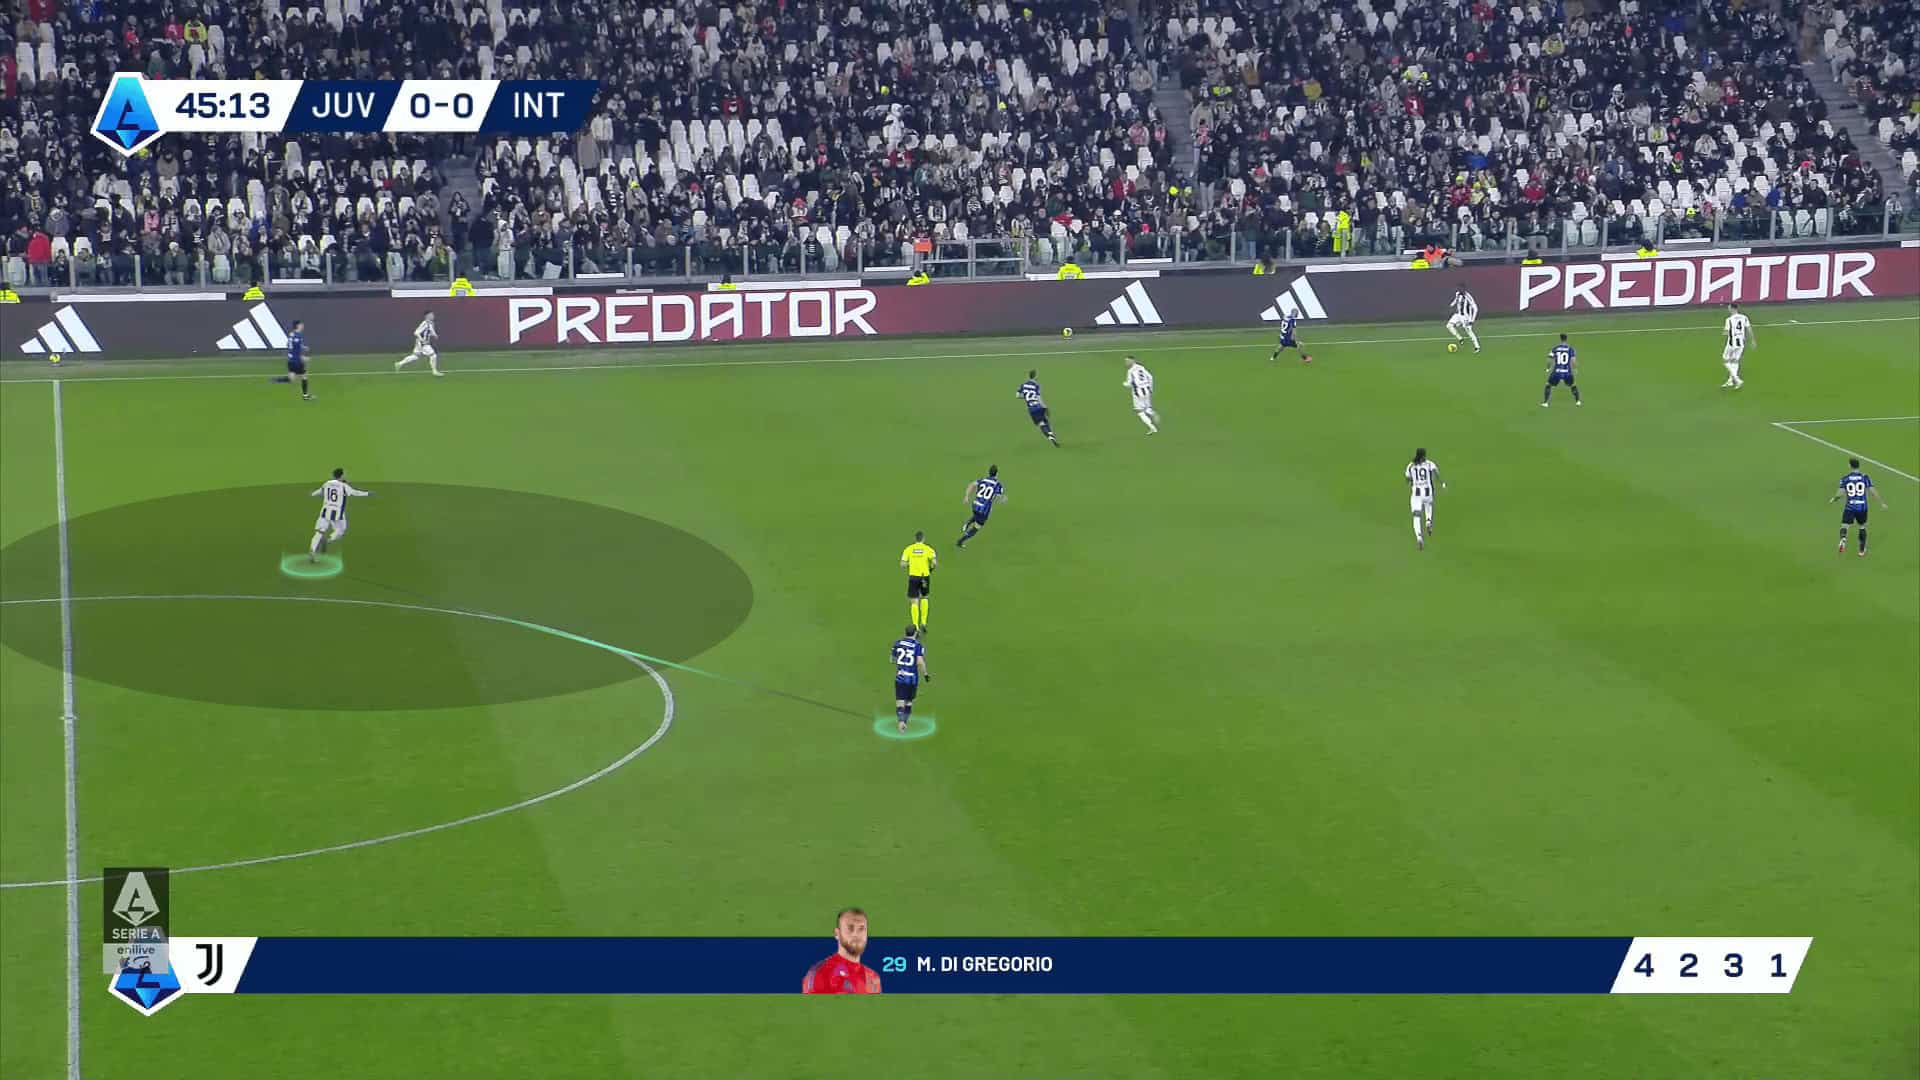
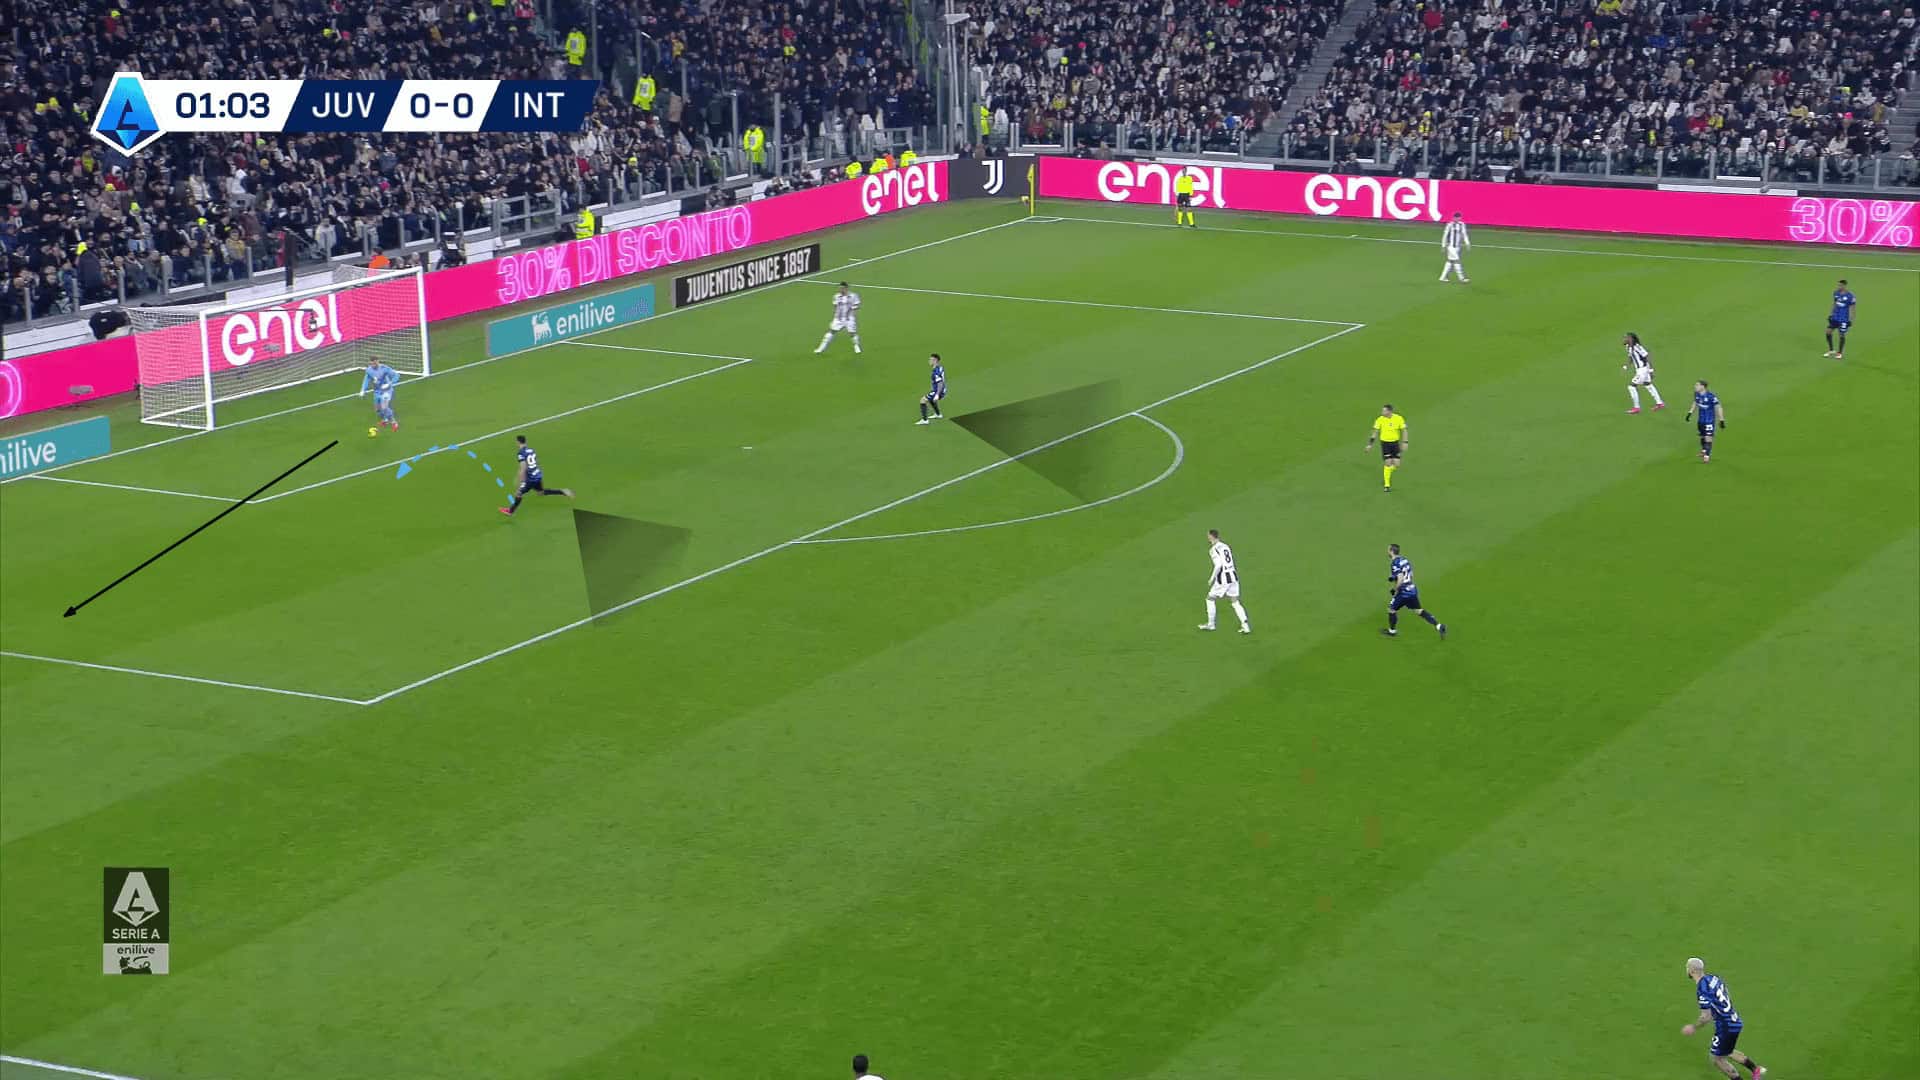
As shown below, the second problem results from all of that.
You can see now that Dimarco (the near wing-back) presses the full-back near the ball, Bastoni presses the near winger, Acerbi presses the CAM, and Pavard presses the striker.
So Dumfries should stay with the left winger, meaning no one is available to press the left full-back after switching the ball.
That means he has a lot of time until Barella reaches him, which can be very good for Juventus, especially after Cambiaso comes in.

Conclusion
To conclude our tactical analysis, all of us nearly agree that Inter Milan were the better side in the first half, and they would have been able to score a goal (or more) if they had been lucky.
On the other hand, it is fair to acknowledge Juventus’ significant improvement in both defence and attack in the second half, which allowed them to become a strong contender in the match.
They ultimately secured three crucial points at home among their fans.
It will be interesting to see how the Serie A title race finishes.