Tottenham Hotspur arrived at the Tottenham Hotspur Stadium needing a season-defining performance to save Thomas Frank‘s tenure.
However, the 1-2 defeat against Newcastle United proved to be the final blow.
This tactical analysis deconstructs the structural flaws that led to the Dane’s sacking, focusing on how Eddie Howe tactics exploited a disjointed Spurs side that has now failed to win a single league game in 2026.
While the “super-tanker” analogy was used to describe a slow turnaround, the reality on the pitch showed a ship that had lost its tactical compass.
Newcastle United prevailed through superior second-ball management and a clear plan to neutralise the hosts’ desperate long-ball exits.
Tottenham Hotspur Vs Newcastle United Lineups & Formations
Tottenham Hotspur Lineup & Formation
Thomas Frank tactics opted for a fluid 4-3-3 system for the Tottenham Hotspur starting XI, a structure that often struggled to establish verticality against a compact block.
Guglielmo Vicario started in goal, with a defensive line featuring Archie Gray, Radu Drăgușin, Micky van de Ven, and Djed Spence.
In this configuration, Yves Bissouma operated as the single pivot, flanked by Pape Matar Sarr and Conor Gallagher as advanced interiors.
Following the early injury to Wilson Odobert in the 30th minute, Mathys Tel entered as a relational outlet on the left, while Xavi Simons and Dominic Solanke completed the forward line.
Newcastle United Lineup & Formation
Eddie Howe opted for a significant tactical variation, deploying a fluid 4-3-3 system that collapsed into a 5-4-1 low block in the final stages of the match.
Nick Pope returned to the starting lineup behind a back four consisting of Kieran Trippier, Malick Thiaw, Sven Botman, and Lewis Hall.
Bruno Guimarães anchored the midfield unit, flanked by Joe Willock and Jacob Ramsey.
In a departure from the traditional focal point, Anthony Gordon operated as a roaming false 9, supported by Harvey Barnes and Anthony Elanga, who posed a high-intensity threat on the flanks.

Tottenham Hotspur Build-Up Logic: The Inverted Full-Back & Transitional Trap
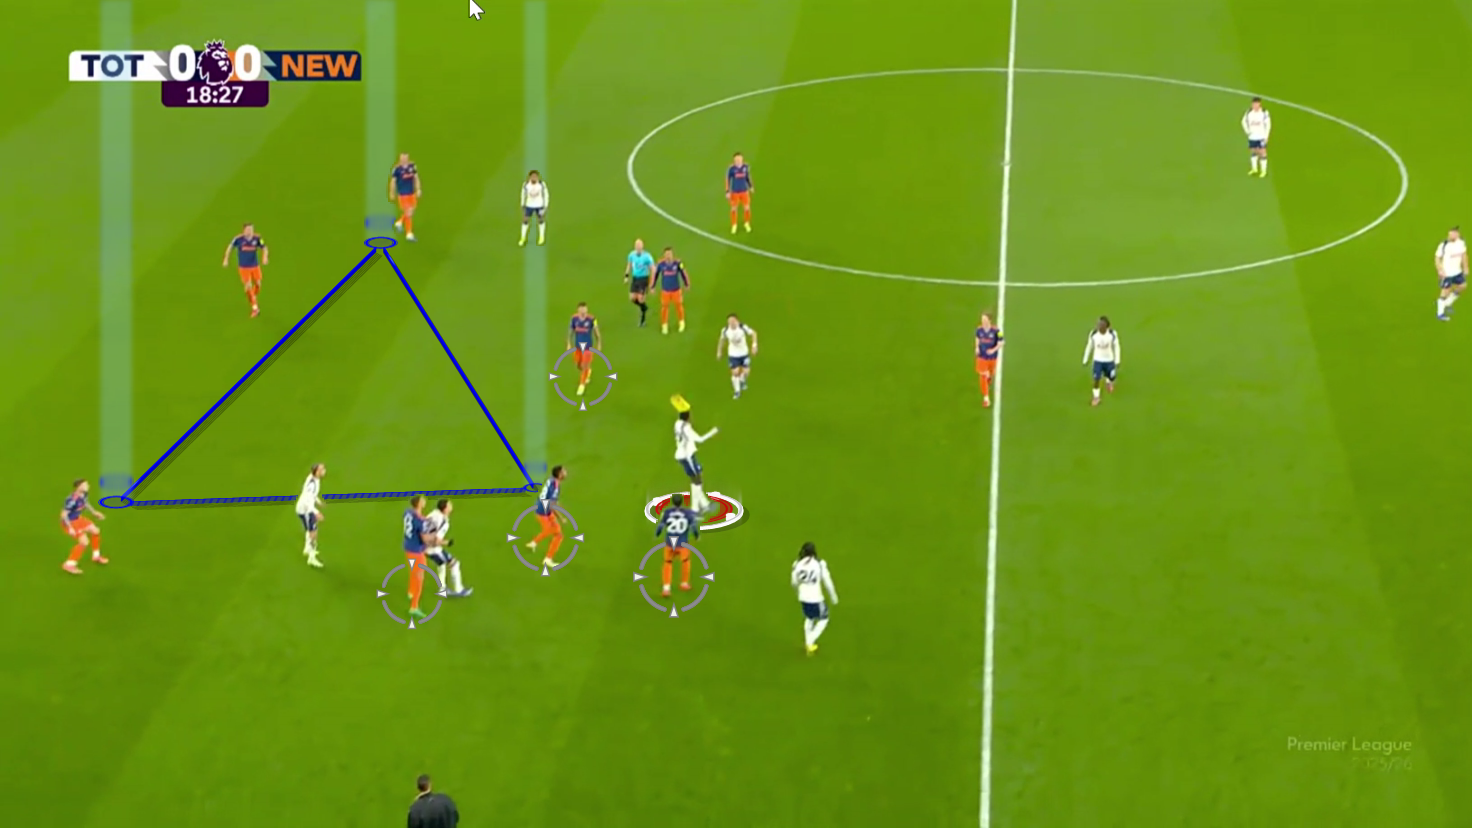
Tottenham Hotspur offensive plan was structured around generating numerical superiority in the second line.
To achieve this, Thomas Frank instructed Archie Gray to act as an inverted full-back, moving into central corridors to create a 3v2 diamond alongside Pape Matar Sarr and Yves Bissouma.
While this provided a stable base for circulation, the structural breakthrough was often neutralised by Newcastle United man-oriented pressure.
By narrowing their position, Tottenham Hotspur induced the opposition to condense the centre, but failed to maintain sufficient “rest-defence” to cover the wide areas upon turnover.
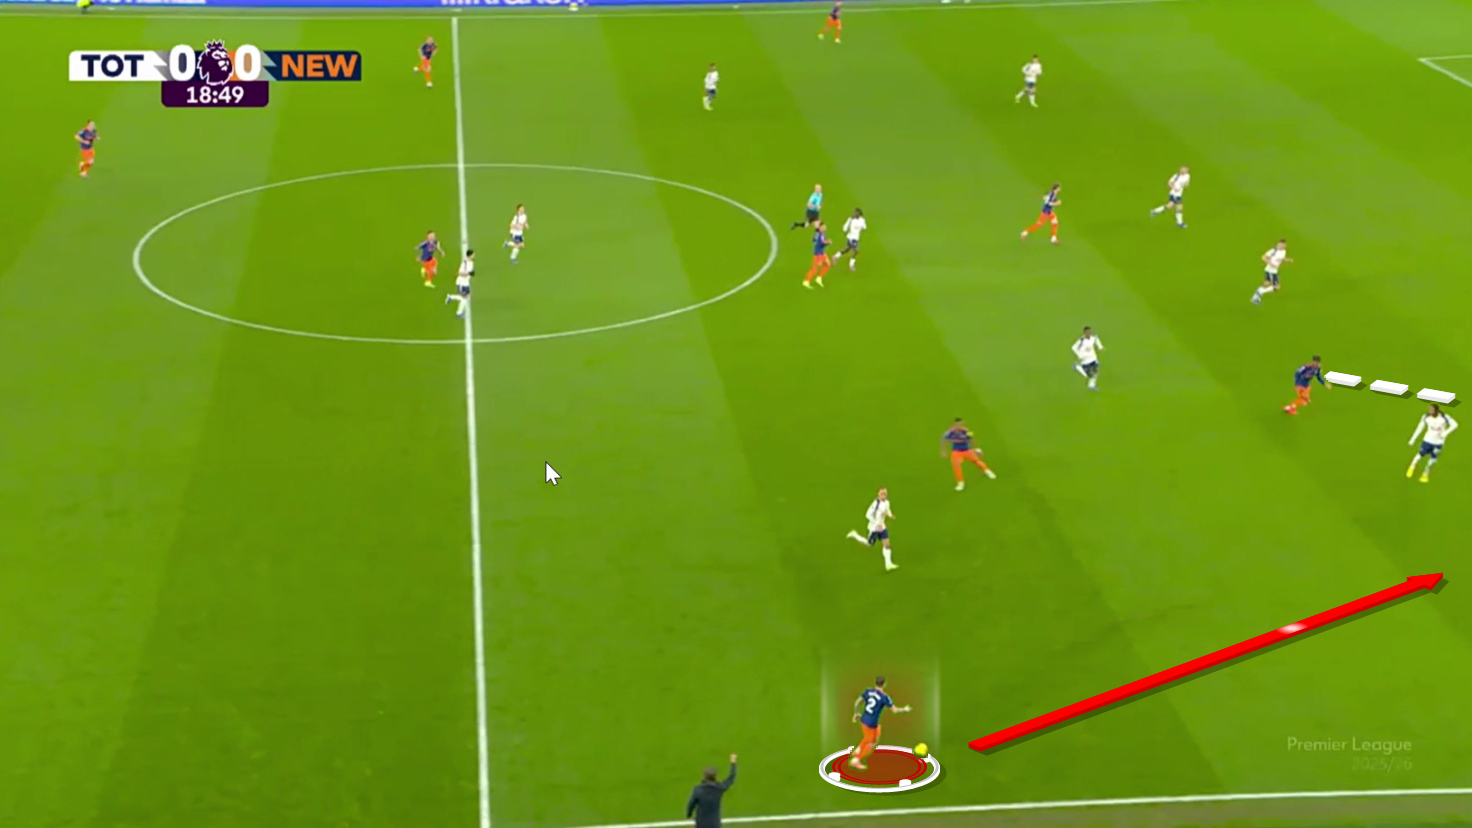
Due to the high-intensity, man-oriented press from Newcastle United’s front line, Guglielmo Vicario is forced into a direct vertical exit.
While Pape Matar Sarr provides a viable physical target and successfully initiates the aerial duel, the structural failure lies in the Spurs’ lack of proximity to the second ball.
Newcastle United’s midfield trio remains compact and numerically superior in the landing zone, effectively neutralising the flick-on and regaining possession in a high-value transitional area.
Newcastle United Defensive Adjustment: Flank Overloads & Blind-Side Penetration
One of the most effective aspects of the Eddie Howe tactical approach was the deliberate isolation of Djed Spence.
Realising that the Tottenham Hotspur left-back was frequently left unsupported by Xavi Simons’ advanced positioning, Newcastle United implemented a high-frequency crossing game and vertical progression from the right wing.
This structural vulnerability was not a momentary lapse but a systemic failure in Thomas Frank’s defensive floor.
Whenever Newcastle United regained possession, the primary objective was to find the overlapping Kieran Trippier or the explosive Anthony Elanga.
By maintaining a minimal horizontal distance between the front three, the visitors forced Radu Drăgușin to vacate the central marking node to provide lateral cover.
This constant “pulling” of the central pairing created a terminal split in the Tottenham Hotspur defensive chain, leaving the interior corridors exposed to high-value penetrations.
Trippier initiates the vertical transition with a direct pass to Anthony Elanga, effectively bypassing the Tottenham Hotspur initial pressing line.
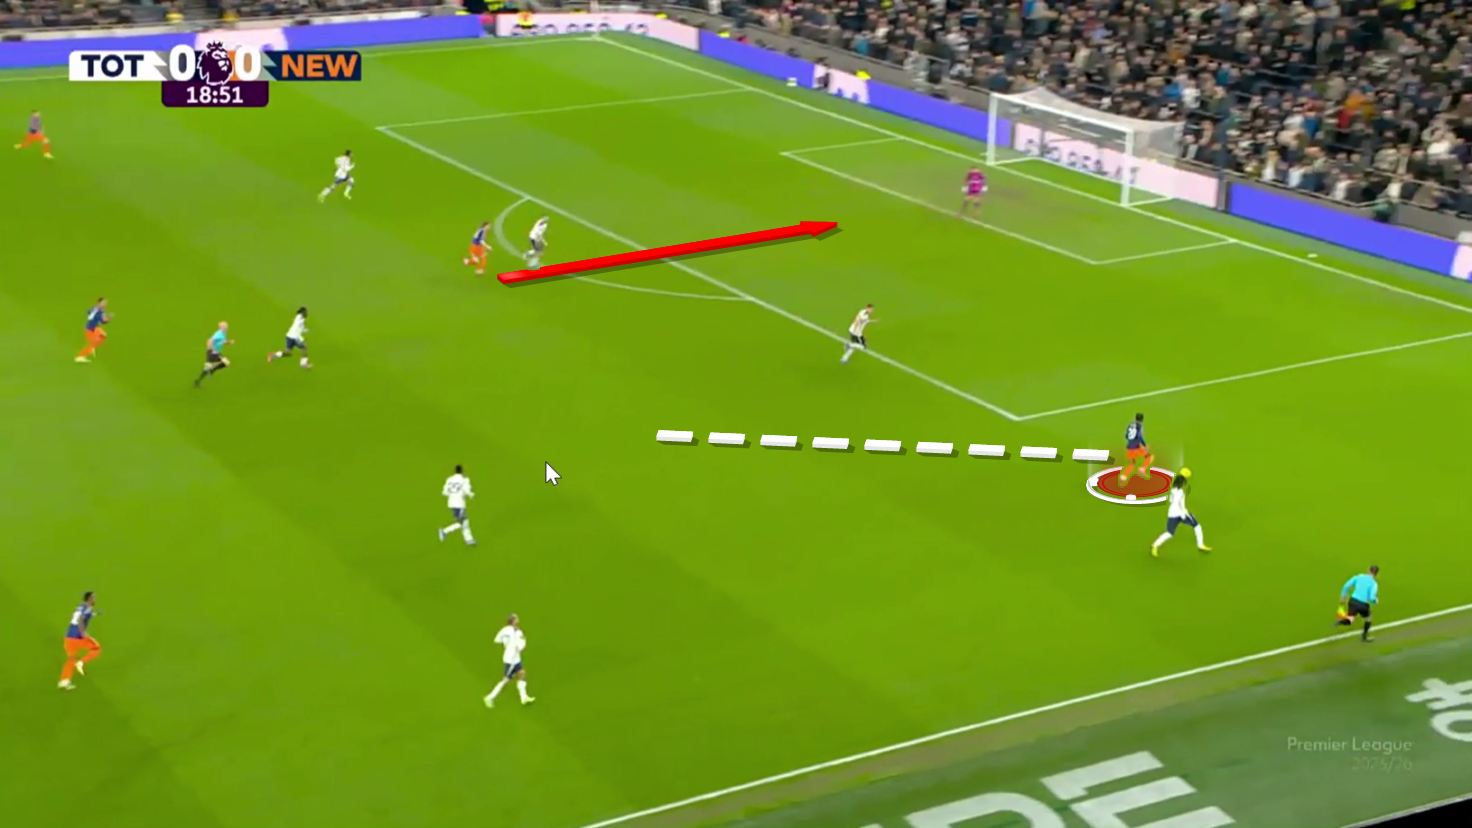
See Anthony Gordon penetrating the penalty area as Anthony Elanga maintains width, exploiting the central channel vacated by Radu Drăgușin during the defensive shift.
The sequence illustrates Kieran Trippier’s vision and Anthony Gordon’s mobility.
By forcing Radu Drăgușin to cover the overwhelmed Djed Spence, Newcastle United successfully manipulated Tottenham Hotspur’s central marking nodes.
The lack of a cohesive “rest-defence” from the home side meant that these vertical attacks were rarely neutralised before reaching the penalty area, providing a definitive example of the structural disconnection that defined the final phase of the Thomas Frank tenure.
Jacob Ramsey As The Relational Node: Exploiting The Half-Space
In this high-friction scenario, the primary driver of Newcastle United’s progression was Jacob Ramsey’s intelligent off-the-ball movement.
The midfielder operated with elite timing, repeatedly exploiting the structural gaps between the Tottenham Hotspur midfield and defensive lines.
As Anthony Gordon moved deeper to function as a focal point, drawing Radu Drăgușin out of the defensive line, Jacob Ramsey consistently capitalised on the vacated central space.
The winning goal in the 68th minute was a masterclass in blind-side attacking and third-man verticality. While the Tottenham Hotspur markers remained excessively ball-oriented, focusing on the ball-carrier Anthony Gordon, Jacob Ramsey initiated a late-arrival run from the left half-space.
By remaining outside the immediate field of vision of Micky van de Ven, Jacob Ramsey was able to penetrate the penalty area unchecked.
This specific sequence highlighted the superior relational chemistry of the Eddie Howe side and the terminal collapse of the Thomas Frank defensive floor, providing a definitive example of the structural disconnection that led to the coaching change.
Conclusion
Newcastle United built the result on the coherence of a tactical plan that neutralised the Thomas Frank structural floor.
The relational pressure on the Spurs’ interiors, combined with an effective exploitation of the flanks, successfully limited the impact of the hosts’ possession.
For Tottenham Hotspur, the match highlighted the difficulty of converting territorial dominance into a scoreboard advantage without a cohesive defensive structure.
While Archie Gray emerged as a source of individual progression, the lack of collective continuity and the psychological weight of the current winless run allowed Eddie Howe to escape with a hard-earned victory.