Total Football Analysis
Once.Sport
  • Football Analysis
    • Data Analysis
    • Formations
      • 2-2-4 Formation
      • 2-3-5 Formation
      • 3-1-4-2 Formation
      • 3-2-2-3 Formation
      • 3-2-4-1 Formation
      • 3-1-6 Formation
      • 3-3-4 Formation
      • 3-4-1-2 Formation
      • 3-4-2-1 Formation
      • 3-4-3 Formation
      • 3-5-1-1 Formation
      • 3-5-2 Formation
      • 4-1-4-1 Formation
      • 4-2-2-2 Formation
      • 4-2-3-1 Formation
      • 4-2-4 Formation
      • 4-3-1-2 Formation
      • 4-3-3 Formation
      • 4-4-2 Formation
      • 4-5-1 Formation
      • 5-3-2 Formation
      • 5-4-1 Formation
      • 6-3-1 Formation
    • Head Coach Analysis
    • Match Analysis
    • Player Analysis
    • Recruitment Analysis
    • Set Piece Analysis
    • Tactical Theory
    • Tactical Preview
    • Team Analysis
    • Training Analysis
    • Tactical Analysis
    • Scouting Report
  • Competition
    • ALL Competitions
    • English Premier League
    • Champions League
    • La Liga
    • Bundesliga
    • Serie A
    • Ligue 1
    • Eredivisie
    • EFL Championship
    • FIFA World Cup 2022
    • WEURO 2022
    • Women’s Super League
    • NWSL
    • Belgian First Division A
    • A-League
    • Liga Profesional de Argentina
    • Austrian Bundesliga
    • Campeonato Brasileiro Série A
    • DFB Pokal
    • 1. HNL
    • Danish Superliga
    • EFL League One
    • EFL League Two
    • FA Cup
    • EFL Cup
    • Indian Super League
    • K-League
    • J1 League
    • Liga MX
    • Copa América 2021
    • Copa del Rey
    • MLS
    • Eliteserien
    • Euro 2020
    • Primeira Liga
    • Scottish Premiership
    • Allsvenskan
    • Europa League
    • UEFA Nations League
    • Liga AUF Uruguaya
  • Coaches
    • All Coaches
    • Alfred Schreuder
    • Ange Postecoglou
    • Antonio Conte
    • Arne Slot
    • Bo Svensson
    • Brendan Rodgers
    • Bruno Lage
    • Carlo Ancelotti
    • Christophe Galtier
    • Claude Puel
    • Claudio Ranieri
    • David Moyes
    • Dean Smith
    • Diego Simeone
    • Domenico Tedesco
    • Frank Lampard
    • Eddie Howe
    • Edin Terzić
    • Emma Hayes
    • Erik ten Hag
    • Ernesto Valverde
    • Gennaro Gattuso
    • Gerardo Seoane
    • Gian Piero Gasperini
    • Giovanni van Bronckhorst
    • Graham Potter
    • Igor Tudor
    • Imanol Alguacil
    • Jesse Marsch
    • Jonas Eidevall
    • Jorge Sampaoli
    • José Bordalás
    • José Mourinho
    • Julen Lopetegui
    • Julian Nagelsmann
    • Julien Stéphan
    • Jürgen Klopp
    • Luciano Spalletti
    • Lucien Favre
    • Manuel Pellegrini
    • Marcelo Bielsa
    • Marco Rose
    • Marco Silva
    • Massimiliano Allegri
    • Mauricio Pochettino
    • Maurizio Sarri
    • Mikel Arteta
    • Niko Kovač
    • Nuno Espírito Santo
    • Oliver Glasner
    • Patrick Vieira
    • Paulo Fonseca
    • Pep Guardiola
    • Peter Bosz
    • Rafa Benítez
    • Ralf Rangnick
    • Ralph Hasenhüttl
    • Roger Schmidt
    • Roy Hodgson
    • Sean Dyche
    • Sérgio Conceição
    • Simone Inzaghi
    • Sonia Bompastor
    • Stefano Pioli
    • Steffen Baumgart
    • Steven Gerrard
    • Thiago Motta
    • Thomas Frank
    • Thomas Tuchel
    • Unai Emery
    • Vincenzo Italiano
    • Xavi
  • Teams
    • ALL Teams
    • AC Milan
    • Ajax Amsterdam
    • Arsenal
    • AS Monaco FC
    • Atalanta
    • Atlético Madrid
    • FC Barcelona
    • FC Bayern Munich
    • Borussia Dortmund
    • Celtic FC
    • Chelsea FC
    • Everton F.C.
    • Inter Milan
    • Juventus F.C.
    • Leeds United F.C.
    • Liverpool FC
    • Manchester City
    • Manchester United FC
    • Paris Saint-Germain
    • Rangers FC
    • RB Leipzig
    • Real Madrid CF
    • Tottenham Hotspur
    • West Ham United
  • Players
    • ALL Players
    • Alisson Becker
    • Bukayo Saka
    • Erling Haaland
    • Harry Kane
    • Jack Grealish
    • John Stones
    • Julián Alvarez
    • Kalvin Phillips
    • Kevin De Bruyne
    • Kyle Walker
    • Kylian Mbappé
    • Lamine Yamal
    • Lionel Messi
    • Luis Díaz
    • Mohamed Salah
    • Phil Foden
    • Virgil Van Dijk
  • Contact
  • Write For TFA
No Result
View All Result
No Result
View All Result
Total Football Analysis
No Result
View All Result
Home Match Analysis

Rayo Vallecano Vs Atlético Madrid [3–0] – La Liga 2025/2026: Clinical Rayo, Blunt Atlético – Tactical Analysis

Vedant Kharakwal by Vedant Kharakwal
February 17, 2026
in Match Analysis, 4-2-3-1 Formation, 4-3-2-1 Formation, 4-4-2 Formation, Analysis, Atlético Madrid, Diego Simeone, Iñigo Pérez, La Liga, Rayo Vallecano, Tactical Analysis
0
Rayo Vallecano vs Atlético Madrid

Rayo Vallecano hosted Atlético Madrid in Gameweek 24 of the 2025/2026 LaLiga season at Estadio Municipal de Butarque.

Rayo Vallecano came out of the contest with a 3-0 victory, enough to keep themselves out of the relegation spots by a point with a game in hand.

A loss would keep the visitors in fourth, right behind Villarreal, who have a game in hand.

Although Atlético enjoyed more of the ball, it was the hosts who dominated crucial statistics; they led in terms of expected goals (1.61-0.70), total shots (13-9), big chances (6-1), tackles (12-11), and free-kicks (13-10).

Both sides were evenly matched in final-third entries (44-45).

This indicates that Los Vallecanos were highly efficient with their attacks.

Through this tactical analysis, we aim to identify the strengths of Rayo Vallecano’s and Atlético Madrid’s performances and propose solutions to the latter’s challenges.

Rayo Vallecano Vs Atlético Madrid Lineups & Formations

Let us look at how Iñigo Pérez and Diego Simeone fielded their squads.Lineups 2

The hosts, Rayo, played in a 4-2-3-1 formation.

Augusto Batalla started in goal.

Andrei Rațiu (right-back), Florian Lejeune (right centre-back), Nobel Mendy (left centre-back), and Alfonso Espino (left-back) were the back four.

Skipper Òscar Valentín and Gerard Gumbau played as the double pivot. Gumbau came off for Unai López (83’).

Ilias Akhomach (right) and Fran Pérez (left) were the wingers, alongside Isi Palazón (centre-attacking-midfielder); Jorge de Frutos played as the lone striker.

Alkhomach and Pérez made way for Randy Nteka (74’) and Álvaro García (64’) respectively; Palazón and de Frutos were substituted by Pedro Díaz (64’) and Jozhua Vertrouwd (64’) respectively.

The visitors, Atlético, played in a 4-3-2-1 formation.

Skipper Jan Oblak started between the sticks, behind a back four of Nahuel Molina (right-back), José María Jiménez (right centre-back), Clément Lenglet (left centre-back), and Matteo Ruggeri (left-back).

Lenglet and Ruggeri made way for Ademola Lookman (63’) and Obed Vargas (56’).

Johnny Cardoso played as the pivot, with Rodrigo Mendoza and Alejandro Baena as the attacking midfielders.

They were all replaced by Marcos Llorente (63’), Robin Le Normand (56’), and Julián Alvarez (56’).

Thiago Almada (right) and Nicolás Golzález (left) played as the wide midfielders, with Alexander Sørloth up top.

Rayo Vallecano Dominant Performance

Rayo Vallecano Defensive Phase

Iñigo Pérez’s side proved to be a tenacious unit during this fixture, defending in a deep 4-4-2 structure inside their half.

Rayo Vallecano low-block

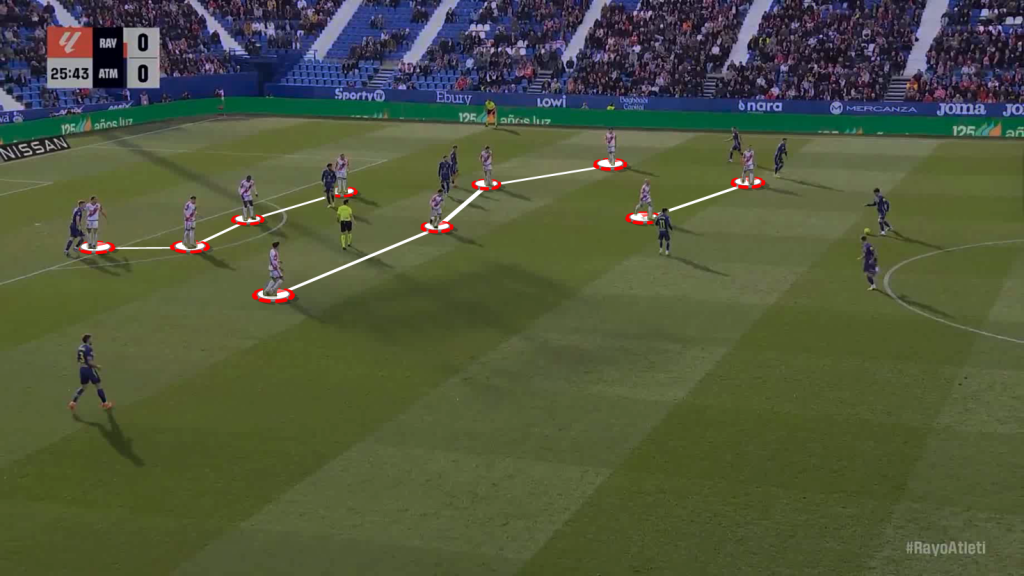
They kept out the threat in wide areas by doubling up on opposition wingers.

While stepping up in a mid-block, they got into a 4-2-3-1 shape off the ball.

Rayo 4 2 3 1 defending shape

In situations where Atlético’s defenders found line-breaking passes, Rayo Vallecano’s double pivot shifted across to shut down the space.

Their defensive movements to cover one another were crucial in defending the space in the midfield third.

While pressing in the mid-third and the attacking third, they approached by executing tight man-orientations.

Rayo man marking

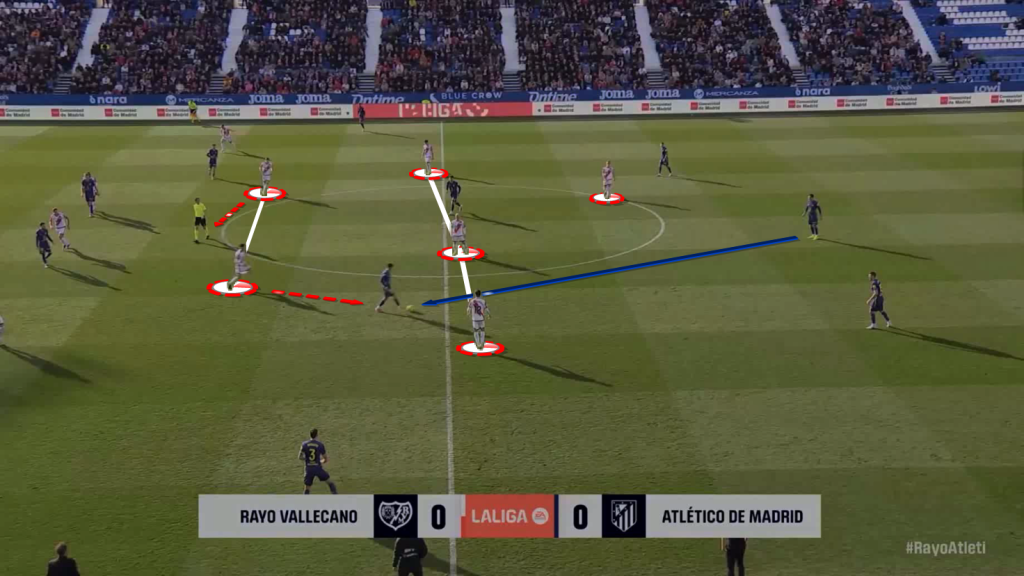
The opponents attempt to attack down the wide channel.

However, Rayo Vallecano have man-marked all the options in the vicinity of the ball-carrier, leaving him no option but to go back to the goalkeeper.

Pérez’s side did well in squeezing their opponent in the wide areas.

Wide squeeze

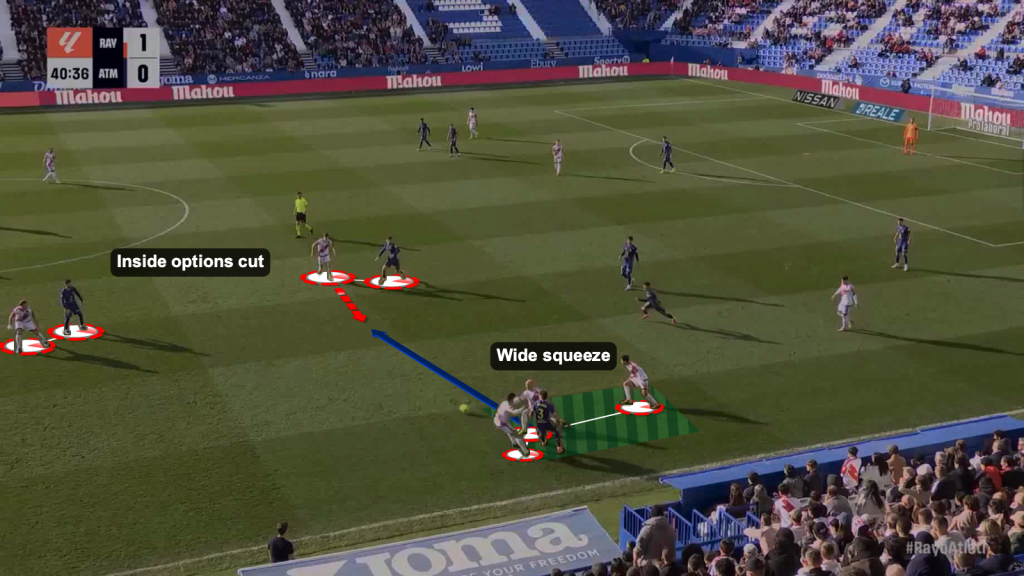
There were moments when the opponent, stuck near the touchline, found an inside pass.

Vallecano were careful to cut off the options in the half-space as well.

During dynamic build-up situations for the opponents, Los Vallecanos shut down the central zone.

As the opponents moved the ball to the wide zone, the hosts pounced.

Rayo forcing long balls

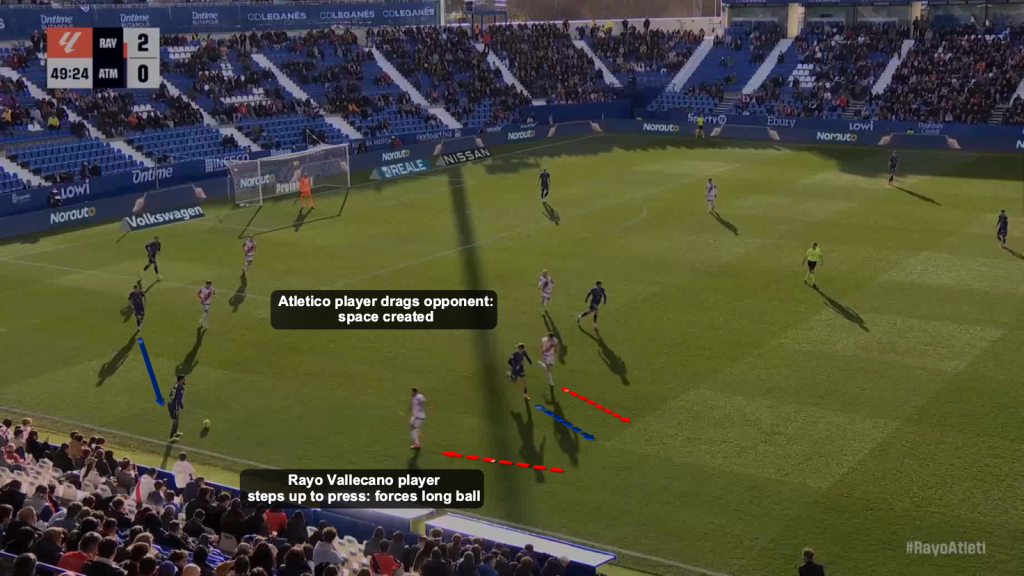
Even when opponents attempted to create space by dragging defenders, Vallecano ensured the space was covered by a player from another position stepping in.

This way, they forced their opponents to play a rushed long pass, eventually giving away possession.

Staying tight in the central zone got them their second goal.

Goal 2 3

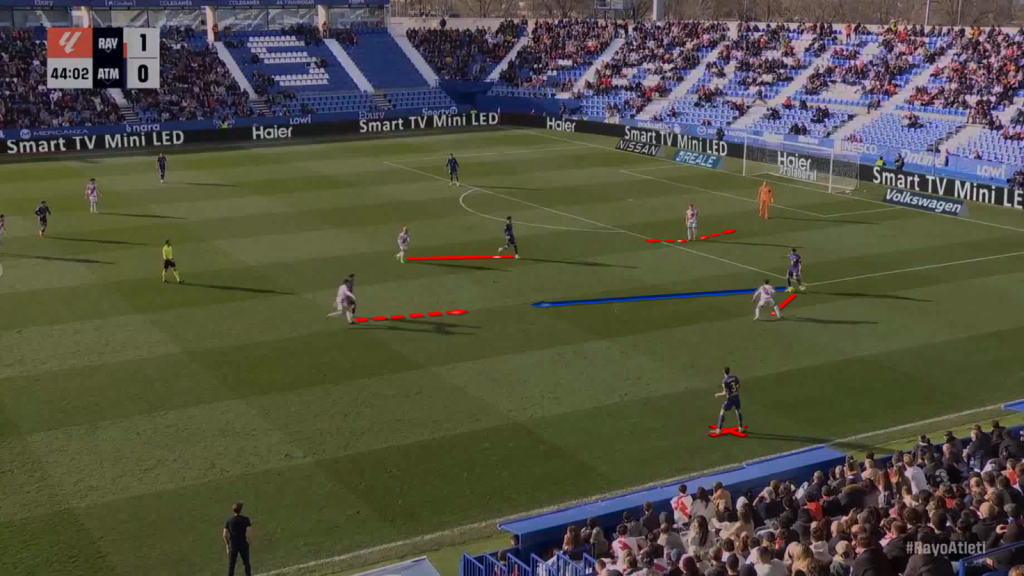
The opposition centre-back is under pressure from his direct opponent, who cuts the wide passing lane.

Vallecano’s striker cuts the safe back-pass to the goalkeeper, which leaves the vertical pass as the feasible remaining option.

Once the pass is played, the Rayo Vallecano midfielders step aggressively to intercept in the attacking third and launch an attack, which results in a goal.

Rayo Vallecano Attacking Phase

The Red Sashes were smart with how they utilised the ball.

They opted to consolidate possession when the opponents were in a deep block.

https://totalfootballanalysis.com/wp-content/uploads/2026/02/Rayo-consolidation-to-attract.mp4


By moving the ball back and playing it sideways, they attracted pressure from the opponent’s first line.

Once the initial wave came, Vallecano had access to the space between the lines.

By playing angular passes, they moved the ball to their pivots to attract the second line of press.

Once that happened, they found the next pocket of vertical space.

Although these actions were not a consistent sight, rolling the ball around in phases helped them slow the game down.

Thid man combination attacking third

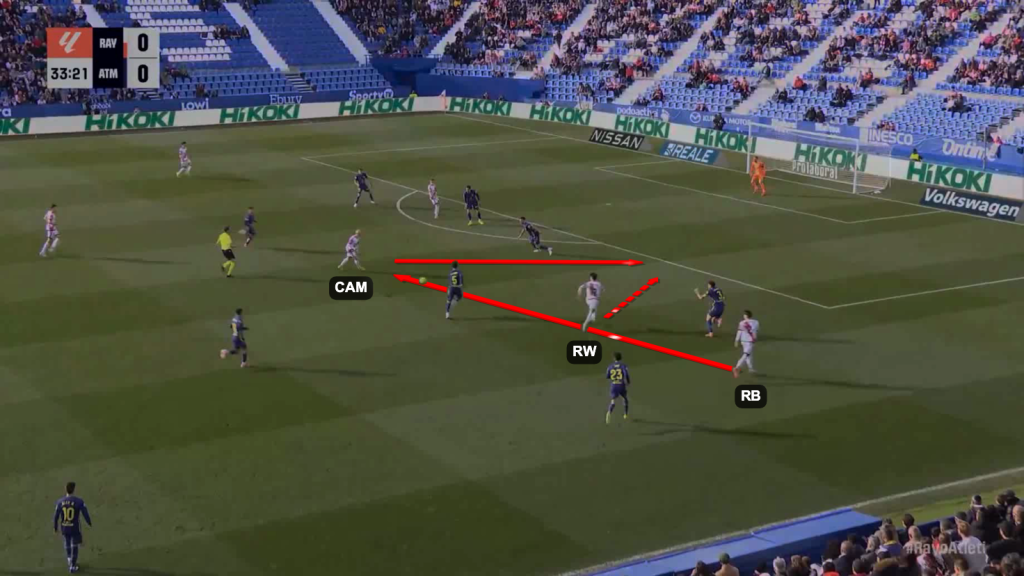
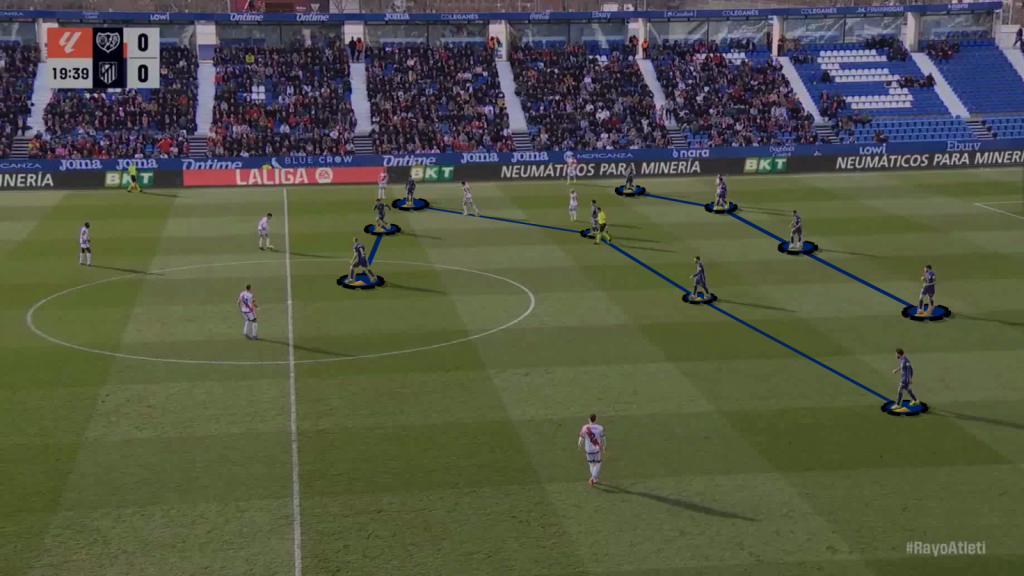
Rayo Vallecano attempted to penetrate Atlético’s backline by playing quick combinations.

The right-back plays an inside pass to the attacking midfielder, who sets up a through pass for the right-winger.

The right-winger’s run exploits the gap between the opposition centre-back and full-back.

The hosts found penetration through the half-space and wide areas to be their major chances and box entries.

https://totalfootballanalysis.com/wp-content/uploads/2026/02/Goal-1.mp4

For their opening goal, Vallecano created a 2v2 situation in the wide channel.

After the lay-off, the winger created separation from his direct opponent and became the bait.

This put the full-back in a 1v1 situation, with the opponent having no cover, as the covering defender moved closer to the winger.

The Vallecano full-back utilised the space expertly as he played a cut-back for the finish.

While attempting to progress down the wide channel, Rayo Vallecano also used quick one-twos to find space in-behind.

https://totalfootballanalysis.com/wp-content/uploads/2026/02/Rayo-one-two-wide-area.mp4

The right-back finds the right-winger to feet, who is immediately closed down by the opponent full-back.

However, the right-back realises this and continues his movement to make a run into the space left by the opposition full-back.

Owing to this neat combination, Rayo Vallecano makes a box entry in a matter of seconds.

Atlético Madrid Positive Actions

Despite losing out on the three points, Diego Simeone’s side showcased some well-executed actions.

Atlético Madrid mid-block

They maintained a compact 4-4-2 shape in mid-block, which gave their opponents a fair bit of challenge in finding penetration.

While they were in the shape, the opponents were forced to go around the structure to find progression.

Rayo pivots marked

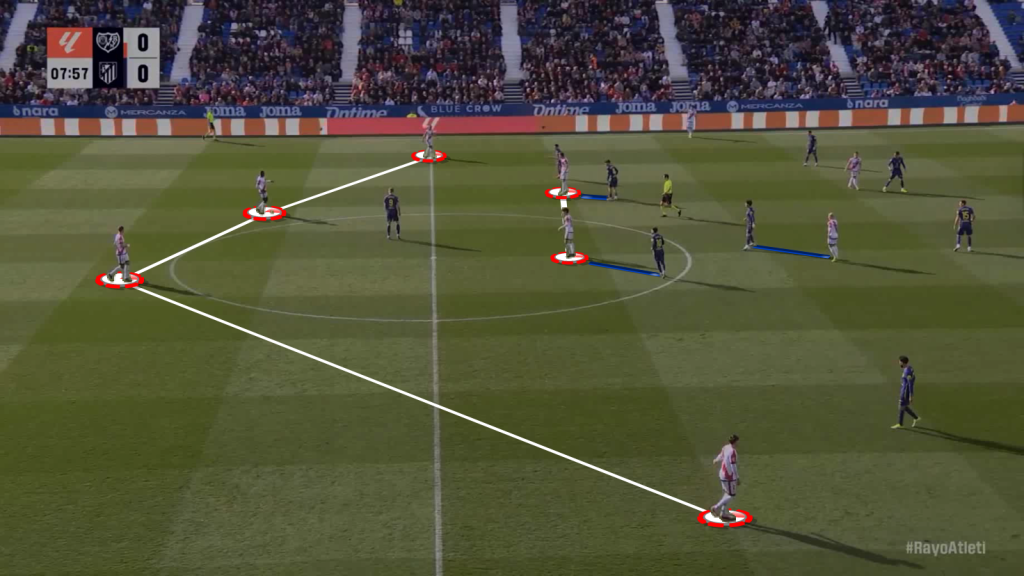
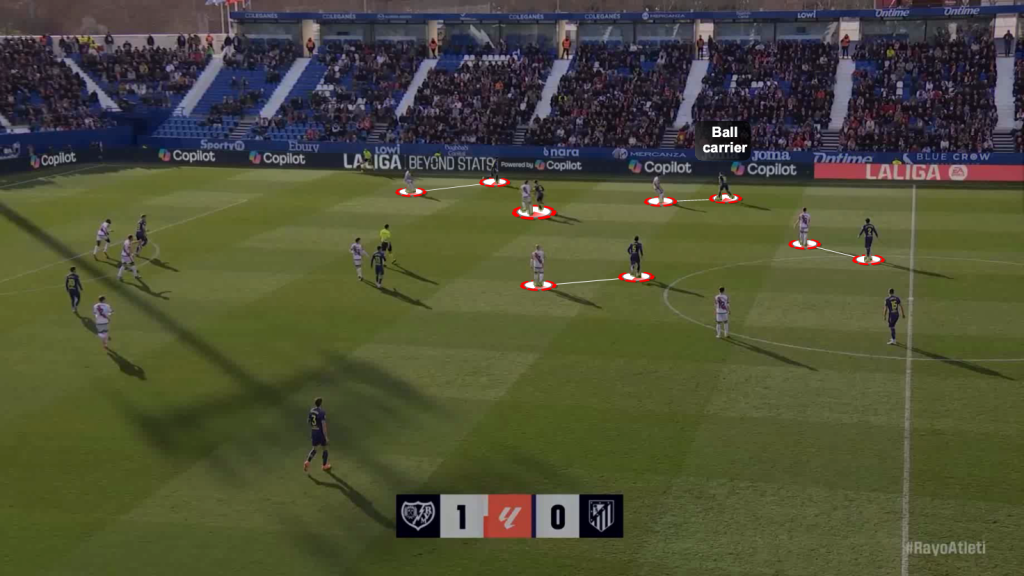
One of the reasons for this was Atlético marking the opposition pivots during build-up.

In the above image, Rayo Vallecano are in their build-up shape; Los Cochoneros have marked the opponent’s pivots and the attacking midfielder.

This led to their opponents having less success in the central zone.

While pressing in the opponent’s half in some cases, Atlético set up a trap which forced their opponents to congested spaces.

Atletico pressing trap

The opposition centre-back has no options in the vicinity; the passing lane to the other centre-back is closed by the striker curving his run.

In a situation like this, the ball-carrier has to either play it all the way back or drive forward and enter the pressing trap.

Most of the penetration for Simeone’s side came from the wide areas, since they struggled to unlock Rayo Vallecano’s defence for the larger part of the game.

It was around the hour mark that they began finding some penetration from the half-spaces.

Atletico through pass

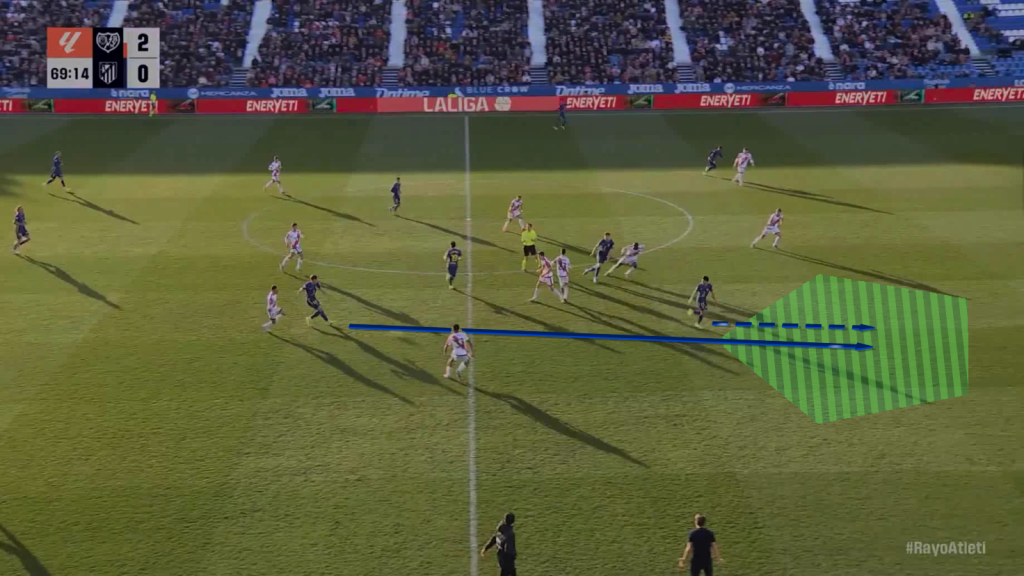
With the opponent’s back line stepping up frequently, there were spaces opening up behind.

Atlético finds the through pass with a well-timed run to exploit this space.

However, this was an inconsistent action from the visitors.

Atlético Madrid Tactical Solutions

Atletico pressing solution

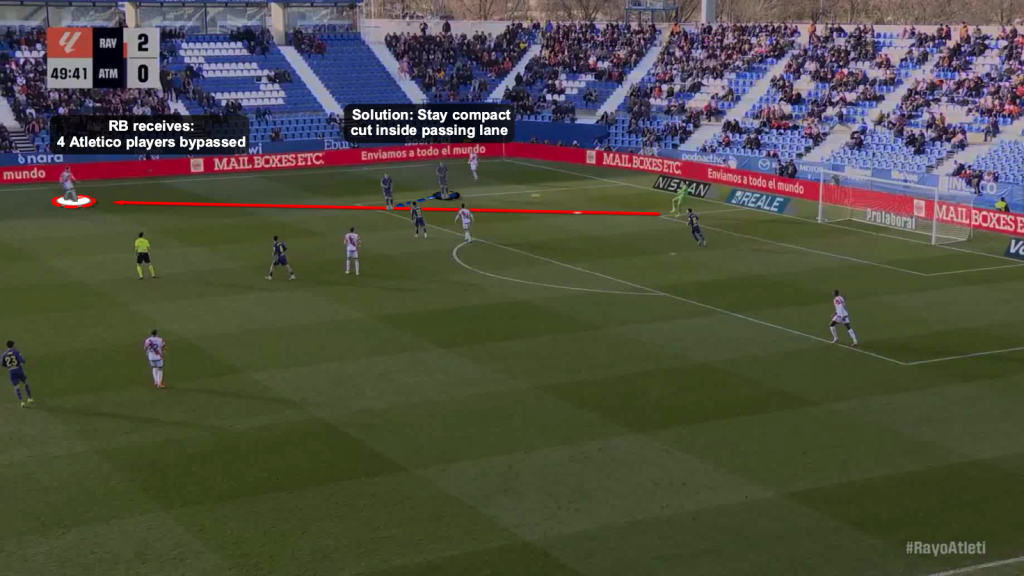
In situations where the visitors pressed high, the opponent played through them with a certain ease.

The solution to this is making small adjustments in positioning while pressing.

The winger cutting the inside pass is more crucial than cutting the sideways pass.

If he stays compact to cut off the more dangerous pass, the opposition goalkeeper will have to play it sideways to the wide area; as a result, all four Atlético players will stay in the game.

The visitors were inadequate in terms of shifting play to keep possession consistently, which is a major reason why they did not control the game.

Atletico shifting play solution

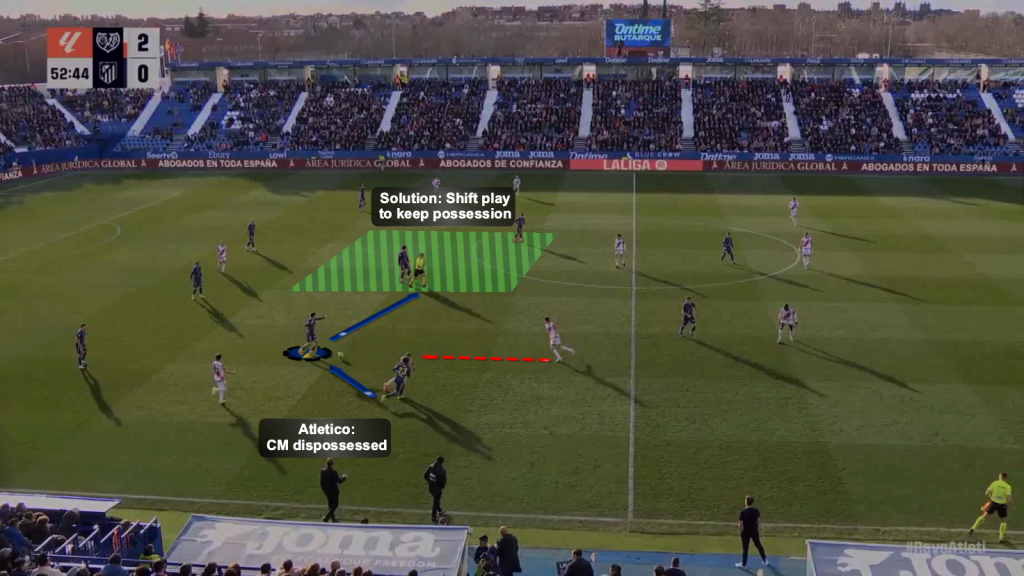
Right-winger finds one of the midfielders, who is immediately pressed by an opponent and gets dispossessed.

The solution is to open up to the other side and shift play by moving the ball into space.

This is a simple solution to retain possession, which Rayo Vallecano executed fairly consistently, unlike Atlético.

Atletico exit pass solution

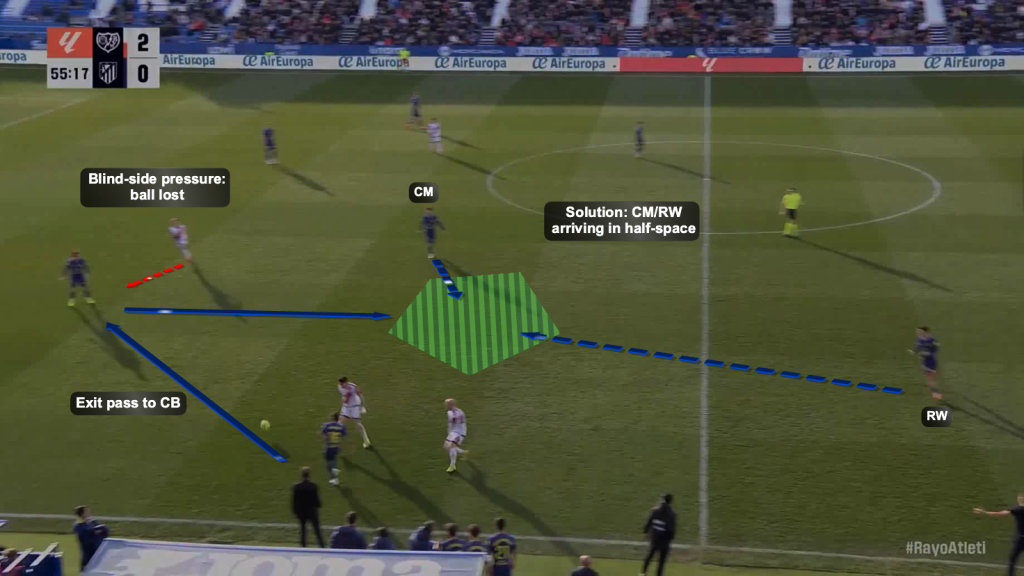
Another example of finding an exit pass to keep possession.

The right-back, pressed by two opponents, plays a back-pass to exit pressure.

As the ball travels to the centre-back, he receives blind-side pressure, which forces him to play on one-touch.

Since no one shows up for the ball, the opponents end up winning possession.

The simple solution here is for either the midfielder or the winger to arrive in the half-space to receive the exit pass.

Using the space in-behind is an area Atlético struggled with.

Through pass selection

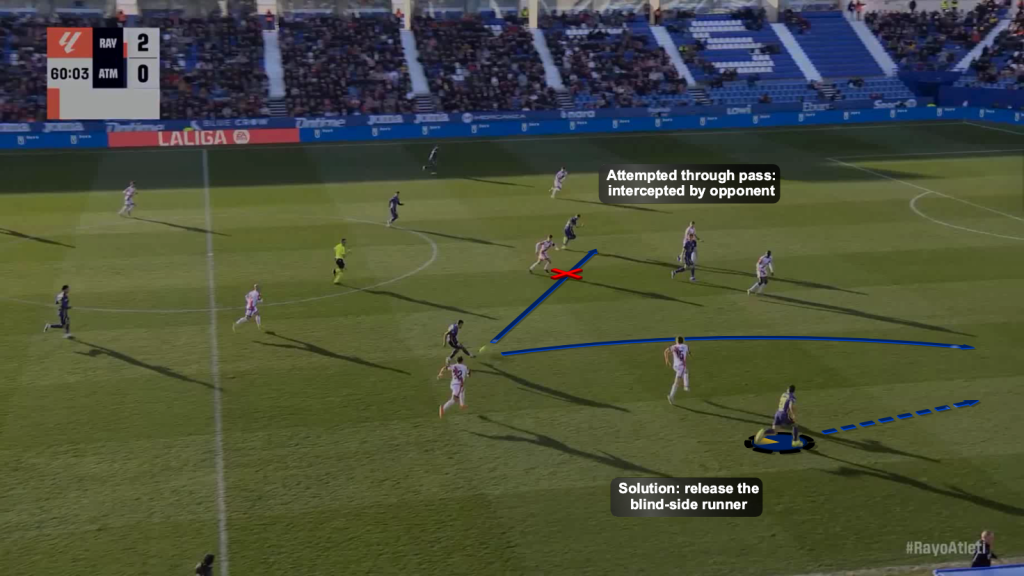
The midfielder attempts to play a through ball diagonally across the field, which is read by an opponent and intercepted.

This stops the Atlético attack and pivots them into defending a transition straight away.

The solution is to choose the right pass: a teammate is making a run in the wide channel on the defender’s blind side.

With the passing lane for the through ball open, it is a good opportunity to find the release.

Wide overload solution

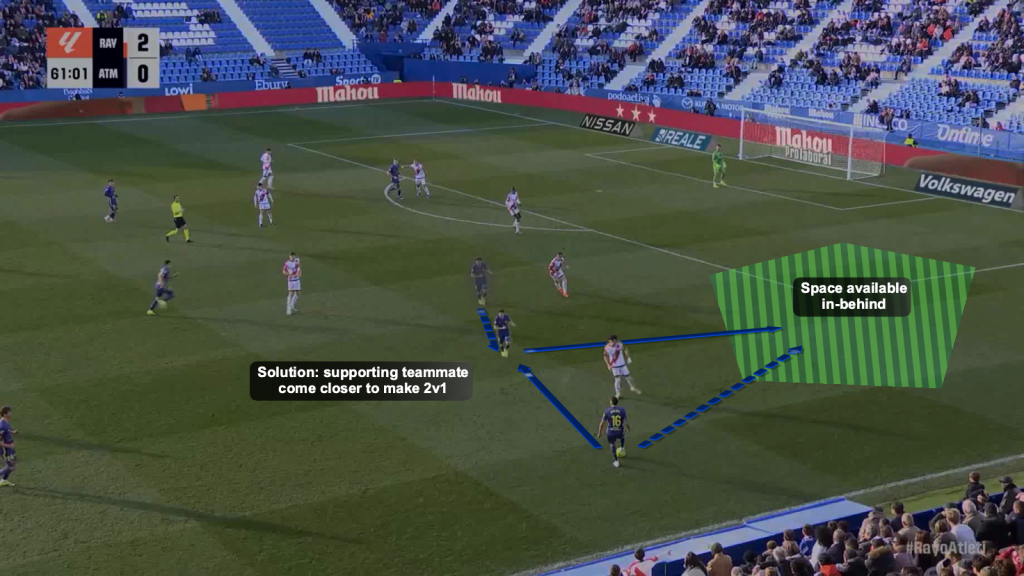
Another example of space in-behind: the winger in a 1v1 can be assisted by the teammate in the half-space.

By coming closer, he can make a 2v1 overload; a simple one-two is enough to exploit the space behind the defence.

Atletico attacking transition solution

The Atlético player makes the wrong choice of pass in a positive transition moment.

The teammate in zone-14 receives the ball; however, every opponent in the vicinity has him tracked.

The solution here is to find the blind-side runner.

There is enough space in-behind to play a chipped pass into his path.

The teammate arriving in zone 14 can act as a decoy.

Conclusion

Rayo Vallecano did not have a lot of ball possession.

However, they utilised the ball well to gain control over the game.

With correct decisions in the defensive phase and finding enough exit passes, they were in a good position to slow the game down when required.

Since they had limited access to the central channel, they found progression through the wide area and sometimes the half-spaces.

Atlético Madrid struggled with consistency even though they had more possession.

Their display on the ball was sub-par as they kept giving it away in tight spaces, owing to their inability to find exit passes.

They laid out a decent pressing trap and a fairly compact mid-block shape, but could not find consistency with progressive passes and penetrative play, even when there were spaces available.

Tags: Atletíco MadridAtlético Madrid FormationAtlético Madrid LineupAtletico Madrid Style Of PlayAtlético Madrid Tactical AnalysisAtletico Madrid TacticsDiego SimeoneDiego Simeone Atlético MadridDiego Simeone FormationDiego Simeone Strengths And WeaknessesDiego Simeone Style Of PlayDiego Simeone Tactical AnalysisDiego Simeone TacticsHow Good Is Iñigo PérezIñigo PérezIñigo Pérez Coaching StyleIñigo Pérez FormationIñigo Pérez Manager StyleIñigo Pérez Rayo VallecanoIñigo Pérez Rayo Vallecano TacticsIñigo Pérez Strengths And WeaknessesIñigo Pérez Style Of PlayIñigo Pérez Tactical AnalysisIñigo Pérez TacticsLa LigaLa Liga Tactical AnalysisLa Liga TacticsRayo VallecanoRayo Vallecano FormationRayo Vallecano LineupRayo Vallecano Style Of PlayRayo Vallecano Tactical AnalysisRayo Vallecano TacticsRayo Vallecano vs Atlético MadridRayo Vallecano vs Atlético Madrid FormationRayo Vallecano vs Atlético Madrid LineupRayo Vallecano vs Atlético Madrid ScoreRayo Vallecano vs Atlético Madrid Tactical AnalysisRayo Vallecano vs Atlético Madrid Tactics
Previous Post

Napoli Vs AS Roma [2–2] – Serie A 2025/2026: Derby Del Sole Drama In The Top-Four Race – Tactical Analysis

Next Post

Wolverhampton Wanderers 2025/2026: Wolves’ Tactical Erosion & A Historically Poor Premier League Campaign – Data Analysis

Next Post
Wolves Decline 20252026

Wolverhampton Wanderers 2025/2026: Wolves' Tactical Erosion & A Historically Poor Premier League Campaign – Data Analysis

  • About Total Football Analysis
  • Contact Total Football Analysis
  • Write For Total Football Analysis
  • Advertise
  • Privacy Policy
  • Cancellation / Refund Policy
  • Resources
  • Terms Of Service

© 2026 Total Football Analysis

No Result
View All Result
  • Football Analysis
    • Data Analysis
    • Formations
      • 2-2-4 Formation
      • 2-3-5 Formation
      • 3-1-4-2 Formation
      • 3-2-2-3 Formation
      • 3-2-4-1 Formation
      • 3-1-6 Formation
      • 3-3-4 Formation
      • 3-4-1-2 Formation
      • 3-4-2-1 Formation
      • 3-4-3 Formation
      • 3-5-1-1 Formation
      • 3-5-2 Formation
      • 4-1-4-1 Formation
      • 4-2-2-2 Formation
      • 4-2-3-1 Formation
      • 4-2-4 Formation
      • 4-3-1-2 Formation
      • 4-3-3 Formation
      • 4-4-2 Formation
      • 4-5-1 Formation
      • 5-3-2 Formation
      • 5-4-1 Formation
      • 6-3-1 Formation
    • Head Coach Analysis
    • Match Analysis
    • Player Analysis
    • Recruitment Analysis
    • Set Piece Analysis
    • Tactical Theory
    • Tactical Preview
    • Team Analysis
    • Training Analysis
    • Tactical Analysis
    • Scouting Report
  • Competition
    • ALL Competitions
    • English Premier League
    • Champions League
    • La Liga
    • Bundesliga
    • Serie A
    • Ligue 1
    • Eredivisie
    • EFL Championship
    • FIFA World Cup 2022
    • WEURO 2022
    • Women’s Super League
    • NWSL
    • Belgian First Division A
    • A-League
    • Liga Profesional de Argentina
    • Austrian Bundesliga
    • Campeonato Brasileiro Série A
    • DFB Pokal
    • 1. HNL
    • Danish Superliga
    • EFL League One
    • EFL League Two
    • FA Cup
    • EFL Cup
    • Indian Super League
    • K-League
    • J1 League
    • Liga MX
    • Copa América 2021
    • Copa del Rey
    • MLS
    • Eliteserien
    • Euro 2020
    • Primeira Liga
    • Scottish Premiership
    • Allsvenskan
    • Europa League
    • UEFA Nations League
    • Liga AUF Uruguaya
  • Coaches
    • All Coaches
    • Alfred Schreuder
    • Ange Postecoglou
    • Antonio Conte
    • Arne Slot
    • Bo Svensson
    • Brendan Rodgers
    • Bruno Lage
    • Carlo Ancelotti
    • Christophe Galtier
    • Claude Puel
    • Claudio Ranieri
    • David Moyes
    • Dean Smith
    • Diego Simeone
    • Domenico Tedesco
    • Frank Lampard
    • Eddie Howe
    • Edin Terzić
    • Emma Hayes
    • Erik ten Hag
    • Ernesto Valverde
    • Gennaro Gattuso
    • Gerardo Seoane
    • Gian Piero Gasperini
    • Giovanni van Bronckhorst
    • Graham Potter
    • Igor Tudor
    • Imanol Alguacil
    • Jesse Marsch
    • Jonas Eidevall
    • Jorge Sampaoli
    • José Bordalás
    • José Mourinho
    • Julen Lopetegui
    • Julian Nagelsmann
    • Julien Stéphan
    • Jürgen Klopp
    • Luciano Spalletti
    • Lucien Favre
    • Manuel Pellegrini
    • Marcelo Bielsa
    • Marco Rose
    • Marco Silva
    • Massimiliano Allegri
    • Mauricio Pochettino
    • Maurizio Sarri
    • Mikel Arteta
    • Niko Kovač
    • Nuno Espírito Santo
    • Oliver Glasner
    • Patrick Vieira
    • Paulo Fonseca
    • Pep Guardiola
    • Peter Bosz
    • Rafa Benítez
    • Ralf Rangnick
    • Ralph Hasenhüttl
    • Roger Schmidt
    • Roy Hodgson
    • Sean Dyche
    • Sérgio Conceição
    • Simone Inzaghi
    • Sonia Bompastor
    • Stefano Pioli
    • Steffen Baumgart
    • Steven Gerrard
    • Thiago Motta
    • Thomas Frank
    • Thomas Tuchel
    • Unai Emery
    • Vincenzo Italiano
    • Xavi
  • Teams
    • ALL Teams
    • AC Milan
    • Ajax Amsterdam
    • Arsenal
    • AS Monaco FC
    • Atalanta
    • Atlético Madrid
    • FC Barcelona
    • FC Bayern Munich
    • Borussia Dortmund
    • Celtic FC
    • Chelsea FC
    • Everton F.C.
    • Inter Milan
    • Juventus F.C.
    • Leeds United F.C.
    • Liverpool FC
    • Manchester City
    • Manchester United FC
    • Paris Saint-Germain
    • Rangers FC
    • RB Leipzig
    • Real Madrid CF
    • Tottenham Hotspur
    • West Ham United
  • Players
    • ALL Players
    • Alisson Becker
    • Bukayo Saka
    • Erling Haaland
    • Harry Kane
    • Jack Grealish
    • John Stones
    • Julián Alvarez
    • Kalvin Phillips
    • Kevin De Bruyne
    • Kyle Walker
    • Kylian Mbappé
    • Lamine Yamal
    • Lionel Messi
    • Luis Díaz
    • Mohamed Salah
    • Phil Foden
    • Virgil Van Dijk
  • Contact
  • Write For TFA
  • Login

© 2026 Total Football Analysis