Bayern Munich defeated Borussia Dortmund 2-1 in matchday 7 of the 2025/2026 edition of the Bundesliga.
Both sides were unbeaten going into the game.
Although it was a slender victory, the chances created by Vincent Kompany’s side narrate a different story.
The Bavarians had a near-perfect first-half display.
Harry Kane, who played right behind the striker in attacking midfield, influenced his team’s game to a large extent.
The Englishman had a 90% accuracy in long passes, made five recoveries, won 10 duels, and also scored a crucial goal in the process.
This was Kane’s 12th league goal and the 22nd goal in all competitions for club and country this season in just 15 games.
He scores consistently, and his contribution in and out of possession has been significant this season.
Through this tactical analysis, we look at how Harry Kane’s role as an attacking midfielder helps Bayern Munich and how the Bavarians dominated the first half against Dortmund.
Bayern Munich Vs Borussia Dortmund Lineups & Formations
Let us look at how Vincent Kompany and Niko Kovač fielded their squads.

Bayern Munich Lineup
Bayern played in a 4-2-3-1 formation.
In goal was skipper Manuel Neuer, behind a back four of Sacha Boey (right-back), Dayot Upamecano (right centre-back), Jonathan Tah (left centre-back), and Konrad Laimer (left-back).
Aleksander Pavlović and Joshua Kimmich were the pivots.
The front four consisted of Luis Díaz (left-winger), Harry Kane (centre-attacking midfielder), Michael Olise (right-winger), and Nicolas Jackson (striker).
Borussia Dortmund Lineup
Dortmund played in a 3-5-2 formation.
Gregor Kobel started between the sticks.
The back three was Niklas Süle (right centre-back), Waldemar Anton (central centre-back), and captain Nico Schlotterbeck (left centre-back).
Julian Ryerson (right) and Daniel Svensson (left) were the wing-backs.
The midfield three comprised Marcel Sabitzer, Pascal Groß, and Felix Nmecha.
The front two were Karim Adeyemi and Serhou Guirassy.
Bayern Munich Attacking Tactics
In this section, we will look at the attacking features of Bayern Munich during the first half.
Bayern Munich Build-Up & Progression
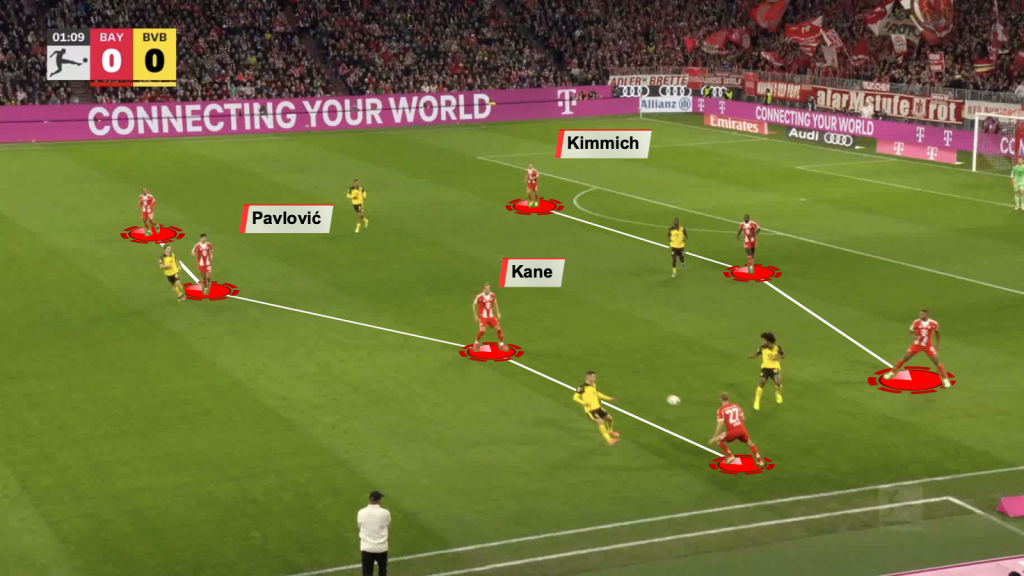
Bayern were seen playing out from the back with a back three, with Kimmich dropping alongside the centre-backs.
This left enough space in the midfield for Kane to drop alongside Pavlović.
As the full-backs pushed up, the formation became a 3-4-3 quite regularly.
The full-backs stayed wide, hugging the touchline in the defensive third.
Harry Kane frequently dropped in the right half-space, receiving from Laimer (left-back) to either play a diagonal switch or play short vertical passes.
An example is Kane drops into the half-space to open play and progress the ball.
The Englishman’s ability to drop deep and operate as a midfielder helped Bayern control the majority of ball possession (75%) in the first half.
They played 339 accurate passes within that period.
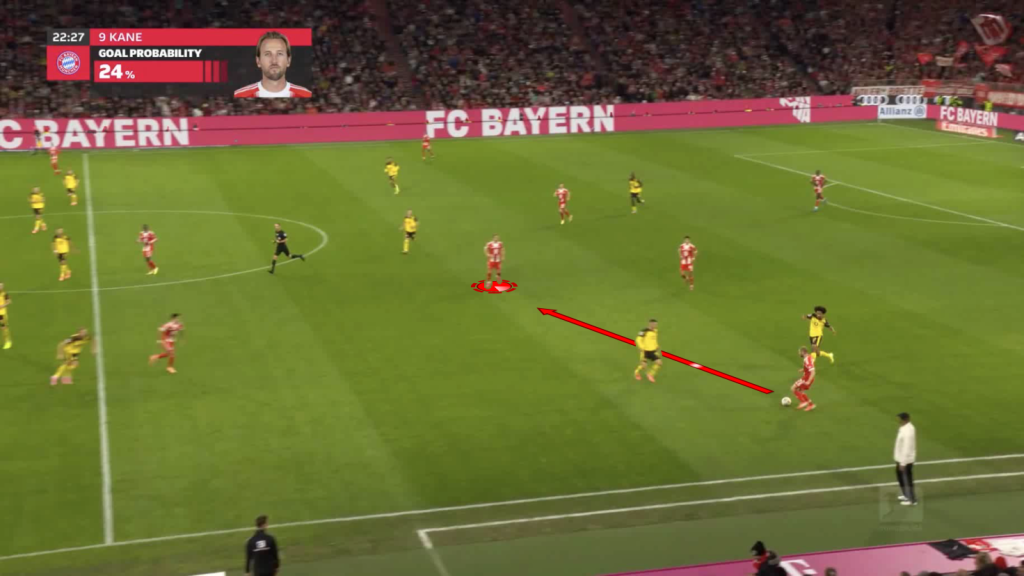
Kane displayed adeptness in picking out vertical passes to break Dortmund’s lines of pressure.
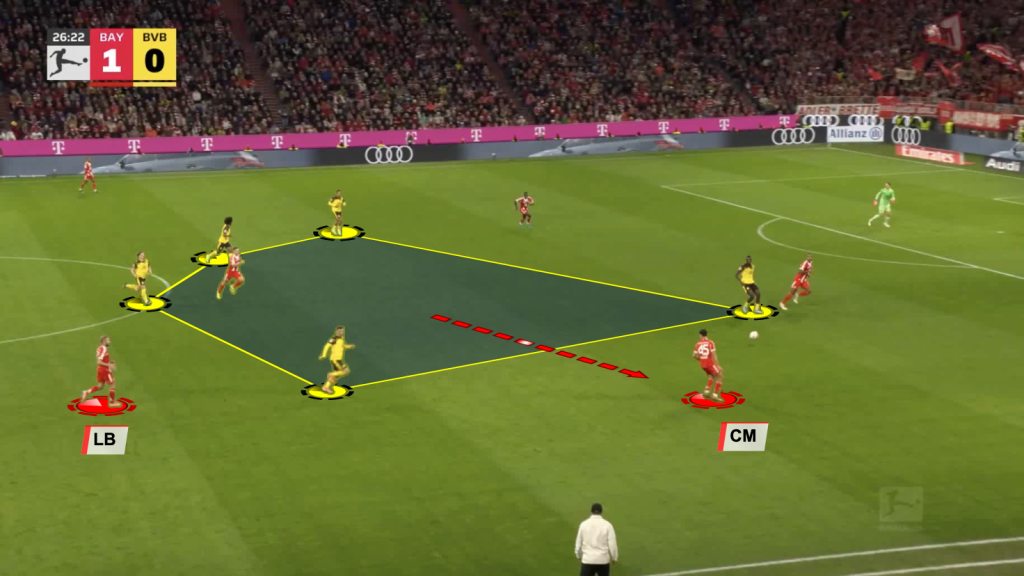
In this image, Laimer starts making a half-space run into the midfield third.
Recognising that there is space behind Dortmund’s second line of press, Kane threads the pass to the Austrian.
In this particular situation, the English striker is surrounded by three opponents.
He manages to escape pressure and start an attack from the defensive third.
This is an invaluable aspect of Kane’s play; it is also one reason Kompany trusts him as an attacking midfielder.
In build-up moments when the opponents closed down all nearby options, Bayern were proficient enough to find the free player.
Here, Tah does not have any short options available while being under pressure himself.
He spots Boey (right-back) offering width on the other side, and finds him with an aerial switch.
Once the full-back gets on the ball, he gets enough space and time to carry the ball forward.
This means that in situations where a straightforward vertical pass is unavailable, playing sideways can help.
The pivots dropping and peeling wide were common actions to carry out build-up play.
Kimmich usually positioned himself closer and in line with the centre-backs.
Meanwhile, Pavlović preferred to peel wide in place of a full-back.
Meanwhile, the full-back could invert and operate in the half-space.
In the example above, Laimer is in the half-space and Pavlović is in a wide position to receive from Tah (centre-back).
Dropping outside the opponent structure sometimes becomes necessary for the pivots, as there is more pressure in the central zone.
Shifting play is not always possible through long passes.
On most occasions, it is imperative to play short to attract opponents so that the free player on the far side gets more time and space to make an impact.
Here, Pavlović recognised early the potential space opening up on the other side.
He starts by playing bounce passes with the teammates in his vicinity.
As he gradually plays it centrally, Bayern shift the play to the far side winger (Olise).
As Bayern started getting more space in the build-up, they were able to progress closer to the midfield third.
This is when the full-backs (especially Laimer) start inverting to give the centre-back more than one vertical option.

Here, Laimer operates in the half-space, leaving the passing lane open to Luis Díaz.
This was the trend on the left side, as Díaz prefers to hug the touchline.
This positioning opens multiple passing angles for the centre-backs.
The wide players linked up to exploit space between the lines.
Here, Laimer plays a give-and-go with Díaz.
Through this, Bayern access the space between BVB’s midfielders and defenders.
During the first half, the visitors lacked the concentration to maintain horizontal compactness.
This was exploited by the Bavarians.
Harry Kane was a significant medium of progression for Bayern.
This was visible through how much of the ball he saw.
In the midfield third, he dropped into pockets at the right time to avoid pressure while receiving.
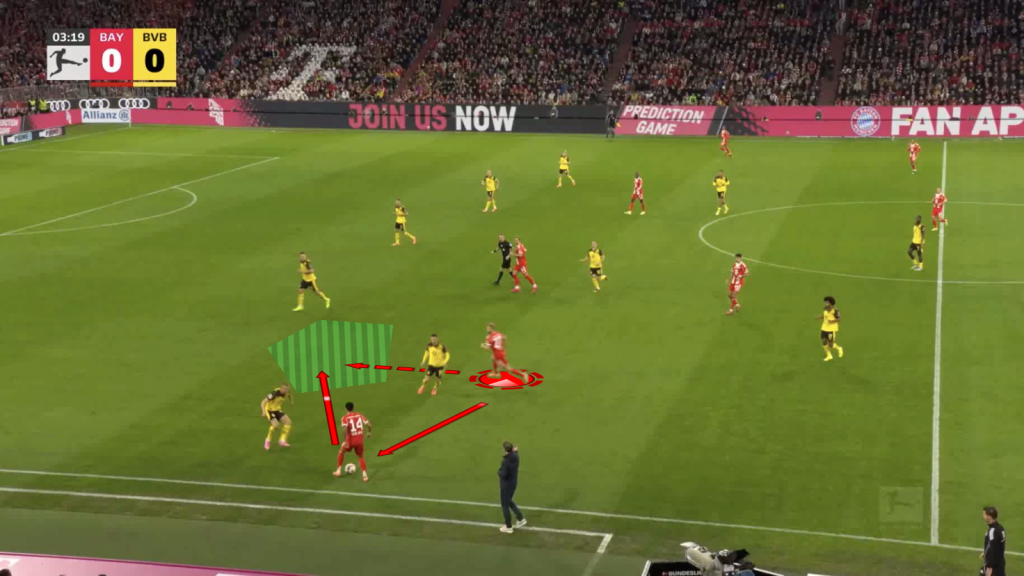
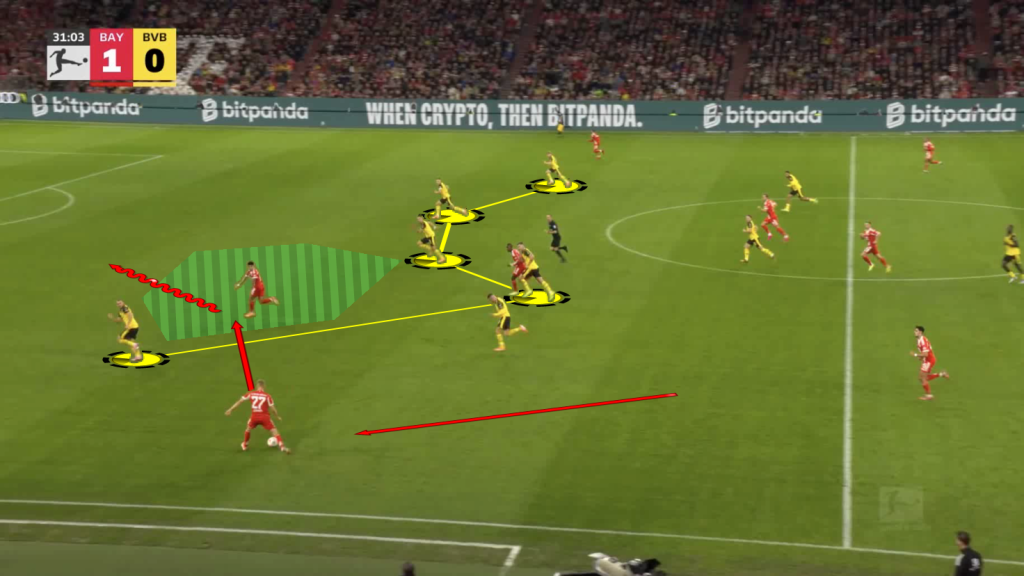
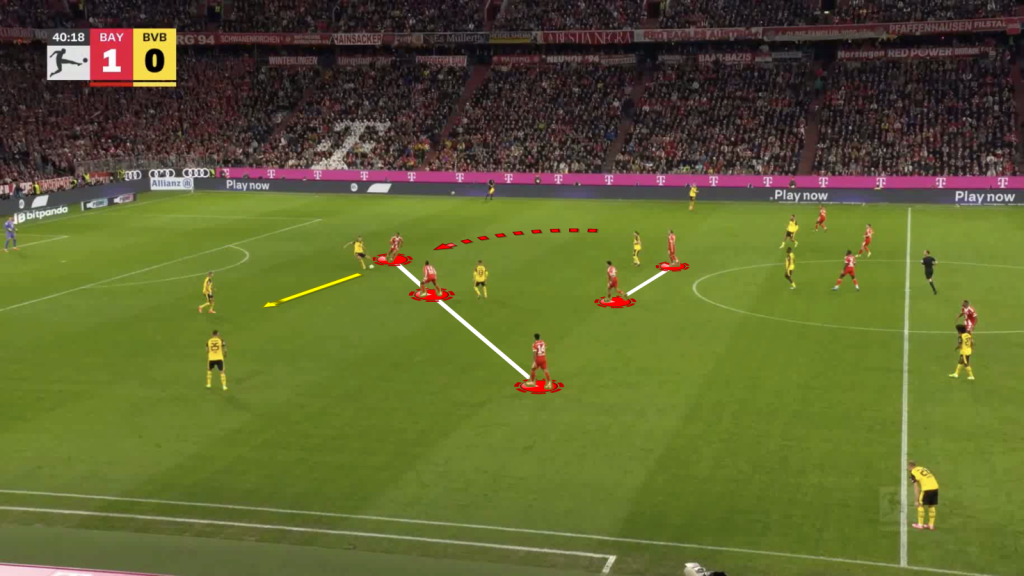
Here is an example: Olise is under pressure and looking to play an exit pass.
All the teammates in the vicinity are under pressure, except Kane; the Englishman receives to release pressure, thereby aiding ball possession and eventually progression.
Harry Kane Relationship With Striker
While it is characteristic of Harry Kane to drop deep and get involved in the build-up and progression, it is also important to see how his relationship with the striker (Nicolas Jackson) influenced Bayern’s attacks.
When Jackson dropped to receive, Kane made sure to occupy the striker’s spot.

Here, Jackson peels out of position to receive in the half-space.
Meanwhile, Kane starts moving into the space left by him.
This also helps the striker as the centre-back will hesitate to step up because of Kane potentially running in-behind.
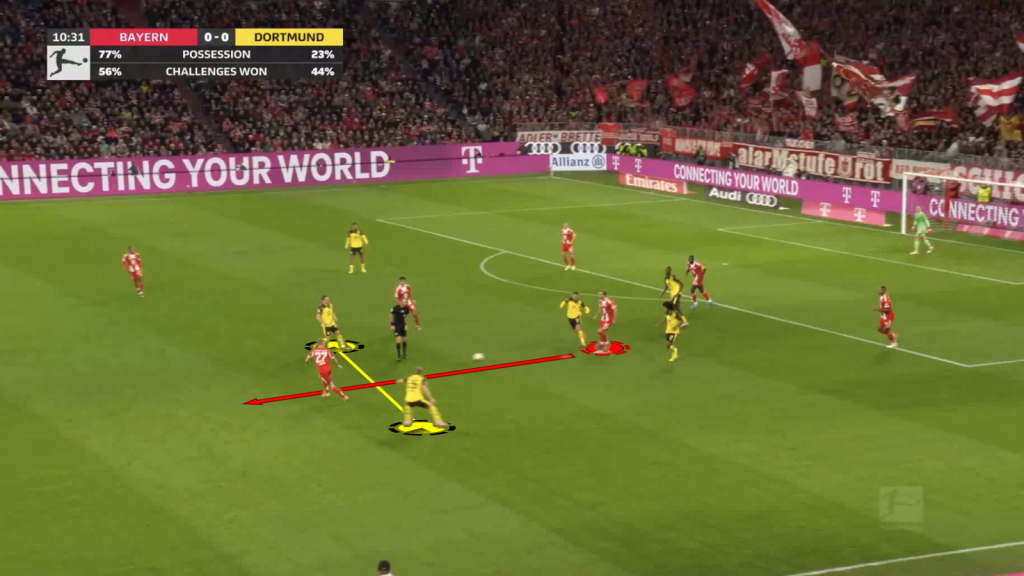
Due to these exchanges, Jackson was even seen dropping deep into his own half.
There were situations when he was followed, which indirectly created space for the hosts.
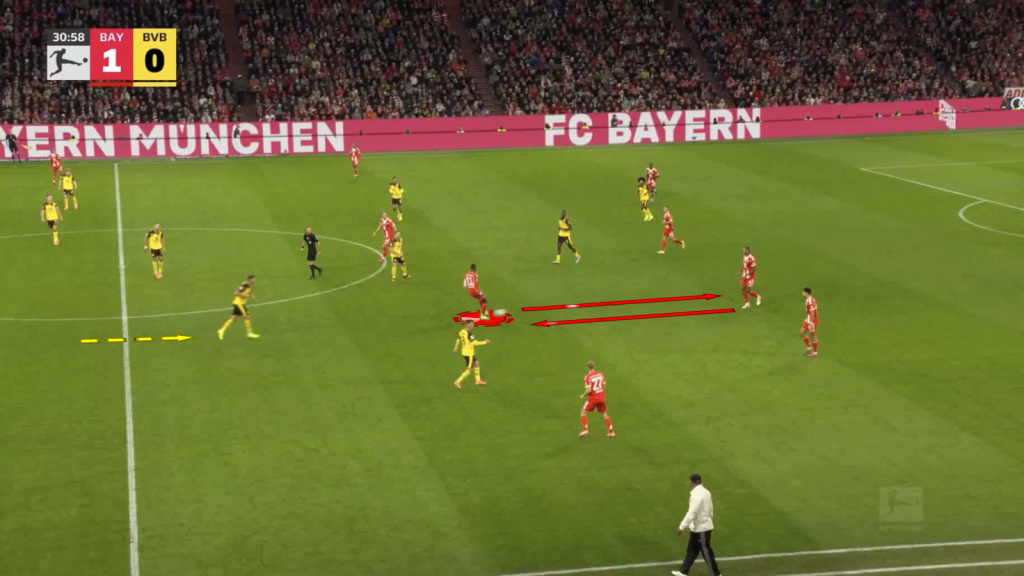
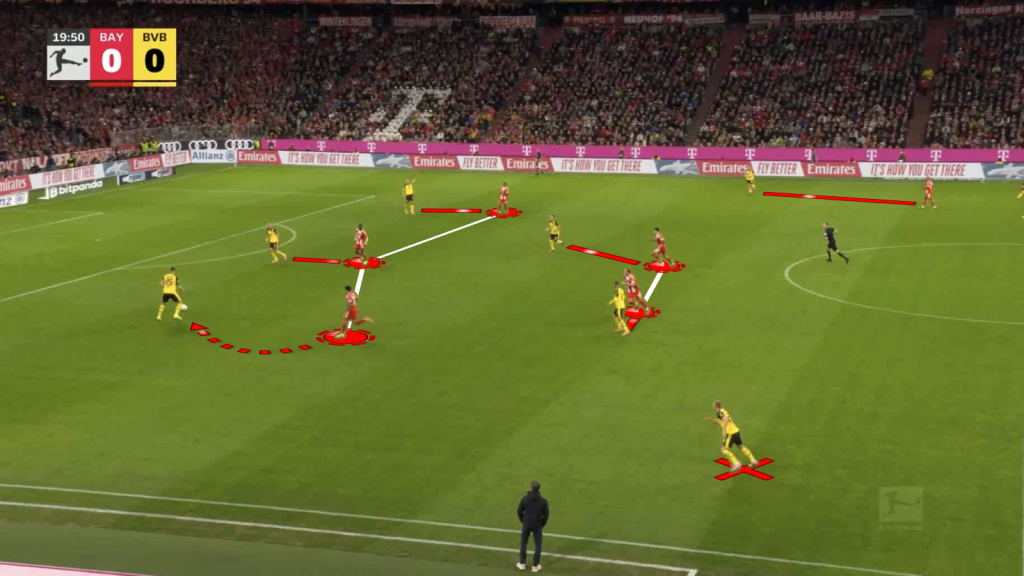
Here, the Senegalese drops to play a bounce pass.
As he is followed by a Dortmund defender, space opens up for a Bayern attack.
Once the ball is played to Laimer, he finds Díaz, making a run in-behind.
The space left by the defender who followed Jackson is evident in this image.
With enough pace and quick execution among their ranks, Bayern manage to inflict pain on their opponents in such moments.
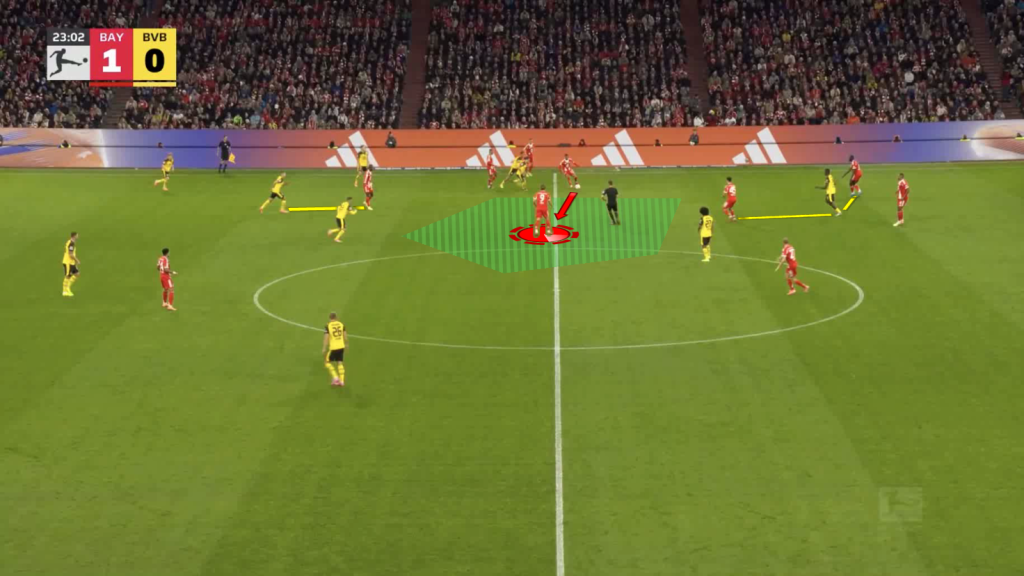
In situations when Jackson pinned a defender, Kane received between the lines, especially in the attacking third.
Here, Kane receives between the BVB midfielders and defenders.
Meanwhile, Jackson has positioned himself alongside a defender, fixing the opponent’s backline.
This grants Kane enough space to receive in that space.
The same happens the other way around. Jackson drops to receive between lines.
Meanwhile, Kane lurks nearby, fixing a defender.
Final Third & Box Entries
Bayern were quick to capitalise on any opportunity to play vertically, especially passes in-behind.
This included passes from the defensive third and the midfield third.
Here is an example: Kane receives inside his own defensive third.
With little pressure from the opponents, he finds Díaz, who makes a run behind the Dortmund backline.
Following is another example:
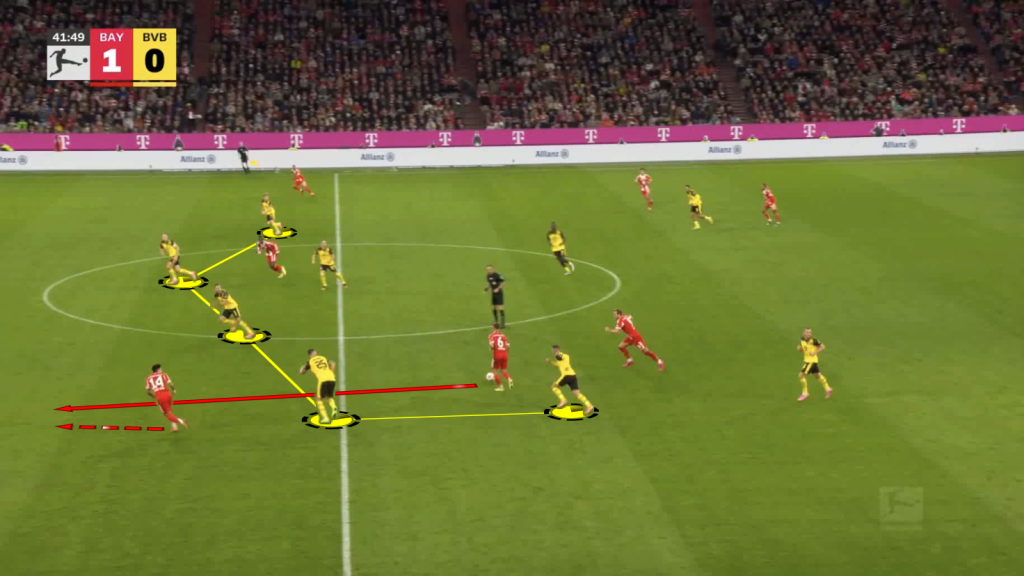
Kimmich receives in the midfield third with the BVB backline unorganised.
He plays a through pass to Luis Díaz.
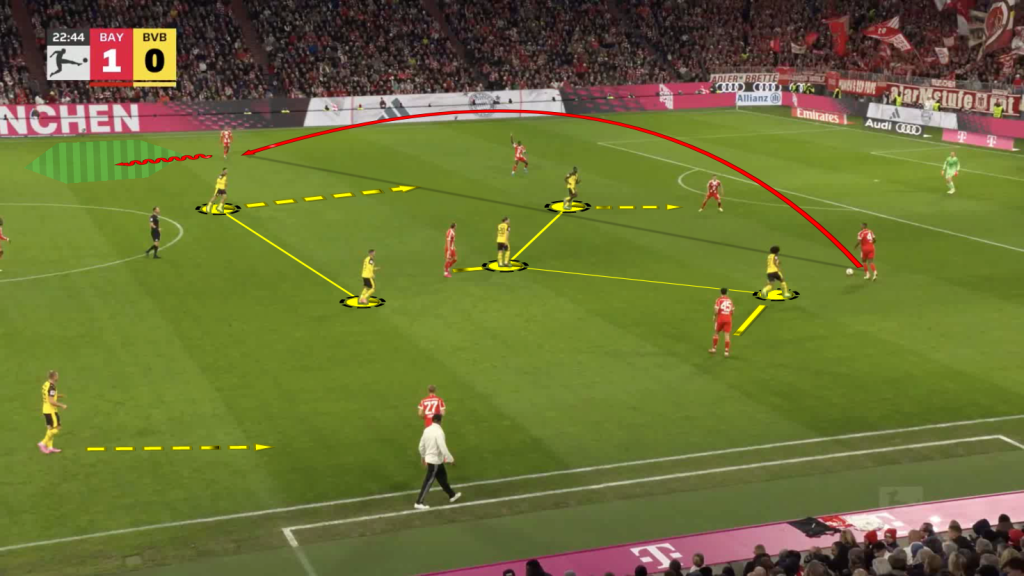
Dortmund struggled to keep their defensive shape in transition during the first half.
The gaps between the three centre-backs and sometimes between the centre-backs and the wing-backs were exposed multiple times.
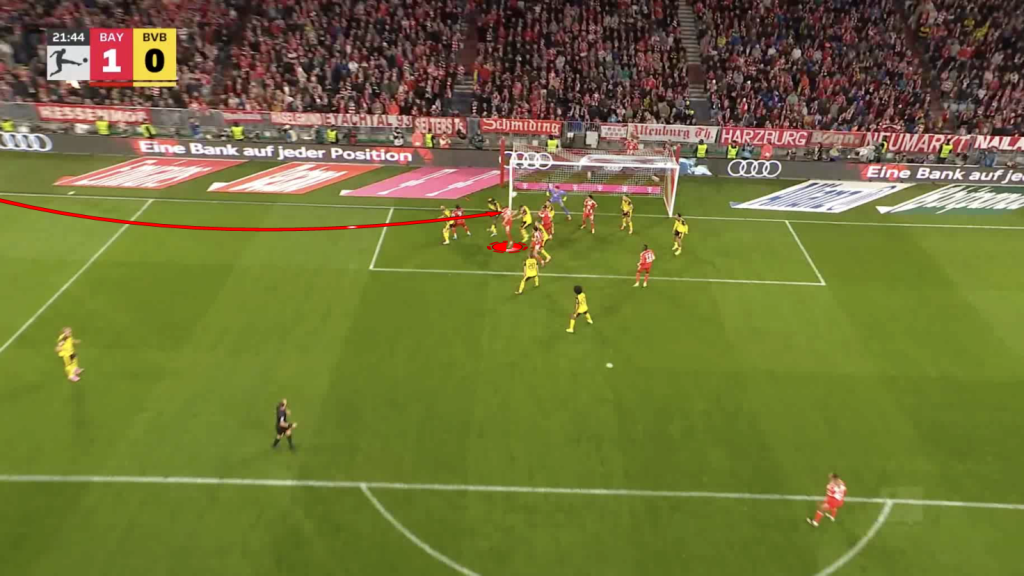
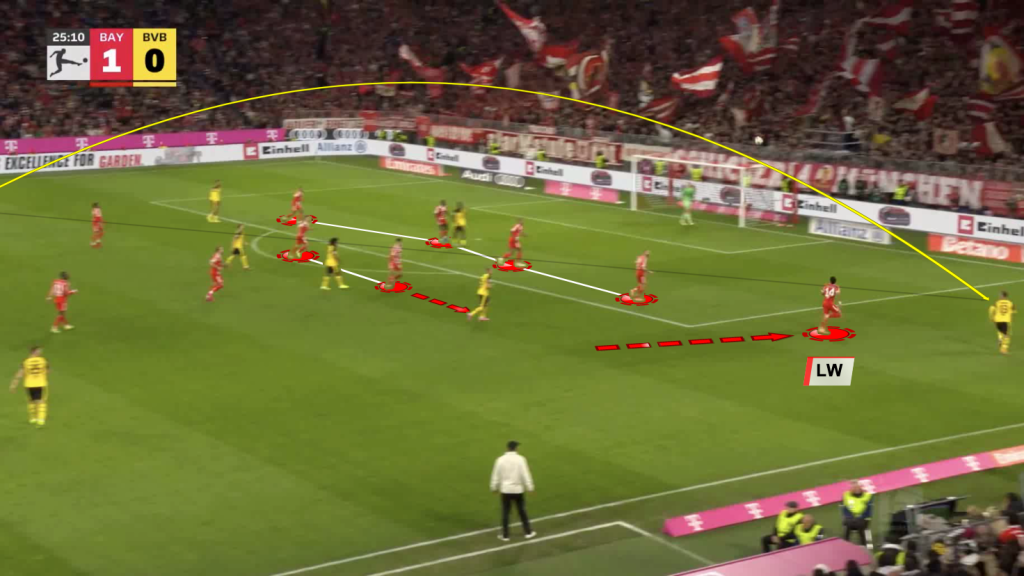
This is the goal scored by Kane.
The corner was a result of one of the passes behind the Dortmund backline.
Kane attacked the near post, positioning himself between two opponents.
The goal was an apt reflection of Bayern’s attacking momentum.
Bayern Munich Defending Tactics
In this section, we will look at the defensive features of Bayern Munich during the first half.
Defending In The Opponent Half
Bayern pressed with their front three as the first line of pressure.
The second line often had Kane and Pavlović, cutting the passes to the BVB pivots.
The Bayern wingers also attempted to curve their pressing runs to prevent Dortmund from making exit passes.
In the image above, Díaz curves his run to keep Dortmund’s right wing-back in his cover shadow.
This forces the right centre-back to go infield or backwards.
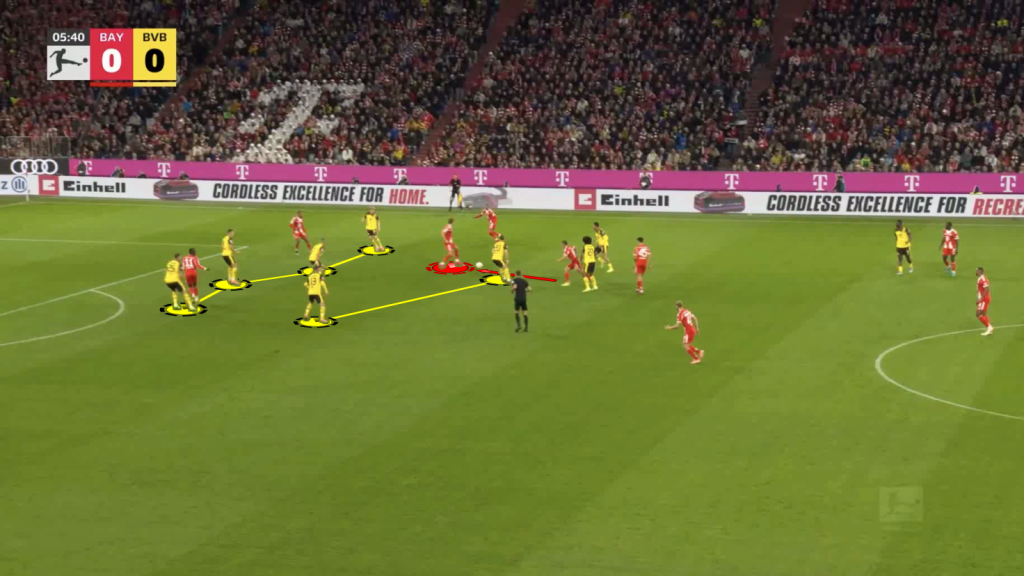
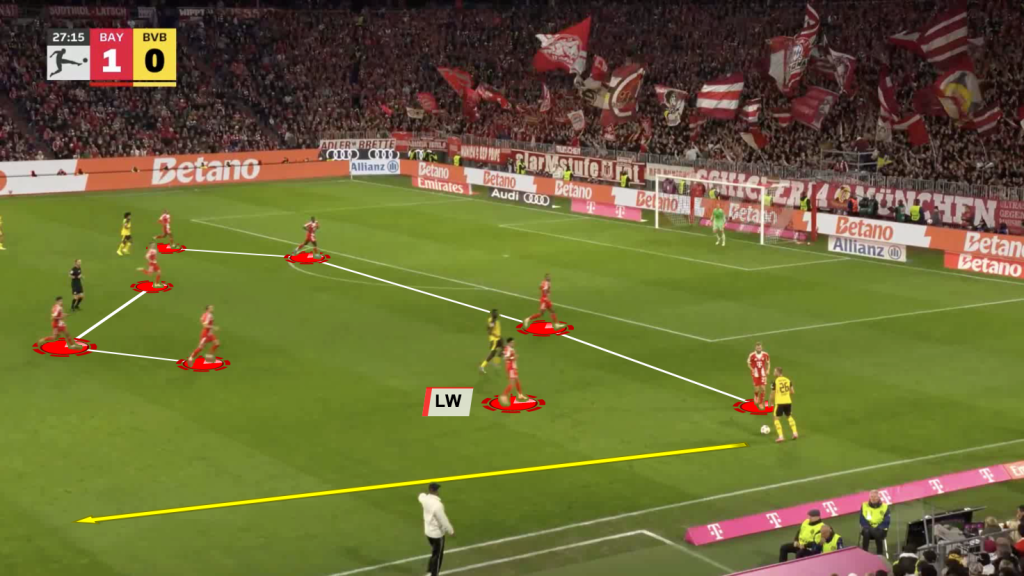
Here is another example: The Bayern front three press in a staggered shape.
Olise curves his run while pressing BVB’s left centre-back, thus cutting the pass to the left wing-back.
The opponent is forced to play to his right, which puts Bayern in a better position to press.
Dortmund eventually play long, with Bayern winning possession.
Even if Dortmund bypassed Bayern’s initial waves of pressure, the Bavarians showed determination to put pressure on the ball to either force the opponent backwards or win the ball for a positive transition.
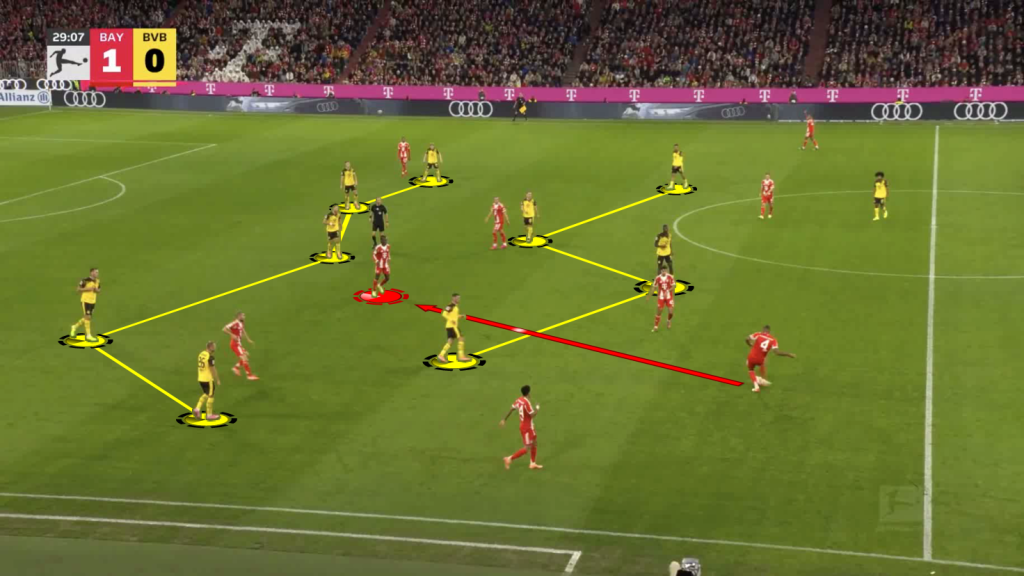
In the example above, BVB’s centre-back plays a pass to the right wing-back, taking five Bayern players out of the game.
However, Laimer is the first one to apply pressure, which is followed by Kane and Díaz doing the same.
Bayern launch a quick counterattack, which results in a corner for them.
Defending In Own Half
Bayern were disciplined and showcased a work-rate to defend with numbers.
Here, a Dortmund attacker has the ball in the wide area.
As Laimer engages, he is covered by his left-centre back (Tah) and left-winger (Díaz).
The opponent in the half-space can be dealt with by either of the covering players.
Meanwhile, the midfield three is also visible in position to defend any cutbacks.
Here is another example: The Dortmund attacker receives a diagonal switch.
Díaz tracks back to engage with him in the wide area.
This helps the back four stay compact and defend the space inside the penalty area.
The block of 4-2 is visible, which is effective in dealing with the immediate crossing threat.
In situations when Dortmund attempted to overload the wide area, Bayern made sure to match the number.
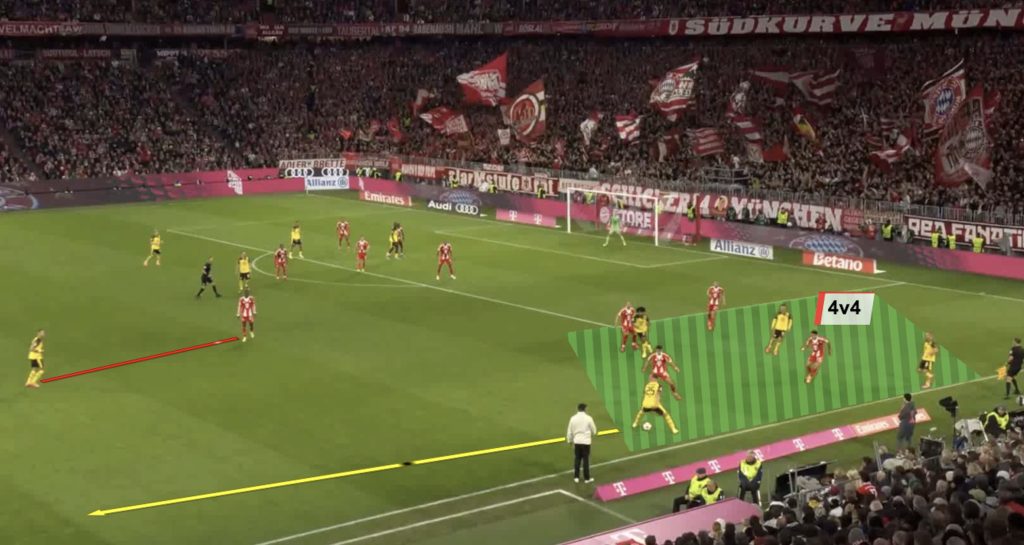
Here, we can see a 4-v-4 situation in the wide area.
With so much crowd, it is difficult for the attacking team to progress down the same flank.
Since all the sideways passes are also blocked off, the only option for the ball-carrier is to play it all the way back.
Conclusion
Bayern Munich controlled maximum aspects of the game during the first half against Borussia Dortmund.
They were patient in possession, had variation in their attack, and were effective in keeping possession.
The movement, positioning, decision-making, and technical and physical actions from Harry Kane caused a significant impact on the way Bayern played during the first half.
While defending, Bayern displayed commendable discipline and work rate to cover spaces and defend with numbers.
They were persistent in getting into a block of 4-2 or 4-3 whenever Dortmund managed to reach the attacking third.
While pressing high, the Bayern wingers curved their runs to force the opponent into congested areas and win the ball.