Not too long ago, four-man midfields were the norm.
The classic 4-4-2 ruled the global football scene.
The only question was whether the team would play a flat midfield or with a diamond.
With that diamond, did they play narrow or wide?
As systems evolved, the four-man midfield gave way to the three-man midfield.
It gave teams a numeric superiority centrally while still giving them a high and wide presence on the wings.
Trends come and go, and the midfield four is back in fashion.
While the 4-4-2 is still utilised, it’s also common to see a four-man midfield used with the three-man backline.
With a four-man midfield back in the mix, this tactical analysis will examine the roles of the central midfielders.
We’ll examine teams that position either two or all four midfielders centrally.
For our examples of two centre midfielders, this analysis will investigate the usage of a double pivot, as well as the usage of a #6 and a #8.
In terms of a setup with four central mids, we’ll look at diamond and box midfields, showing what the teams are trying to achieve and how the player roles fit into the bigger picture.
One quick note, as you work your way through this analysis, the only players with circles beneath them are the central midfielders.
They’re our focus group, so the images are designed to help you quickly identify them and look at them in relation to the bigger picture.
Double-pivot
Let’s start with the double pivot.
When I use the term’ double-pivot,’ I mean a system that features two deep-lying central midfielders.
From a positional sense, they occupy deeper areas in the pitch, often prioritizing their connection with the centre-backs.
While one of the two may occasionally venture forward, the priorities are defensive security and supporting the attack from a deeper position.
When teams went up with a double-pivot, one of the top priorities is preventing opponents from accessing the centre of the pitch, both in open attacks and during counterattacks.
With numbers centrally, they are best positioned to contest entry passes to that part of the pitch, allowing the backline to limit the defensive cues they have to focus on.
A strong central presence is designed to funnel opposition into the wings, slowing their attack and allowing the team out of possession to get numbers behind the ball.
When you think of four-man midfields, the first team that likely comes to mind is Atlético Madrid.
Diego Simeone has made a name for himself with his two banks of four, often starting in a mid-block but then dropping numbers behind the ball in a low block if necessary.
The structure remains intact when they are in possession.
The two deep-lying central midfielders protect his two centre-backs and position the team to defend against counterattacks.
Our first image shows the close connection that Geoffrey Kondogbia and Héctor Herrera maintain with the backline.
As Celta de Vigo counterattack, the two #6s are in control of the midfield, at least in the central channel.
They’re 2v2 in this instance, freeing the left mid to push into the wings to pressure the ball carrier.
More importantly, it leaves only two players for Atlético Madrid’s back four to account for.
From a numeric standpoint, the positional discipline of the double-pivot has Atlético well-position to deal with the counterattack, especially with any passes or crosses that come centrally in the final third.

Equally important, their strong central presence allows the wide midfielders and outside-backs to push into more advanced parts of the pitch.
Our second image shows that connectivity as Atlético looked to connect their lines.
Positioned between the Celta midfield and forward lines, the double pivot offers support to the backline as they try to advance the ball, while also initiating the process of engaging the midfield line.
As the two holding midfielders receive the ball between the lines, they’re the option to operate as deep-lying playmakers or drive at the opposition backline, pulling them out of their shape or pinning them before playing beyond.
As the side moves into the attacking half of the pitch and matches up against a low block, the deeper positions of the two holding midfielders allow them to act as deep-lying playmakers, facilitating play around, through or over the press.
This is exactly how Atlético scored their second goal against Celta.
With Kondogbia positioned between the Celta midfield and forward lines, he had time to pick out the run of Renan Lodi from the wing.

One key note from that last image is the security and freedom afforded by the double-pivot.
With two ball-winners in midfield, Atlético had the freedom to push their wide midfielders high into the half-space, creating space for the two outside backs to move into.
That gave Atlético more numbers centrally.
They utilise those numbers effectively, having the forwards check into midfield, which then creates space for Lodi to run behind the line and score his goal.
Working our way backwards, our final image in the sequence illustrates how the double pivot can positively impact the buildup.
Here, we have Kondogbia and Herrera both moving into the left half-space.
Their positioning creates numeric superiority, cueing Jan Oblak to play into that part of the pitch.

The double-pivot offers tremendous security against opposition attacks, both in open play and counterattacks.
It’s common to see two ball winners in these roles, but you’ll also find the pairing of an elite ball winner with an elite ball progressor.
For example, Real Madrid doesn’t often play with a midfield four, but when they do, you’ll typically find Casemiro and Toni Kroos running the centre of the pitch.
Double-pivots often signal an emphasis on progression through the wings.
But not all four-man midfields are created equal.
Next up, we have a similar setup with four players in a flat midfield, but the key difference is in the way the second central midfielder operates.
6 and 8
There are still two central midfielders in this section, but with different tactical intent.
Rather than playing with two ball-winning defensive midfielders, a growing trend in the game is a four-man midfield with one of the central midfielders playing a traditional number six role and the other as more of an eight.
That #6 profile is instantly identifiable.
It’s a player like Manchester City‘s Rodri or Sporting Clube’s João Palhinha.
Their defensive talent allows their midfield pairing, often an excellent ball progressor, to push into more advanced pockets of space as play develops.
Let’s start with the in-possession tactics, first with the buildup, then moving higher up the pitch.
As Sporting Clube build out of the back, their 3-4-3 is immediately identifiable.
This example comes from their 2020/21 title-winning campaign.
Matheus Nunes and Daniel Bragança are the two central midfielders.
They’re in line with the two wingbacks as the centre-backs initiate the build-out.

One interesting note here is that when two central midfielders are man-marked, they’re free to move higher up the pitch while the centreback, Sebastian Coates, pushes into midfield as a de facto #6, stepping into midfield during build-outs and pressuring entry passes between the lines.
Regardless, the structure gives Sporting a 3-2 at the back, providing central coverage against counterattacks and drawing the opposition centrally, thereby creating space to attack through the wings.
Once Sporting progresses into the second phase of the attack, that’s where we see our #8 come alive.
Nunes starts the sequence with a positional advantage on his opponent, getting to his opponent’s goal-side shoulder before bursting into the half-space with the diagonal run.
Playing off the width offered by his right midfielder and the height of his forwards, Nunes does well to disguise his run between the lines and dismark from his opponent.

Interpreting spatial relations and understanding how to create space are key talents of our #8s.
That spatial orientation enables him to align his actions with those of his central partner.
Bayern Munich’s match against RB Leipzig serves as a perfect example.
We’re now in the second phase of the attack as we move to the Bayern example.
Joshua Kimmich has moved into the right half-space to support possession, giving the Bavarians a numeric superiority.
Meanwhile, Jamal Musiala, his #8, has taken up a high position in the central channel.
As Leipzig attempts to seal Bayern on the wing, Musiala has taken up a dangerous position in Zone 14.
Since Bayern is one player ahead of the ball, they are still well-positioned to play out of the Leipzig press, sending the outlet pass to their central playmaker.
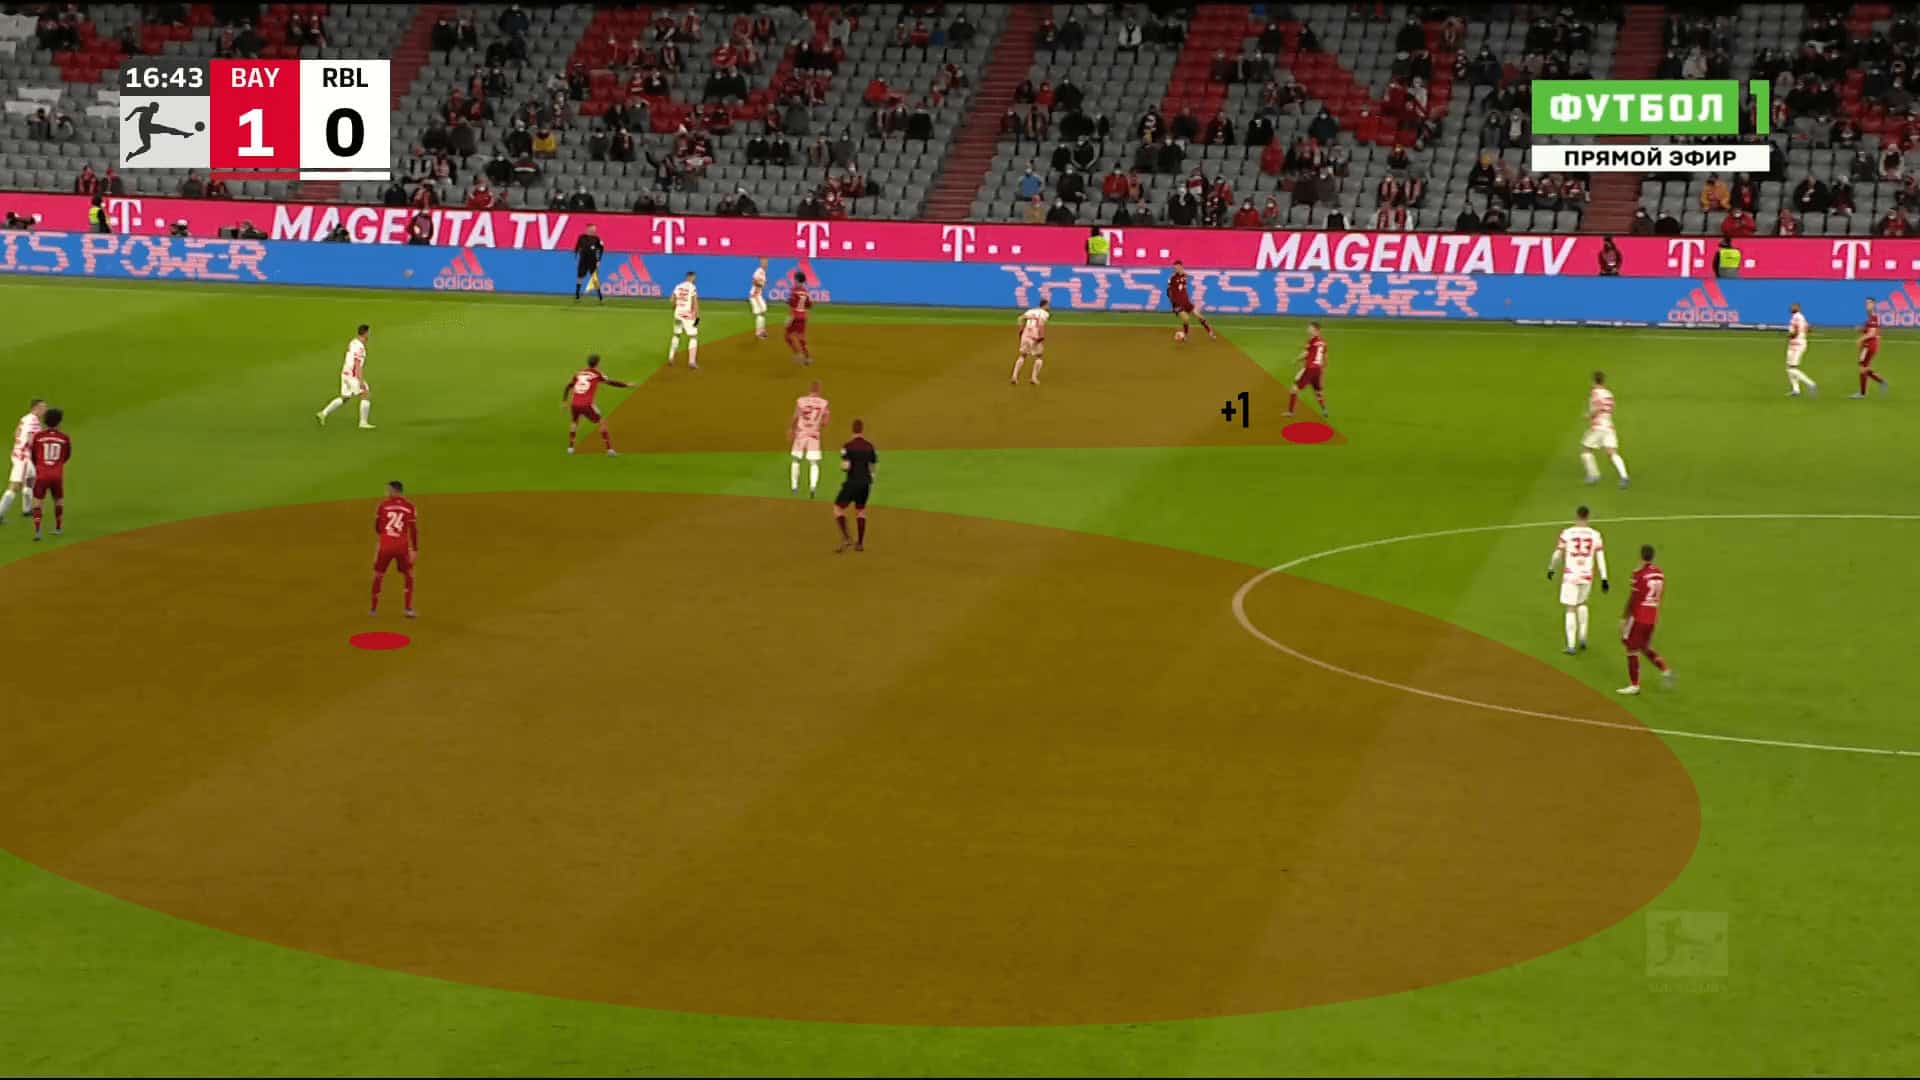
Another key component of Musiala’s positioning is that, should Bayern lose the ball, it keeps his recovery on a straight line, maximizing the efficiency of his recovery run.
Meanwhile, Kimmich is well-positioned to counter-press in the event of a loss.
As these teams push higher up the pitch, preparing to attack the box, the #6 will remain in a deeper position while the #8 looks for opportunities to advance into a support position.
Returning to a Sporting example, as they attack the box, they enter from the wing and have two forwards driving the Marítimo backline towards their six-yard box.
That’s when Nunes reads the cue to make his run to the penalty spot.

The physical and intellectual qualities of the #8 are incredibly important.
Shuttling between his #6’s shoulder and running behind the opposition line requires excellent endurance as well as the tactical intelligence to pick his spots well.
Nunes has recently earned the praise of Manchester City’s Pep Guardiola for the quality it has in this box-to-box role.
It’s highly demanding, but the support underneath the forward line and late runs from deep positions are so difficult to track.
When done well, the #8 role can be a game-changer.
The understanding and cooperation of the forwards is certainly necessary as well.
If attacking support is needed in midfield, one of the forwards drops in between the lines.
They can also create a 3-man midfield with positional rotations to create space higher up the pitch.
When Nunes makes his runs behind the backline, it’s typically in response to one of the forwards dropping in the midfield.
When that happens, the forward must find the balance between pushing higher up the pitch and assuming the responsibilities of the positional rotation.
If possession is lost, the forward must understand the positional demands of his #8 and fulfil them.
Responses in defensive transitions can be tricky with the #6 and #8 combo, especially when the #8 makes his runs beyond the backline.
Our four-in-one image runs through this exact sequence.
First, we have Nunes making his run behind the lines into the wing.
His run spurs João Pereira to cut inside and connect with the forwards.
However, his pass is misplaced; the counterattack is on.

In frame three, Nunes started his recovery run, but it’s the defensive work of Bragança that’s key.
That third frame highlights the passing angle to the centre of the pitch.
The Marítimo attacker has one teammate centrally and one high up the pitch in a 1v3 scenario against Sporting’s back three.
Access to that central teammate is key for progression, especially with Nunes quickly closing down space.
Bragança delays the counterattack just enough to prevent the central pass, as well as for Nunes to catch up and end the counterattack, albeit with a foul.
Let’s stick with the defensive theme but head back to the Bundesliga to see how Bayern’s central midfield pairing approaches the high press.
Rather than dropping deep with a zonal orientation, staying connected with the backline, Bayern Munich take a man-marking approach.
In this instance, it requires them to play with one high and the other low.
Additionally, they receive help from Thomas Müller, who drops into midfield to assist them in going man-to-man.

Defensive tactics will vary from club to club, but with the example of Bayern Munich, we see the #6 and #8 orientation in the defensive phases as well.
However, there are some vulnerabilities associated with the #6 and #8 approaches.
When it does hurt these teams, the pain tends to come when the ball is lost centrally, especially from the feet of those two central midfielders.
In that match against RB Leipzig, Musiala was dispossessed in the build-up to the away side’s first goal.
The final image of the section captures the exact moment the ball is poked free.
Bayern’s back three are in their expansive attacking shape while Musiala and Kimmich provide support.
When Musiala is dispossessed, Leipzig counters in a 4v3, making their runs right through the Bayern backline.

Despite the vulnerability, the #6 and #8 setup has a lot of positives.
For possession-dominant sides, they still maintain a 3-1 at the back, allowing them to protect balls over the top and keep one defensive midfielder as protection for the backline.
The #8 benefits from the freedom to move into more advanced areas and play a greater role in ball progression.
Plus, when the ball is lost, he’s often right there to help counter-press.
To this point, the analysis has focused on two-man central midfields.
For the final two sections, we will turn our attention to teams that create central superiorities through boxes and diamonds.
We’ll start with the box midfield.
Box midfield
As the 4-3-3 and 4-2-3-1 formations became more prevalent, the layered three-man midfield became seen as a means of controlling the centre of the park.
When facing a 4-4-2 with a flat midfield, the assumption was that the midfield three would enjoy a numeric superiority over the opposition’s central midfielders.
Controlling the centre of the park while pushing the most advanced wingers higher was a means of shifting the positional advantage away from the 4-4-2 and into the hands of possession-dominant 4-3-3 teams.
Every tactical solution has its challenges.
To contest the dominance of the three-man midfield, the box midfield was introduced, typically in a 4-4-2 formation.
The benefit of a box midfield was the 4v3 numeric superiority.
A bonus was the positional advantage gained by stretching the width and height the opponent’s midfield three had to cover.
The prominent issue with the box midfield is that the width provider played along the deepest line in the system.
This led to experimenting with a box midfield within a 3-4-2-1 system.
Maybe this is cheating, including what is essentially a six-man midfield in this analysis, But here’s why I’m including it.
First, the two wingers, who start slightly higher than the outside-backs in a 4-4-2 box midfield, are the sole width the providers on the team.
They may slide into a back five or push in line with the forwards to give a traditional front three look.
Their positional responsibilities are so dynamic That it’s difficult to pin them down strictly as midfielders.
In a sense, their roles are so specialised that their job descriptions often exceed traditional descriptions.
Secondly, the two attacking mids who play beneath the centre forward operate more like a #8 and #10 in a traditional three-man midfield.
Viewed this way, the team essentially has two defensive midfielders and two attacking players, giving them four players in the central box.
Perhaps no team better exemplifies this approach than Wolverhampton.
With João Moutinho and Rúben Neves anchoring the midfield, they often have two players playing underneath Raúl Jiménez.
In the examples below, those roles are played by Daniel Podence and Hwang Hee-chan.
Let’s work our way through their four-man partnership, starting with the build-up phase.
Mourinho and Neves are unique in that they are both deep-lying playmakers.
Each is capable in defence, but those qualities pale in comparison to their attacking contributions.
Watching Wolves play, it’s immediately noticeable how tightly connected those two remain throughout the match.
They remain connected with the backline during the buildup and are highly cooperative in their movements.
If Wolves need another player at the back, either of the two may drop in beside the centre-back to give Wolves a 4-1 shape.
The one who stays in midfield will often take on the role of a bounce player, helping Wolves connect to the free man in the buildup.

While the Portuguese pivots guide the team through the build-out phase, the two attacking mids round out the midfield shape to give Wolves a trapezoid.
The pivots remain narrow and tightly connected to offer protection against counterattacks, while the two attacking mids push slightly wider to offer better angles of support to their deeper teammates.
The trapezoidal shape is a common feature in the Wolves box midfield.
Even as they progress to the second phase of the attack, connecting their lines near midfield, the shape remains.
Mourinho and Neves relate to the backline as the top points of an M and to the attacking centre midfielders as the base of a trapezoid.
From a positional standpoint, Wolves use the eight players to create a central overload.
In turn, this forces the opposition’s defensive shape to become narrower, creating additional space out wide for the wingers to exploit.
That freedom starts with the positioning of the box midfielders and their security and possession.
The press resistance of the two holding midfielders is particularly important, especially with Wolves in a three-back system with the left and right centre backs split into the half-spaces in the early attacking phases.
As Wolves looks to progress into the final third, the deep playmaking of Mourinho and Neves becomes the focal point.
Whether they’re simply breaking a line to play into Jiménez and the two attacking midfielders or playing long diagonals into the wings, the base players in the box midfield use their positioning between the opposition forward and midfield lines to dictate the tempo of play and determine when the team is ready to advance into the final third.
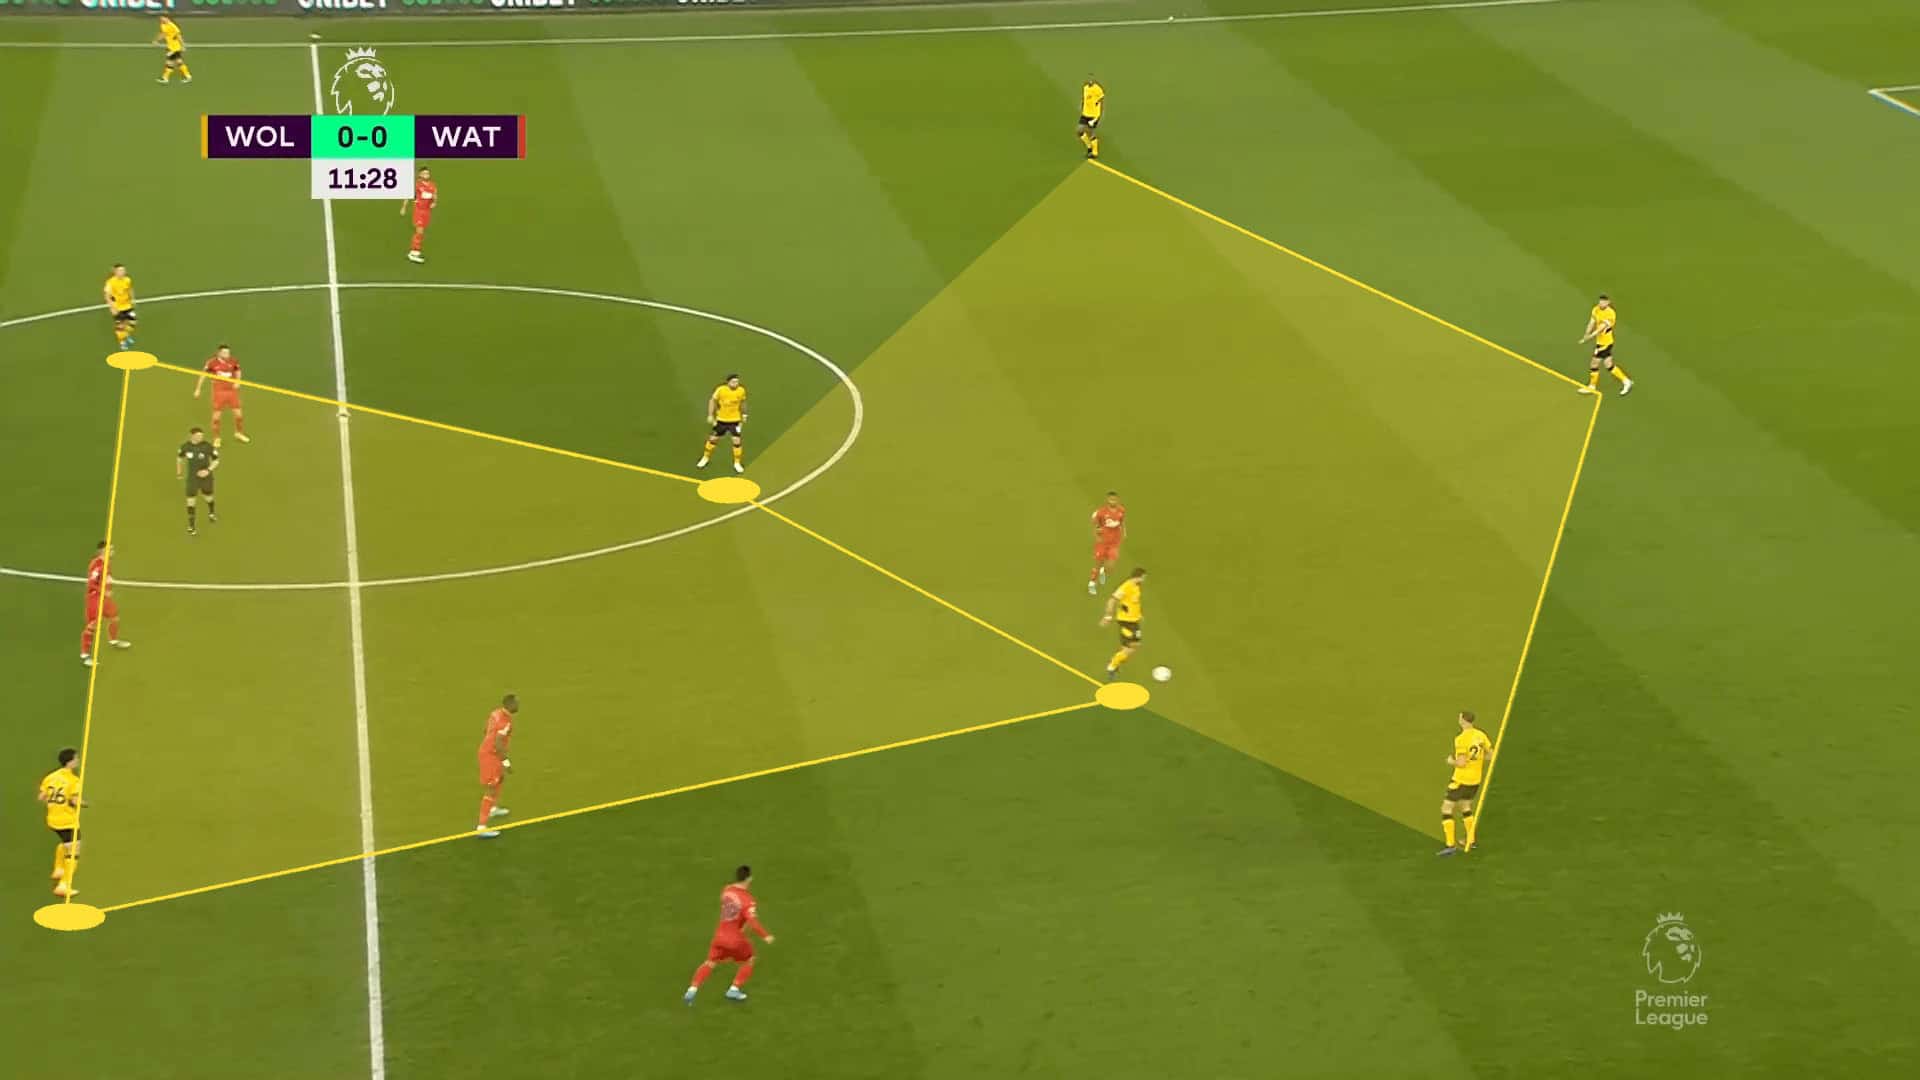
Looking at the three images that are pieced together, we have the sequence that led to Wolves’ second goal against Watford.
Once again, it was the two holding midfielders dictating play.
When Neves received the ball, he played a long diagonal in the direction of Podence.
The attacking midfielder cleverly dummied the ball, allowing it to run into the path of Jonny.
Frame two shows Jonny’s entry into the box and the numbers Wolves had to attack his delivery.

Notice that Jiménez, Podence and Hwang are occupying for defenders spanning the width of the goal.
With the two attacking midfielders maintaining their high presence, they were easily able to run into the box with Jiménez, forcing a rushed recovery from the Watford players.
With all the chaos, the run of the left-winger, Rayan Aït-Nouri, was left untracked.
Another thing to notice is the final positioning of the box midfielders.
The two attacking midfielders finished the play in the box while Moutinho managed to make it to the top of the box.
Neves remained slightly deeper, but with Watford dropping eight players into their own box, he had the freedom to push higher up the pitch, close to the opponent’s box.
One of the other advantages of a box midfield with a lone centre forward is that you benefit from the interactions of the three highest players.
The #9 can slide into left or right half-spaces to push attacking centre mids into the wings.
They can also perform a positional rotation.
If the #9 checks diagonally into midfield, he can do so to create a running lane for one of his two attacking mids.
Whereas the two deeper midfielders rotate less as a matter of defensive positional discipline, the two attacking mids have much more freedom to rotate with each other, the #9 or even the two wingers.
The defensive shape can vary tremendously with box midfields so that I won’t touch upon it here, but suffice it to say that the progression from a box midfield set up in front of a back four to a back three allows teams to use their width better while still maintaining defensive security, especially as they transition to defence.
The central numeric superiority remains, but the change to a back three with a four-man box midfield creates better attacking conditions through the wings.
By unbalancing opponents centrally, Wolves create opportunities on the wings.
The box midfield, especially with their two deep-lying playmakers, gives them security in possession, better attacking conditions on the wings and ensures they’ll have numbers in the box to meet deliveries.
Narrow Diamond
The final central midfielders in this tactical analysis are those who play in a narrow diamond.
We’re going to go with the narrow midfield diamond rather than a wide diamond because a) the wide diamond has largely died out, and b) the narrow diamond, though not as prevalent as in past decades, still has its place in the game.
With four central midfielders, one will inevitably play a more defensive role, two will be box-to-box, and the fourth will stay closely connected to the forwards, often in a 4-4-2 formation.
The roles of the highest and lowest players are highly compatible with the traditional #10 and #6 ideas.
The two box-to-box midfielders are very close to your standard #8, but the variability comes in as they oscillate between central and wide positions.
Their movements, while depending on the club’s game model and system, are most connected to those of the outside-backs.
If the outside-back pushes higher the pitch, his near-sided #8 will typically remain in the half-space.
If the outside-back is cutting a deeper position, that #8 could slide wider to offer width.
Again, the positional responsibilities of the four midfielders will depend largely on the club’s game model.
For this article, we’re going to use my favourite recent example, Pepe Bordalás’ Getafe teams.
Though Bordalás has moved on to Valencia, the organized chaos of his Getafe teams will forever have a place in my mind, as well as my heart.
Although they disregarded aesthetics, their style of play was a burden to everyone they encountered.
Their high tempo, ultra-direct and physical style made teams dread their matchups.
The low-budget club enjoyed Europa League success thanks to a 4-4-2 diamond midfield system, with two outside-backs by trade, who moved into the two #8 roles.
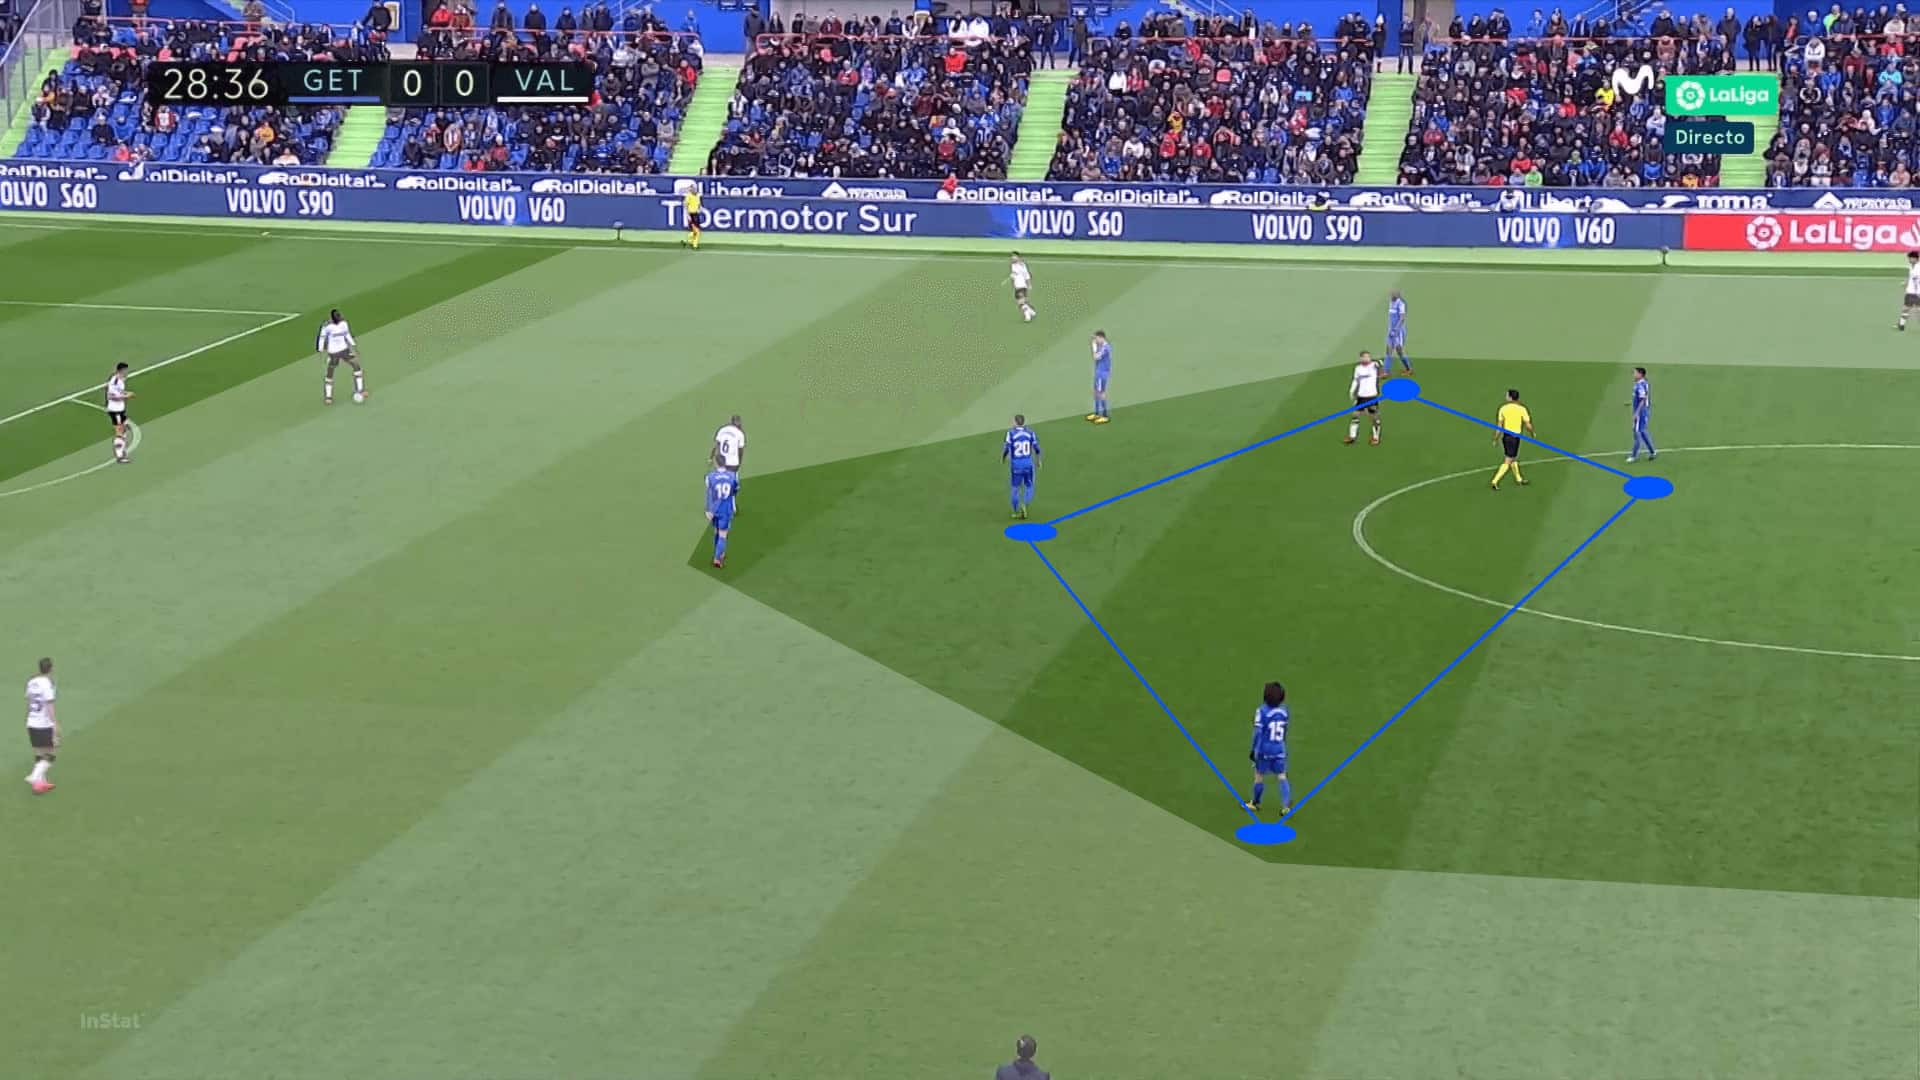
To give a sense of their positional outlook, our first image highlights the midfield four.
The #10, Nemanja Maksimović, has dropped deeper than his two #8s, Marc Cucurella and Allan Nyom.
Still, his primary objective was to support the two forwards and offer a trailing run into the box.

Where Getafe did their damage was in transition.
In attack, the objective was simple; play into the two forwards and support them with the #8s and #10.
Attacking transitions were difficult to contain, but where the midfield four excelled was in transitions to defence.
Because their attacking style was so narrow, the four midfielders did very well to stay connected and counter-press with intensity.
They were remarkably quick in recovering the ball and were among the league leaders in PPDA, fouls and yellow cards.
If they couldn’t win the ball back immediately, they would at least kill the play with a foul.
There was no getting by this Getafe side.
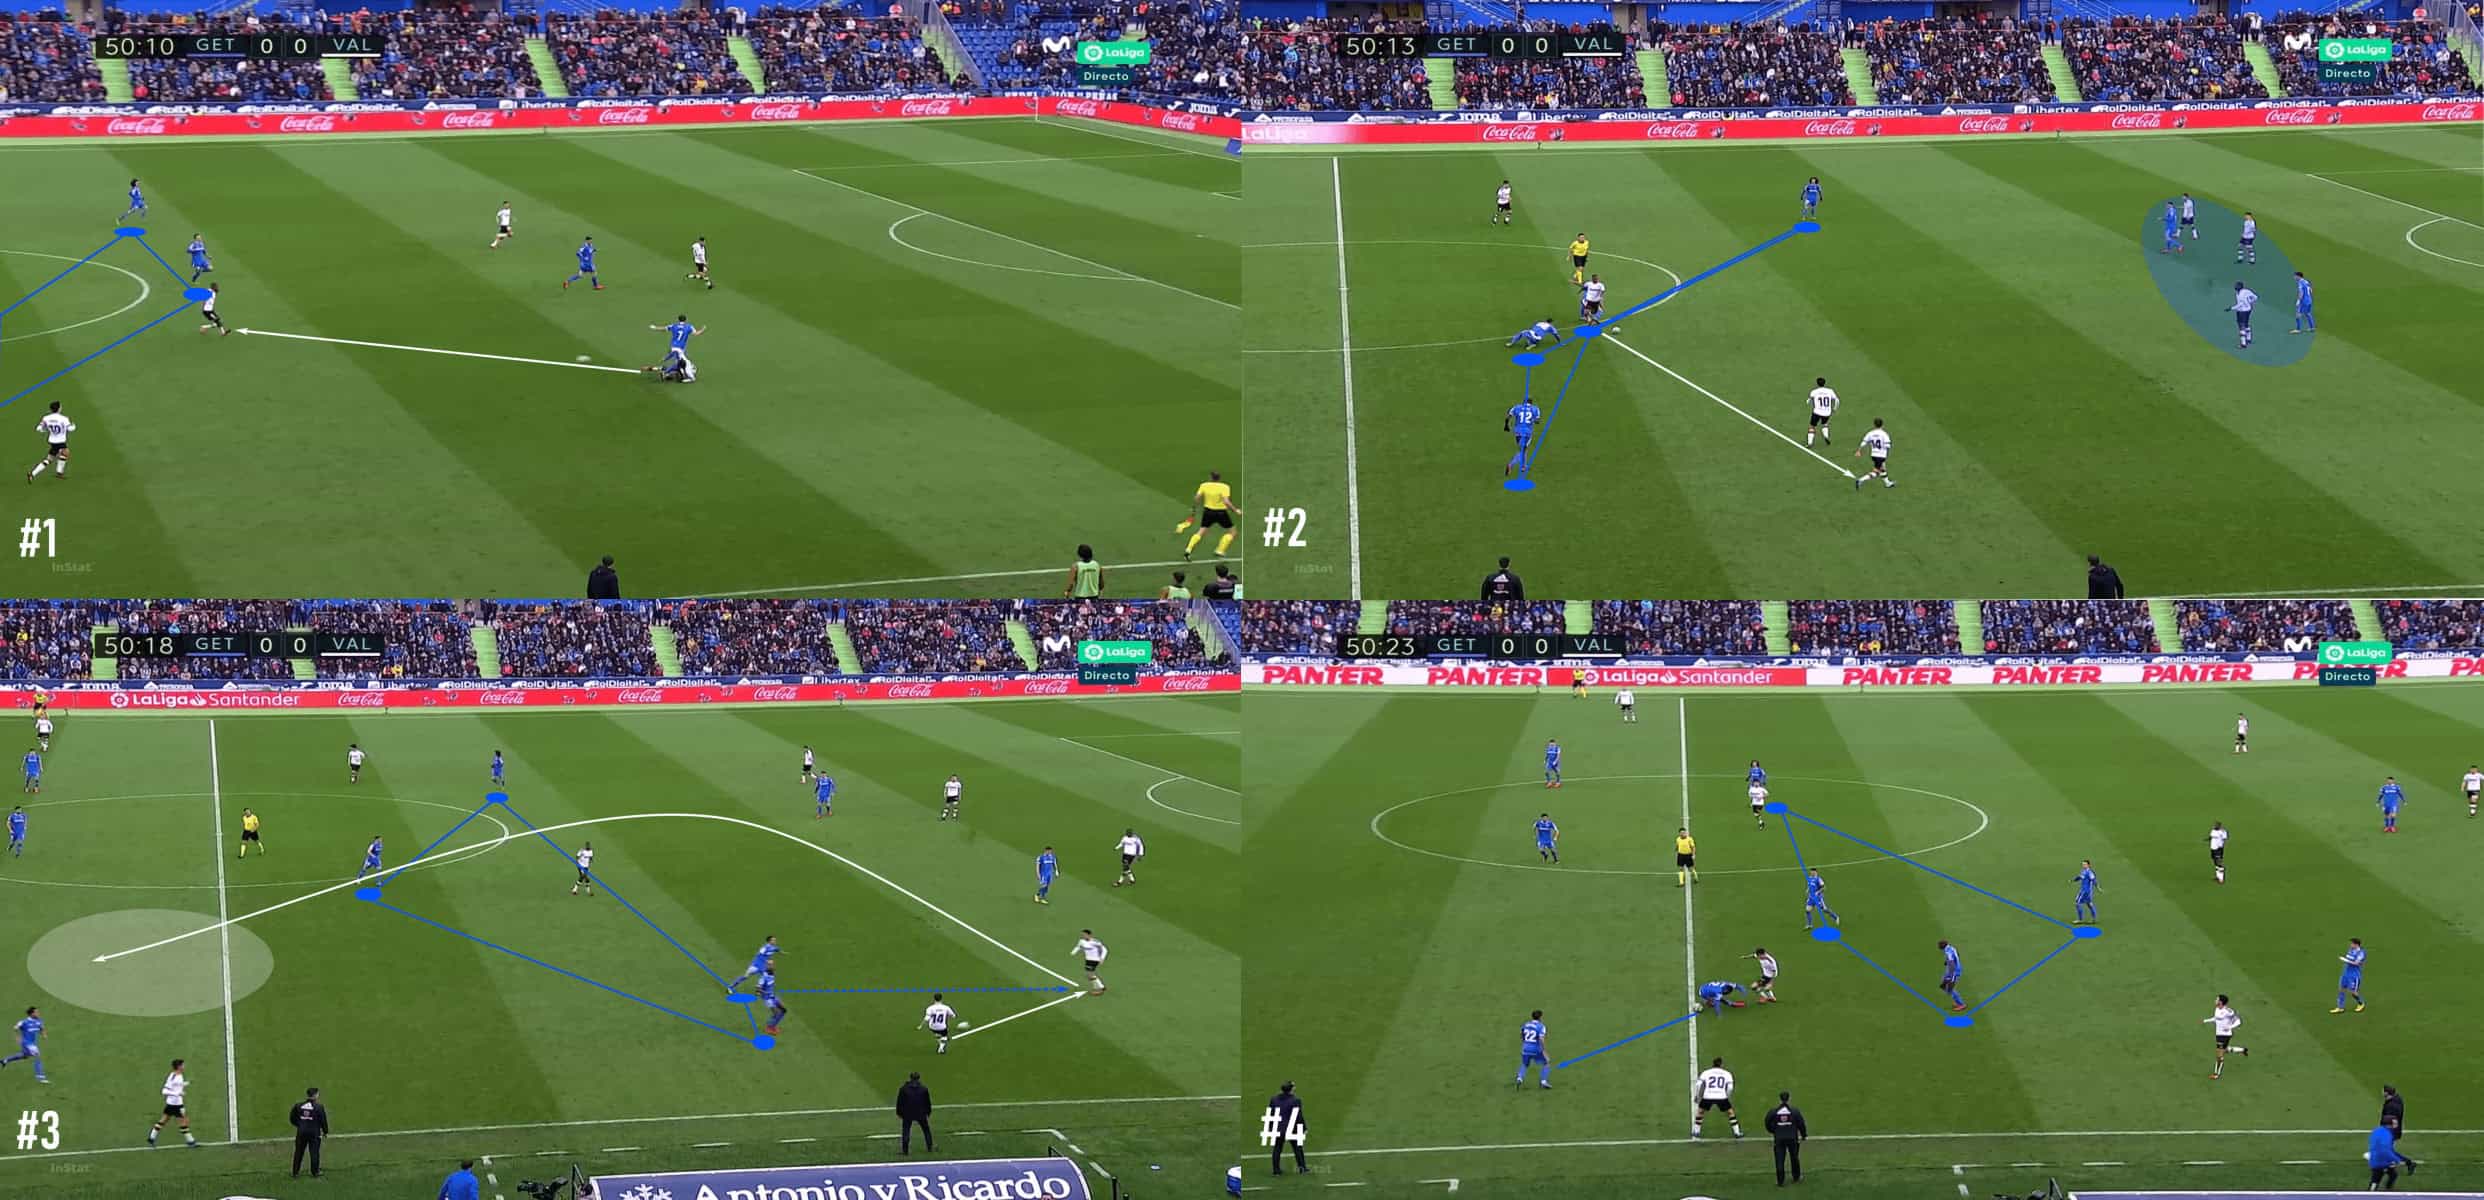
Take the four image sequence as an example.
In frame one, Getafe lost the ball.
Kondogbia recovered it, stepped around two players and passed negatively into the left-wing.
When the ball arrived on the wing, Getafe was quick to bring the next layer of the counterpress.
Images two and three show them quickly closing down Valencia space and forcing them further back until they were no longer willing to accept the risk of maintaining possession while under Getafe’s pressure.
The ball was played forward, and, as seen in image four, it was recovered by a Getafe player.
Bordalás‘ Getafe sites were masters in transition, but they were also exceptional in the high press.
The centre forwards did their parts to funnel play into the wings, but it was the midfielders who made the central channel and half-spaces unplayable.
Examining the way Getafe set out in their high press, the white-shaded area is where they attempted to funnel the opposition.
With only the wings accessible, Getafe funnelled play wide and then sealed the opposition in.
The four midfielders would initially take away the centre of the pitch, then violently collapse on the opposition once play reached the wings.
The impact was devastating and style exhilarating.
Getafe were excellent at funnelling play into the wings, so I looked for an example of another team with a diamond midfield that was less successful in sealing opponents into the wings.
Enter Celta de Vigo.
As Atlético Madrid shifted their possession to the middle of the pitch, the roles and responsibilities of the Celta diamond became more apparent.
While the #6 was still responsible for protecting the two centre-backs and the #10 dutifully pressing the opposition double-pivot, the two #8s could be found taking deeper and wider positions to maintain a connection with the two outside-backs.
As the Atlético midfielders pushed high up the pitch and engaged the outside-backs in duels, the Celta #8s offered coverage to their teammates.
Further, they would track the runs of Atlético’s outside-backs.

Though the intent was to play with a narrow diamond, the reality is that the conditions of the game forced the two #8s to shift into wider positions to account for Atlético’s wing emphasis.
Against three-man midfields, those #8s don’t have to commit as wide, but Atlético’s flat midfield left Celta with little reason to remain centrally in a 4v2 situation while leaving the wings exposed.
Conclusion
As this tactical theory article comes to a close, there is still much more to say about each of the four groups we discussed.
Each offers enough detail to be an article in its own right, but we’ll let this analysis serve as a survey article on the topic.
With four-man midfields returning to prominence, this article has, at the very least, examined what the most common setups are and how the central midfielders are used in those systems.
Again, there’s much more to say about each of these groups, but we’ve at least covered some of the basic principles within various phases of play.