The Premier League marked the return of fans this weekend with an enticing fixture for those from North London, with Tottenham taking on Arsenal at the Tottenham Hotspur Stadium. Both teams came into the game on contrasting form, with Spurs flying high at the top of the Premier League table and looking to carry on in that form, while Arsenal were winless in their last three Premier League games.
The game marked not only the return of fans, but also the return of José Mourinho’s pragmatic and astute tactics against a side favouring possession of the ball. It was Mourinho who won the day, with Tottenham picking up a 2-0 win over Arsenal, with Tottenham’s defensive tactics stifling an Arsenal side desperately trying to break them down. In this tactical analysis, I will break down the defensive system used by Spurs, and look at how Arsenal’s build-up interacted with it and looked to manipulate it.
Line-ups
Tottenham lined up in a 4-4-2, but the roles of the two strikers meant that the formation could also be called a 4-4-1-1, as I’ll discuss within this analysis. Arsenal lined up in more of a 4-2-3-1 for most of the game, with Alexander Lacazette playing behind Pierre Emerick Aubameyang mostly, with Willian and Saka dropping into the half-spaces. Tottenham started with Pierre Emile Højbjerg and Moussa Sissoko in central midfield.

The forward’s roles in Tottenham’s defensive structure
To look at Tottenham’s defensive structure, we will break it down into sections, with us first looking at the strikers’ and winger’s roles within the press. Tottenham pressed in a 4-4-2 and operated in a mid-block early on, before settling into a deeper and deeper block as time went on. When Arsenal’s centre-backs received the ball past differing lines of engagement, Spurs’ strikers would press, with Giovani Lo Celso and Harry Kane pressing the two centre-backs.
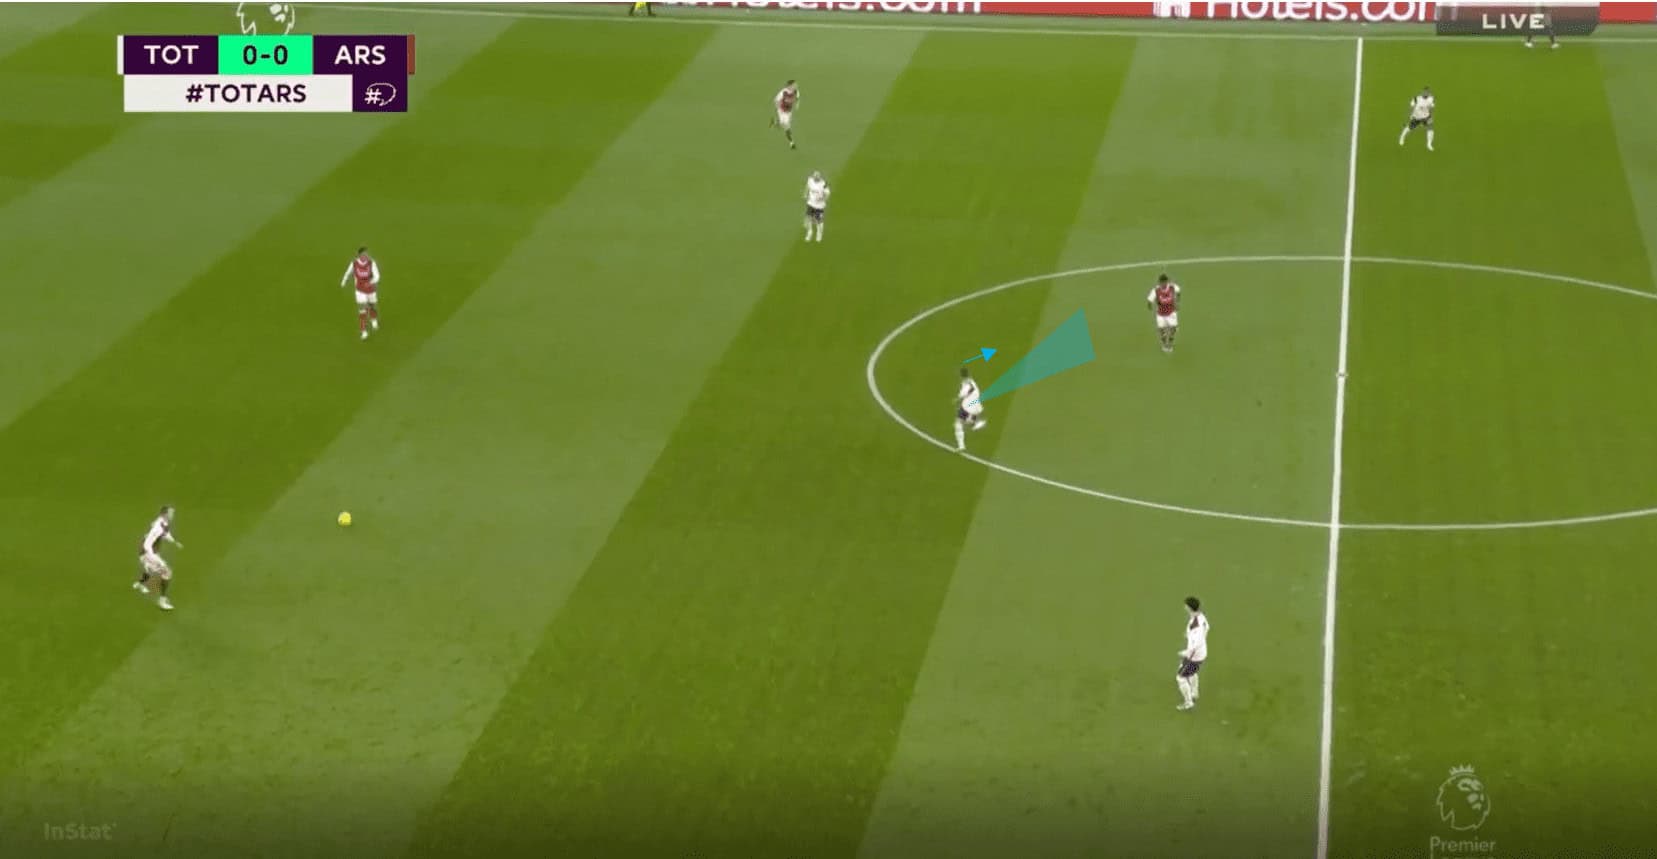
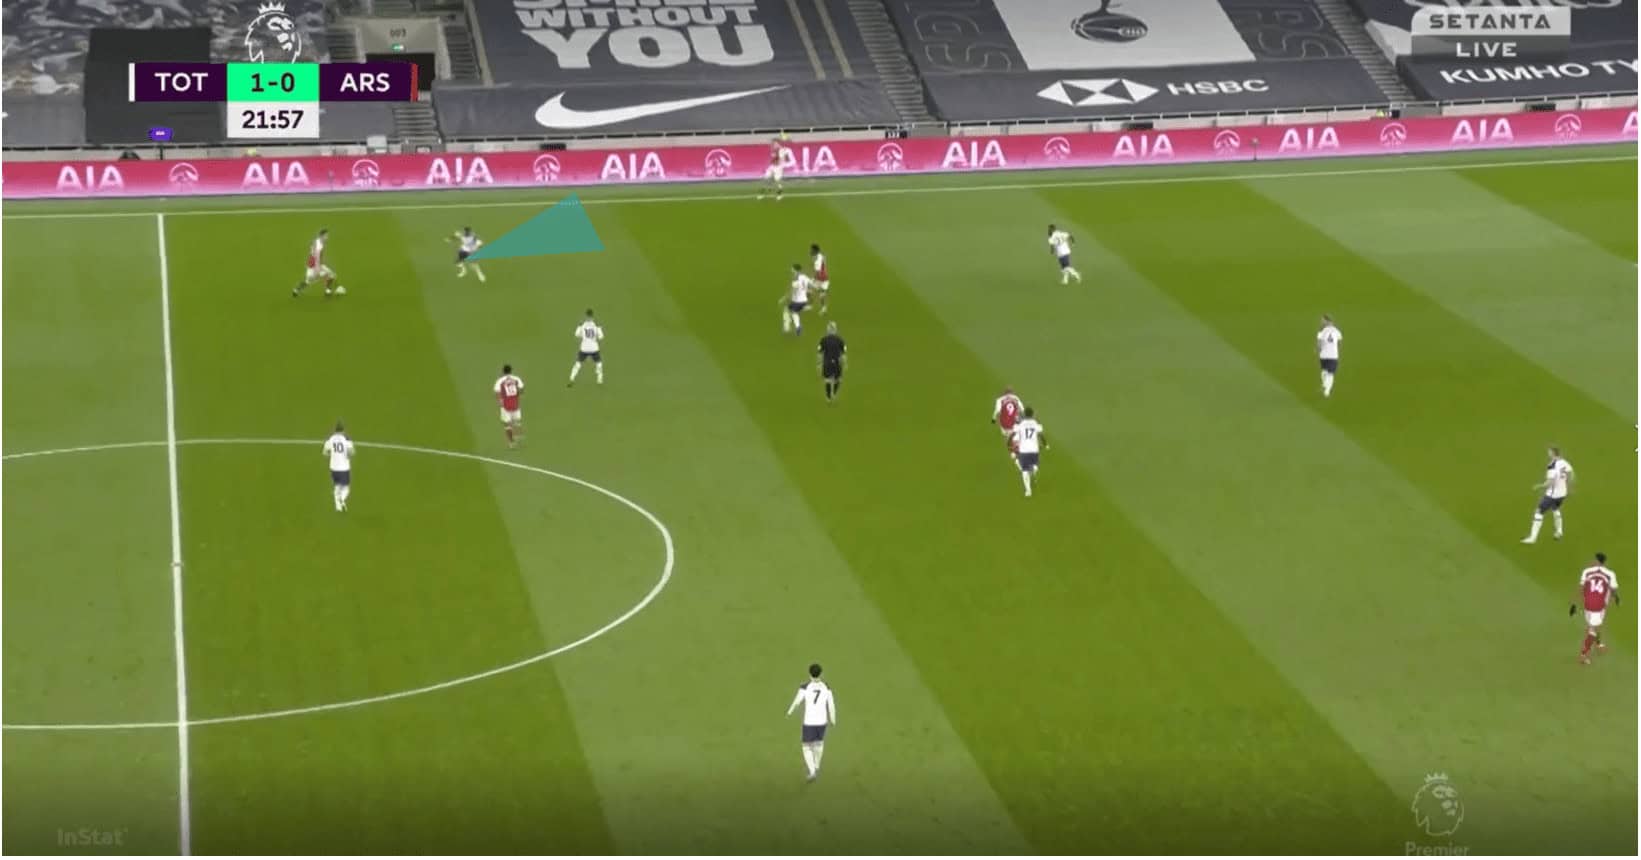
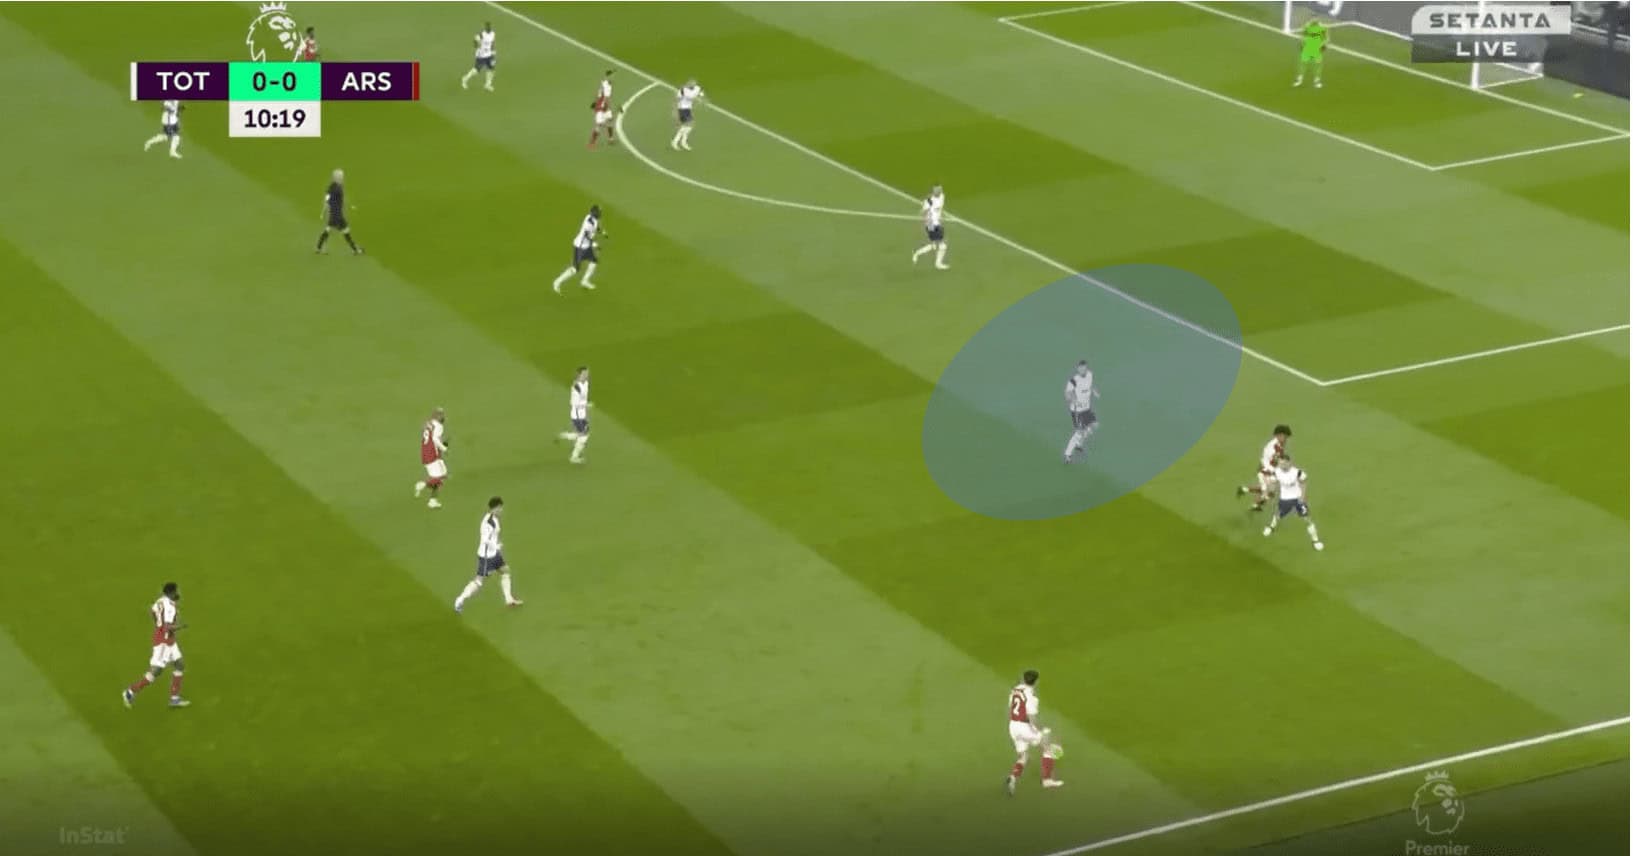
The strikers would not just make a straight pressing run, however, as the strikers were given the role of cutting access to the pivot (Thomas Partey). We can see a nice example of this from early in the game, where Lo Celso presses from inside to out towards a centre-back. Lo Celso scans to check where Partey is, and then continues his run to ensure he remains within his cover shadow.
We can see the same happening again here where Tottenham are triggered to press higher, with Lo Celso moving to the press the centre-back while scanning for the positioning of Partey. With Arsenal in a 4-2-3-1, the far pivot is marked by a high pressing Moussa Sissoko. The advantage of using Lo Celso to cover Partey here is that it allows Spurs’ other central midfielder to remain deeper and cover the half-space or Lacazette.
As a result, that theoretical 3 v 2 overload which occurs when a 4-2-3-1 plays a 4-4-2, doesn’t exist. We can see Son takes a conventional role in the press as a winger here, with him pressing the full-back from the front and remaining in the half-space while the centre-back is in possession. As you’ll see throughout this analysis, Tottenham didn’t press high at all pretty much, but this example gives a good idea of the roles involved within the press.
This sequence of play illustrates their press well. Arsenal move the ball from centre-back to centre-back, and Lo Celso follows Partey’s movement across to the left to prevent him from receiving the ball. Kane cuts the lane to Xhaka too, although the Swiss international doesn’t really want the ball here. Tottenham are in their 4-4-2 shape, and neither of their central midfielders are occupied so they can sit deeper to protect the half-space.
Arsenal send the ball back to the right, and Lo Celso just stays with Partey to prevent him from receiving, while Son moves across and presses Bellerin into going back to the centre-back. The nearest central midfielder Sissoko can drop into the half-space to cover it, and so Holding is allowed to receive freely. This is done because he has no free options in front of him, with Partey covered and Xhaka on the opposite side. Tottenham can mark Lacazette and the inside forward on this side with their midfielder and full-back, and so Arsenal can’t progress the ball.
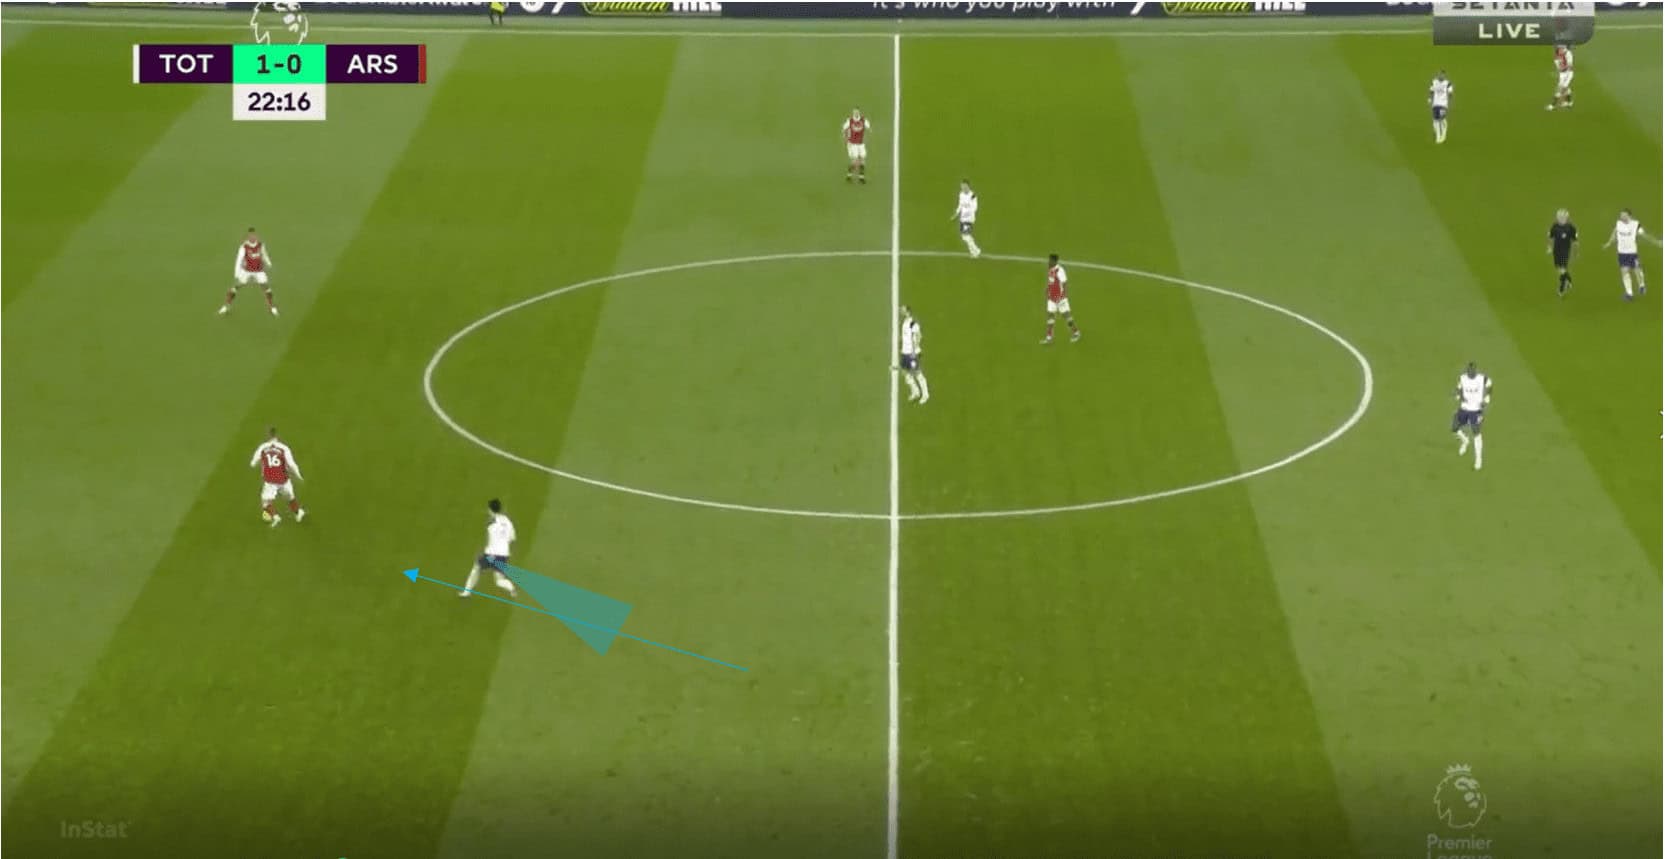
In response to this structure, Arsenal would often drop a central midfielder into the backline to form a back three, and Tottenham’s press was prepared for this and adjusted to it. Particularly in the first half, when this situation arose, the Tottenham winger would step higher and press on a diagonal to cut access to the wing-back. This prevented the full-back from being drawn out into a wide area, which increased cover of the half-space, and also forced Arsenal to play into the half-space or centre where, because of the striker’s pressing, Tottenham’s central midfielders were free to mark players. As a result, situations like the one below arose, where no options could be found and Arsenal were forced backwards or sideways.
We can see another example here where Son presses in from a wide area towards the wide centre back in order to cut the wide lane. Again, Arsenal have no central options who are unmarked, and so they are forced to play laterally again. I’ll discuss how this changed in the second half later.
Tottenham protect the half-space
A major aspect of Tottenham’s defensive structure in these kinds of matches is the protection of the half-space, and as I’ve already mentioned the roles of the forward help in this. The main players who are responsible for protecting the half-space though are the centre backs, central midfielders and full-backs. Mourinho’s central midfielders play a key role as they are allowed to sit much deeper than conventional midfielders, and so when the ball goes into a wide area, it is often their job to fill the half-space and mark the inside forward (or whoever) within it.
We can see an example below where Tottenham’s pressing intentions are clearly visible. Arsenal are in a back three, and so Steven Bergwijn gets ready to press on a diagonal. Right-back Serge Aurier moves slightly wider in case the lane is not cut, while Sissoko can stay narrow and occupy Saka in the half-space.
We can see in this example with Tottenham sat deeper in the second half, the full-back is forced to press wider, and so the half-space is vacated. As a result, Spurs rely on the ball-near central midfielder, in this case Højbjerg, to drop into the half-space to cover and prevent an Arsenal player from receiving in this area.

We can see another example here on the opposite side, where Arsenal overload the wide area, but because of the deep positioning of the nearby central midfielder, Tottenham are able to nullify the overload quickly and cover any dangerous spaces. Aurier can follow the ball down the line, while Sissoko can pressure the player on the ball. We can see he clearly signals for the centre-back to tuck across to cover the half-space slightly more.

Here later in the game, we saw Tottenham’s wingers began to become more and more passive, and even when Arsenal formed a back three, they wouldn’t push out to press on a diagonal, instead sitting deeper and preferring to frustrate and protect the wide lane. We can see the left-winger here presses the wide player, while full-back Ben Davies acts as more of a centre-back, or cornerback if you like, and so he covers the half-space. On top of that, Sissoko also comes across and is able to cover the half-space, and so progression through this area with Tottenham is practically impossible, especially given Arsenal’s positional structure in this example. Tottenham are incredibly deep and vertically compact here.
How did Arsenal look to build through this?
In my notes, I split Arsenal’s positional play into basically good ideas and a lack of ideas, and so we will start off with Arsenal’s struggles in the build-up, and the origins of these.
It seems that one of the main problems in Arsenal’s positional play was their lack of central occupation, with the two central midfielders struggling to impact the game when Arsenal were in forward positions. We can see Arsenal start the play well here, with Xhaka and Partey dropping into a double pivot in order to escape the pressure of the two strikers. The ball-near Tottenham central midfielder would often focus on the half-space, and so the central lane would open up at times, so Lacazette here drops to receive before playing wide. This poor occupation of central areas by midfielders was something I also pointed out in an analysis in August.

But because Lacazette acts as the free player, when he drops wide and centrally while Arsenal are in a double pivot, they lose numbers higher up the pitch, and so Tottenham simply settle into their shape once the ball goes wide, and the ball-near central midfielder is unoccupied. Ideally, you would be looking to create an overload on this player, with potentially a wing-back occupying the full-back, an inside forward in the half-space, and another forward running behind for example, but because Arsenal require such numbers deeper, they aren’t able to create an overload. Willian offers an opportunity to play down the line to drag the ball-near central midfielder out of position, but even if this happens, no Arsenal player is in the nearby vicinity to make a run into this space.
We can see a similar kind of conceptual problem again below, which revolves around Arsenal’s use of a back three and the subsequent lack of occupation of the central midfielder. Arsenal drop into a back three here and trigger the winger to press, before switching the ball and then bringing it back again. This allows them to access the wing-back.
However when they do, occupation of the central midfielder in the half-space is poor again. This time they do have one player occupying him in Lacazette, but what we really want is an overload on this central midfielder, with one player in front and one player behind helping to create a passing lane into the half-space. Ideally, Partey would be where Lacazette is positioned, while Lacazette would move just in front of the Tottenham centre-back. This would create an overload on the central midfielder, and help Arsenal to progress the ball.
In this example, Arsenal’s structure is not too bad as they have two players in the half-space helping to create overloads on the back line. They fail to utilise any overload here though, and end up just going back to the goalkeeper here. The use of opposite movements here between the two players occupying the full-back may have allowed them a way in behind, and there is also the possibility of playing into Thomas Partey, who would then create an overload due to a Spurs midfielder being forced to press.
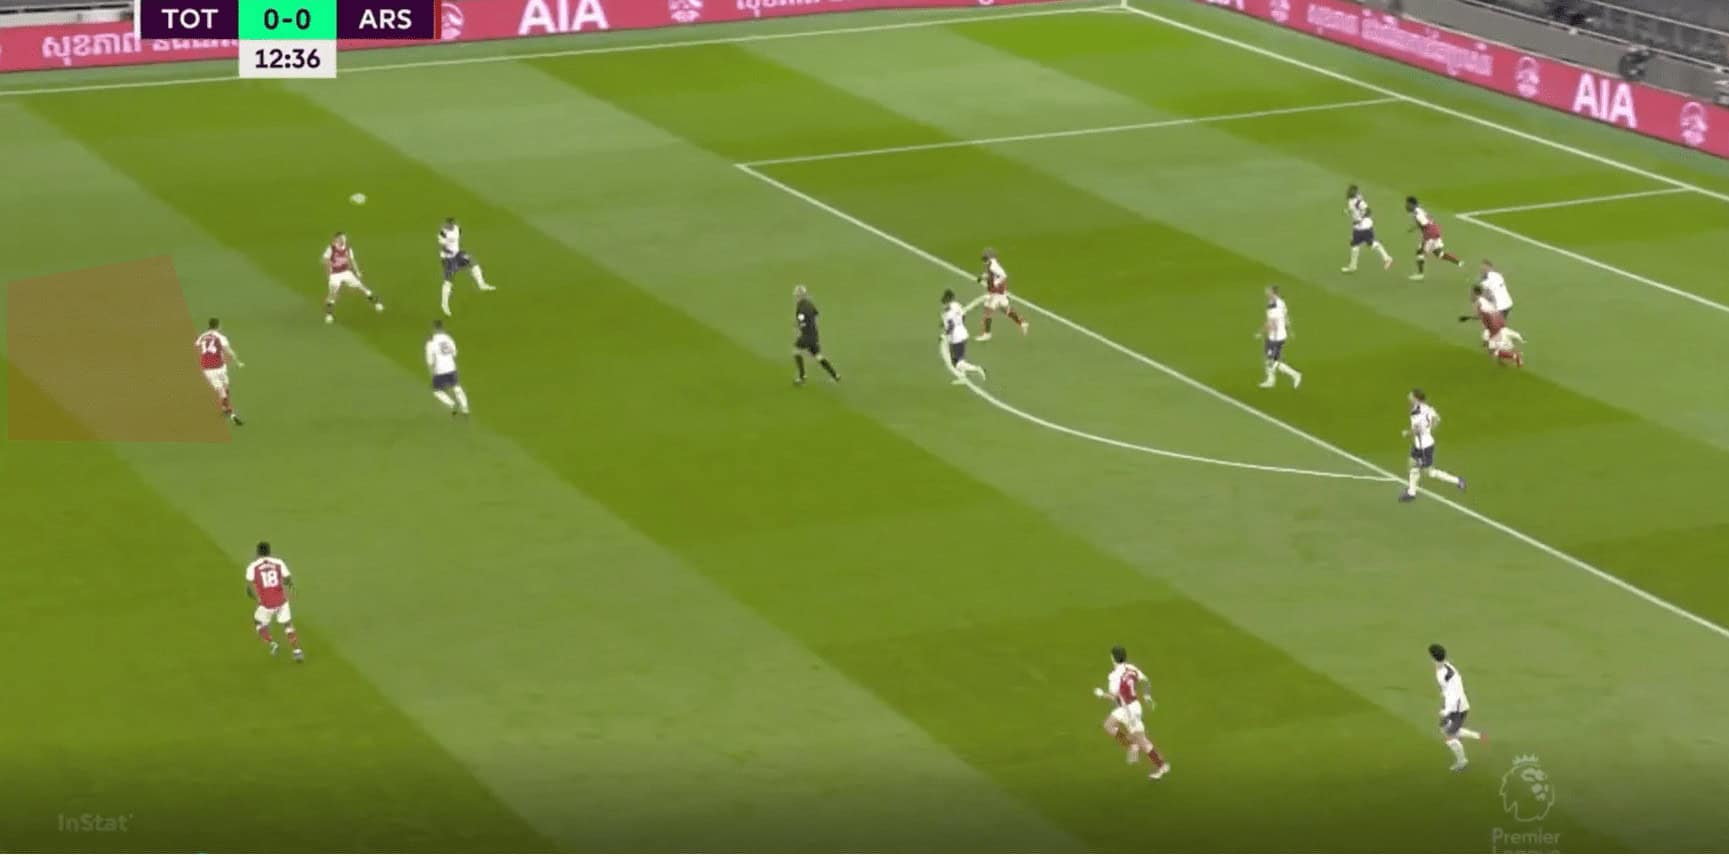
Here, Arsenal do quite a good job of occupying the central midfielders from the front, and so passing lanes in behind into the half-space open up. A centre-back pushes up for Arsenal and is followed by Lo Celso, while the ball-near central midfielder Sissoko doesn’t tuck across enough and is occupied by Xhaka. Bukayo Saka takes the Tottenham full-back away well, and so the passing lane opens up massively but Lacazette, Willian, and Aubameyang are all just waiting in the box.
Is quick, structured build-up a potential solution?
Everybody knows that moving the ball quickly in games like these is vital for the possession side, and on a few occasions Arsenal showed how this could be used to disorganise Tottenham.
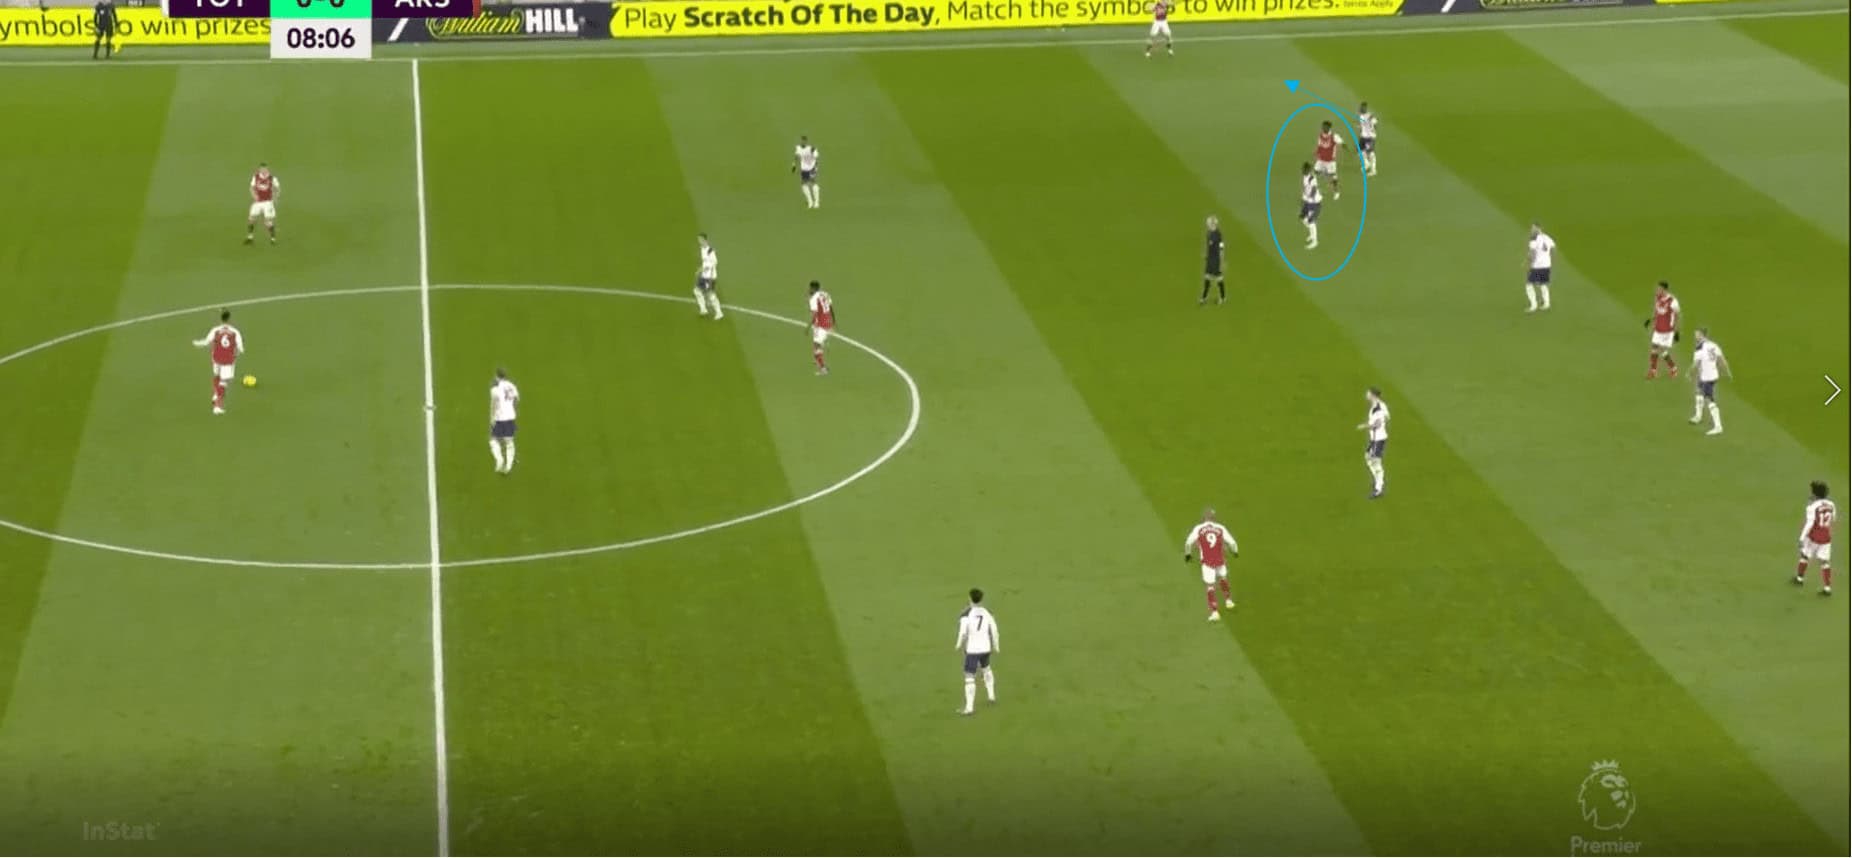
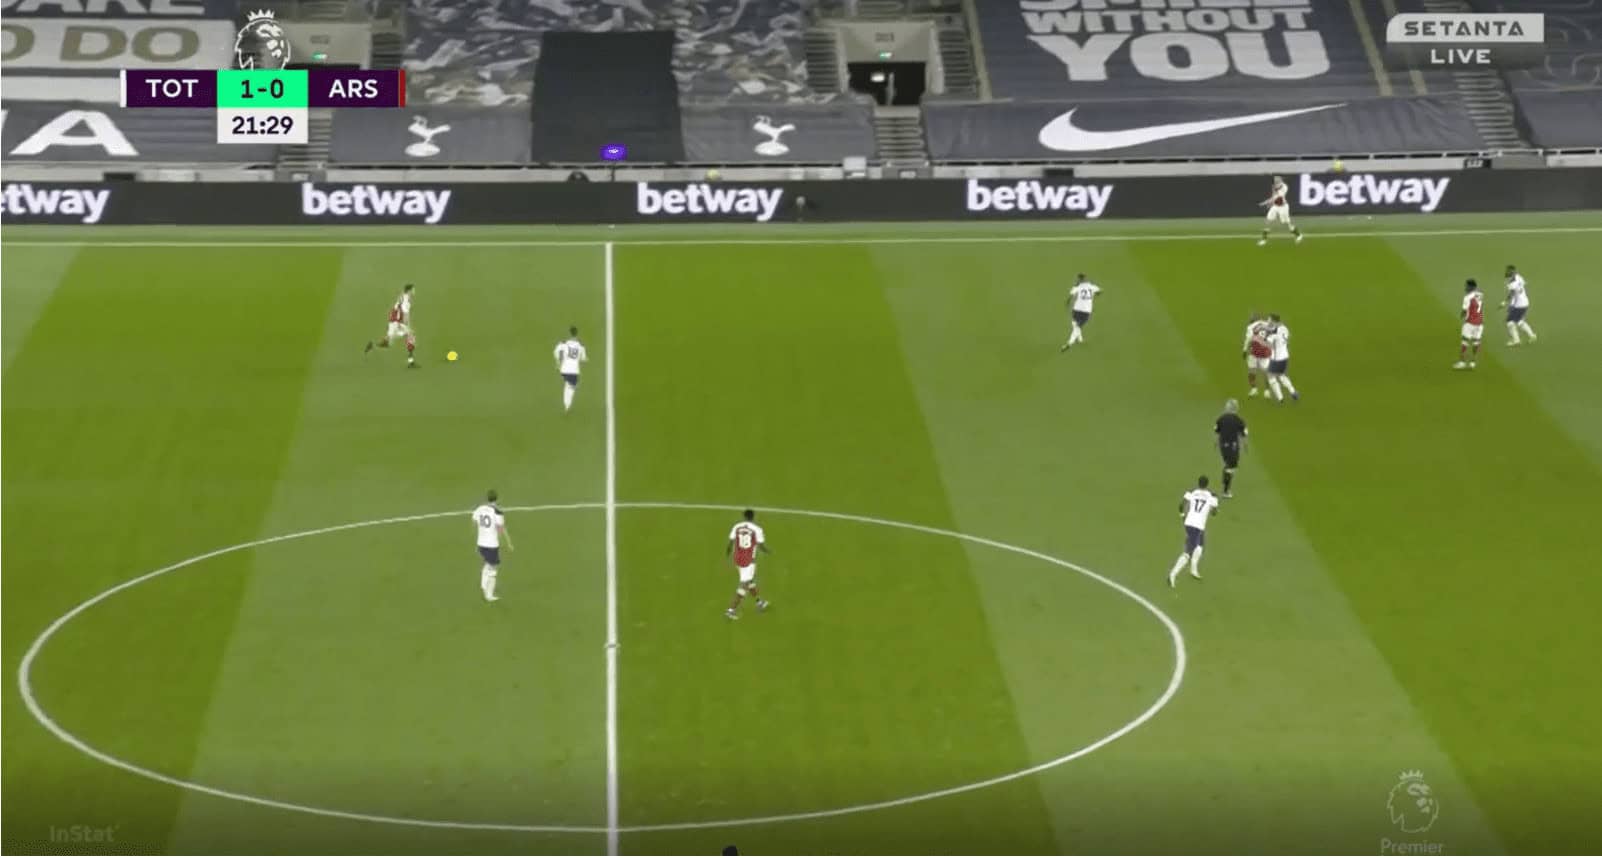
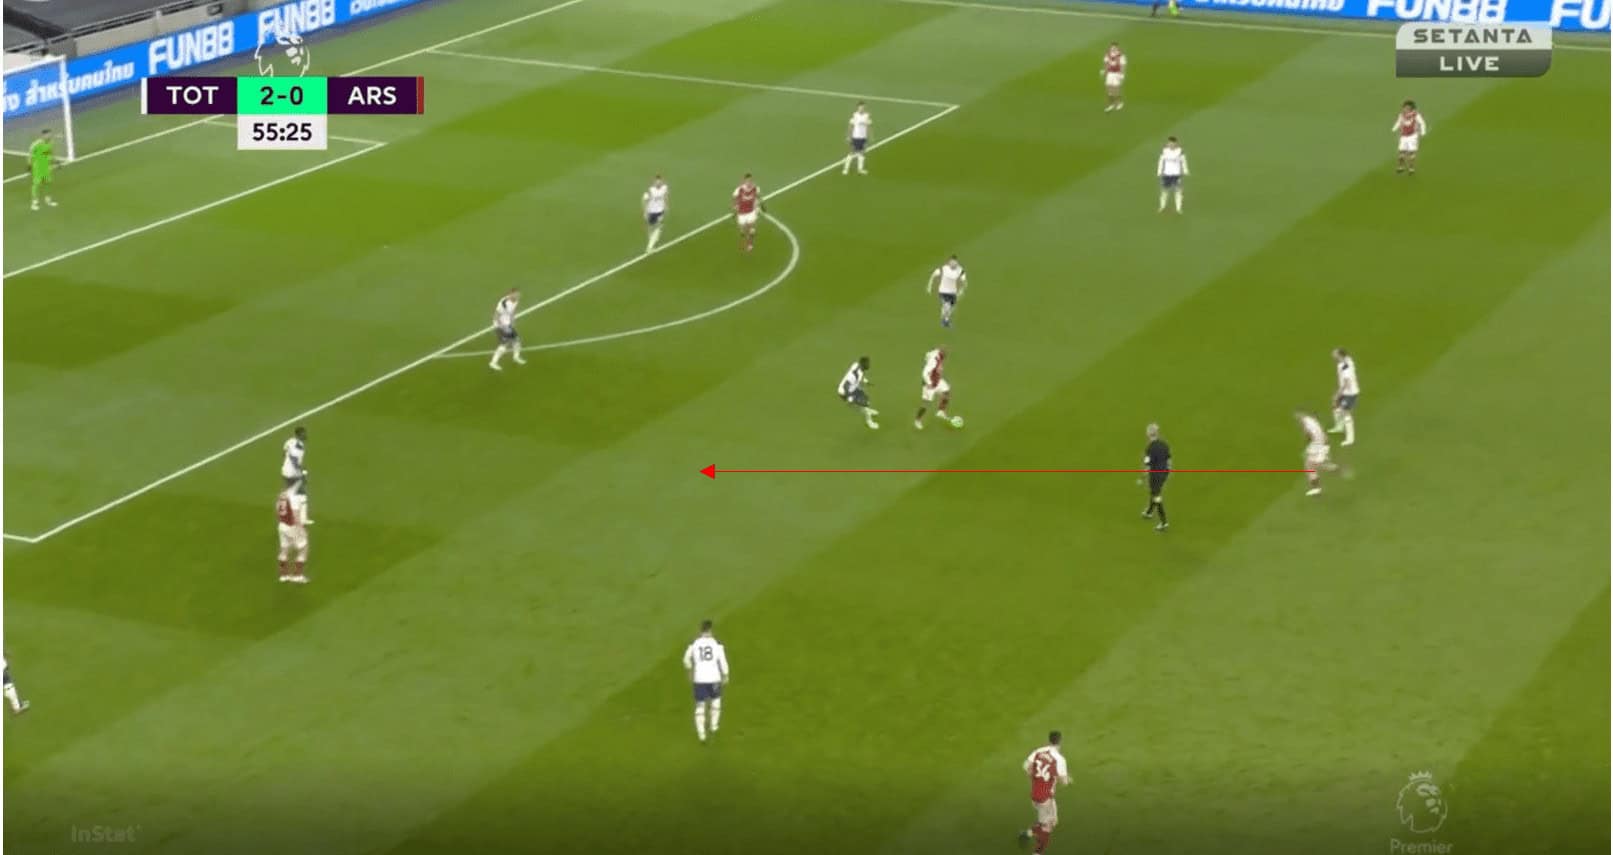
We can see an example below, where Tottenham’s press is triggered by a pass into the full-back by Arsenal. If this is used consciously, the aim would be to trigger the ball-near central midfielder to press across to cover the half-space, before the ball is sent straight back centrally by the full-back.
Because the central midfielder is triggered to cover the half-space, the central lane can open, and so for Arsenal it is about how can they then use that. Occupying both central midfielders before having another attacker arrive into the space between the two would be an excellent way of progressing the ball, for example. This is of course easier to suggest in hindsight.
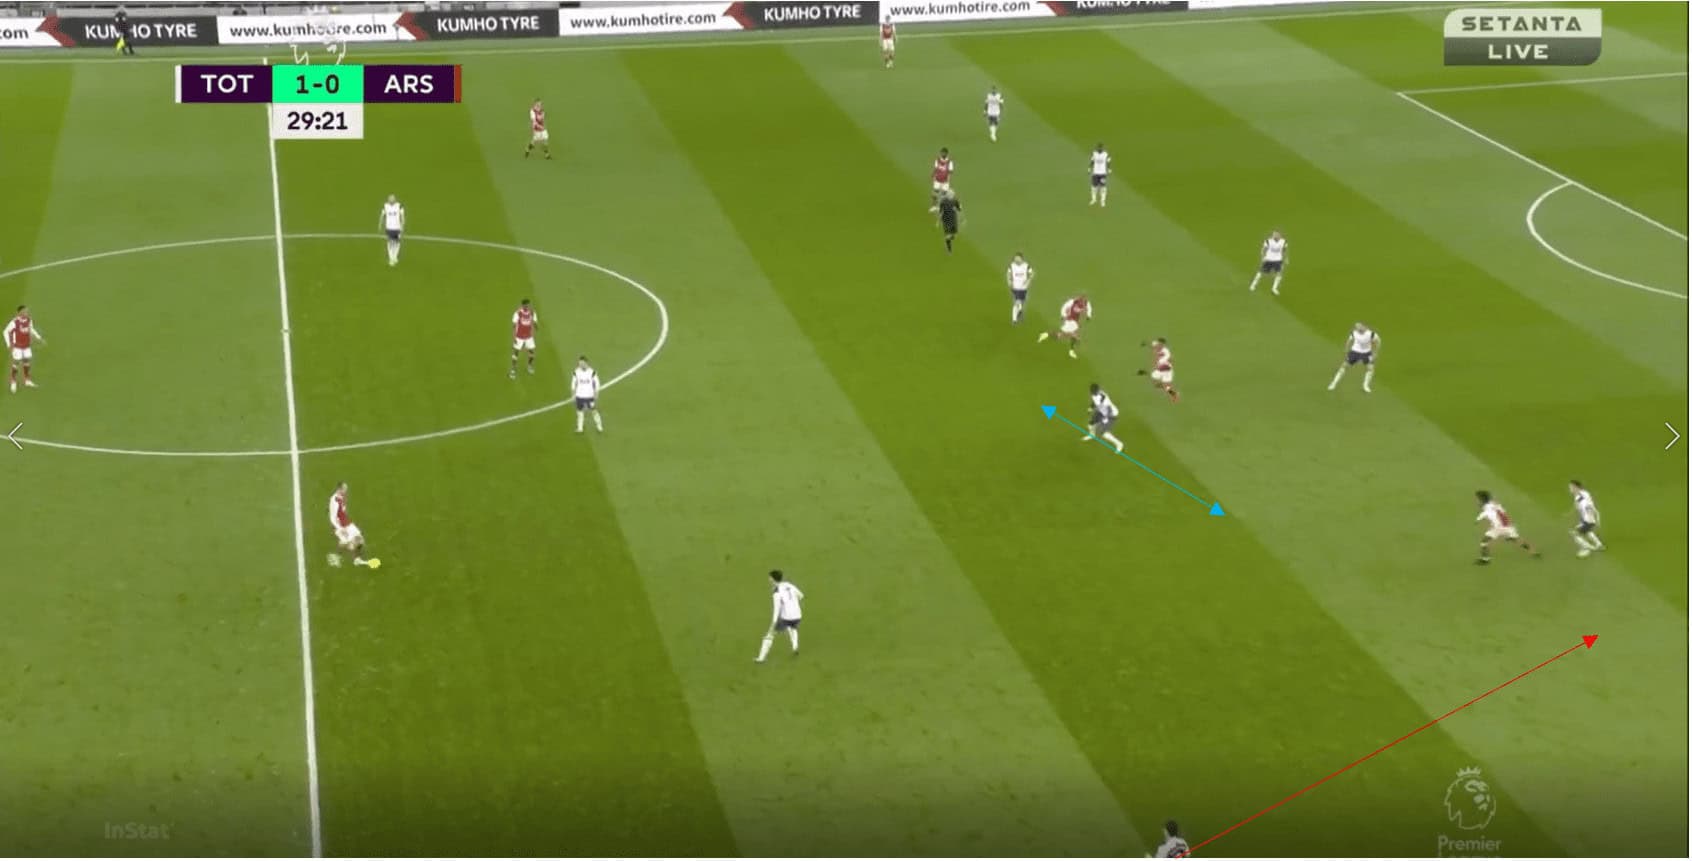
The inside forwards of Arsenal always started in a higher position than the Tottenham central midfielders (naturally), and so the forwards always have a ‘head start’ on these midfielders. This head start is lost though if you give the opposition enough time to recover or block passing lanes, and so quick sharp passing is vital. With this example below, it is a case of how quickly can you combine to play these passes, and can you do it with the correct timing. The timing of the pass by the full-back has to be optimal to allow the full-back to press him enough, while the timing of the run by Willian is also vital to get away from the midfielder and to also stay onside.
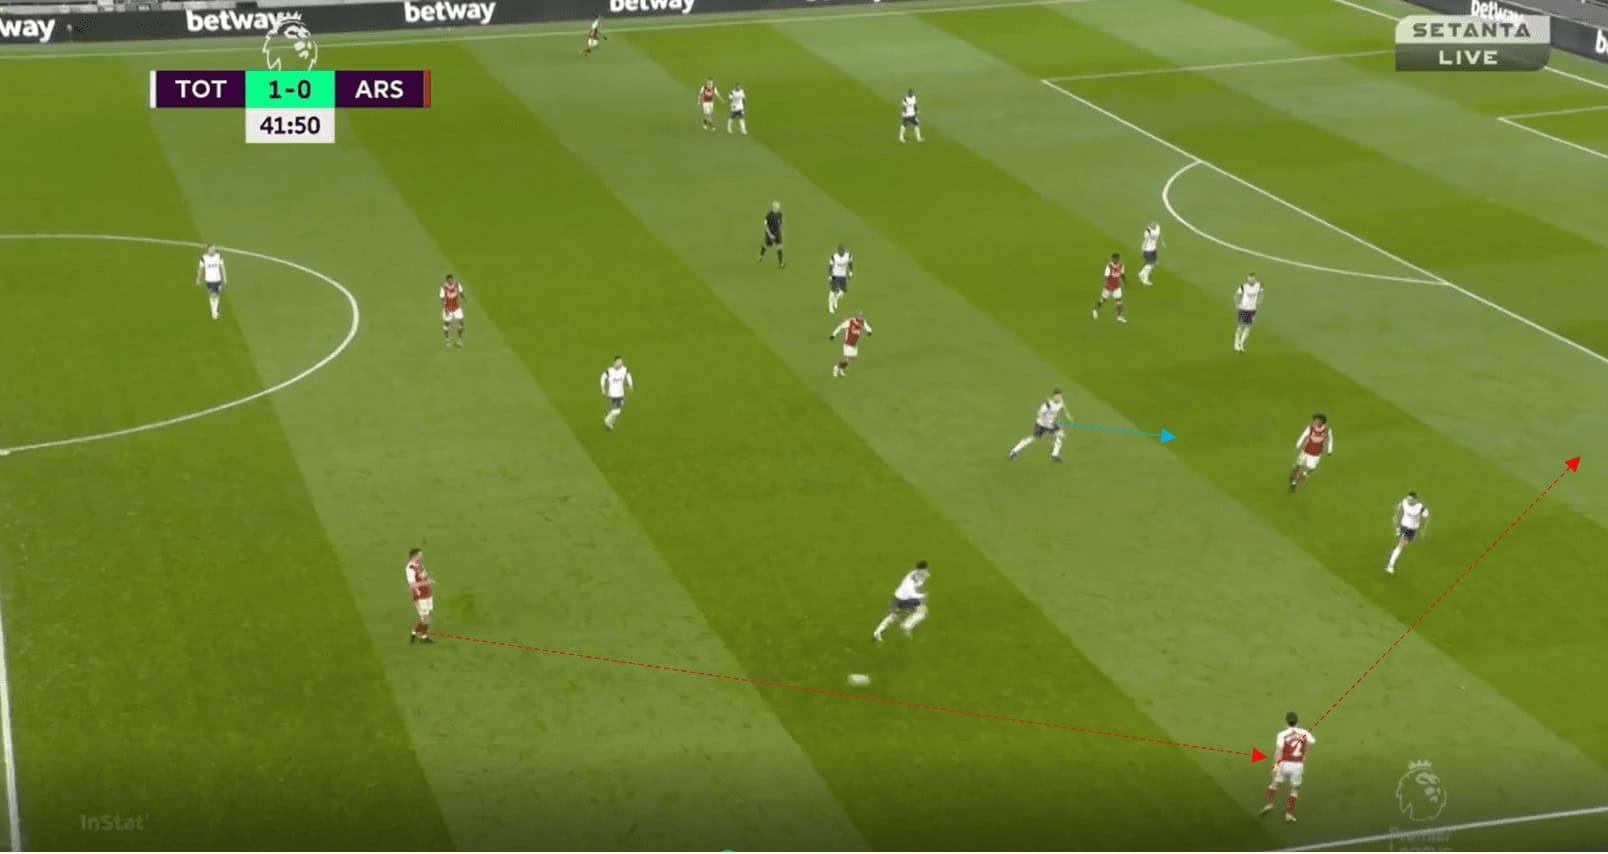
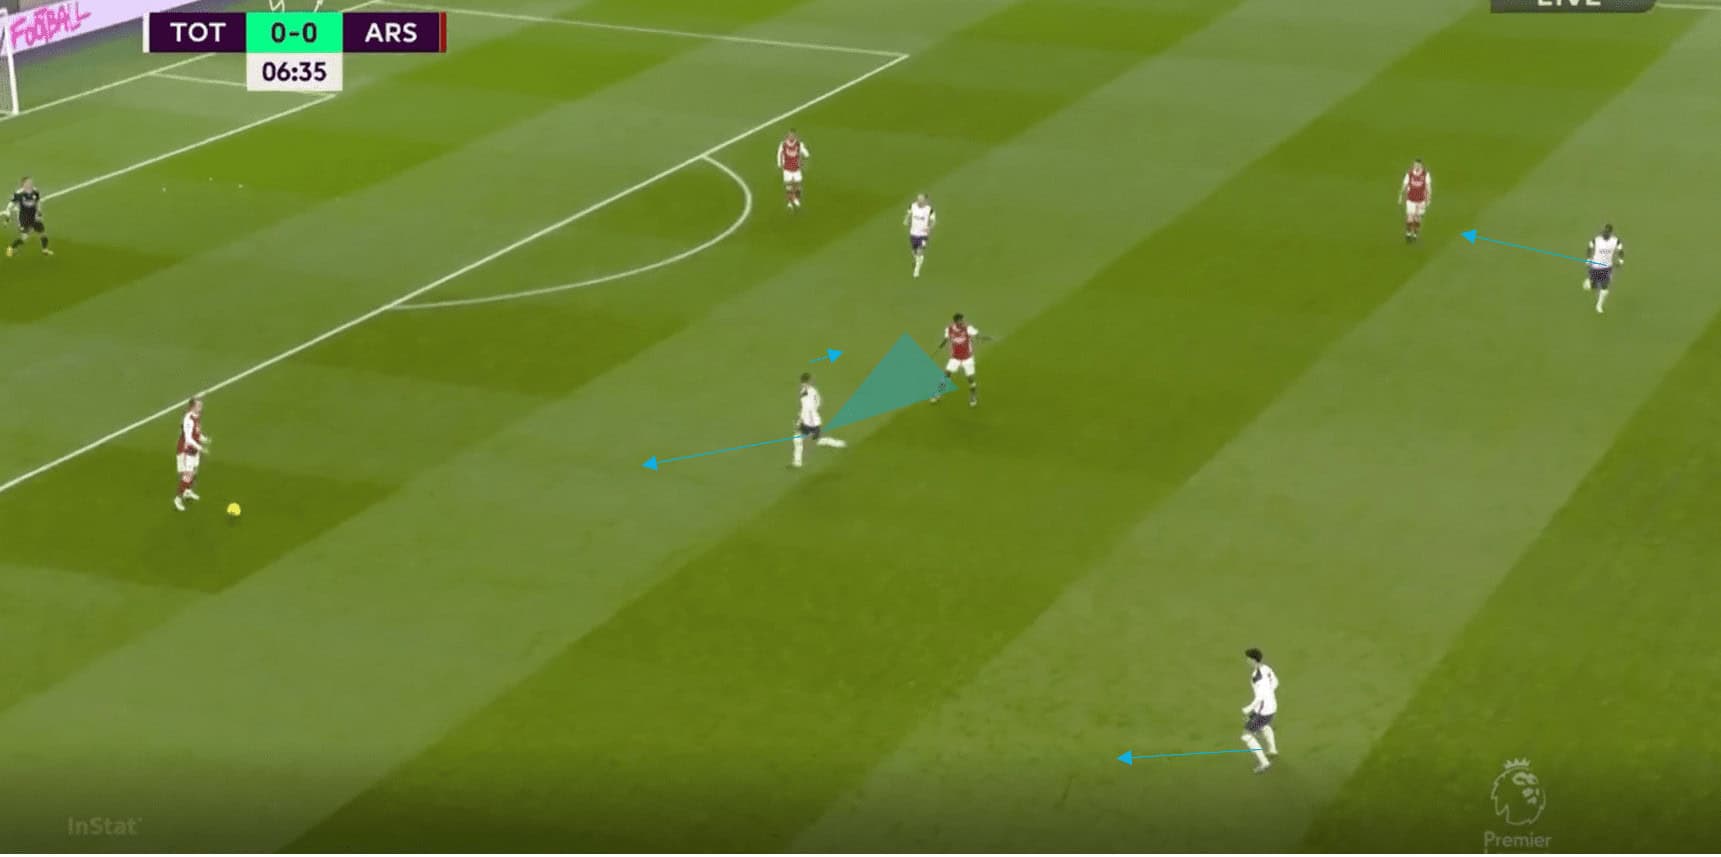
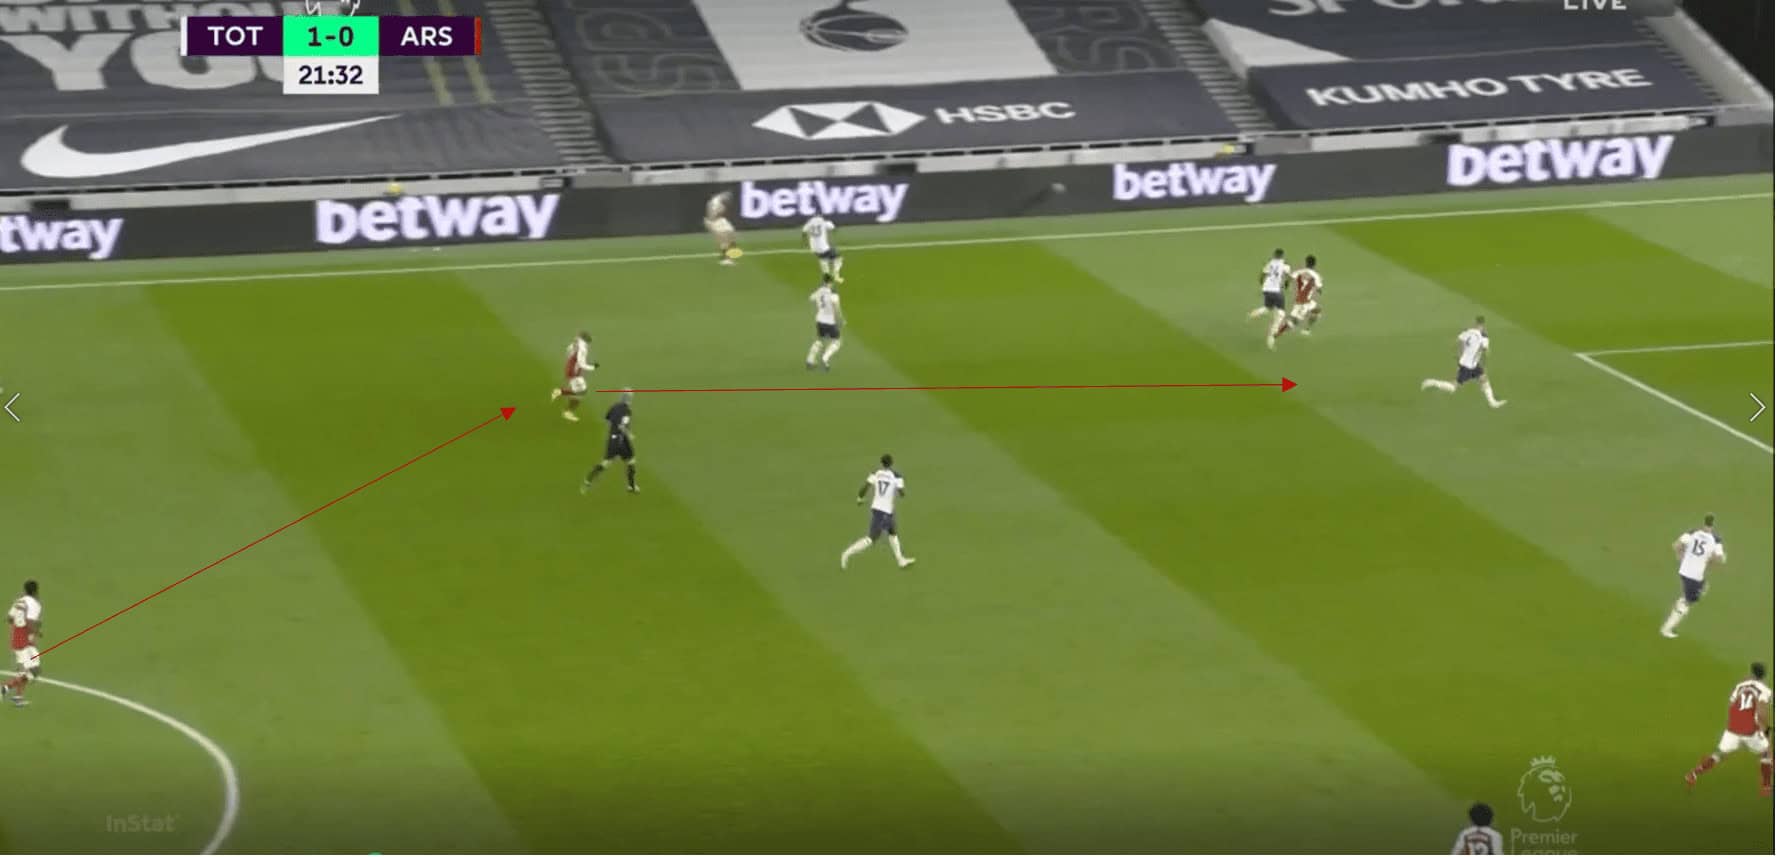
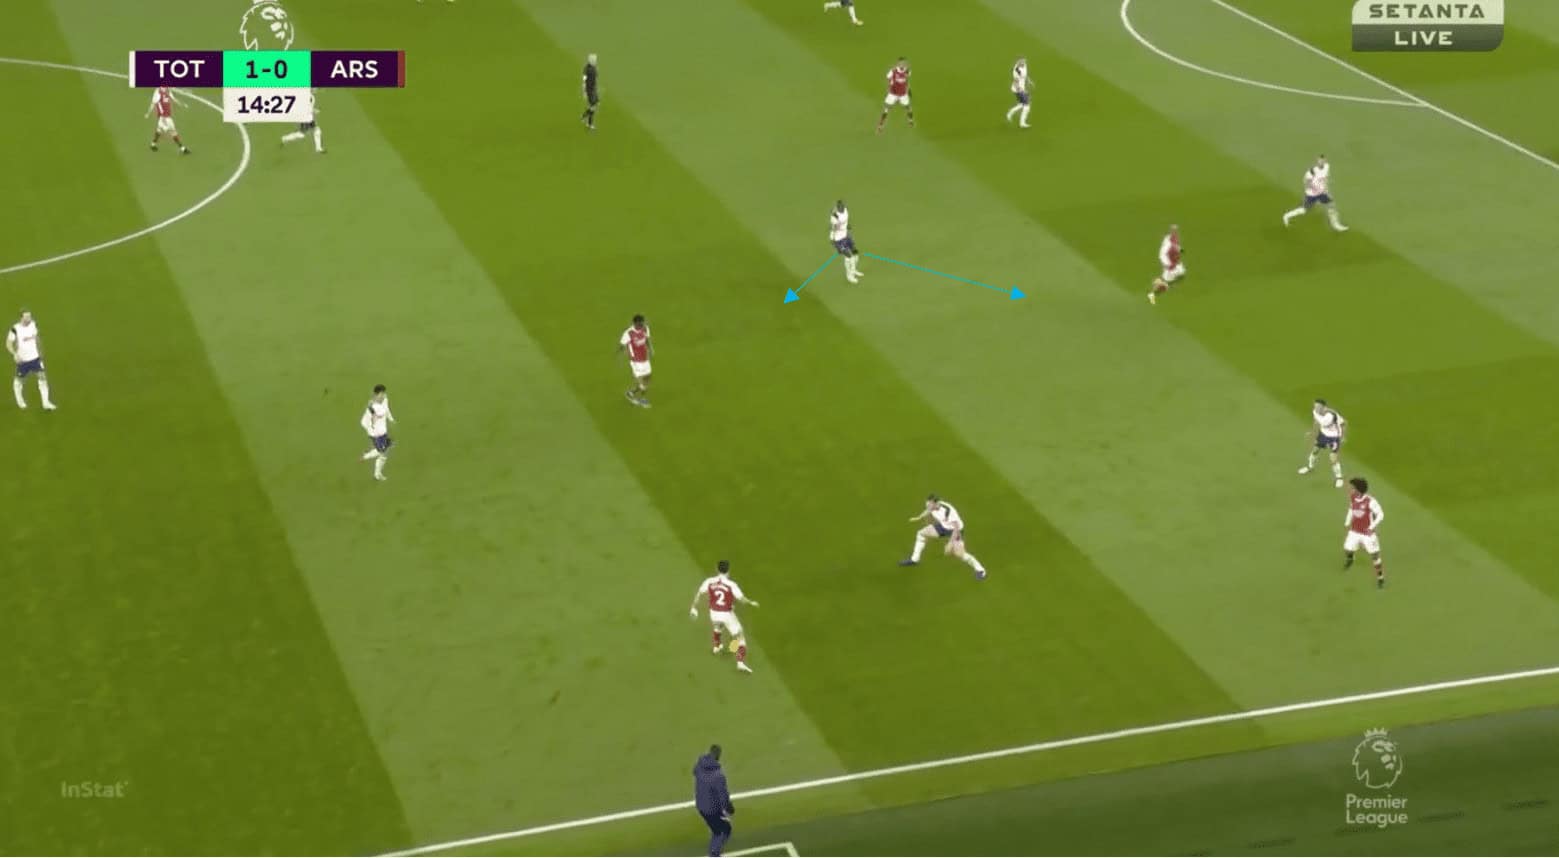
Because quick passes allowed for this head start to be taken advantage of, longer, more direct passes were often successful for Arsenal. We can see a nice example of a rotation here, with Willian occupying the Spurs full-back from the outside initially, before rotating inwards to alow Bellerin to receive. A 2 v 1 is created on the Spurs full-back here, and this would usually be nullified by the central midfielder tucking across, but due to the directness, we can see Sissoko can’t help.
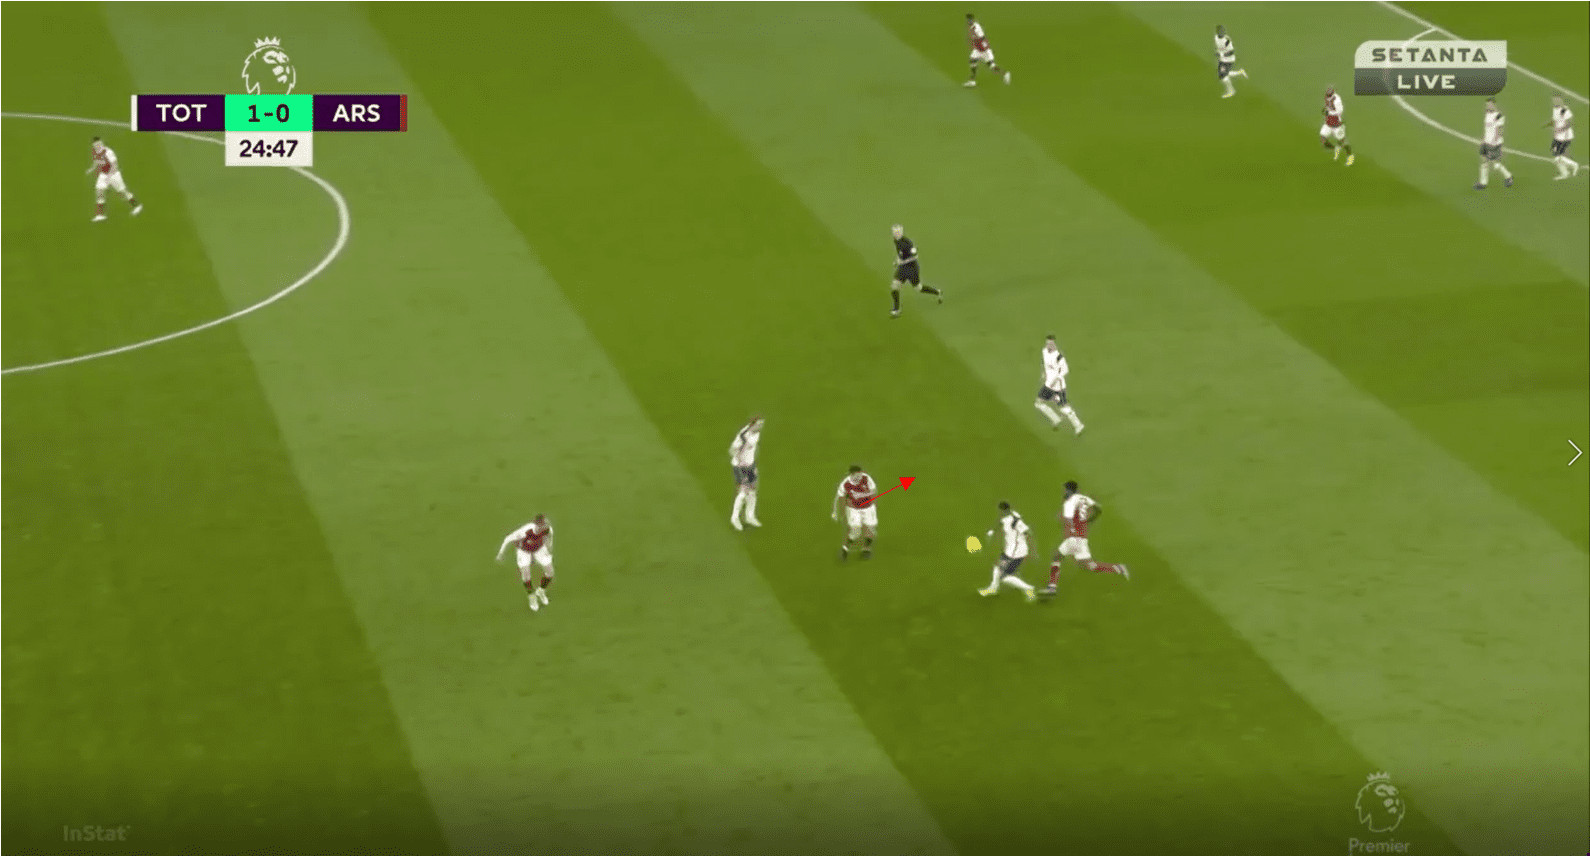
We can see another example of this working well again, with a 2 v 1 created and Tottenham unable to cover the half-space. Tottenham are actually very disorganised here, with Lo Celso as the nearest central midfielder.
We can see a final example of this below, with Bellerin here inverting to occupy the half-space, while Willian moves wider to receive. We can see Lacazette occupies the ball-near central midfielder, and so an overload is created in the half-space which Arsenal can exploit. Arsenal were often unable to execute in situations like this however, with their technical execution often letting them down.
Other nice ideas of playing through
Ideas and execution are obviously two different things, but the notion that Arteta got his tactics all wrong and that he was out of his depth is just plain wrong in my opinion.
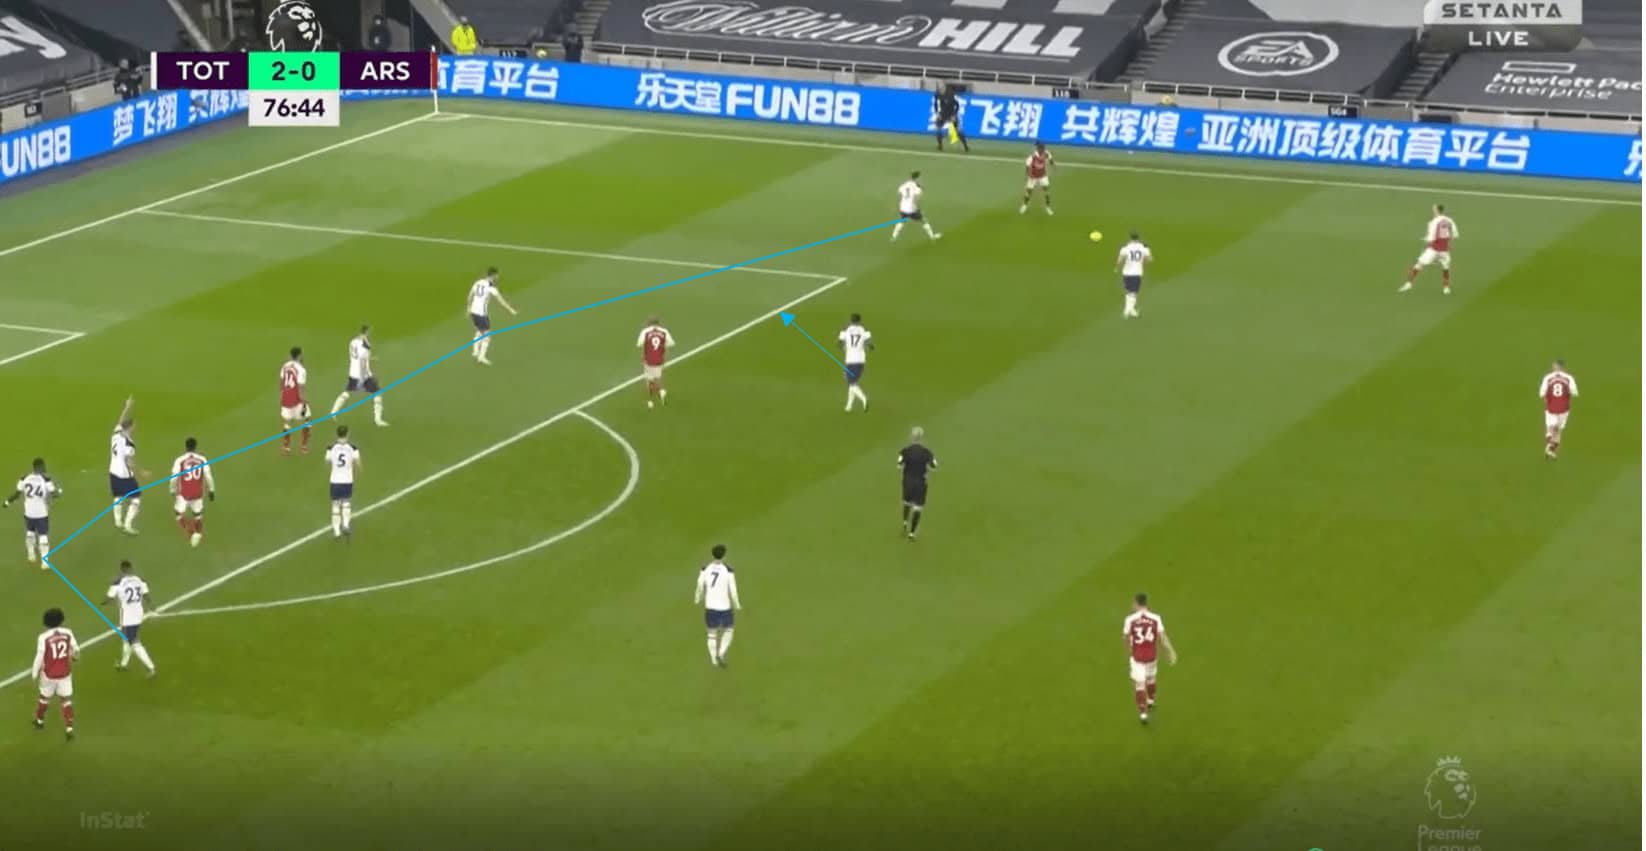
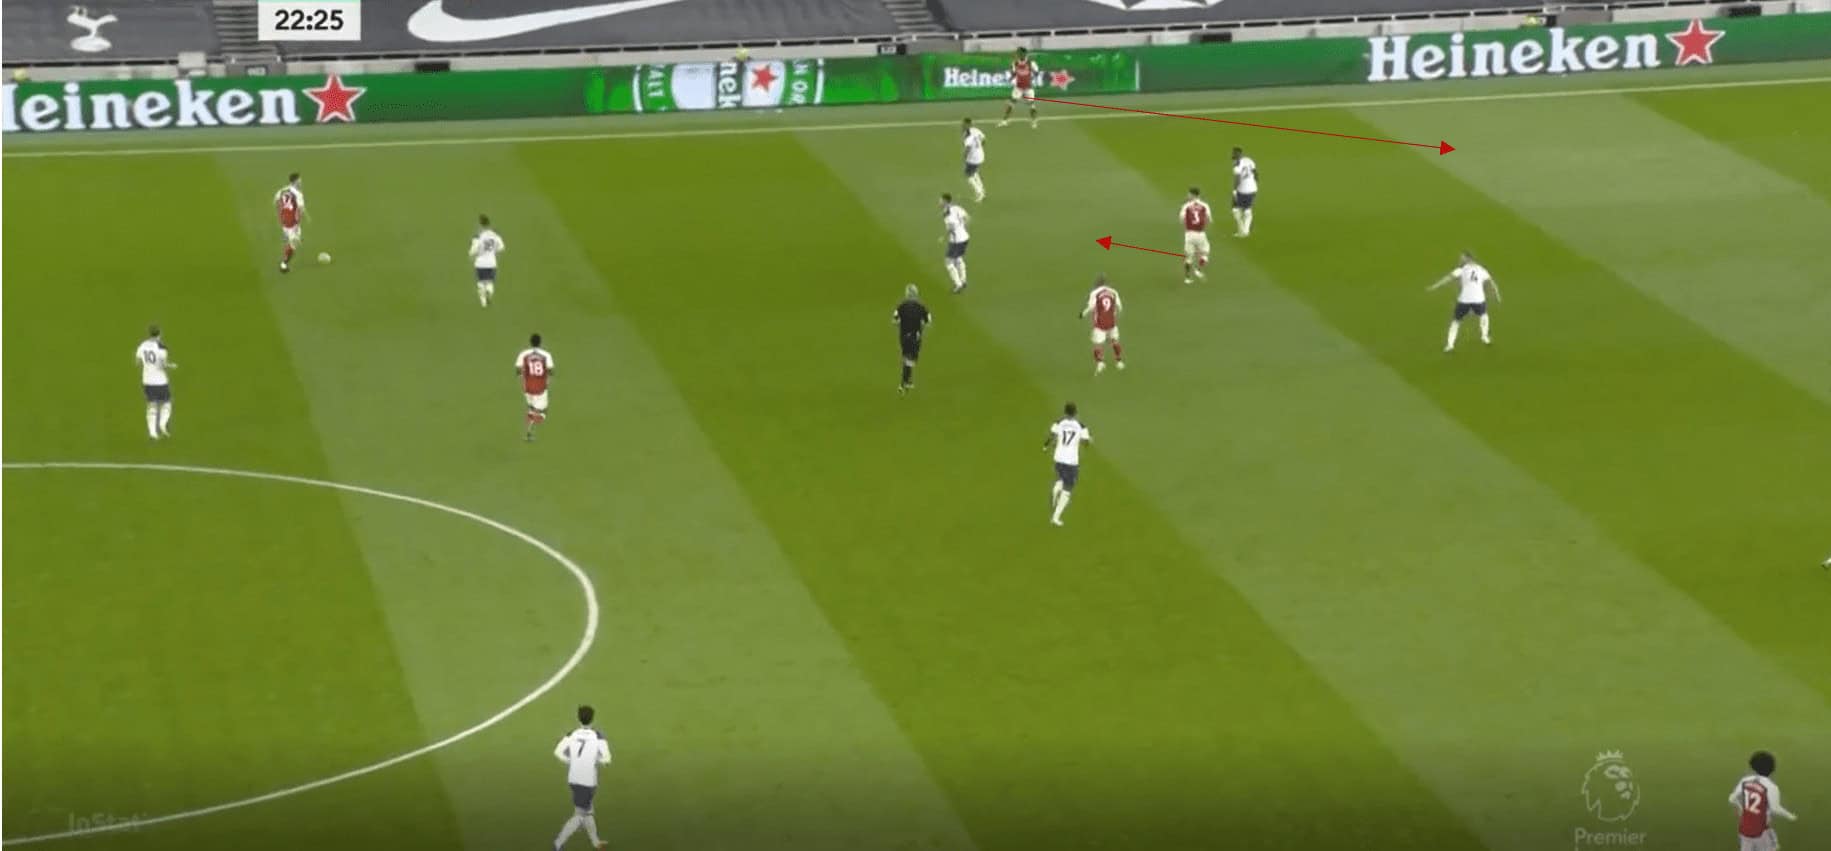
Earlier in the article, I discussed how Arsenal struggled to occupy the central midfielders and create overloads, but they were able to do this on occasion, and we can see a perfect example below. We see Arsenal are able to access the wing-back under no pressure having used a back three, and so the ball-near central midfielder is forced to press wide. Thomas Partey stays centrally and occupies a central midfielder, while Lacazette moves behind this same player and is partially covered by the Tottenham centre-back. Arsenal use double width here also to pull the full-back wider. The opportunity arises for either of the two players around Sissoko to receive, or for Aubameyang to make a run in behind Lacazette’s marker.
We can see a nice idea for an overload again here, with a lateral overload being created on Sissoko, with a player either side of him. There are multiple possibilities around movements here, with Bellerin maybe moving higher and in behind while Willian takes his marker forward. I don’t get the sense with this Arsenal team that they don’t know what to do or that they are badly coached, but they just aren’t there yet in terms of executing these movements and combinations.
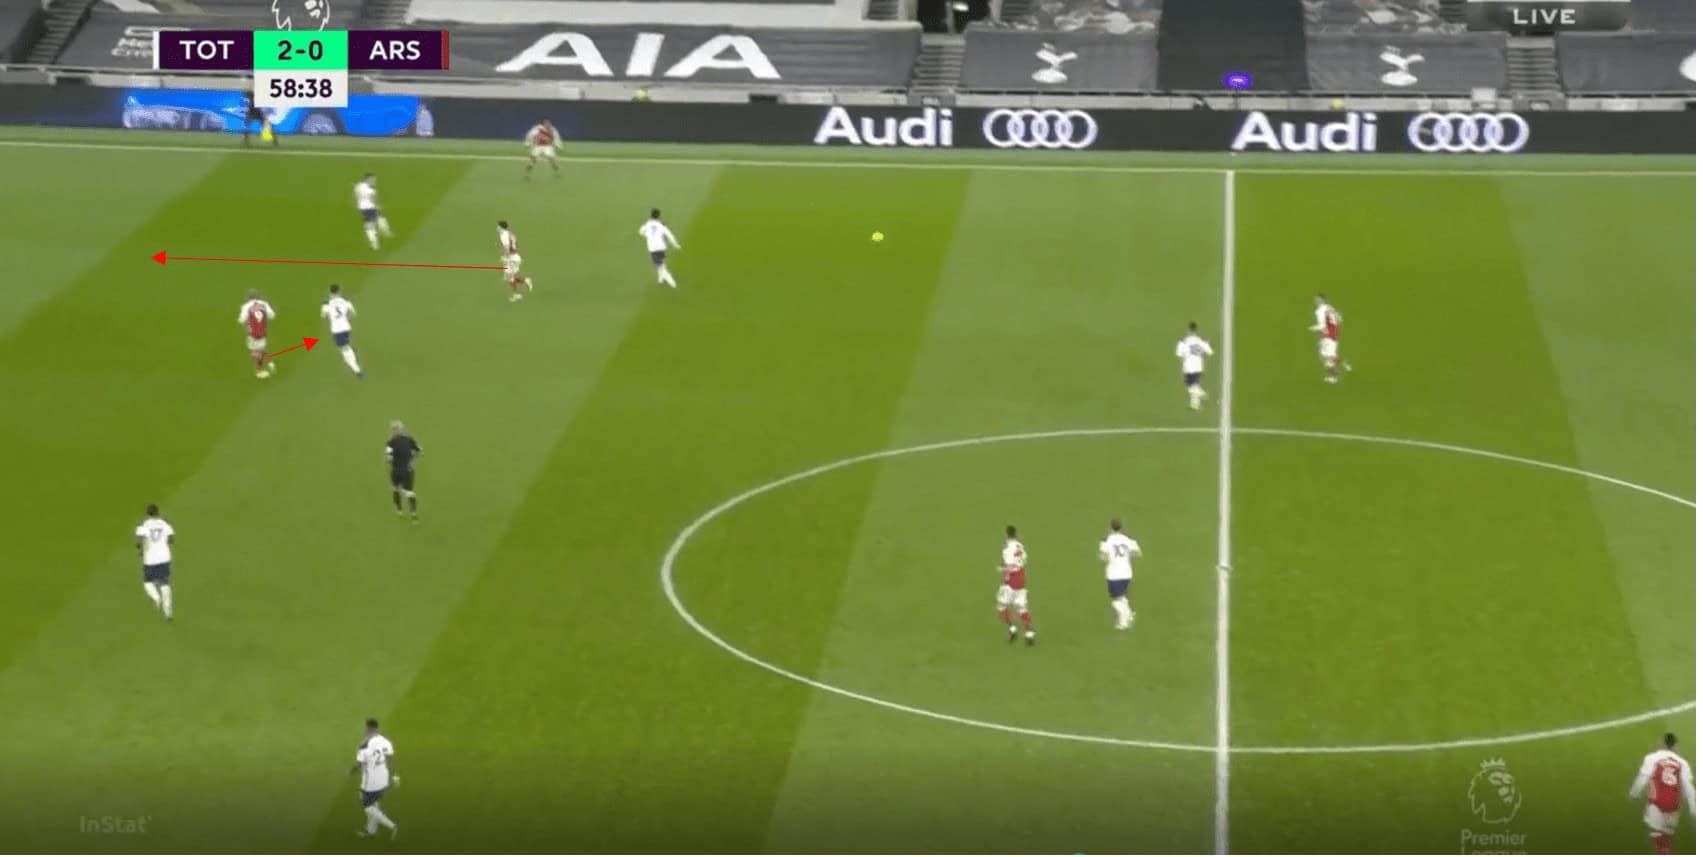
In a really good example here, we see Arsenal create a nice overload on a central midfielder, with Lacazette occupying the midfielder while Dani Ceballos makes a run from deep to arrive onto a pass. This allows Ceballos to go forward immediately with the ball due to his body orientation, and because he’s arriving from deep, he can’t be marked by a Tottenham defender in a deep area. Ceballos gets the ball wide, but again sloppy technical execution lets them down.
Rest defence
It is hard to call Arsenal’s rest defence poor as a whole in the game, as Tottenham were largely contained in the second half, even if that was in part due to how deep they got. The first half counters did of course cost them the game though.
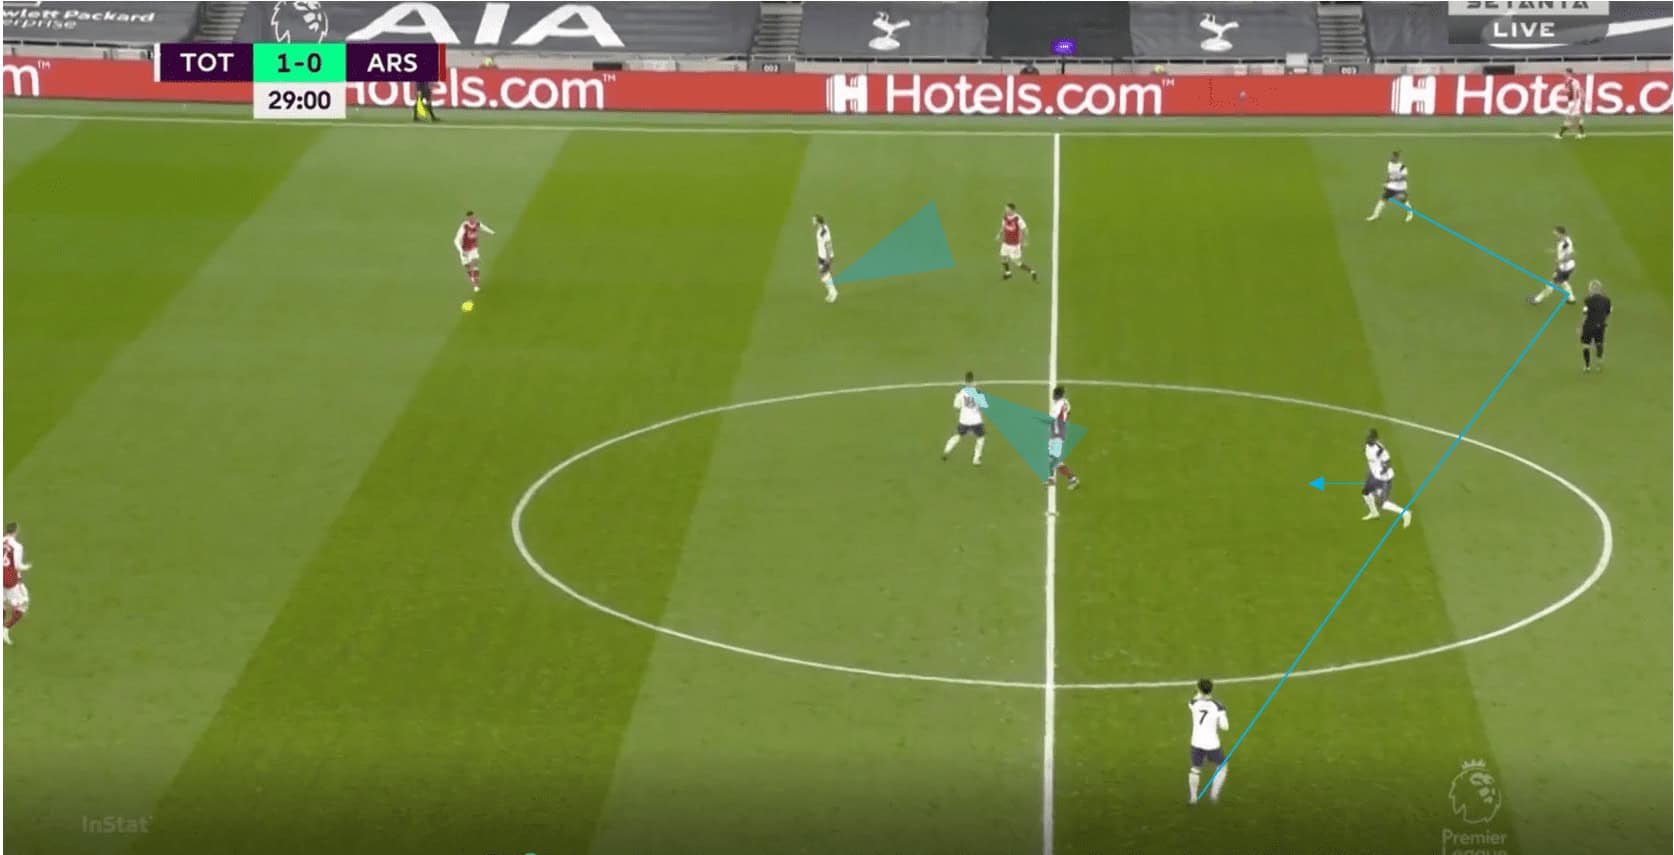
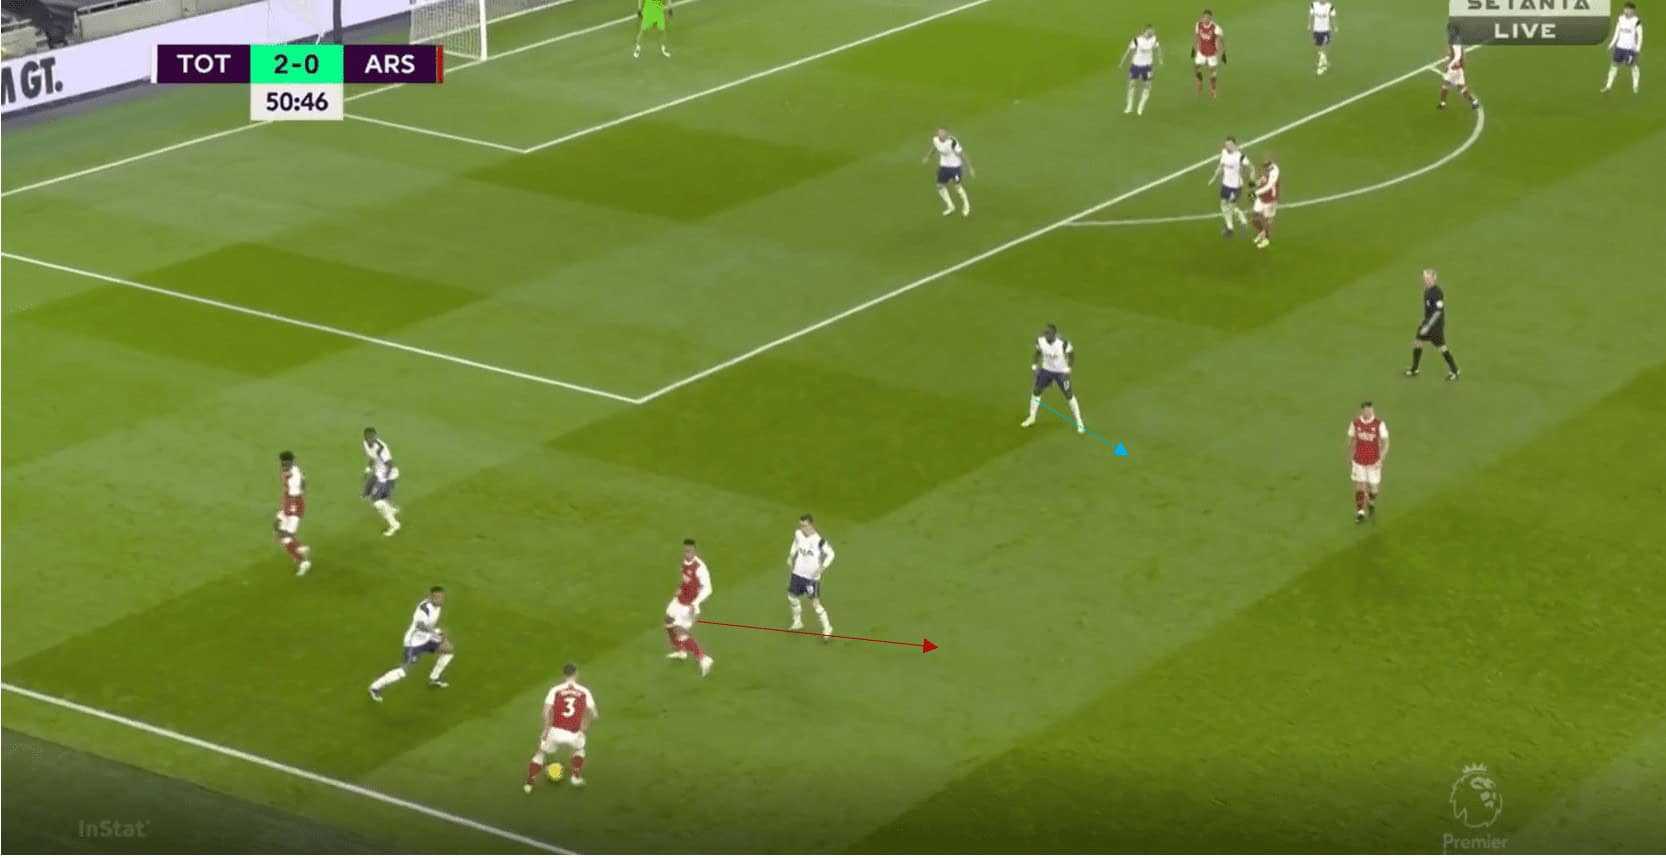
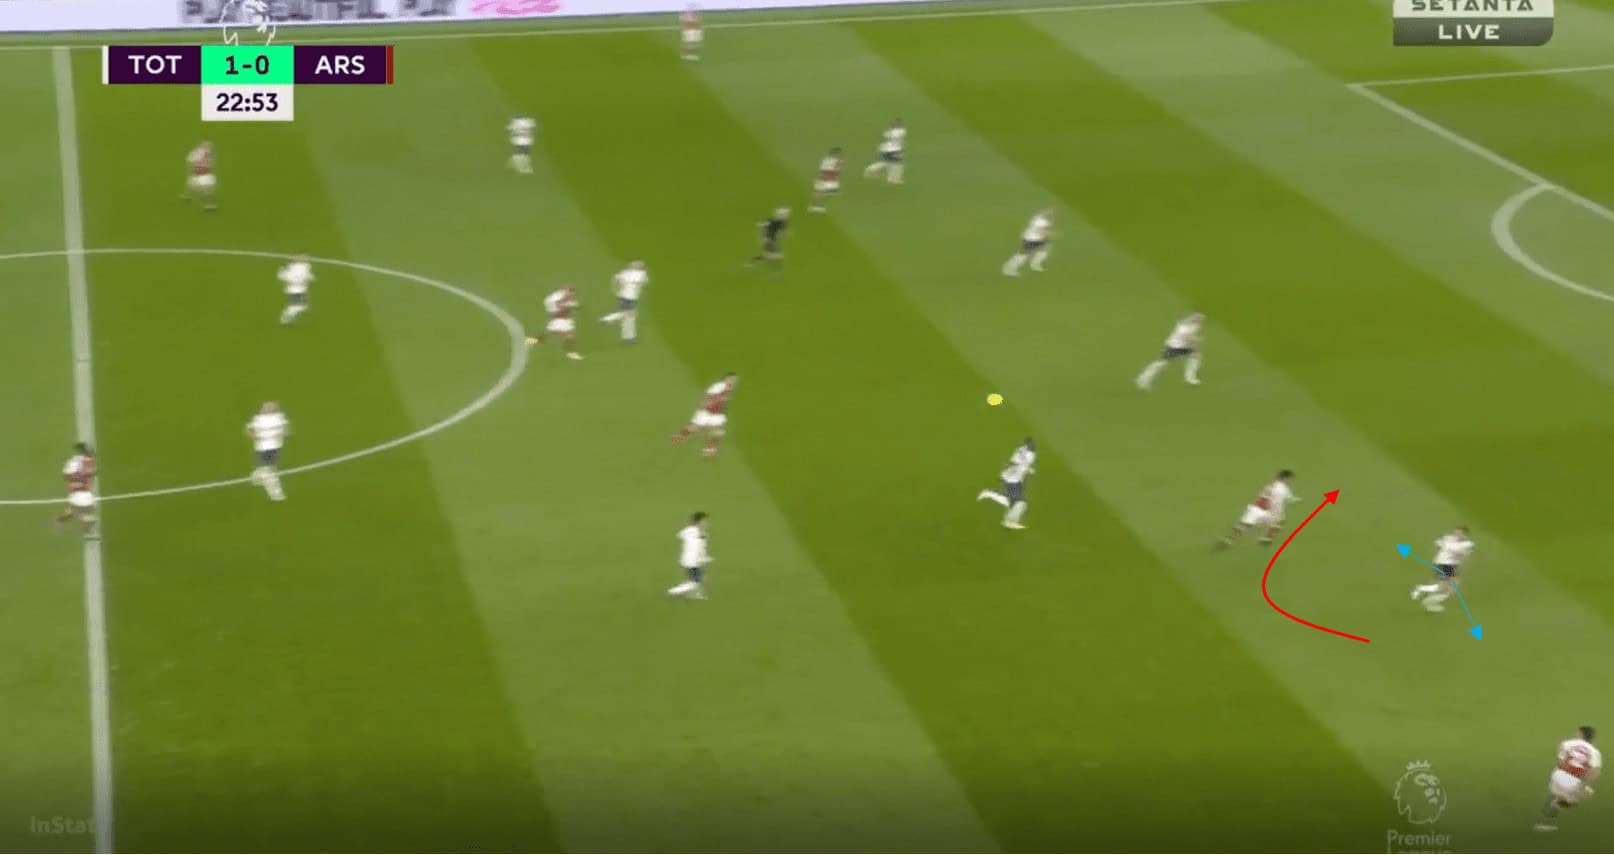
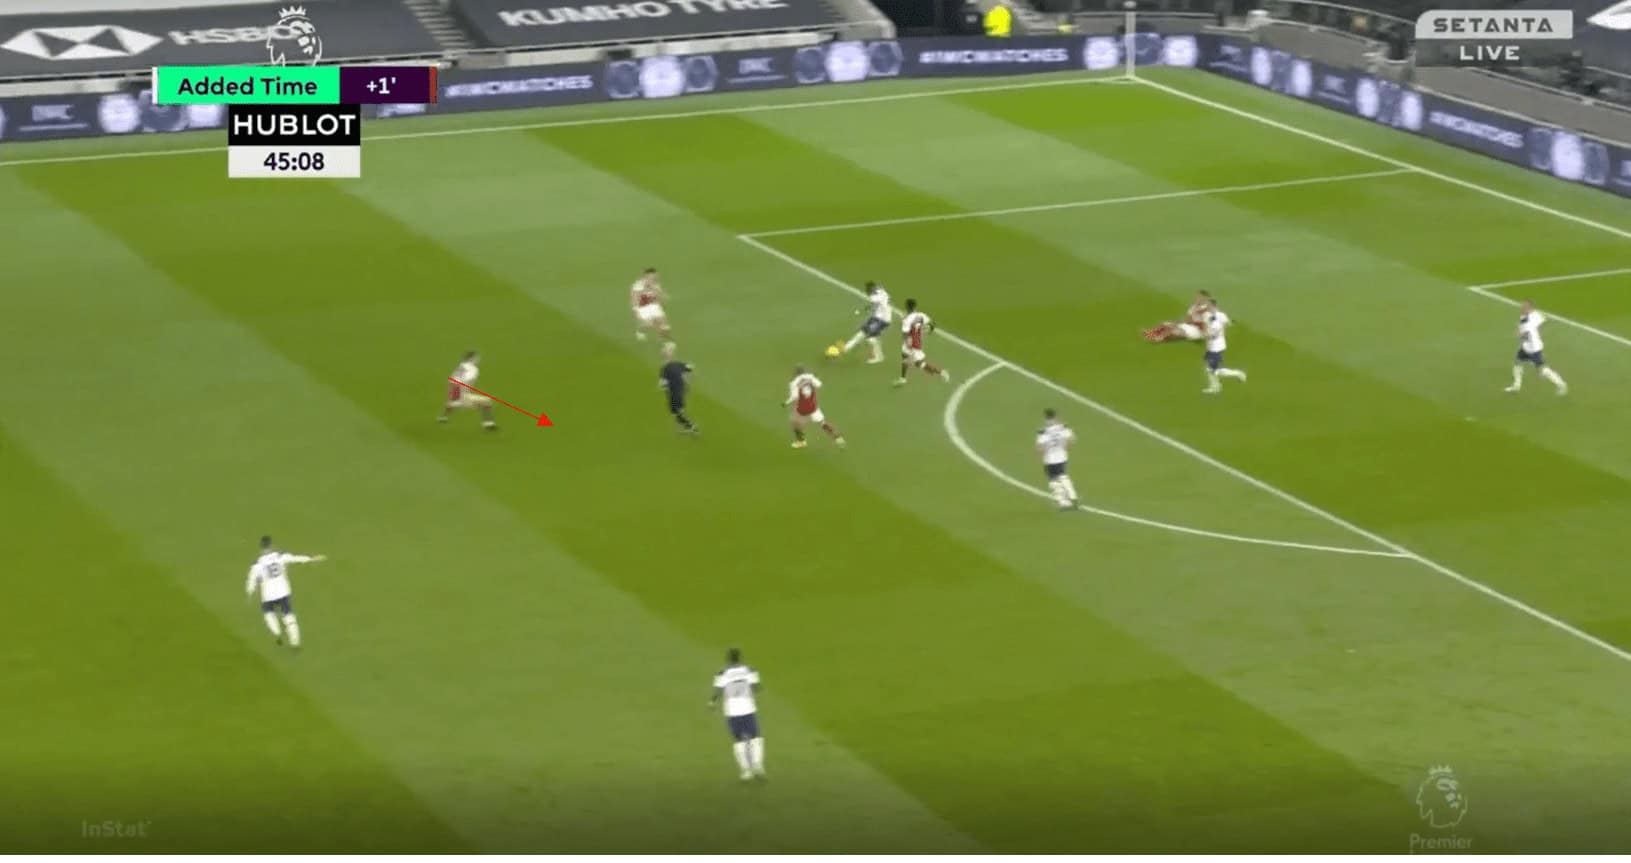
It was obvious before the game that Tottenham’s counters are often sourced from Harry Kane’s hold-up ability, and Arsenal could perhaps have done more to nullify this for the first goal. To deal with target players in a build-up, using one player in front and one behind is often a good way to ensure they don’t control the ball and play it on, and Xhaka here is caught too high and concedes space in behind, meaning Kane has opportunity to control and play into Son who runs and scores.
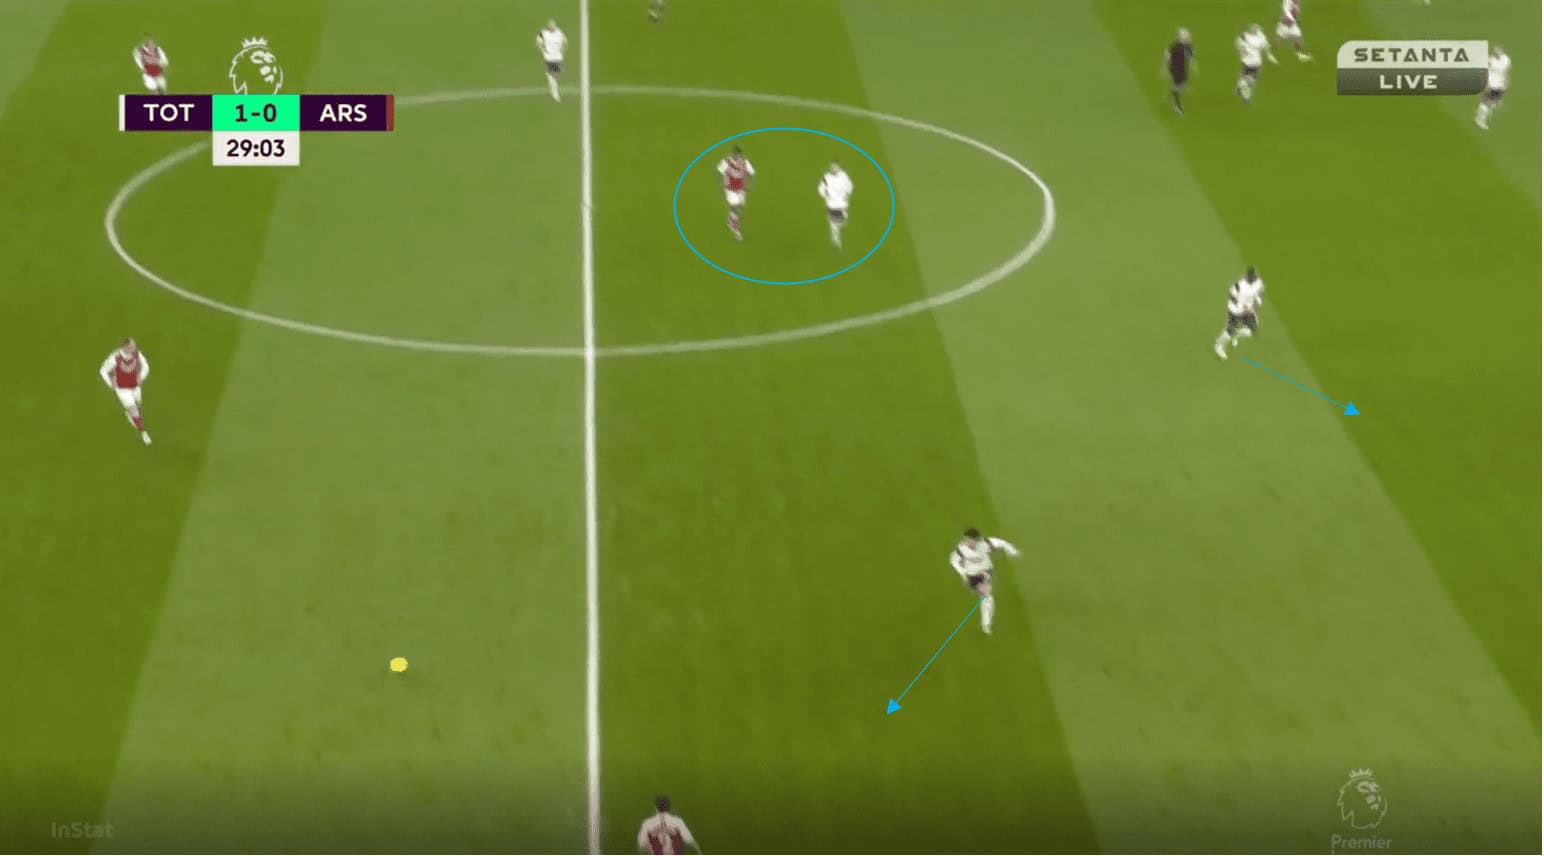
Arsenal’s rest defence is not too bad here, but Xhaka just makes a poor decision and counter-presses poorly to allow this central pass. Tottenham actually have no places higher than those in this picture, and so allowing the player in possession to run down the line and into more traffic would have been a much better option, but Xhaka does a poor job of protecting the inside.
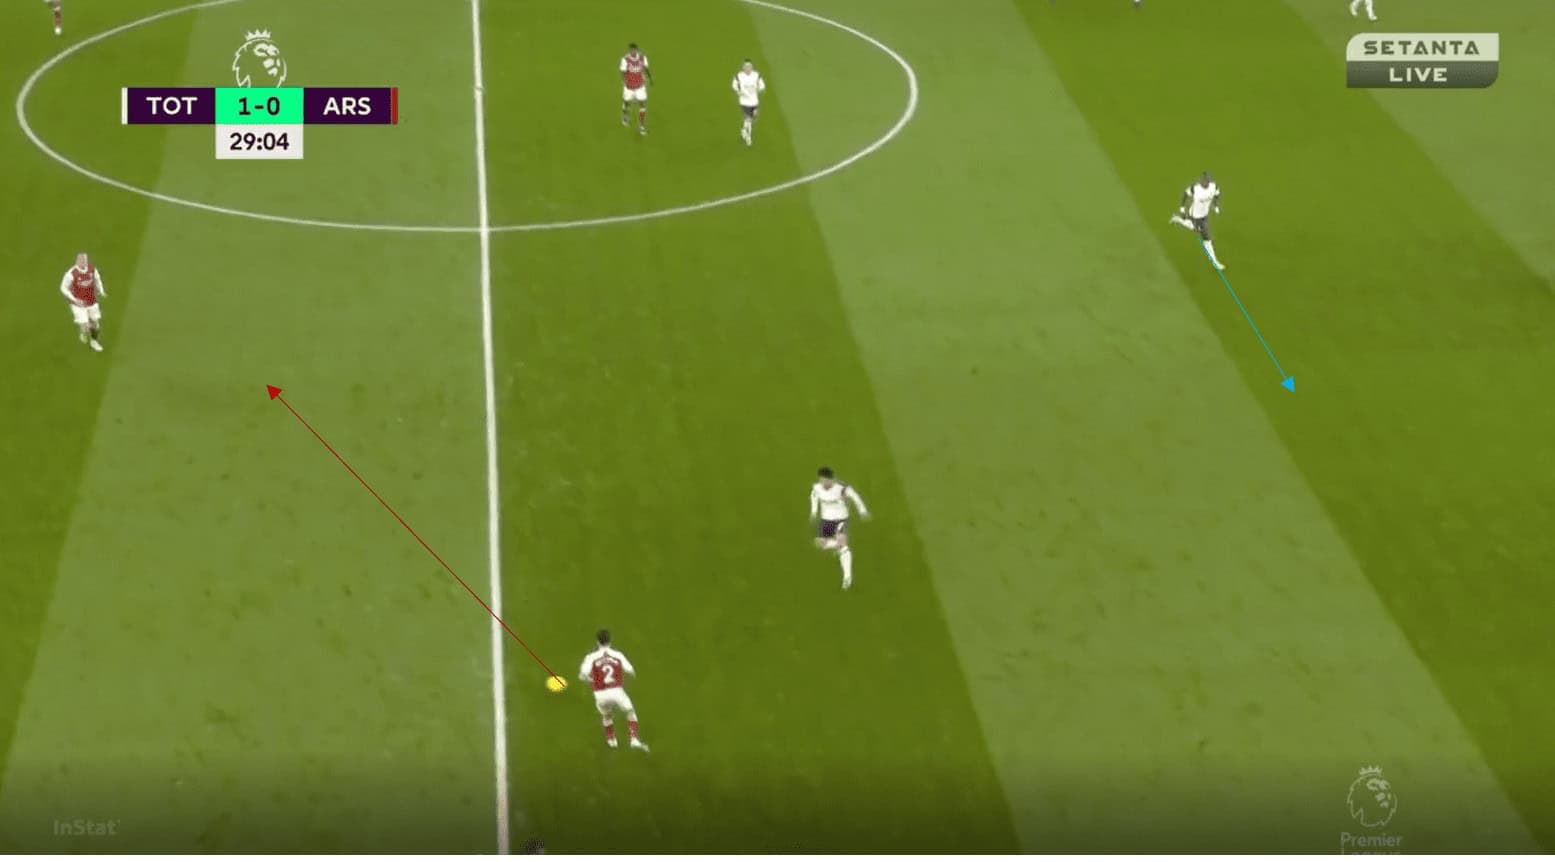
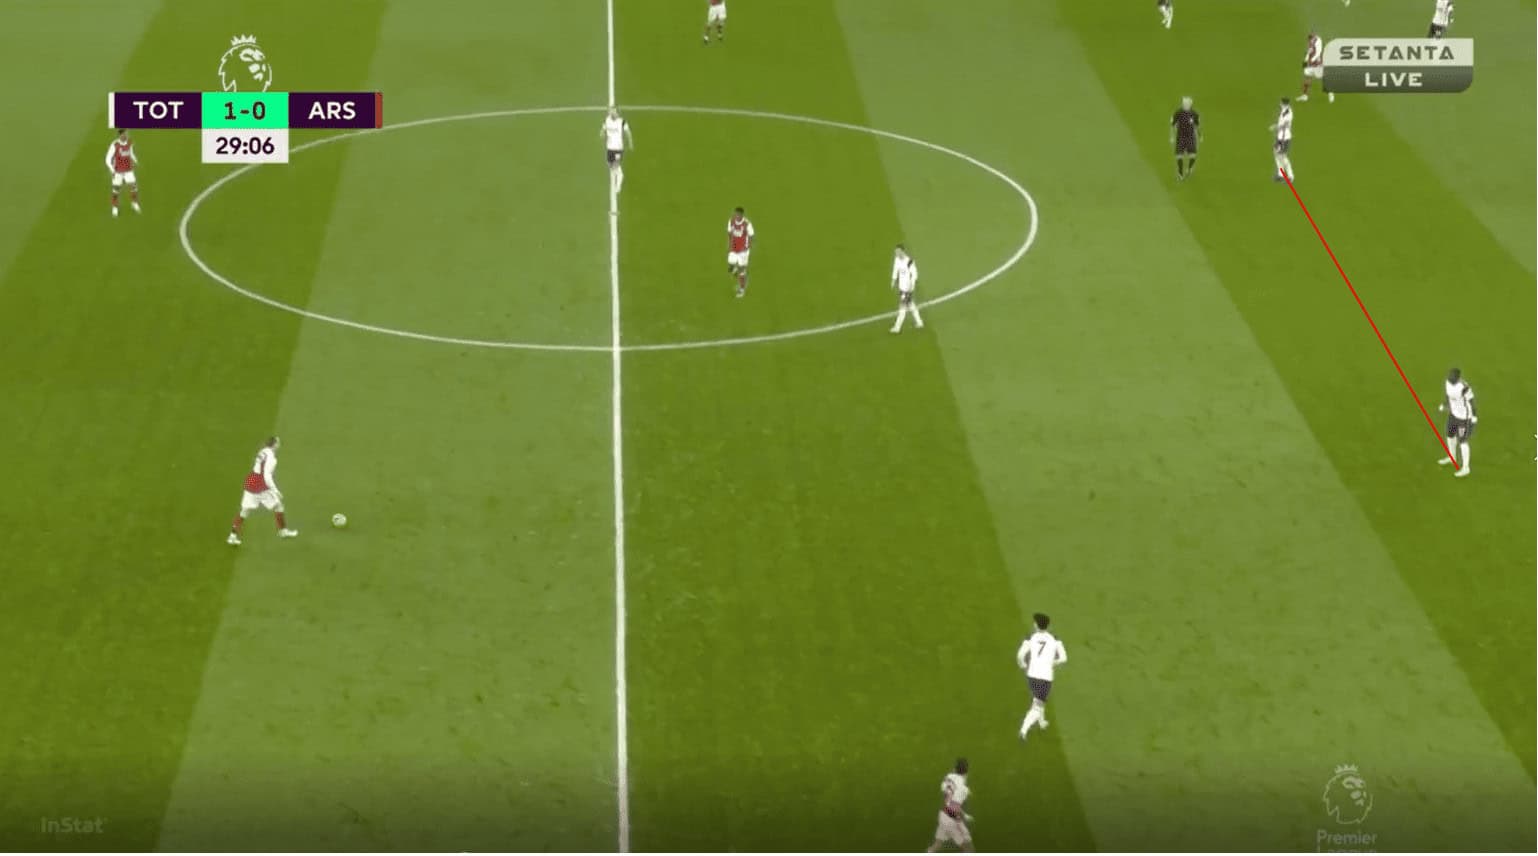
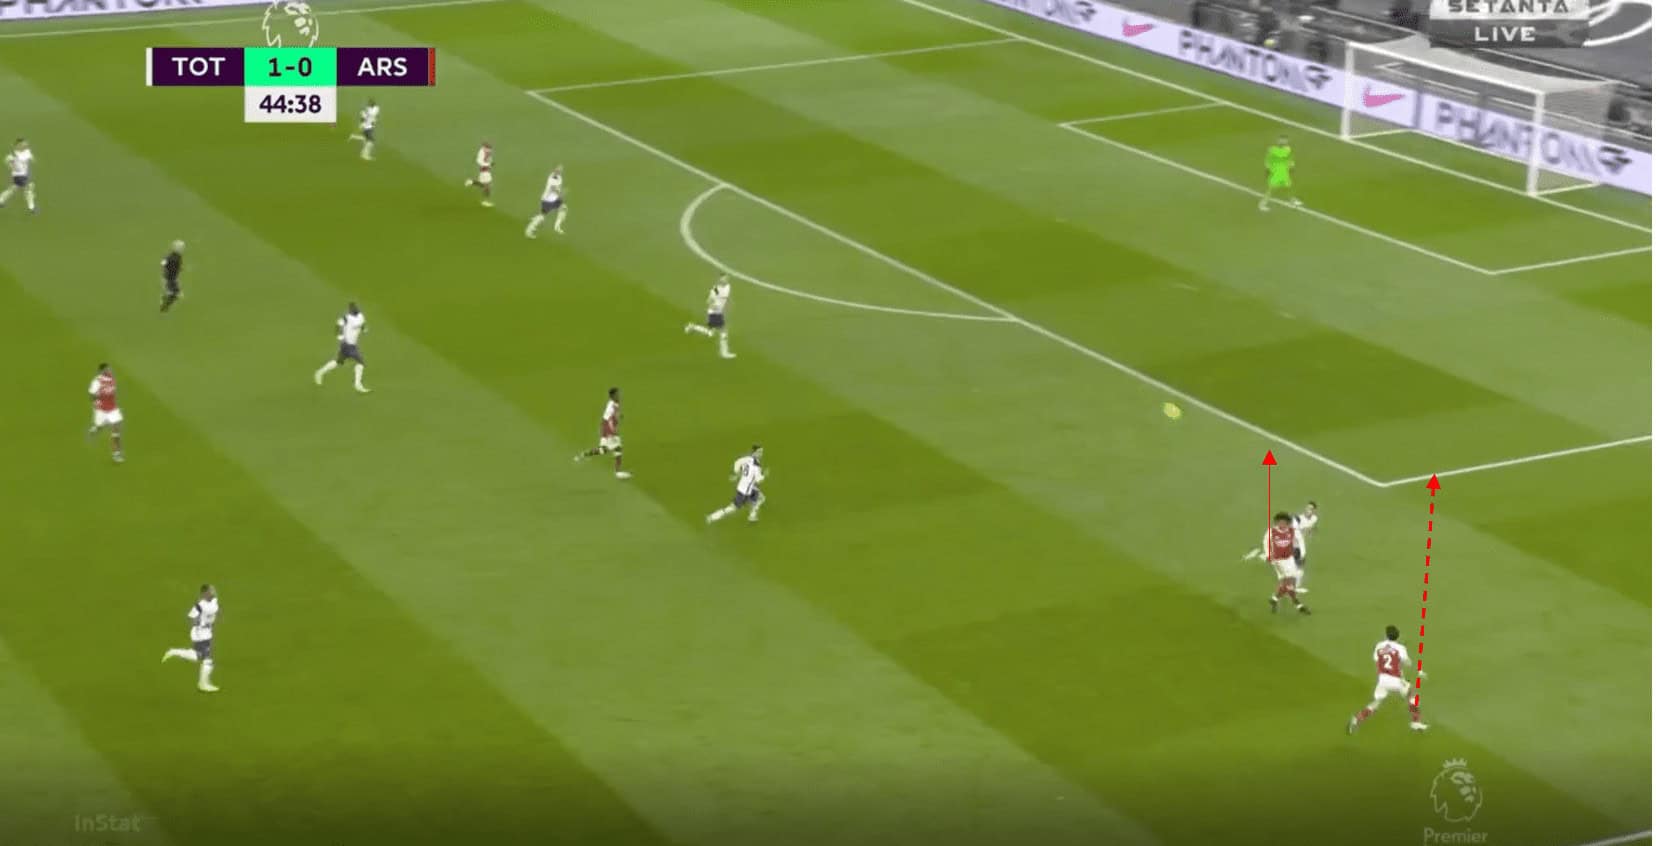
Tottenham’s second goal came from Arsenal counter-attacking a Spurs counter, and so rest defence is always difficult in these circumstances, however, again Arsenal could do better. Leaving themselves in an underload at the back was the real problem in the counter, but counter attacks are often (and best) solved by cutting them at their source, and again Xhaka doesn’t do a great job of cutting the lane to prevent the central pass. This is very difficult, in fairness, but he makes it harder for himself with his starting position.
Conclusion
It really was the kind of performance that Mourinho teams become remembered for, and Tottenham’s defensive tactics managed to stifle and frustrate Arsenal all game long. For the ‘possession team’ in these matches, it is all about balancing risk, maintaining control with good rest defence, technical quality, good positional structure, a bit of luck, and marginal gains, and unfortunately for Arsenal, they couldn’t claim to have all those things at the same time throughout the game. Conceding early goals was always going to put them in a hard position, and they just weren’t able to break them down for the reasons outlined. Again, it can’t be underestimated how difficult these kind of games can be, and so the outcry around Arteta losing the game isn’t something I agree with, but it’s also not surprising.
On the larger scale, this result puts Tottenham back on top of the league with Liverpool close behind on goal difference. Those two sides meet on the 16th December, and thankfully for Liverpool, that list of attributes needed to beat this Tottenham side are all ones Liverpool have shown consistently.
If you want even more time stamped examples and details from this game, I will be publishing my notes on Twitter so take a look at those too.