So far, the current season has not gone as Borussia Dortmund had imagined.
After being eliminated from the UEFA Champions League, UEFA Europa League, and the domestic DFB-Pokal, they have only a small chance of winning the league.
Nevertheless, after a club-intern analysis, Marco Rose will also be on the sidelines at BVB next season, as Managing Director Hans-Joachim Watzke confirms to Sky.
When asked whether Rose would stay “one hundred percent” at Borussia Dortmund, the 62-year-old replied: “Yes, because he is doing a good job, we want continuity in the position and are satisfied with him.
That’s very simple. We’ve said that often enough.”
In the summer, Rose will then be responsible for coordinating the upheaval at BVB.
Several players, especially star striker Erling Haaland (21), are expected to leave the club.
Today, we will look at Rose’s tactics during this season.
In this tactical analysis, we will examine how injuries affected the team and why they employed multiple formations throughout the campaign.
Marco Rose Formations
Dortmund have defended in a myriad of shapes that vary based on ball placement on the field.
The nominal formations have varied from 4–3–3 to 4–1–2–1–2 to 4–2–3–1 to 3–5–2.
These impact how the team press and the zones they’re able to nullify, while the other zones they might struggle in.
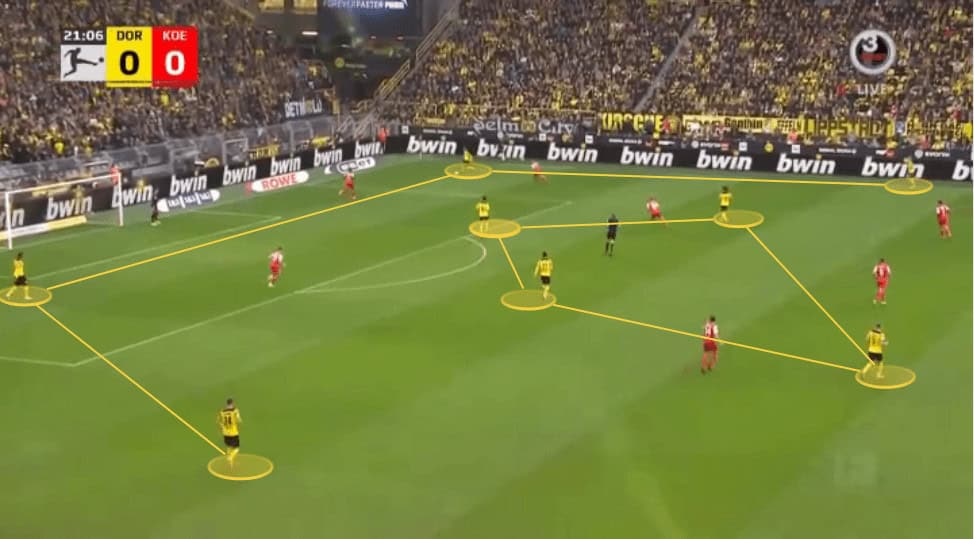
First is the 4–3–3, which has been their primary formation in most matches this season.
This generally defends pretty wide and is often used when playing against an opposition that use a back 3/5 to counter the natural width of those formations.
In this formation, the midfield is usually comprised of one number 6 (Witsel/Dahoud), who acts as an “anchor” while two 8s press higher.
This causes an immediate weakness in the build-up phase.
Opposition players can exploit the diamond gap between the 6, 8, and striker to receive and turn.
The 4–3–3 presses in a 4–3–3 shape and has a few main zones of excellence.
First is the wide areas, where the 4–3–3 is particularly dangerous.
The team presses from inside the pitch into the wide areas.
This creates a dangerous situation wide for the opposition, where a combination of the winger, 8, and fullback can overload to win the ball back.

The 4-1-2-1-2 is the next formation to discuss, the one everyone thought they were using.
There’s an easy explanation for this: Rose’s 4–1-2-1-2 defends deeper with three up top as well.
Generally, it has the same strengths.
Those wide areas are where strikers, 8s, 10s, or fullbacks can work to overload and win the ball.
The main difference here is in the opposition build-up phase, where the 10 (often Reus) will man-mark the opposition 6.
Many Bundesliga teams will build with a single midfielder deep, or have the second member of their double pivot move high, making this an effective way to defend any ball progression.
The 4–2–3–1 formation has been used sparingly this season, but its application in certain scenarios has been evident.
This formation defends explicitly well in the second line of progression.
By creating a four-man forward line, the striker can defend the two centre-backs, move the ball wide to one of the wide areas, and prevent circulation.
All that said, the differences between the two (4–3–3 and 4–2–3–1) are pretty negligible.
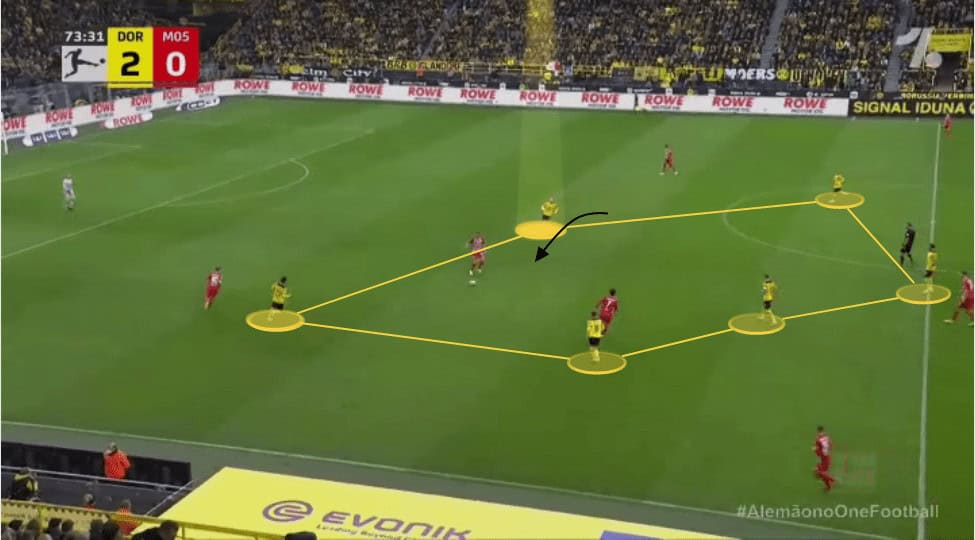
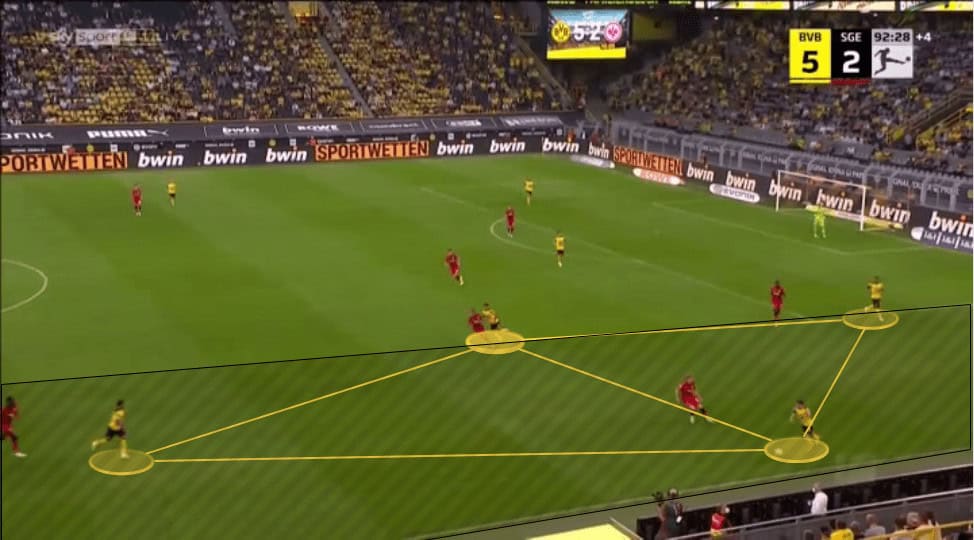
The 3–5–2 is the final formation used, and it has mostly been employed to account for missing attackers, such as Haaland and Reus (see the Gladbach match).
Defensively, it’s a good matchup in a man-oriented setup vs another 3/5 back side, but the wide areas get overloaded here more frequently.
Marco Rose Defending phase
Vastly more important than the formations used is the principles Rose conveyed to the players.
From the front end of the attack, players are instructed to quickly repress lost balls to regain possession and to double down and isolate the attackers.
This is particularly common in the wide areas of the pitch, and in the centre of the pitch after the first midfield line is broken.
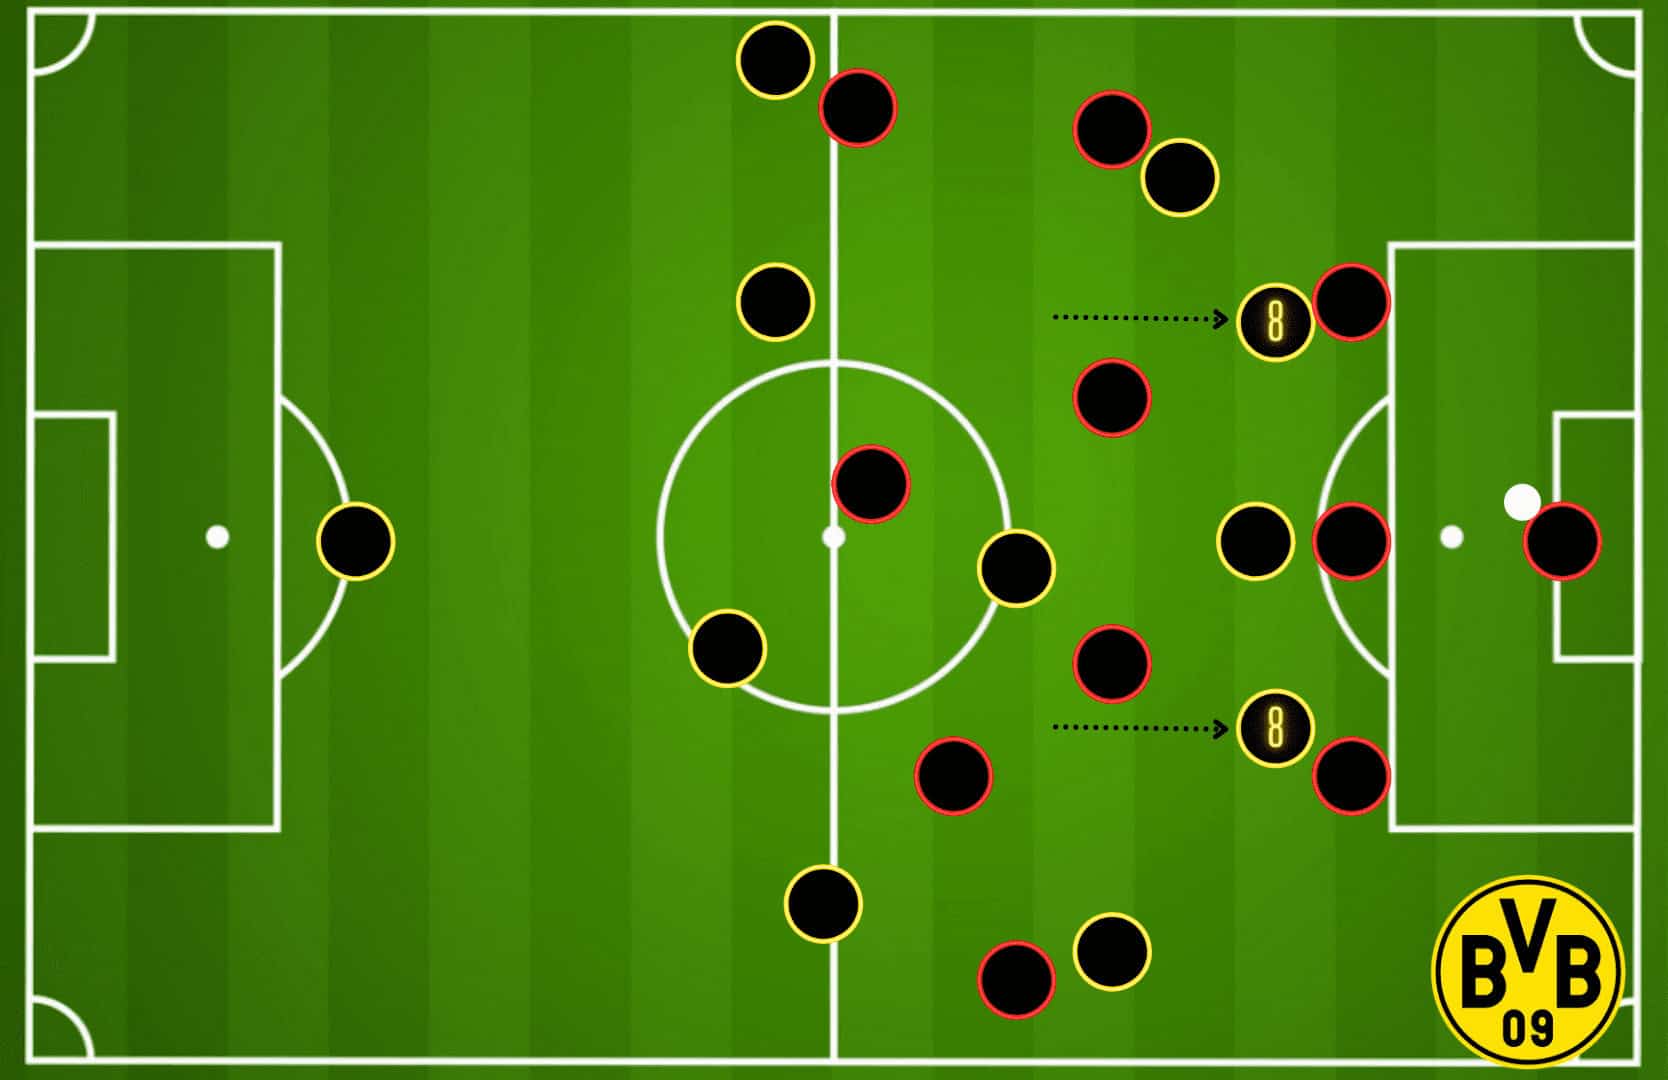
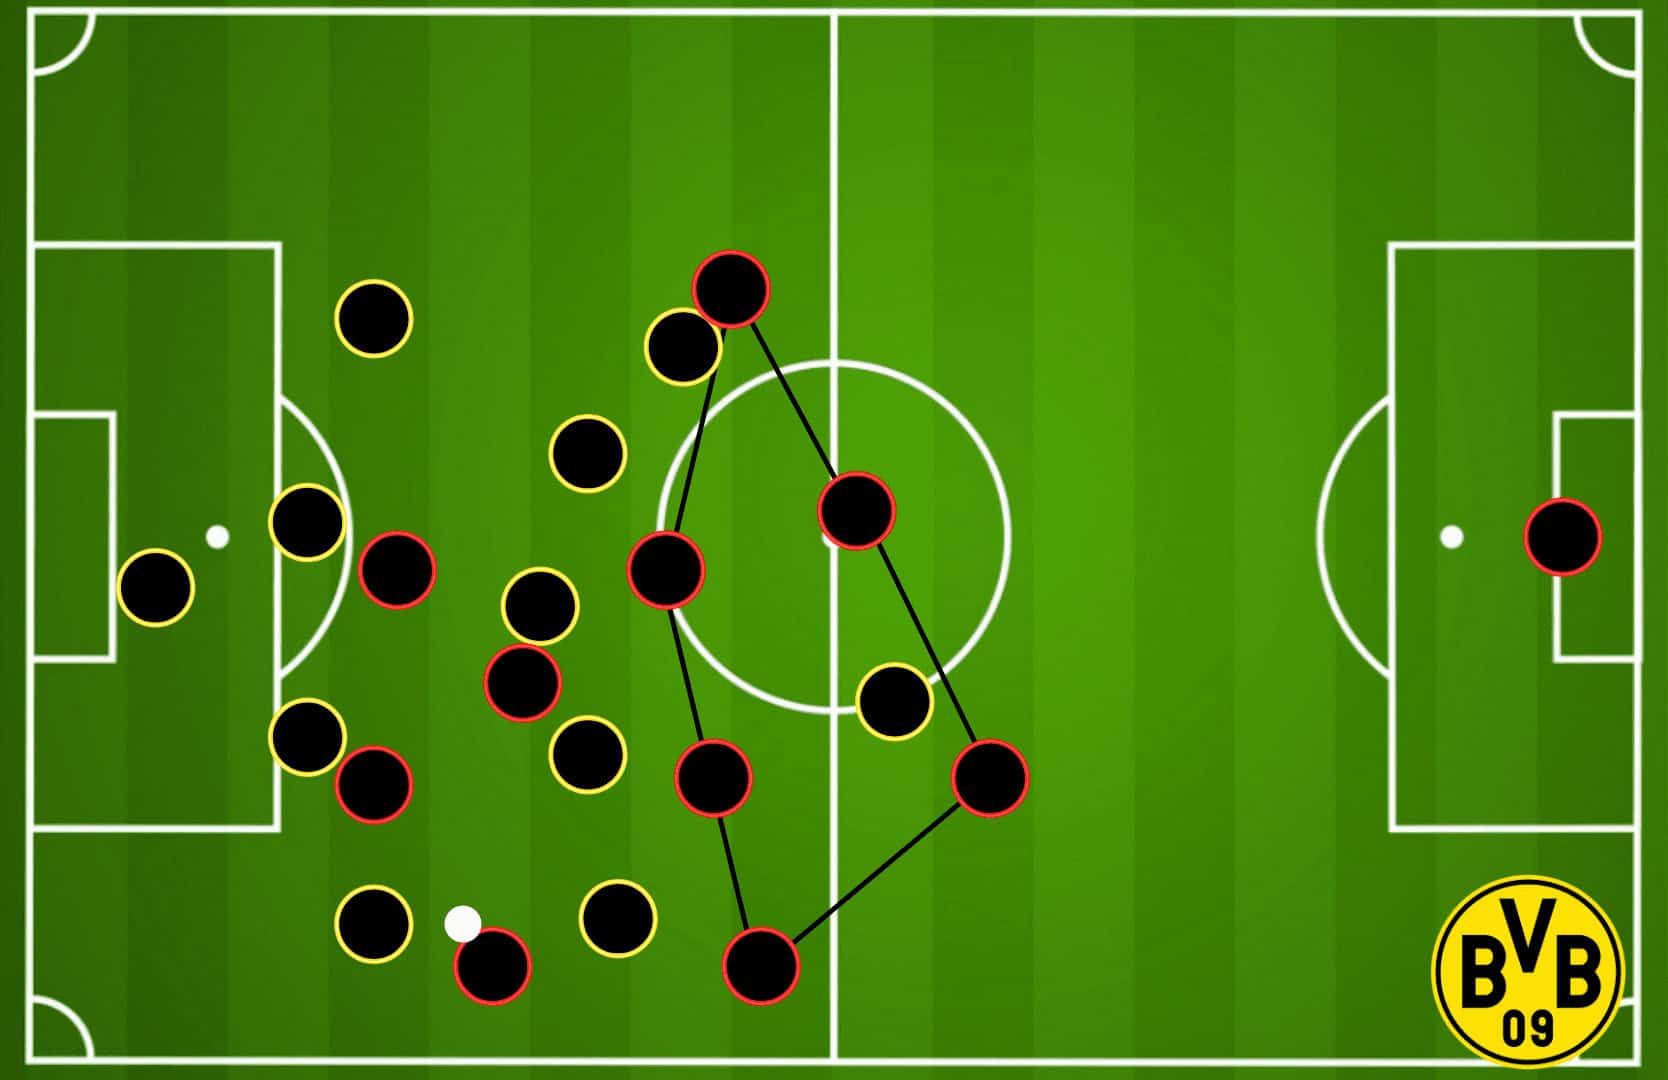
These can be roughly defined by zones, as shown below.
Although it’s not an exact science in this case, these red zones (intense pressing) are specific places where winning the ball is prioritized.
At the same time, the blue (drop off) and yellow (weaker/situational) are more focused on box defence and space/progression defence, respectively.

It all starts with pressing angles and a supporting press, which Haaland excels at due to his size.
He can direct the opposition to certain sides of the pitch simply by using his body shape.
He is rarely instructed to press hard, but his body shape forces a pass in one direction or the other.
His movement acts as a pressing trigger for the players around him.
They are able to anticipate the next pass and press before or as the pass is made rather than when it arrives.
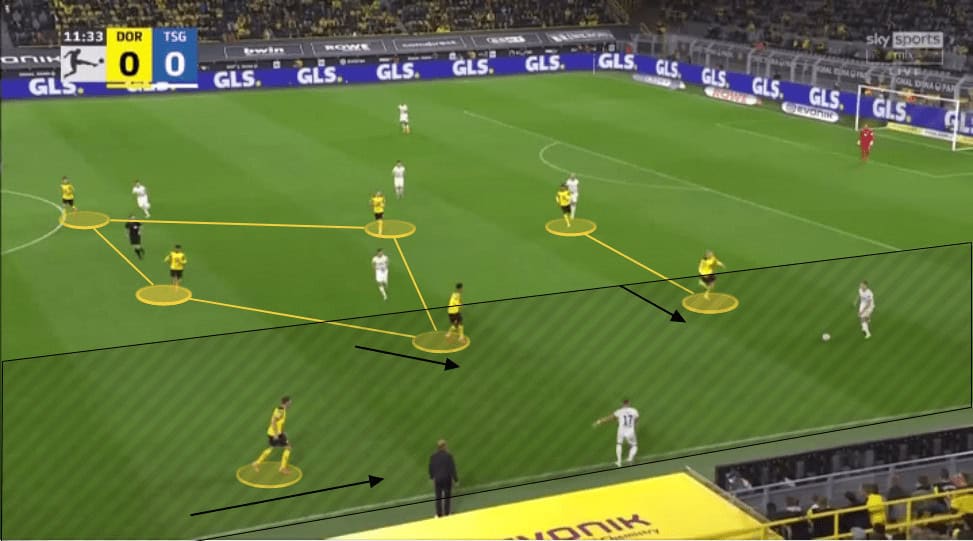
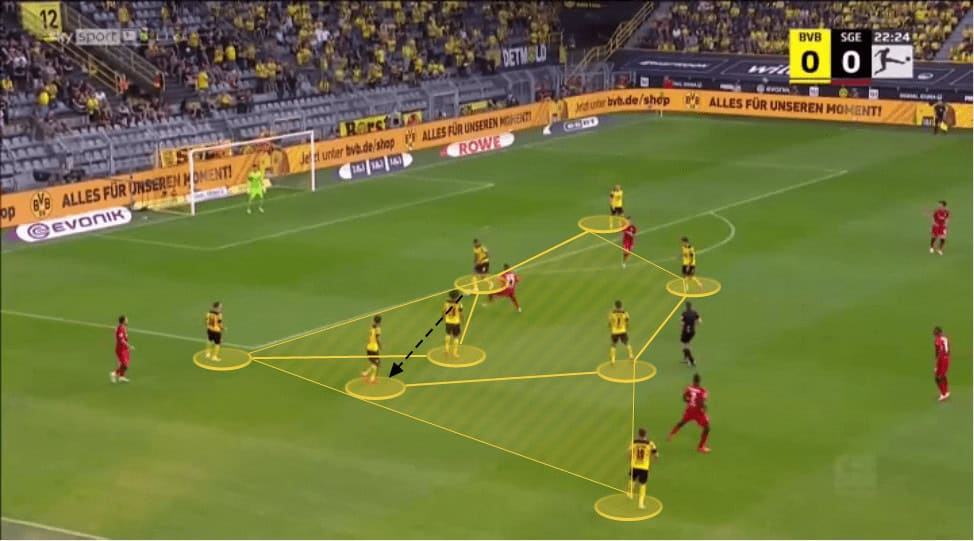
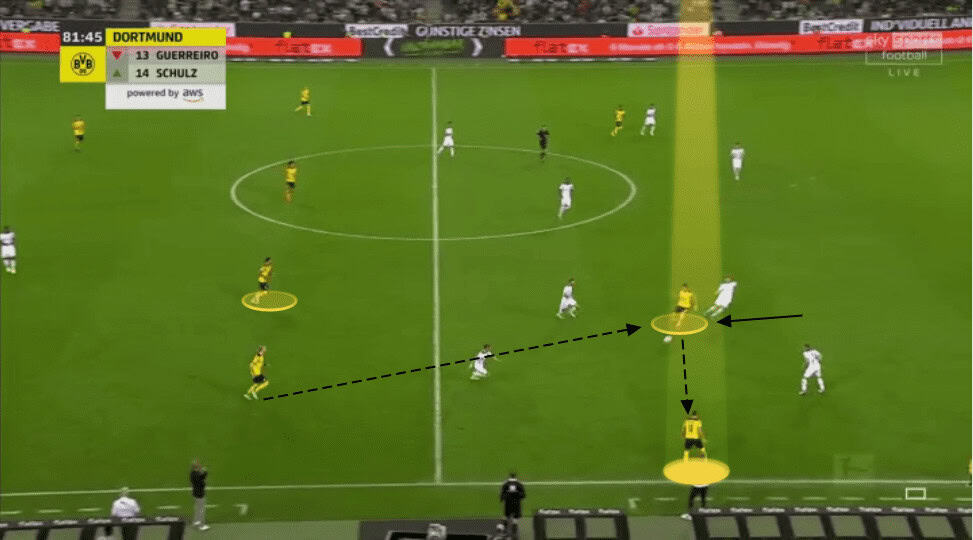
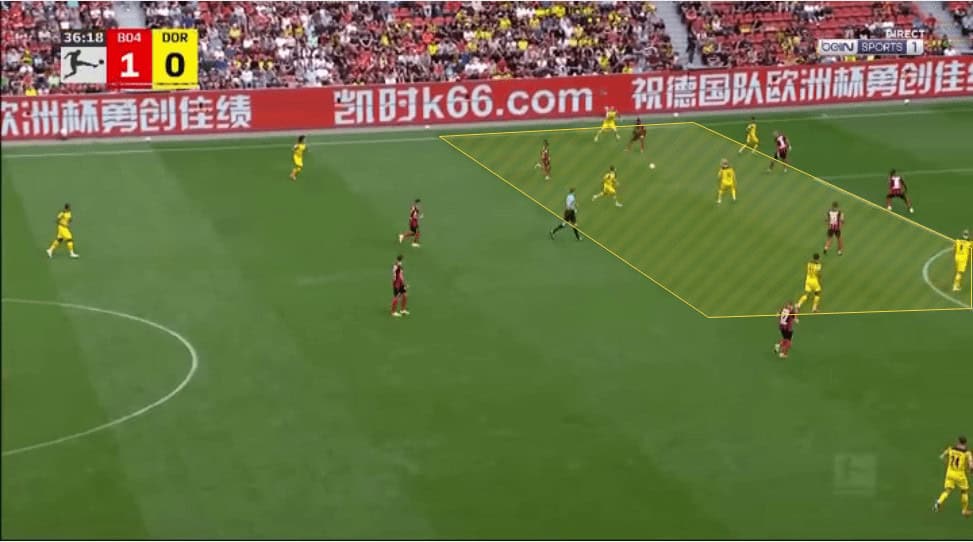
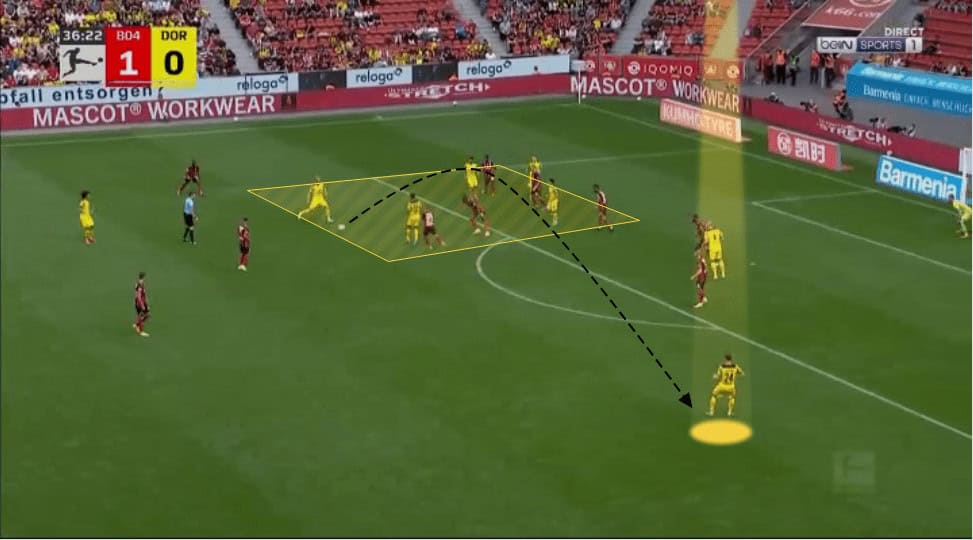
The situation below shows an example of how Haaland can direct the opposition’s play in a certain way and also conveys the next piece of this: pressing traps.
Once the ball is played wide, it triggers Schulz to press.
Pongračić has already begun to slide to cover his gap, and in the end, Mainz had nowhere to play the ball.
It becomes increasingly apparent that these pressing traps are BVB’s way of winning the ball, and this can be seen across all their formations.

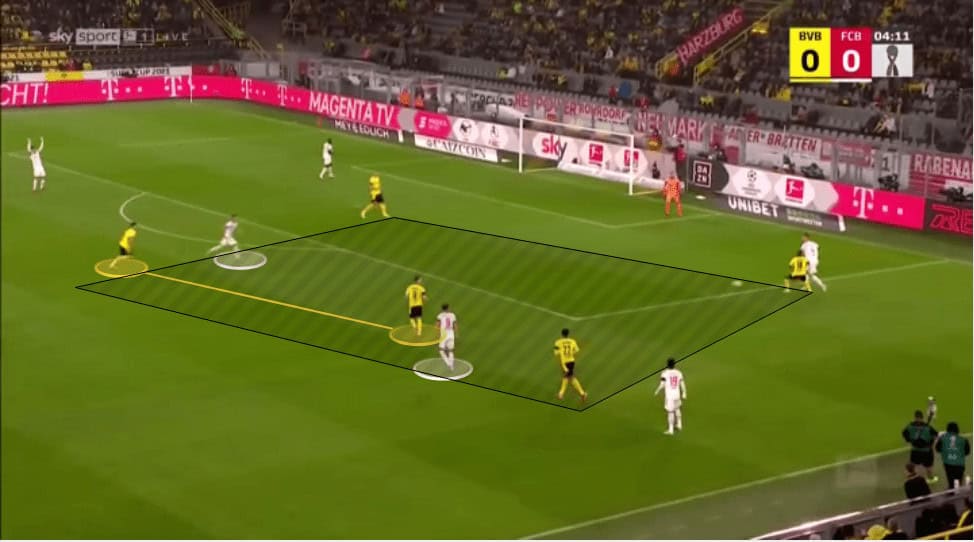
This specific situation was against Bayern, where Dortmund were using the 4–1-2-1-2 to defend.
Moukoko’s body shape guides the CB wide, which triggers Bellingham’s press.
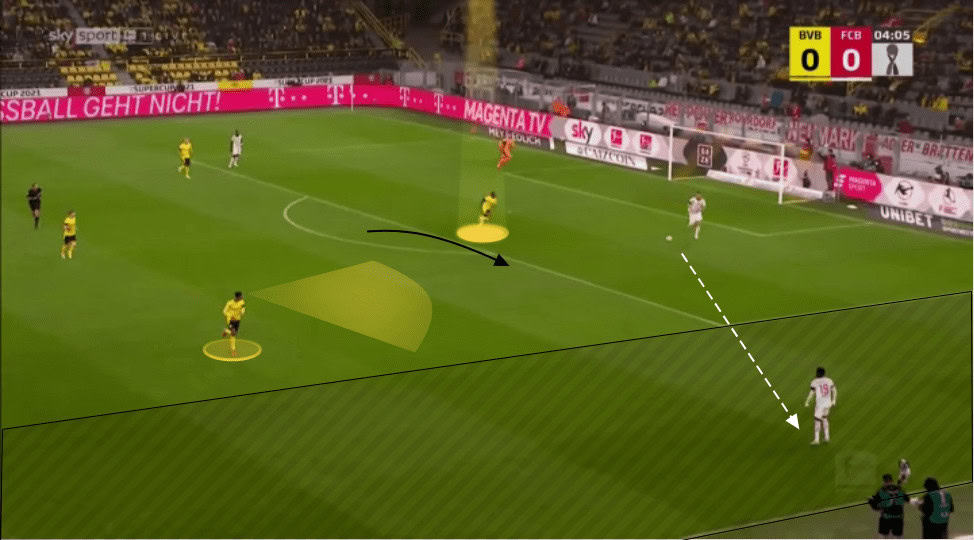
Reyna and Reus combine to mark the pivot, and Bayern loses the ball after running out of passing options.
A slight tangent here: the ball could likely have been won more easily if Moukoko had pressed harder or continued to shadow Süle, but it still worked.
Another variation on these pressing traps can be seen against Hoffenheim, where Haaland passively removes the option through the middle, forcing the CB to pick as a side as he drives forward.
After that, Bellingham and Meunier wait and watch to see if a pass will be made as Haaland pressures from behind.
Collectively, all options are closed down (or made useless), forcing a long ball that is comfortably covered by the backline.
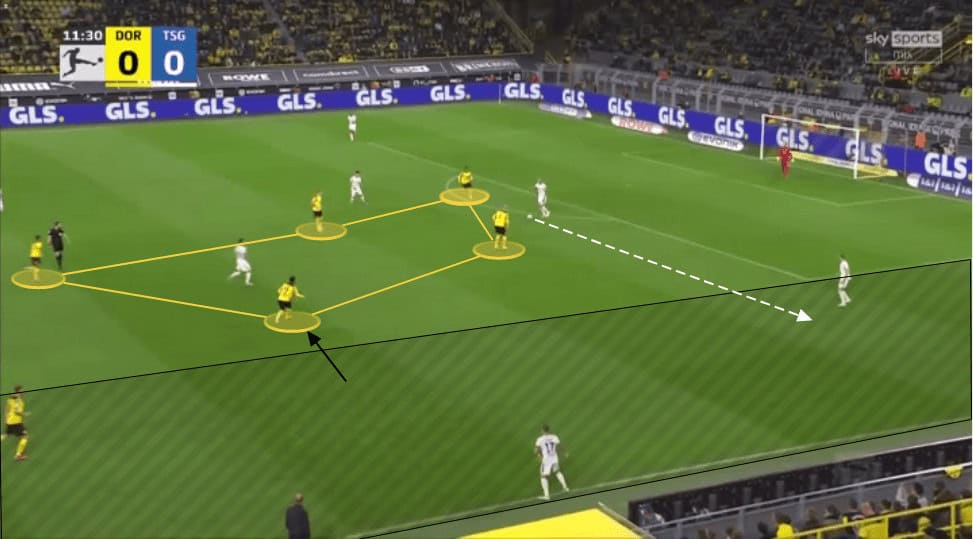
An essential piece of this Hoffenheim clip is not just the pressing trap, but also the forwards’ ability to press somewhat softly.
The standard rule of thumb is that when using a high line, you must secure it with a strong (and cohesive) press from the front.
Once that first line of press is broken, you go into a regrouping and dropping phase, during which teams are often most vulnerable.
In Dortmund’s case, they can downplay the importance of the press due to Kobel.
Throughout the season, he has demonstrated immense confidence coming off his line, allowing a passive press with a high line that would normally be exploited with a keeper like Bürki.
This section is missing one thing, though: What happens when the team gets pushed back deeper?
These traps aren’t always executed well, and that’s where mid-block and low-block defence come into play.
Each of the previously mentioned formations settles into a slightly different shape.
For example, the 4–3–3 formation often resembles a 4–5–1, with both wingers dropping deep.
At other times, it resembles a 4–4–2 formation, where the ball-side winger drops deep to support their fullback.
This is where “formations” become a bit muddied, and it’s important to focus on the principles.
‘Fullbacks are the winger’s job’ is the first point worth picking out.
Especially in the high 4–3–3, the ball-side winger is expected to protect the opposition fullback.
If he begins to overlap, the water becomes less clear, and the “defensive basics” begin to come into play.
Things like passing off a runner to a teammate, covering vacated space, and other things are all apparent.
I don’t generally find that low-blocks vary their instructions per player; rather, it’s the overall ideas behind it.
One of those team ideas is to isolate a player through pressing angles and win the ball back with intense pressing triggered by specific events.
For example, intense pressure from the midfielders when a line-breaking pass is played, or similarly in the wide zones when a player is isolated.
There are very rare situations in which BVB are back in their box, defending the shot, shuffling from side to side.
Miscellaneous defensive things and changes by the opposition
Some position-specific aspects can vary from one opposition to another or remain constant throughout.
One of those constants is the behaviour of the centre-backs, who often man-mark the opposition forwards.
This has resulted in multiple instances of balls being played behind the defensive line, in which a defender (or a few) is caught out of place because they trail the opposition forward like a duckling with its mother.
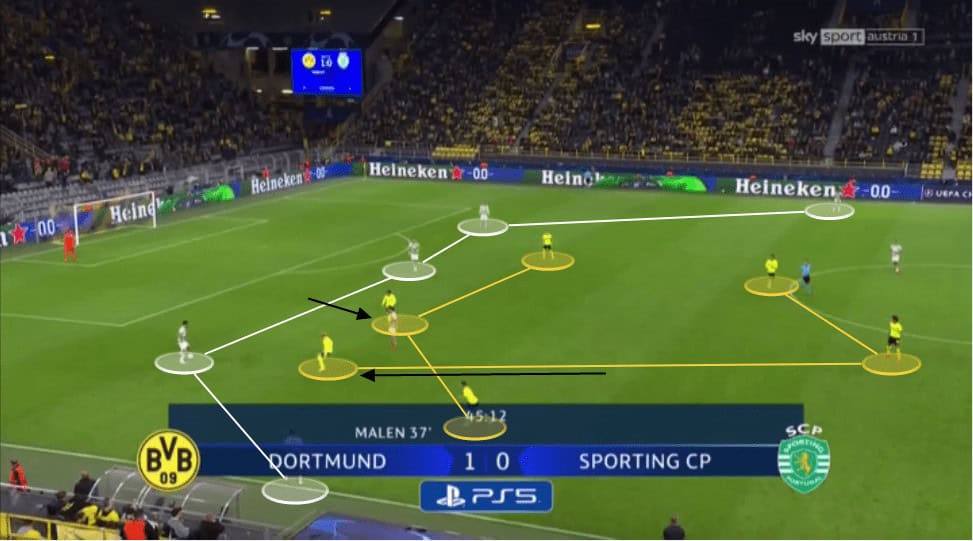
One of these variations can be seen within the 4–3–3 specifically.
Often, the 8s step up even higher than the wingers and press the outside centre-backs against a 3-back formation.
In the example below, Dortmund is using a slightly asymmetric 4–3–3 formation, where Bellingham is positioned slightly deeper than Brandt, who somewhat interchanges with Hazard on the left flank.
This was likely done to match up with Sporting’s back five, allowing them to press in a man-oriented fashion efficiently.
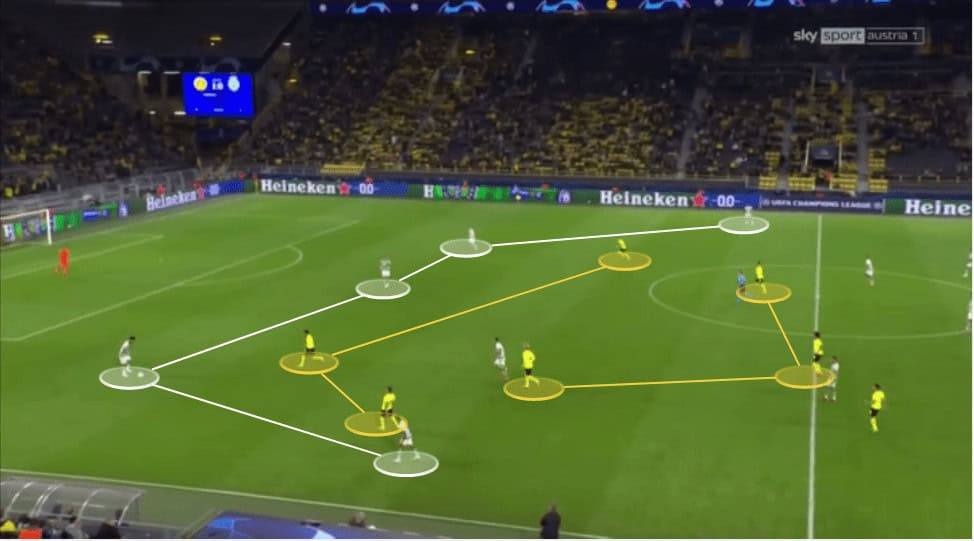
It is important to note that Malen first covers the CB and then Brandt’s man, with an emphasis on preventing central progression.
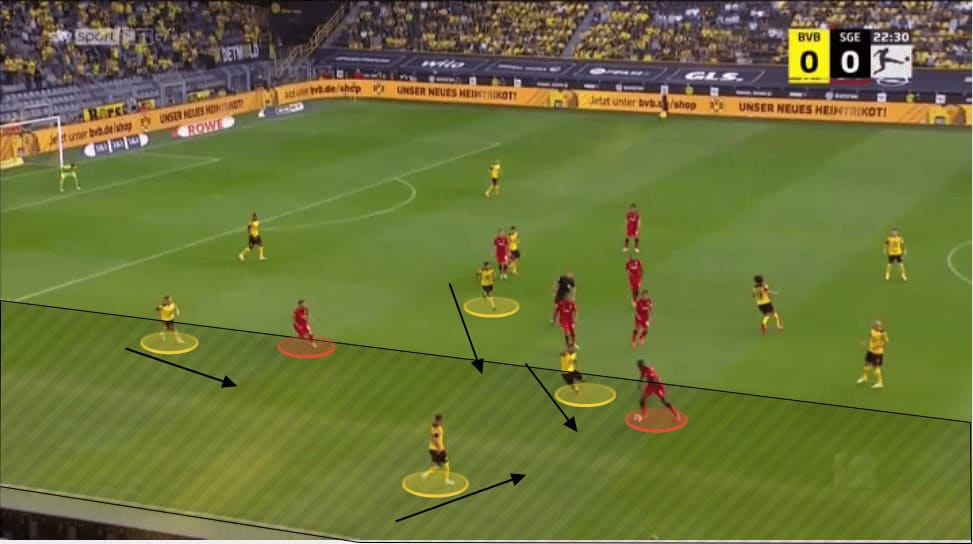
Another noticeable defensive change is within the 3–5–2 used.
While BVB will sometimes man-mark the CBs and 6 in a 4-1-2-1-2, this was more obviously intentional against Köln.
This was likely due to Horn’s inability to play a lofted ball to his entirely unmarked full-backs.
This clip also demonstrates how forwards fill in each other’s gaps to ensure that passes are covered.
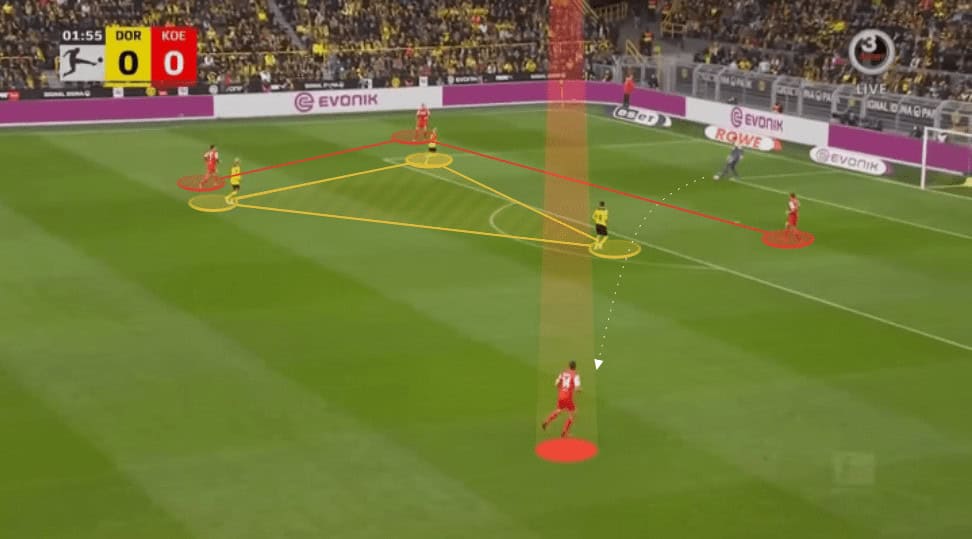
Watch Reus specifically as Brandt moves to pressure the RCB deep.
He moves to mark the 6, taking Brandt’s spot.
It’s a small tidbit, but it is important coaching that ensures the running is meaningful.
This clip also illustrates an important point I’ve somewhat neglected: if the press is broken, the attempted narrowness of their pressing opens acres of space where a strong opposition can play out and stretch them.

The failures of these two principles were on display against Ajax.
While BVB struggled to press well, resulting in frequently wasteful running, Ajax’s ability to play through the press and play expansively was immensely difficult for them to handle across both matches.
Marco Rose Transitions
As seen in most of these previously mentioned principles, Dortmund’s mentality is driven by creating dangerous transitions that provide opportunities for its players to thrive.
Haaland and Malen are integral to this, as they’re both very good at finding and making runs behind the defensive line.
Unlike previous seasons though, Dortmund have become drastically less transition-dependent.
Marco Rose Defence to attack
If executed properly, the defensive concepts discussed previously will create numerous transition opportunities at the locations where the balls are won.
This means that the “first action” immediately after winning the ball is important.
Assuming the ball was won through one of the preferred methods, the player on the ball will likely have a multitude of short-range passing options right in front of him.
This poses the first question for the ball-winner though.
If the ball is taken off a midfielder, the opposition’s defensive line is more likely to be exposed, making a counterattack more dangerous at that moment.
If the ball is won within their own half, BVB will generally be more likely to play it forward.
On the other hand, if the ball is won in the opposition’s half or in the central third, it is more often recycled backwards to the defenders, who can then circulate before choosing a new direction of attack.
If none of these options are mentioned before, the next option is “How can I combine to build forward?”
As mentioned previously, the ball-winner will be presented with a multitude of options in front of him to play with.
Choosing a forward option and making a run after playing the ball implies an immediate attack forward.
Below is an example of this: This specific situation is a great example of a few things.
First, the play must be kept tight to win the ball back and isolate the Frankfurt forwards.
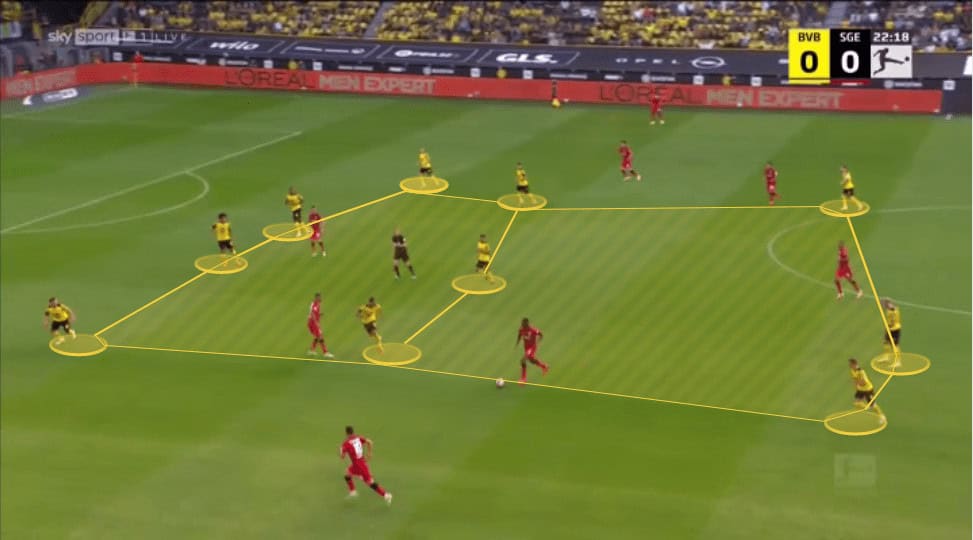
Second, Akanji has a forward-first mentality.
He immediately finds a midfield option in front of him without taking too much time to think about it.
Finally, it is an excellent example of how players impact their game model.
Bellingham and Passlack work to win the ball back the second time before it lands at Haaland’s pace, whose immense pace is able to isolate the Frankfurt defenders.
One of the more in-depth pieces of each defensive formation is that each defensive shape alters the rest defence of the opposition, and more importantly, the positioning of BVB’s forwards.
For example, in a 4–3–3, Haaland can often be isolated up top as the wingers track back.
This makes transitions slightly more difficult because he lacks the support of Reus and Passlack, as seen in the last clip.
One final piece of the defence-to-attack section is how Haaland acted as an outlet.
One of the important parts of defending a ‘crisis’ once the opposition is in the final 1/3 is having an outlet.
By exerting a dominant aerial and physical threat up top, BVB can clear their lines and move forward.
This is undoubtedly an area for improvement for him, though, as he sometimes lacks the patience to wait for a pass and struggles when pressed from the front.
Marco Rose Attack to defence
Known for their counter-pressing in Germany, BVB is no different to this idea.
Immediately after losing the ball, the nearest man will often press hard.
If isolated, a second man will often step forward to assist the press.
While this counter-press is underway, the rest of the team either returns to their positions or assists with the counter-press.
There is never a still body after losing the ball, whether it’s the CBs moving to mark forwards or wingers pressing.
This also brings back the graphic from before that shows the press level by zone.
Particularly when the opposition gains a threatening position in the central areas, the primary focus shifts to box defense and to removing a dangerous shooting position.
The yellow zone is mostly situational.
At times, as seen in the Hoffenheim clip, the goal is to utilise body shape to guide the opposition.
In other clips, like against 1. FC Köln, pressing is intense even in the opposition 1/3.
Most important are the wide zones, where the sidelines act as additional defenders and constraints on the opposition.
This is why pressure is more intense here, and they’re confined to a 180° view of the field.
These red pressure zones are also critical because they’re directly derivative of the short passing mentioned a few times already.
By keeping passes short and combining with nearby teammates, the distance you must cover to repress the ball is drastically shorter.
Marco Rose Attacking Tactics
Starting from the back, Dortmund has used the same build-up structure across the board in their build-up, even with variations in shape.
When deepest, like on goal kicks, it resembles almost a 3–3 shape, where Kobel becomes part of that back line.
He is an adequate passer, does well under pressure, and creates a third man for the opposition to worry about in the defensive line.
Despite a myriad of formations being used, this shape remains constant throughout, at least for many moments.
For example, against Köln, BVB used a 3–5–2 defensive shape while still maintaining a diamond shape in build-up.
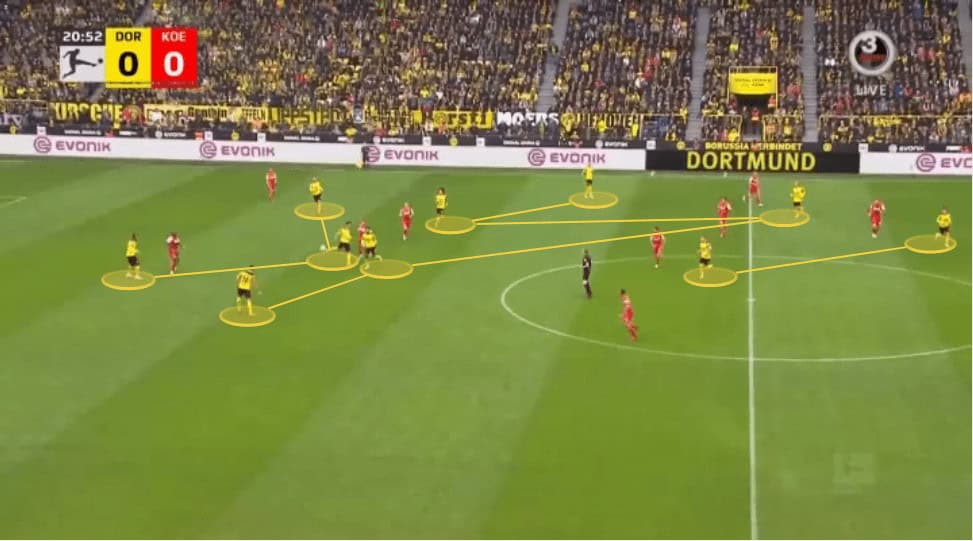
This was accomplished through Hummels’ staying in midfield, and the wingbacks staying in their natural positions.
In this instance, Hummels steps out of the defensive line and into the midfield, similar to the exact behaviour a 6 would make.
Marco Rose Build-up principles
As we progress slightly higher up the field, more players come into play than just the 3–3 build-up shape mentioned earlier.
First, the two midfielders float in the half-spaces as a quick vertical option.
They rarely receive the ball, but they can be used in combination with the 6 and opposite 8 to create midfield rotations that create space for receiving.
Although the pass wasn’t great in the end, Dahoud was able to play a ball forward, facing forward.
Some of these rotations, like the one seen above, create opportunities for the midfielder who rotates into the space to receive facing forward.
This is an immediately dangerous situation against a man-oriented opposition, like Hoffenheim, because it means the press has failed.
Dortmund are also able to progress similarly vs other man-marking opposition through wide combination play.
These patterns are designed so that when a player receives, they do so in a threatening situation.
An example of this can be seen below, against another man-oriented side, Frankfurt.
One of the most important principles of these patterns is something Marić himself has discussed in a few interviews.
Players are meant to have possible solutions at their fingertips rather than being handed the solution without thinking:
“For me, [tactics are] definitely not a specific match plan with pre-determined sequences, situations, or moves.
In my mind, tactics describe the sum of a team’s decisions for solving a particular situation.
Tactics are, for instance, a player recognizing where and how he is being closed down, but still managing to see an available teammate.
And also how that team-mate has positioned himself in such a way to remain available and then to receive a pass in the right place at the right moment.
Ultimately, it’s a straightforward process: on the pitch, you’re either protecting the ball, demanding the ball, or creating space.
There is nothing else.
Tactics is the mutual resolution of a situation through predefined playing philosophies, which correspond with the players’ abilities and their understanding of the game.”
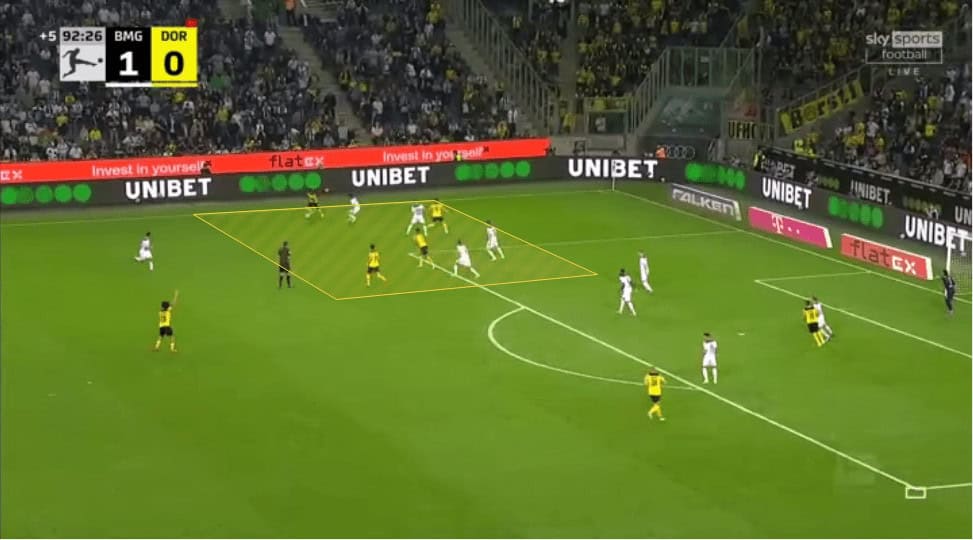
Each of these patterns is not meant to be an automatism, as much as it’s meant to be a “what-if” relationship between players and the ball carrier, as seen in the example below.
While this specific combination didn’t quite work out, it showed us the myriad of options presented to each player based on common patterns: forward-looking for space to receive.
Winger is wide and able to receive, and his body shape allows him to act as a ‘wall’ or a man on whom a pass can be bounced off.
Centre-mid provides an option to turn out and switch play.
As each player received, he was presented with situations where he knew a teammate would be and being able to resolve the situation in front of him.
Anyways, the pressing shape/trap from Gladbach was perfect here.
Marco Chance creation
First is the idea of keeping play in tight spaces.
I’m beating a dead horse by now, but in the final 1/3 especially, BVB keep play roughly in one zone to create chances for counter-pressing.
This isn’t all defensive, though.
If you’re a team like BVB, it’s a pretty good bet that your players are good enough to play comfortably in these tight spaces.
By using this method, you’re able to draw in opposition defenders before finally finding the underloaded side of the field with an open man or creating a 1v1 situation.

Accomplishing this, though, is much easier said than done.
Players must always be moving and looking for new openings to receive in space while being cognizant of the locations of the rest of their team.
They do this by creating triangles in those wide areas, where small movements can open up another pass once the ball carriers move the ball on.
The idea of keeping play in small spaces is apparent at the beginning of the next situation, before Brandt finds Meunier on the right flank.
With time to receive, open, and cross, Meunier plays an inch-perfect ball onto Haaland’s head to finish.
This idea alleviates the stresses of continuing to play in those tight spaces while also providing a dangerous scoring opportunity, such as a cross or a 1v1, similar to the Wolf one before.
Timing when to send this ball out is imperative to its success, as the players are always there, but knowing when they’re free and when they can create a dangerous situation is hard.
One of those risks is that these passes are full-field switches, and with the entire team compressed into one area, losing the ball can (and has before) lead to a hard counter against an exposed BVB backline.
When executed properly though, there can be great effects.
Adding to the danger here for the opposition is that once Meunier receives in an underloaded zone, he’s quickly looking to play the ball back into an overloaded one before the opposition can react and slide across.
At times, this can be seen as “useless width” where a player is standing on the opposite side of the pitch.
I would argue that, within reason, this layer of width causes situations exactly like those shown above.
Some other important aspects of their play include how Haaland and Malen operate within the 4-1-2-1-2 formation.
Deeper in the build-up, Malen links play with the 10 and the rest of the midfield.
Some would call this a ‘false 9,’ although this often gives the impression that he never runs behind.
These runs behind, though, are why they’re positioned on the sides they’re on.
Malen, a right-footed player, starts as the left striker, while Haaland starts as the right striker.
Haaland has a very specific tendency to shoot from the deep left half-space across his body.
By playing as the RST, Haaland is able to make a diagonal run into the left half of the field, and receive a straight pass from his midfield or the wide areas.
Malen is able to do the same on the right.
Conclusion
Dortmund adjusts its building tactics based on the opposition, whether that involves man-marking, identifying a specific spot to exploit, or understanding its zonal marking schemes.
The most obvious example is how Dortmund scored goals against opponents who employed a stricter man-marking scheme, while having to adjust their tactics against teams like Freiburg, which sit deeper and play zonal for most of the match.
They’ve also altered their tactics not just to suit an opposition but to suit themselves.
For example, before the Gladbach match, both Reus and Haaland got injured.
In this event, Dortmund may have looked to play their normal 4-1-2-1-2 with Reus and Haaland up top to exploit the width of their fullbacks.
In the end, Rose switched to a 3–5–2, which still aimed to exploit those same deep half-space runs, but it added players to the defensive line to change the way they built without Haaland’s and Reus’ abilities.