Total Football Analysis
Once.Sport
  • Football Analysis
    • Data Analysis
    • Formations
      • 2-2-4 Formation
      • 2-3-5 Formation
      • 3-1-4-2 Formation
      • 3-2-2-3 Formation
      • 3-2-4-1 Formation
      • 3-1-6 Formation
      • 3-3-4 Formation
      • 3-4-1-2 Formation
      • 3-4-2-1 Formation
      • 3-4-3 Formation
      • 3-5-1-1 Formation
      • 3-5-2 Formation
      • 4-1-4-1 Formation
      • 4-2-2-2 Formation
      • 4-2-3-1 Formation
      • 4-2-4 Formation
      • 4-3-1-2 Formation
      • 4-3-3 Formation
      • 4-4-2 Formation
      • 4-5-1 Formation
      • 5-3-2 Formation
      • 5-4-1 Formation
      • 6-3-1 Formation
    • Head Coach Analysis
    • Match Analysis
    • Player Analysis
    • Recruitment Analysis
    • Set Piece Analysis
    • Tactical Theory
    • Tactical Preview
    • Team Analysis
    • Training Analysis
    • Tactical Analysis
    • Scouting Report
  • Competition
    • ALL Competitions
    • English Premier League
    • Champions League
    • La Liga
    • Bundesliga
    • Serie A
    • Ligue 1
    • Eredivisie
    • EFL Championship
    • FIFA World Cup 2022
    • WEURO 2022
    • Women’s Super League
    • NWSL
    • Belgian First Division A
    • A-League
    • Liga Profesional de Argentina
    • Austrian Bundesliga
    • Campeonato Brasileiro Série A
    • DFB Pokal
    • 1. HNL
    • Danish Superliga
    • EFL League One
    • EFL League Two
    • FA Cup
    • EFL Cup
    • Indian Super League
    • K-League
    • J1 League
    • Liga MX
    • Copa América 2021
    • Copa del Rey
    • MLS
    • Eliteserien
    • Euro 2020
    • Primeira Liga
    • Scottish Premiership
    • Allsvenskan
    • Europa League
    • UEFA Nations League
    • Liga AUF Uruguaya
  • Coaches
    • All Coaches
    • Alfred Schreuder
    • Ange Postecoglou
    • Antonio Conte
    • Arne Slot
    • Bo Svensson
    • Brendan Rodgers
    • Bruno Lage
    • Carlo Ancelotti
    • Christophe Galtier
    • Claude Puel
    • Claudio Ranieri
    • David Moyes
    • Dean Smith
    • Diego Simeone
    • Domenico Tedesco
    • Frank Lampard
    • Eddie Howe
    • Edin Terzić
    • Emma Hayes
    • Erik ten Hag
    • Ernesto Valverde
    • Gennaro Gattuso
    • Gerardo Seoane
    • Gian Piero Gasperini
    • Giovanni van Bronckhorst
    • Graham Potter
    • Igor Tudor
    • Imanol Alguacil
    • Jesse Marsch
    • Jonas Eidevall
    • Jorge Sampaoli
    • José Bordalás
    • José Mourinho
    • Julen Lopetegui
    • Julian Nagelsmann
    • Julien Stéphan
    • Jürgen Klopp
    • Luciano Spalletti
    • Lucien Favre
    • Manuel Pellegrini
    • Marcelo Bielsa
    • Marco Rose
    • Marco Silva
    • Massimiliano Allegri
    • Mauricio Pochettino
    • Maurizio Sarri
    • Mikel Arteta
    • Niko Kovač
    • Nuno Espírito Santo
    • Oliver Glasner
    • Patrick Vieira
    • Paulo Fonseca
    • Pep Guardiola
    • Peter Bosz
    • Rafa Benítez
    • Ralf Rangnick
    • Ralph Hasenhüttl
    • Roger Schmidt
    • Roy Hodgson
    • Sean Dyche
    • Sérgio Conceição
    • Simone Inzaghi
    • Sonia Bompastor
    • Stefano Pioli
    • Steffen Baumgart
    • Steven Gerrard
    • Thiago Motta
    • Thomas Frank
    • Thomas Tuchel
    • Unai Emery
    • Vincenzo Italiano
    • Xavi
  • Teams
    • ALL Teams
    • AC Milan
    • Ajax Amsterdam
    • Arsenal
    • AS Monaco FC
    • Atalanta
    • Atlético Madrid
    • FC Barcelona
    • FC Bayern Munich
    • Borussia Dortmund
    • Celtic FC
    • Chelsea FC
    • Everton F.C.
    • Inter Milan
    • Juventus F.C.
    • Leeds United F.C.
    • Liverpool FC
    • Manchester City
    • Manchester United FC
    • Paris Saint-Germain
    • Rangers FC
    • RB Leipzig
    • Real Madrid CF
    • Tottenham Hotspur
    • West Ham United
  • Players
    • ALL Players
    • Alisson Becker
    • Bukayo Saka
    • Erling Haaland
    • Harry Kane
    • Jack Grealish
    • John Stones
    • Julián Alvarez
    • Kalvin Phillips
    • Kevin De Bruyne
    • Kyle Walker
    • Kylian Mbappé
    • Lamine Yamal
    • Lionel Messi
    • Luis Díaz
    • Mohamed Salah
    • Phil Foden
    • Virgil Van Dijk
  • Contact
  • Write For TFA
No Result
View All Result
No Result
View All Result
Total Football Analysis
No Result
View All Result
Home Analysis

How Ben Tozer Throw-Ins Helped Cheltenham Town Become League Two Champions – Tactical Analysis

Harshal Patel by Harshal Patel
June 1, 2021
in Analysis, Ben Tozer, Cheltenham Town FC, EFL League Two, Set Piece Analysis, Tactical Analysis
0
Cheltenham Town throw-ins tactical analysis tactics

Cheltenham Town capped off a brilliant season by winning League Two, their first-ever Football League trophy, and thereby securing promotion to League One for the 2021-22 season.

While there were several factors behind this successful season, not least the impact of manager Michael Duff since his arrival in November 2018, one of the most intriguing and noteworthy aspects of Cheltenham’s season was their use of throw-ins as an attacking weapon.

Regular watchers of the Robins will have become used to seeing captain Ben Tozer launching throw-ins into the penalty area from either flank, and this tactic often caused a lot of disruption and panic in opposition defences.

This tactical analysis piece will attempt to decipher Cheltenham Town’s tactics from throw-ins and the routines and setups that allowed them to use this unorthodox tactic successfully.

The Setup

While Cheltenham have varied their positioning and runs from throw-ins, some key principles have more or less been constant, which we will try to illustrate here.

Cheltenham Town throw-ins tactical analysis tactics

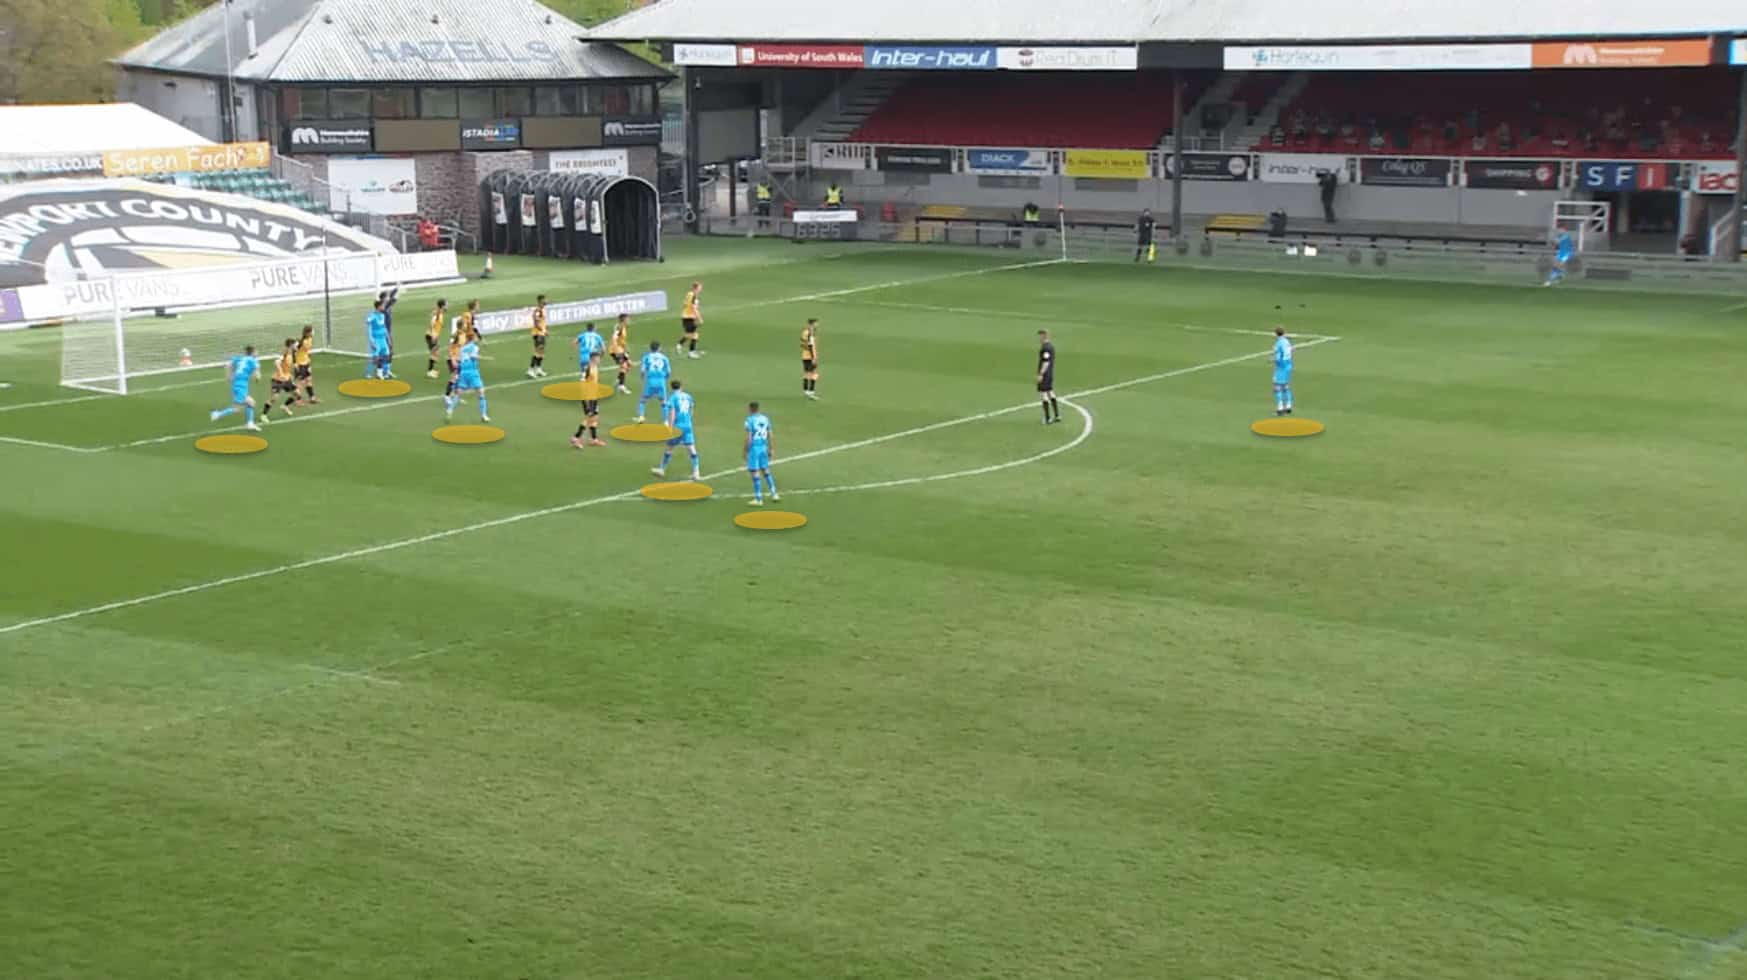
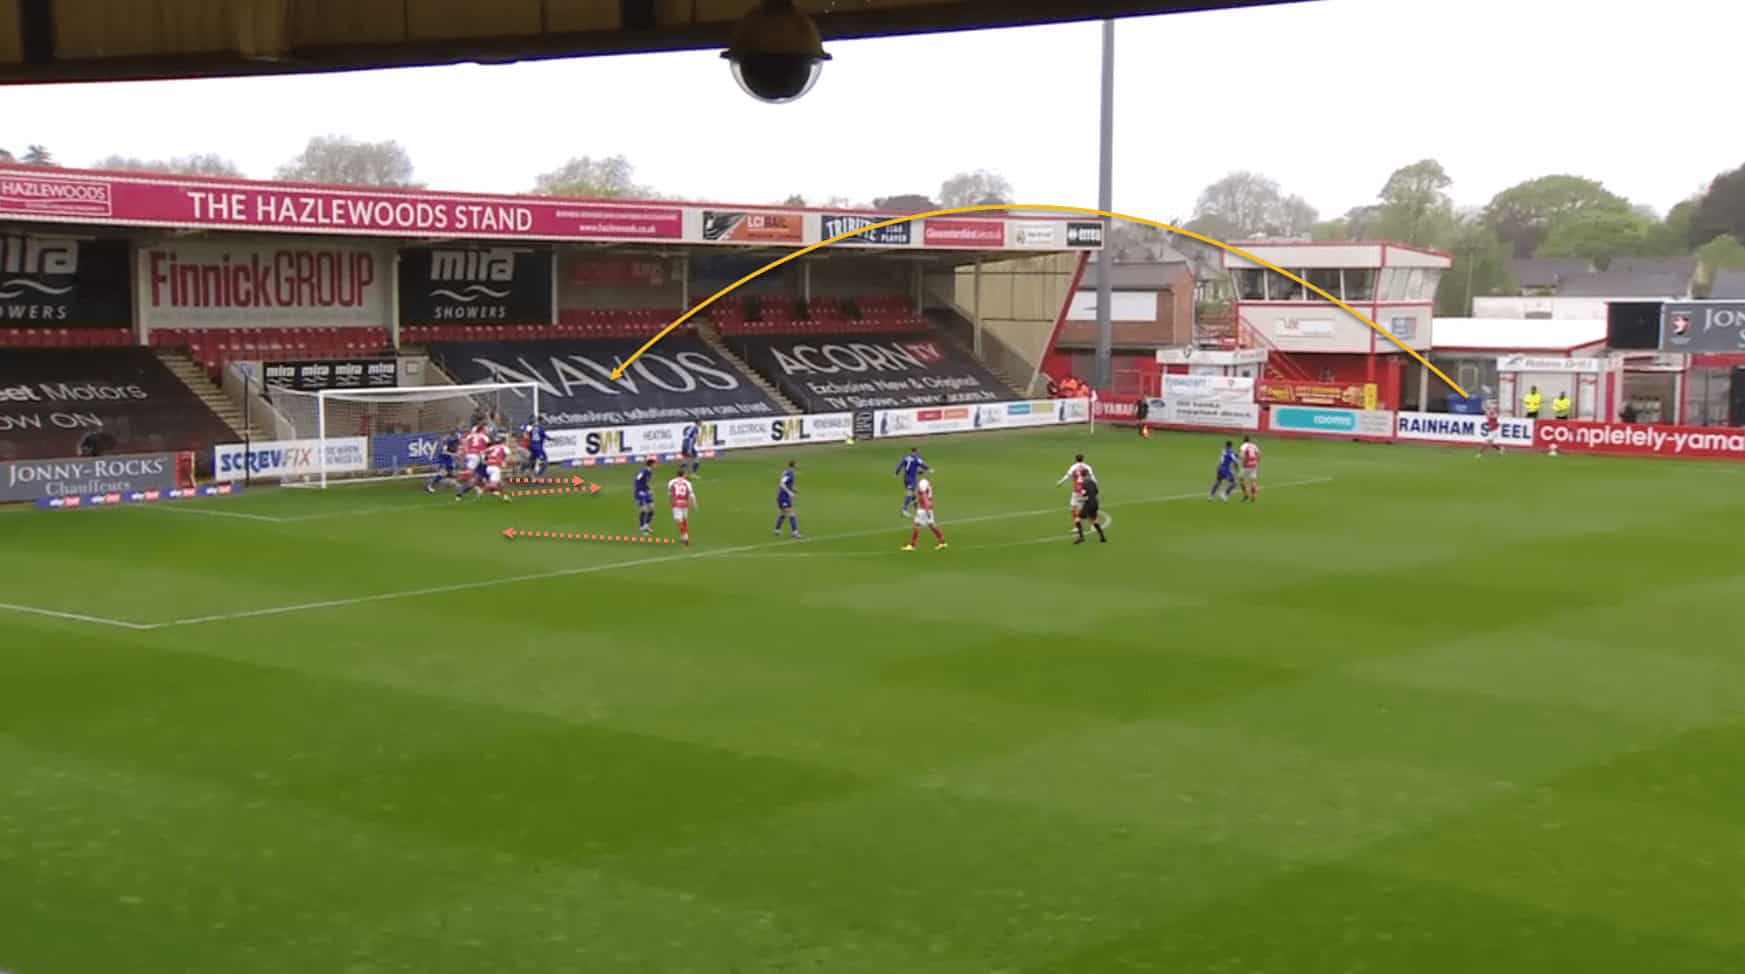
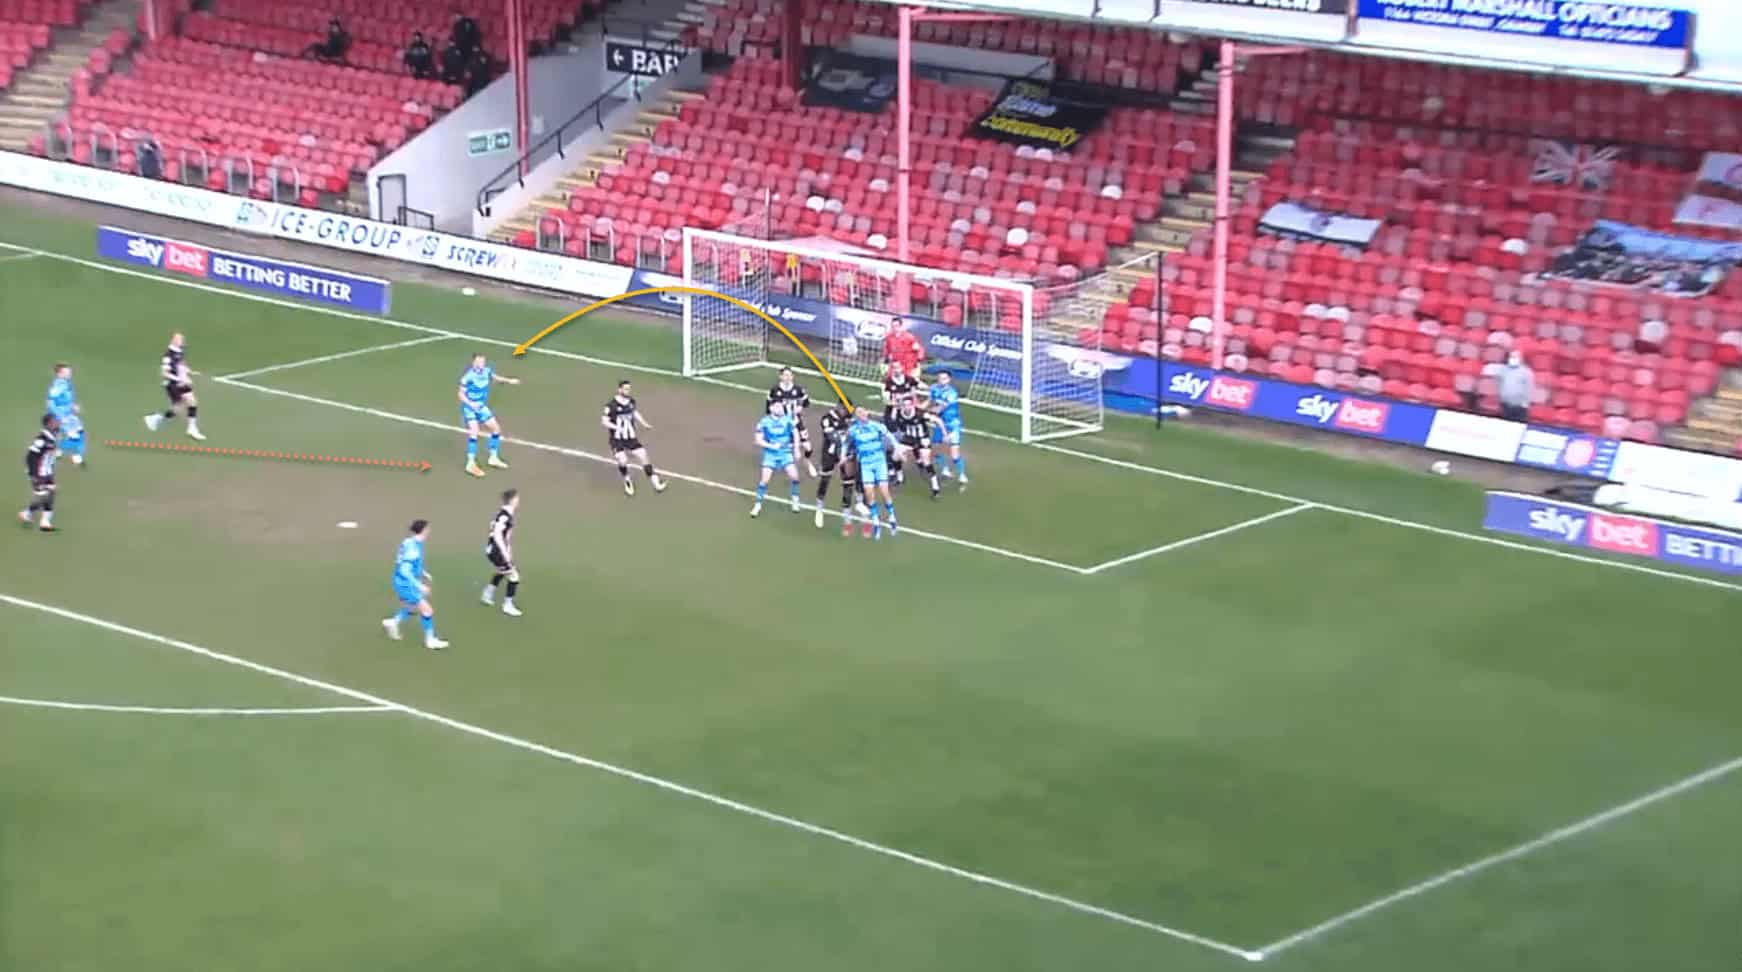
In this image, we can see the typical setup from Cheltenham during a long throw-in.

As Tozer winds up to fling the ball into the box, there are two players stationed outside the penalty area to pick up clearances and loose balls, as well as to prevent counter-attacks.

Two players are then positioned at either edge of the six-yard area – this is to make central runs into space from a deeper position to get on the end of flick-ons and contested headers.

Finally, we see three players almost on the goalline, with two of them jostling around the goalkeeper, and the third at the back post.

These players will all converge on the six-yard area when the ball is in the air, aiming to prevent the goalkeeper from claiming the throw and also to crowd him, thereby reducing reaction time and space in the event a shot or header is taken.

This setup is better illustrated through the tactical board image below –

Cheltenham Town throw-ins tactical analysis tactics

The three players on the goalline will all come out to contest the ball, along with the player at the far edge of the six-yard area.

The deep player outside the left side of the penalty area will make a late run into the box to get on the end of any fluffed clearances or flick-ons in space.

In contrast, the player closest to the throw-in taker, at the near post area, will move centrally to ensure that there are always two players behind the ball.

The presence of two, or sometimes even three, players outside the area is important.

Given that this is a throw-in, it is unlikely to be delivered with the same pace and power as a free-kick or corner, as much as Tozer possesses incredible strength, which he uses to propel the ball into the box from such distances.

Thus, the throws are often high and looping and, therefore, quite slow, and so even if a defender makes first contact and manages to head the ball away, it is unlikely to travel too far outside the area.

Therefore, having players outside the area to pick up these clearances and try to take a shot or pick a pass is clever, as it ensures that the opposition are ‘boxed-in’ and cannot clear their lines effectively and quickly.

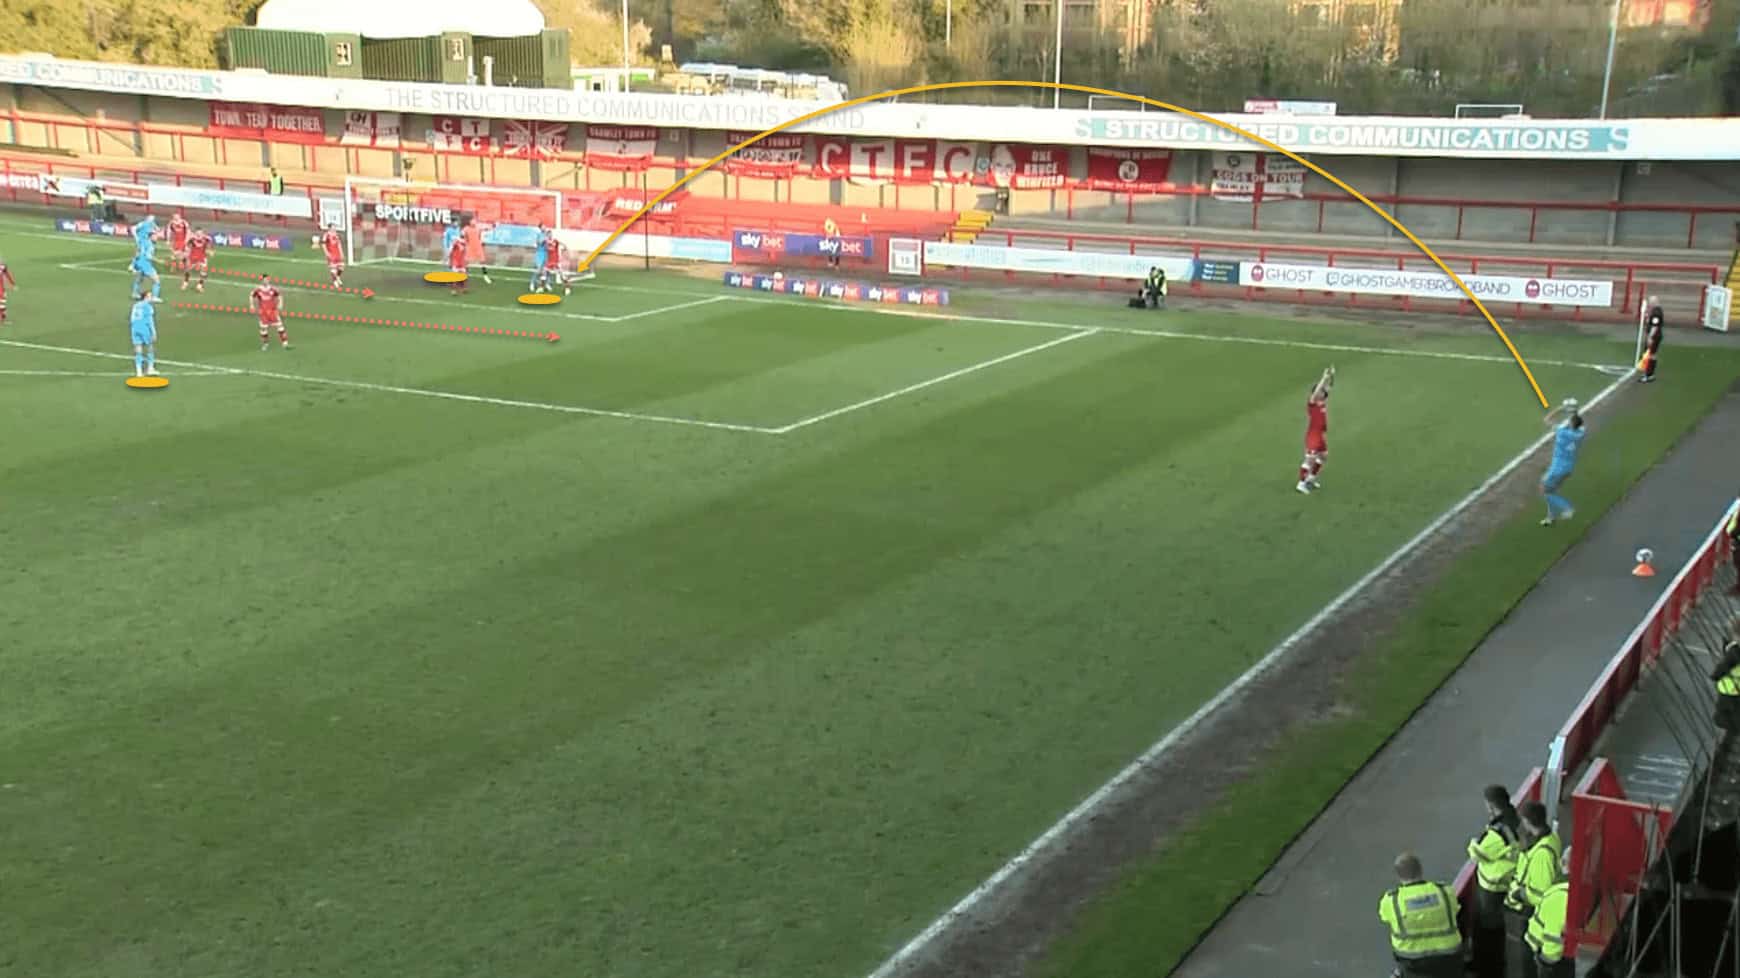
Another variation of their usual setup is shown below.

setup 2

Cheltenham are attacking this throw-in with eight players, with all of them being far more spaced out than in the earlier example.

Once again, note how there are two players outside the penalty area for the same reasons as explained above.

Another player will look to make a run into the box from outside, while the rest of the players make runs into roughly the same area to try to win the ball, although a couple will hang back and try to find space.

setup 2.1

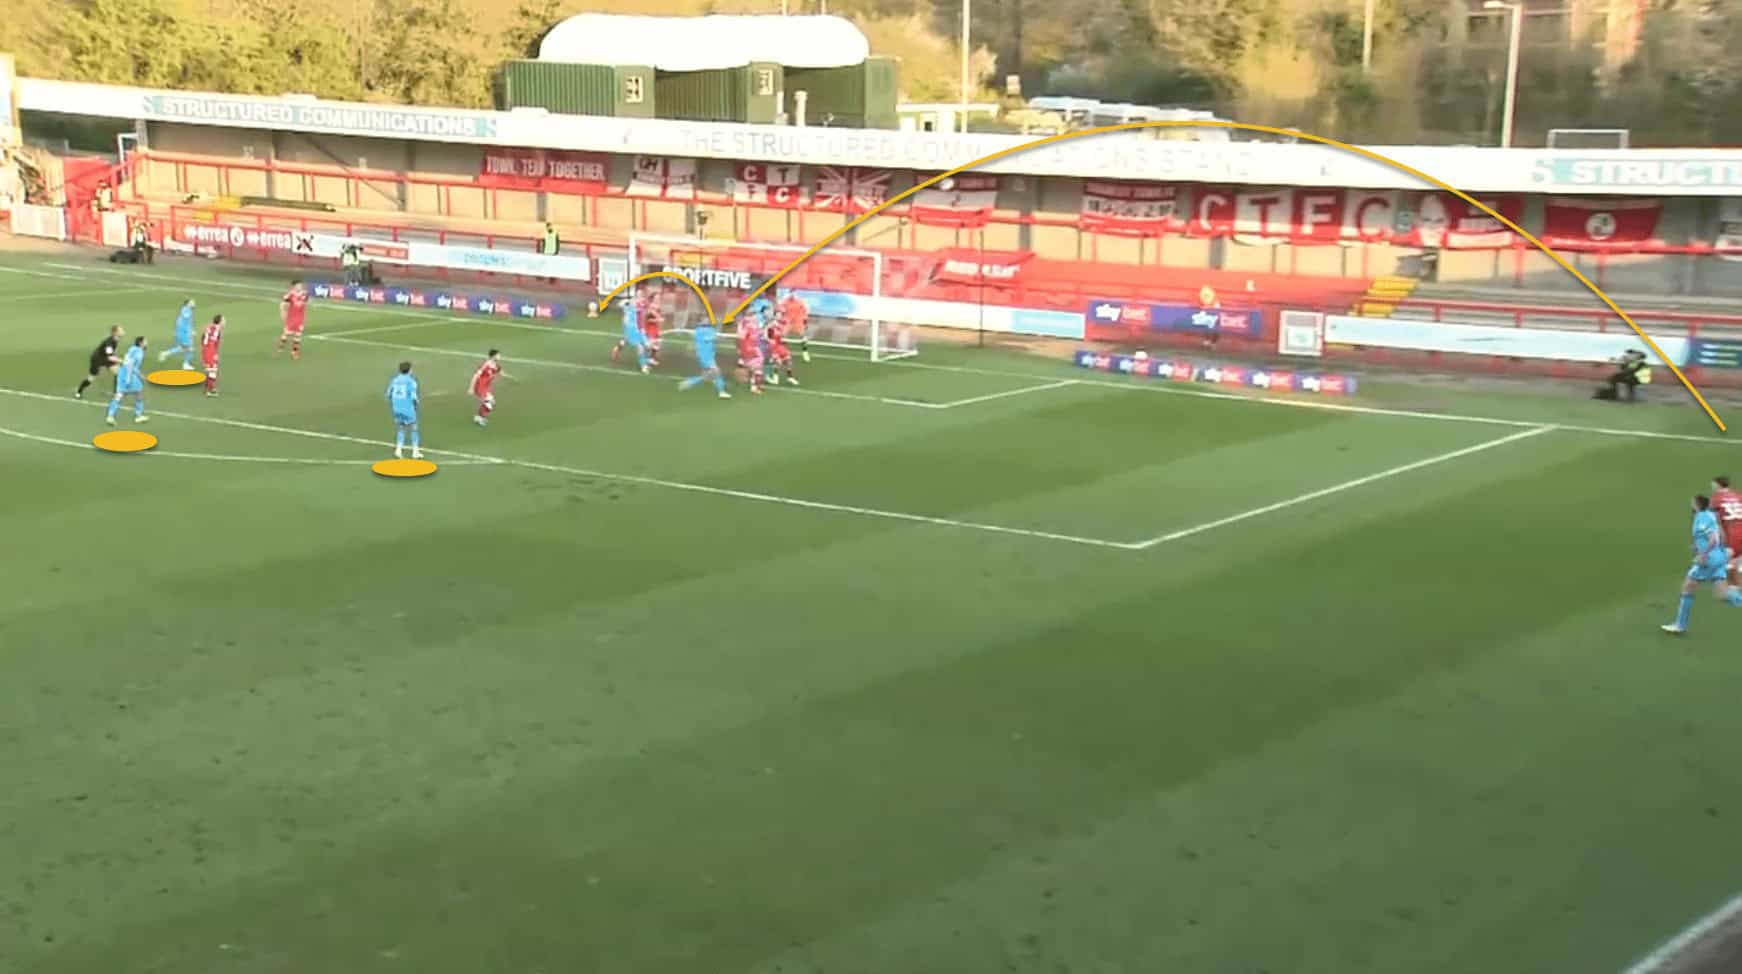
The difference in positioning from the previous example can be seen more clearly here.

The opposition is concentrating on blocking the near post area, which is understandable since that is the most likely location where the throw will be directed.

It is extremely difficult to throw the ball to the far post, given the distance from the touchline.

Consequently, Cheltenham and Tozer usually took throw-ins towards the near post, or slightly more centrally, aimed at the space between the penalty area and the six-yard box.

There is one late runner into the box from deep, with two players staying back, while one player again attempts to crowd the goalkeeper.

There is a bit of a gap between the near post and far post areas, and this is where most of the Cheltenham players will attempt to be when the ball is delivered, with their movement also dragging the opposition with them and, therefore opening up the space for the late run from outside the area as well.

Thus, we can see that there are a few standard principles that the Robins tried to utilise in their throw-ins – create space for late runs from deep, crowd the goalkeeper, and try to be positioned in one block when the ball reaches the area to improve the chances of winning the ball, either in the air itself or through a flick-on fluffed clearance to a man in space.

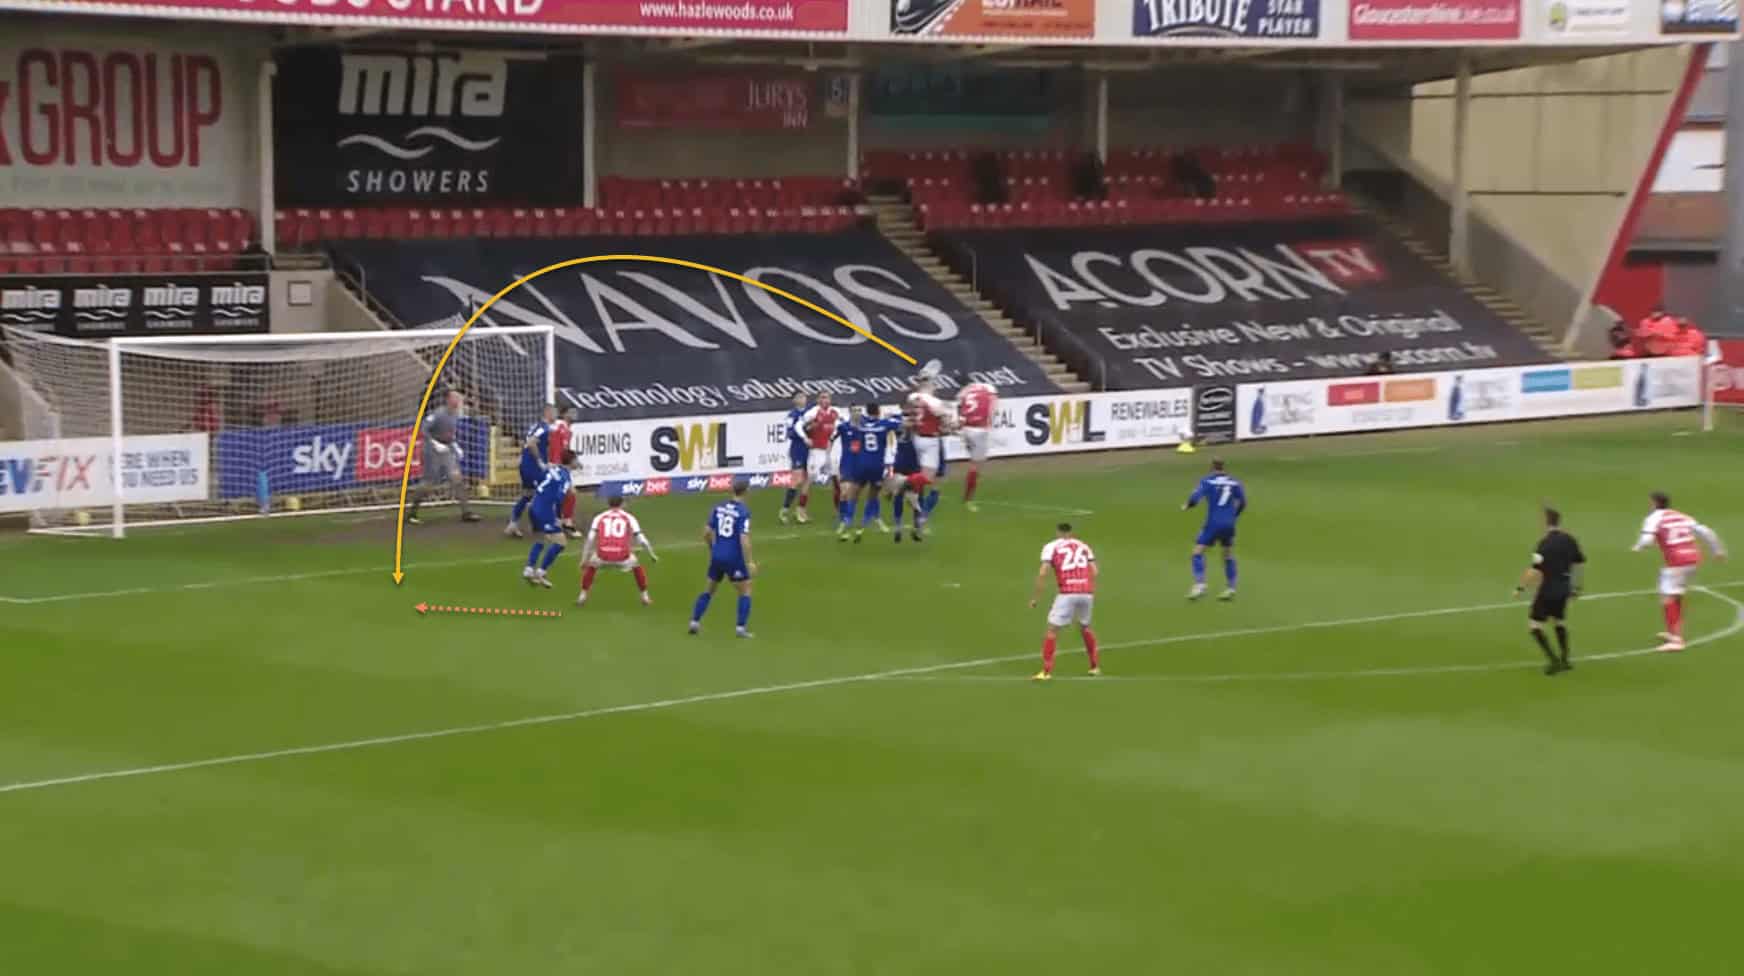
The effect of crowding the goalkeeper can be seen below as well –

Cheltenham Town throw-ins tactical analysis tactics

Tozer will sometimes aim his throws directly at the goalkeeper, forcing him to make a save in this manner.

Of course, Tozer cannot score directly from a throw, but given the mass of bodies around the keeper, it creates a lot of confusion and doubt, with just a faint touch from an outfield player needed to send the ball into the goal.

Routines

It is also important to note that Cheltenham used long throw-ins across the pitch, not just in the vicinity of the penalty area.

While Tozer was the designated long throw-in taker for attacking the box, the rest of the defence, including Sean Long, Will Boyle, Chris Hussey and Charlie Raglan all took throws in deeper areas.

Cheltenham Town throw-ins tactical analysis tactics

Cheltenham Town throw-ins tactical analysis tactics

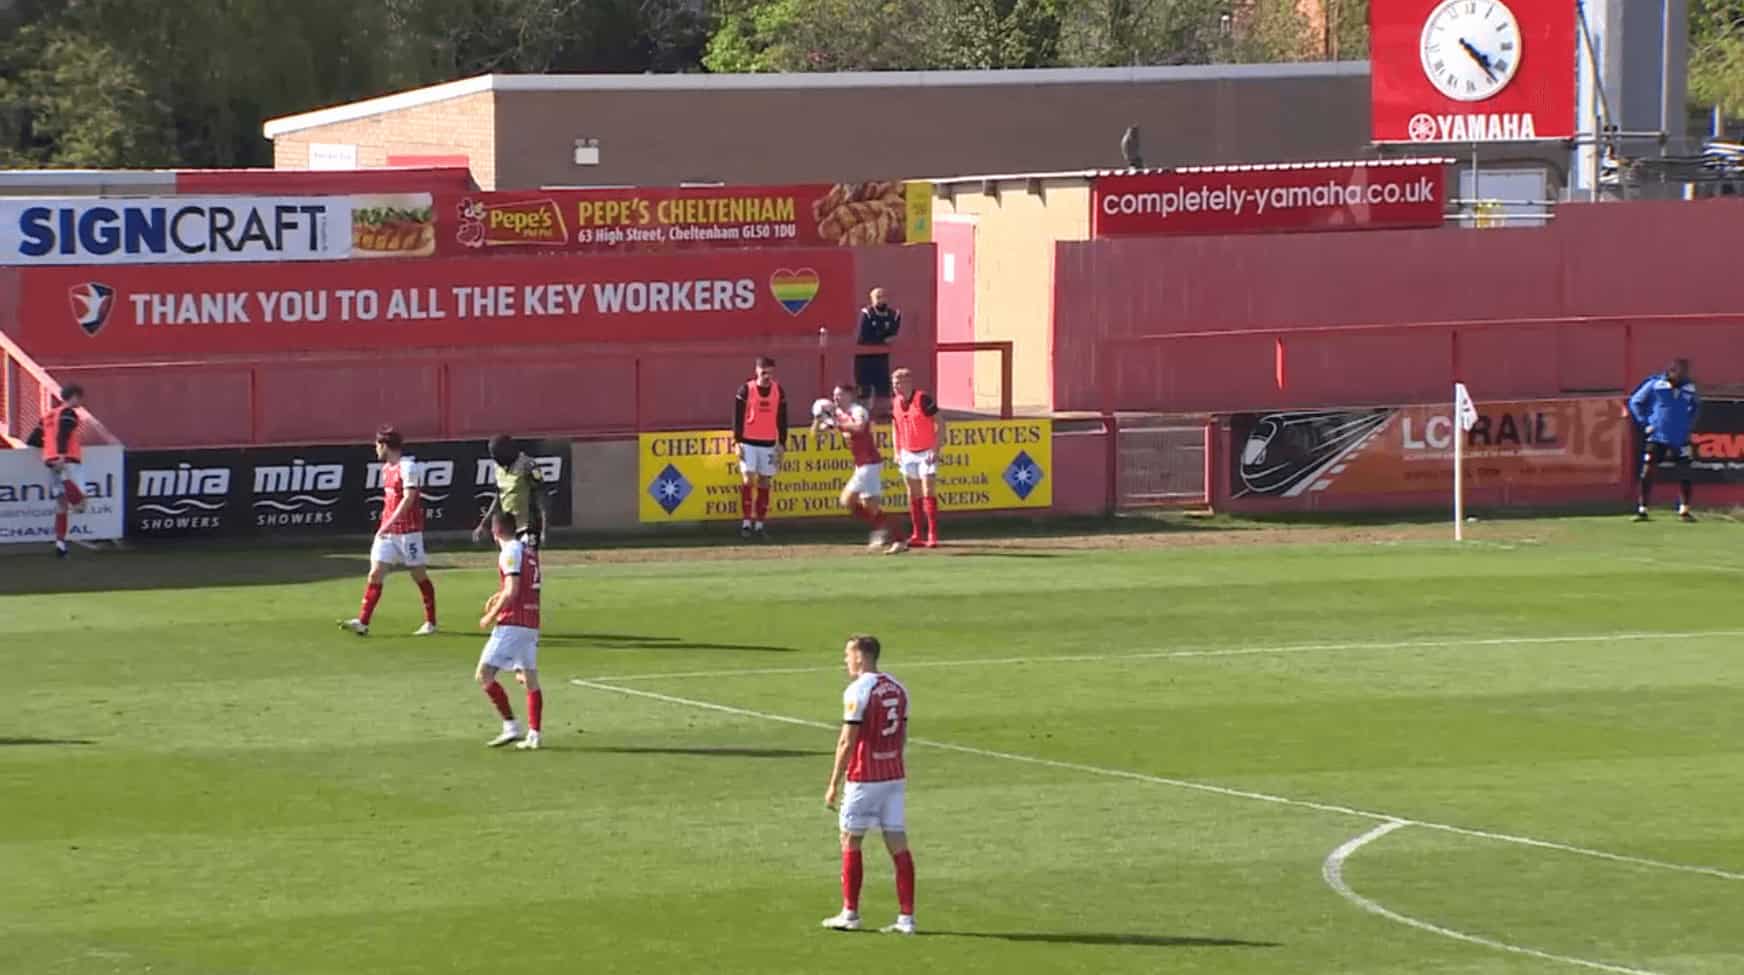
Note just how far the ball is thrown here, with the Cheltenham player contesting the aerial duel just a few yards from the halfway line, from a throw that was taken level with his own penalty area.

Of course, it is their use of throw-ins as an attacking tactic, akin to a set-piece situation, that has attracted all the attention.

We have already shown a couple of the standard setups used by Cheltenham during the season and will now examine a few routines within those initial setups.

Cheltenham Town throw-ins tactical analysis tactics

Again, note some of the key principles in play here, as discussed earlier – men outside the area to mop up clearances, one player making a late run towards the far post area, and the rest of the players all rushing to the near post to drag defenders out and create space.

We can also see how they have crowded out the goalkeeper here to prevent him from coming out and claiming the throw.

Cheltenham Town throw-ins tactical analysis tactics

In this case, the Cheltenham player wins the initial header, flicking it on for Alfie May at the far post, but the ball is just a little away from him, and he cannot get a clean connection on his shot.

However, the space at the fair post is quite visible here, with the opposition all getting drawn to the near post.

Cheltenham Town throw-ins tactical analysis tactics

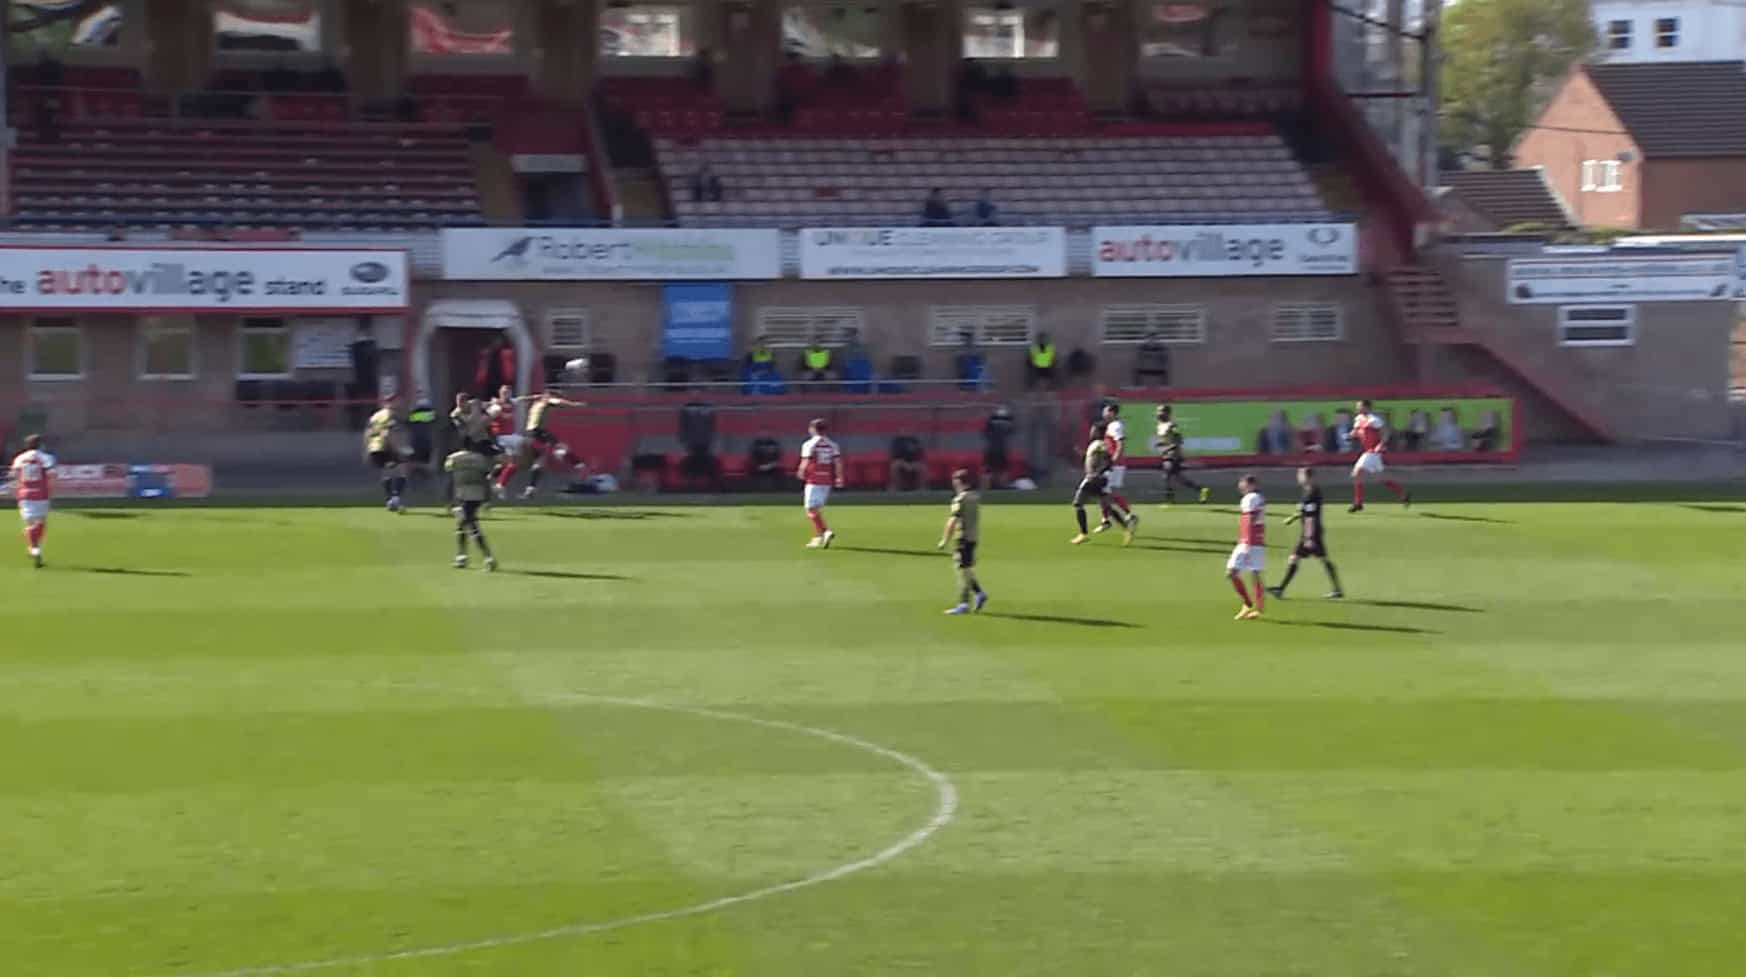
Another example here, with a slightly different setup, as there are two players on the goalline, and two making runs into the near post area.

Cheltenham Town throw-ins tactical analysis tactics

Again, the Cheltenham player wins the initial header and can flick it on to the back post, where it just evades his teammate, who had held his run and stayed at the far post rather than coming out to the near post.

Thus, there are slight variations in terms of the runs and positioning of individual players, but the basic structure appears to be the same: crowd the near post or the central area and try to win the initial header to flick it on to a teammate in space at the far post.

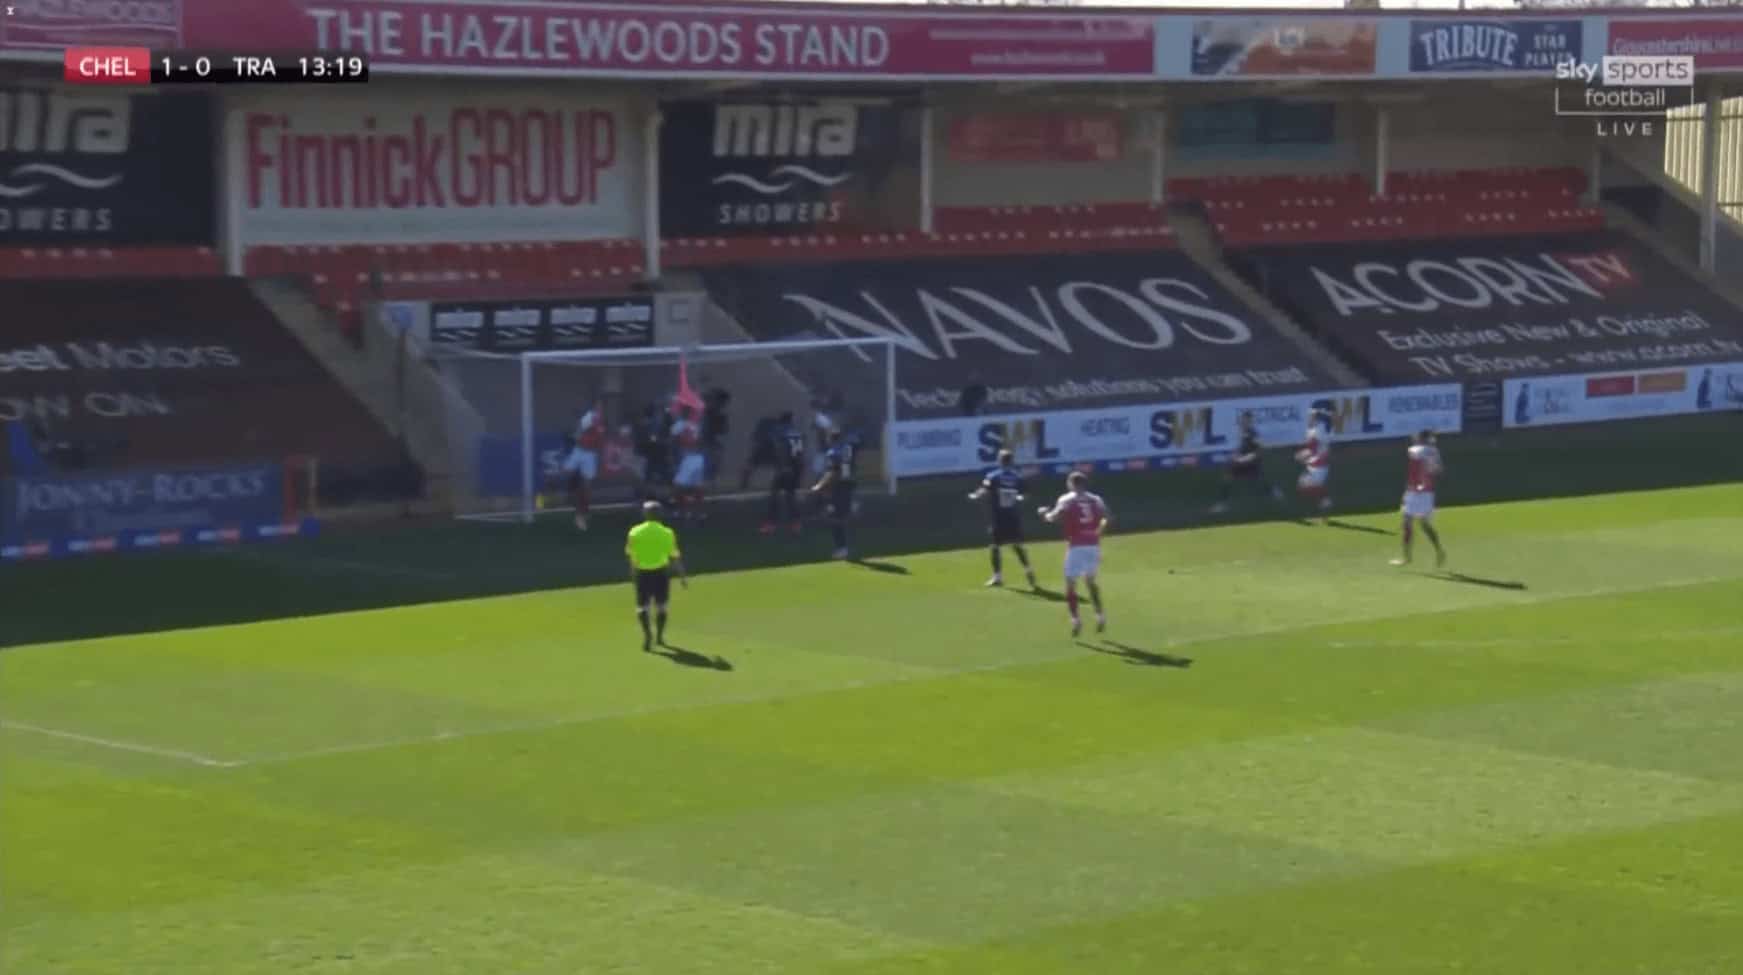
Here is an example where this strategy worked perfectly, but the goalkeeper was able to make a good save.

Cheltenham Town throw-ins tactical analysis tactics

The throw is aimed towards the near post, with the players moving out to contest it…

Cheltenham Town throw-ins tactical analysis tactics

…and the Cheltenham player wins the ball in the air again, flicking it on for his teammate who is in acres of space at the far post.

He manages to put his header on target, but the goalkeeper is able to scramble across his line and make the save.

Also note how there is another teammate who could have potentially run into the same space had this player also made a run towards the near post.

Conclusion

This has been a fairly innovative tactic from Cheltenham Town – most teams only use long throw-ins towards the end of matches when they are losing, and that too as a desperate attempt to get the ball into the box quickly, rather than through any well-coached routines.

However, this is a strategy that has definitely worked for them, given that Tozer had seven assists in League Two, as well as six ‘indirect’ assists, where a goal was scored following one of his throws.

This has been a breath of fresh air to watch, and shows the value of trying to maximize even innocuous situations such as throw-ins.

It will, therefore, be extremely interesting to see if the Robins maintain this level of performance in League One and whether they adjust their routines and tactics in such situations to catch more teams off guard.

Previous Post

The Total Football Analysis Interview: Robert Weaver – Crystal Palace 1st Team Analyst and Author

Next Post

Debinha scout report: why Brazilian is crucial to North Carolina Courage’s tactics

Next Post
Debinha at North Carolina Courage 2021 - scout report - tactical analysis tactics

Debinha scout report: why Brazilian is crucial to North Carolina Courage's tactics

  • About Total Football Analysis
  • Contact Total Football Analysis
  • Write For Total Football Analysis
  • Advertise
  • Privacy Policy
  • Cancellation / Refund Policy
  • Resources
  • Terms Of Service

© 2026 Total Football Analysis

No Result
View All Result
  • Football Analysis
    • Data Analysis
    • Formations
      • 2-2-4 Formation
      • 2-3-5 Formation
      • 3-1-4-2 Formation
      • 3-2-2-3 Formation
      • 3-2-4-1 Formation
      • 3-1-6 Formation
      • 3-3-4 Formation
      • 3-4-1-2 Formation
      • 3-4-2-1 Formation
      • 3-4-3 Formation
      • 3-5-1-1 Formation
      • 3-5-2 Formation
      • 4-1-4-1 Formation
      • 4-2-2-2 Formation
      • 4-2-3-1 Formation
      • 4-2-4 Formation
      • 4-3-1-2 Formation
      • 4-3-3 Formation
      • 4-4-2 Formation
      • 4-5-1 Formation
      • 5-3-2 Formation
      • 5-4-1 Formation
      • 6-3-1 Formation
    • Head Coach Analysis
    • Match Analysis
    • Player Analysis
    • Recruitment Analysis
    • Set Piece Analysis
    • Tactical Theory
    • Tactical Preview
    • Team Analysis
    • Training Analysis
    • Tactical Analysis
    • Scouting Report
  • Competition
    • ALL Competitions
    • English Premier League
    • Champions League
    • La Liga
    • Bundesliga
    • Serie A
    • Ligue 1
    • Eredivisie
    • EFL Championship
    • FIFA World Cup 2022
    • WEURO 2022
    • Women’s Super League
    • NWSL
    • Belgian First Division A
    • A-League
    • Liga Profesional de Argentina
    • Austrian Bundesliga
    • Campeonato Brasileiro Série A
    • DFB Pokal
    • 1. HNL
    • Danish Superliga
    • EFL League One
    • EFL League Two
    • FA Cup
    • EFL Cup
    • Indian Super League
    • K-League
    • J1 League
    • Liga MX
    • Copa América 2021
    • Copa del Rey
    • MLS
    • Eliteserien
    • Euro 2020
    • Primeira Liga
    • Scottish Premiership
    • Allsvenskan
    • Europa League
    • UEFA Nations League
    • Liga AUF Uruguaya
  • Coaches
    • All Coaches
    • Alfred Schreuder
    • Ange Postecoglou
    • Antonio Conte
    • Arne Slot
    • Bo Svensson
    • Brendan Rodgers
    • Bruno Lage
    • Carlo Ancelotti
    • Christophe Galtier
    • Claude Puel
    • Claudio Ranieri
    • David Moyes
    • Dean Smith
    • Diego Simeone
    • Domenico Tedesco
    • Frank Lampard
    • Eddie Howe
    • Edin Terzić
    • Emma Hayes
    • Erik ten Hag
    • Ernesto Valverde
    • Gennaro Gattuso
    • Gerardo Seoane
    • Gian Piero Gasperini
    • Giovanni van Bronckhorst
    • Graham Potter
    • Igor Tudor
    • Imanol Alguacil
    • Jesse Marsch
    • Jonas Eidevall
    • Jorge Sampaoli
    • José Bordalás
    • José Mourinho
    • Julen Lopetegui
    • Julian Nagelsmann
    • Julien Stéphan
    • Jürgen Klopp
    • Luciano Spalletti
    • Lucien Favre
    • Manuel Pellegrini
    • Marcelo Bielsa
    • Marco Rose
    • Marco Silva
    • Massimiliano Allegri
    • Mauricio Pochettino
    • Maurizio Sarri
    • Mikel Arteta
    • Niko Kovač
    • Nuno Espírito Santo
    • Oliver Glasner
    • Patrick Vieira
    • Paulo Fonseca
    • Pep Guardiola
    • Peter Bosz
    • Rafa Benítez
    • Ralf Rangnick
    • Ralph Hasenhüttl
    • Roger Schmidt
    • Roy Hodgson
    • Sean Dyche
    • Sérgio Conceição
    • Simone Inzaghi
    • Sonia Bompastor
    • Stefano Pioli
    • Steffen Baumgart
    • Steven Gerrard
    • Thiago Motta
    • Thomas Frank
    • Thomas Tuchel
    • Unai Emery
    • Vincenzo Italiano
    • Xavi
  • Teams
    • ALL Teams
    • AC Milan
    • Ajax Amsterdam
    • Arsenal
    • AS Monaco FC
    • Atalanta
    • Atlético Madrid
    • FC Barcelona
    • FC Bayern Munich
    • Borussia Dortmund
    • Celtic FC
    • Chelsea FC
    • Everton F.C.
    • Inter Milan
    • Juventus F.C.
    • Leeds United F.C.
    • Liverpool FC
    • Manchester City
    • Manchester United FC
    • Paris Saint-Germain
    • Rangers FC
    • RB Leipzig
    • Real Madrid CF
    • Tottenham Hotspur
    • West Ham United
  • Players
    • ALL Players
    • Alisson Becker
    • Bukayo Saka
    • Erling Haaland
    • Harry Kane
    • Jack Grealish
    • John Stones
    • Julián Alvarez
    • Kalvin Phillips
    • Kevin De Bruyne
    • Kyle Walker
    • Kylian Mbappé
    • Lamine Yamal
    • Lionel Messi
    • Luis Díaz
    • Mohamed Salah
    • Phil Foden
    • Virgil Van Dijk
  • Contact
  • Write For TFA
  • Login

© 2026 Total Football Analysis