On Wednesday evening, Chelsea hosted Real Madrid at Stamford Bridge in a hotly anticipated semi-final second leg. After a 1-1 draw in the first leg, Chelsea had the advantage of an away goal going into this tie. As it turned out, this away goal didn’t play a part in the result, as Chelsea coasted to a convincing 2-0 win, giving them a 3-1 win overall, and sending them into the Champions League final. Chelsea were so dominant, they registered a 3.45 xG compared to Madrid’s 0.38, despite the visitors enjoying the bulk of possession. The visitors struggled to break down Chelsea’s resolute and compact defensive shape, whilst the blues were a considerable threat on attacking transition all evening.
This tactical analysis breaks down a couple of tactics Thomas Tuchel’s men used to gain the upper hand, giving an analysis on why Real Madrid came up short on the night.
Formations and personnel
Unsurprisingly, Tuchel fielded a 3-4-3, with a back three of Antonio Rudiger, Thiago Silva, and Andreas Christensen. In front of them, sat N’golo Kante and Jorginho in a double pivot, with Ben Chilwell and Cesar Azpilicueta in the wing-back positions. Whilst the image below shows Mason Mount, Timo Werner and Kai Havertz in a front three with set positions, these three were interchangeable throughout the evening. Their rotations and combinations proved very difficult for Madrid’s own back three to deal with.
This back three was comprised of Eder Militao, Sergio Ramos, and Nacho Fernandez. Casemiro sat in front of them as a single pivot, with Luka Modric and Toni Kroos in front of him. Ferland Mendy and Vinicius Junior played on either wing, with Eden Hazard and Karim Benzema partnered up front.

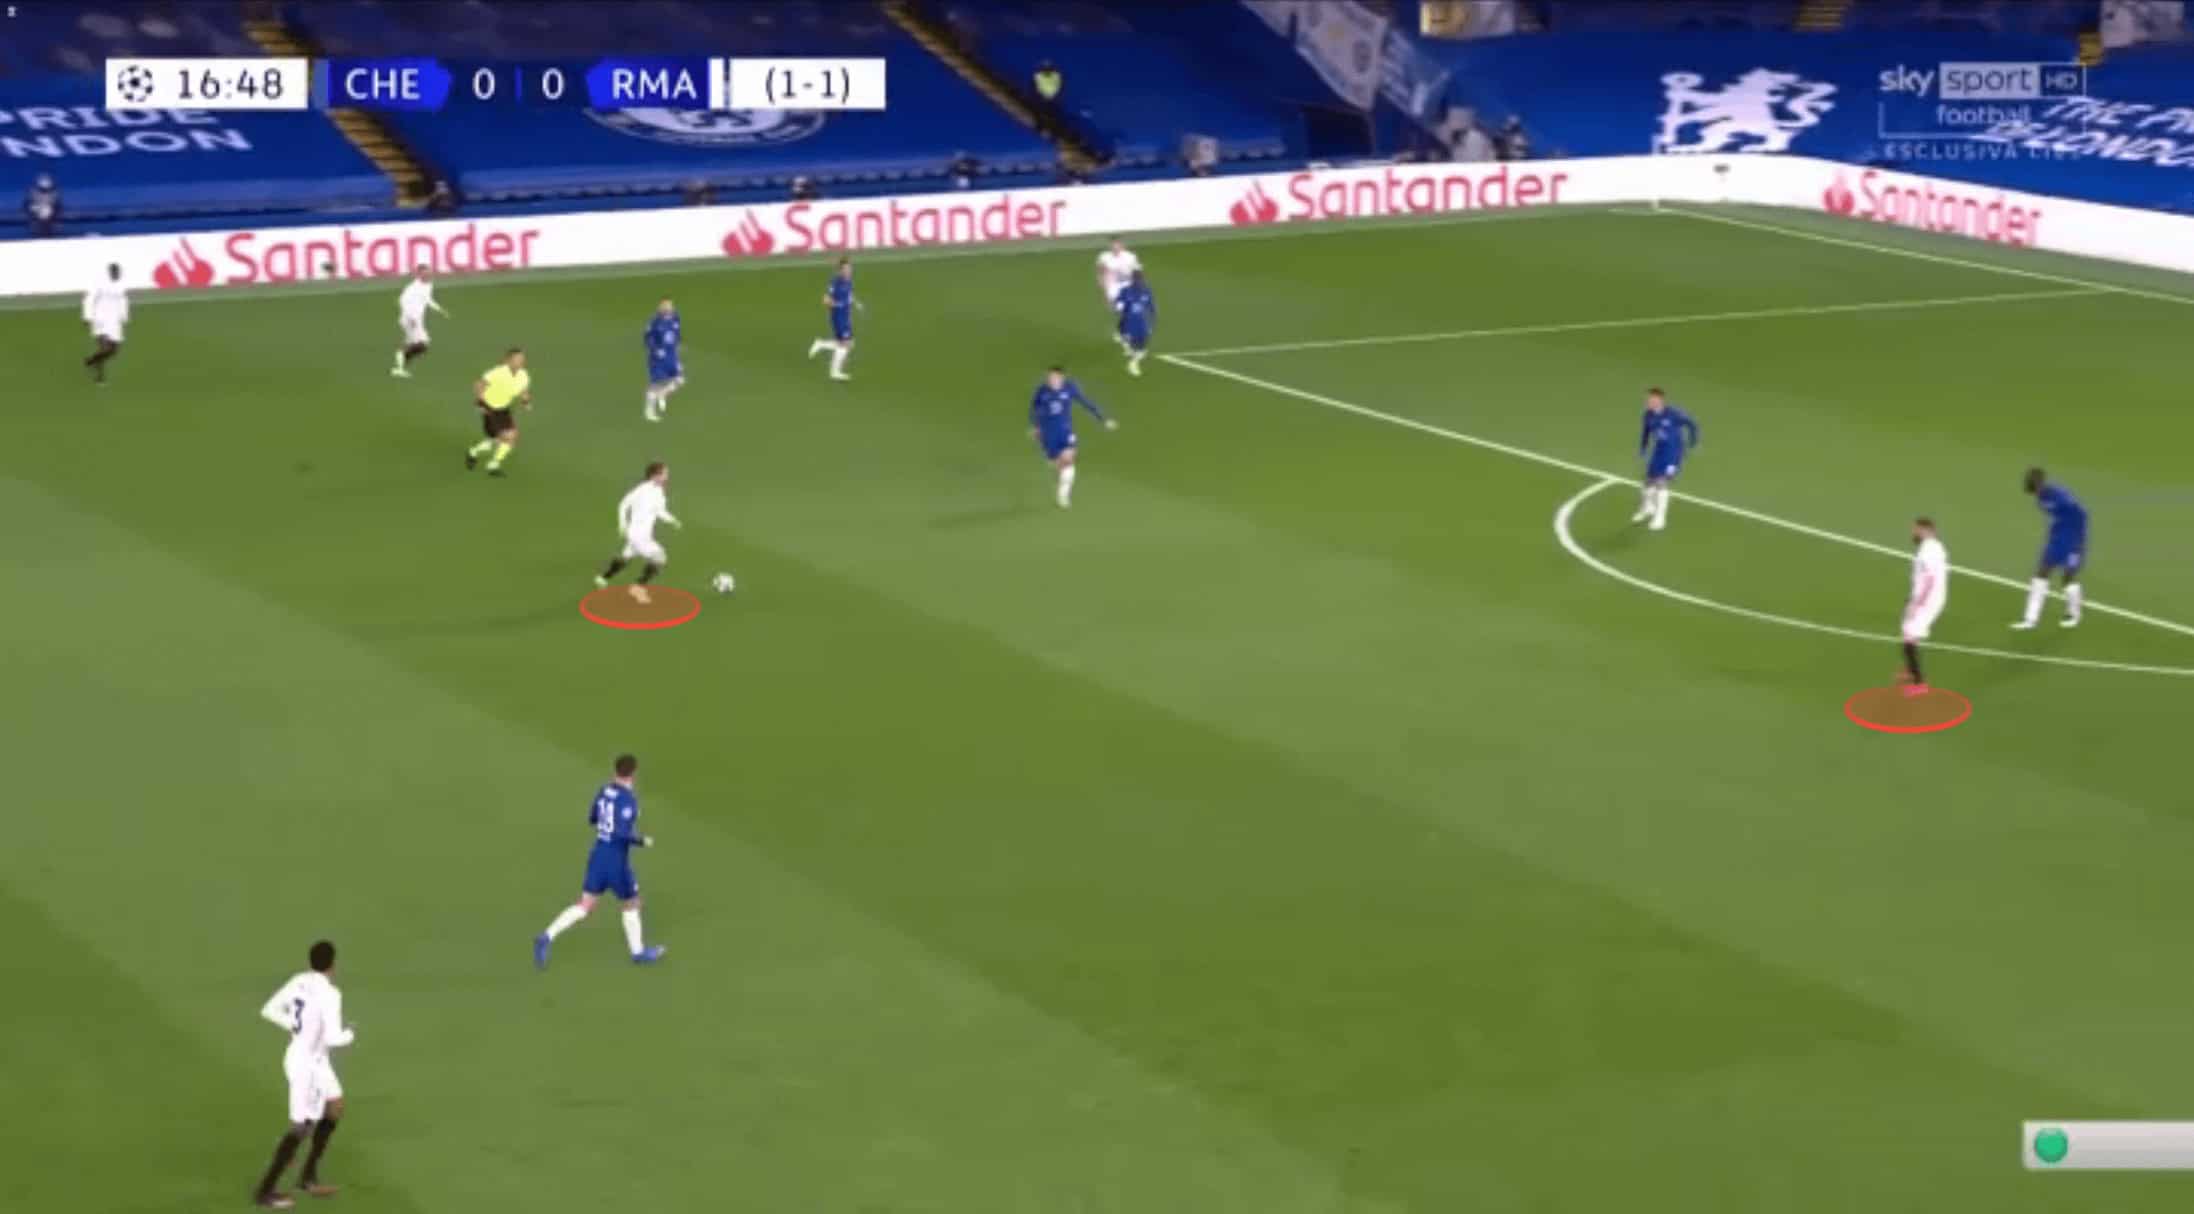
Creating space between the lines
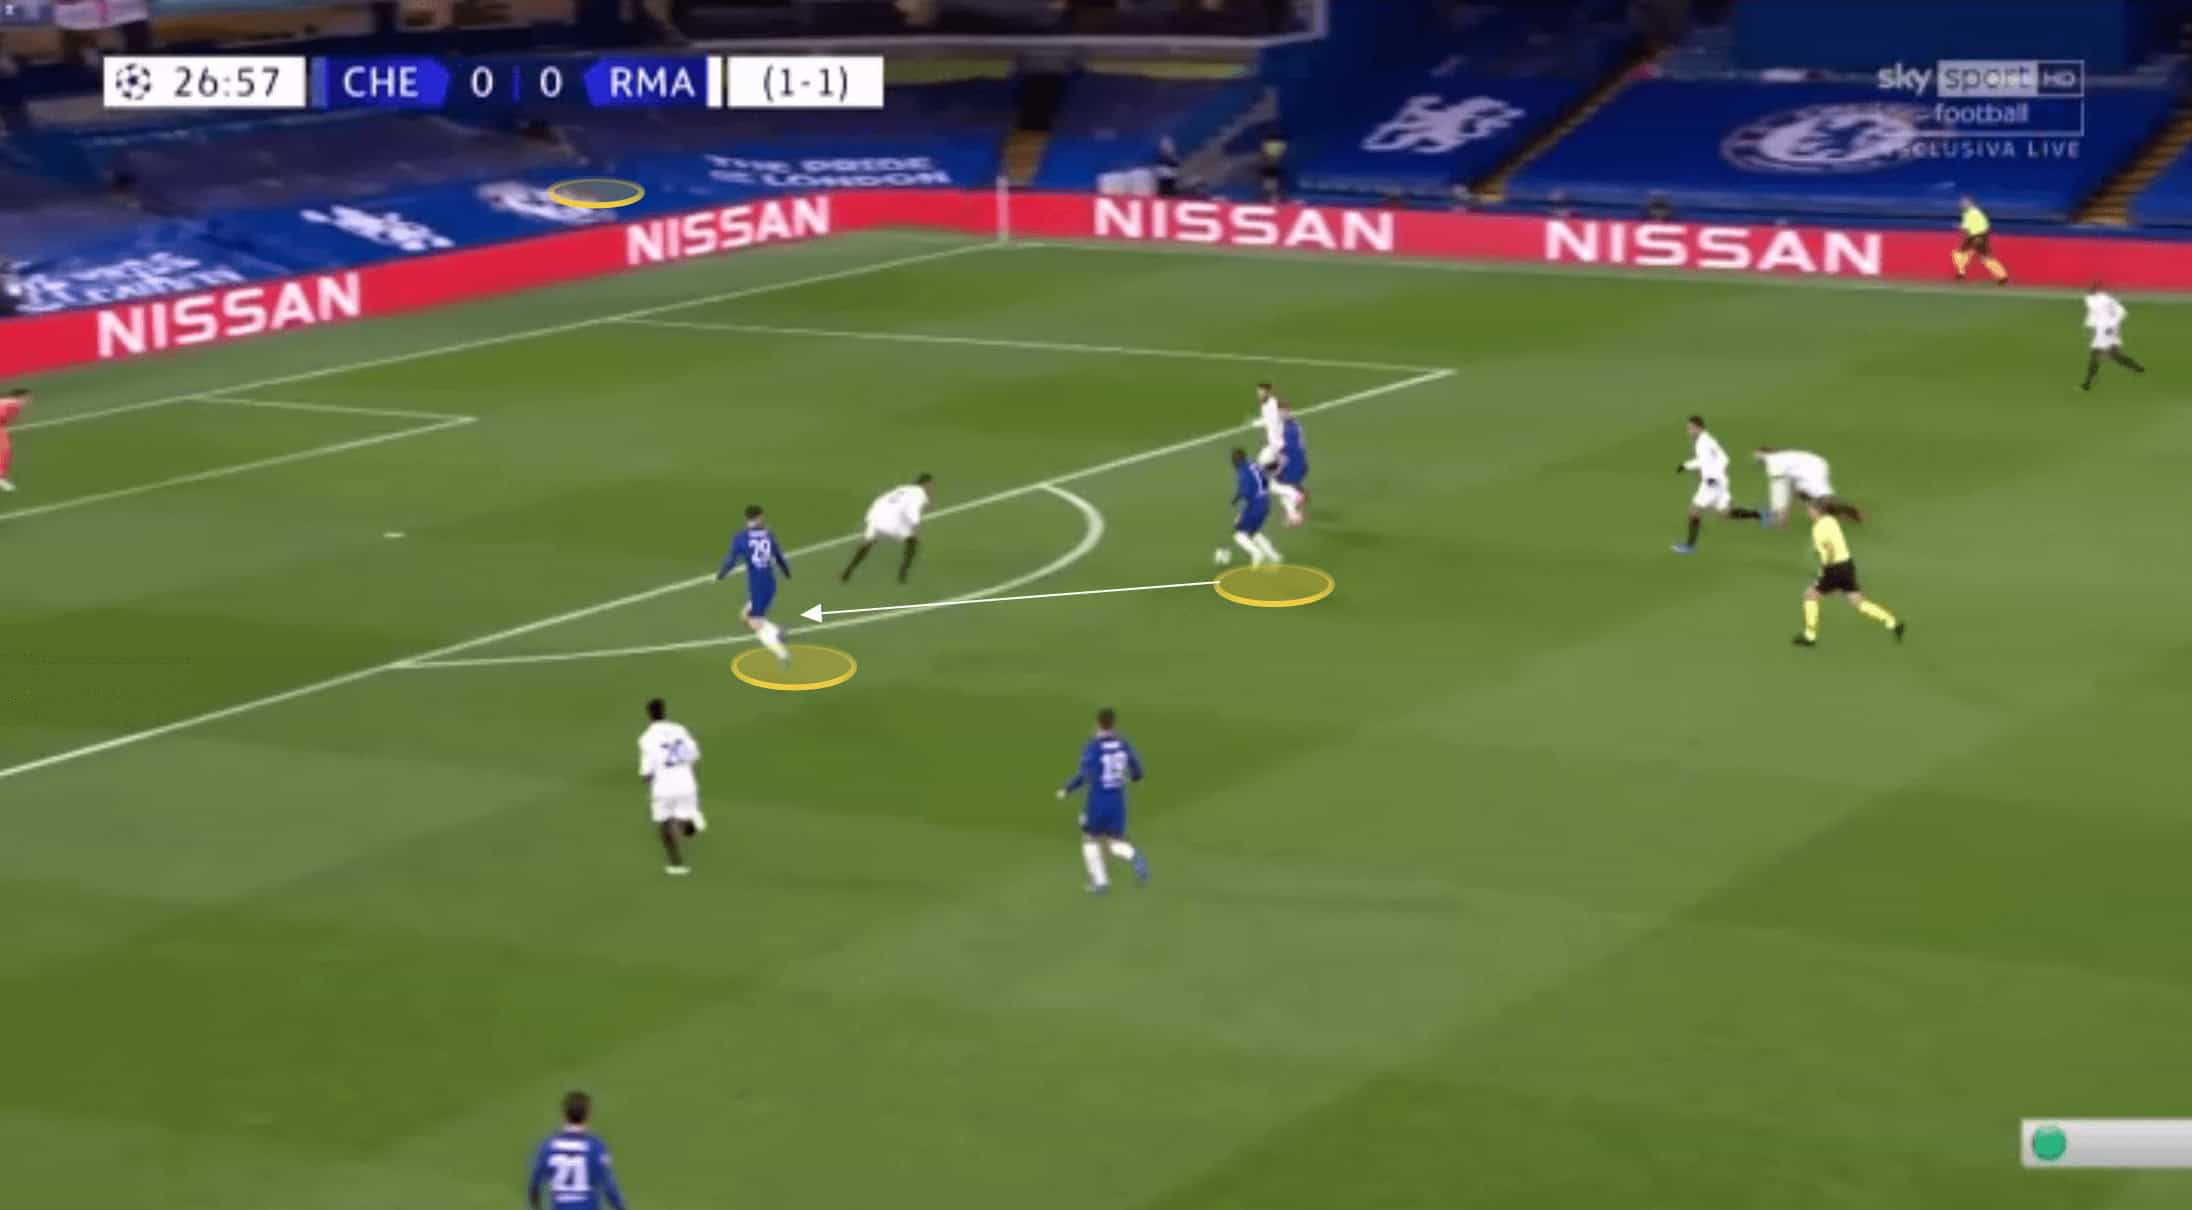
Chelsea did a terrific job of stretching Madrid’s defence over the course of the game. One way which they managed to do this was by creating an overload on Casemiro before then drawing the centre-backs out of the back line, and exploiting the space either behind them or either side of them.
We can see an example of this below where Jorginho and Mount are matched up against Modric and Kroos. Casemiro lingers behind in the space between the midfield and defence.

Jorginho receives possession in little space and with his back to goal, in doing so drawing the press of Madrid’s midfield. In turn Kante was able to move in behind into the space between the lines. We can see this in the image below. However, what we can also see is Havertz dropping the other side of Casemiro, giving Chelsea a 2v1 overload on the Madrid pivot.

As Kante receives the ball in this space he is able to draw Casemiro towards him.

And after a quick interchange with Werner, Kante could slide Havertz in with the through pass.
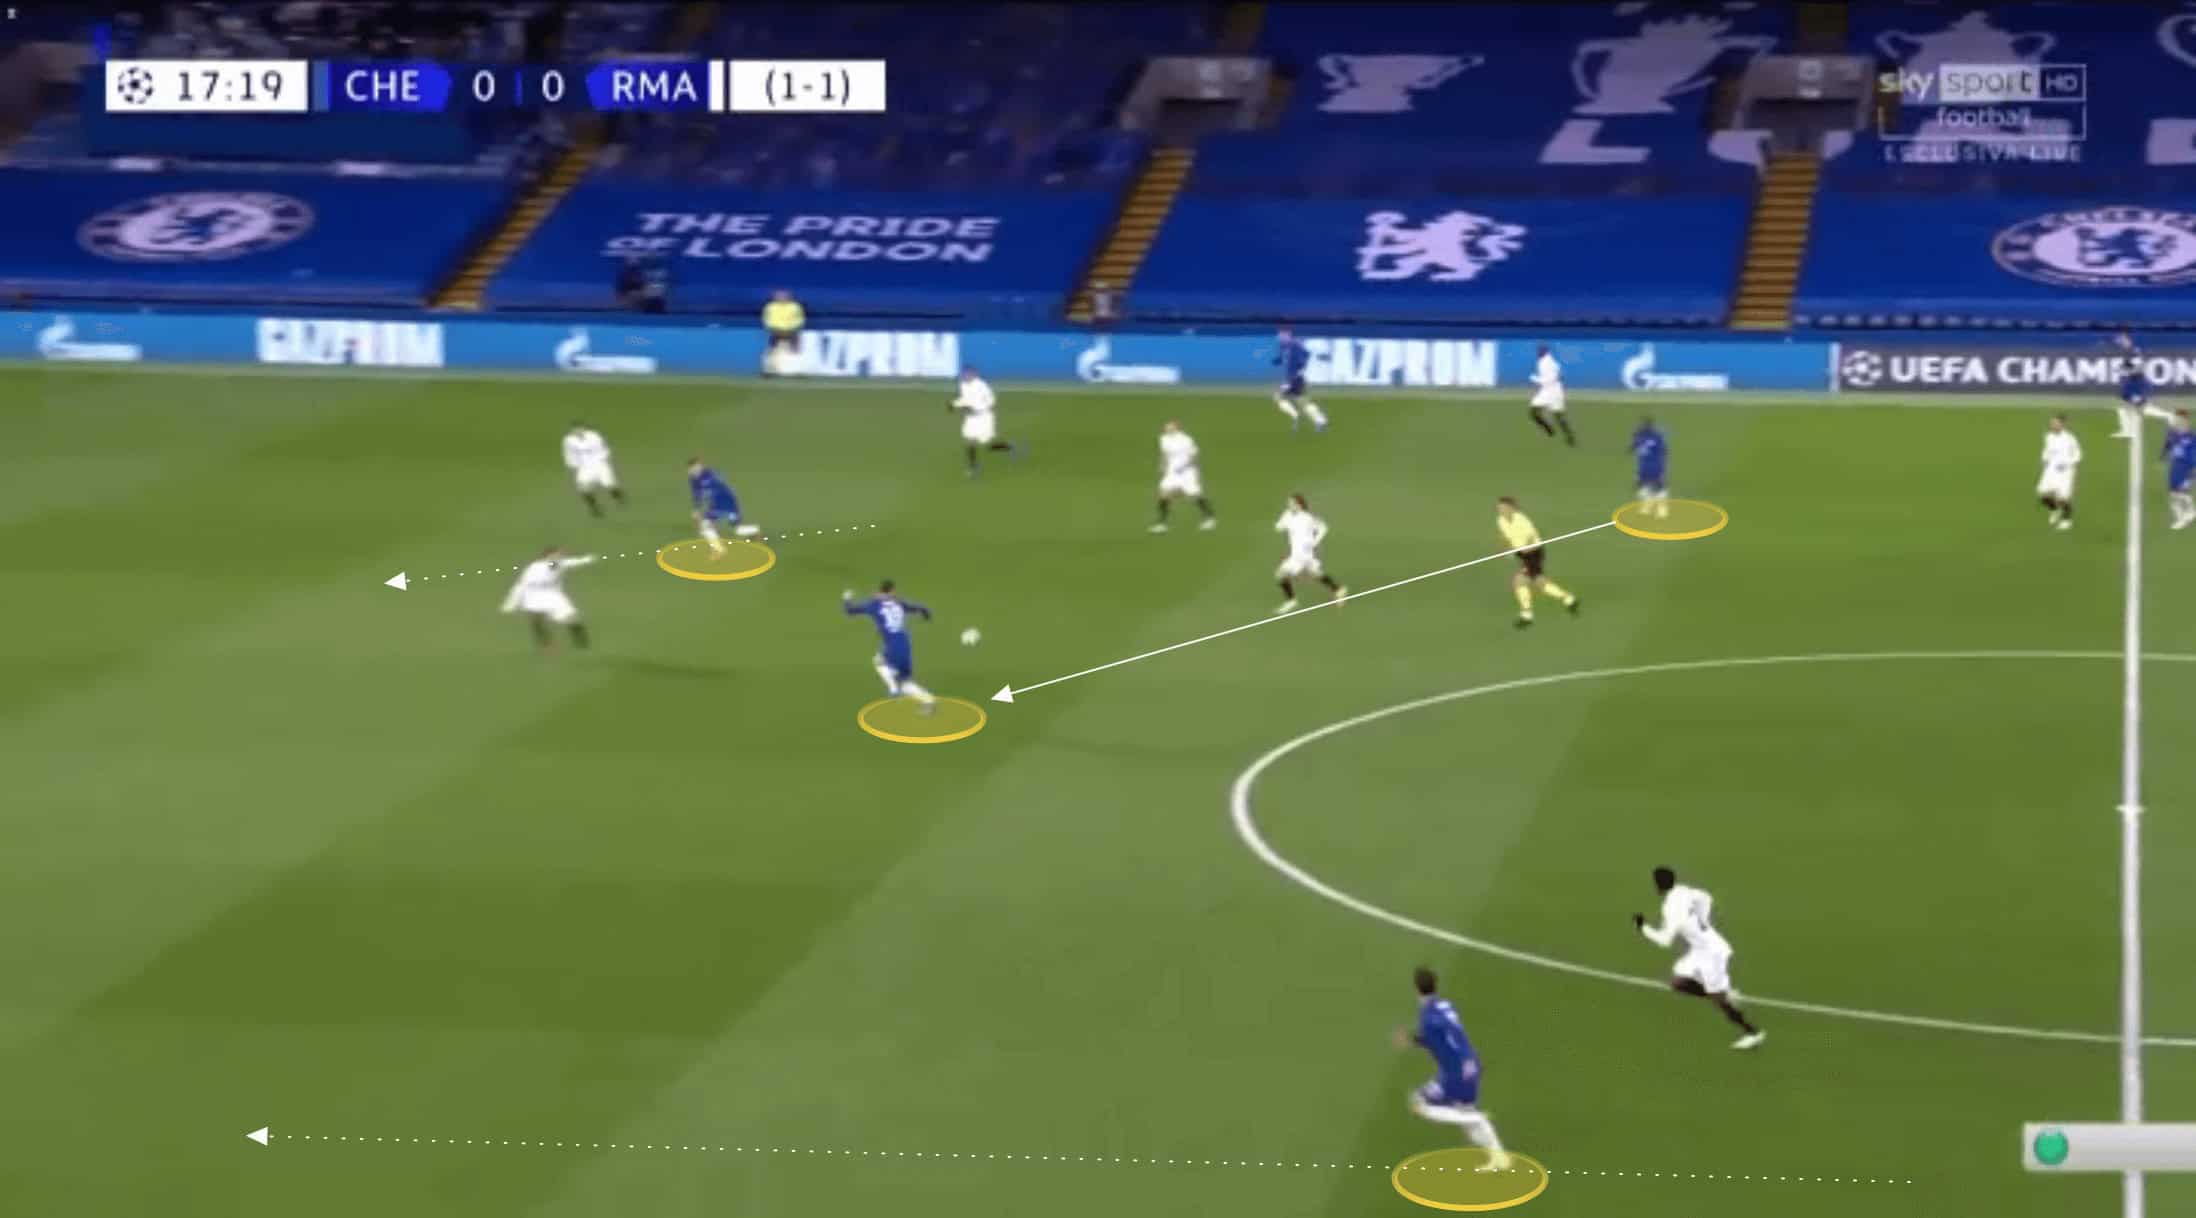
Hitting Madrid on transition
Chelsea were most threatening on attacking transition, using their pace on the counter-attack to create goal-scoring opportunities.
Firstly, Werner would drop deep to support in the defensive phase. The young, German forward is direct and pacey on the ball. As a ball-carrier, he is a terrific option to get on the ball in transition and drive forward, turning defence into attack very quickly.
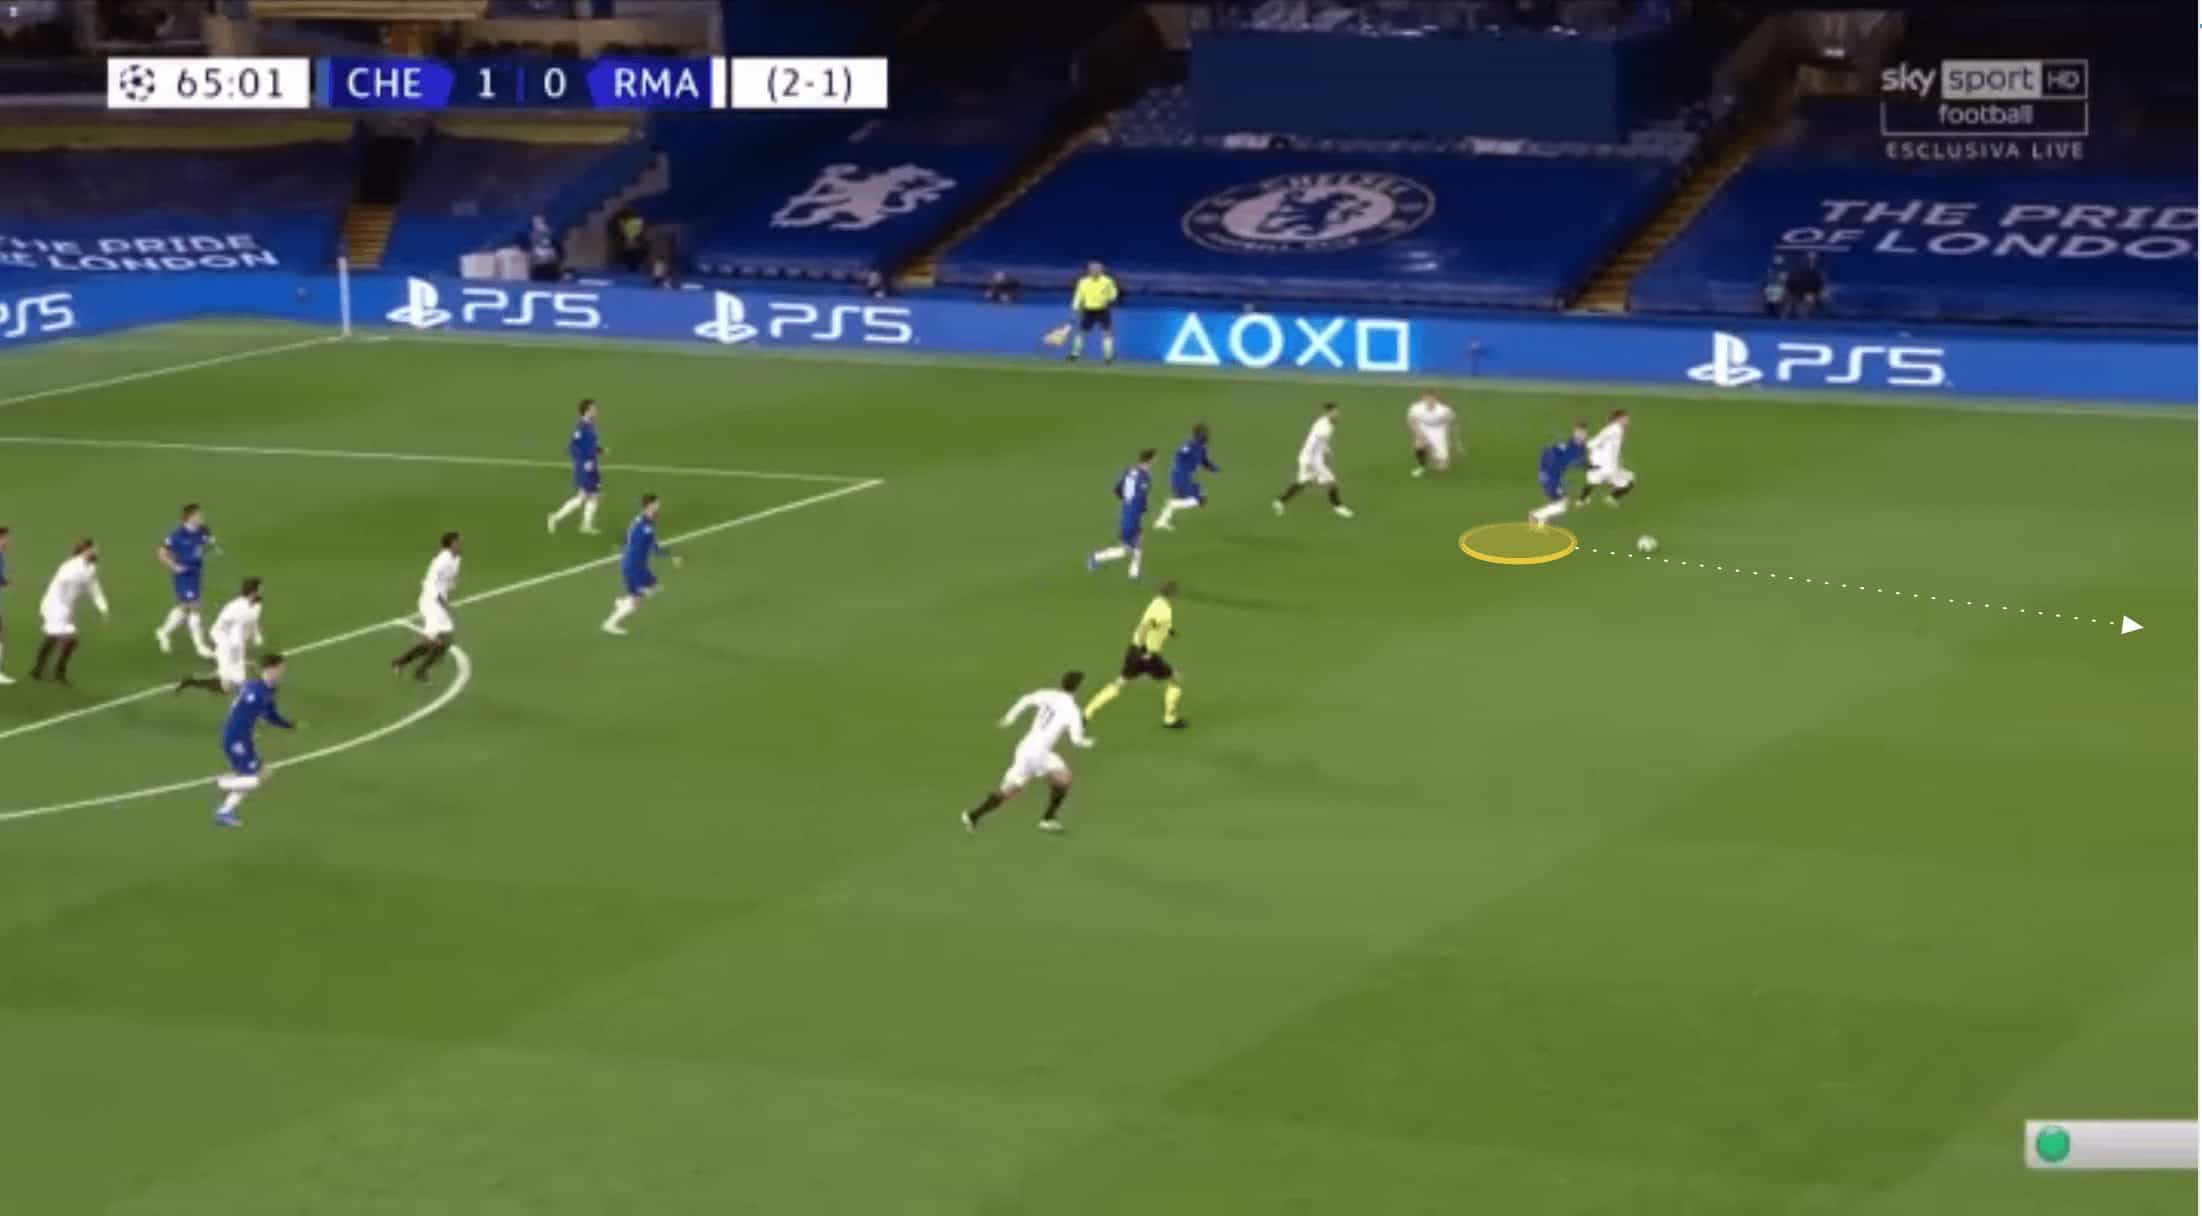
Havertz and Mount are no slouches either, whilst with Kante behind this front three and Chilwell on the left, Chelsea aren’t short of players who can burst forward to support the counter. We can see this occurring below, as Werner continues the attacking phase shown earlier, with Kante bursting forward on the overlap to support.
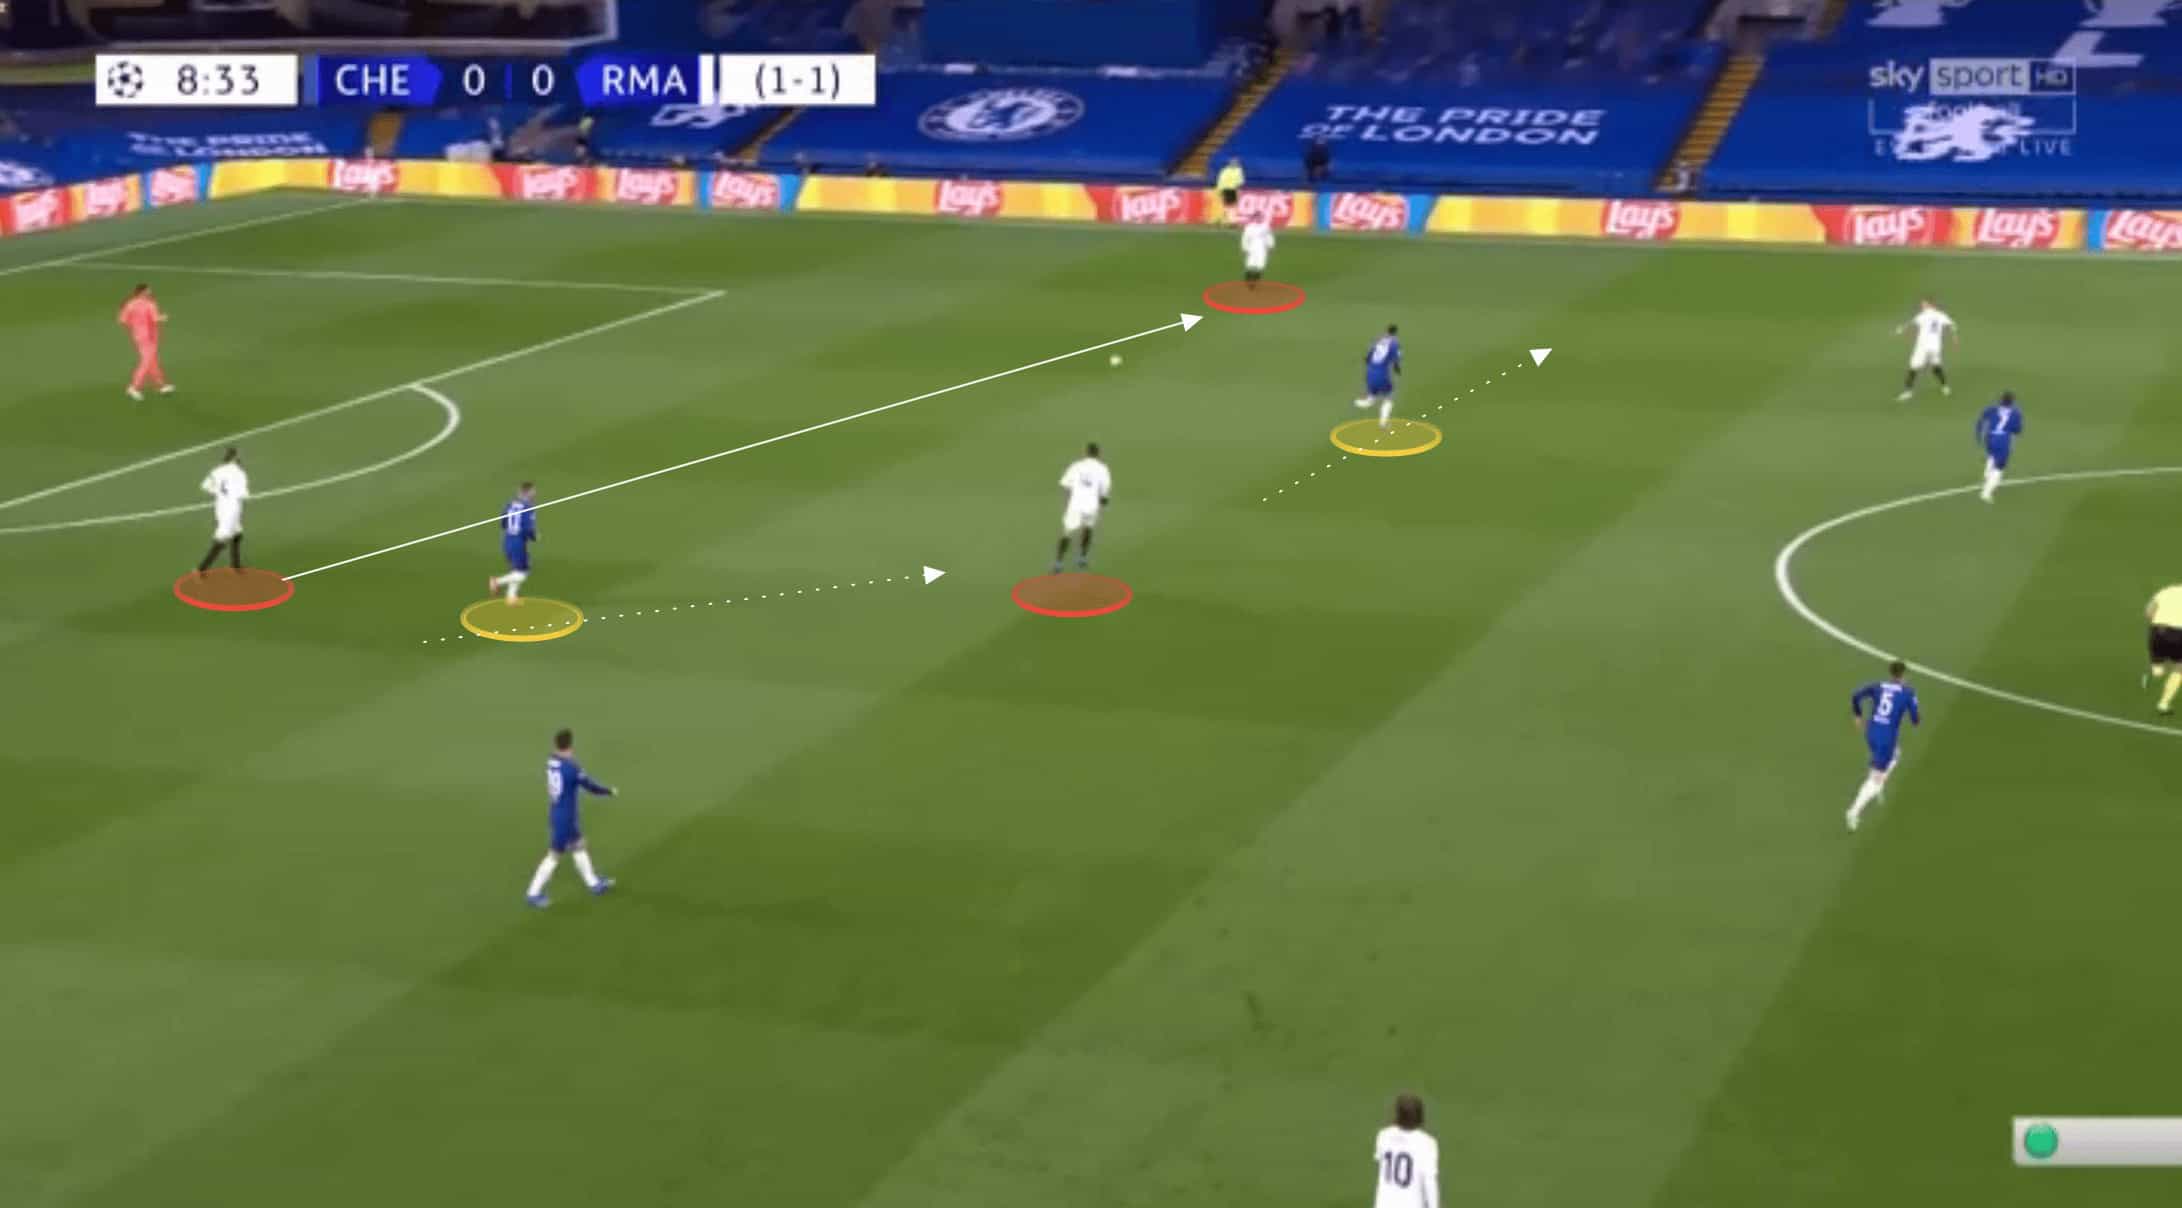
However, there was far more to this phase of their game, and Tuchel ensured Chelsea always had players around the ball immediately on transition. This gave them the ability to quickly combine and secure possession, before quickly pushing forward on the counter.
Below we can see the ball won back as Madrid aimed to play out, with five Chelsea players surrounding two Madrid players. Werner immediately looks for the pass in behind, whilst Kante immediately makes himself available between the lines and in a central position.

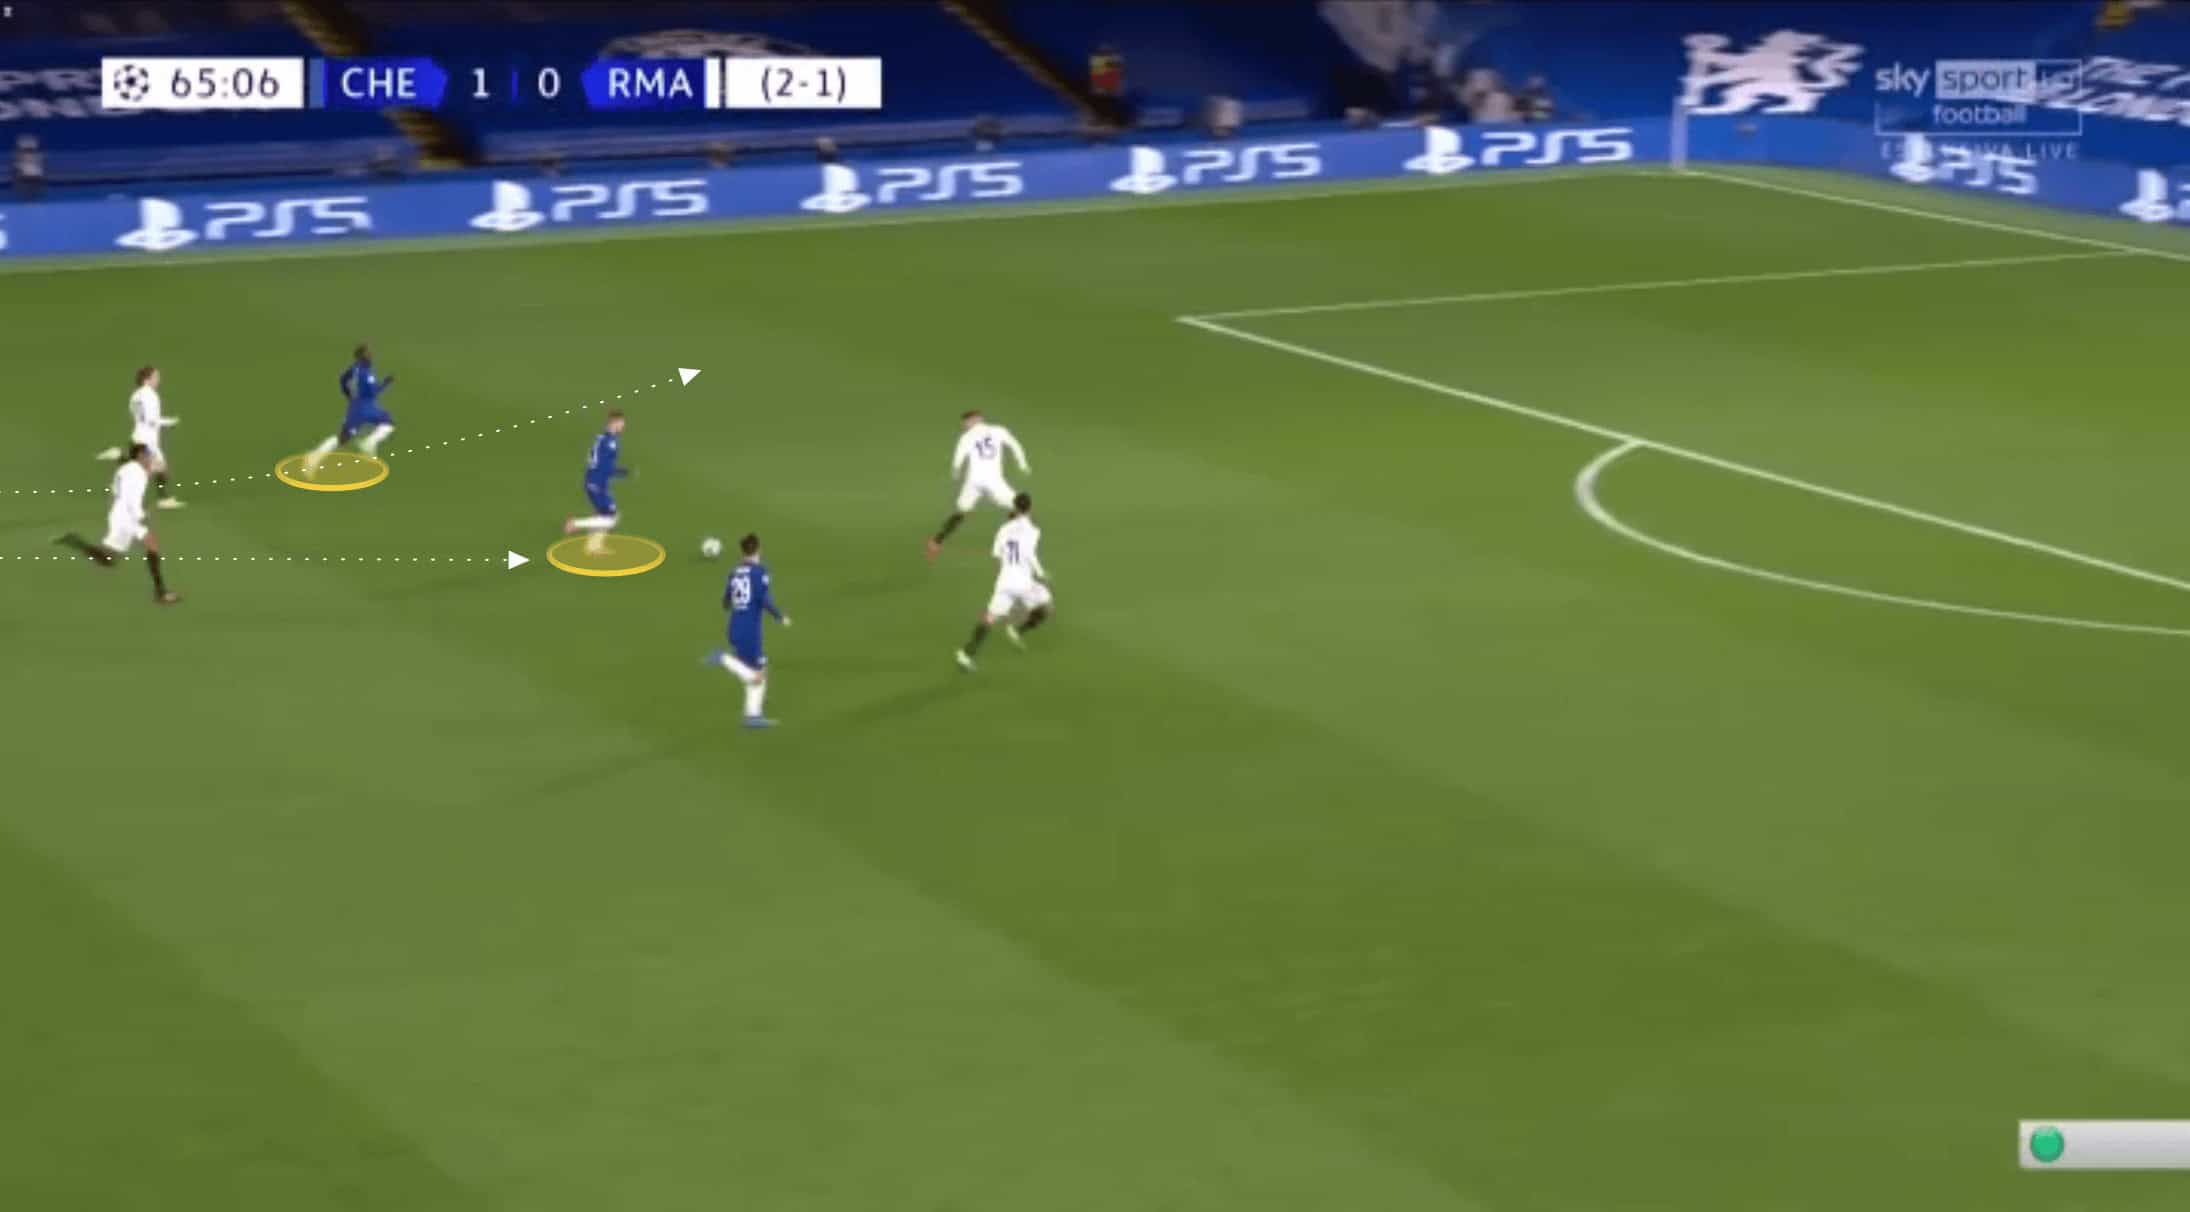
Chelsea’s ability to secure possession and immediately play forward was possible due to their compactness. These immediate combinations over short distances also had the impact of narrowing Madrid’s defensive shape before then moving the ball either forward or out wide.
Below we can see Jorginho making an interception, as Kante then immediately picks up the the loose ball.
As he turns to drive forward, we can see Havertz in space immediately and Werner making a run in behind as Havertz’s run draws the Real Madrid centre-back forward. However, we can also see the benefit of a pacy wing-back with Chilwell streaming forward to support the counter-attack, giving Chelsea that wide outlet option.
Chelsea’s pressing structure
Chelsea were structured and disciplined in their pressing approach. They pressed with their front three looking to show Madrid out wide, and cover Casemiro.

As the ball was worked wide, they would shift across, with Werner then dropping in to pick up Casemiro, ensuring there was no easy central pass for Madrid.
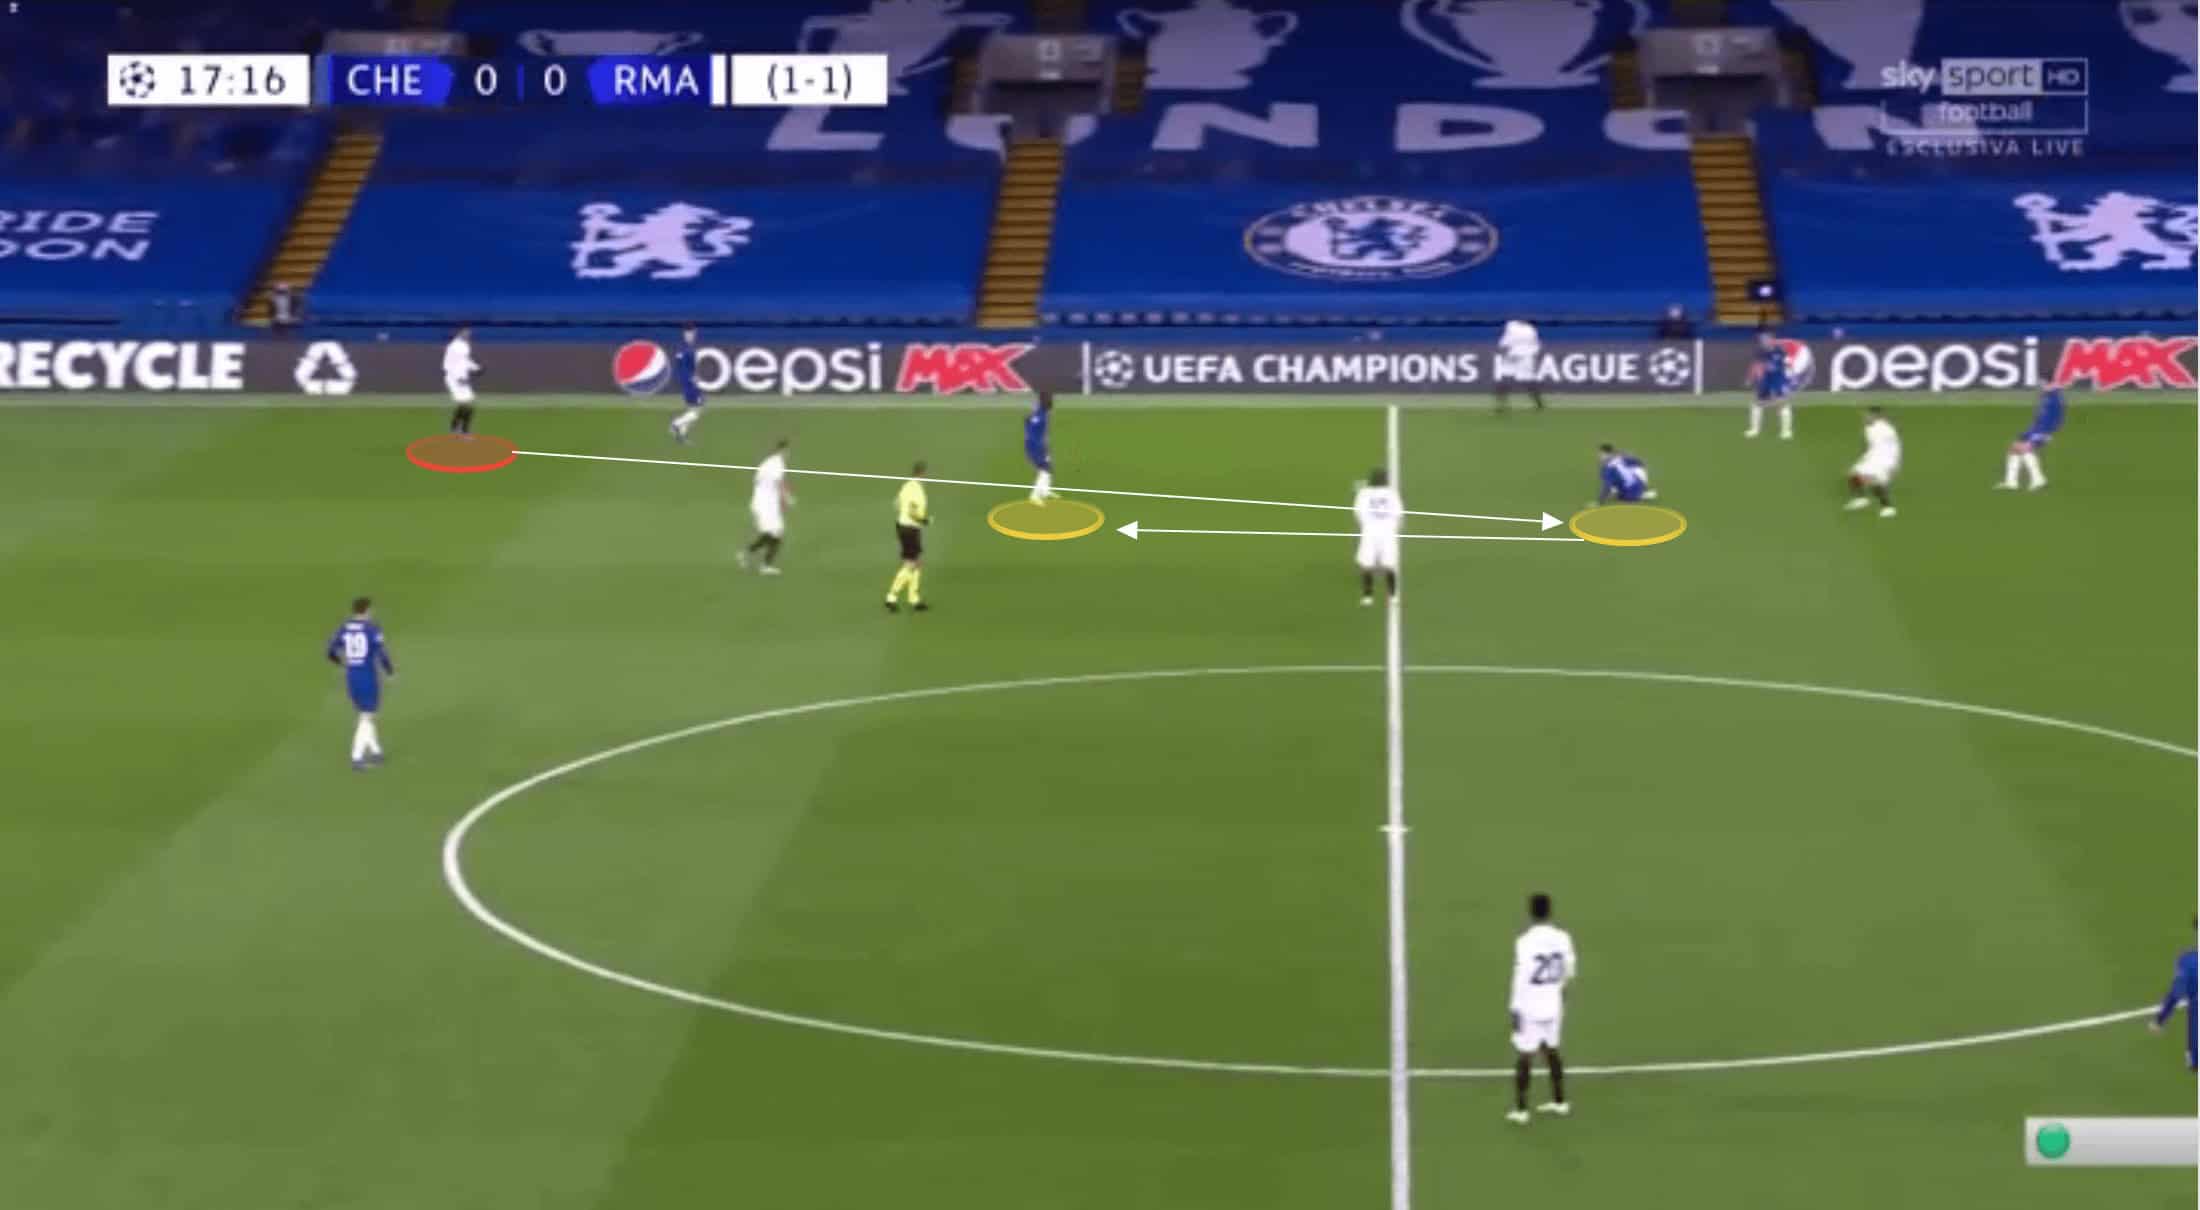
In the event Chelsea’s press weren’t able to cover the inside pass, and Madrid could by pass the first line of press, Tuchel relied on the mobility of his double pivot. Whilst Kante is world renown for his ability to cover ground to press, Jorginho is still seen as a ball-playing tempo setter, rather than someone who can contribute in this phase of the game. However, his discipline and energy in the press was clear to see for all last night.
In the example below, the pass inside meant Jorginho has to push forward and cover, and in turn Kante dropped to ensure the double pivot couldn’t be split with a pass.

The duo worked well in tandem, as we see this pattern of play progressing in the next image. With Modric switching the ball, Kante was able to immediately shift across and Jorginho reciprocated by dropping in to protect the central space.
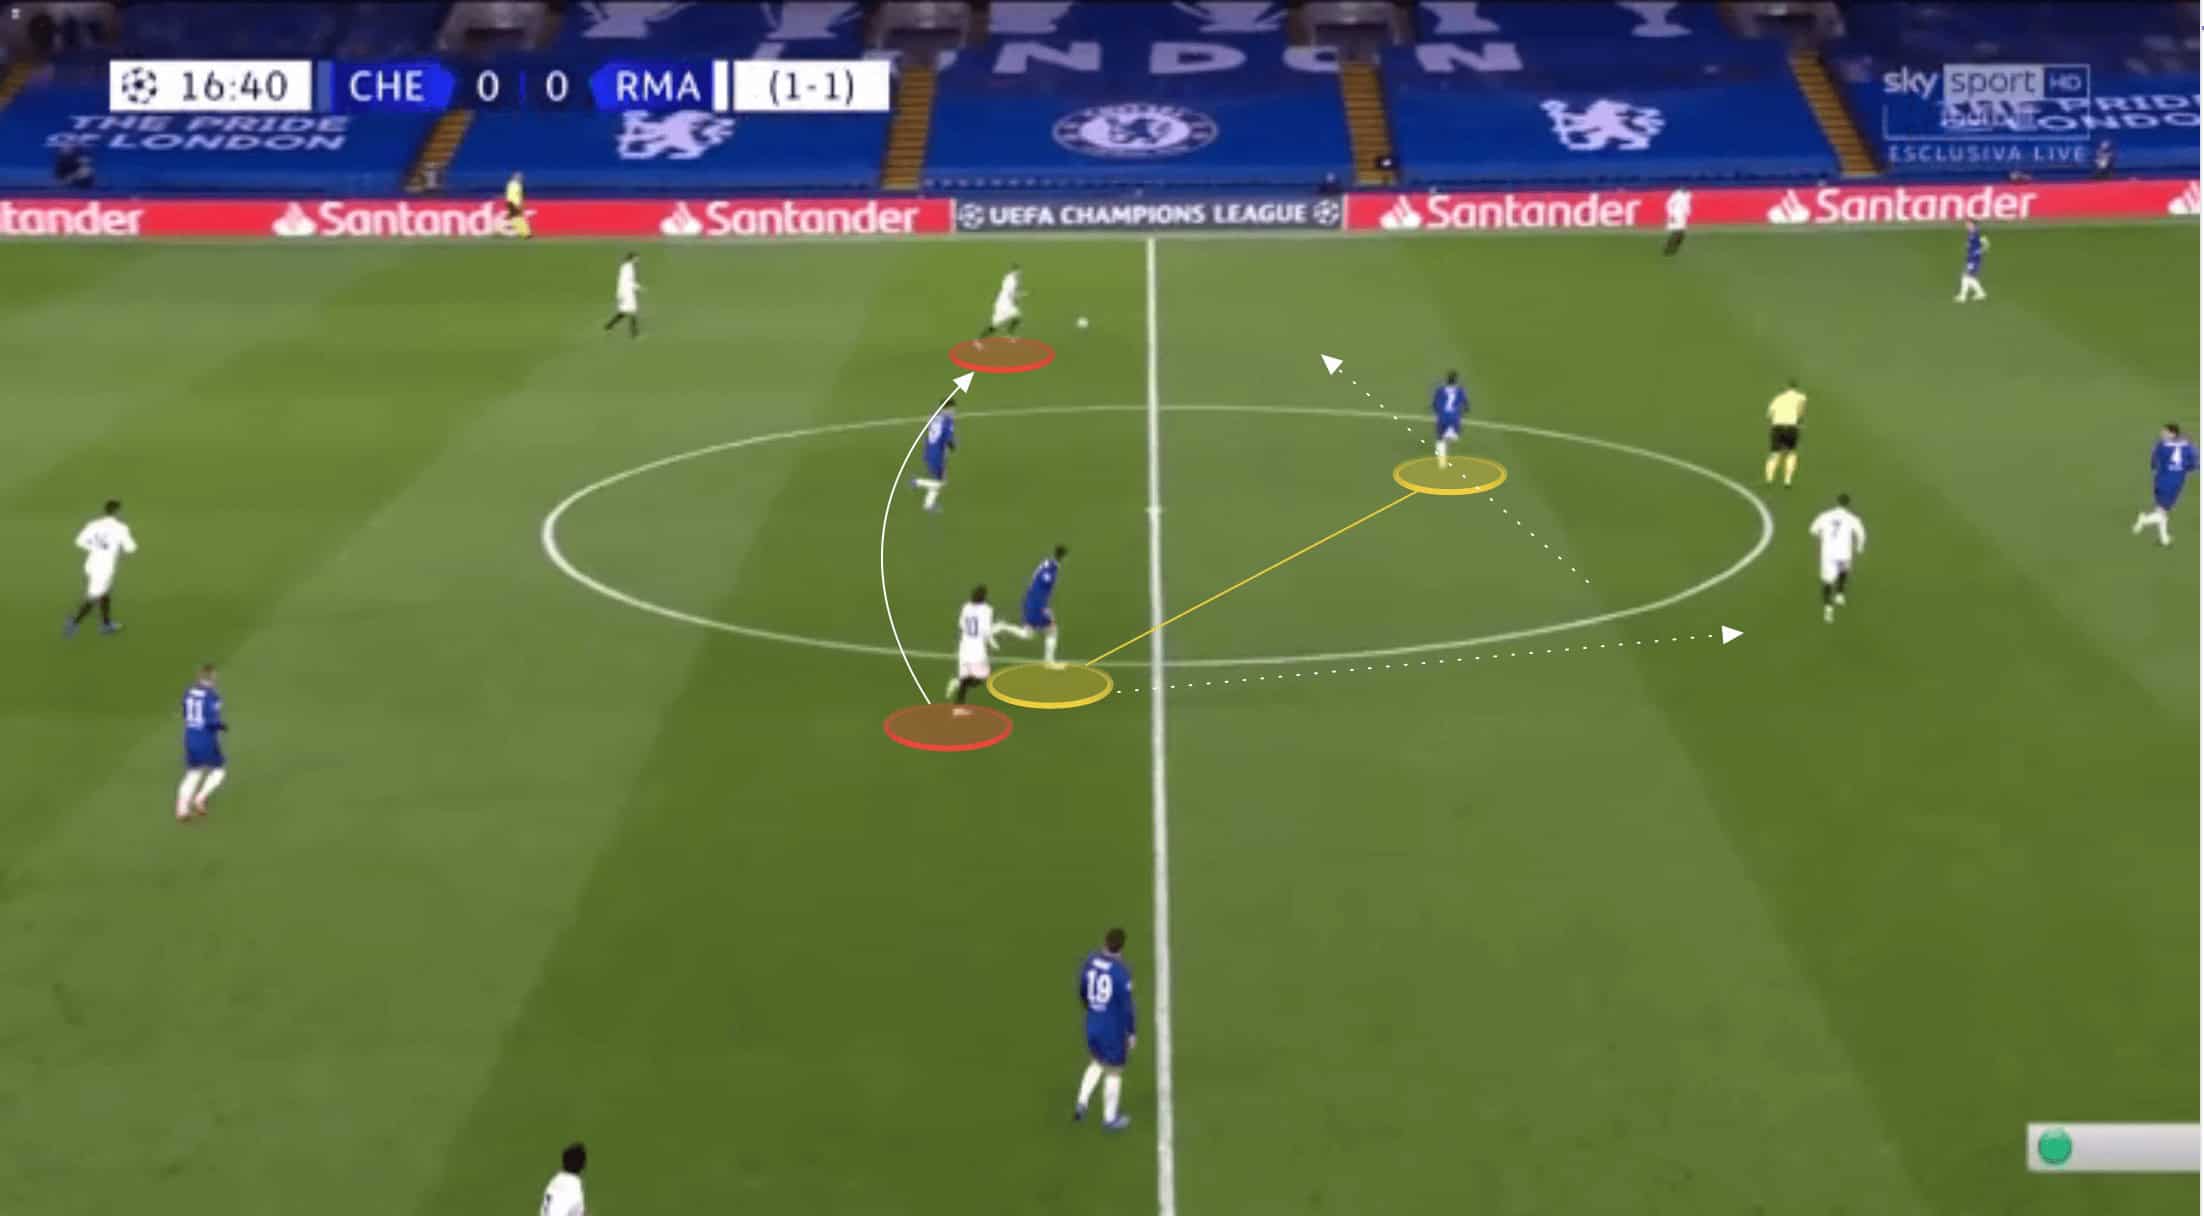
Kante’s ability to cover ground so quickly not only allowed Chelsea to protect the centre of the pitch as they pressed, but also quickly turn this press into a counter-attack. If Madrid wer brave enough to play inside, Kante was alert to any slightly under hit or wayward passes, and was ready to press these if the opportunity arose.
We can see how an interception in this area could quickly lead to an attacking overload against Madrid’s defence, as Kante drives forward with a teammate either side of him in a 3v2.

Real Madrid’s flat attack
Madrid fans would have been disappointed with the overall lack of creativity shown by their team, despite fielding a line-up with plenty of individual attacking talent in it. As mentioned in the introduction of this piece, Madrid’s overall xG for the game was significantly dwarfed by that of the hosts. Below we can see Chelsea’s shot map from the game, showing a high number of efforts from inside the area, and with them all coming from central areas.

This in contrast to Madrid’s shot map makes for sorry reading. Madrid managed just a handful of shots on goal, with the majority coming from outside of the area, and overall from less central areas than Chelsea’s own attack managed.

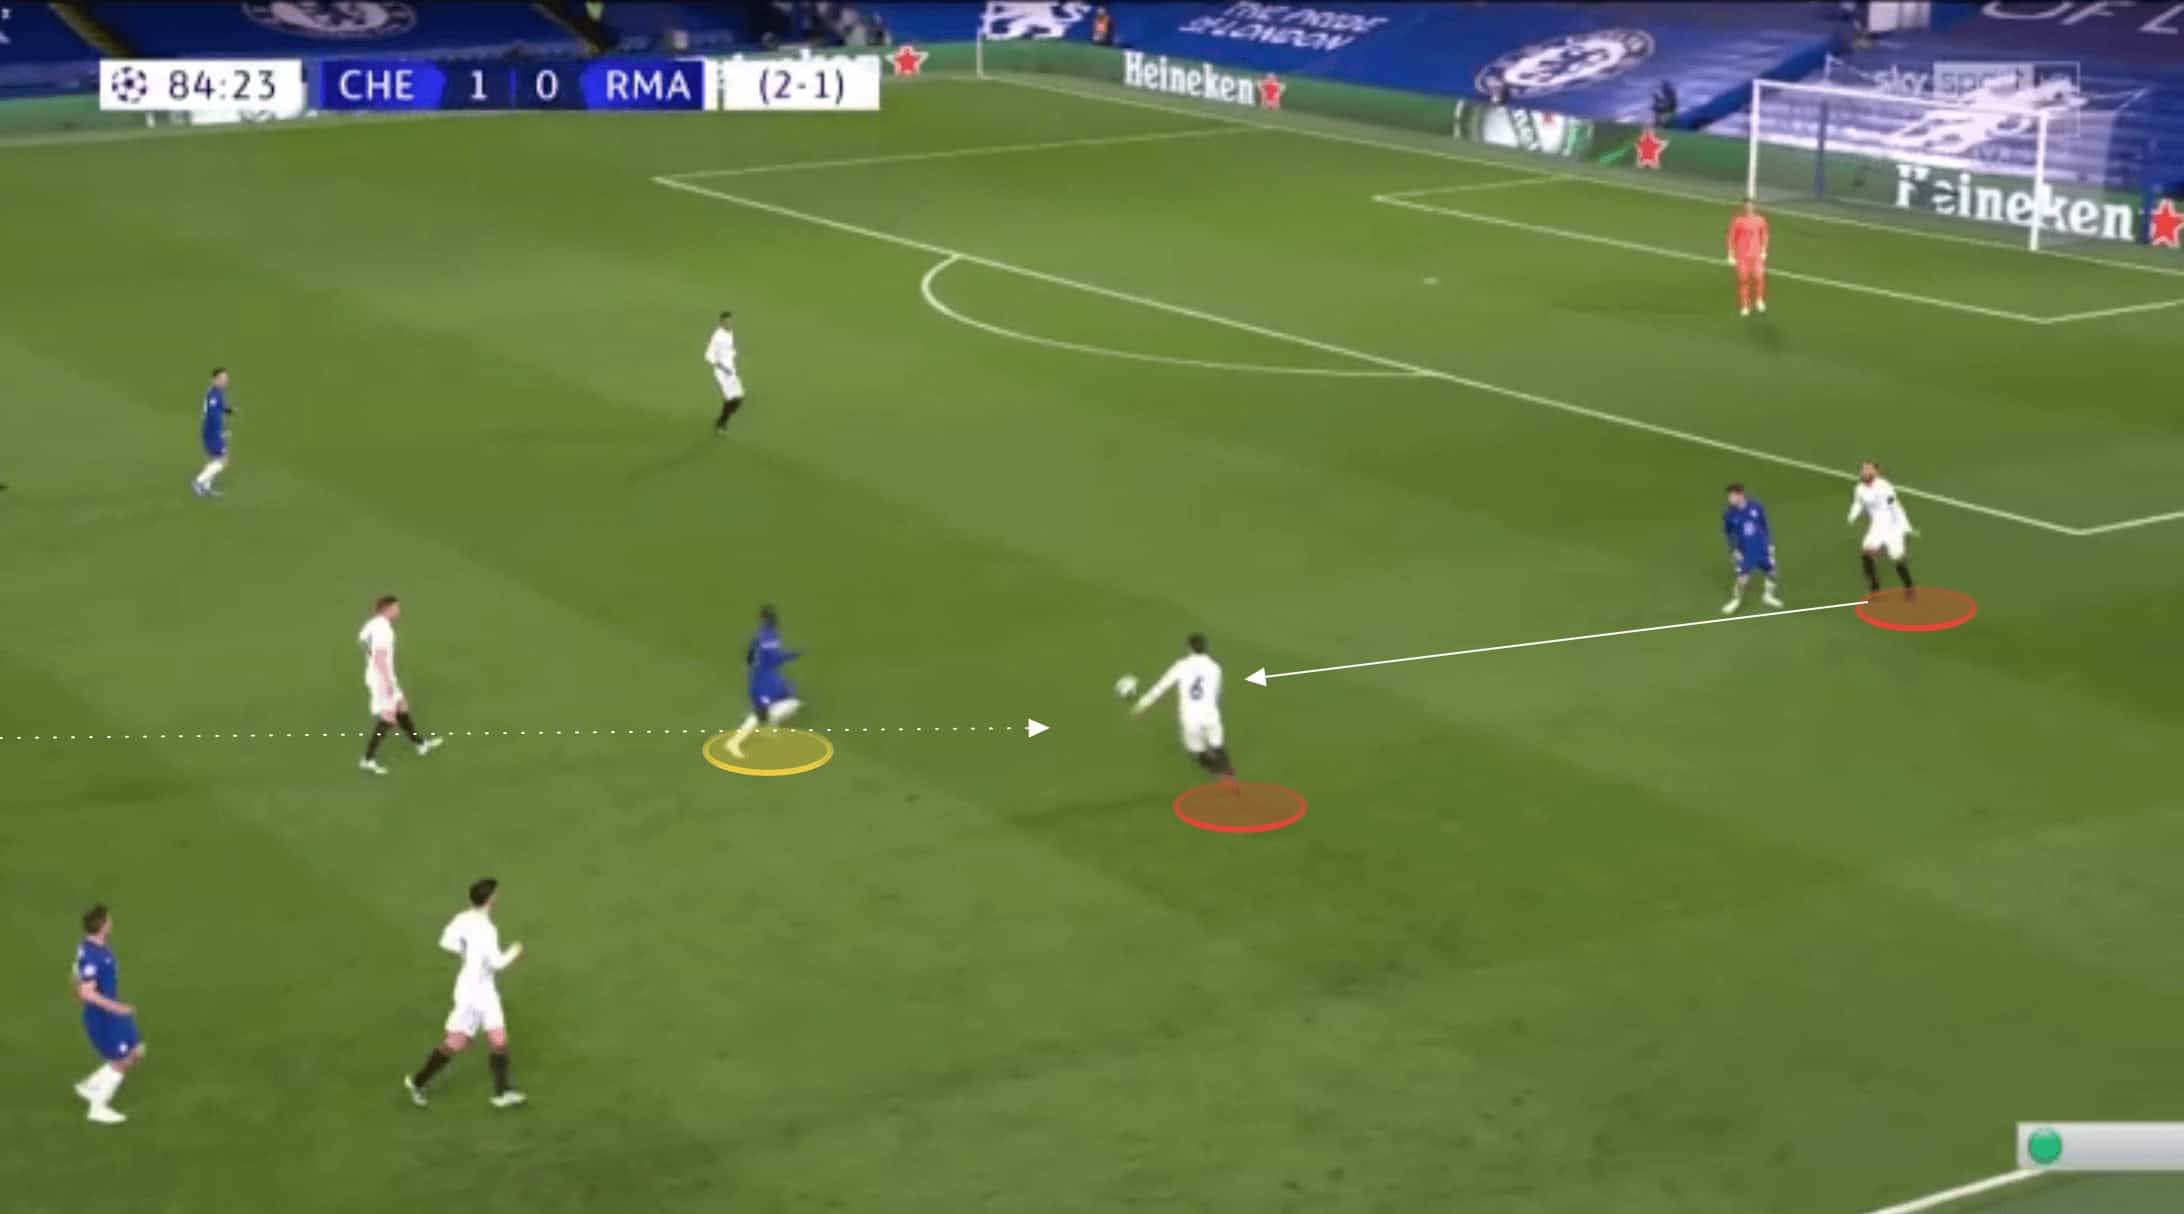
Chelsea were able to keep a compact defensive shape and make it difficult for Madrid to get into central goal-scoring areas. However, there was a definite flatness to Madrid’s attack on the evening. When they were able to get the ball into the central channel and into a player in space, there was very little in the way of attacking movement. We can see an example of this in the next image, where Modric has possession of the ball in the central channel. Benzema isn’t on the last man, and is instead facing the ball, with his back to goal, yet he has no support anywhere around him. A pass into feet here would likely have led to Chelsea’s centre-backs quickly regaining possession from the isolated forward, and Modric instead went for goal from this distance himself.
When Madrid had more attacking players around the ball, there was still a lack of ideas. The image below shows how the forwards could have rotated their positioning in an attempt to at least draw Chelsea’s back line out and potentially hit the space outside. However, this didn’t occur. We can also see how there are no central-midfielders looking to make late runs into the space outside of Chelsea’s back line, again to potentially create a little more central space for their forwards, or provide an option for the through pass themselves.

Instead the pass went inside in this instance, and we can see how Chelsea were immediately able to surround the ball, suffocating the attack.

Conclusion
It’s fair to say that at the beginning of 2021, had you said to even the most optimistic of Chelsea fans that they would reach the Champions League final, they wouldn’t have believed you. Nevertheless, here we are, and not only do they deserve to be there, but there is a very real possibility they upset Manchester City in the final too. Tuchel has forged a winning side based around defensive discipline and pace in attack, that was too much for Real Madrid over two legs. Throughout this fixture, they demonstrated this in droves, nullifying any threat from the visitors, whether through their intelligent pressing, or their organised deeper defensive shape, whilst continuously causing havoc to a creaky Madrid defence with their rapid counter-attacks in transition. It will be fascinating to see if Tuchel can repeat this performance on an even bigger stage later this month.