Leeds United put themselves one step closer to an illustrious Premier League return by coming out on top of Monday’s EFL Championship first versus second clash with Sheffield United away at Bramall Lane.
Now, at the time of writing, Leeds sit five points clear at the top of the league table, with 12 games left to play in the season.
The visitors had the majority of the possession in Monday’s fixture, with an Illan Meslier own goal putting Sheffield United a goal to the good in the 12th minute.
However, Leeds’ ball dominance ultimately paid off as they broke the Blades down three times in the second half to take all three points from this top-of-the-table battle with their Yorkshire rivals.
Leeds used their full-backs to stretch Sheffield United and exploit space out wide continuously throughout the game — this proved key to their victory.
Our tactical analysis focuses on explaining how Daniel Farke’s side successfully used width to get the ball into dangerous areas for chance creation against Sheffield United and how this led to their 3-1 away victory in the end.
Lineups & Formations

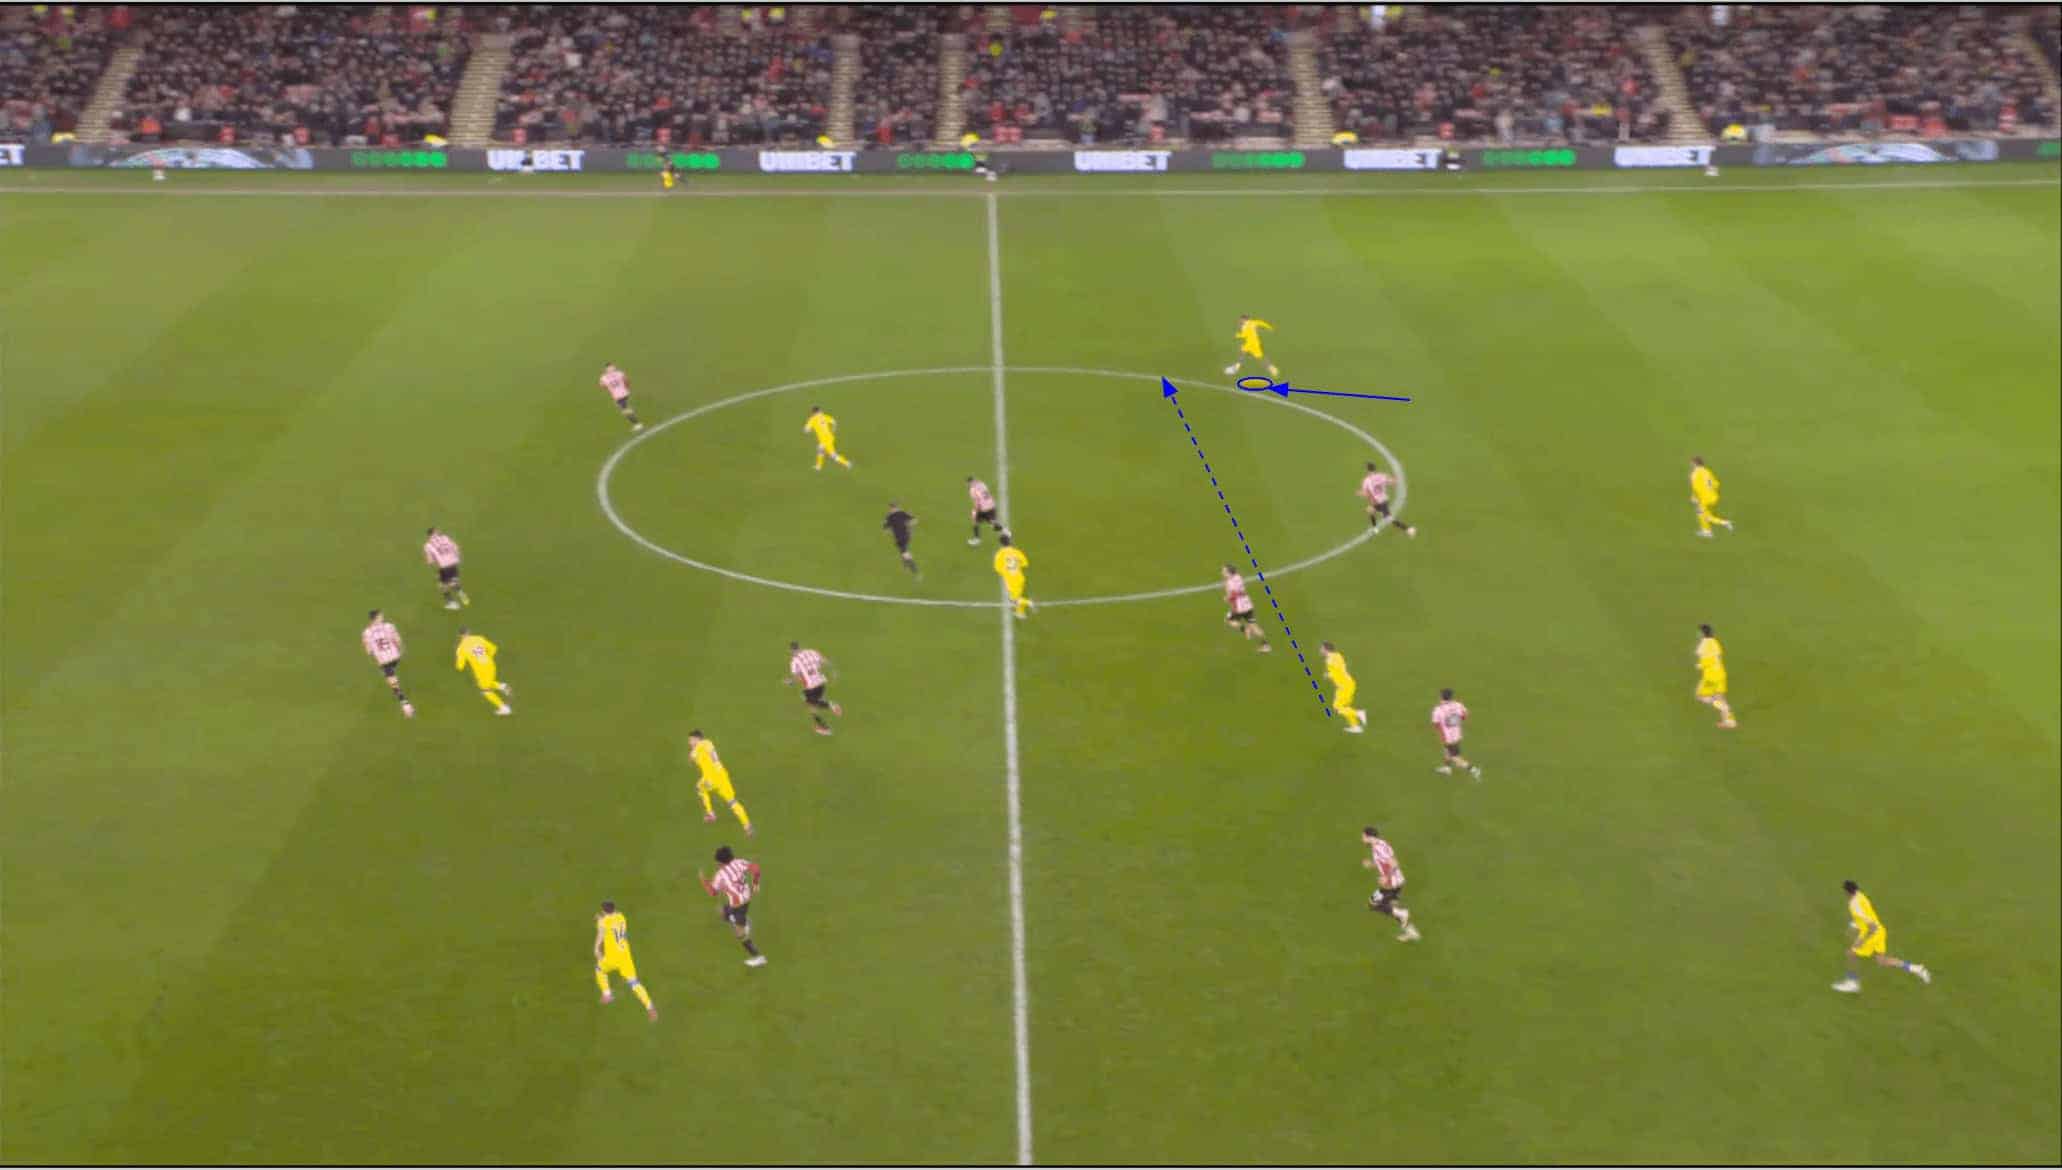
The image above shows Leeds’ in-possession shape along with Sheffield United’s out-of-possession shape.
With Leeds having the majority of ball possession in this game, this was how we saw the two teams lining up for most of the contest.
Farke’s side had a base 4-2-3-1 shape, which generally turned into more of a 3-4-3 in possession.
Illan Meslier started in goal, with Jayden Bogle at right-back, Joe Rodon at right centre-back, Pascal Struijk at left centre-back and Junior Firpo at left-back.
Ao Tanaka occupied the right holding midfield position alongside Ilia Gruev on the left.
Tanaka dropped deeper than Gruev in possession, splitting the centre-backs to create Leeds’ back three while the full-backs, Bogle and Firpo, advanced forward.
Brenden Aaronson was in the ‘10’ position for Leeds, with Daniel James on his right and Manor Solomon to his left, while Joël Piroe led the line for Leeds.
Farke made four substitutions to that starting lineup during the game.
Firstly, a double substitution in the 58th minute saw Mateo Joseph and Joe Rothwell replace Brenden Aaronson and Ilia Gruev.
Then, Wilfried Gnonto came on for Manor Solomon in the 83rd minute before Sam Byram replaced Jayden Bogle in stoppage time.
As for the home side, Chris Wilder set Sheffield United up in a 4-4-2 shape here.
Michael Cooper started in goal behind a back four of Harry Clarke at right-back, Anel Ahmedhodžić at right centre-back, Jack Robinson at left centre-back and Harrison Burrows at left-back.
Sydie Peck occupied the right holding midfield position for the Blades alongside Vinícius Souza on the left, with Jesurun Rak-Sakyi on the right wing and Ben Brereton Díaz on the left wing.
Meanwhile, Callum O’Hare played just off Tyrese Campbell up front.
Wilder made a total of five substitutions in this game.
The first one saw Hamza Choudhury come on for Harry Clarke at half-time, with a double substitution that saw Thomas Cannon and Gustavo Hamer replacing Jesurun Rak-Sakyi and Tyrese Campbell following that on the hour mark.
Tom Davies then replaced Ben Brereton Díaz in the 73rd minute, and Kieffer Moore came on for Callum O’Hare in stoppage time.
Analysing Leeds’ Ball Progression Vs Sheffield United’s 4-4-2
Sheffield United defended in a position-oriented 4-4-2 formation for most of the game, while Leeds United attacked in a 3-4-3 formation.
Sheffield United’s 4-4-2 was generally quite compact and this often allowed Leeds to find space in wide areas when building out from the back.
Here, for instance, left centre-back Struijk advanced the ball up the wing to Firpo, who then passed the ball to Solomon in the left half-space to facilitate progression towards the centre.
Sheffield United’s right winger, Rak-Sakyi, was relatively closeby when Firpo received the ball, meaning the left-back had to act quickly on receiving, but he was able to do so, and Leeds made some important progress towards goal.
At times, Leeds were able to manipulate Sheffield United’s defensive shape for the benefit of their ball progression.
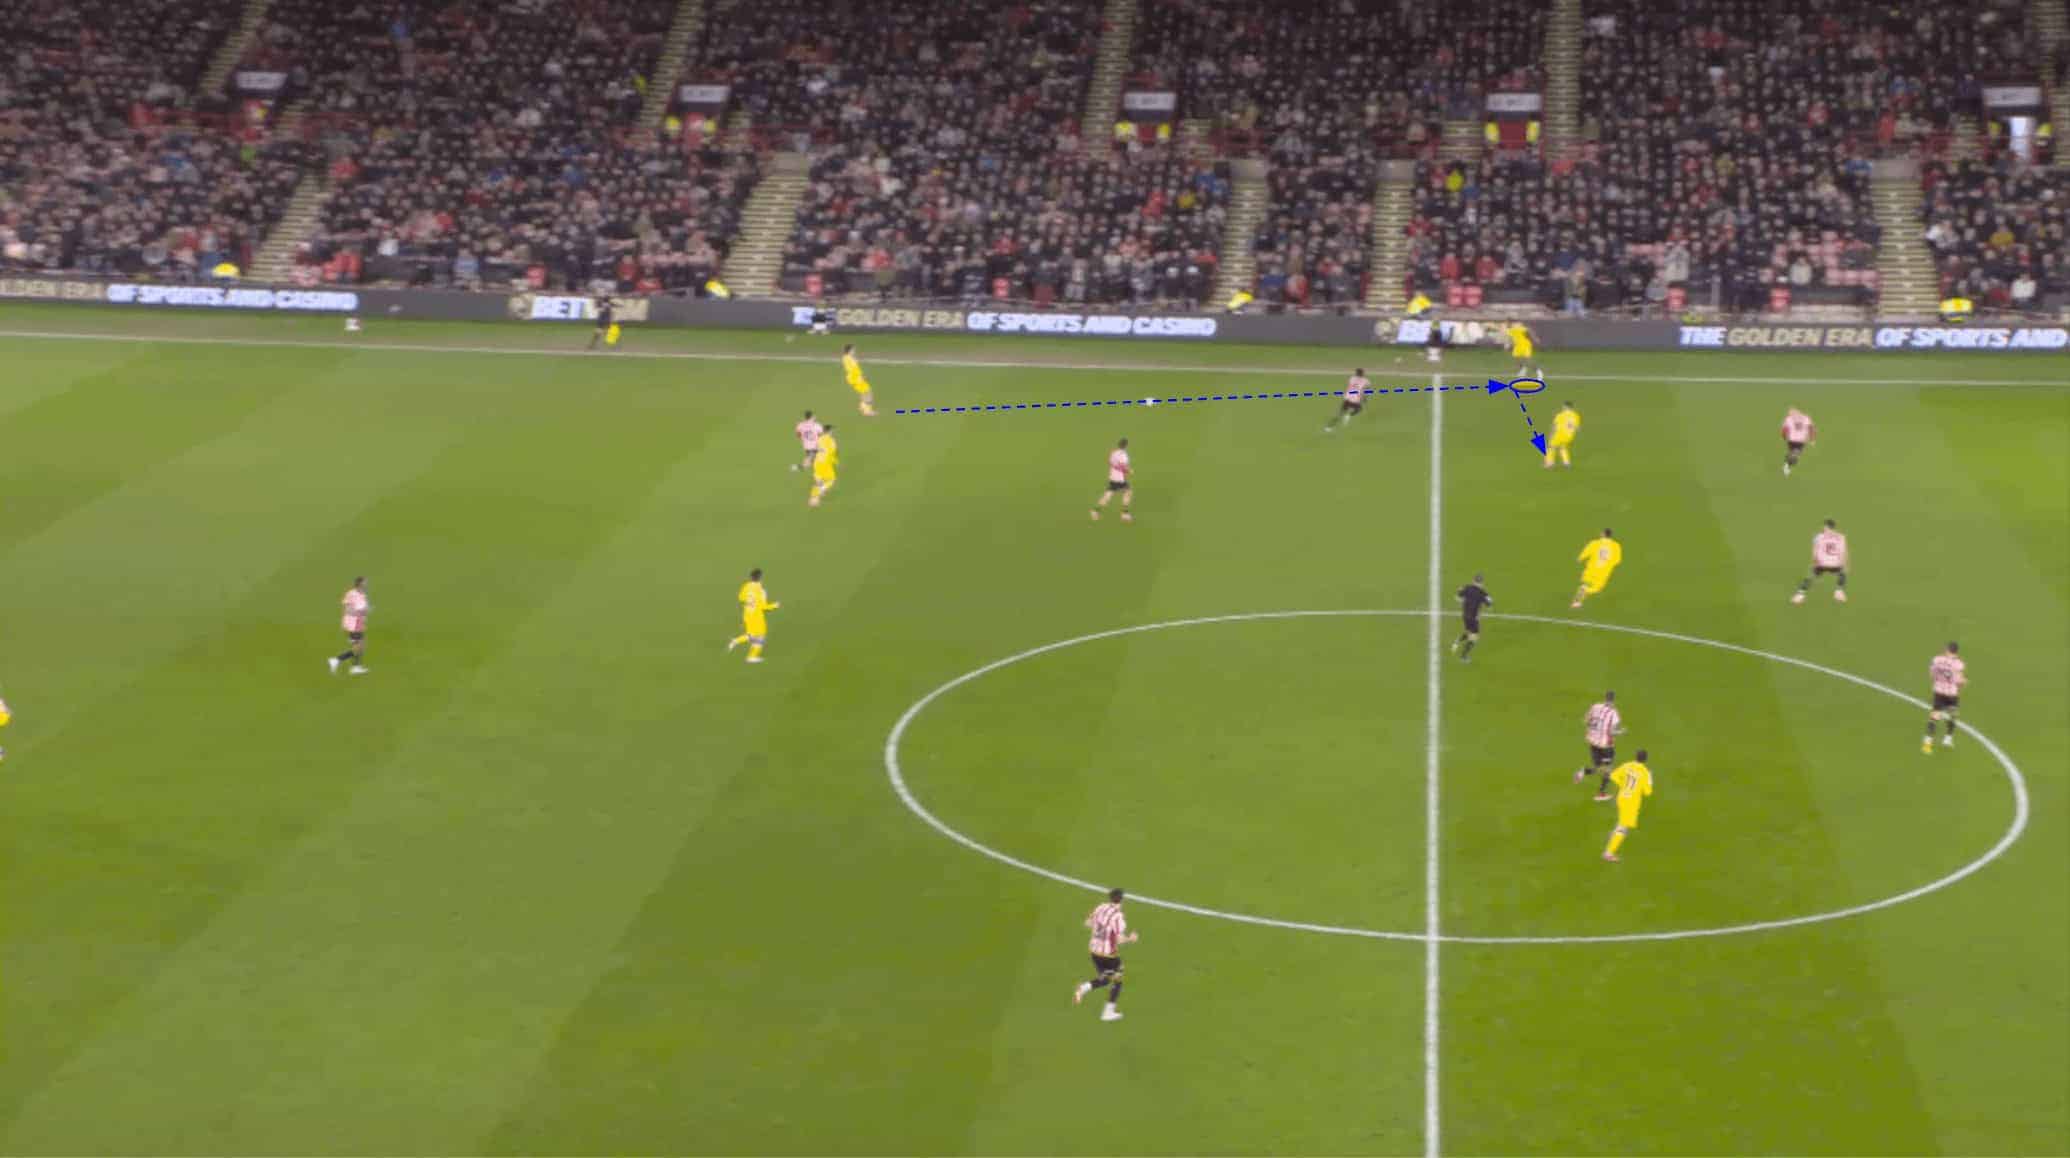
In figure 3, for instance, Gruev has dropped out from the left holding midfield position to a traditional left-back position, which attracts the attention of right winger Rak-Sakyi as Tanaka receives the ball from Meslier in the centre of the pitch.
Gruev’s intelligent and unselfish movement creates space for Firpo, allowing Tanaka to show off his wide passing range with a crossfield ball to pick out the advancing left-back in plenty of space, enabling the receiver to carry the ball towards goal.
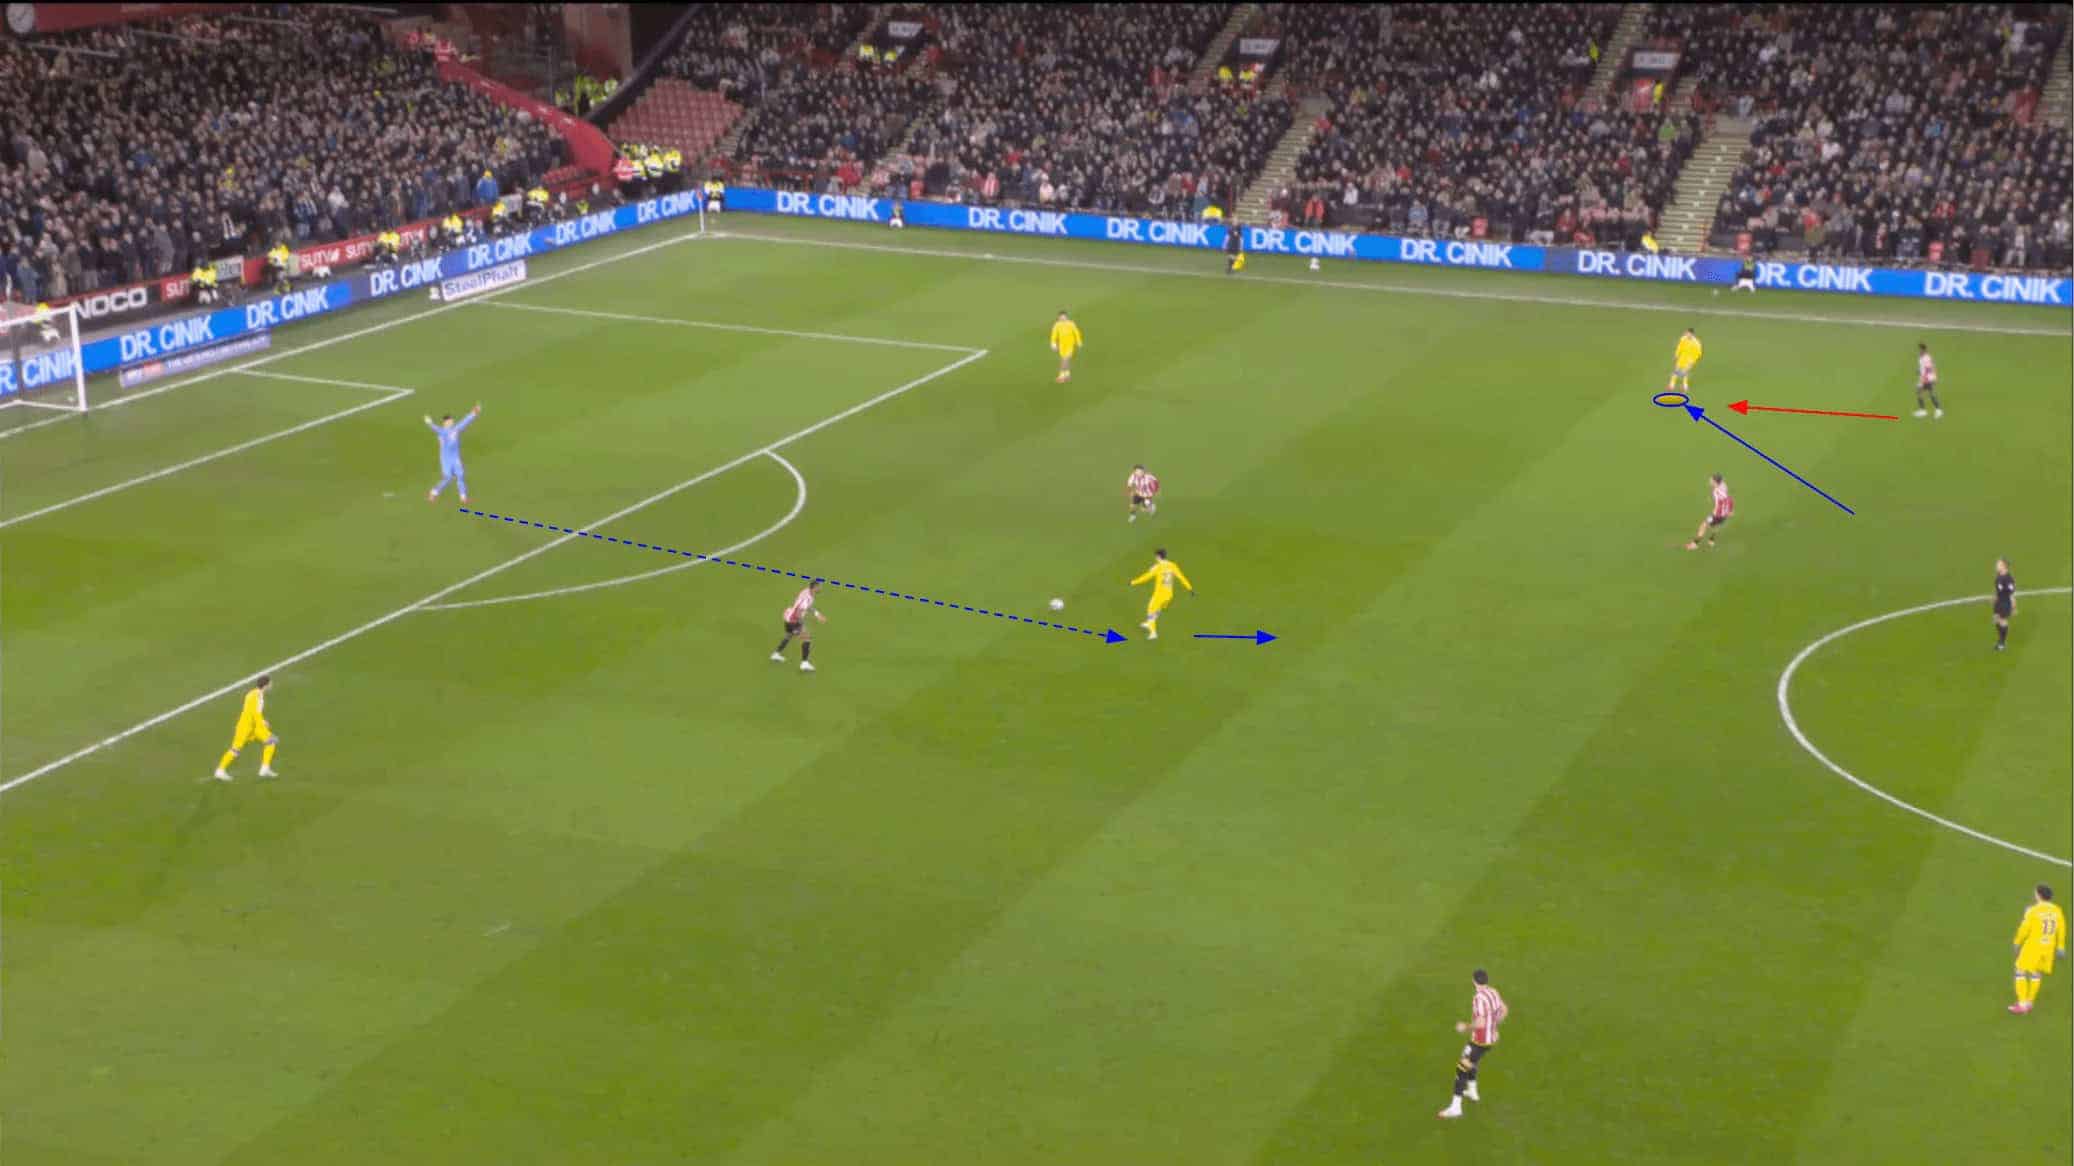
Leeds succeeded in picking out Firpo, Bogle and James—all of whom provided the width for Farke’s side quite a bit—throughout this game with intelligent off-the-ball movement to manipulate markers and find space along with some quality passing at times, as we see in figure 4.
In this regard, things became even easier for Leeds as the game progressed into the latter stages, and Sheffield United’s shape became more of a 4-3-3.
Analysing Leeds’ Ball Progression Vs Sheffield United’s 4-3-3
In the second half of this game, Sheffield United began pressing more often with a three-man forward line rather than two.
This may have been designed to negate Leeds’ +1 man advantage in their build-up, as they formed a three-man backline against Sheffield United’s two-man forward line when Tanaka dropped between the centre-backs.
However, Sheffield United’s pressing intensity wasn’t particularly high.
All this three-man forward line essentially served to do was give the Blades even less coverage of the wings, creating more space for Leeds’ full-backs to exploit.

Here, we see Struijk passing the ball out wide to Firpo, who has acres of space to receive and carry forward, potentially hurting Sheffield United and creating a goalscoring opportunity for Leeds.

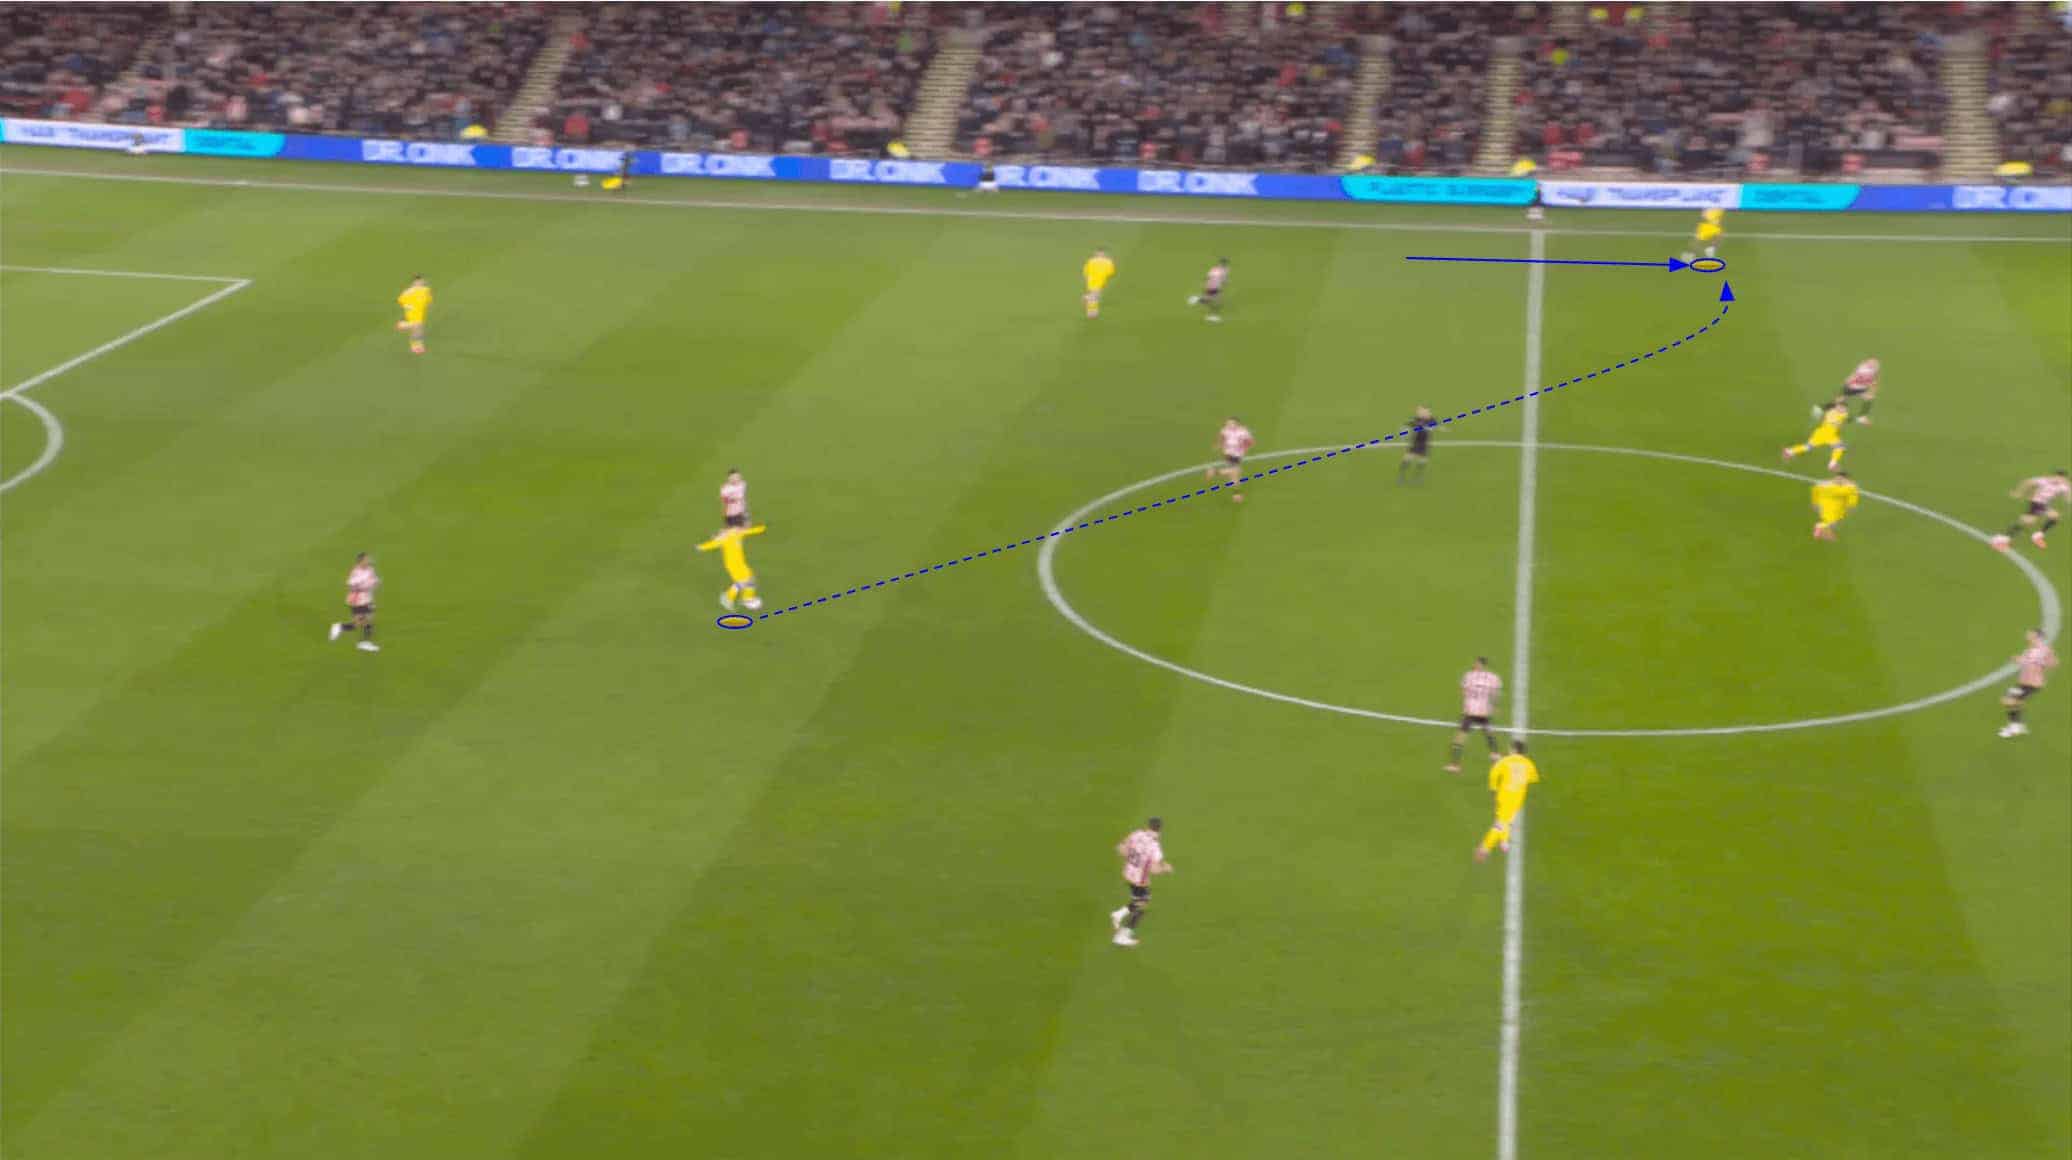
Here, we can see how the three-man forward line failed to apply enough pressure on Struijk to prevent him from passing the ball forward to Manor Solomon.
Solomon dropped into some space alongside the holding midfielder on that side to make a passing option for the centre-back.

When he dropped deep, Solomon drew Sheffield United’s right-back to him, creating even more space for Firpo out wide.
After the ball is laid off to the holding midfielder by Solomon, it’s then relayed out to Firpo, who once again has a lot of space to work with and progress Leeds into a dangerous position for chance creation.
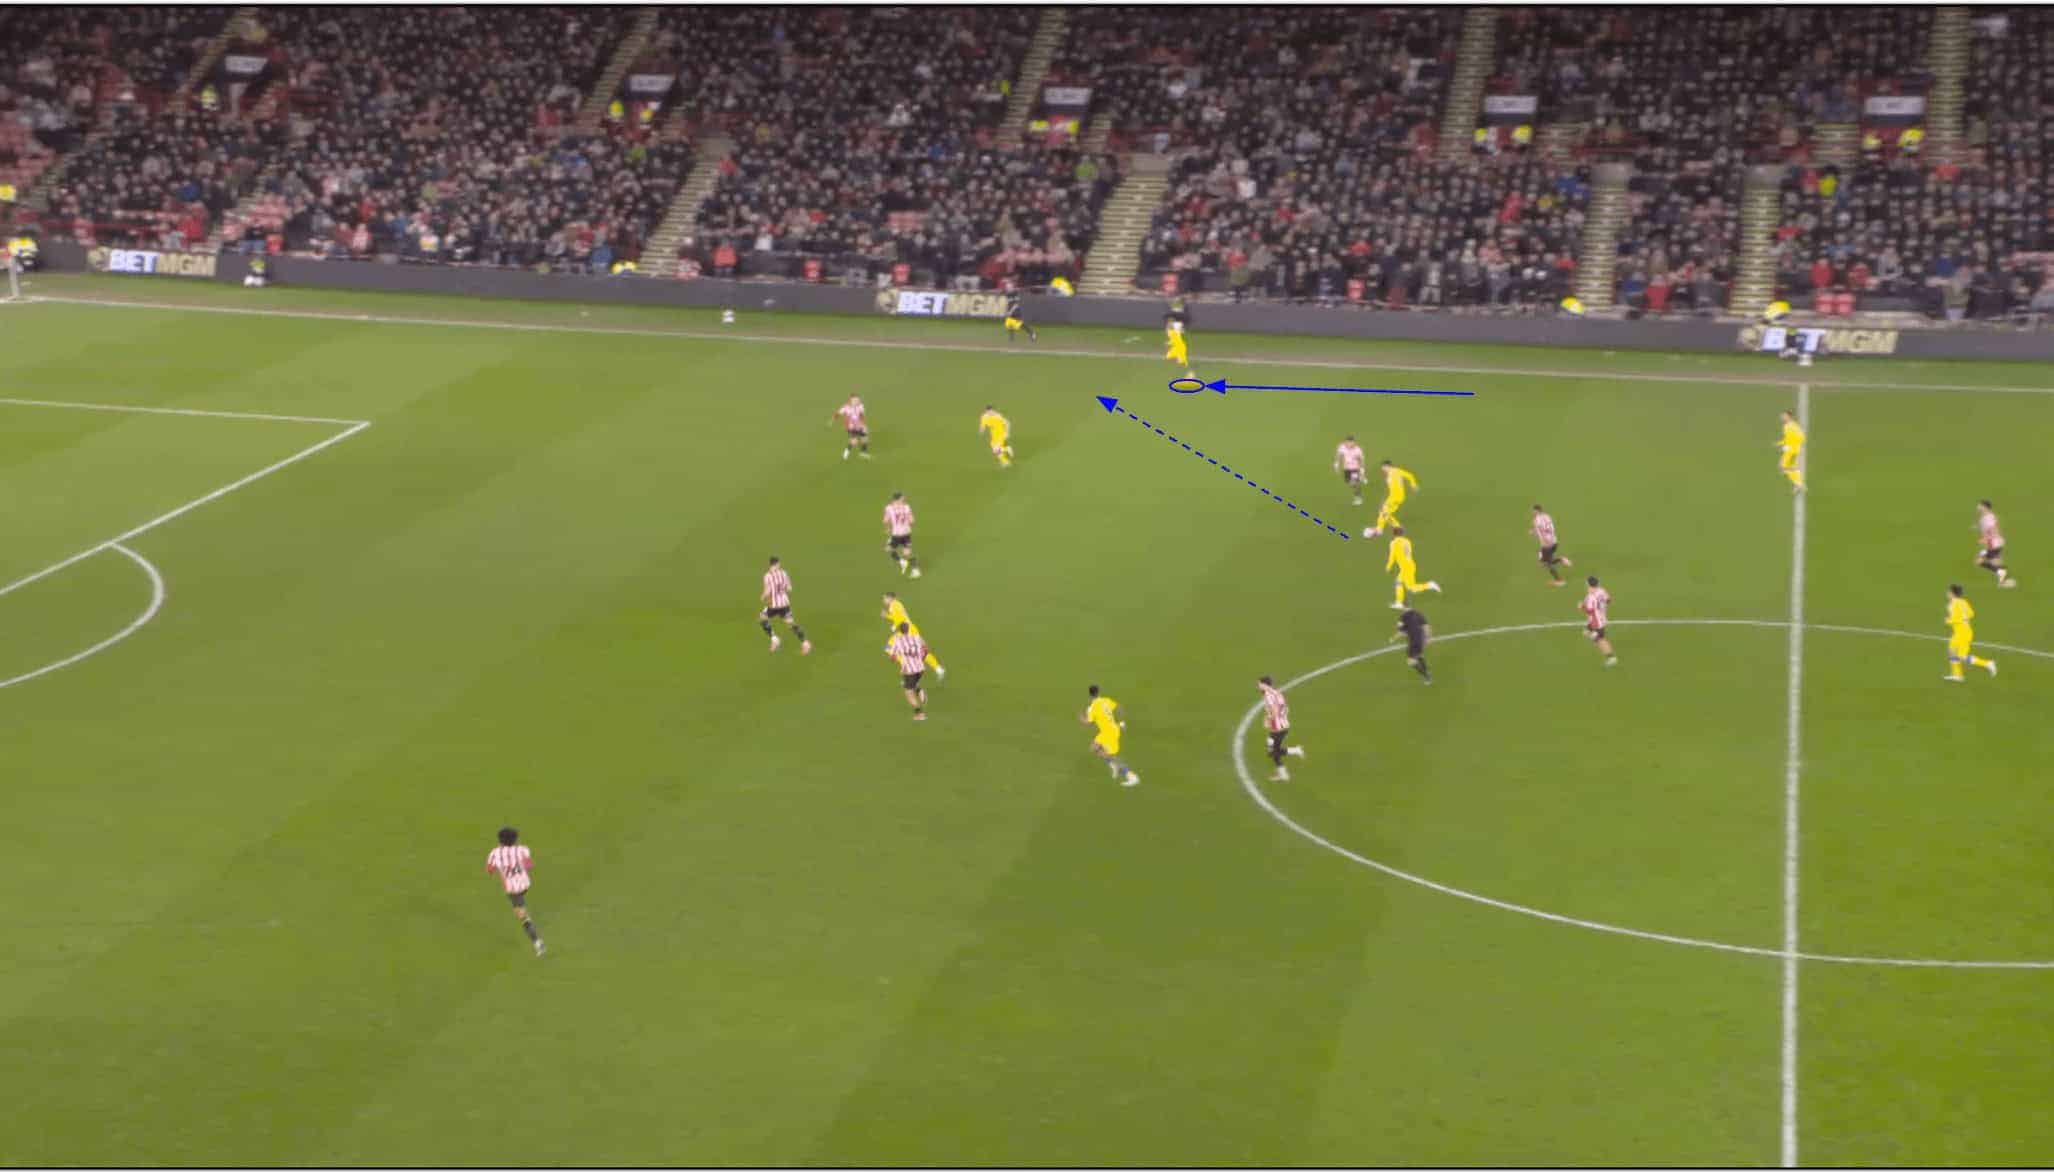
Here, right winger James’ run inside draws the opposition left-back to him, easily creating space for overlapping right-back Bogle to become a very inviting passing option for the midfielder in possession.
This creates a clear path for Leeds to progress from the middle third to the final third.
Continuously giving Leeds this amount of space out on the wings eventually led to Sheffield United’s demise in this game.
Firpo’s headed goal in the 72nd minute was a direct result of the move we see beginning in Figure 9.
Right-back Bogle received the ball with lots of space around him and, crucially, to carry into.
From here, the ball enters the final third, where Daniel James can make an inviting cross which meets Firpo’s head as the left-back finished off an electric counterattacking move for Leeds.
After Leeds took the lead in the 89th minute through a set-piece, they quickly followed that goal up with a third in the 90th minute.
Again, this goal was scored because too much space was afforded to Farke’s side on the wing, and Leeds made the most of that space in attack.
Conclusion
To conclude our tactical analysis, Leeds killed Sheffield United with their use of width, emphasised by intelligent off-the-ball movement, pacey wide players and crafty passers to pick them out from central areas.
Sheffield United’s tactical changes in the second half failed to halt Leeds’ ball progression.
Instead, they gave Leeds more opportunities to progress into the final third, which ultimately proved fatal.