On Monday evening, West Ham United returned to the London Stadium for the first time this season in a competitive fixture. They welcomed Leicester City, a side still buoyant from their Community Shield win over Manchester City. Both sides opened the season with a victory last week, with the Hammers beating Newcastle 4-2 away from home, and Leicester sneaking a 1-0 win at home over Wolves, courtesy of a Jamie Vardy winner. In the first Monday night game of the season, there was quiet intrigue from around the league as two teams who finished neck and neck in fifth and sixth place last season, respectively (Leicester managing one more point than West Ham) were pitted against one another.
The game was turned on its head from an Ayoze Perez red card, and West Ham weathered a late comeback from Leicester at 2-0, to 2-1, before running out as 4-1 winners. This tactical analysis gives an in-depth analysis into some of the key tactics from this Premier League game.
Formations and line-ups
Although Leicester have made a couple of astute signings (as per the norm) this summer they fielded a starting XI comprised of players who were at the King Power last season. West Ham have had a disappointing transfer window, with Alphonse Areola the only signing thus far, and he only made the bench himself. Therefore, both teams fielded familiar sides, and both fielded 4-2-3-1 formations.
Leicester were forced to partner Daniel Amartey at the back with Caglar Soyuncu, with Jannik Vestergaard not ready to make the squad just yet. Of the midfield three, Wilfried Ndidi unsurprisingly played as the deepest, with Tielemans operating in a box-to-box role as would be expected.
West Ham’s midfield three was an equally unsurprising selection, although Pablo Fornals played very high at times, almost looking like a shadow striker. Said Benrahma started once more, and continued his fine form to begin the season, playing as an inverted winger on the left hand side, with Bowen doing likewise from the right.

Leicester’s mixed results in breaking West Ham’s mid-block
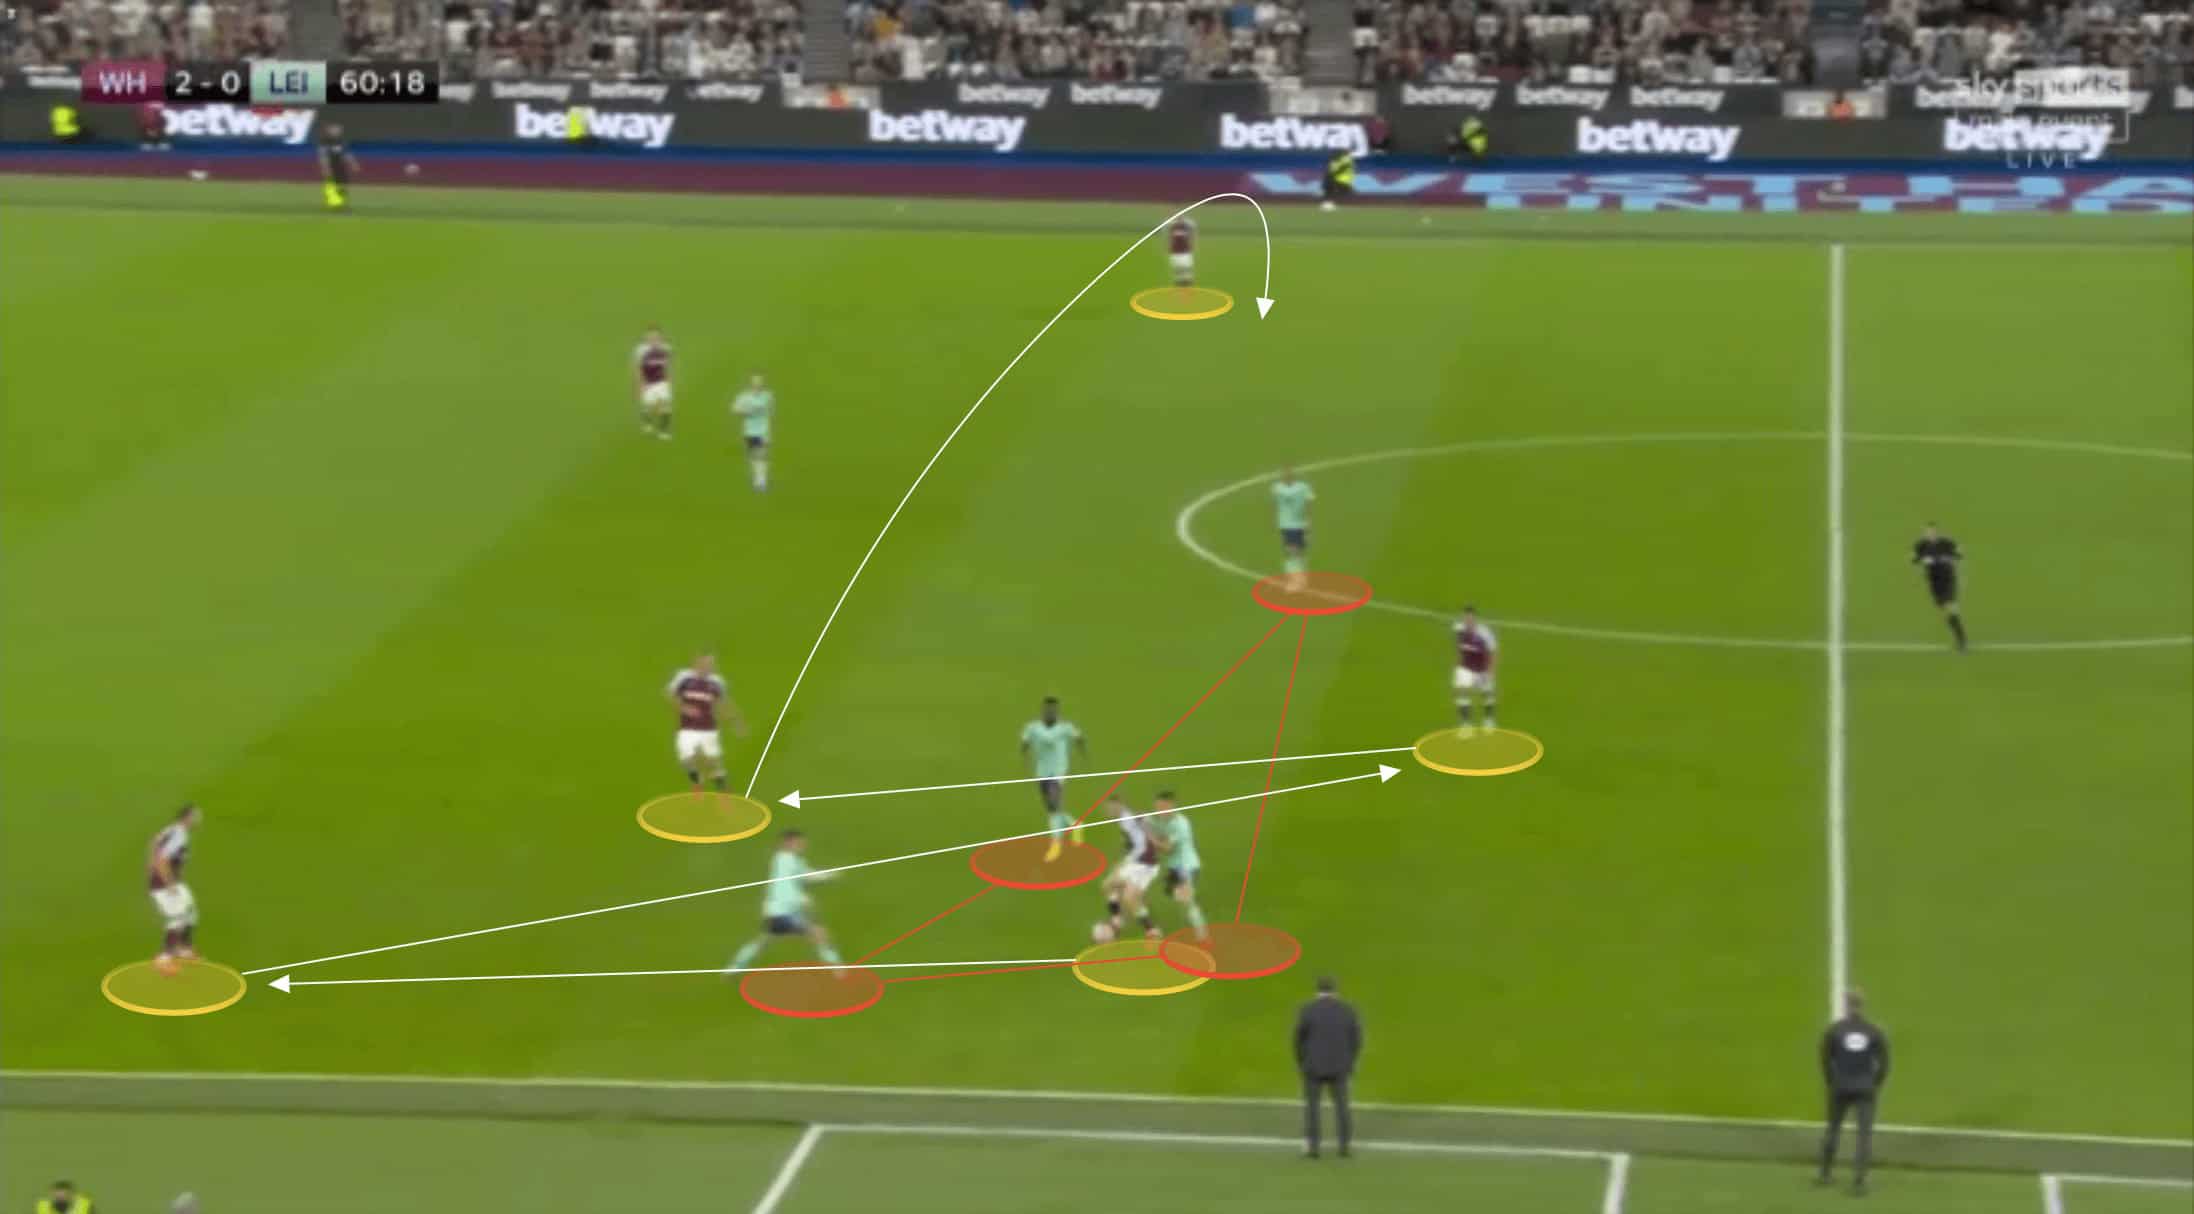
Leicester immediately took the impetus in this fixture, dominating large swaths of possession, but they were inconsistent with finding progressive passes to break West Ham’s compact mid-block. We can see from the image below how right up until the sending off of Perez, Leicester were enjoying a possession share in that 55-65% range.

West Ham remained centrally compact with Rice anchoring a compact from six. Fornals played a vital role in stepping forward to join Michail Antonio at the forefront of this pressing group. Whilst Antonio still led the press, Fornals would step forward if he recognised a pressing trigger. Otherwise, he was expected to cover the pass into either Ndidi or Tielemans, based on who was operating in the deepest position. Bowen and Benrhams were instructed to initially stay very narrow, preventing Leicester from being able to play centrally with the ball at the back.
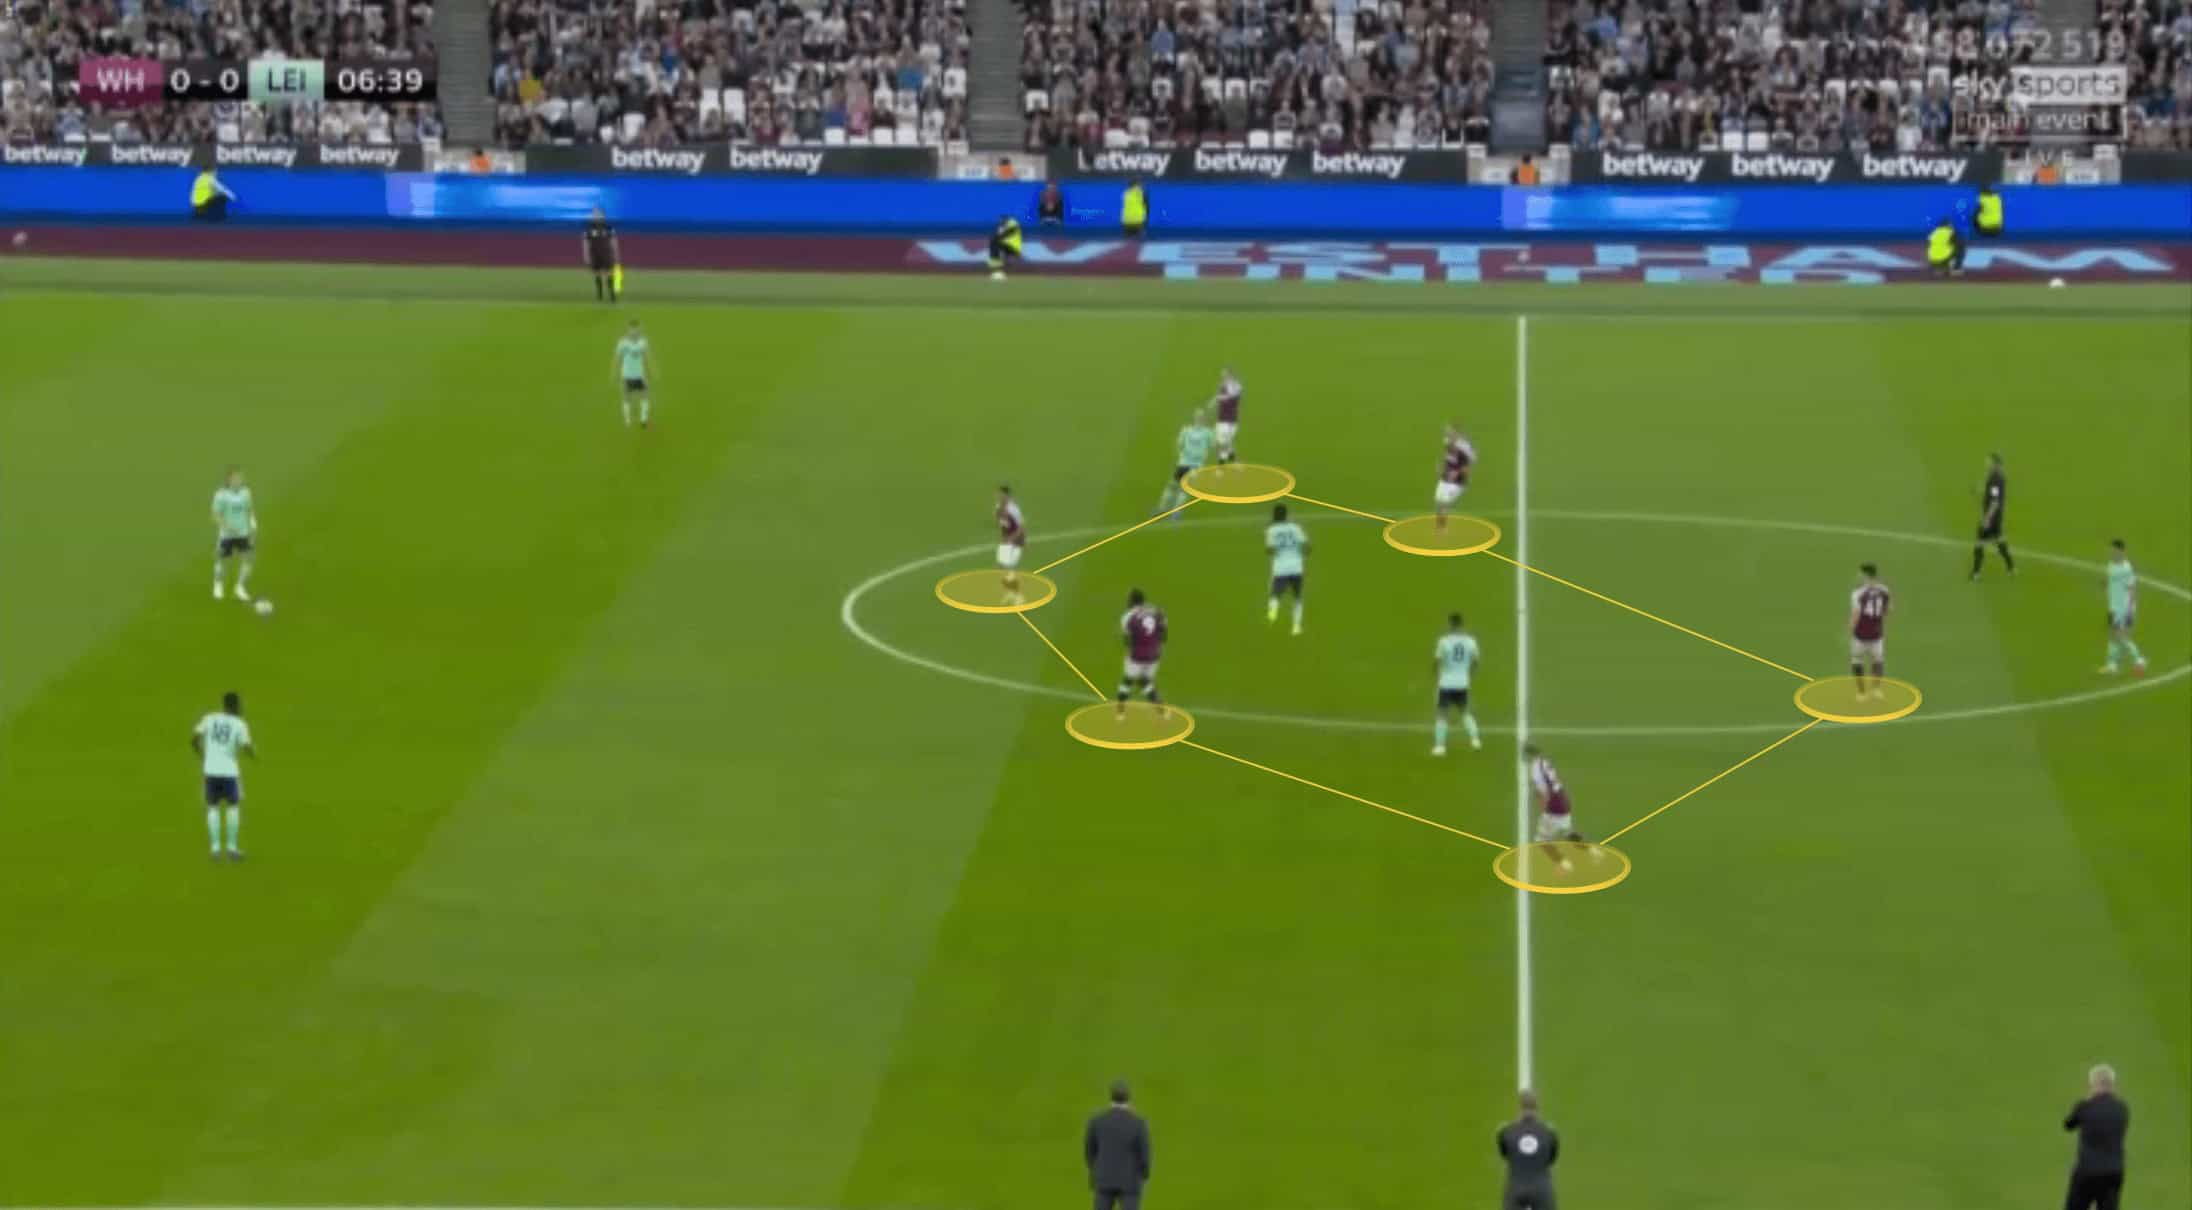
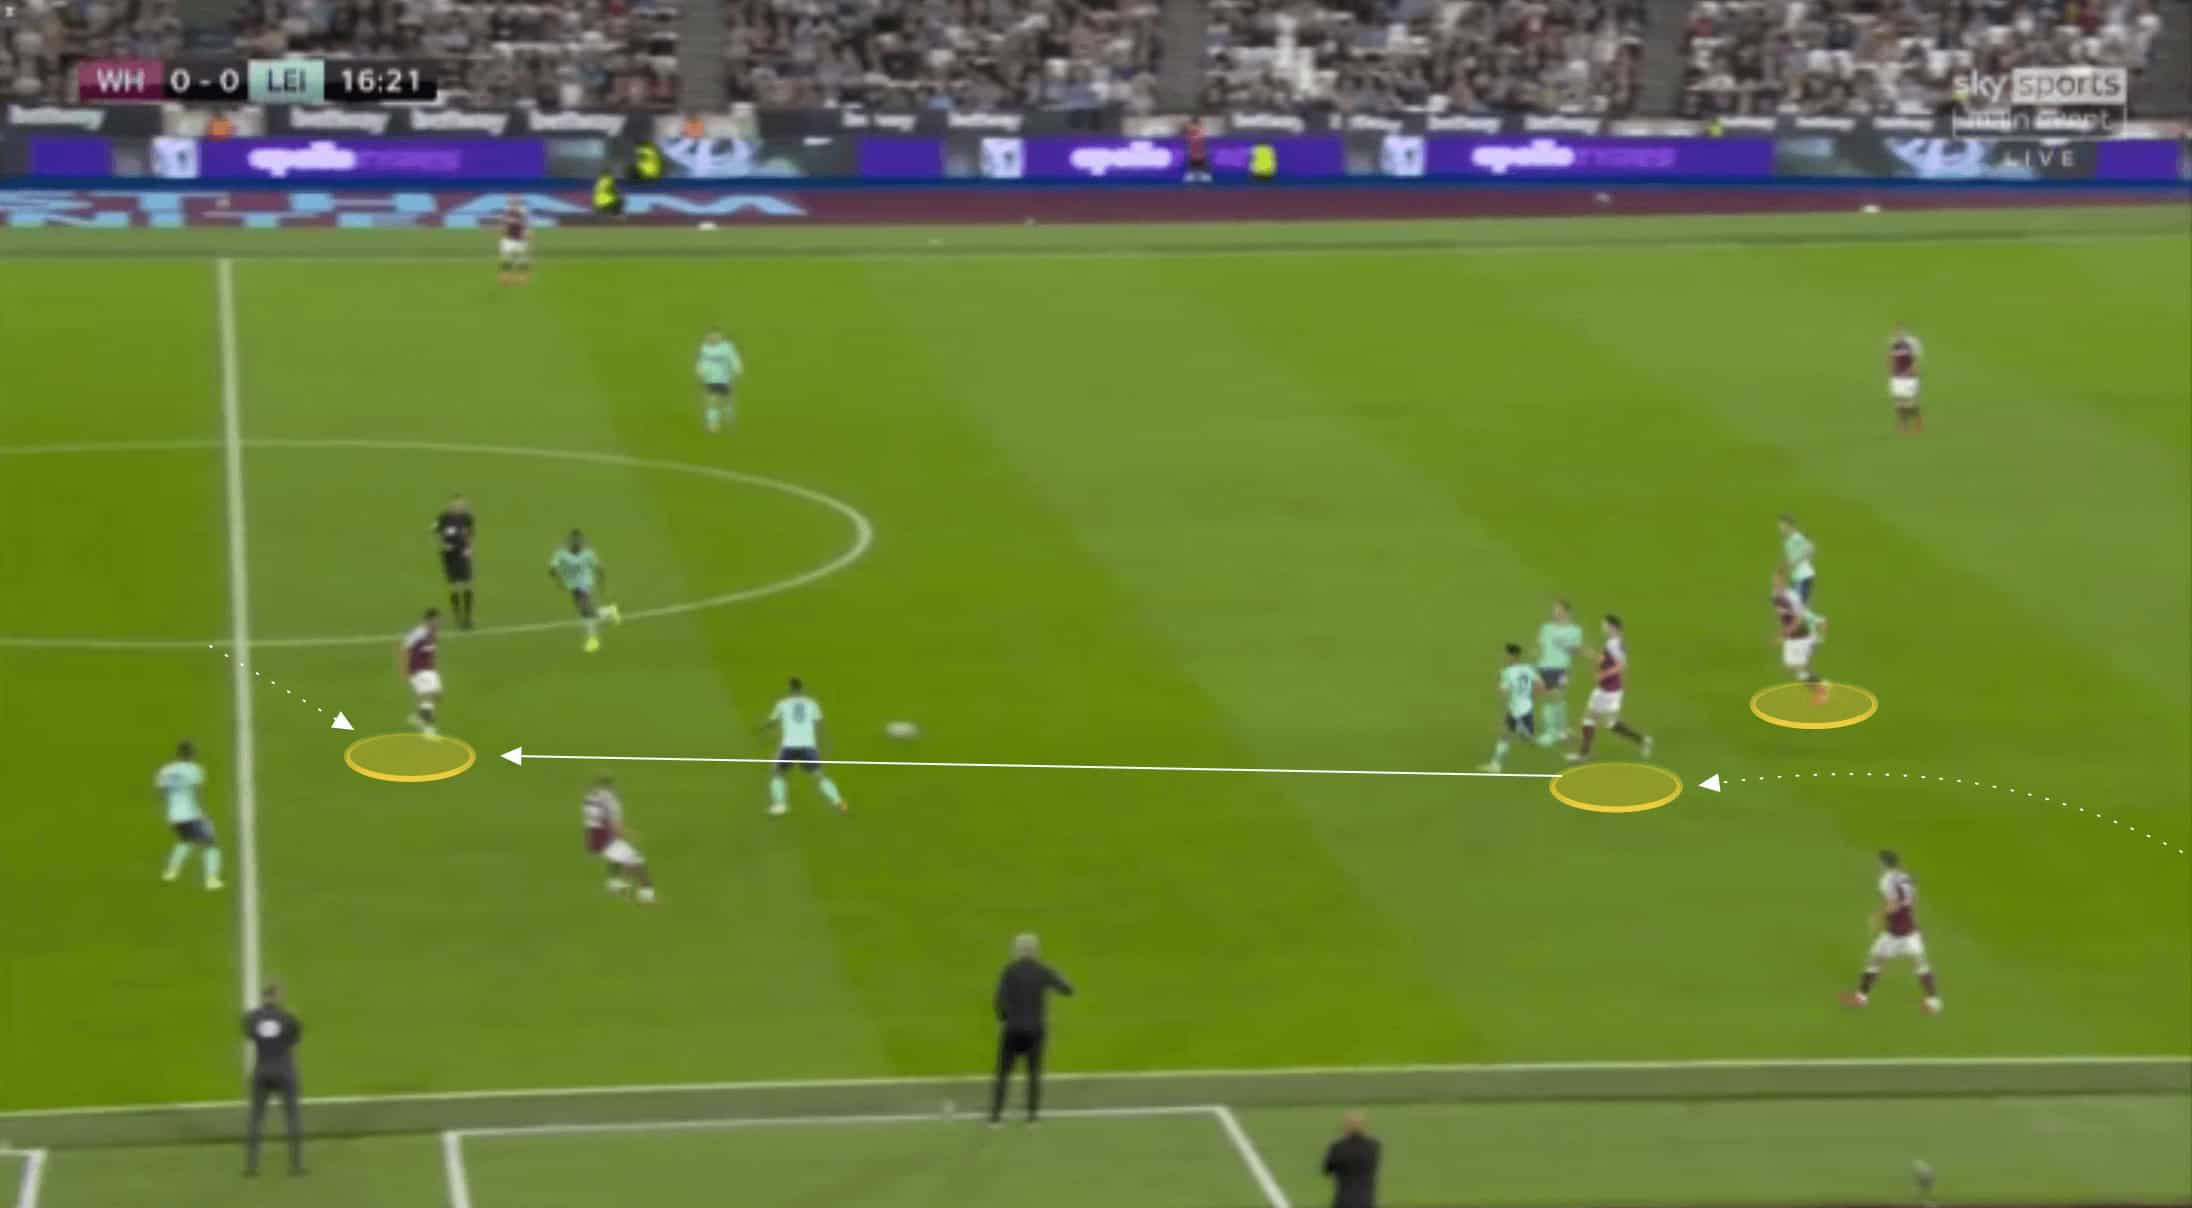
This next image shows us how Antonio and Fornals remained tight on the near-side pivot. Antonio would step forward to pressure the ball-carrier into playing a pass with Fornals remaining on the pivot, but if the ball was switched, Fornals would now push forward to press with Antonio dropping back in to cover the pivot.
The West Ham press wasn’t always this disciplined though, and Leicester were patient in continuously circling the ball and waiting for the opportunity to play forward through the central channel.
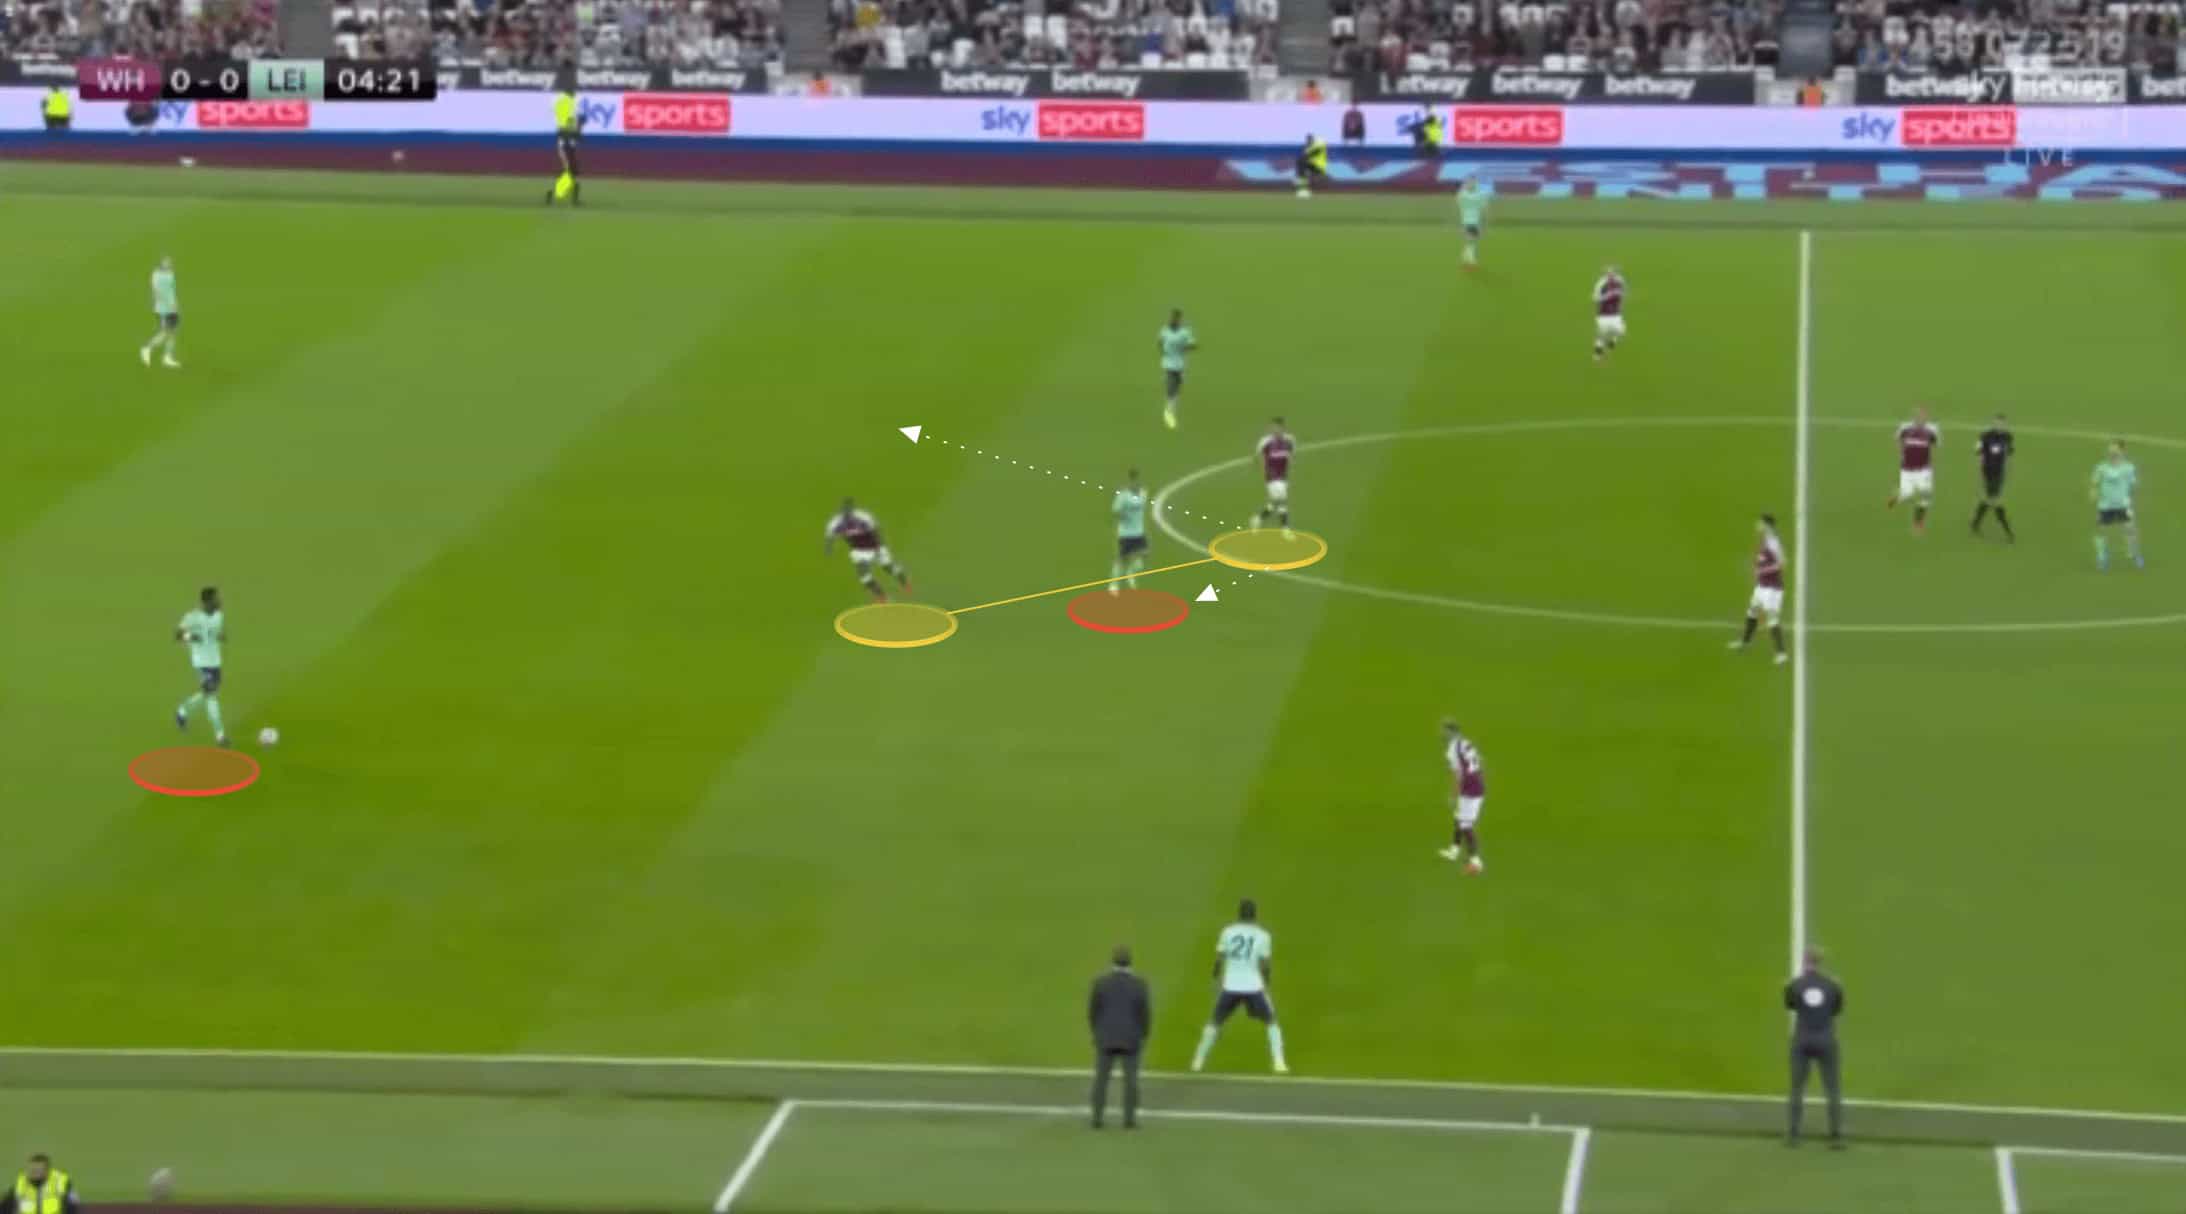
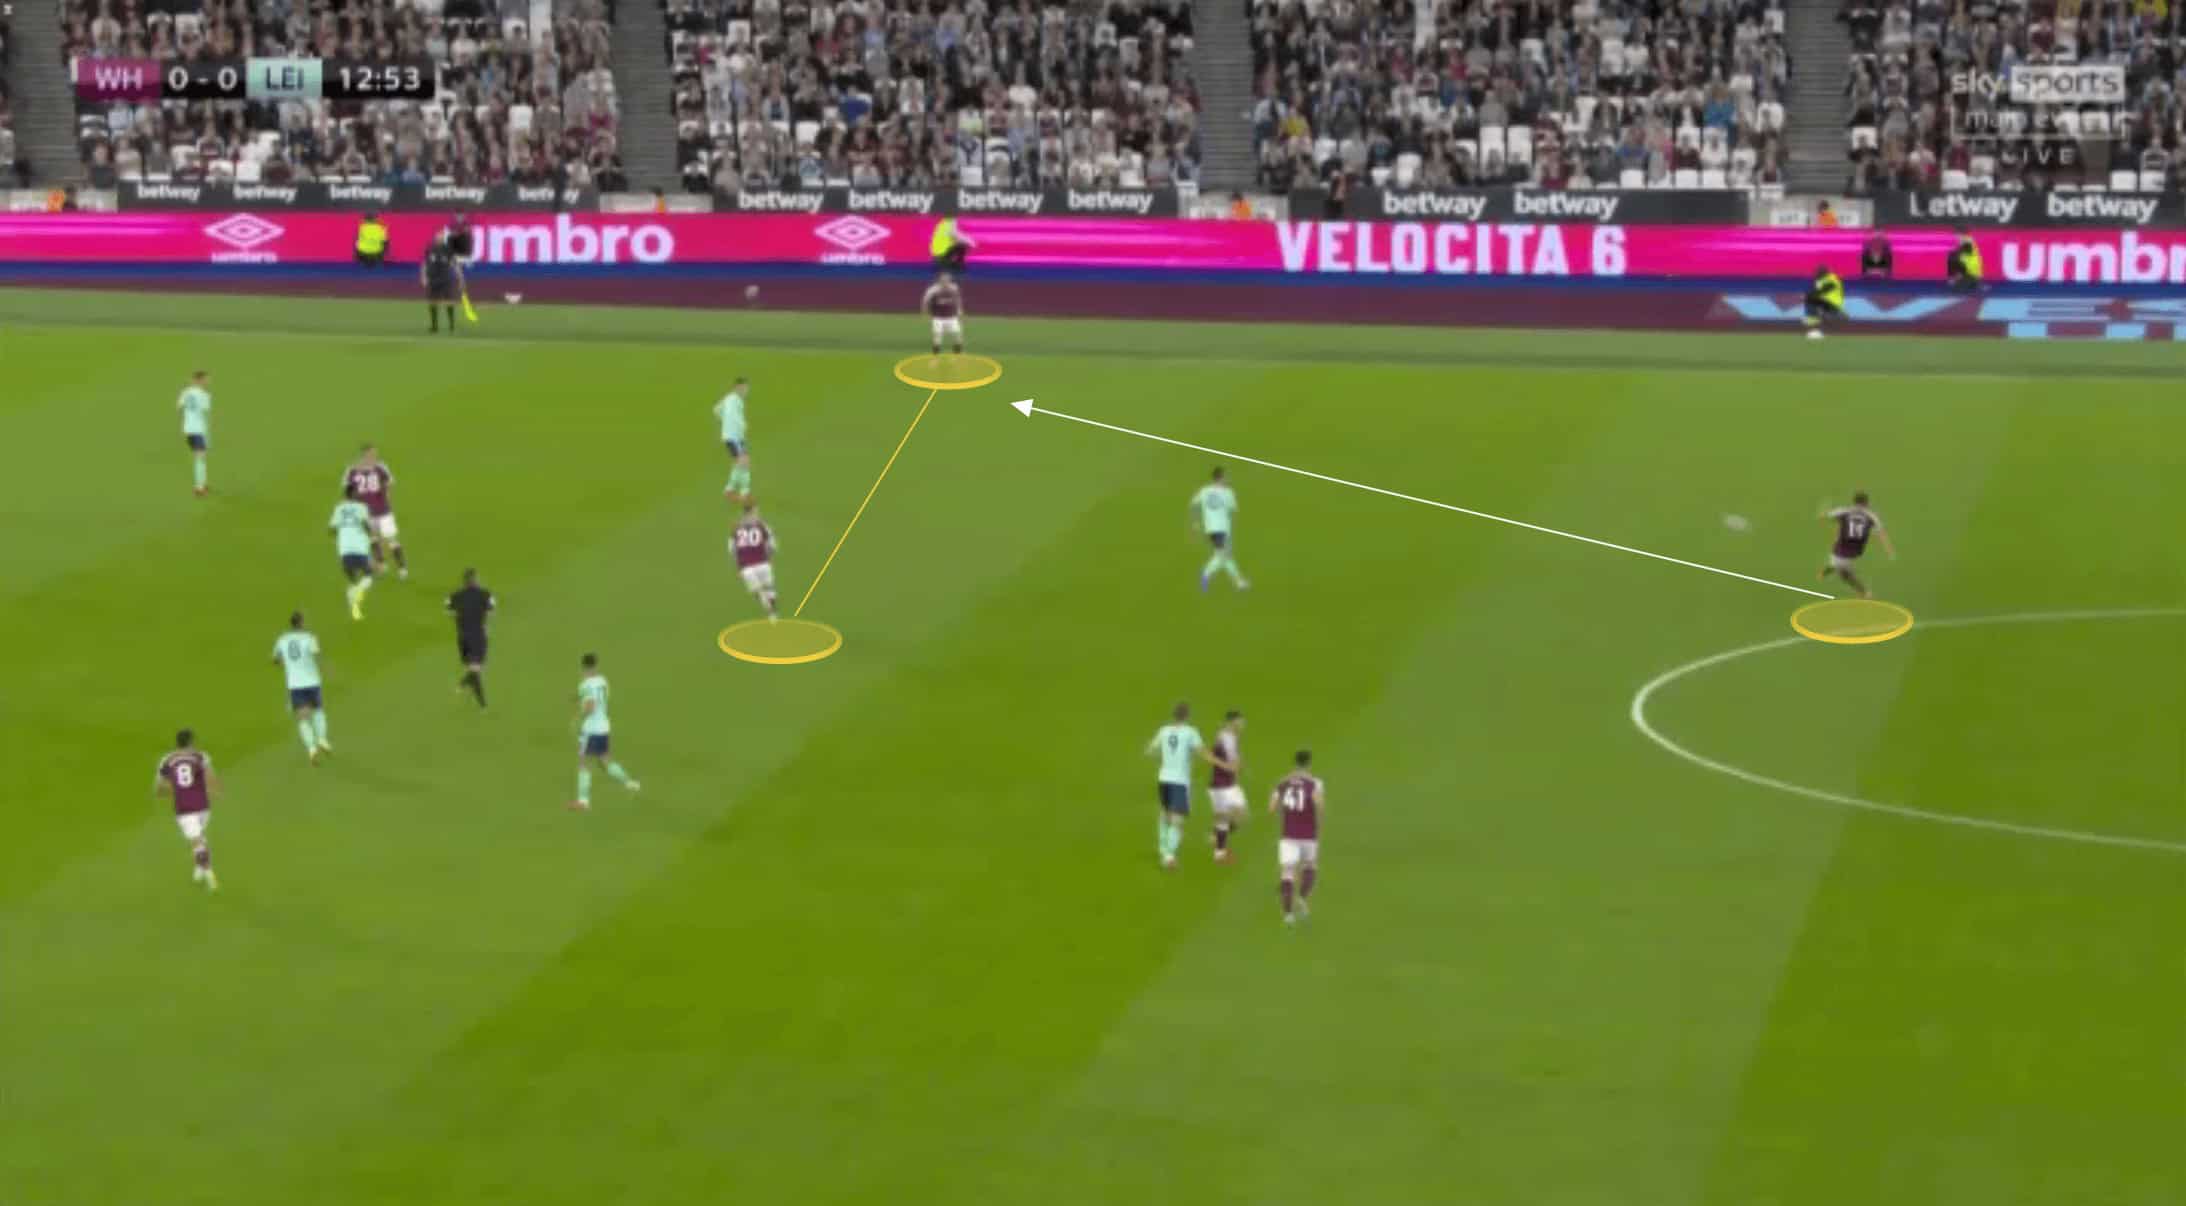
If West Ham pushed out of their block to press, Bowen would curve his run inside to prevent Amartey being able to play to Ricardo Pereira, and instead show him inside into the congested midfield. The only issue with this was Antonio didn’t hold his position all of the time, and Fornals may have been too far away to cover the near-side pivot. This created the opportunity to play inside to Tielemans.
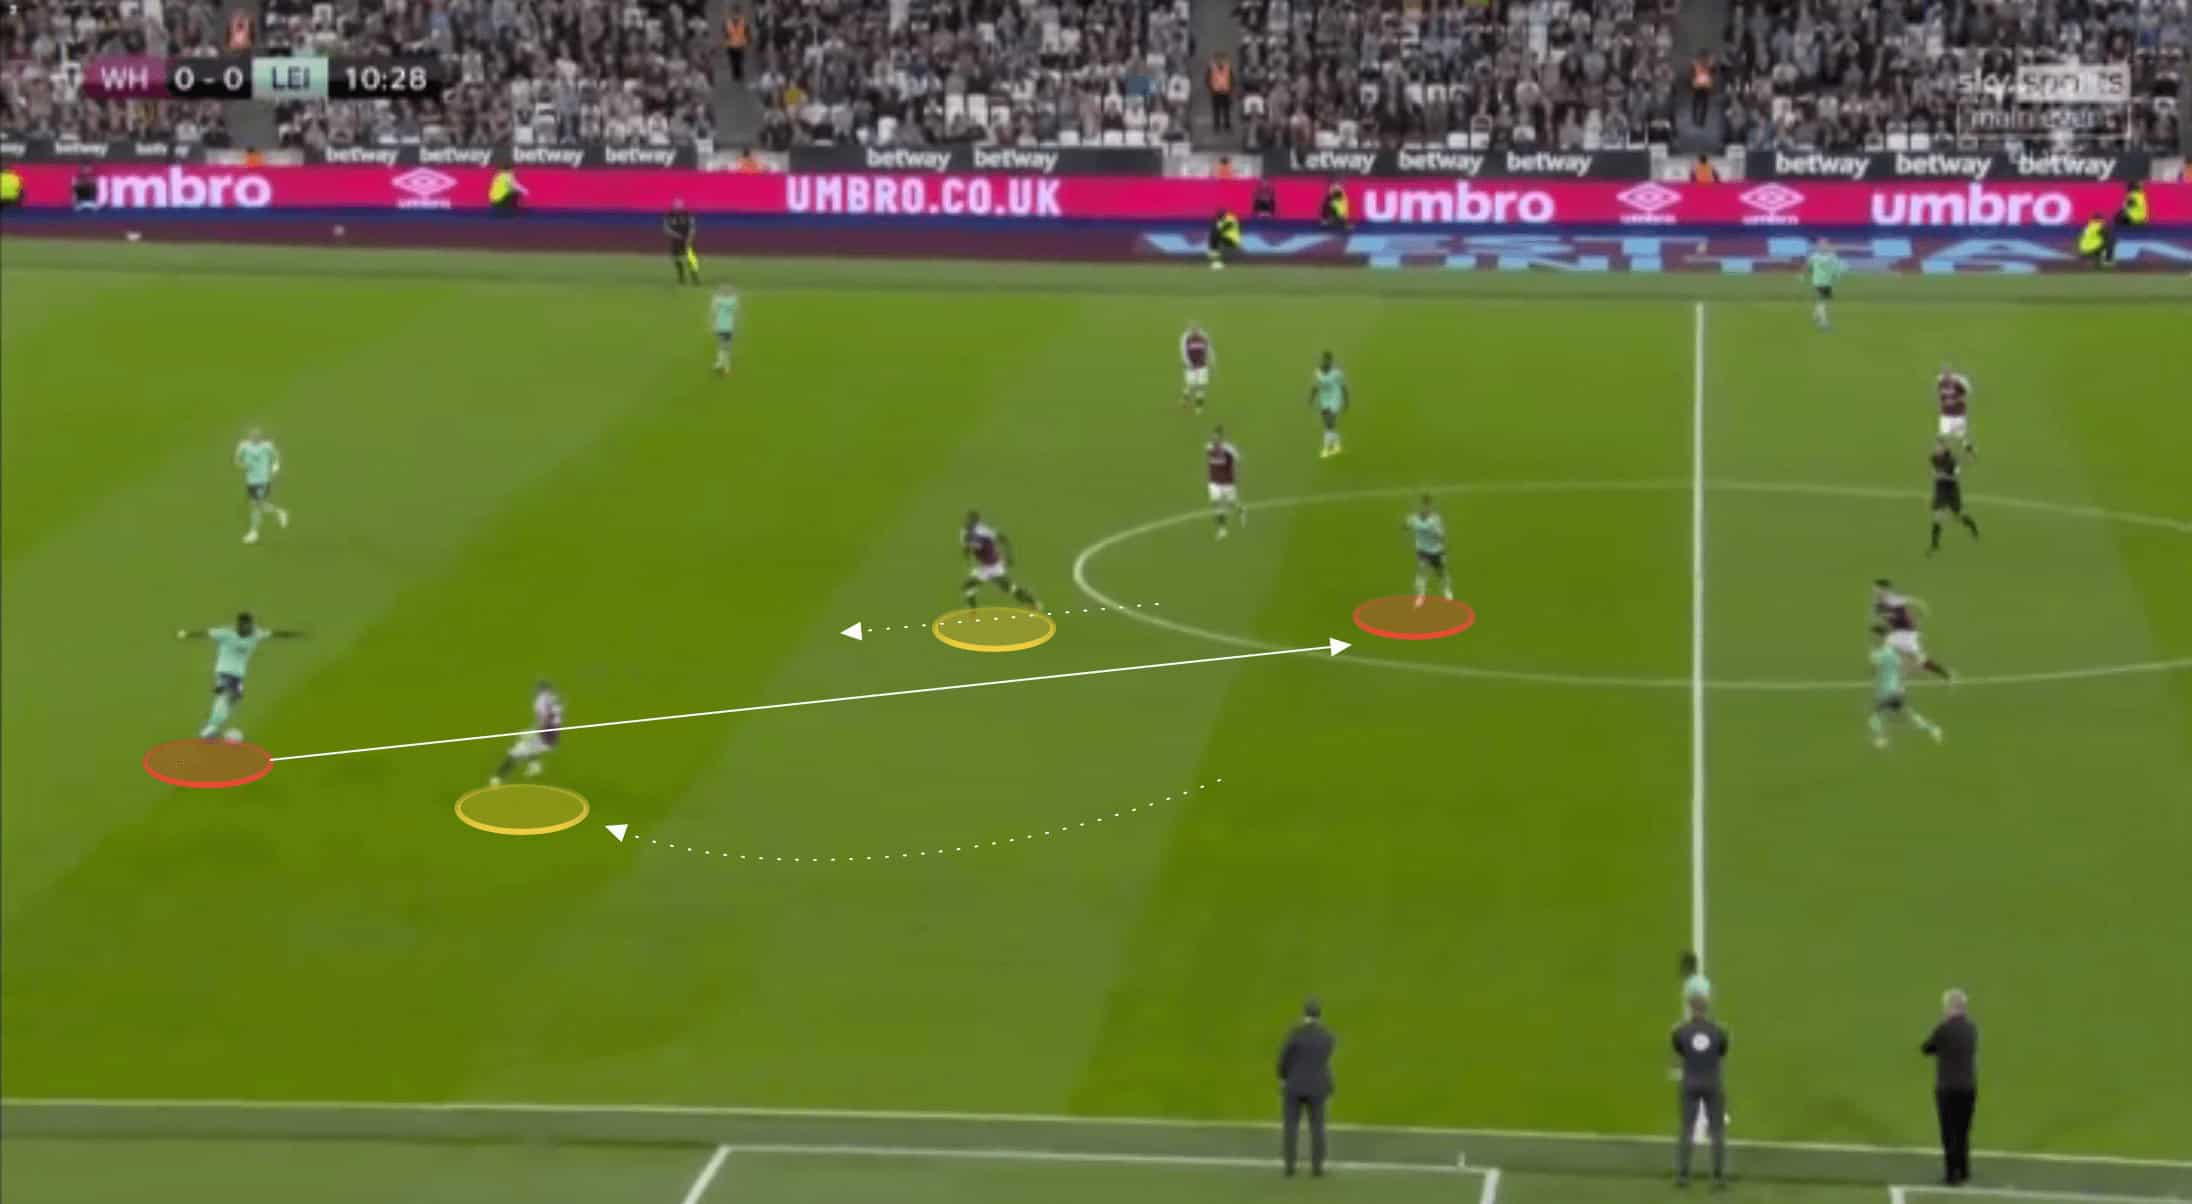
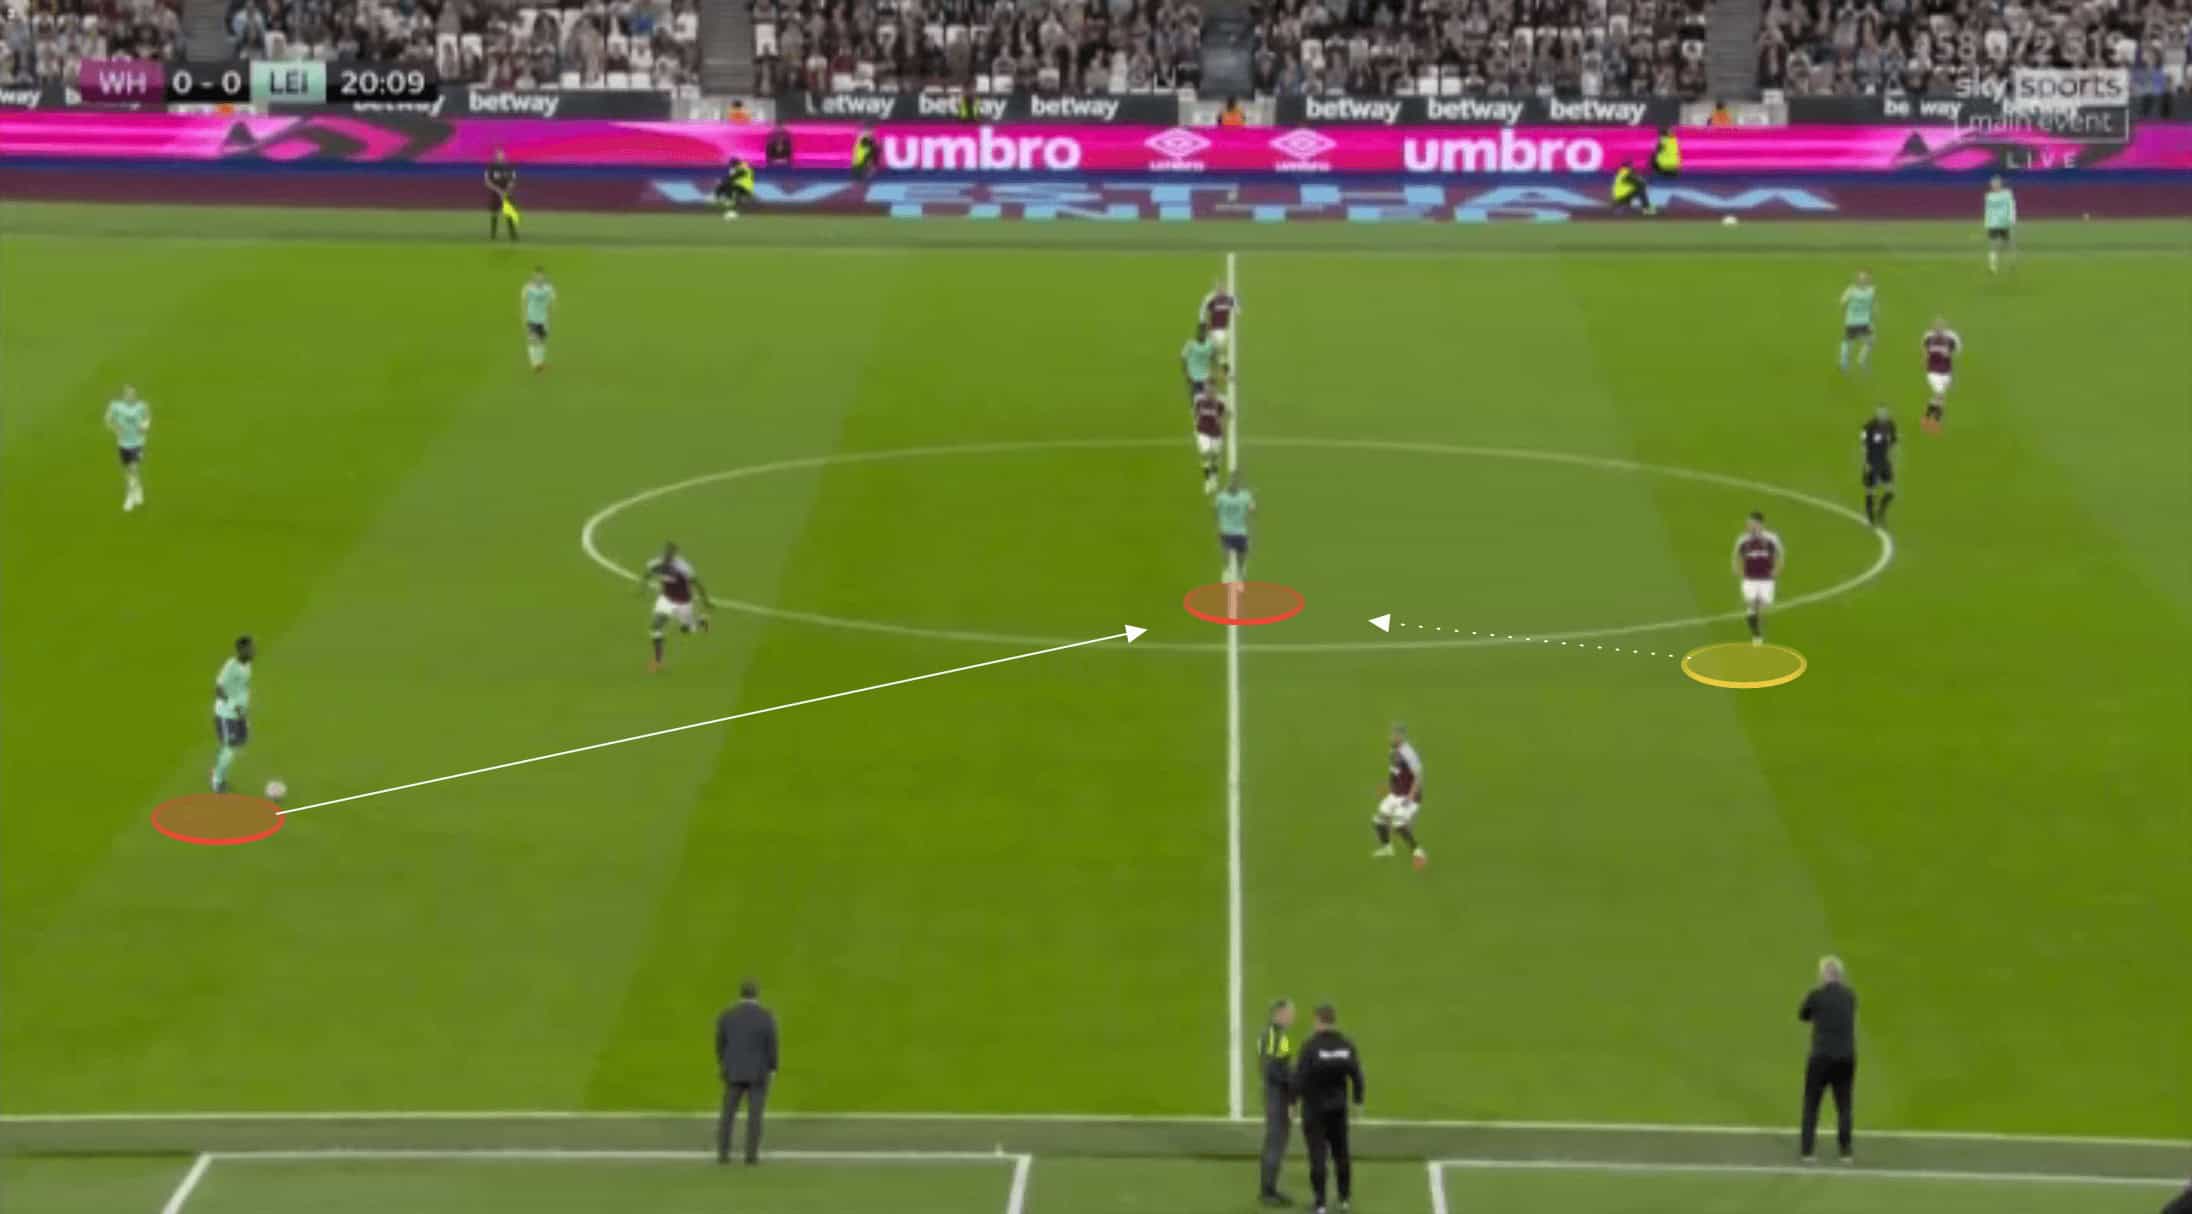
When they were finally able to play through West Ham, Leicester were very quick to continue to play forward. Immediately the midfielders would look for that forward pass option potentially to James Maddison or Vardy, whilst Perez and Harvey Barnes would be far wide ready to get on the ball on the flank. This can be seen below as Tielemans pass to the far-side stretches West Ham’s defence.
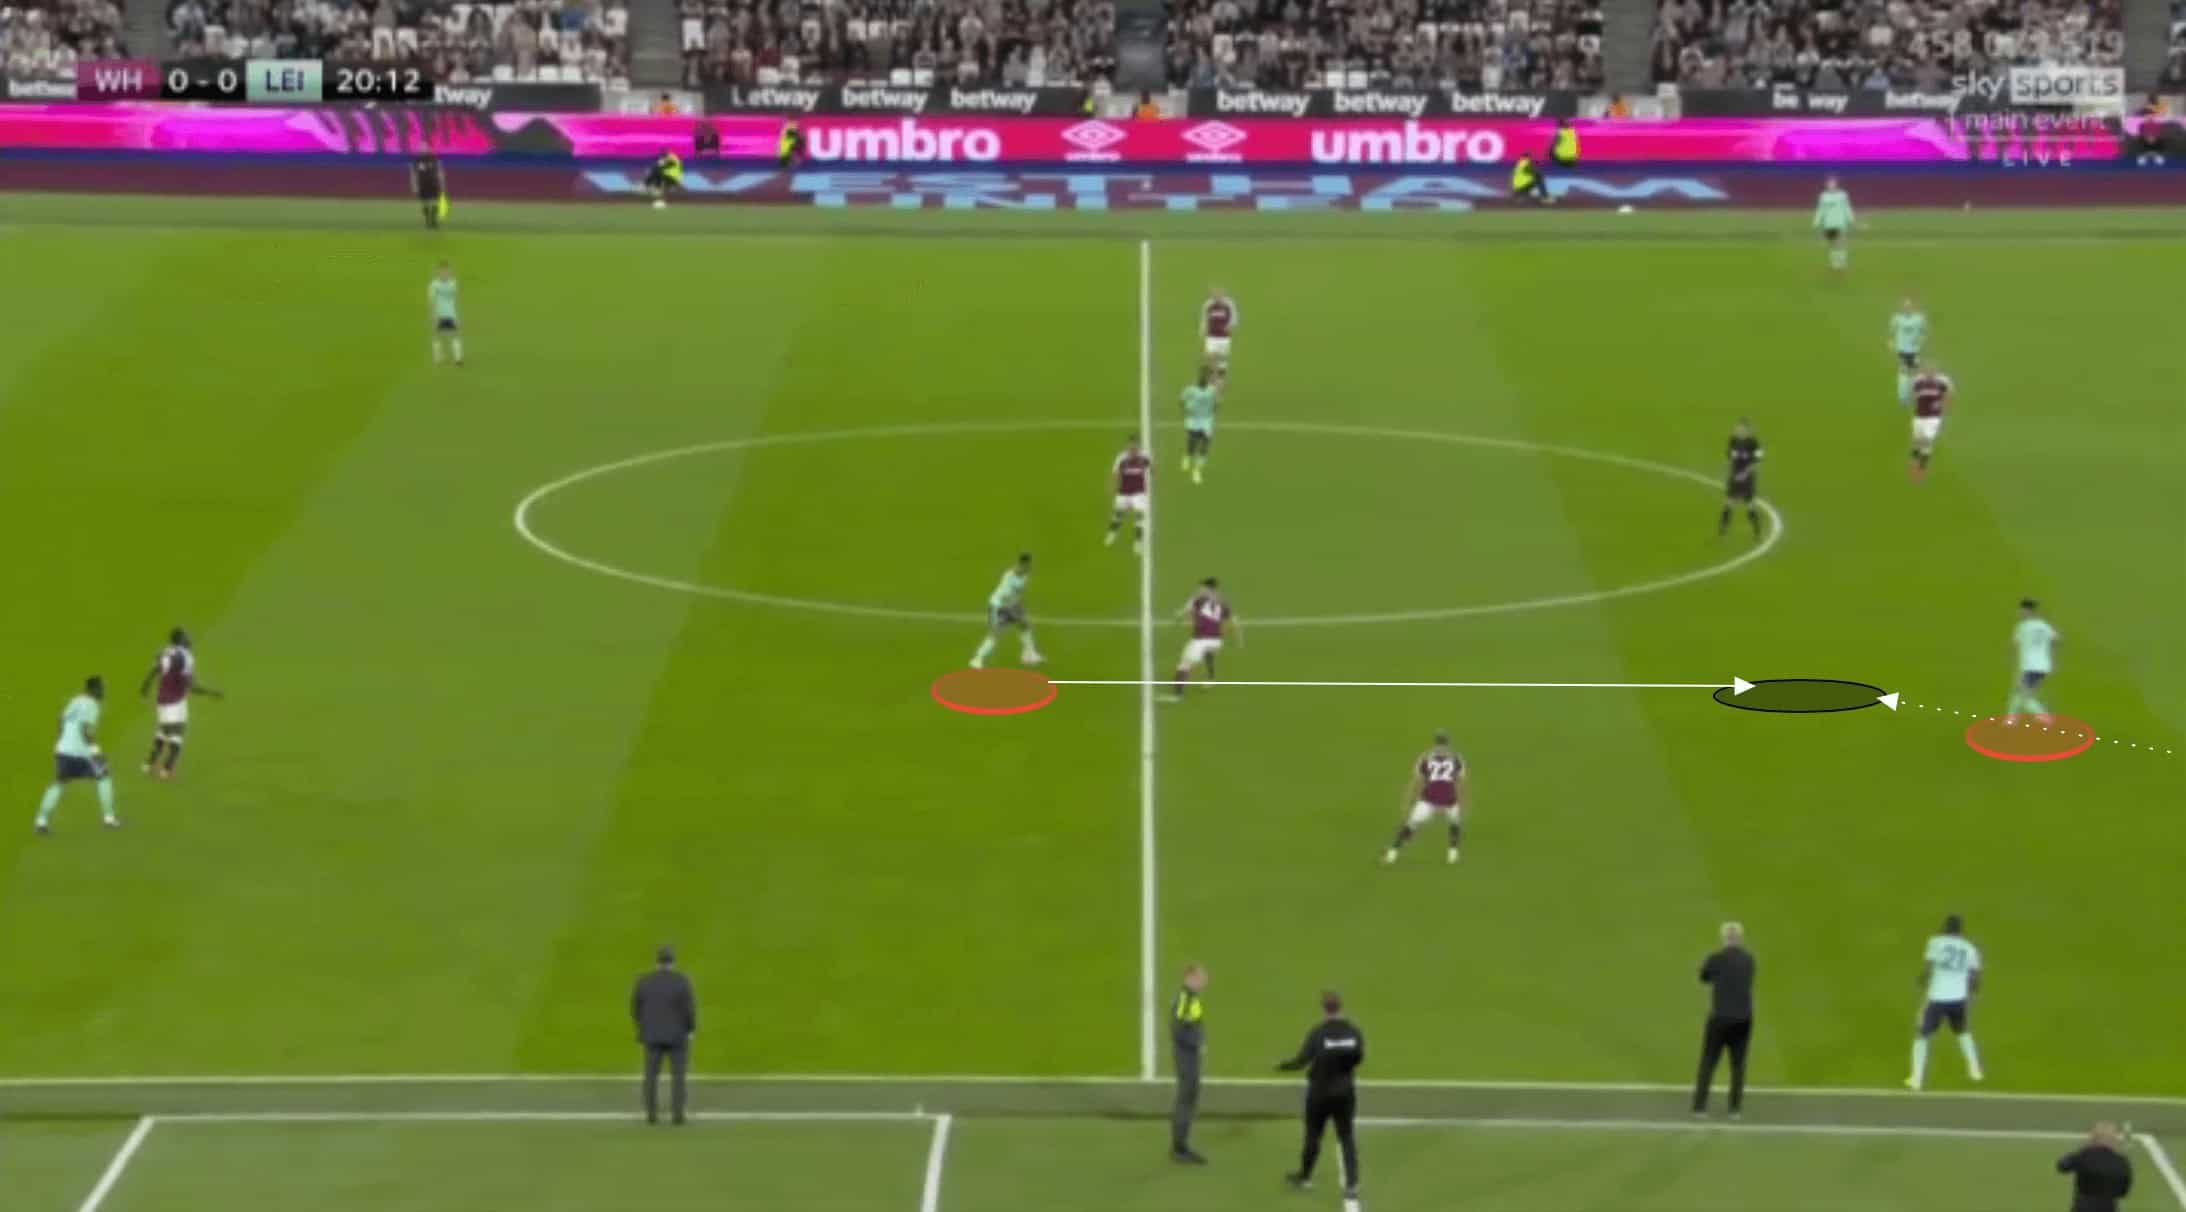
Rice could be drawn out too, having to cover his midfield teammates should they not have sufficiently covered the Leicester near-side pivot. With a pass like the one shown below into Tielemans, Rice would step forward to pressure the midfielder.
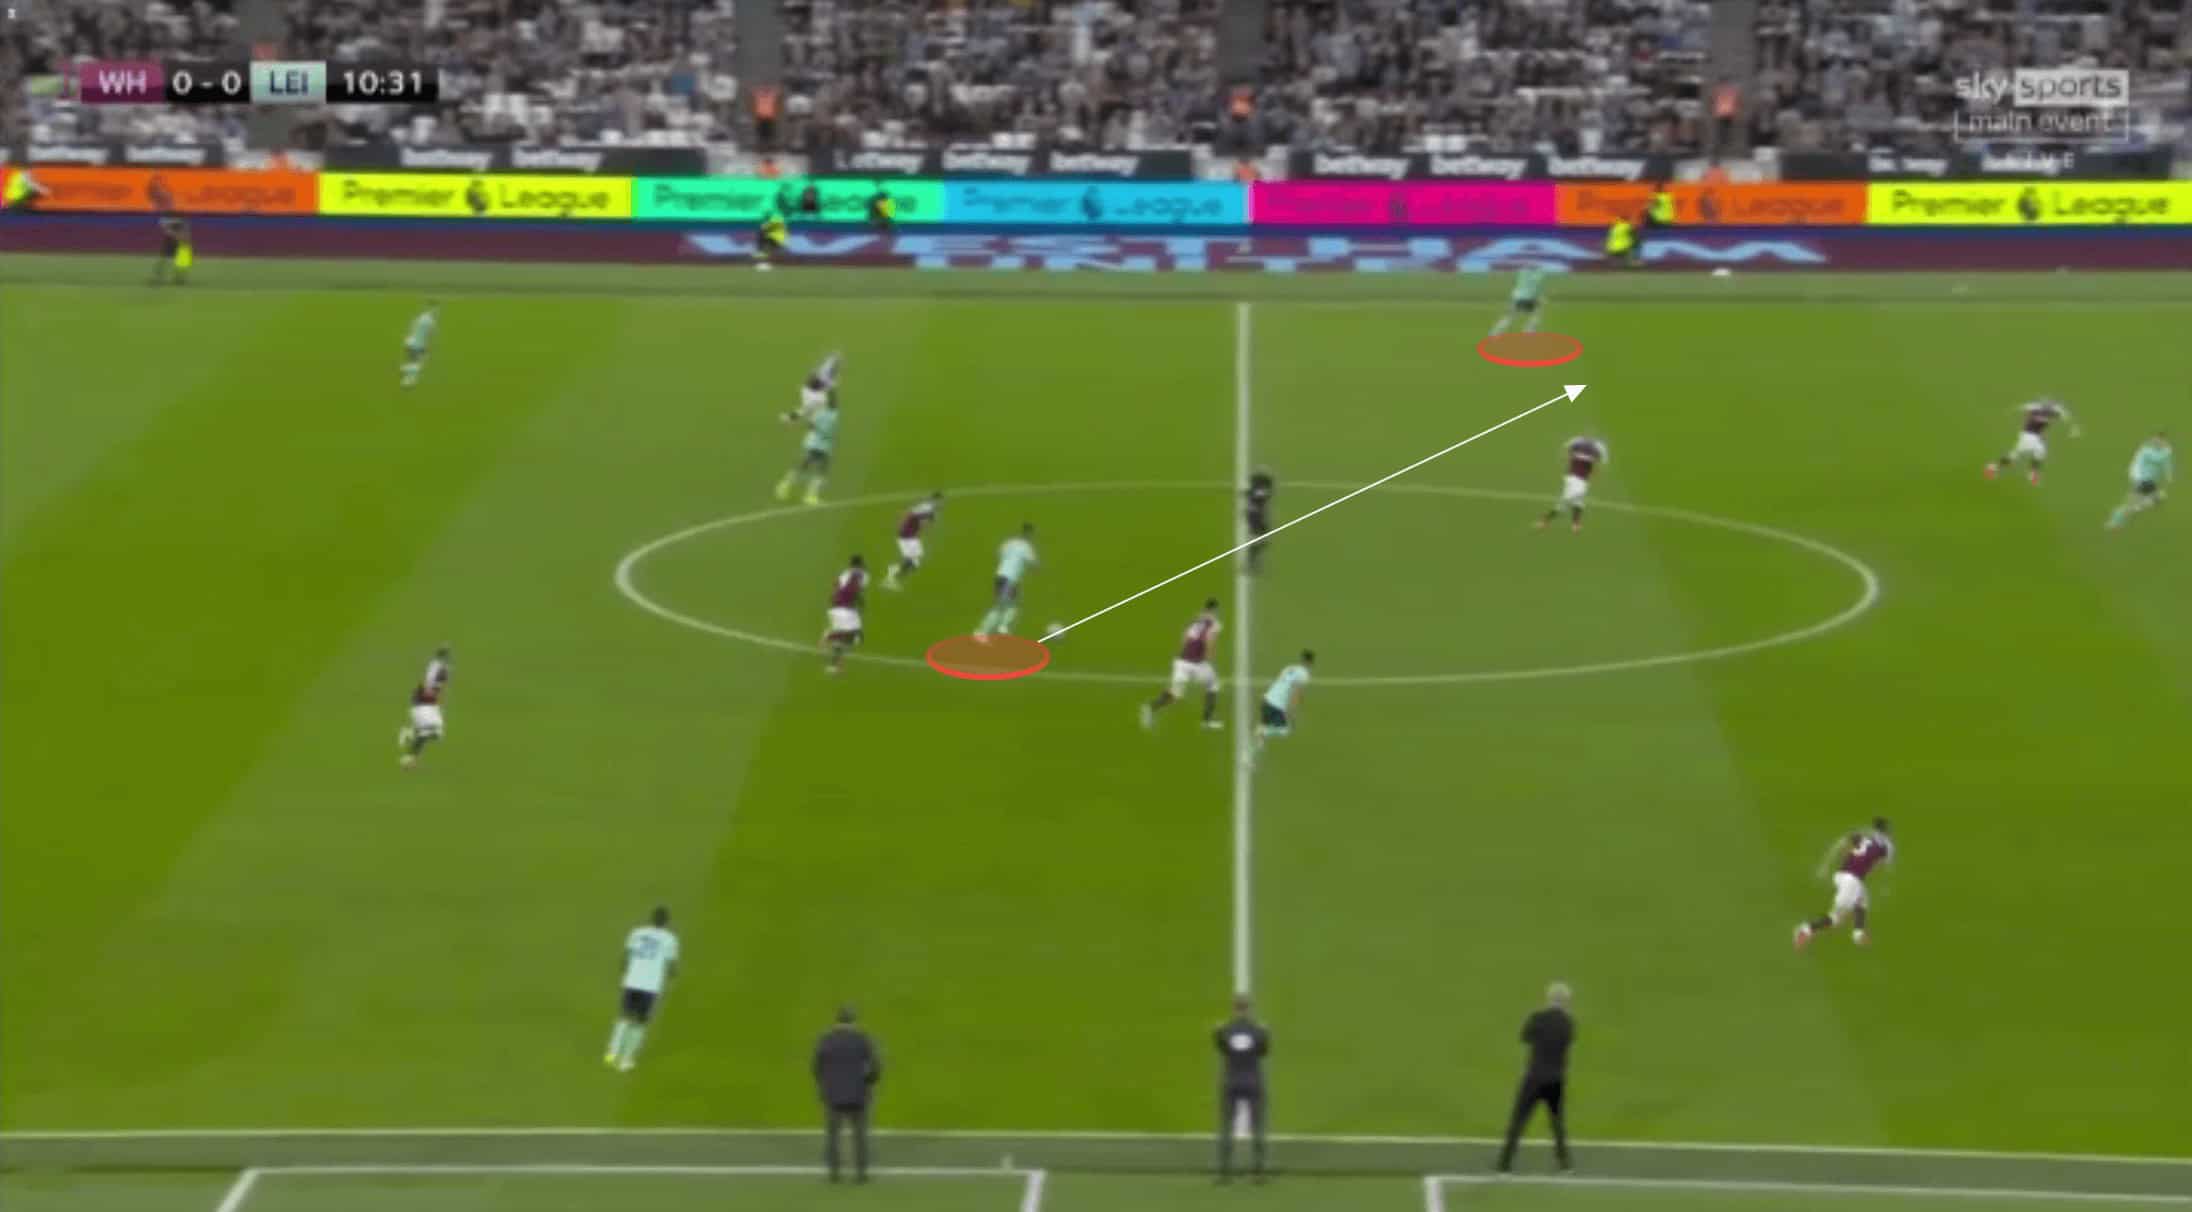
With Ricardo Pereira playing high and wide, Perez could drop inside and provide the passing option beyond the line of press, with Maddison remaining central, and covered by Tomas Soucek.
West Ham’s shape in possession
Ignoring the full-backs, which we will come onto momentarily, West Ham looked to create numerical superiorities around the ball during build-up, whilst continuously having passing options between the lines for them to play forward to.
Declan Rice was pivotal in ensuring there was this overload in the initial build-up phase, dropping very deep to get on the ball, often taking a position in the half-space to the left of West Ham’s centre-back duo of Craig Dawson and Angelo Ogbonna. Vladimir Coufal pushed high and wide when Rice did this, but Aaron Cresswell would stay relatively deep, holding the width, and providing a short easy pass option for rice. The England midfielder would sometimes make this pass, but would also be aggressive in driving forward on the ball himself to beat the initial press, before breaking lines and playing forward.
Regardless of whether it was Rice or Cresswell in possession, West Ham’s attacking midfield three of Benrahma, Fornals and Bowen were expected to make late runs between the lines from which West Ham could play through to. Just as Fornals dropped into the half-space to receive the pass from Ric in the previous image, Bowen cuts well inside in the next picture, providing that line-breaking pass option for Cresswell.
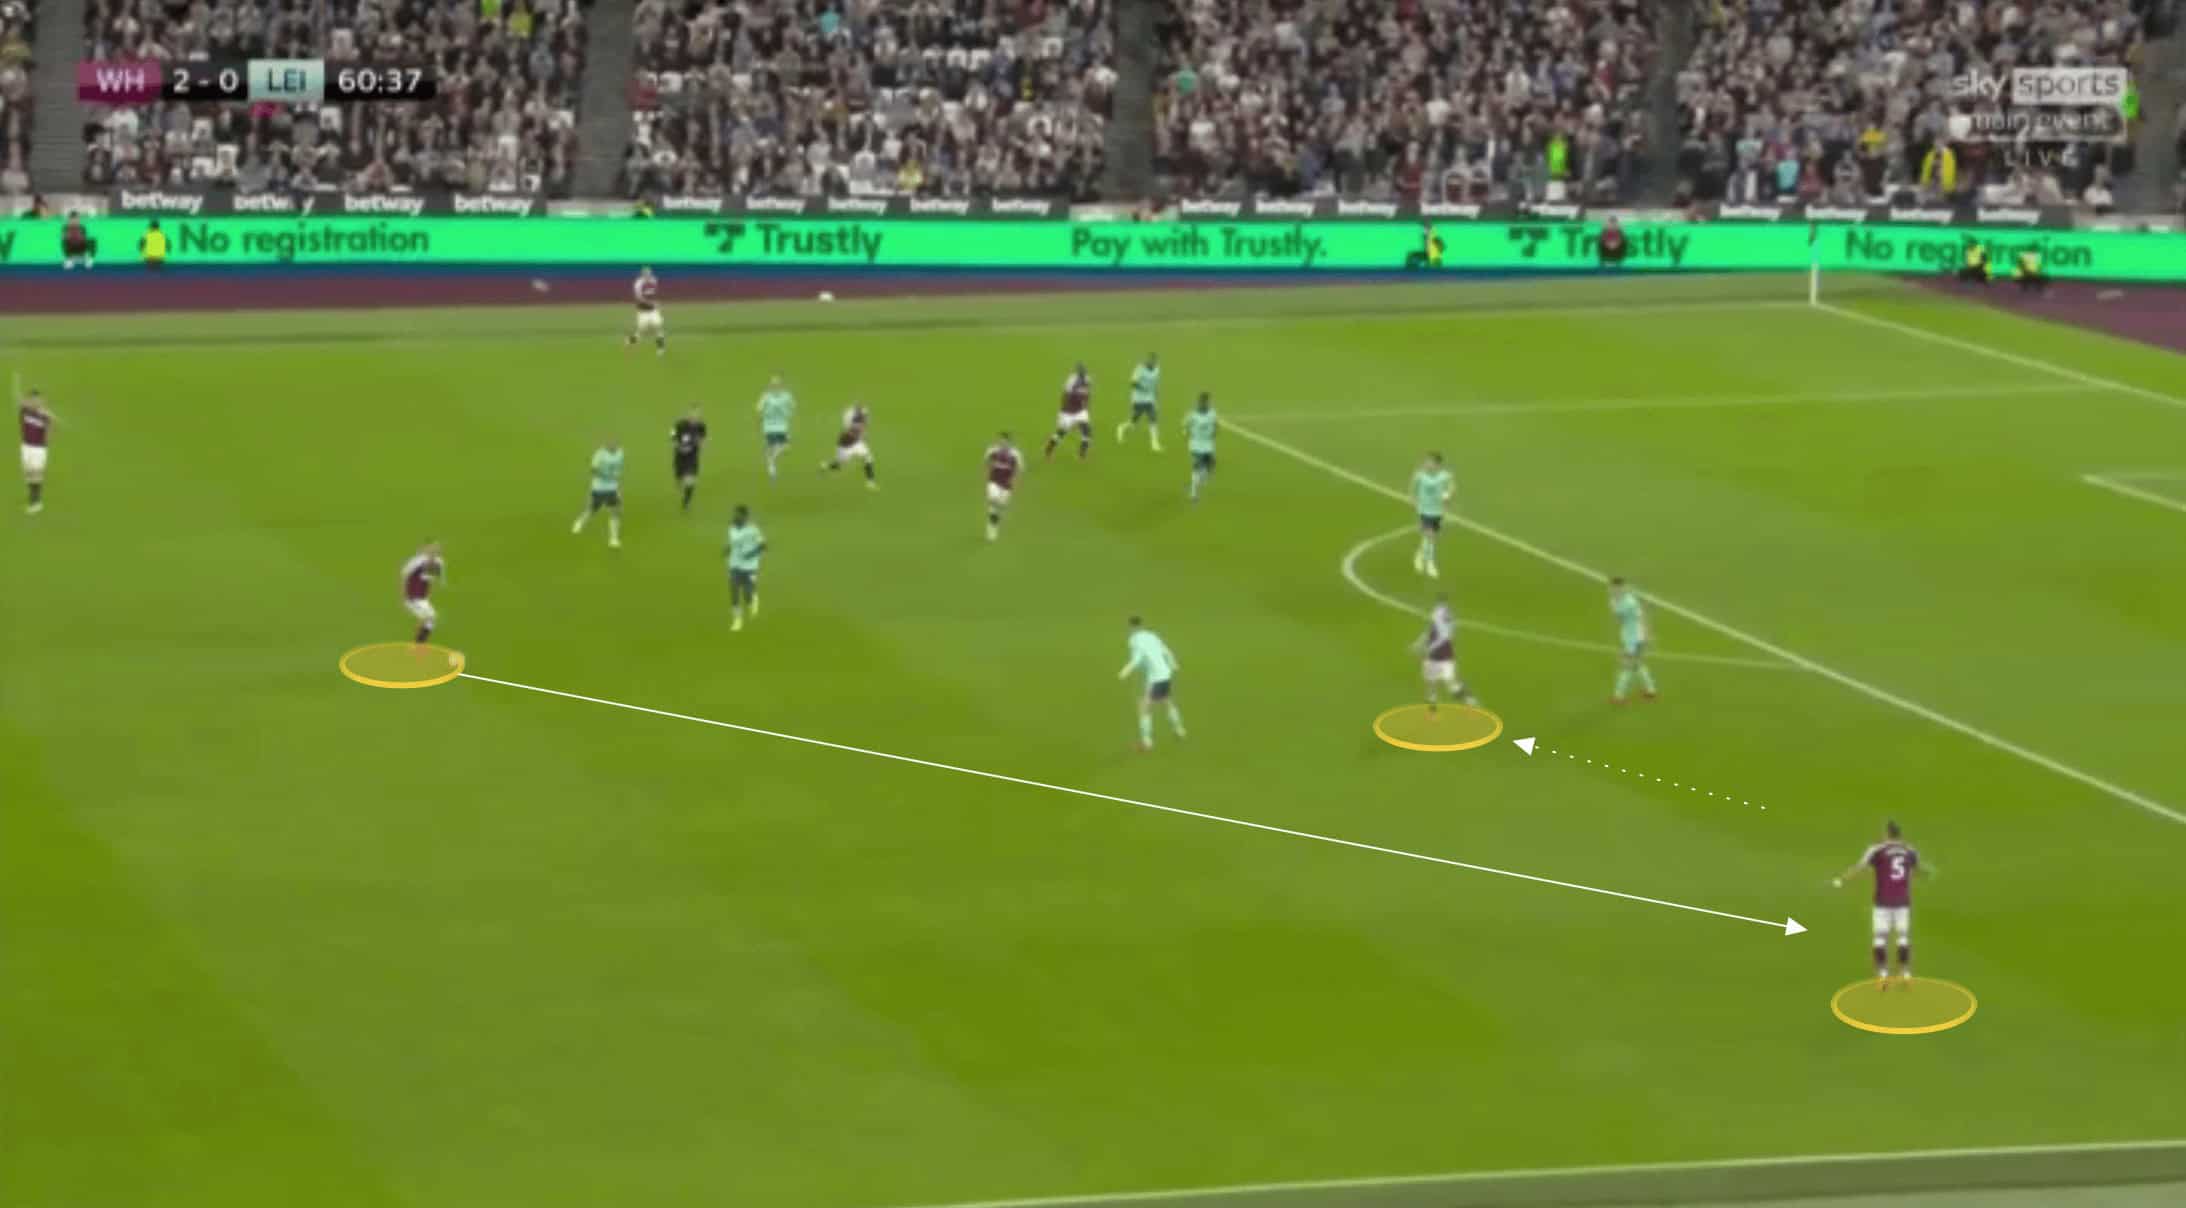
It was this structure that led to West Ham’s third goal, albeit not with them breaking lines with a pass, but rather Rice and Cresswell linking up on the left side. Rice dropped deep to get on the ball in the half-space whilst Cresswell pushed further forward.

Benrahma remained tucked inside, sitting on Amartey, and allowing Rice and Cresswell to combine with a quick one-two, with Cresswell releasing rice in behind. Amartey couldn’t shift across to cover Ricardo Pereira at right-back due to Benrham’s presence inside. Rice was then able to cross for Antonio, who scored his first of the evening from this exchange.
West Ham’s wing play
The Hammers consistently provided problems for Leicester with their attacking structure of pushing their full-backs on, and having their wingers stay well inside. They were able to make late movements to isolate the Leceister full-back in a 2v1. They also kept that doubt in the full-backs mind of whether to remain compact or whether to push wide and press. If they did the former, Coufal and Cresswell would take the space to whip crosses into the box, and if they went to press, West Ham could break the lines with a through pass between the Leicester full-back and their inside centre-back.
We can see how narrow West Ham’s wingers played below with the pass going out to Coufal and Bowen positioned in the central channel.
Yet as we can see in the next image, the height and width of the full-back along with the position of the winger, stretched Leicester’s defensive shape and created passing lines from which West Ham’s creative midfield could play the full-backs in behind with.

As soon as the winger recognised their full-back teammate was in a position ro receive, they would drift inside, drawing their marker narrow, and leaving plenty of space out wide. We can see this below as Bowen moves inside to give Coufal plenty of space to receive. If Leceister’s left-back had been drawn out here, Bowen would have been able to quickly create a 2v1 with Coufal.
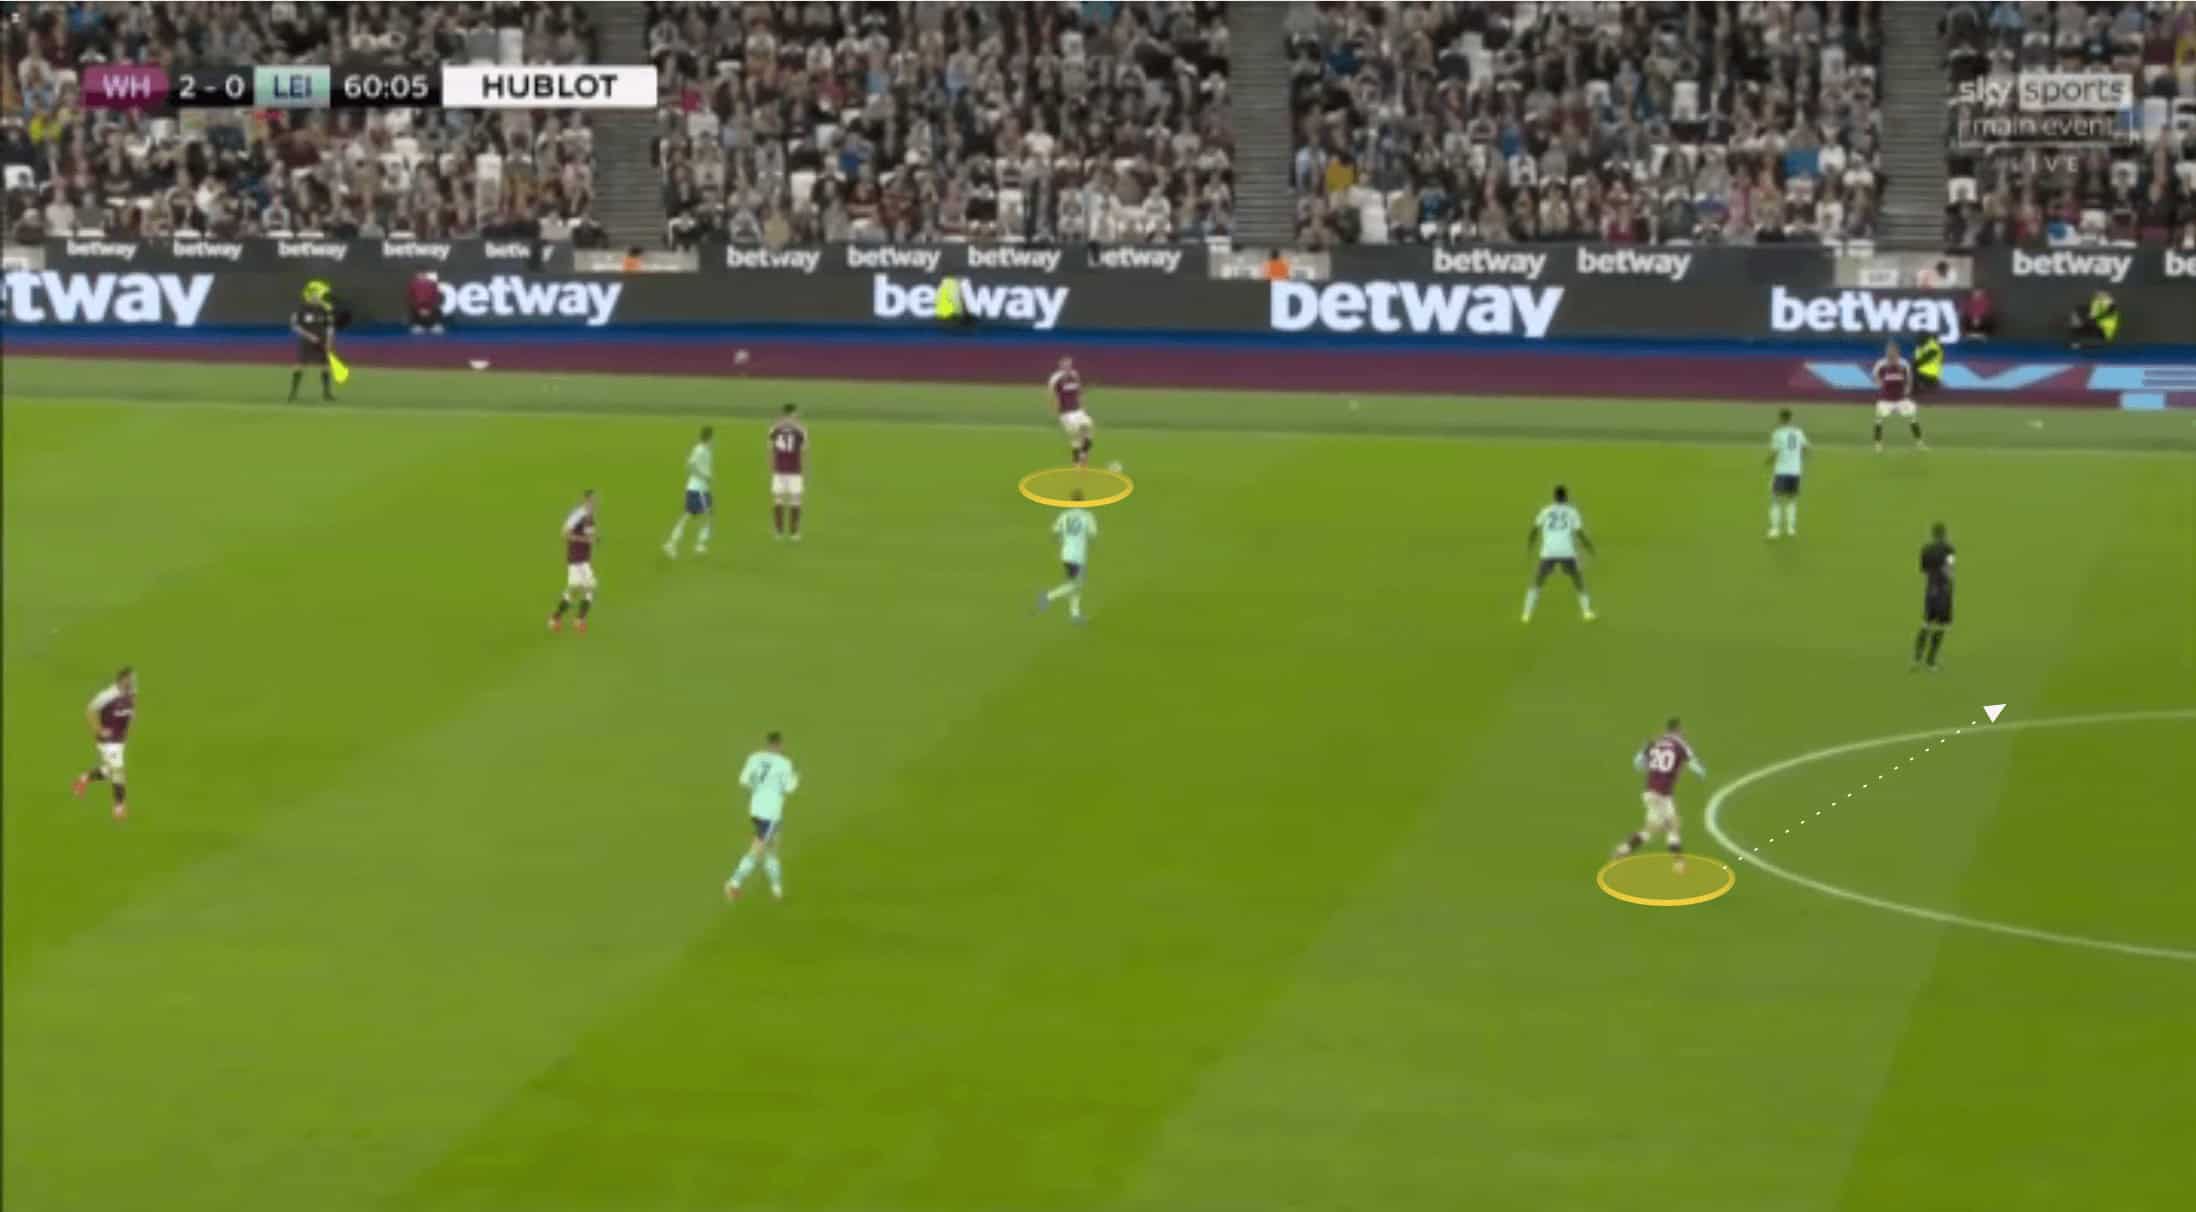
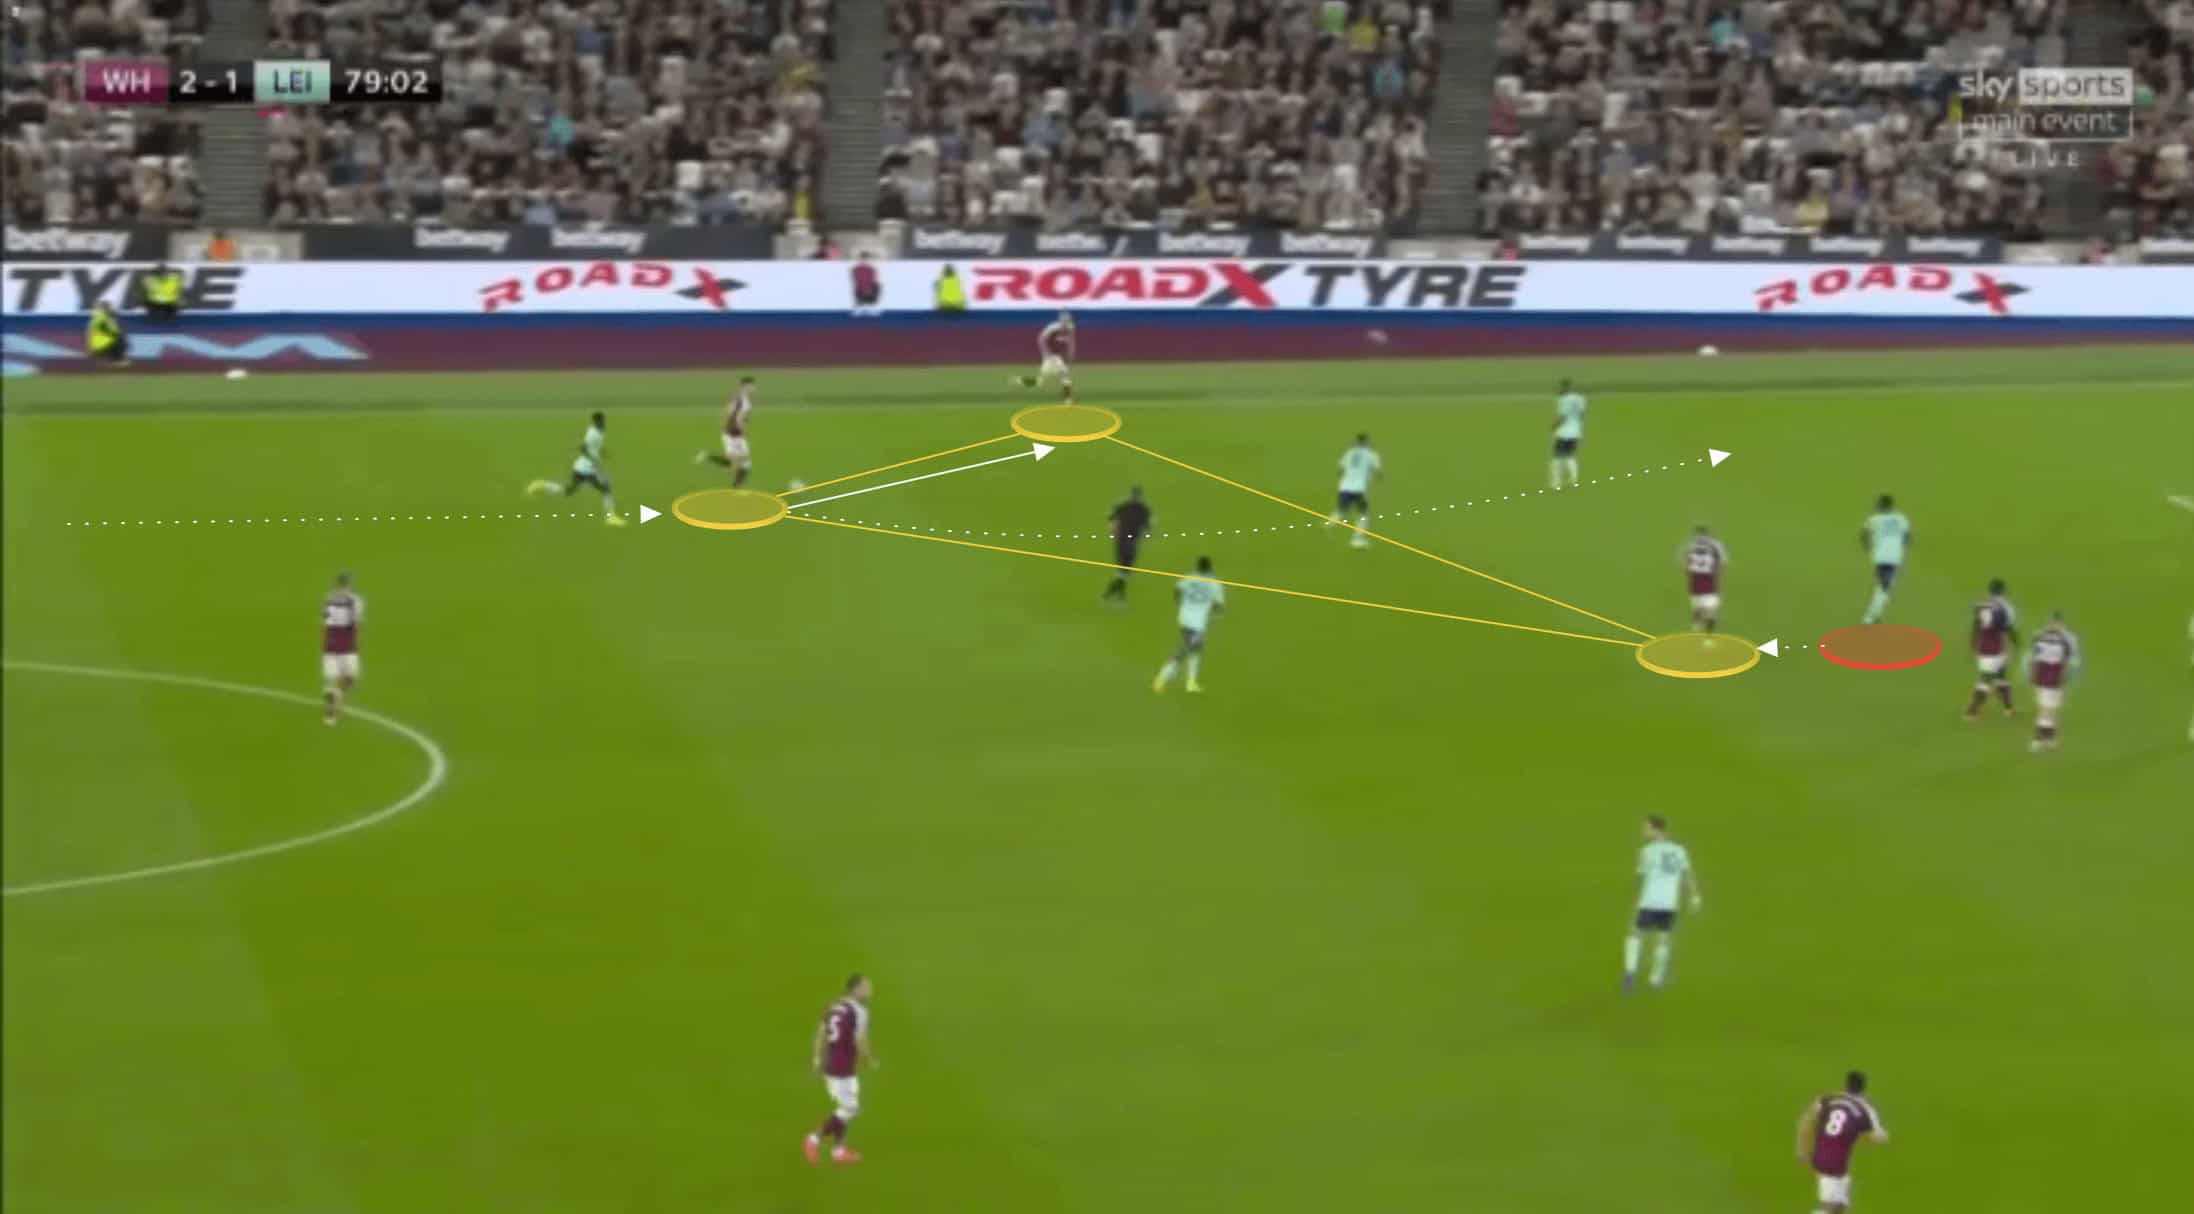
West Ham would also draw Leicester over to one side during build-up play, overloading the flank with the presence of one of the pivots and Fornals, along with the full-back and winger. Once they had engaged in a quick sequence of passes, they were able to switch play to the opposite flank. This was particularly devastating when Leicester were down to 10 men, with West Ham taking out five of their nine outfield players in the sequence highlighted in the image below.
Conclusion
Admittedly the result was heavily impacted by Perez’s dismissal, and the Leicester side we saw in the second half was understandably a shadow of that which started the game relatively brightly in the first 30, and if anything were the better side. But West Ham took control of the game, using their extra man to secure superiority across the pitch. Moyes’ side employed simple but effective tactics, and along with some terrific individual performances from the likes of Benrahma, Fornals, and Antonio, they were able to pull away from the Foxes and take the three points.