It is important for teams to have principles of play so that players have clarity about what moves to make during different phases of the game. Each team has principles to abide by to carry out the coach’s intended style of play. While this is common for teams, we rarely see this level of clarity for sides during set-pieces.
This is the start of a series of articles where the different principles of attacking and defending set pieces will be explained in detail to make the foundations of successful set plays clear for everyone. The first fundamental principle we will be diving into is called sustaining pressure, where we look into how teams can set up to keep the ball in the final third and sustain pressure on their opponents as a means to fall back on, no matter how accurate the delivery is or if the movement of the attackers isn’t quite right.
This tactical analysis will look into the tactics behind the first set-piece principle of attacking corners, which is labelled ‘Sustaining Pressure‘, with an in-depth analysis of how teams can set up for corners to maintain the ball in the final third. This set-piece analysis will examine how teams often manage to defend against corner kicks, how attacking teams can set up to ensure the ball remains in the final third and the roles and responsibilities of the rest defence outside the box.
Preventing the Ball from Leaving the Final Third
There are five different outcomes in which a direct corner kick can be successfully defended whilst remaining in play, with staggering levels of success for each:
- Goalkeeper Claim
- Headed Clearance
- Volley Clearance
- Second phase (following a shot/aerial duel)
- Cross misses everyone
The most success comes from a goalkeeper claiming the ball, where the defending side instantly regains possession. A volleyed clearance then provides the next-most success, as the player clearing the ball has the opportunity to clear the ball into the opposition’s half, whilst a headed clearance has a lower range, where a powerful headed clearance will still remain the final third.
Second-phase clearances have varied potential, depending on how much time the player on the ball has. If he finds himself in space, inside his box, with time to look up and find a teammate, it could be the most successful, but the second phase also has the potential for defenders to find the ball at their feet, with attackers breathing down their neck instantly. In these scenarios, there is no time to clear the ball, and they are at risk of being tackled inside their own box, leading to a dangerous turnover.
When a cross misses everyone, it all depends on how quickly each team can react and get to the ball before it goes out of play. These situations can lead to defending teams starting counterattacks, but also to attacking sides having a second opportunity at crossing the ball in.
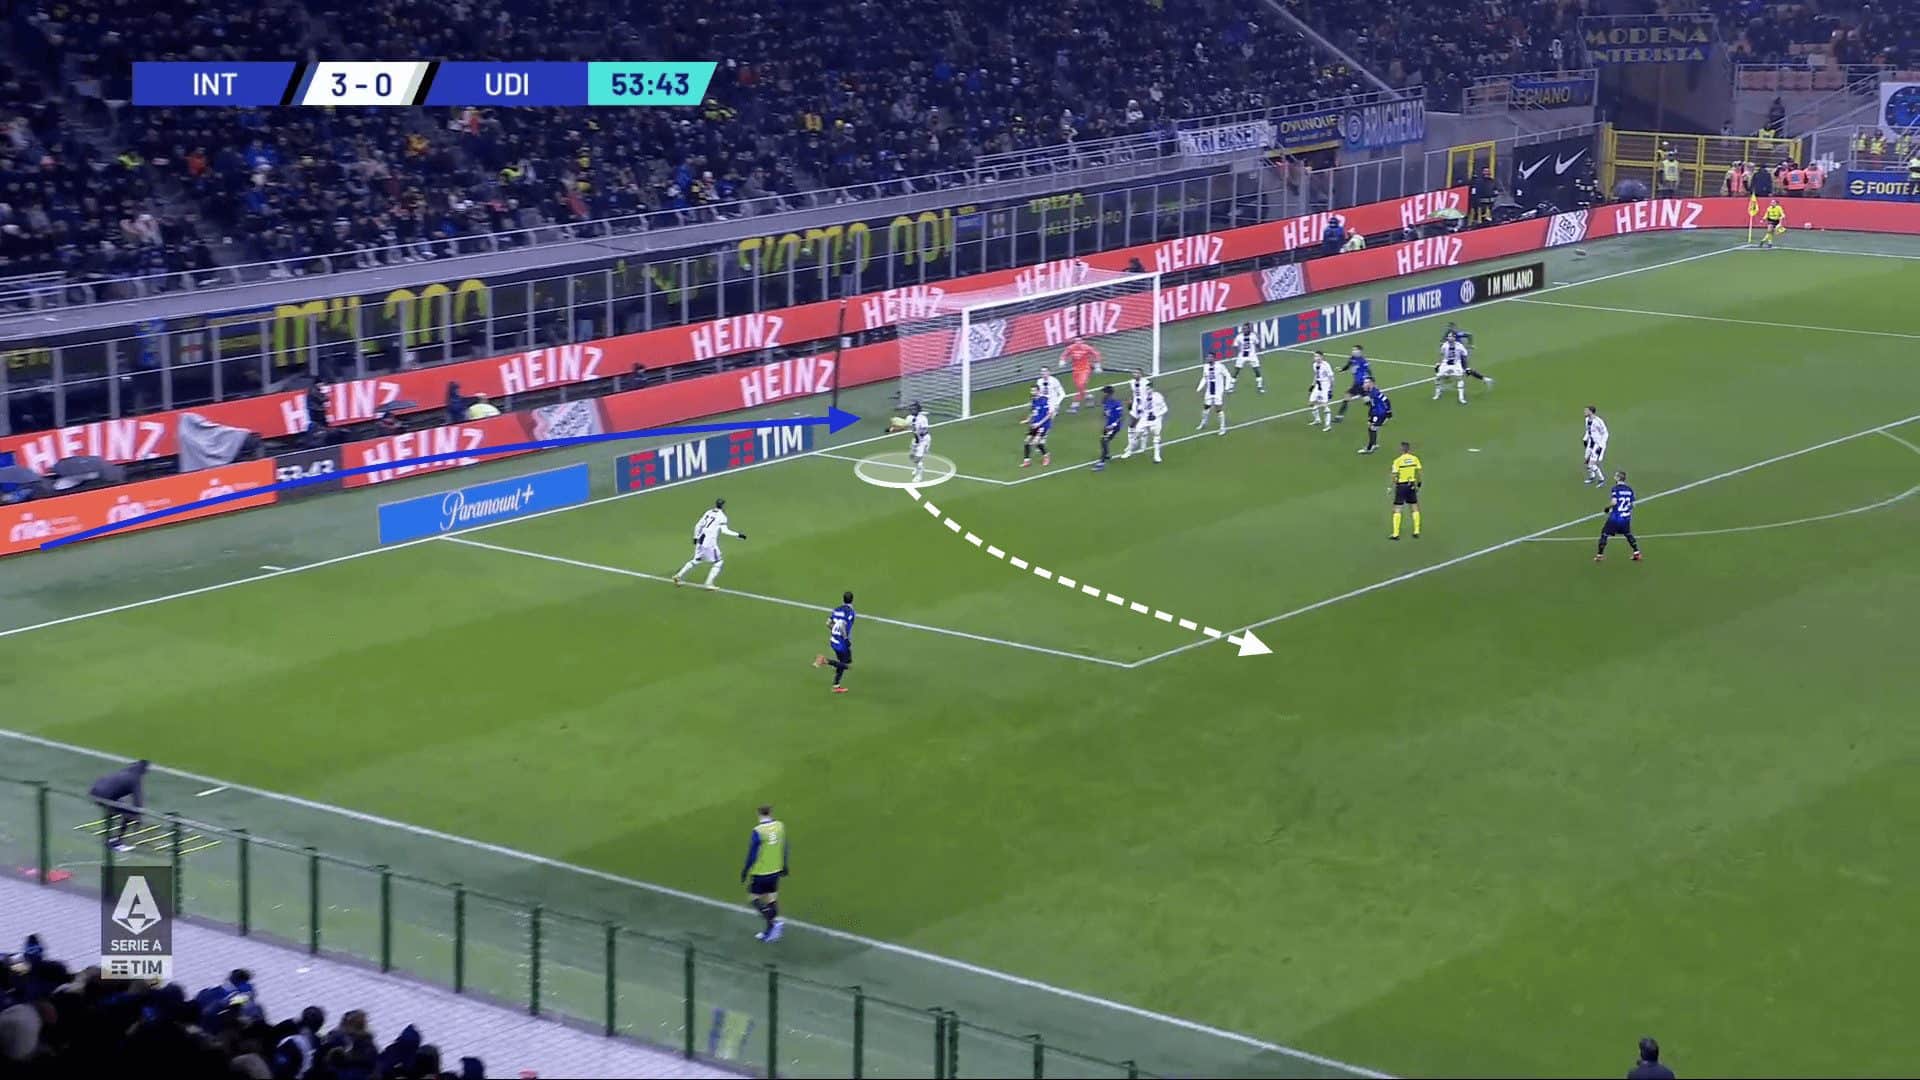
One of the biggest killers to a potential attack, or wave of pressure from attacking corners, is the positioning of the zonal defender on the near side of the six-yard box. This zonal defender can instantly end an attack if the corner is either underhit or an attacker mistimes his run into that zone.
Whilst every defender in the box has the possibility to clear the ball, only this player can kill the attack. If the cross fails to clear the first man, he can either clear the ball first-time with a volley or control the ball and dribble out of the box before picking out a pass like in the example against Inter below. However, if the ball clears the first man, every other defender competing for the ball will only be able to clear the ball with their head.
The potential range on a header, compared to a volley, is much less. A headed clearance will only clear the box, meaning it can remain in the final third, whilst a player volleying the ball has the range to reach the halfway line, where the defending side will be able to step up and prevent the attacking side from sustaining pressure in the final third.
One of the vital elements to sustaining pressure is to prevent this near-sided zonal defender from even having the chance of clearing the ball. This can be achieved through either the use of a screen where a player is ball-side, relative to that defender, or through timing a run in front of the zonal defender.
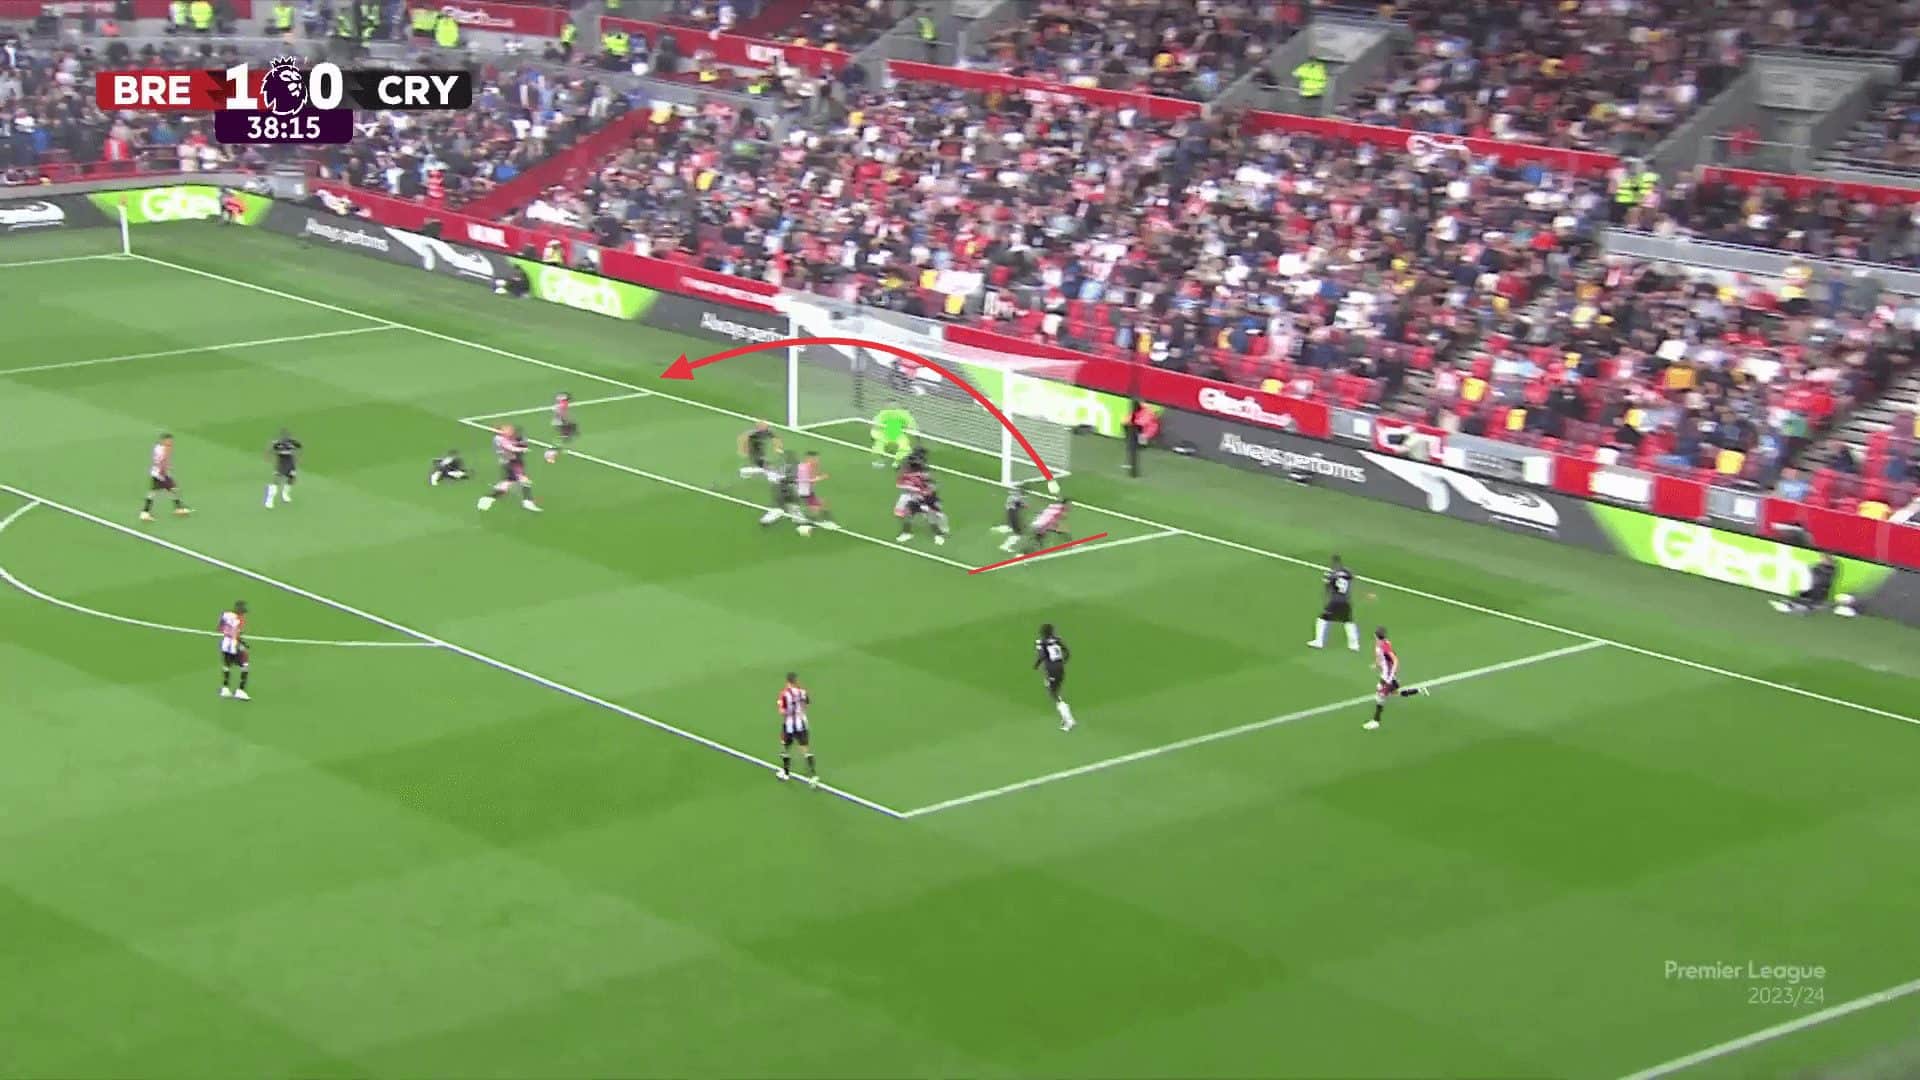
Either way, an attacker must be in a position where he can make the first contact on a cross that is arriving at the near side of the six-yard box, as this area is the one where most counterattacks can stem from. Brentford is a side that uses this principle for their corners, and as can be seen in the example below, they make these movements to the near side, even when the corner is aimed towards the back half of the penalty area, just in case a corner is mishit. With this one movement by one attacker, the volleyed clearance can be nullified, leaving opposition sides with only four other methods of defending the corner kicks.
Below is another example of Brentford using the screen on the near-side zonal defender. In this example, the cross doesn’t arrive where intended, which is only natural for many players. As a result, Ethan Pinnock can be seen setting a wide stance in the red circle to prevent the zonal defender from being able to attack the ball and clearing it. While the defender does manage to make the first contact, Pinnock has done enough to disrupt the headed clearance so that the ‘cleared’ ball remains in the box.
We can see the ball lands in the box again, which provides Brentford with a second opportunity to get it into the danger area. Even though the corner may be deemed as unsuccessful, Brentford managed to keep the attack alive, and sustain the pressure on the opposition side rather than allowing them to get a proper clearance and step up as a team away from their box.
While the main intention of this near-side screen is to help Brentford sustain pressure on the opposition by preventing them from leaving their own third, a benefit is also that this player is able to flick the ball either towards the goal or across it. The role of this player is to prevent the near-side defender from attacking the ball, but he can also act as an attacking tool for his team, simultaneously trying to stop counterattacks whilst creating chances for his team.
Preventing Goalkeeper Claims
As mentioned earlier, the two biggest threats to sustaining pressure for an attacking side are the near-side zonal defender, who can potentially kick the ball far from goal, and the goalkeeper, who can regain possession for his side instantly.
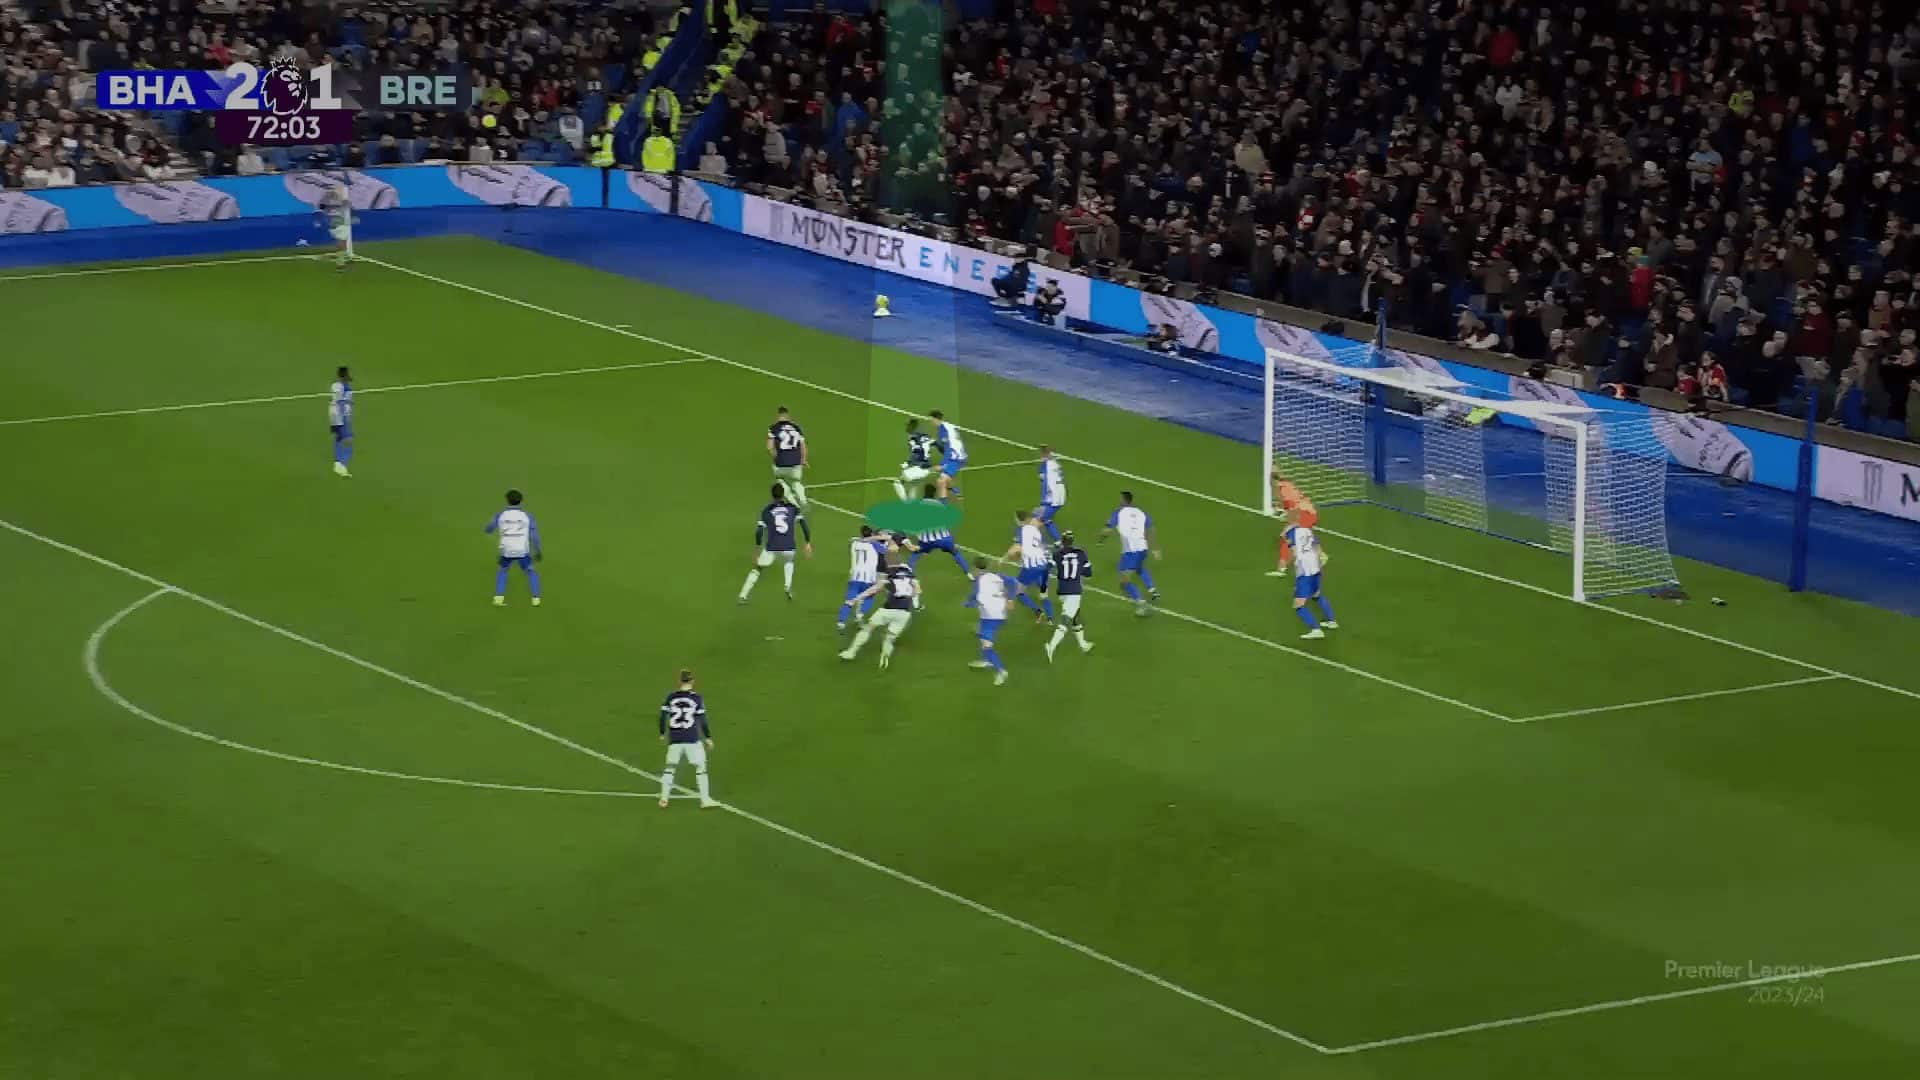
The second key element to sustaining pressure during attacking corner kicks is to prevent the goalkeeper from being able to claim the ball. Similar to the first element, the key is to use screens on the goalkeeper to force him to remain on the line. Attackers must be able to get close to the goalkeeper, where they can then use the wing span of their arms and legs to set up a wide wall, which makes it impossible for goalkeepers to get around, as seen in the example below. When this sort of screen is set, the goalie cannot step off their line, meaning that the only area they are in complete control of is the goal line, allowing attacking sides to enter the six-yard box without the threat of a goalkeeper claiming the cross.
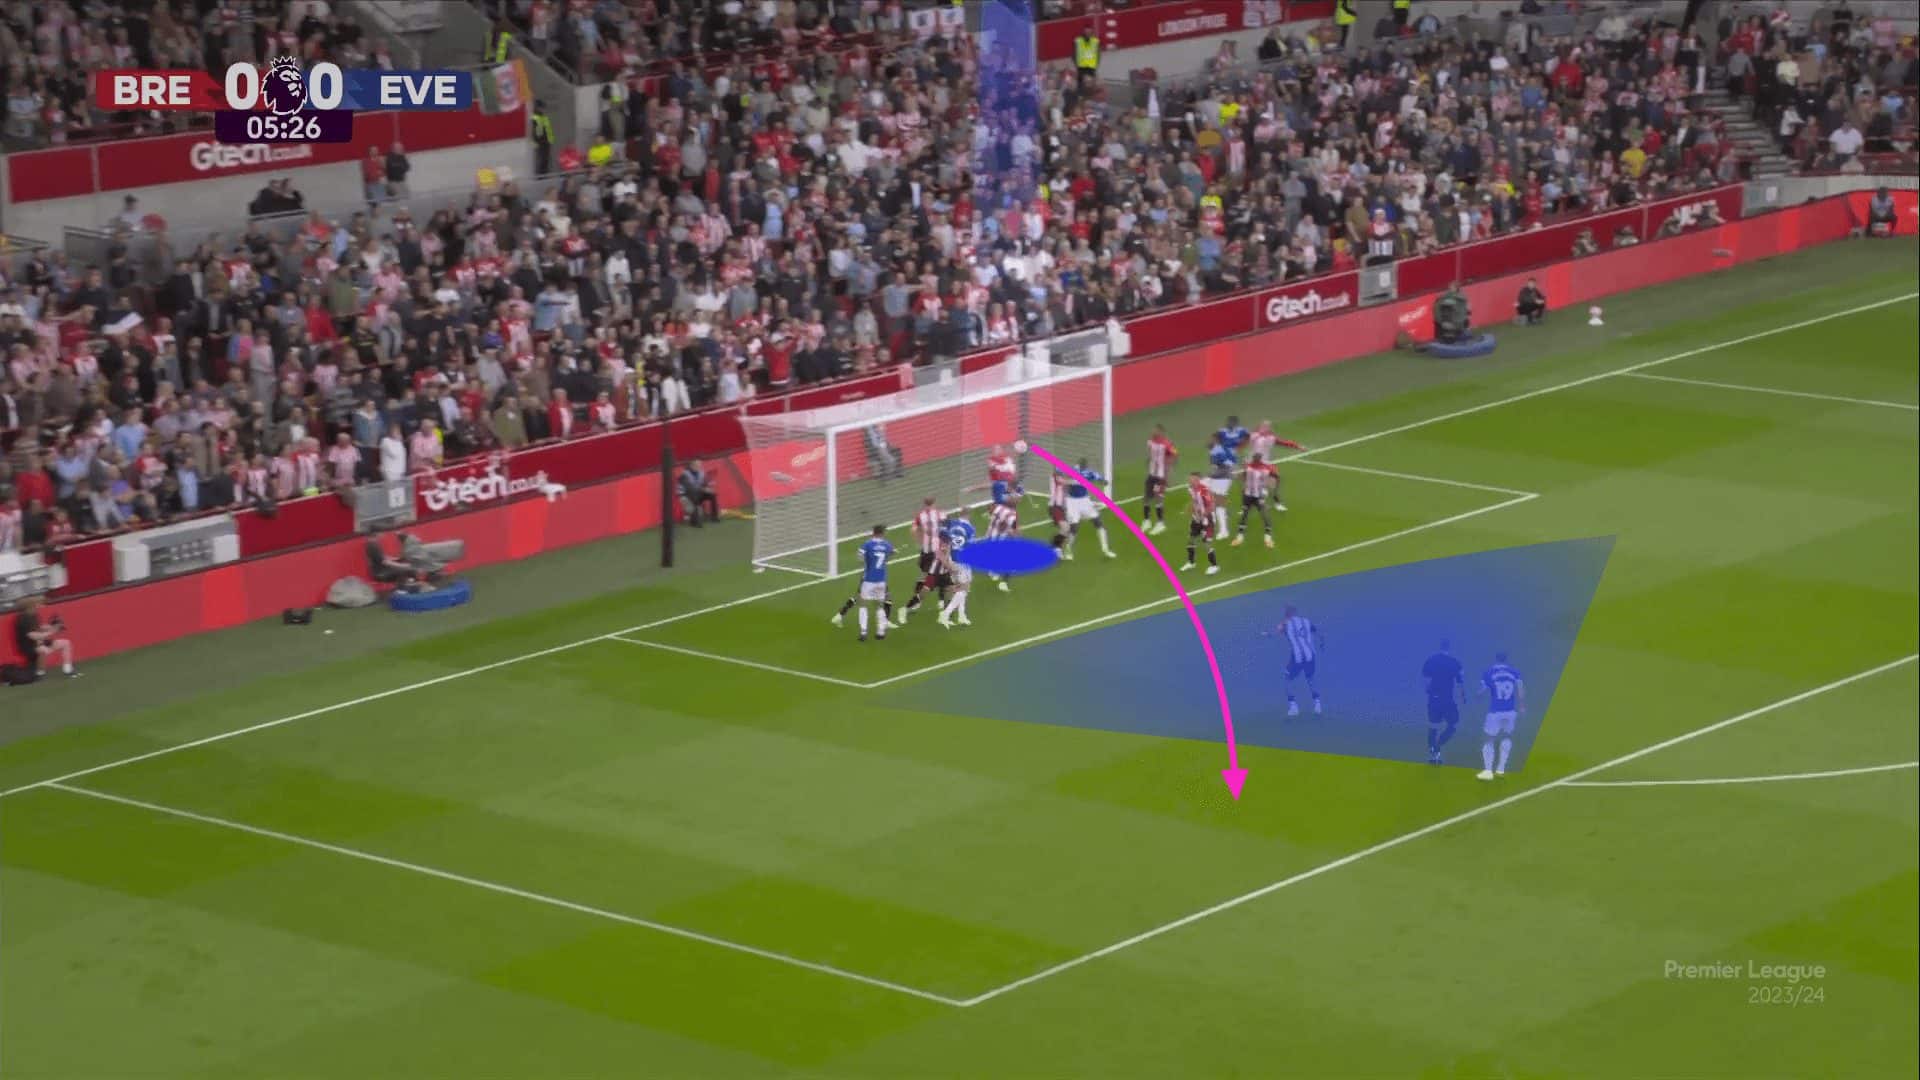
This also means that if a ball does get fairly close to the goalkeeper, they cannot step up to claim it but can only throw their arms towards the ball, which often results in keepers having to punch the ball. The punch is a better option than trying to catch it, but not being sure, as spilling the cross could mean the ball drops right in front of the goal. In the example below, we can see that Everton have a player inside the penalty area who is ready to pounce on any loose balls inside the box, or on the player who could potentially receive it.
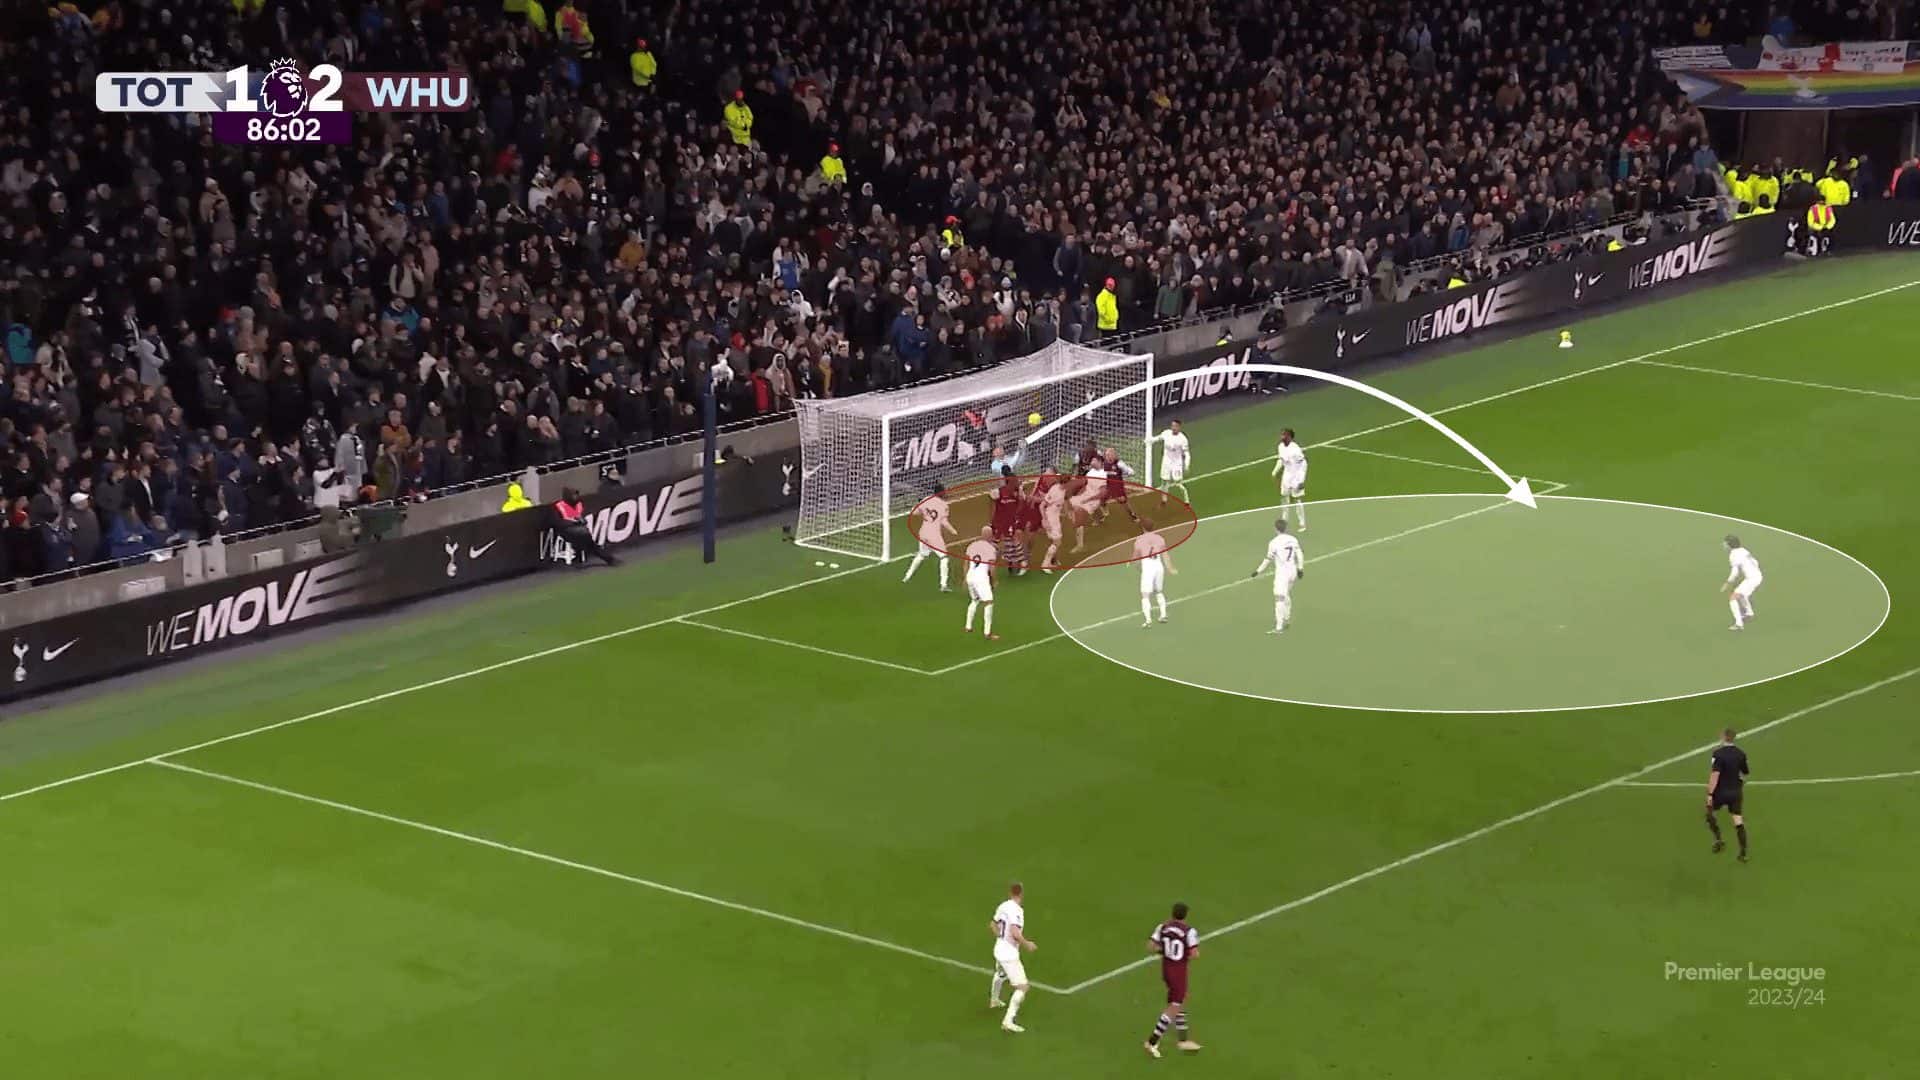
Another form of blocking the goalkeeper is by forming a hoard around him. However, the issue shown in the example below is that fewer players can collect any loose ball should the goalkeeper manage to clear it. In these situations, the lack of presence in the box, outside the six-yard box, leaves West Ham extremely vulnerable to a Tottenham counterattack. It is clear that one screen should be satisfactory to block the goalie, so putting all your eggs in one basket can lead to other parts of the game being neglected, such as second-phase control and the ability to sustain pressure.
Rest Defence Roles & Responsibilities
The most complete attacking sides, in relation to controlling the second phase and sustaining pressure, use a three-man rest defence structure. With this system, the three players combined have full control of the whole area around the box, so any headed clearance or punch from the goalkeeper will land in one of their zones. As mentioned earlier, with adequate safety measures taken to prevent the opposition from regaining the ball instantly, the three players have nothing to worry about behind their backs and can focus on being the first to reach any other forms of clearance.
During the second phase chances, there are six attackers inside the box and two on the edge near the box, meaning that there are eight potential players who can attempt to react to any loose balls. If any cross is overhit and the ball misses everyone, the far-side rest defender can follow the ball up and attempt to keep the attack alive.
It is important to have three players in the rest defence for the following reasons: firstly, each of the three channels inside the width of the area can be covered. A two-man pairing could leave big gaps where not all the space can be covered. In addition, a two-man rest defence can make it harder for the ball to be kept in the final third, but this point will be expanded on later in the article.

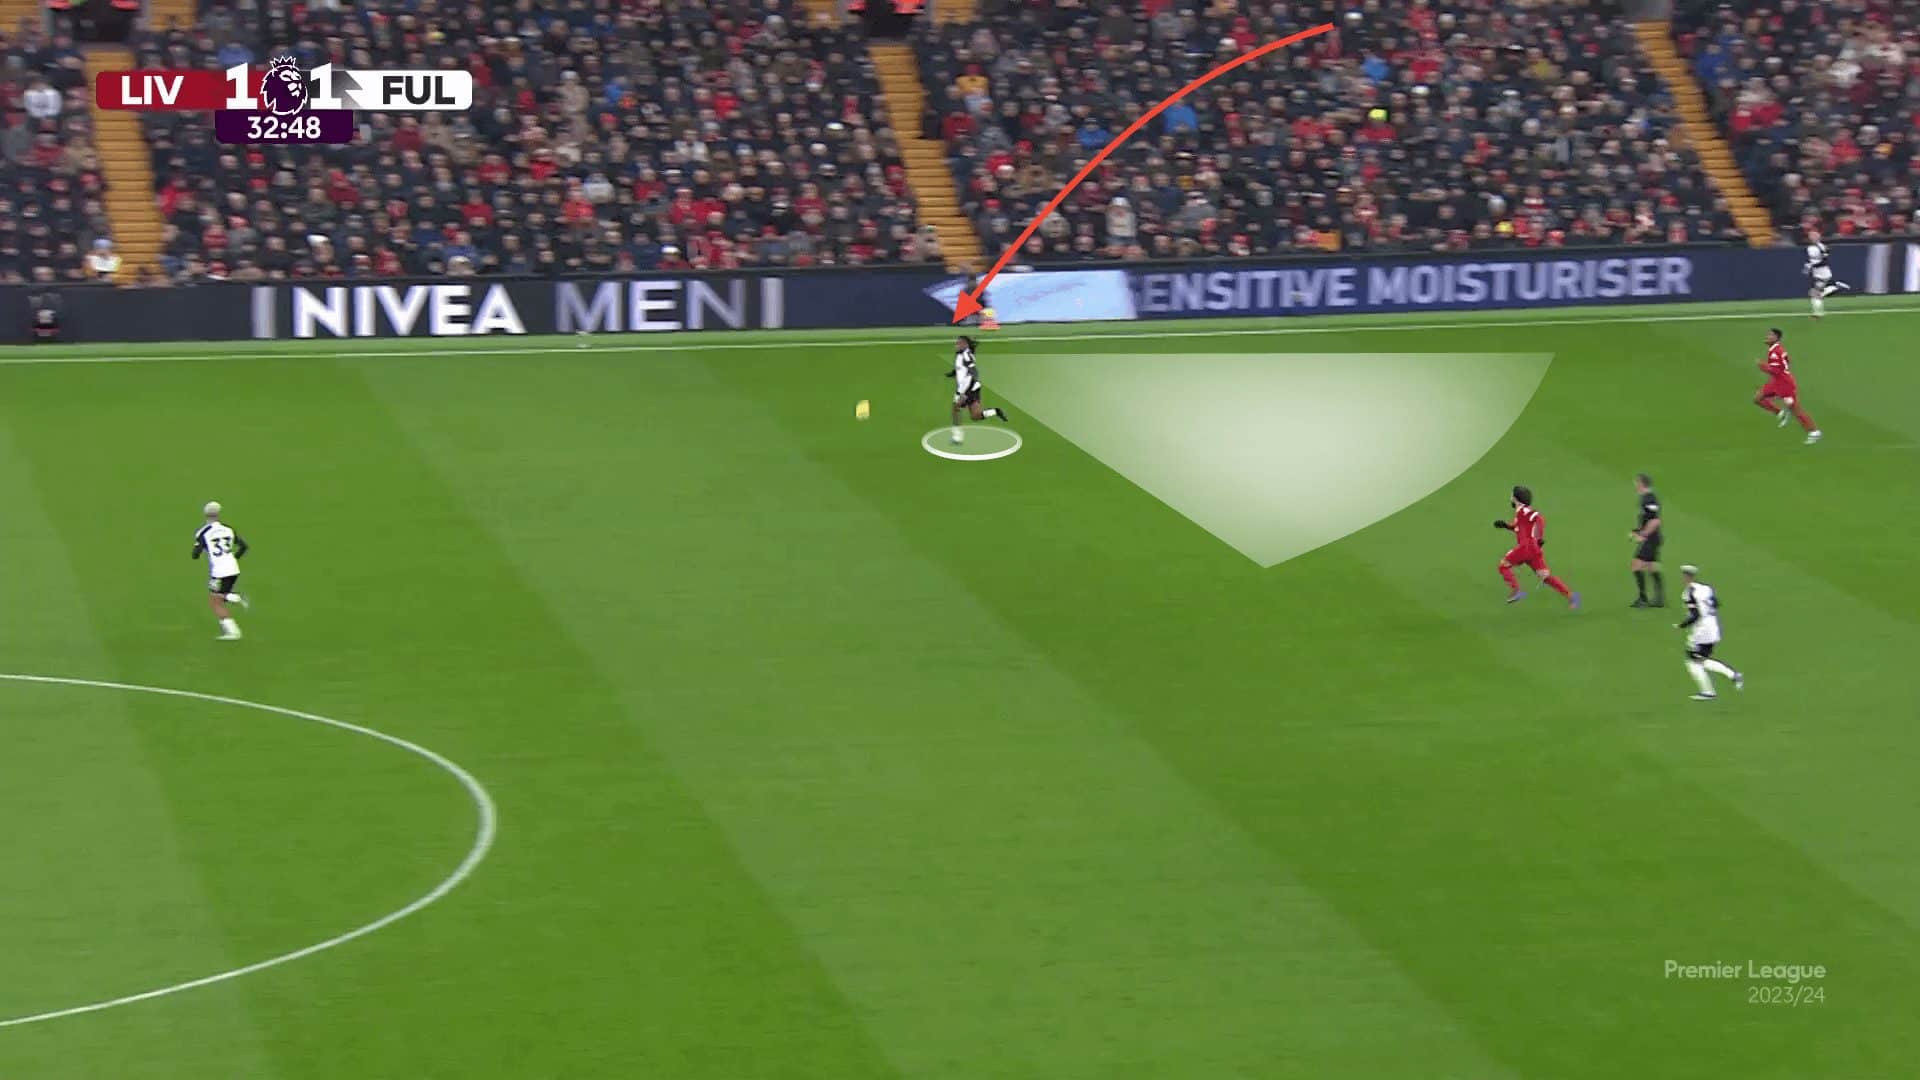
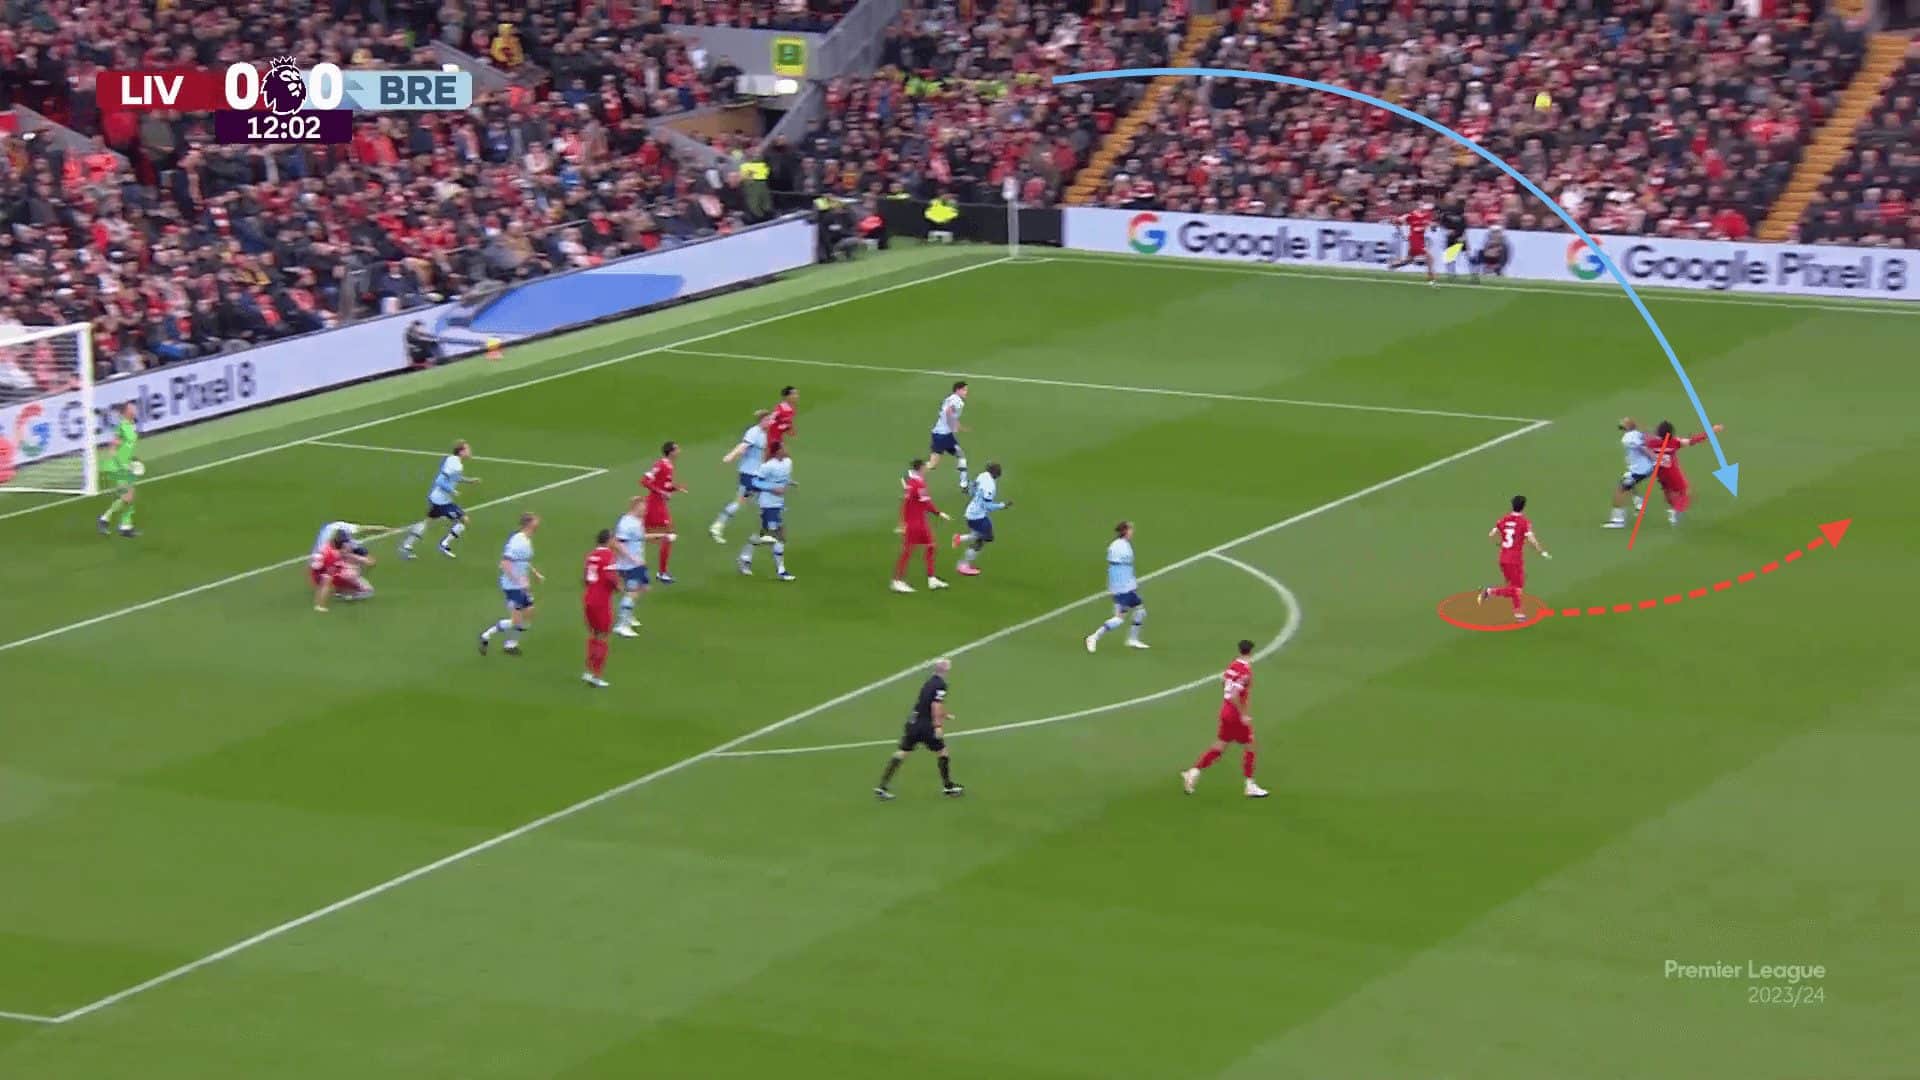
In the worst-case scenario of a headed clearance being attacked by a defender with a run at the ball, the maximal distance the header could reach would still be within reach of the rest defence. As we can see below, the cross goes behind every attacker, meaning the defender can clear it without a problem.
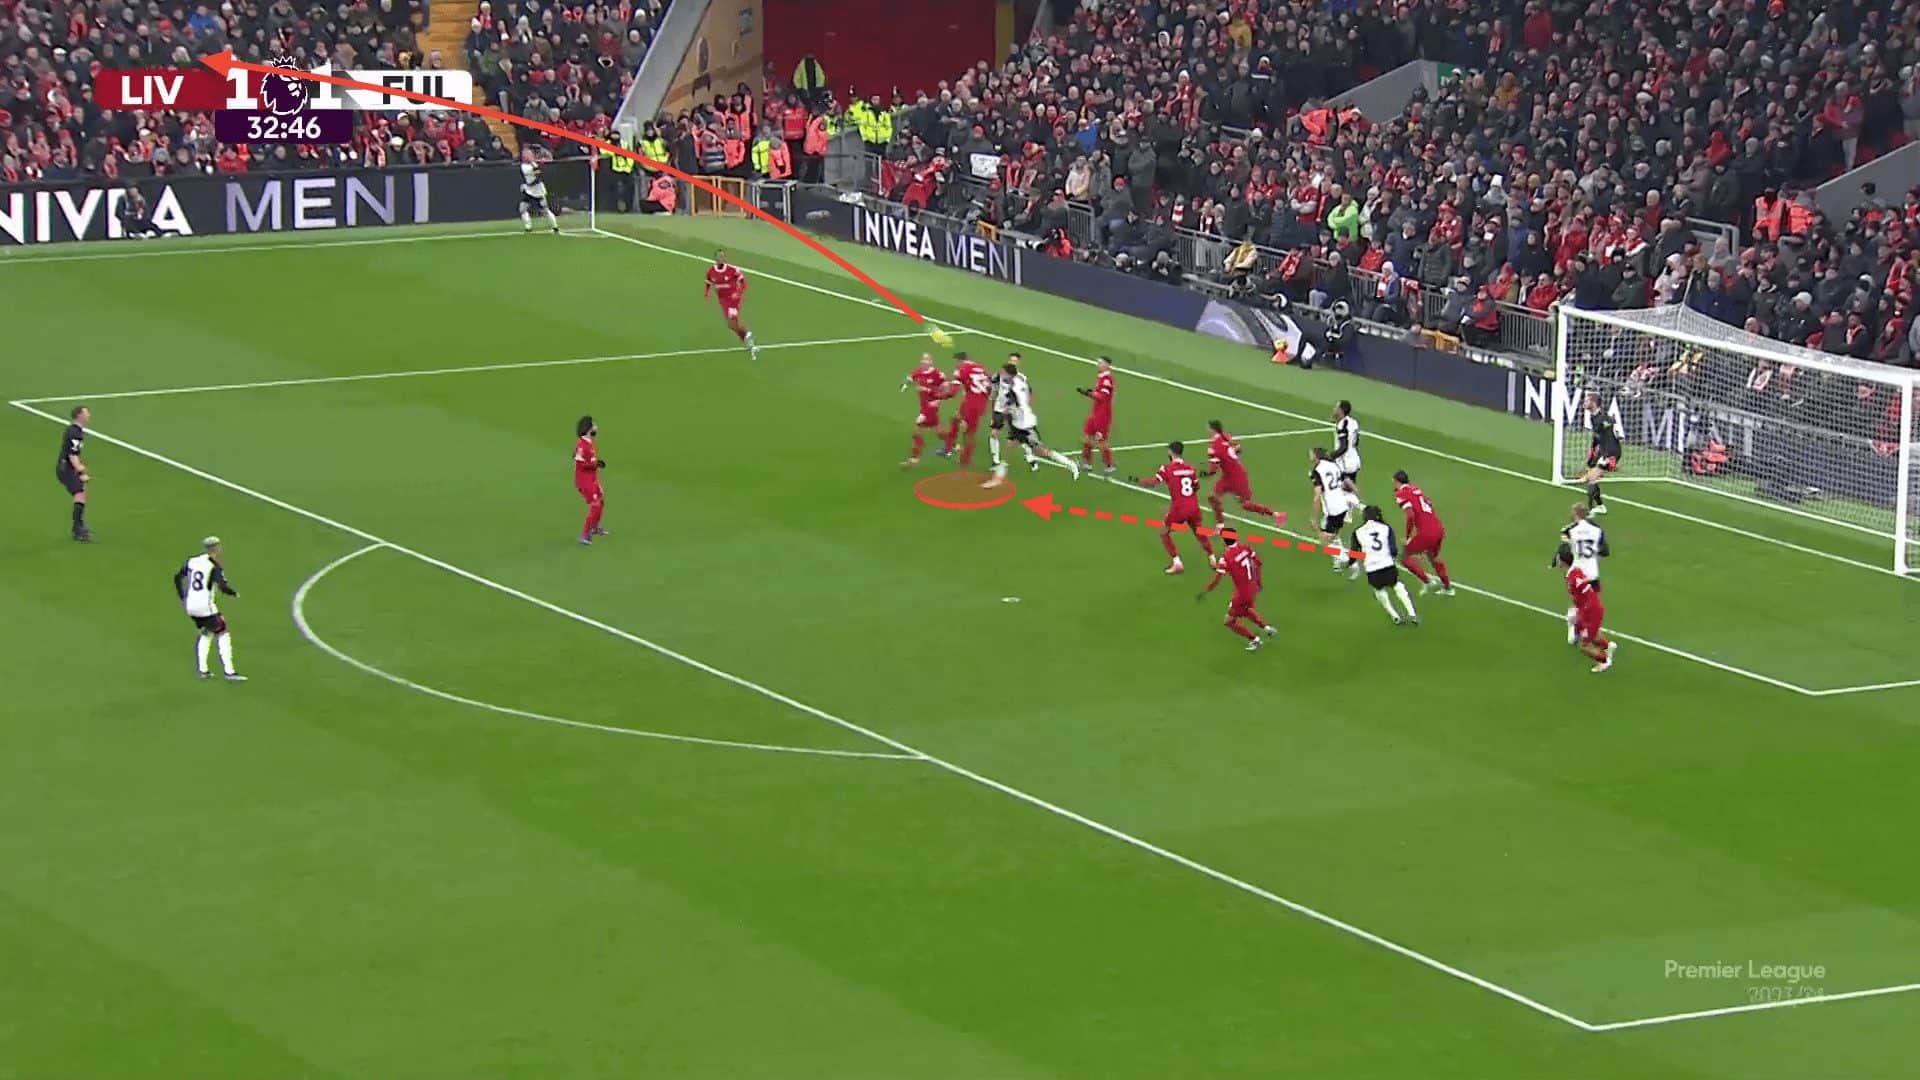
However, the ball still only reaches the edge of the final third, meaning that Fulham, in this case, can instantly control the ball, face forward again, and continue to attack the goal. The headed clearance, whilst being practical for Liverpool, still only gives them a couple of seconds before Iwobi controls the ball and is ready to turn and face the goal again. This means that the best-headed clearance only gives 2-3 seconds for the defending sides to step up from the box, meaning that they can’t get too far away, meaning the attacking side is still able to sustain pressure in the final third following a corner kick.
As mentioned earlier, having three players in a rest defence structure is critical to being able to sustain attacks for one primary reason. Imagine the width of the penalty area is split into three equal lanes, where each defender is positioned in each one whilst being near the one beside them. This means that one defender can instantly enter his teammate’s lane at any moment to help them regain the ball following a clearance. The ability to create those 2v1s is vital to sustaining pressure. In the example below, one player can prevent the attacker from reaching the ball’s path (Salah), whilst a second teammate can quickly come in and control the ball as it lands (Endo) before facing the goal and crossing the ball back in, therefore sustaining pressure.
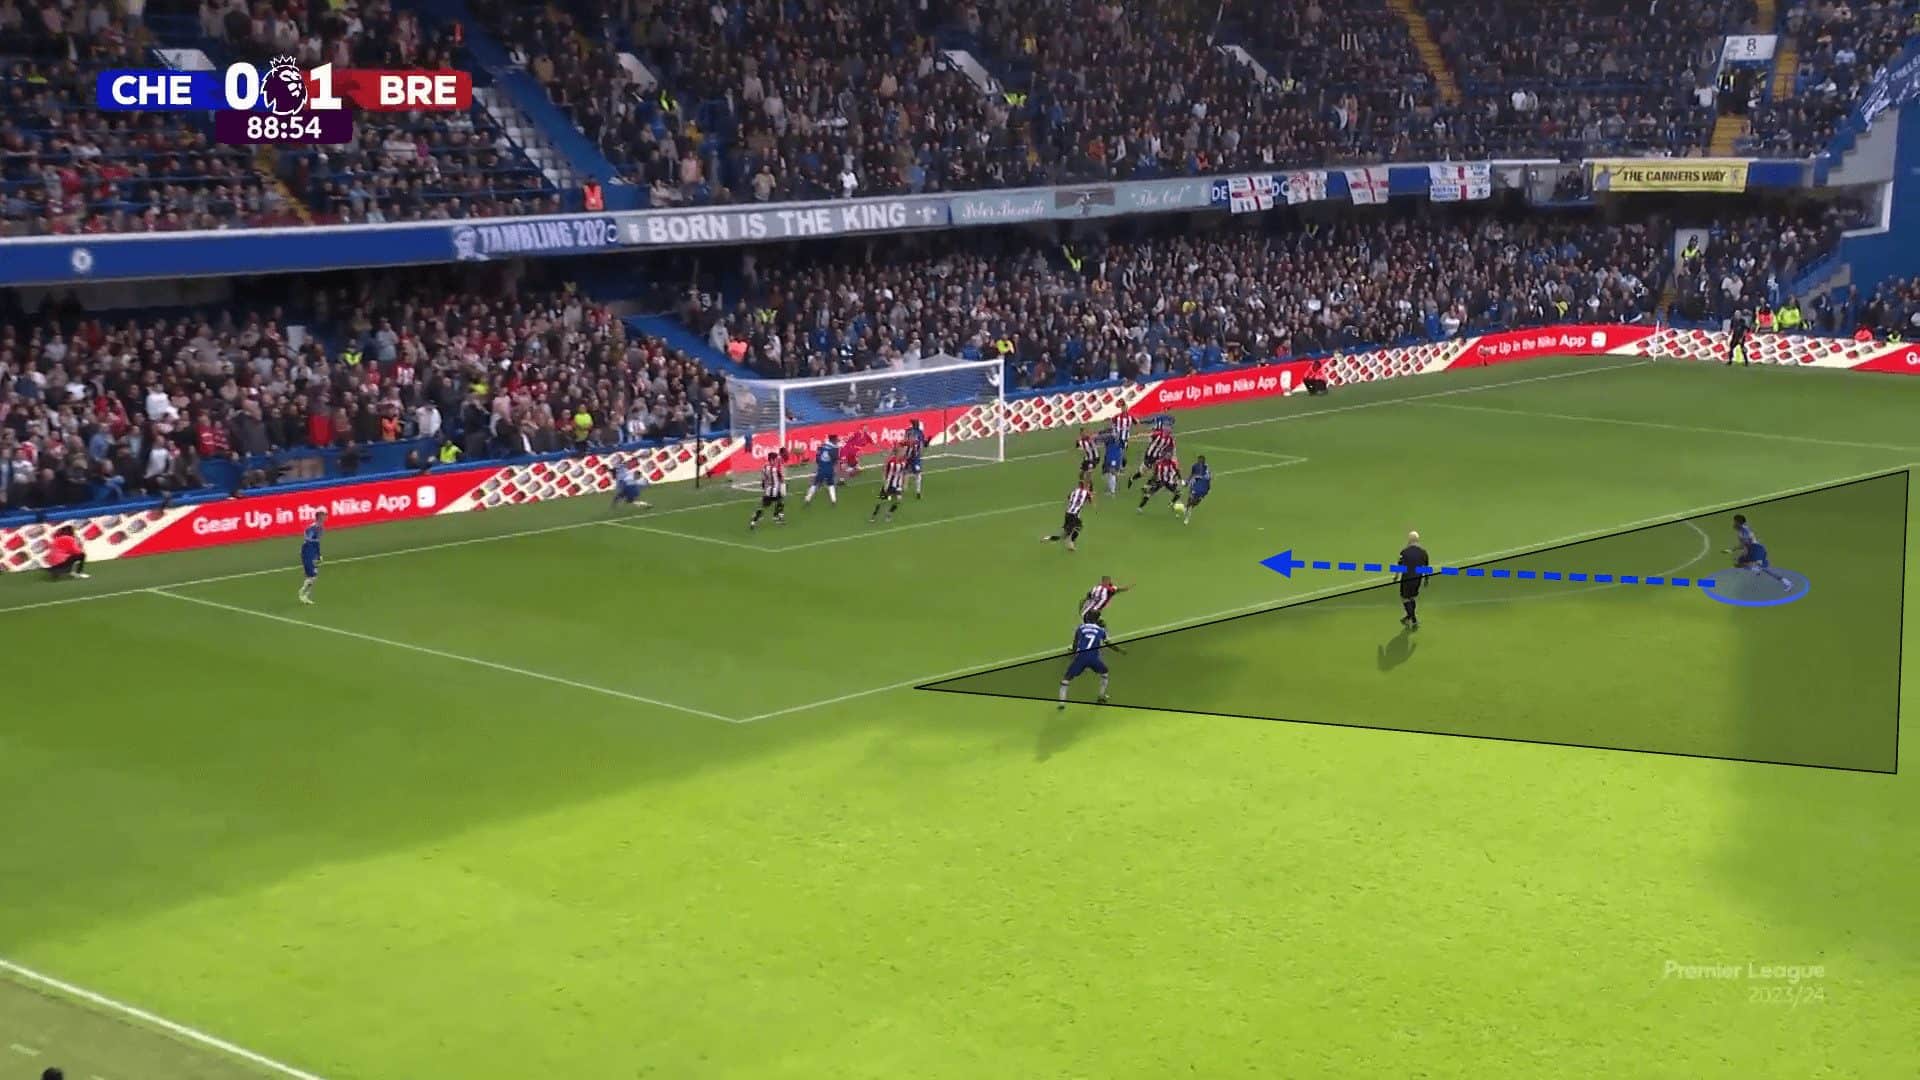
When there are only two players in the rest defence structure like the one below, the nearest defender has to attempt to regain the ball. In this case, it is Cole Palmer for Chelsea, whilst his other defender in the pairing is stuck by the other corner of the area, where he is too far away to come and support Palmer. This means that Palmer has to attempt to win the physical battle with his opponent while also attempting to regain control of the ball. Focusing on both simultaneously already causes him problems as he cannot execute either action to his maximum potential.
Even if Palmer does successfully regain the ball, he will have a defender on his back, making it difficult to sustain pressure by keeping the ball in the final third. He would have to focus on securing possession by giving it back to the goalkeeper, giving Blackburn the time they need to step up and away from the box. Had there been an extra player outside the box, that player could focus on getting into the Blackburn player’s path, while Palmer could then focus on controlling the ball and finding a free player inside or around the box.

Below, we can see another example of how a two-man rest defence pairing can be extremely costly. In this case, the middle and left lanes are covered by Chelsea, but when the player highlighted leaves his middle lane to compete for the ball, there is no one left in the middle and right lanes outside the box. The ball eventually gets cleared to the right lane, where Raheem Sterling has to try to cover by moving across the width of the penalty area whilst also moving back to goal. The distances to cover are too large for a two-man pairing, showing the need for a three-man rest defence from corner kicks.
The profile of players in the rest defence is as important as the tactical reasoning behind the positioning and number of defenders. The players outside the box must be physically capable of covering large distances if, in the worst-case scenario, an attacker manages to pick up a loose ball and drive towards the goal. It is equally important for that player to be adept defensively and know when to dive in and delay the attack. The mental profile of the players is also vital, as those players must have the right decision-making to understand when the right moment to step up or drop off is, whilst also being concentrated enough on the ball to react instantly to changes in the situation. I believe this profile is most important for the central player in the rest defence structure, who is responsible for covering both players on either side of him, whilst the two wider players should have a creative element to their game to be a threat during those second phase opportunities.
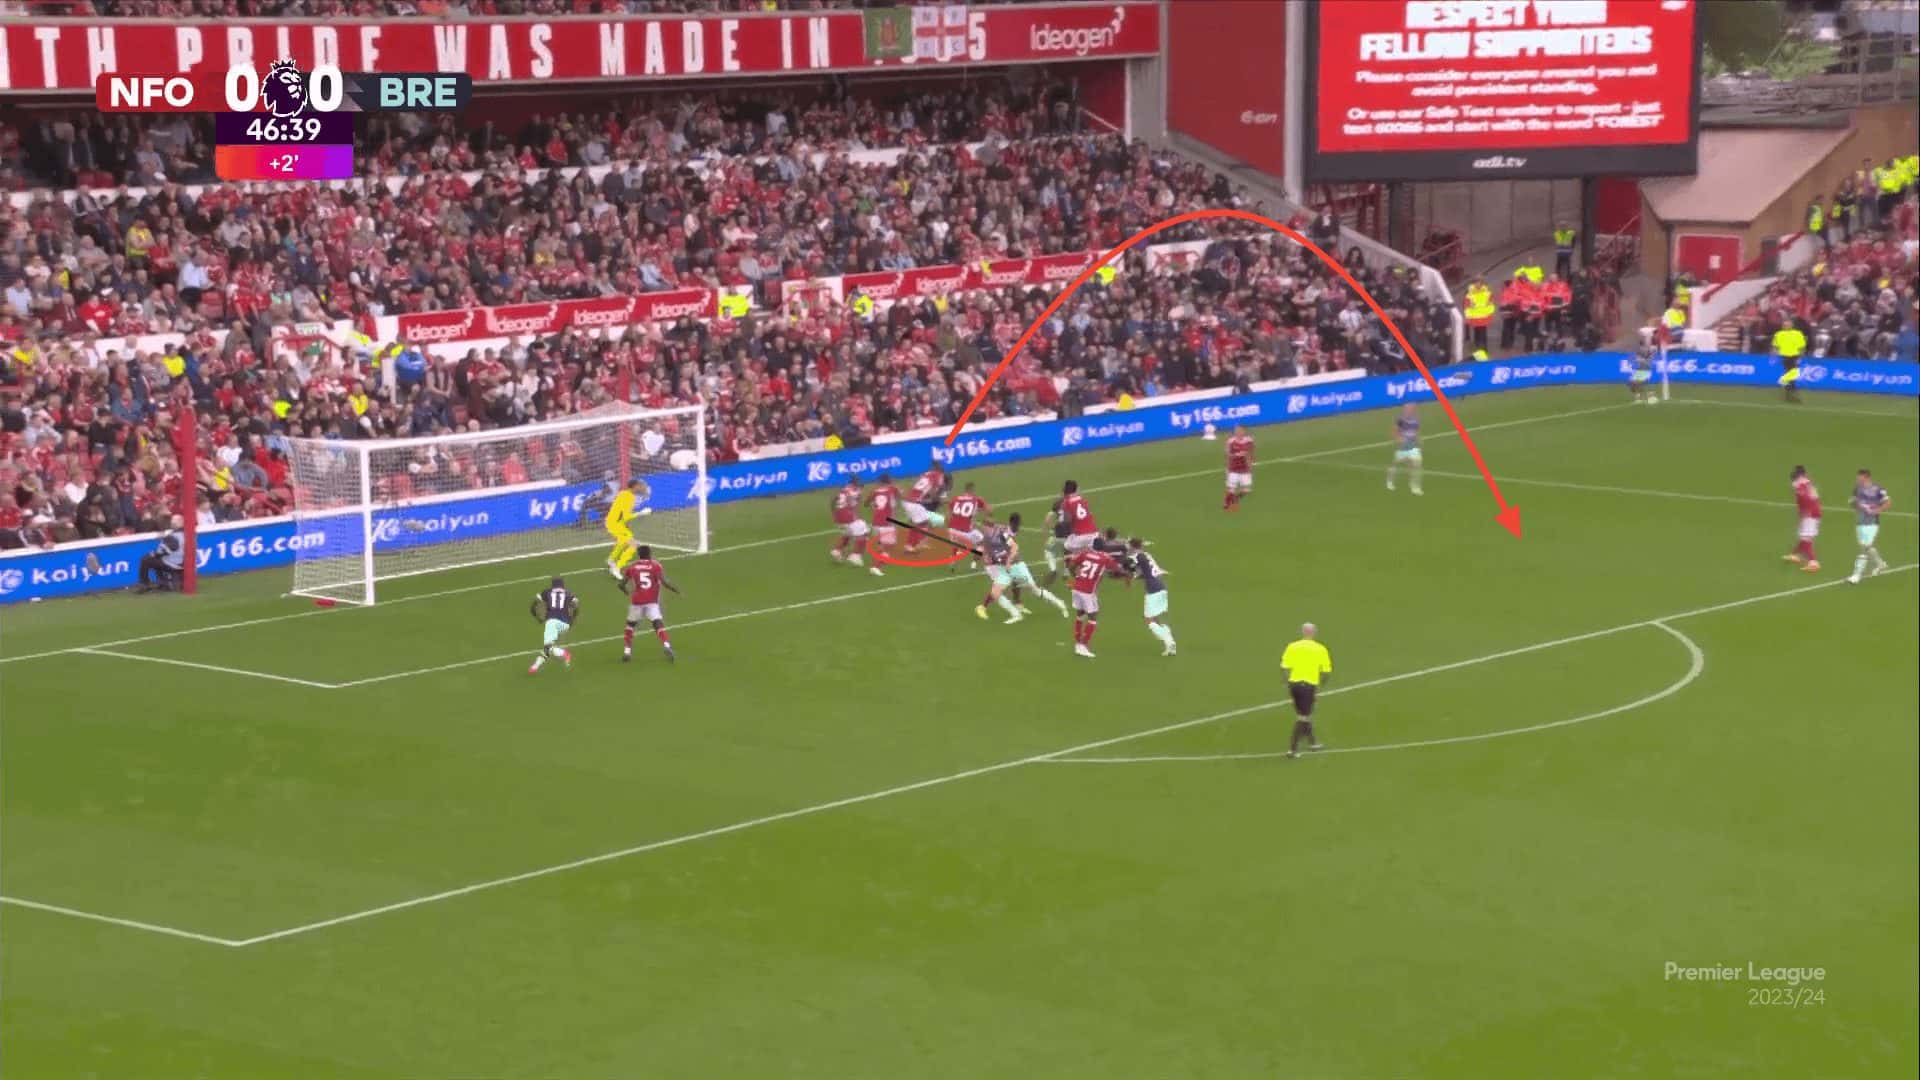
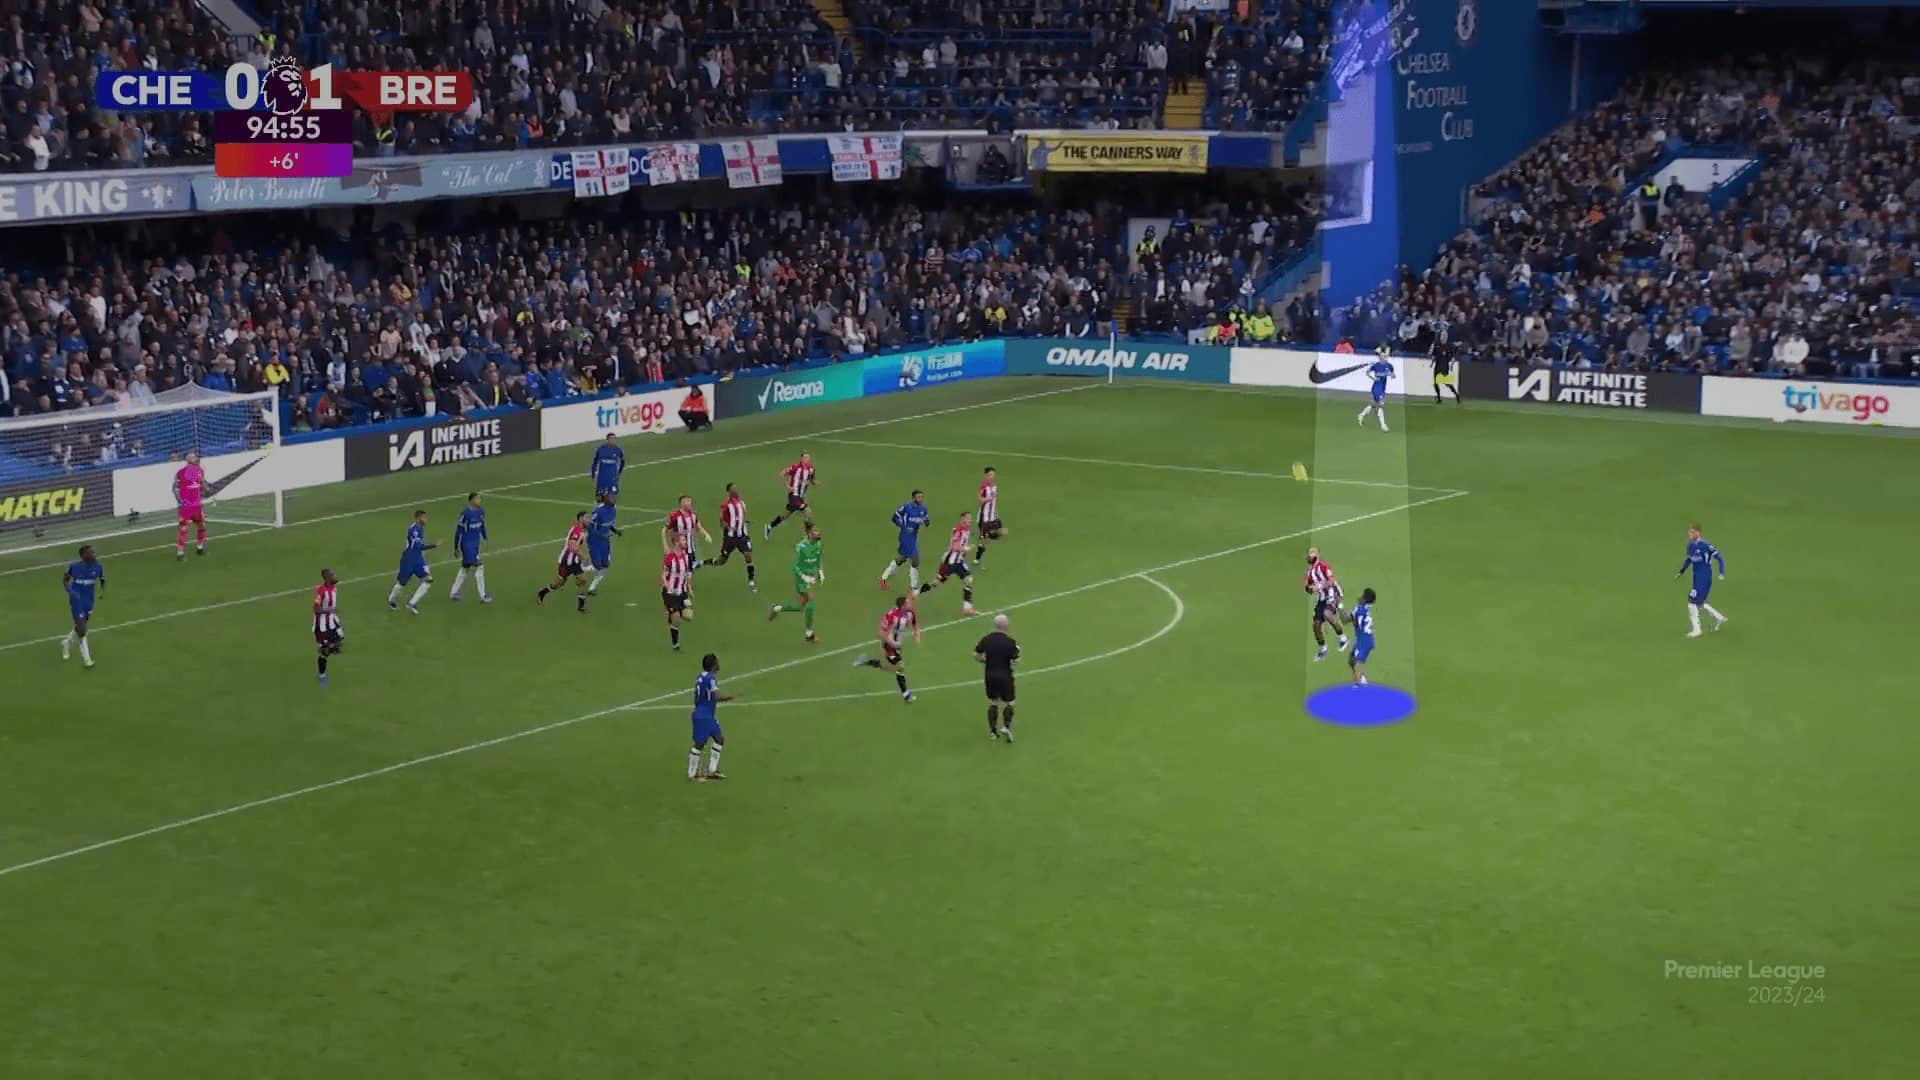
In the example below, the wrong decision in when to compete for the ball or not has resulted in the last defender being taken completely out of the game after losing an aerial duel, leading to a goal conceded, although this was in extreme circumstances.
Summary
This tactical analysis has detailed the different ways in which a side can sustain pressure following attacking corners, even if there are faulty parts during the lead-up to the corner being taken. With certain positions being targeted with screens, attacking sides can keep the ball in the final third more consistently. With that security that a counterattack is challenging to achieve, attacking sides have the possibility to use a higher number of players to attack the box, where more creative routines can be formed.
Two screens can be enough to prevent the ball from leaving the final third, whilst the careful positioning of rest defences can allow teams to funnel the ball back into the box following headed clearances or any overhit crosses which miss every player. Furthermore, with more attackers in the box, the attacking side increases their chances of winning the loose balls during the second phase of corner kicks, thus having the possibility to sustain attacks, no matter how a defending side deals with an attacking corner. This means that teams without as much aerial threat can consistently create chances following corners, through tactical movements and carefully planned positioning.