The return of Frauen-Bundesliga brought us a kickstart back to action, with a tense match between Bayern Munich and Hoffenheim. On a larger scale, this match represents a decisive battle for the second UEFA Champions League slot in the league with both teams seeking to enter the competition against European rivals such as Chelsea and Manchester City. Through analysis, we found that Hoffenheim brought interesting positional play tactics to the pitch. We also found that Bayern had a clear match-plan to attack a potential weak-link in the Hoffenheim structure. This tactical analysis will look at exactly how it happened.
Lineups
Bayern Munich (4-4-2): Benkarth, Hendrich, Wenninger, Demann, Schweers, Lohmann, Magull, Gwinn, Dallmann, Simon, Islacker.
TSG 1899 Hoffenheim (3-4-1-2): Leitzig, Specht, Wienroither, Naschenweng, Krumbiegel, Dongus, Lattwein, Pankratz, Waßmuth, Billa, Rall.
Hoffenheim: attacking structure
Although Hoffenheim lined up in a 3-4-1-2, the formation morphed dramatically when entering the attacking phase. When gaining possession, Hoffenheim liked to spread their centre-backs into the central channel and adjoining halfspaces. This, paired with a single midfielder dropping into the central channel, allowed the visitors to create a diamond shape in the centre of the pitch.
As this shape was created, the wingbacks pushed high up the pitch almost to the offside line. This allowed Hoffenheim to have six attackers in the attacking and midfield lines while retaining a diamond four at the back to resist potential counter-attacks.
Below we see a moment early in the match in which the Hoffenheim centrebacks have occupied the central channel and halfspaces. The central midfielder who dropped in to form the top of the diamond tended to change in each phase of possession. This rotation of midfield players helped to render any Bayern player to player marking schemes as useless.

As the base attacking diamond was set up, the six attacking players would alternately drop or advance into space with the aim of creating movement and disorganization in the Bayern defensive block. These movements were typically vertically based with a high player dropping and a low player pushing towards the offside line.
These movements were done often with the effect of pulling Bayern players out of their positions and creating space to exploit. While the Hoffenheim diamond base retained possession, they could be seen scanning up field searching for space to place the ball.
The centrebacks would often release the ball forward in front of the Bayern defensive line to a dropping forward or into space behind to an attacker making a penetrating run.
A majority of the balls played forward occurred in the flank or halfspace. As the ball travelled forward, the far side centre midfielder would tuck across the field to offer themselves as a passing option. This movement also laid the positional foundation for a successful counter-press.

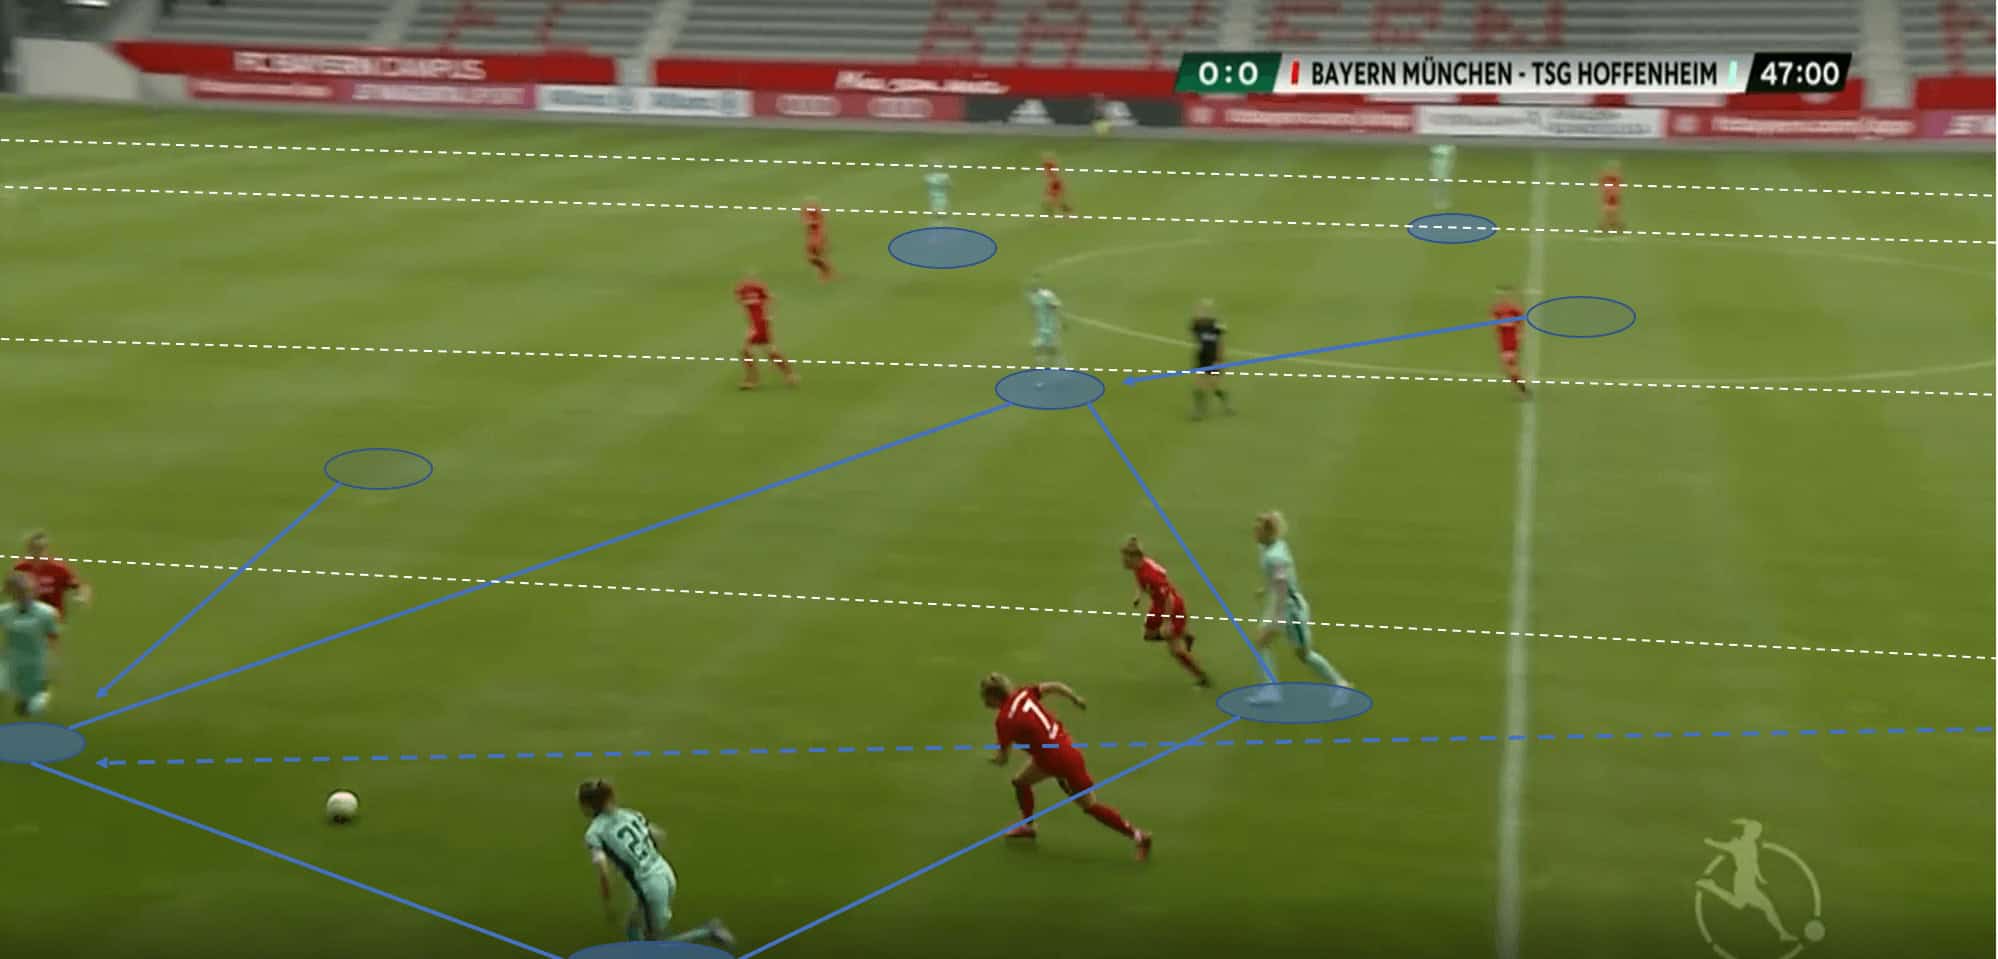
Below we see a moment in which Hoffenheim have advanced the ball up the left flank to the wingback who is making a run into space. As the ball travels forward, the nearby forward and centre midfielder arrive to provide options for lay-offs.
Notice that the far-side central midfielder has drifted across the left halfspace to provide support as well. The far side forward and wingback remain in their positions to occupy their markers and provide width in attack.
Hoffenheim used this rigid base diamond along with a fluid front six to attack and harass the Bayern defensive block. This tactic proved to be fairly effective throughout the match, although Hoffenheim seemed to lack a clinical finish to translate the tactic to the scoreboard.
Bayern: attacking the wingbacks
Bayern entered the match with a particular attacking avenue in mind: the space behind the Hoffenheim wing-backs. Hoffenheim’s attacking tactical format put much emphasis on their wingbacks pushing high in attack. This did work for Hoffenheim, but it also left a large window of opportunity for Bayern attacks.
Bayern were able to do take advantage of the space left behind by the Hoffenheim wingbacks by moving the ball into those spaces quickly in transition. In bouts of longer possession, Bayern would also target the wingback position by patiently shifting the Hoffenheim block to one side to create an eventual 2v1 against the far side wingback.
Bayern primarily chose to target the left flank and Hoffenheim’s right wingback Paulina Krumbiegel. Krumbiegel is a bright prospect within Frauen Bundesliga, but she is still young (19 years old) and is known chiefly for her attacking qualities. Because of this, Bayern focused the crux of their attack on Krumbiegel’s position.

Upon Bayern receiving possession, attacker Mandy Islacker and defenders Carolin Simon and Verena Faißt would prioritize penetrating into the space left behind by Krumbiegel as quickly as possible. In the example below, we can see the ball is moved forward quickly and large attacking spaces are found. This is solely due to Hoffenheim being so aggressive in the positioning of their wingbacks.
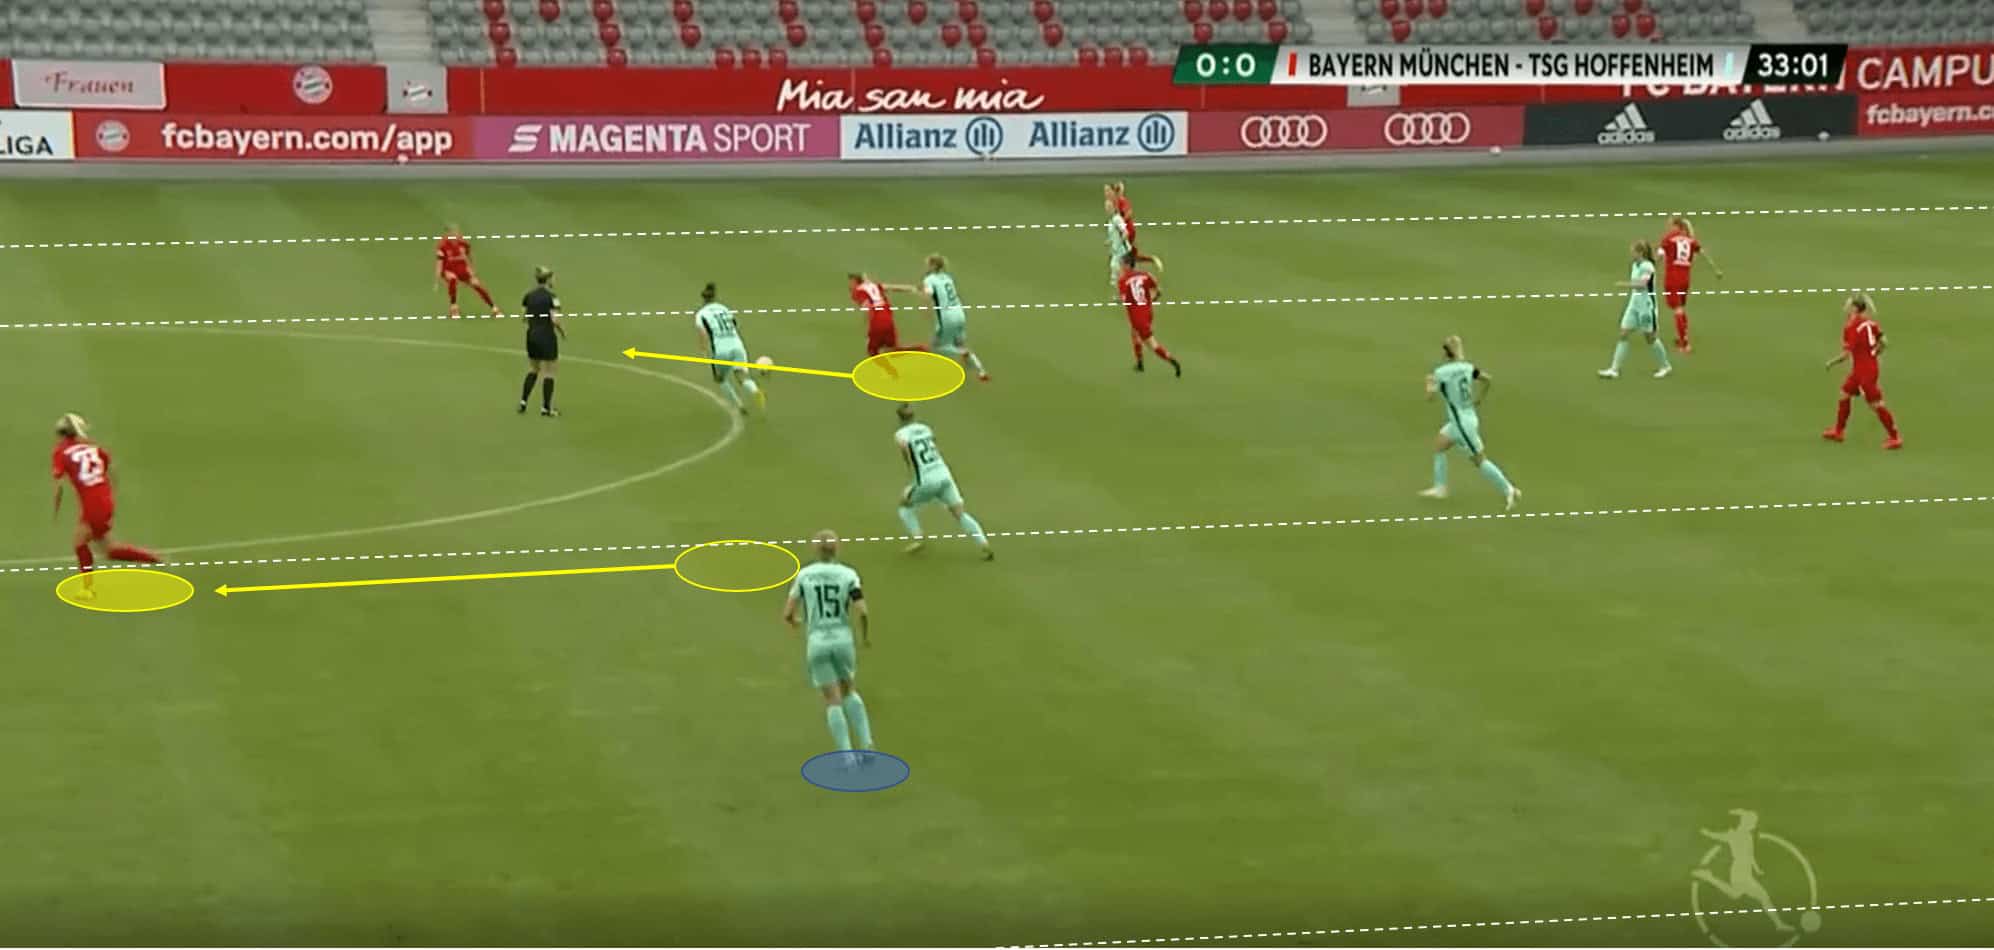
Bayern have won the ball in the central channel. Ball-winner Sydney Lohmann immediately penetrates forward and scans the left flank. As we can see in the picture above. Islacker is already moving into the space left behind Krumbiegel. While Islacker is in a full sprint, Krumbiegel is still flat-footed and ball-watching.
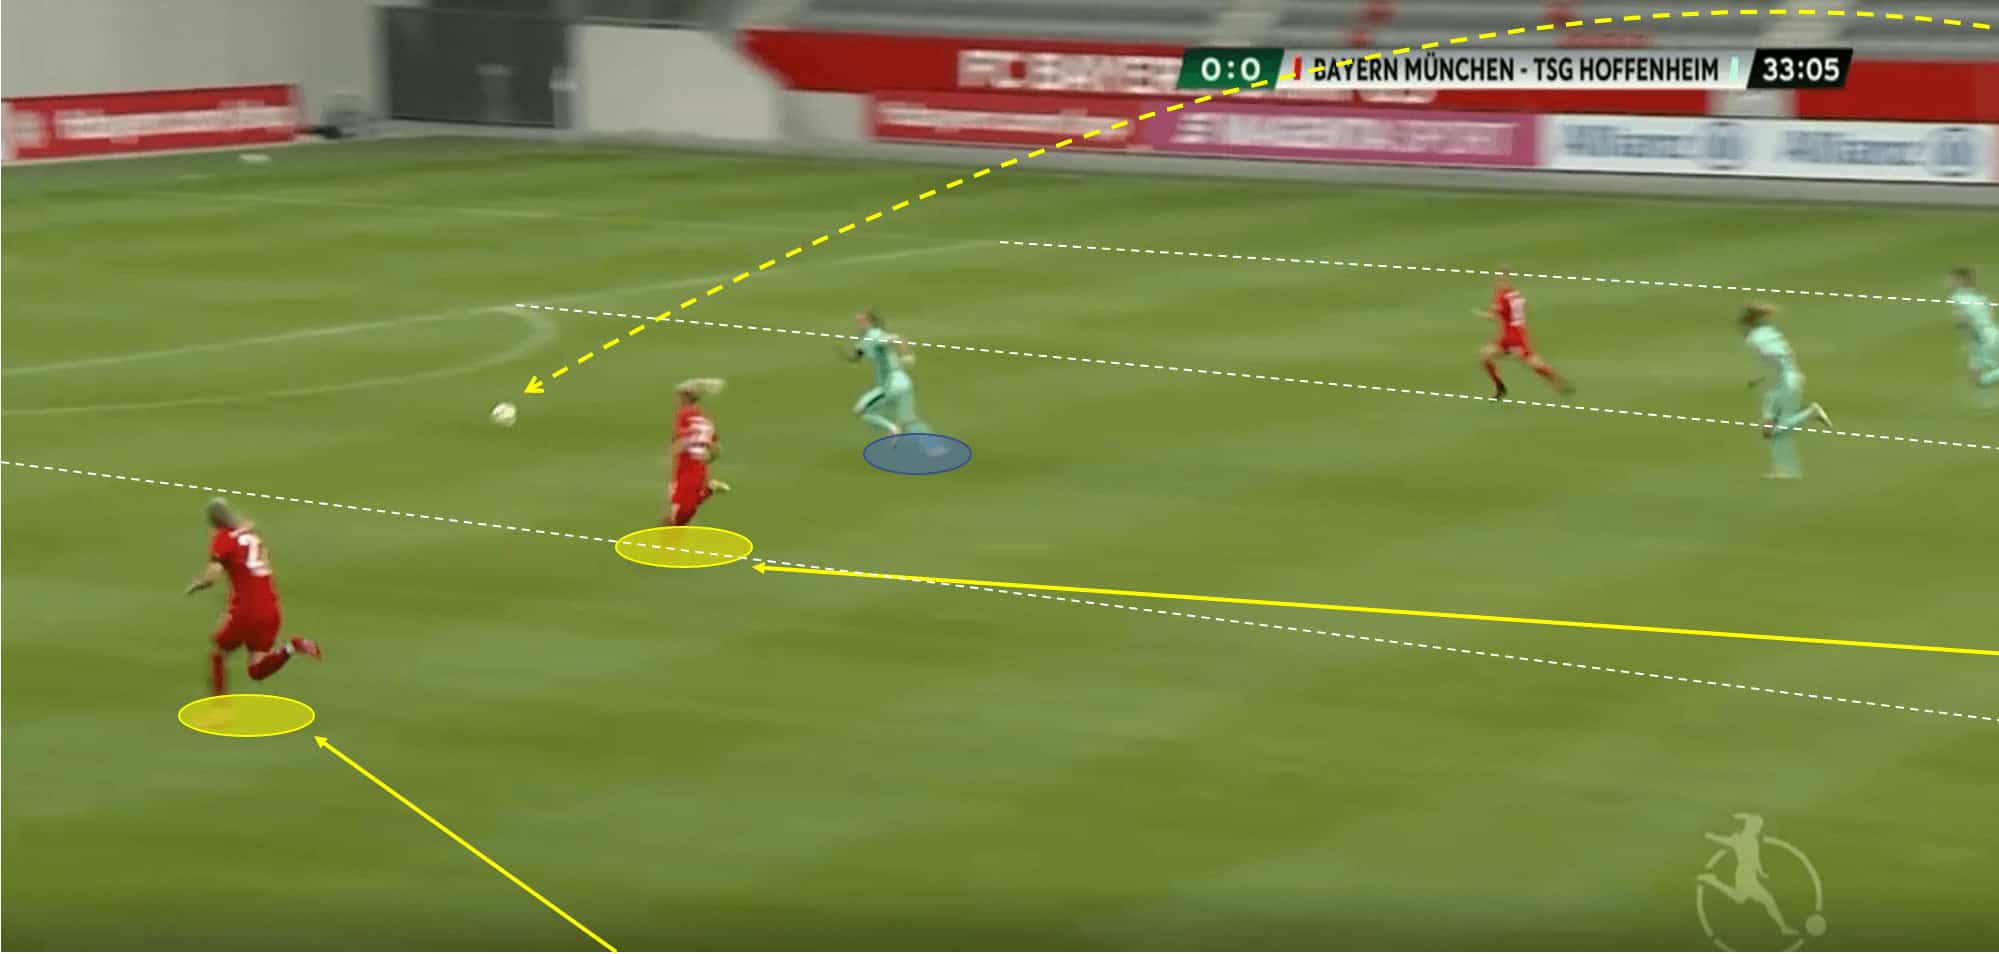
Lohmann launches a direct aerial ball forward to find both Islacker and Faißt almost completely free in the left halfspace. This quick transition gives Bayern a 3v1 situation against Hoffenheim’s lone centre-back. Unfortunately for Bayern, they are unable to convert the chance.
Attacking Krumbiegel was not only reserved for transitionary moments in the match. Bayern also focused on her in longer phases of possession as well. Below we see a moment in which Bayern have progressed play through the right flank. This has naturally drawn the Hoffenheim block to that side of the pitch and has subsequently left Krumbiegel as the lone Hoffenheim player in the left flank and halfspace.
Bayern quickly switch the point of attack by releasing a low and fast-paced pass to Linda Dallmann in the central channel. Dallmann receives across her body and quickly plays the ball into the 2v1 that has developed against Krumbiegel in the left halfspace.
Bayern used the route of attack throughout the match and were able to generate a fair amount of chances on goal. Unfortunately, Bayern were also unable to convert any of these chances.
Hoffenheim: pressing structure
Hoffenheim’s defensive structure also played a major factor throughout the match. The visitors stuck to their 3-4-1-2 formation when in a low or mid-block and sought to control the central areas of the pitch. When Bayern played to a flank the Hoffenheim unit shifted to the presence of the ball and smothered the attack.
Although, more often than not, Hoffenheim engaged in a high press. This was not to be unexpected, considering Hoffenheim recover the ball in the attacking third of the pitch for 18% of their recoveries (tied for second in the league). What is noteworthy is how efficient Hoffenheim were with their pressing tactic.
Pressing is clearly done by sending players forward to pressure and recover the ball. Many teams press by sending a number of players forward that equal the number of attacking players trying to progress the ball forward. The logic being that by marking each player in the area the team in possession will have difficulty progressing the ball. That being said, the sign of an more advanced pressing team is the ability to press the ball with fewer players than the opposition has in the relative area.
Hoffenheim were able to apply high levels of pressure on Bayern while using fewer players than Bayern had in the relative area. This allowed Hoffenheim to effectively press without losing an overload in the defensive and midfield lines. This was done through positioning pressing players to have access to not just one, but two Bayern players and to engage in the use of cover shadows to remove passing options.
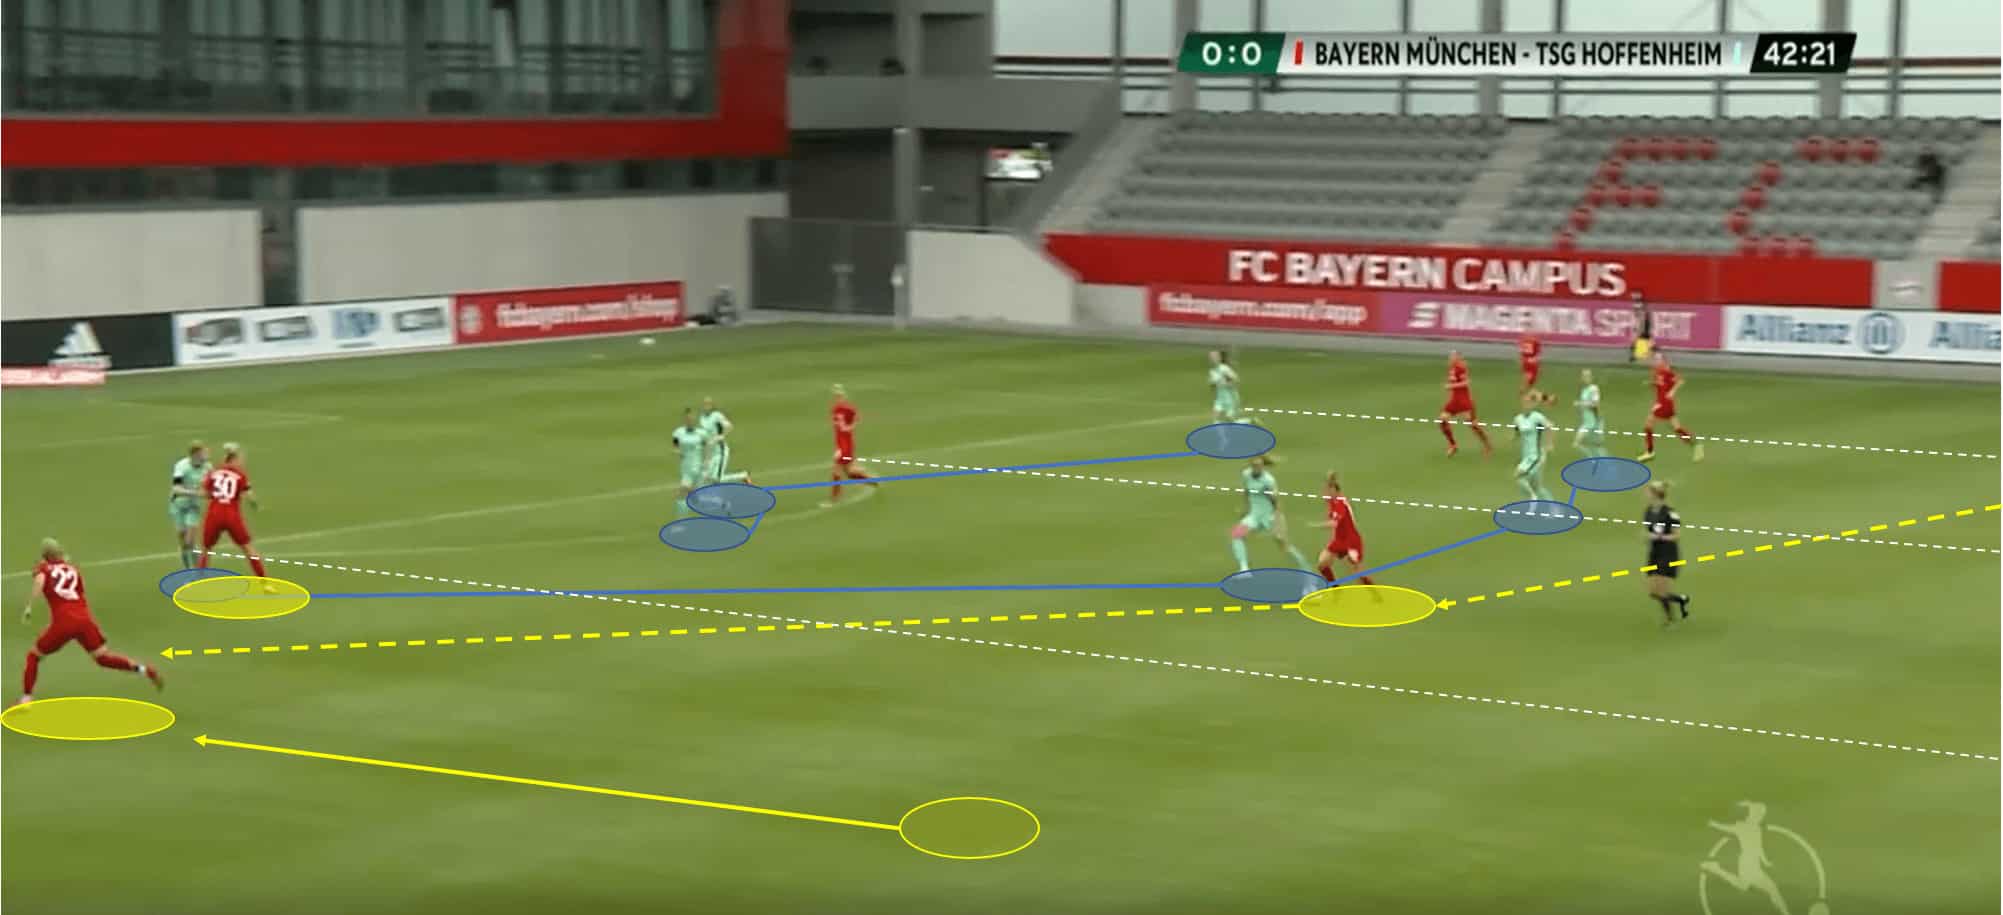
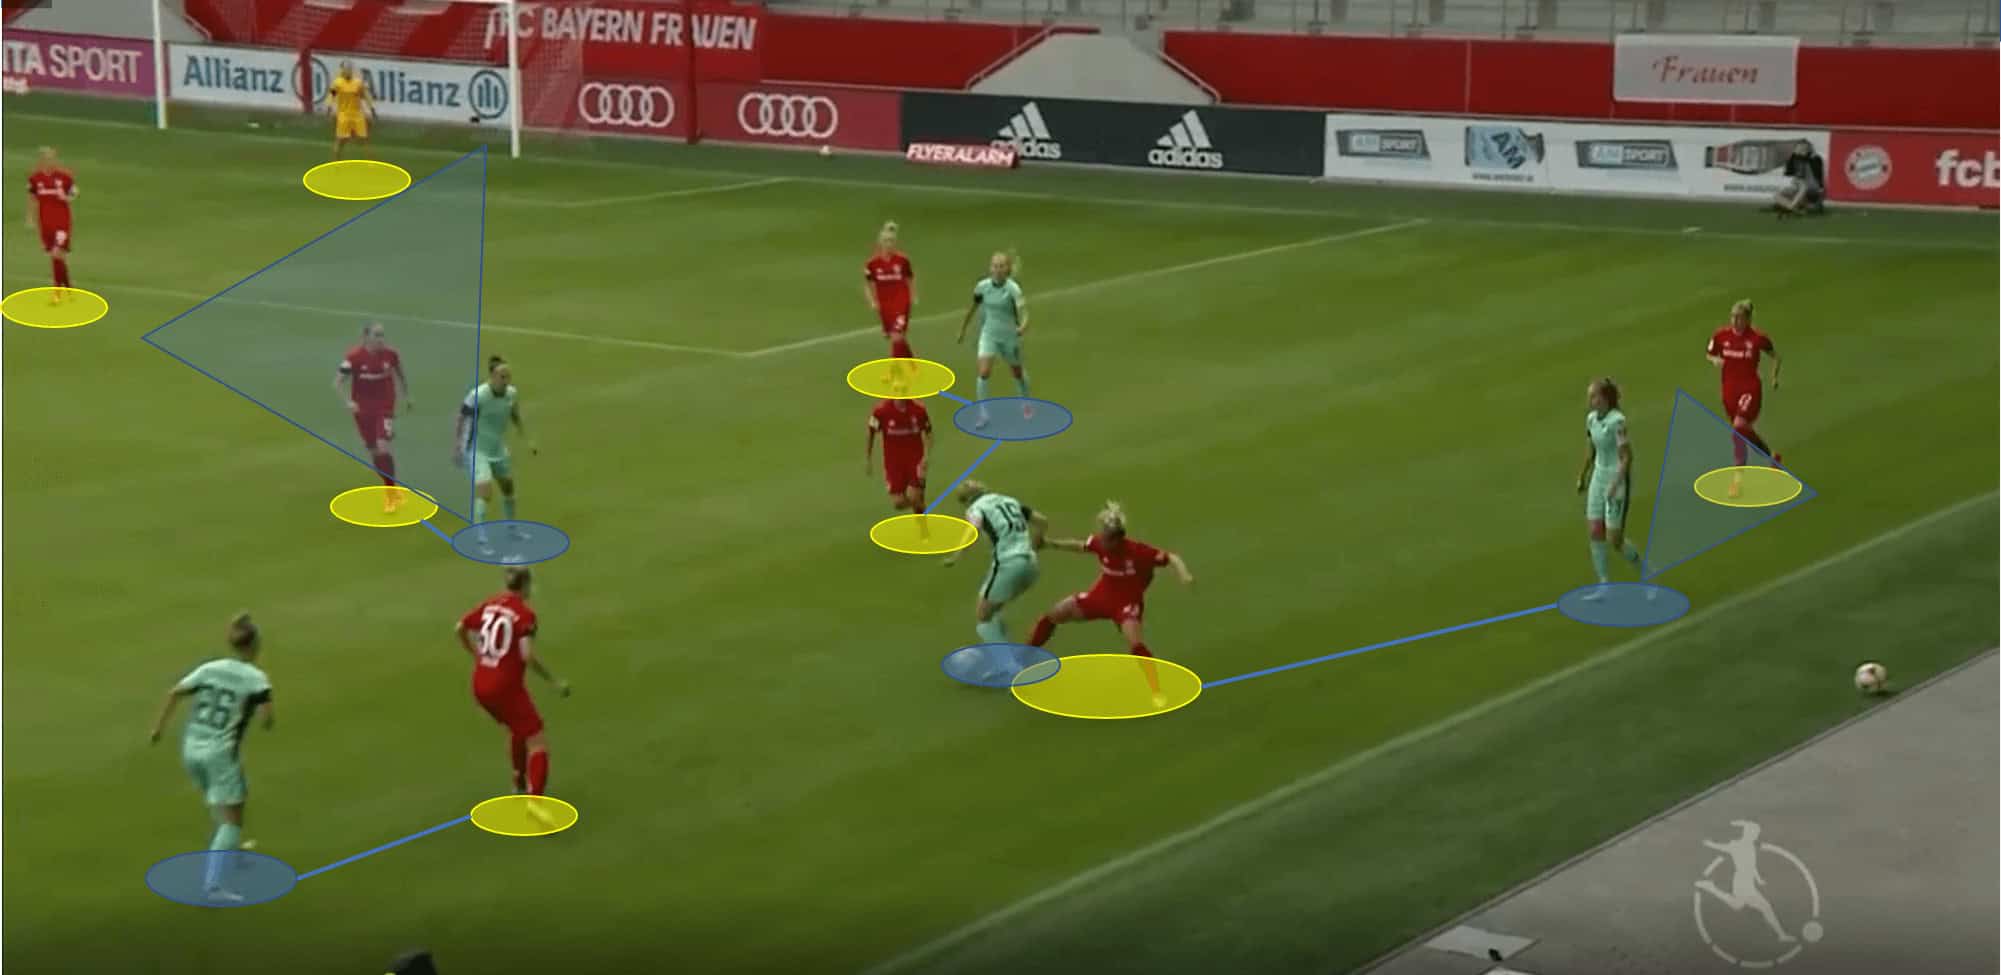
Typically, Hoffenheim were quite aggressive in their press, as we see with the following two examples. Below, Hoffenheim have pressed high up the right flank. In this moment, Hoffenheim have pressured and recovered the ball by using five players against Bayern’s eight nearby players.
This was done through a few key players. On the touchline, Franziska Harsch has put herself in a position to pressure the ball carrier from behind while being able to eliminate the player behind her as a passing option with her cover shadow. Forward Nicole Billa, was positioned herself to eliminate a central midfielder, central defender and goalkeeper with her cover shadow.
This leaves the remaining three Hoffenheim players in the area to occupy the other Bayern players in the area, which they do with ease. In this moment, Hoffenheim are easily able to win the ball and initiate a dangerous counter-attack in the attacking third.
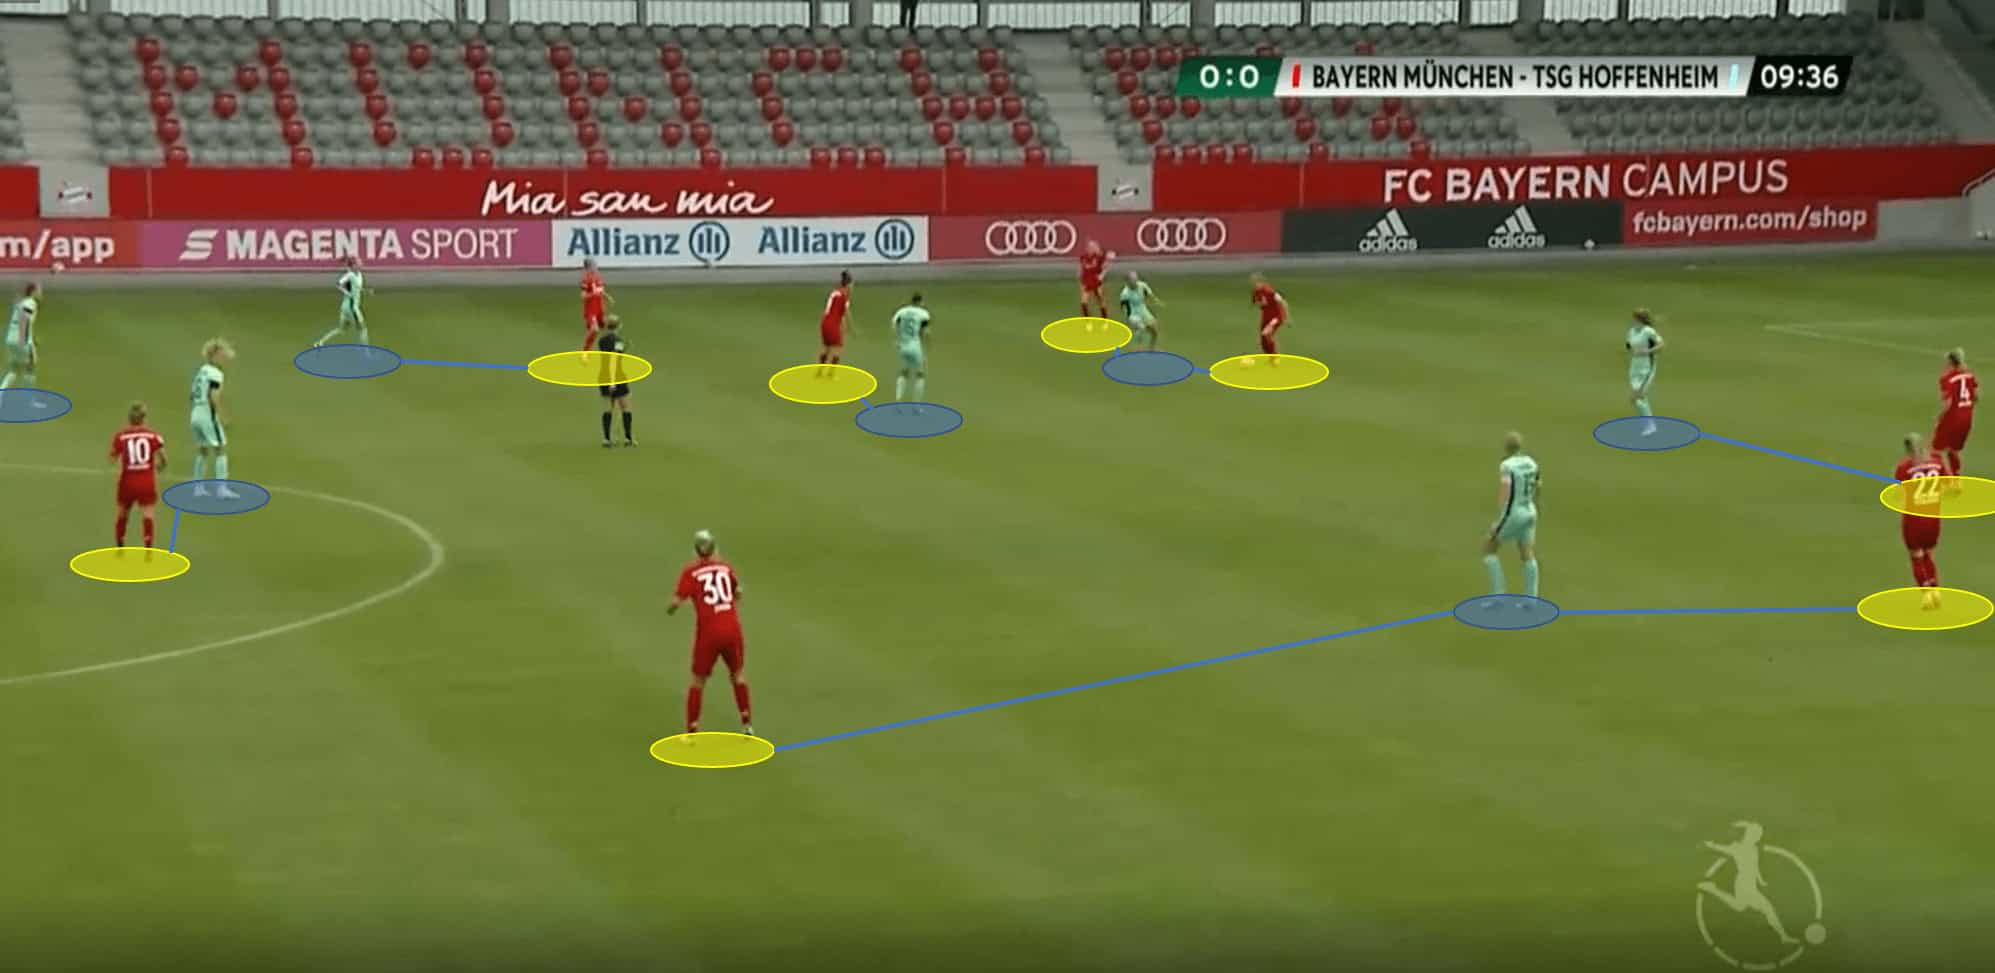
We also see efficient pressing on the left side of the pitch as well. Hoffenheim move forward as a unit and begin to press the Bayern build-up. Hoffenheim’s right wing-back Krumbiegel has drifted inside to create access to both Bayern’s Simon and Faißt. Harsch is able to apply passive pressure to the ball carrier while maintaining a cover shadow on Bayern defender Kristin Demann. Hoffenheim forward Maximiliane Rall is able to pressure the ball carrier into a poor pass while maintaining a cover shadow on the player behind her.
The combination of various Hoffenheim players being able to access or take away multiple Bayern players as options allowed Hoffenheim to press effectively through the match. This was seen in the fact that Bayern did not seem to settle into the game and find a rhythm until the half-hour mark.
Conclusion
In the end, the scoreline will show that Bayern dominated the match with a 3-0 performance. This is one of those not-too-rare moments in the beautiful game where the run of play does not exactly match the scoreline. Hoffenheim were able to control much of the game and kept the Bavarian powerhouses on their heels. They will surely be disappointed to have left the pitch with no points.