As the full-time whistle sounded, boos and beer showers rained from the London skies as England supporters voiced their displeasure.
After a comprehensive victory against the Asian champions, Iran, a 0-0 draw while being outplayed by the North American Champions put a temporary dampener on the English World Cup party.
In the USA, the scenes were exactly the opposite. The pre-match psyche was largely pessimistic among the American crowd, so to see the calibre of play against the top-rated team in the group was the encouragement American fans needed, especially after a disappointing draw against Wales.
As frustration filled the English air, American watch parties were filled with excitement and joy. It’s not to say a win wasn’t preferred, but more that the performance exceeded expectations.
This tactical analysis will take a deep dive into the key tactical principles that decided the game. We’ll start with each team’s passive mid-block, then advance to in-possession tactics and attacking transitions.
Lineups

Garret Southgate set out the same lineup that faced Iran. In a 4-2-3-1, Jordan Pickford took his position in goal, protected by a backline of Kieran Trippier, John Stones, Harry Maguire and Luke Shaw. In midfield, Jude Bellingham and Declan Rice operated as the double pivot with Mason Mount ahead of them. Bukayo Saka and Raheem Sterling were the two wide forwards in the system while Harry Kane recovered from his injury in time to make the start up top.
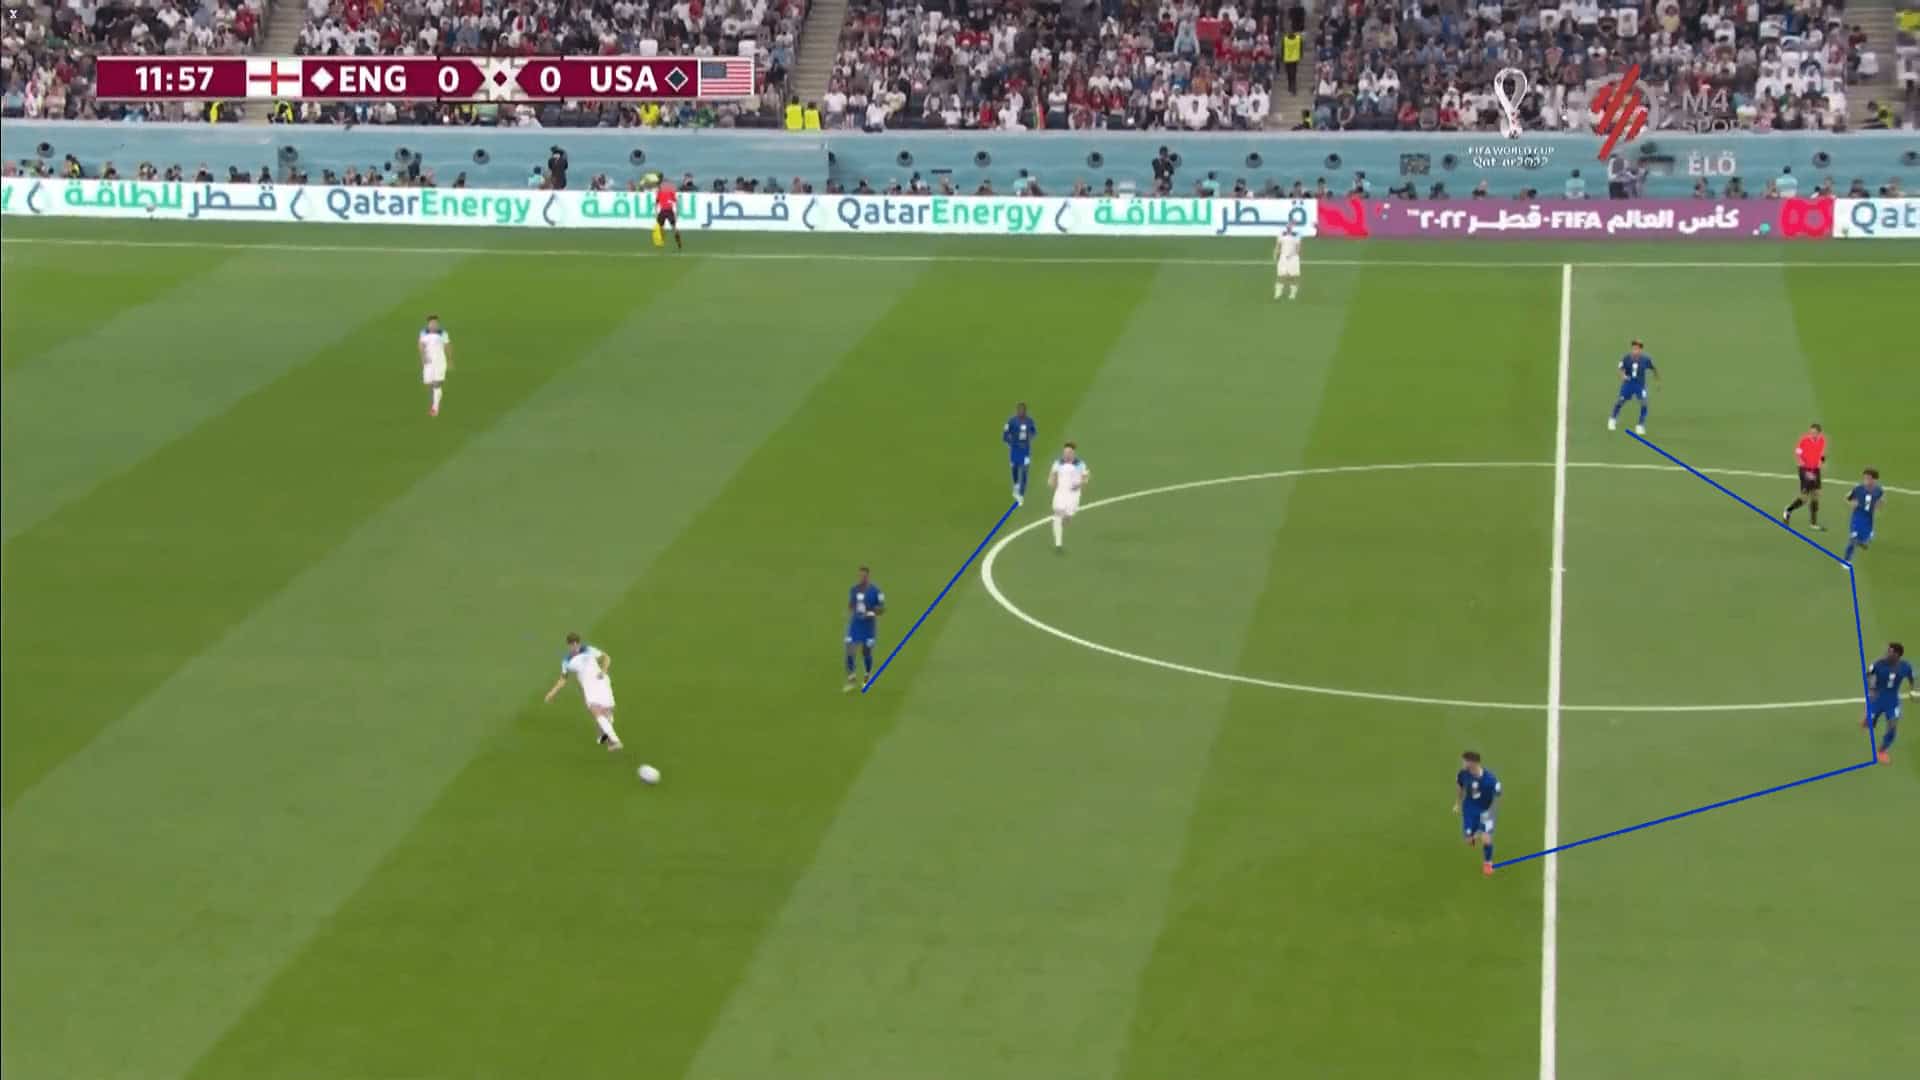
The USA’s Gregg Berhalter countered with a lineup very similar to the one used against Wales, but in a different system. The shape was a 4-4-2, as shown in the image above, but with Timothy Weah given license to push into the wings and Weston McKennie liable to slide inside. Christian Pulisic’s positioning and movements were nearly identical to his left-forward role. It was a 4-4-2 on paper, but the roles were very dynamic with the wide interchanges keeping the English off balance.
Matt Turner made the start in goal with a backline featuring Sergiño Dest, Walker Zimmerman, Tim Ream and Antonee Robinson. The midfield featured McKinnie, Tyler Adams, Yunus Musahh and Christian Pulisic. Weah kept his starting role and the one change to the lineup was Haji Wright replacing Josh Sargent as the forward strike partner.
Passive pressing in a mid-block
The match was very methodical. Rather than end-to-end action, each side’s tactics seemed to revolve around their pressing strategy. This is especially the case with the USA given that they entered the match expecting England to have more of the ball. That held true with England owning 55% of the possession.
Berhalter’s switch to a 4-4-2 pressing system was very successful on the night. The clean sheet testifies to his defensive tactics, as does holding England to just seven shots on the night, three of which found the target. England’s xG of 0.6 was nearly a full point below their total against Iran.
One of the keys to success was the two forwards sitting deeper to deny entry passes into Rice. The approach was a mid-block, but a very passive one. There was very little impetus to pressure the English centre-backs. Instead, they took the lead role in possession with the midfielders typically screened by the USA’s heavy central presence.
Perhaps the best way to emphasise how effective Berhalter’s tactics were is to compare the statistics of England’s midfield from the Iran game to the match versus the USA. Each of England’s three starting midfielders averaged fewer passes per minute and had a worse pass completion percentage.
Bellingham’s passing accuracy dropped from 85% in the first game to 70% in the second and he averaged 25% fewer passes per minute. Likewise, Mount’s passing accuracy drop from 69% against Iran to 49% against the USA, but his pass per minute only dropped by 4%. Rice was the key to USA’s defensive tactics. They wanted to keep the ball off of his feet, and it worked. Though his passing percentage only dropped from 88% to 85%, he saw a 21% drop in passes per minute. In terms of the total numbers, he went from 110 passes against Iran to 72 against The Yanks.
England’s midfield struggles were in part due to the USA’s rigid and compact defending, but also from the performance put in by Adams. The Leeds United midfielder was everywhere. He engaged in 18 defensive duels, winning 13 (72%). He added six interceptions and six recoveries in total in the oppositions half of the pitch.

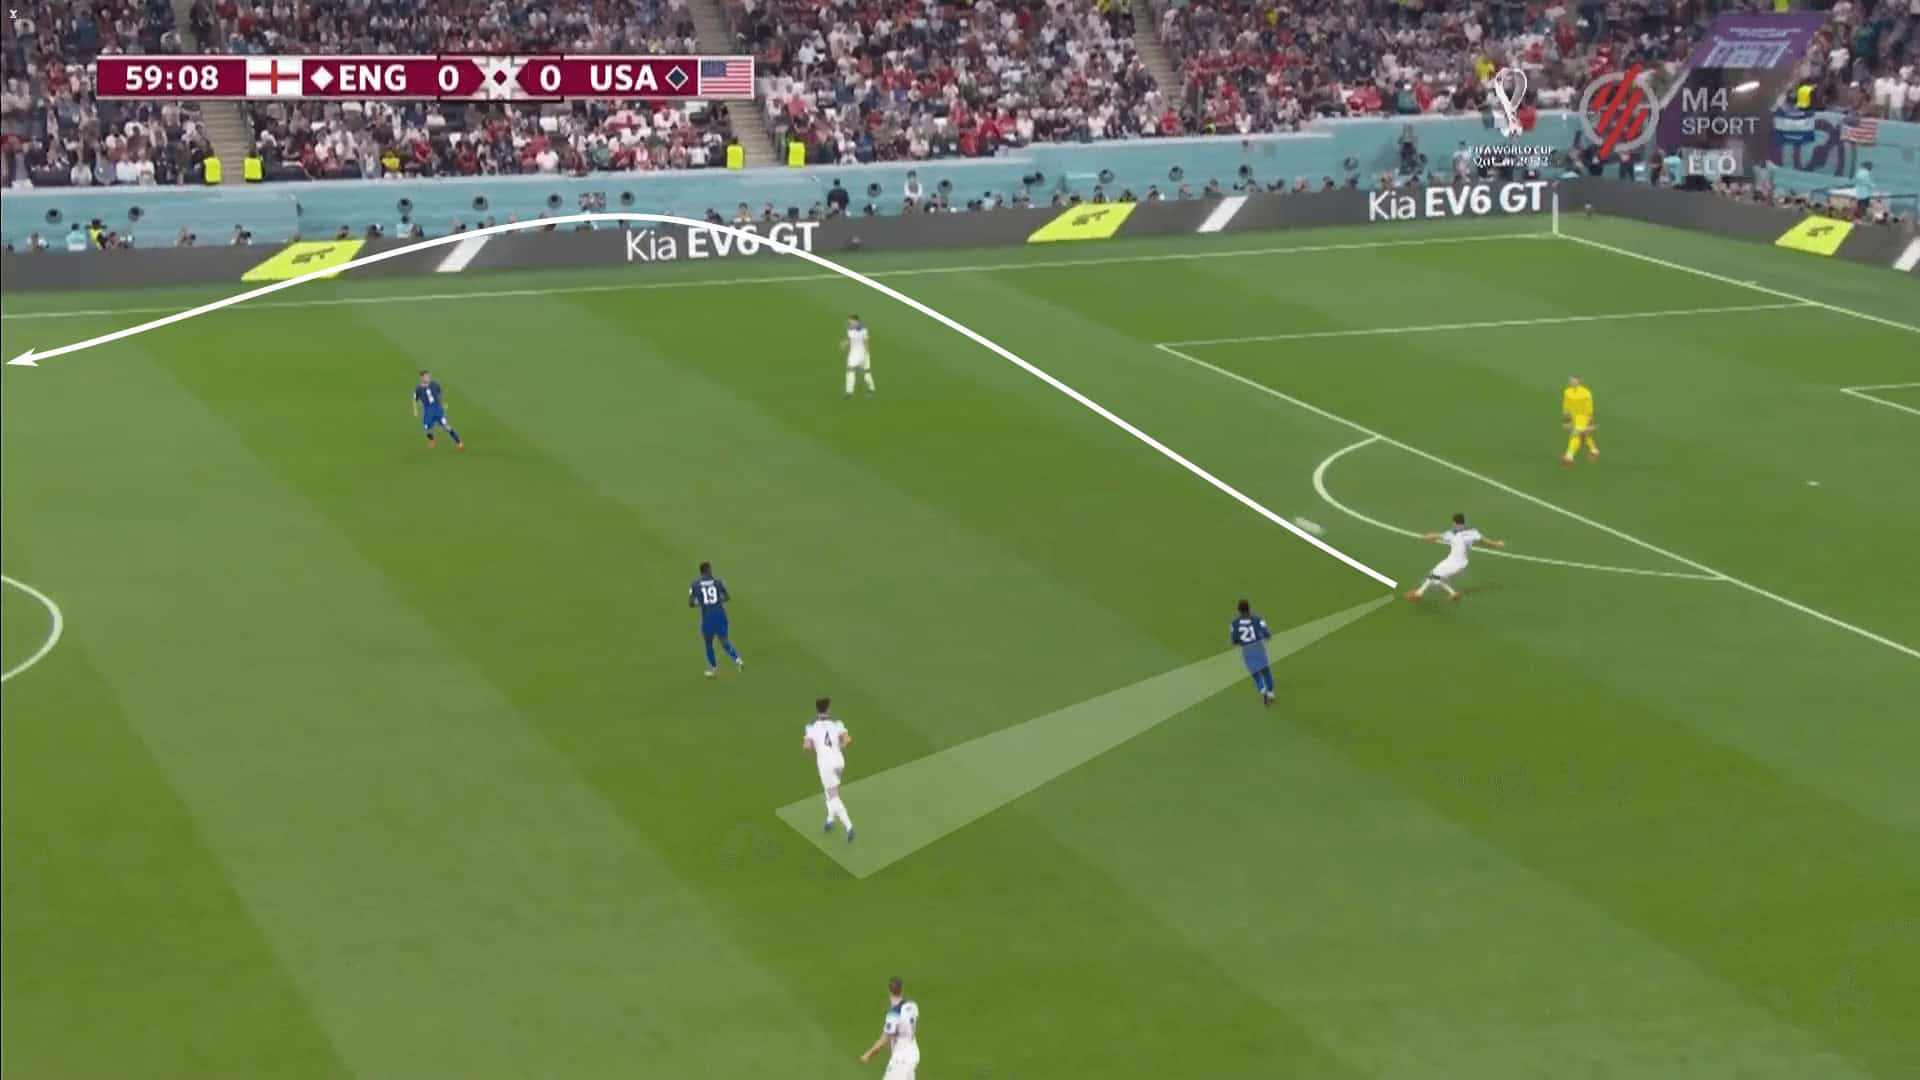
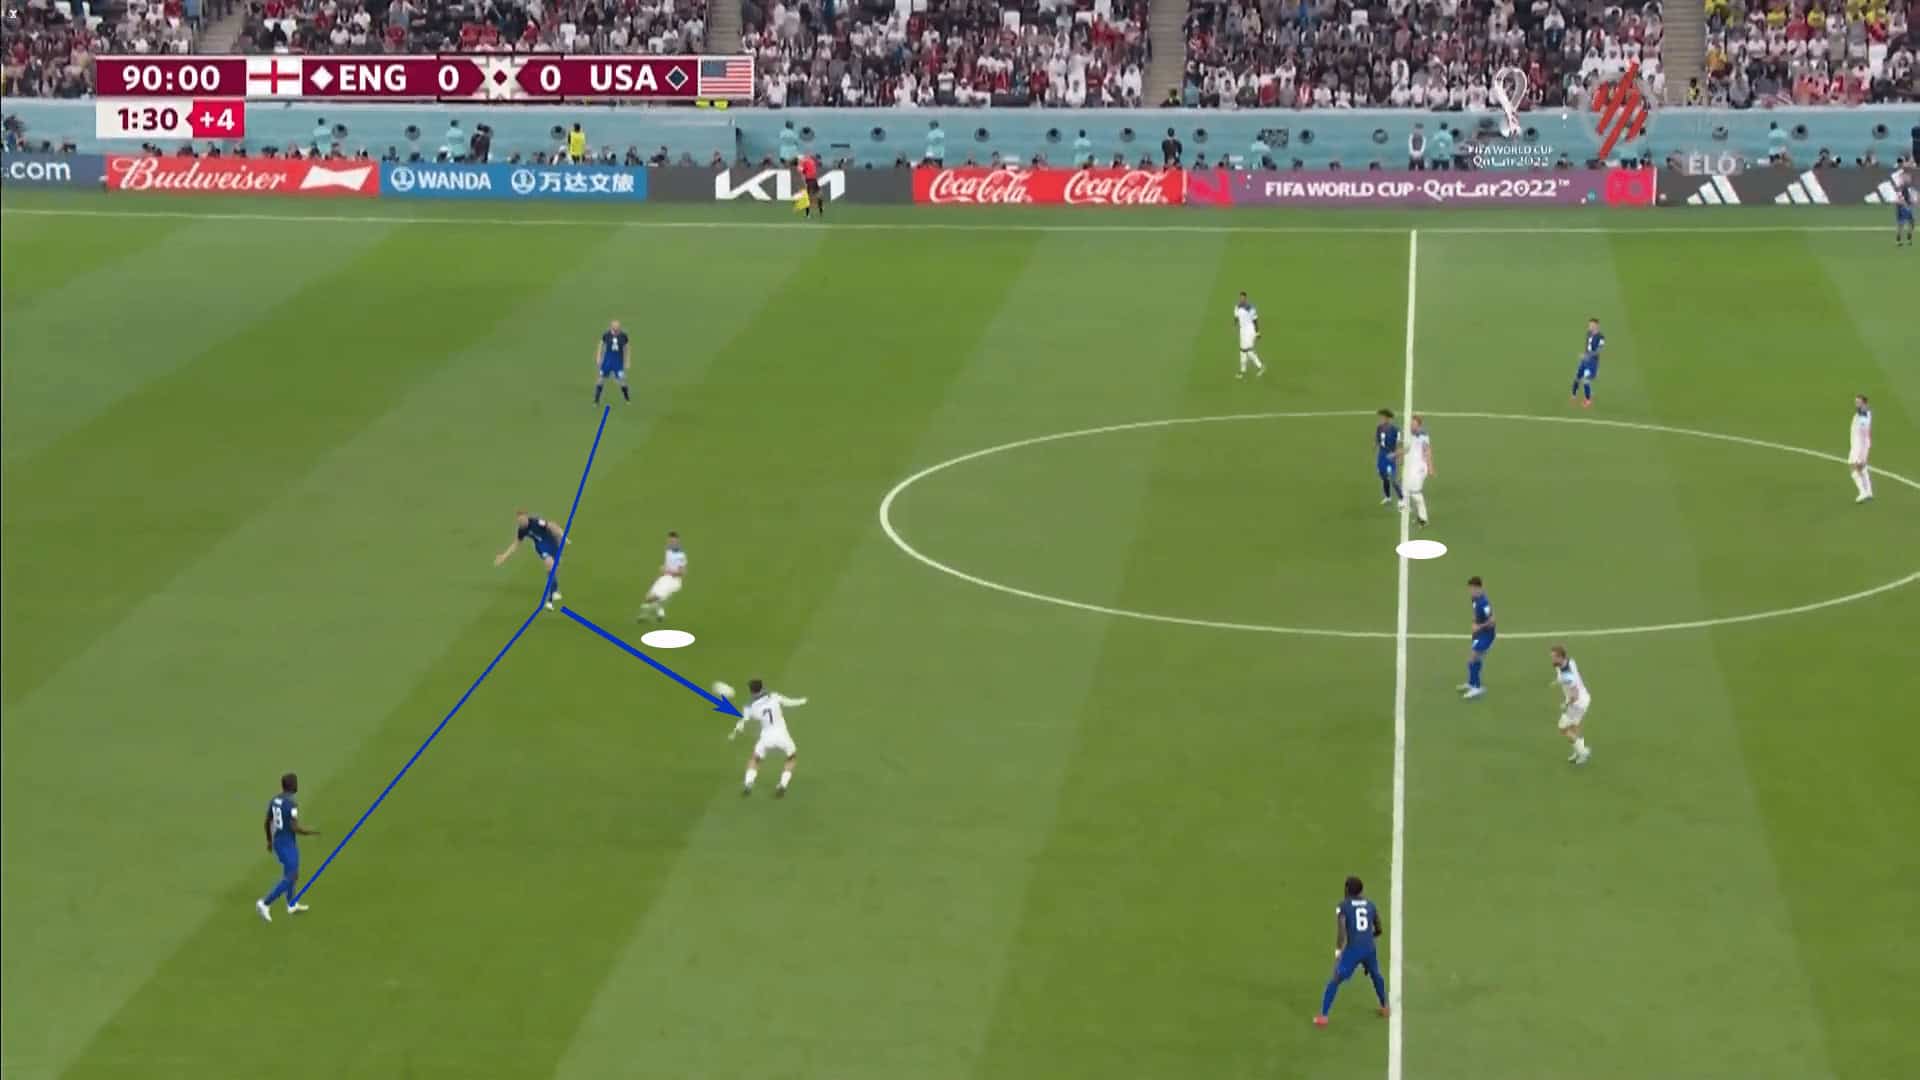
England’s lack of success playing through midfield forced them to play around the press. With Maguire and Stones running the show from deep, the Americans were very inviting of long diagonals into the wings. In the image below, we see Weah blocking the passing lane to Rice. Maguire opted to try the long diagonal to Trippier in the wing, which led to an American interception.
When the USA wasn’t immediately able to recover the ball, their compact shape was quick to slide to the ball and seal England into the wing.
Moving to England, the objective seemed very similar. They wanted to control the centre of the pitch and force the USA to play around the press. The width in their lines was typically good in this match, but it was the distance between the lines that hurt them. The US midfielders had far too much time and space to receive in midfield and did well to get into forward-facing positions.
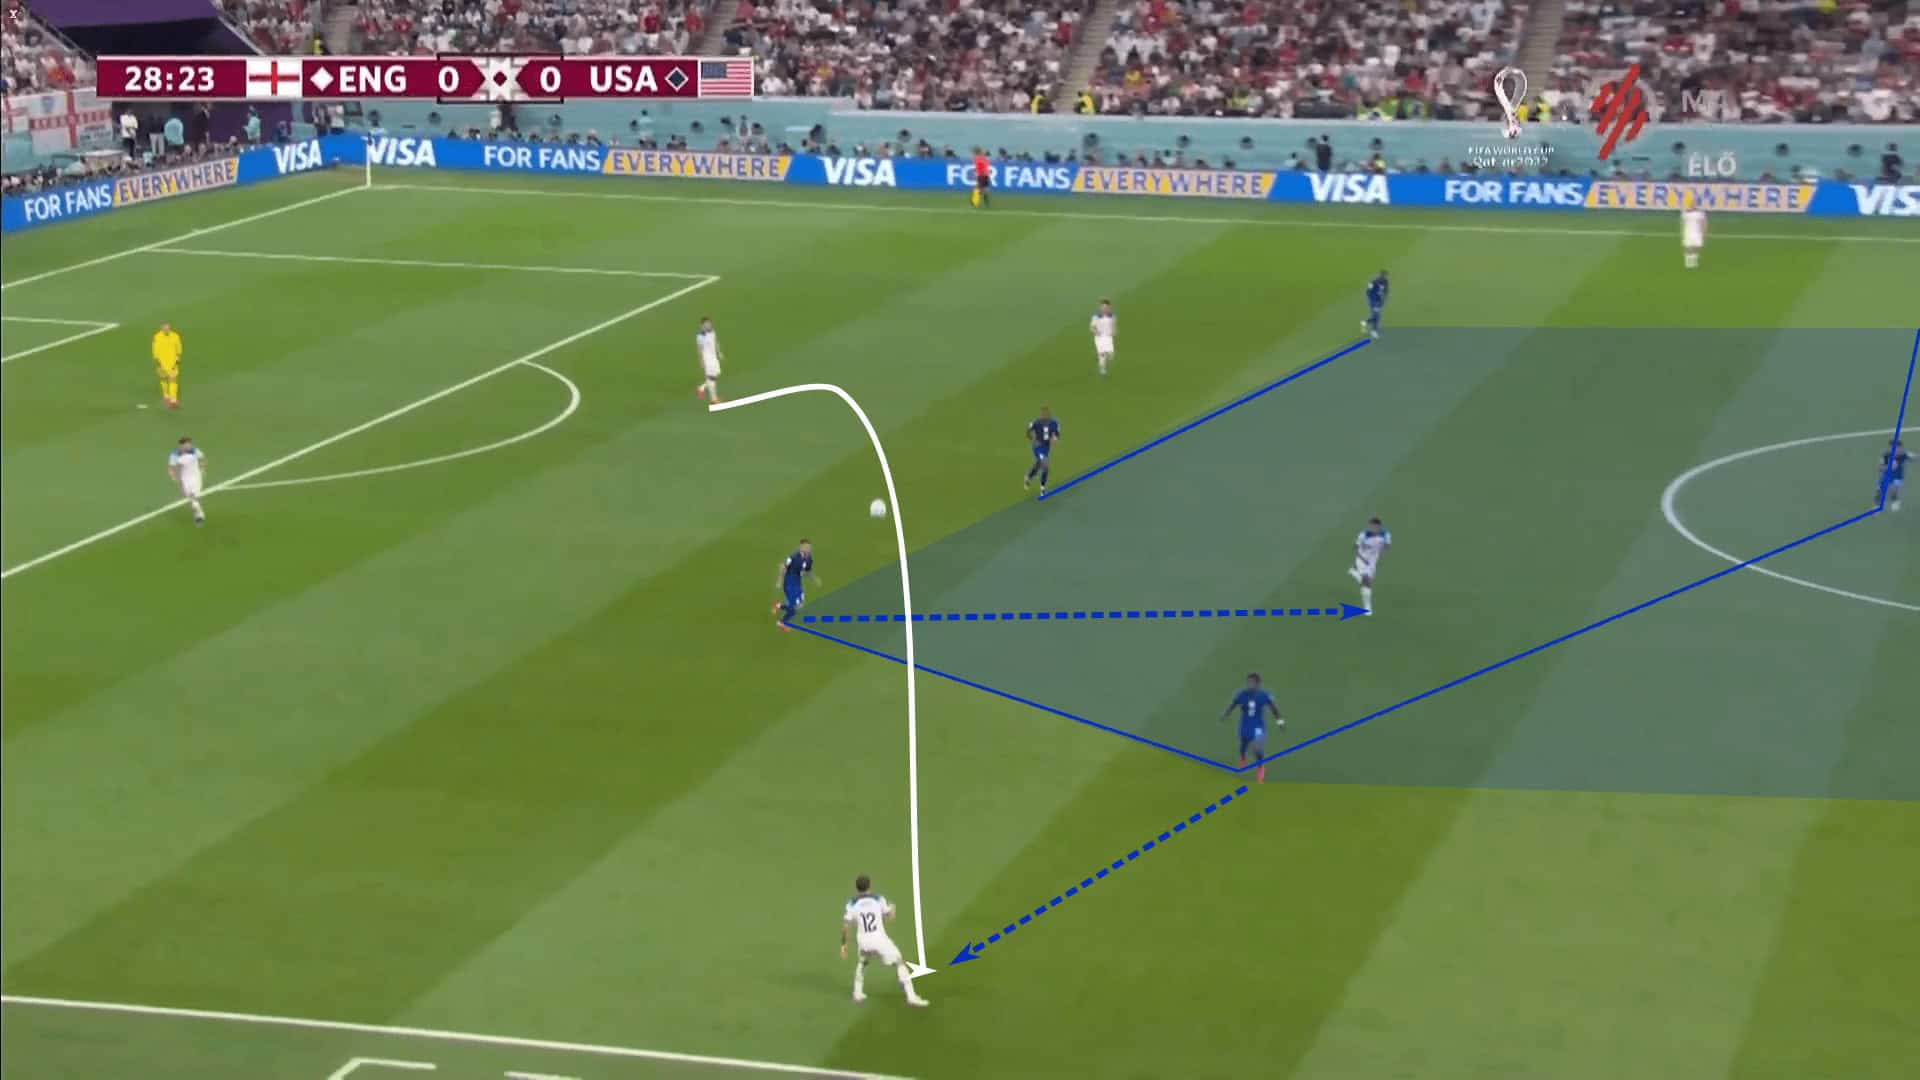
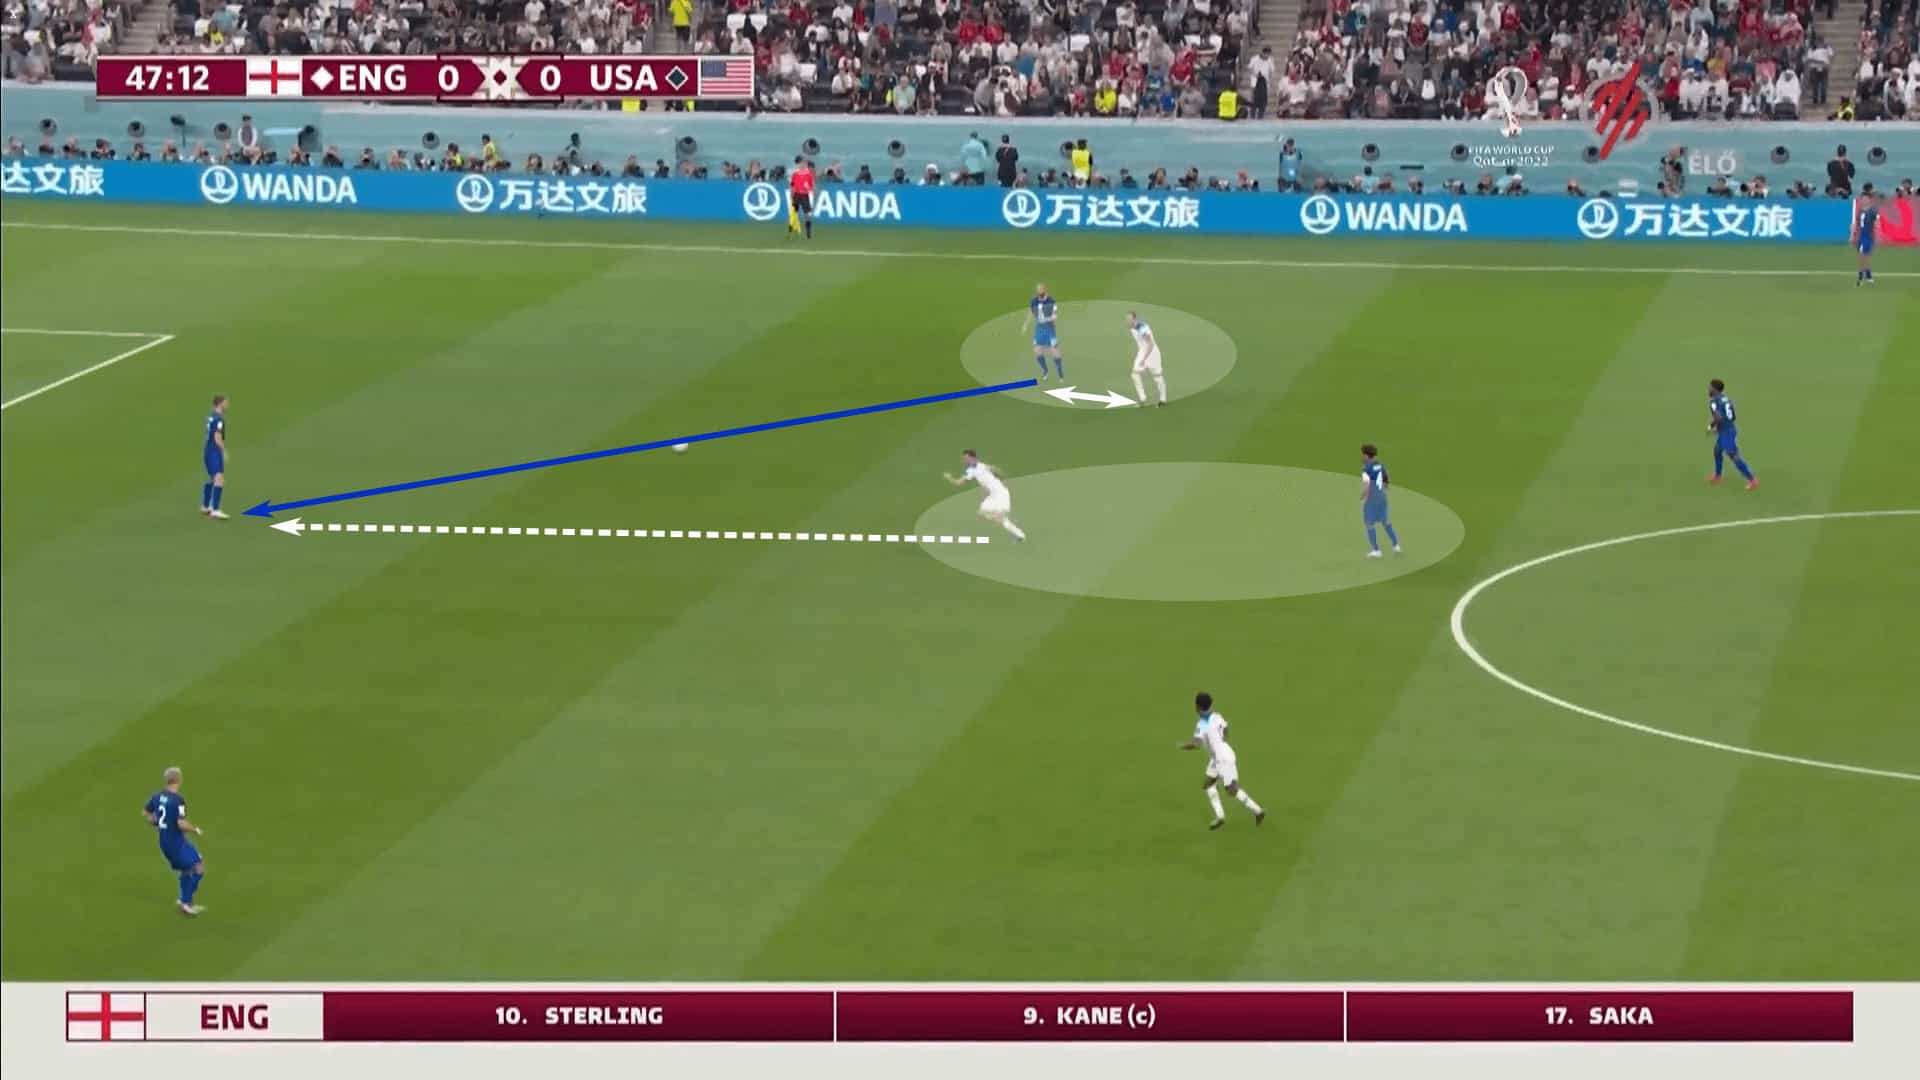
When England defended at their best. Their 4-2-3-1 structure prevented the USA from playing into the midfield, forcing Ream and Zimmerman to direct the attack. England’s targeted pressing triggers were passes into Zimmerman. Notice in the image below that Kane is offset to the right applying light pressure to Ream. Has the pass was played back to Zimmerman, Mount printed forward to aggressively pressure the Nashville SC centreback.
Throughout the match, you could see Kane and Mount essentially switching places in the press. Kane would drop off to man-mark Adams, letting Mount use his mobility to target those passes into Zimmerman.
The approach was effective. Zimmerman had a poor match, which includes this bad giveaway in the 92nd minute. The American completed 62 of 70 passes, an 89% pass completion rate. That’s in contrast to the 98% passing efficiency he had against Wales.
How the midfield determined the match’s rhythm
With each team’s mid block slowing central progress, the rhythm of the game was dictated by play in the middle third. Starting with England, USA’s horizontally and vertically compact press steered The Three Lions towards the obvious solution, play around the press.
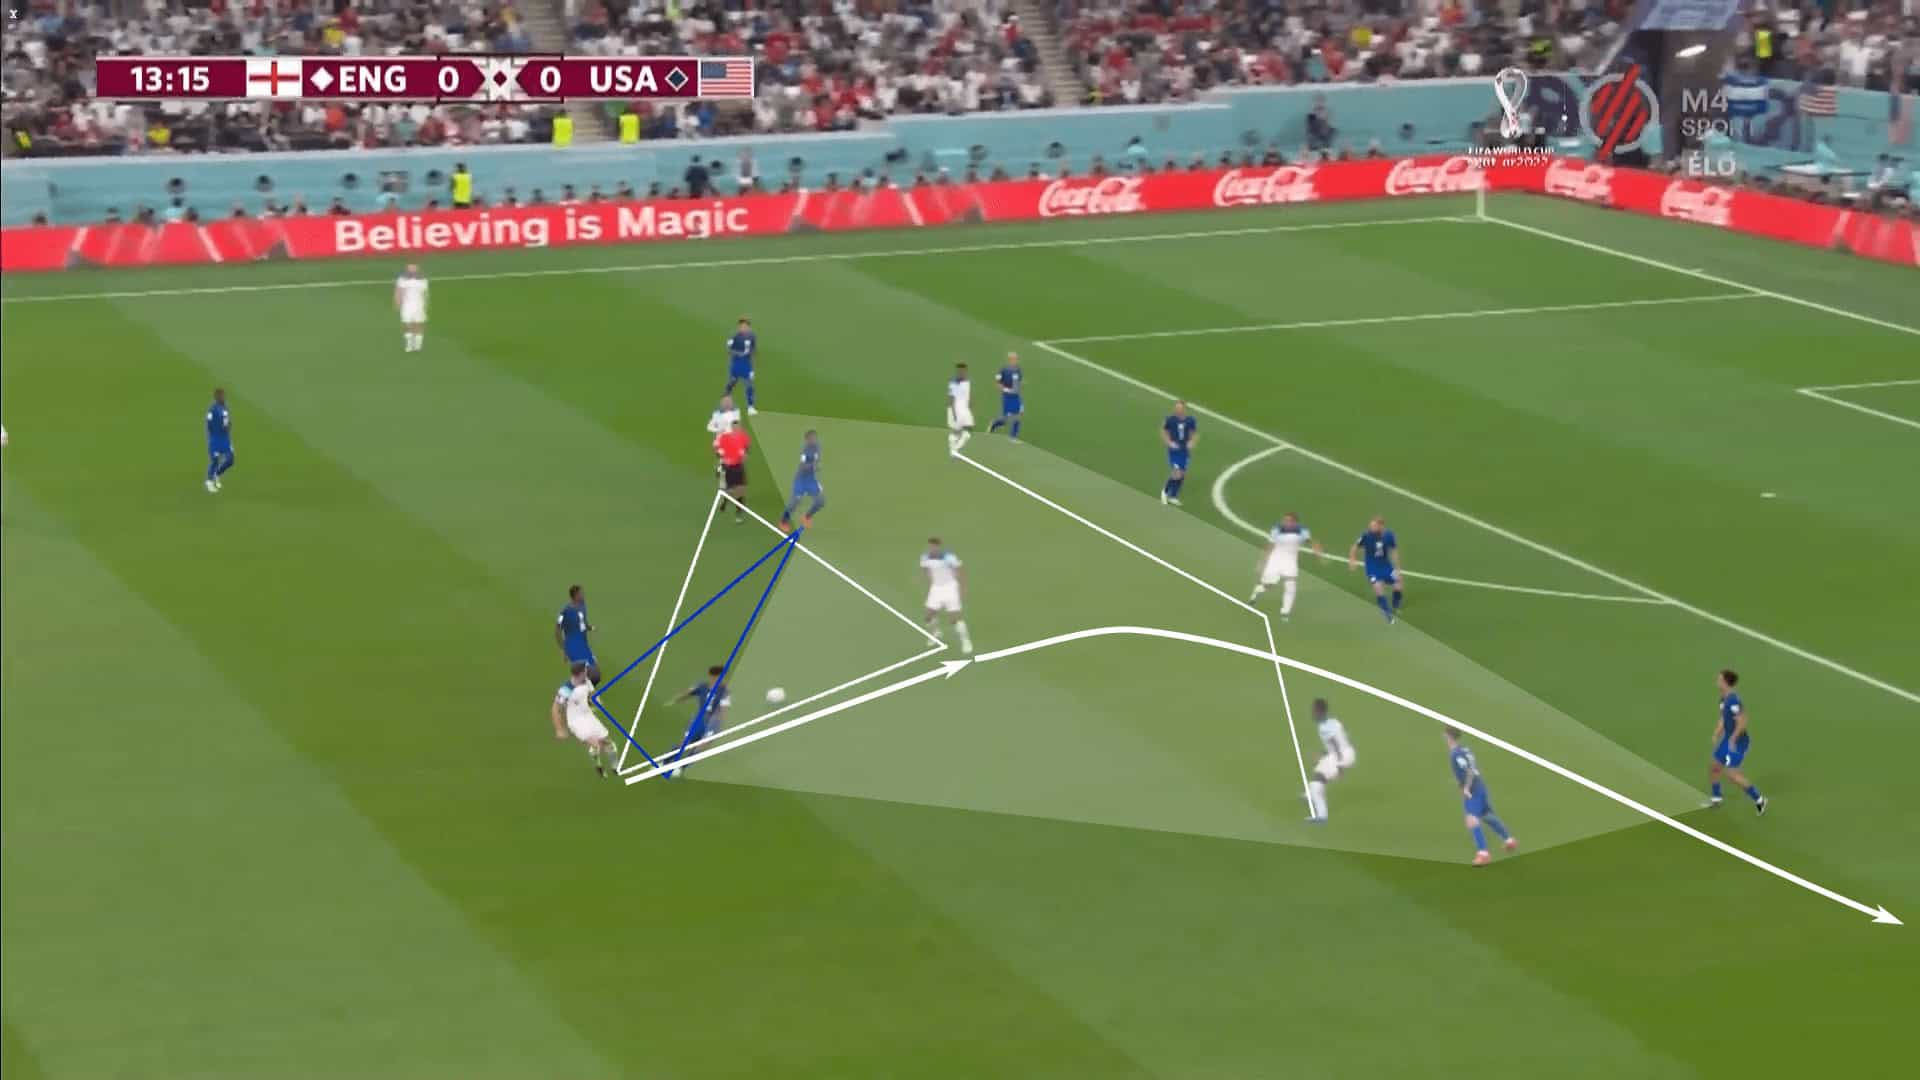
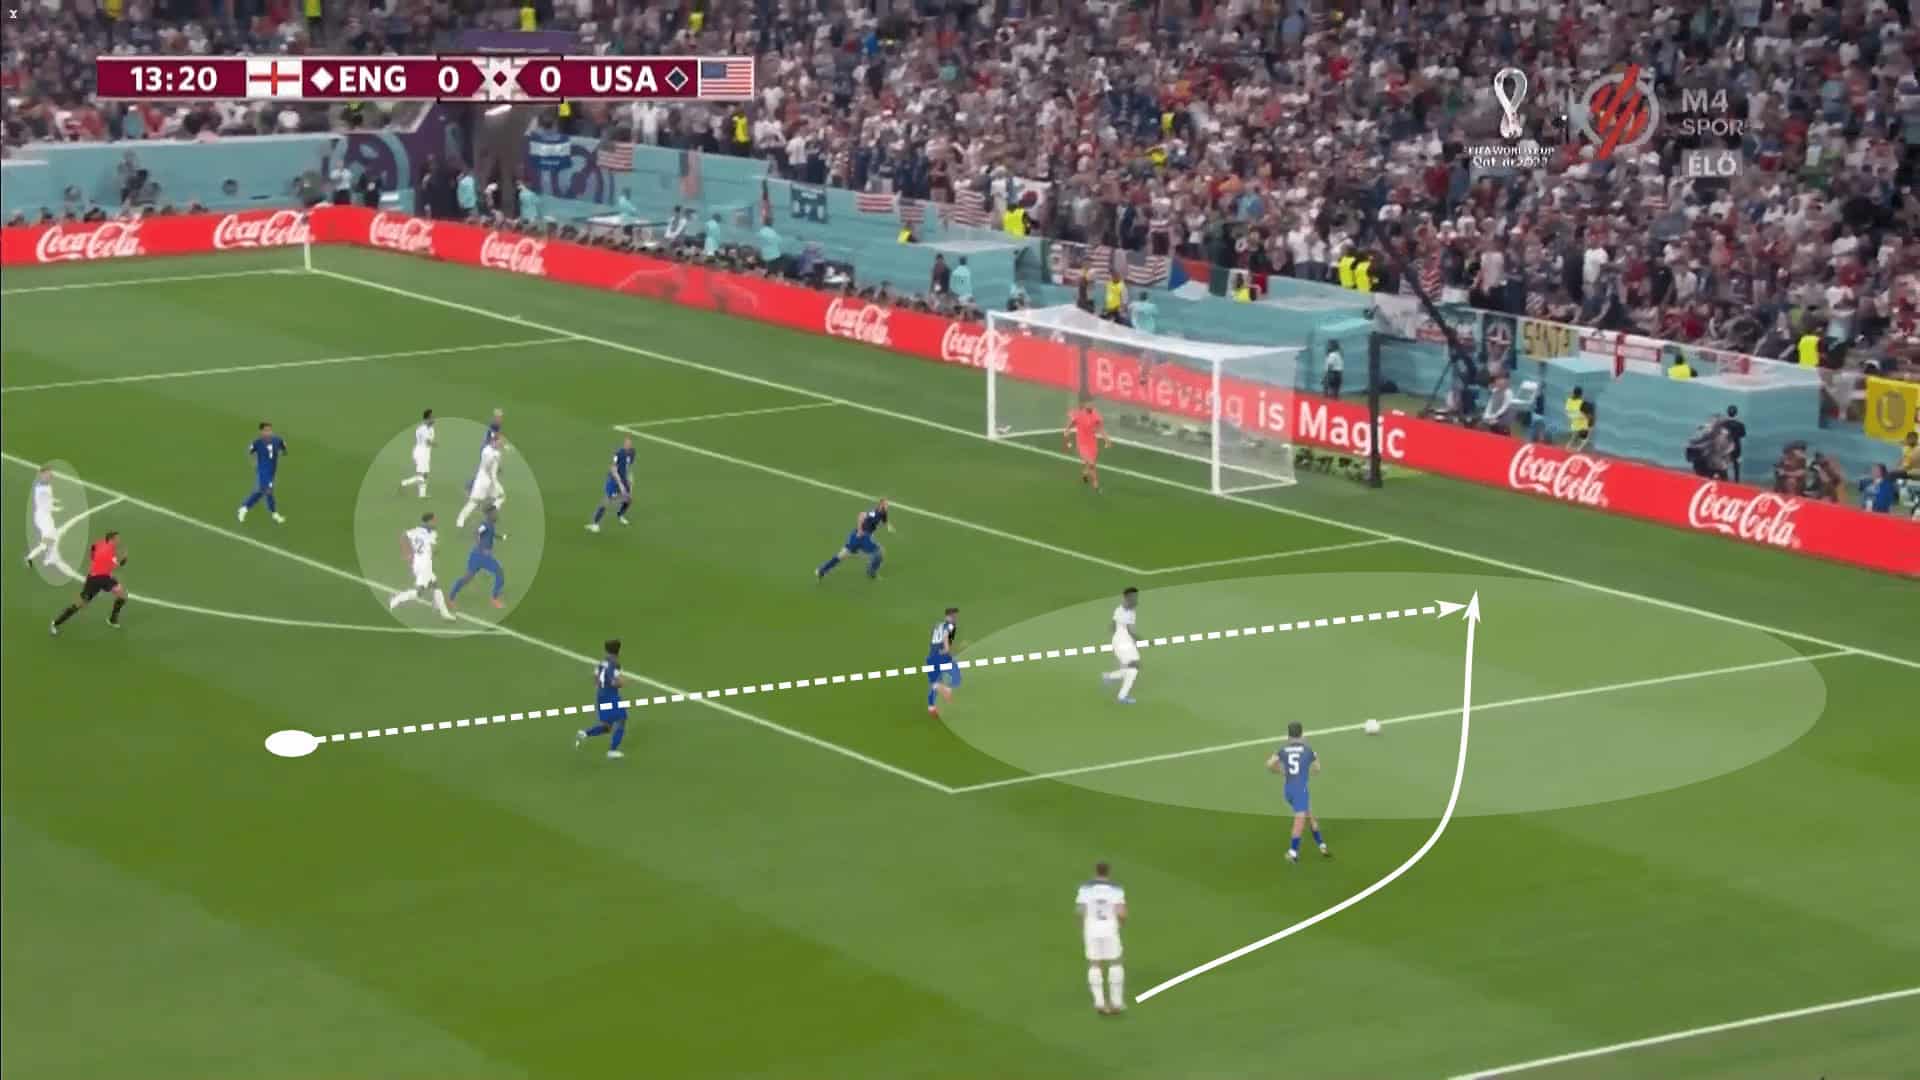
That’s how England’s best chances emerged. In the 10th minute, England changed the tempo from slow ball circulation around the back to a direct possession leading to Kane’s deflected shot. Stones linked up with Trippier, who pushed high enough to engage Robinson, not Pulisic. With the American left-back pushing up the pitch to pressure Trippier, Bellingham found a pocket of space to receive and play into Saka. The arsenal forward cut inside, allowing Bellingham to attack the space behind Robinson. The Dortmund midfielder raced into the box and played a picture-perfect negative cross into Kane’s feet, nearly giving England an early advantage.

It was a very similar scenario at the end of the first half with the outside-inside pattern. This time, the ball came from the left side of the pitch. Shaw found Sterling against Zimmerman in the central channel. The Chelsea forward was able to receive in a forward-facing position, allowing him to spot the run of Mount. The past took a fortunate deflection off of Zimmerman’s leg, redirecting the ball to the centre of the box, right into the path of Mount. His first-time hit tested Turner, but the goalkeeper was able to parry it wide.
Direct possessions, especially after an initial indirect sequence, were England’s best path to goal. However, when they were able to pin the USA into a low block, England used a high central overload to unbalance the Americans. Kane and the wide attacking mids would drive the Americans deeper while Mount, Bellingham and Rice circulated the ball in the English midfield. That central dominance forced the Americans to defend even narrower, leaving the wings exposed to the late runs of England’s outside-backs.
As the ball was played wide, Sterling and Saka looked for opportunities to run behind the backline. The objective was to receive the ball in the half space of the box and then send the final pass. That’s exactly what they managed here through Saka.
Outside-to-in attacking was England’s primary focus, but it also became predictable, leading to their seven-shot performance. On the other hand, the USA showed themselves very comfortable and competent in creating and exploiting central spaces.
Adams, McKennie and Musah ran the midfield, but the USA didn’t want to go 3v3 against England in the middle of the park. Instead, each of the forwards looked for opportunities to drop into midfield to create an American advantage and open up opportunities to receive between the English lines. Pulisic was key to this tactic given he’s the most comfortable of the three at playing in tight spaces.

But with the forward dropping into midfield, there had to be corresponding runs from the midfielders. Dynamic positional rotations kept England off balance as their midfielders struggled to track runs from deep, leaving the backline vulnerable in front and behind them.
The sequence below shows one of the better moves from the Americans. Musah played into Weah, who set the ball back to McKennie. Musah made the initial run behind Shaw but then saw that Weah was able to turn on his defender and get behind him. That left Musah to make an untracked run into the box.

Though England had the better of possession, the Stars and Stripes were more dynamic in open play. Positional rotations kept the English off guard, as did the ability to attack centrally or in the wings, as well as between the lines or running in behind. Overall, it was a fantastic performance for the Americans when in possession.
Final third movement and shot creation
The difference in tactics in the middle third was highly noticeable, but it’s the movement in the final third and shot creation that really set these teams apart. That’s where we’ll take this tactical analysis.
In the previous section, it was the Americans who had the better of play in the final third. Two sequences, in particular, showed the quality of movement and why they were able to generate a few quality scoring opportunities.
Midway through the first half, the USA fought their way back into the match before eventually taking over. When they couldn’t attack centrally, the USA looked to create numeric superiorities out wide. Notice in the first image of the sequence, Weah is high in the central channel flanked by Shaw and Rice. As McKennie received out wide, Weah dropped outside of the press, freeing Shaw to move in support of Sterling. Rice also vacated the area, pushing higher in anticipation of a negative pass.
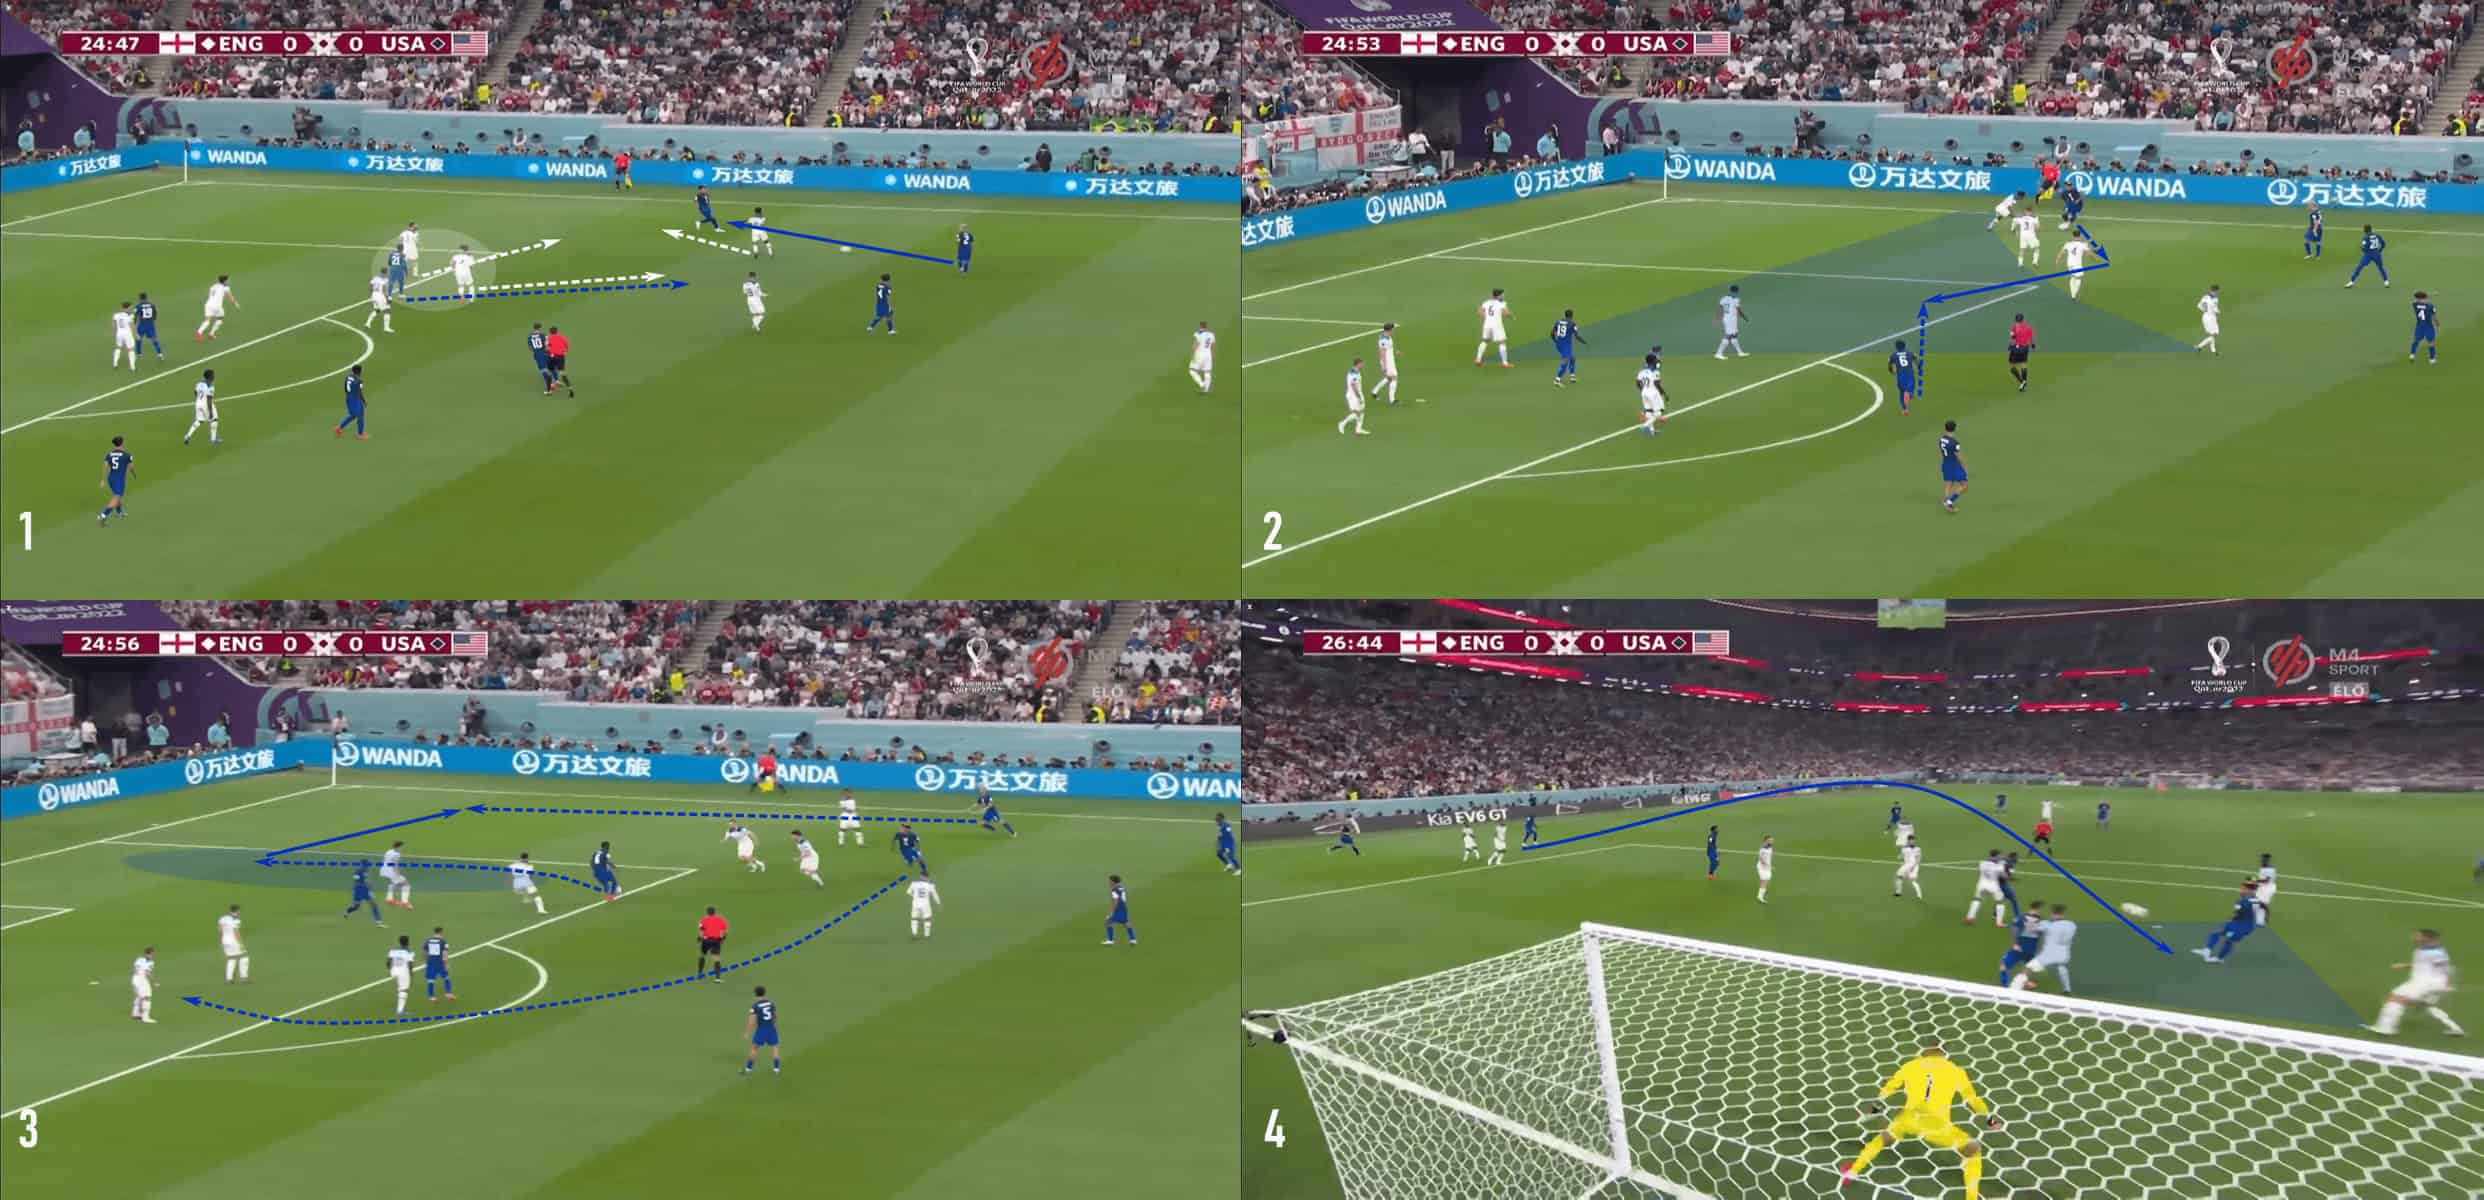
That movement created a gap for Musah to run into. McKennie split English defenders, playing the ball into Musah’s feet. The England-born Valencia midfielder cut sharply towards the endline before setting the ball back to Dest. Meanwhile, McKennie left the wing, making his run into the box. In that fourth image, we see the pocket of space he found. Though he sent the shot over, the goal line camera gives us a good look at the opportunity he had.
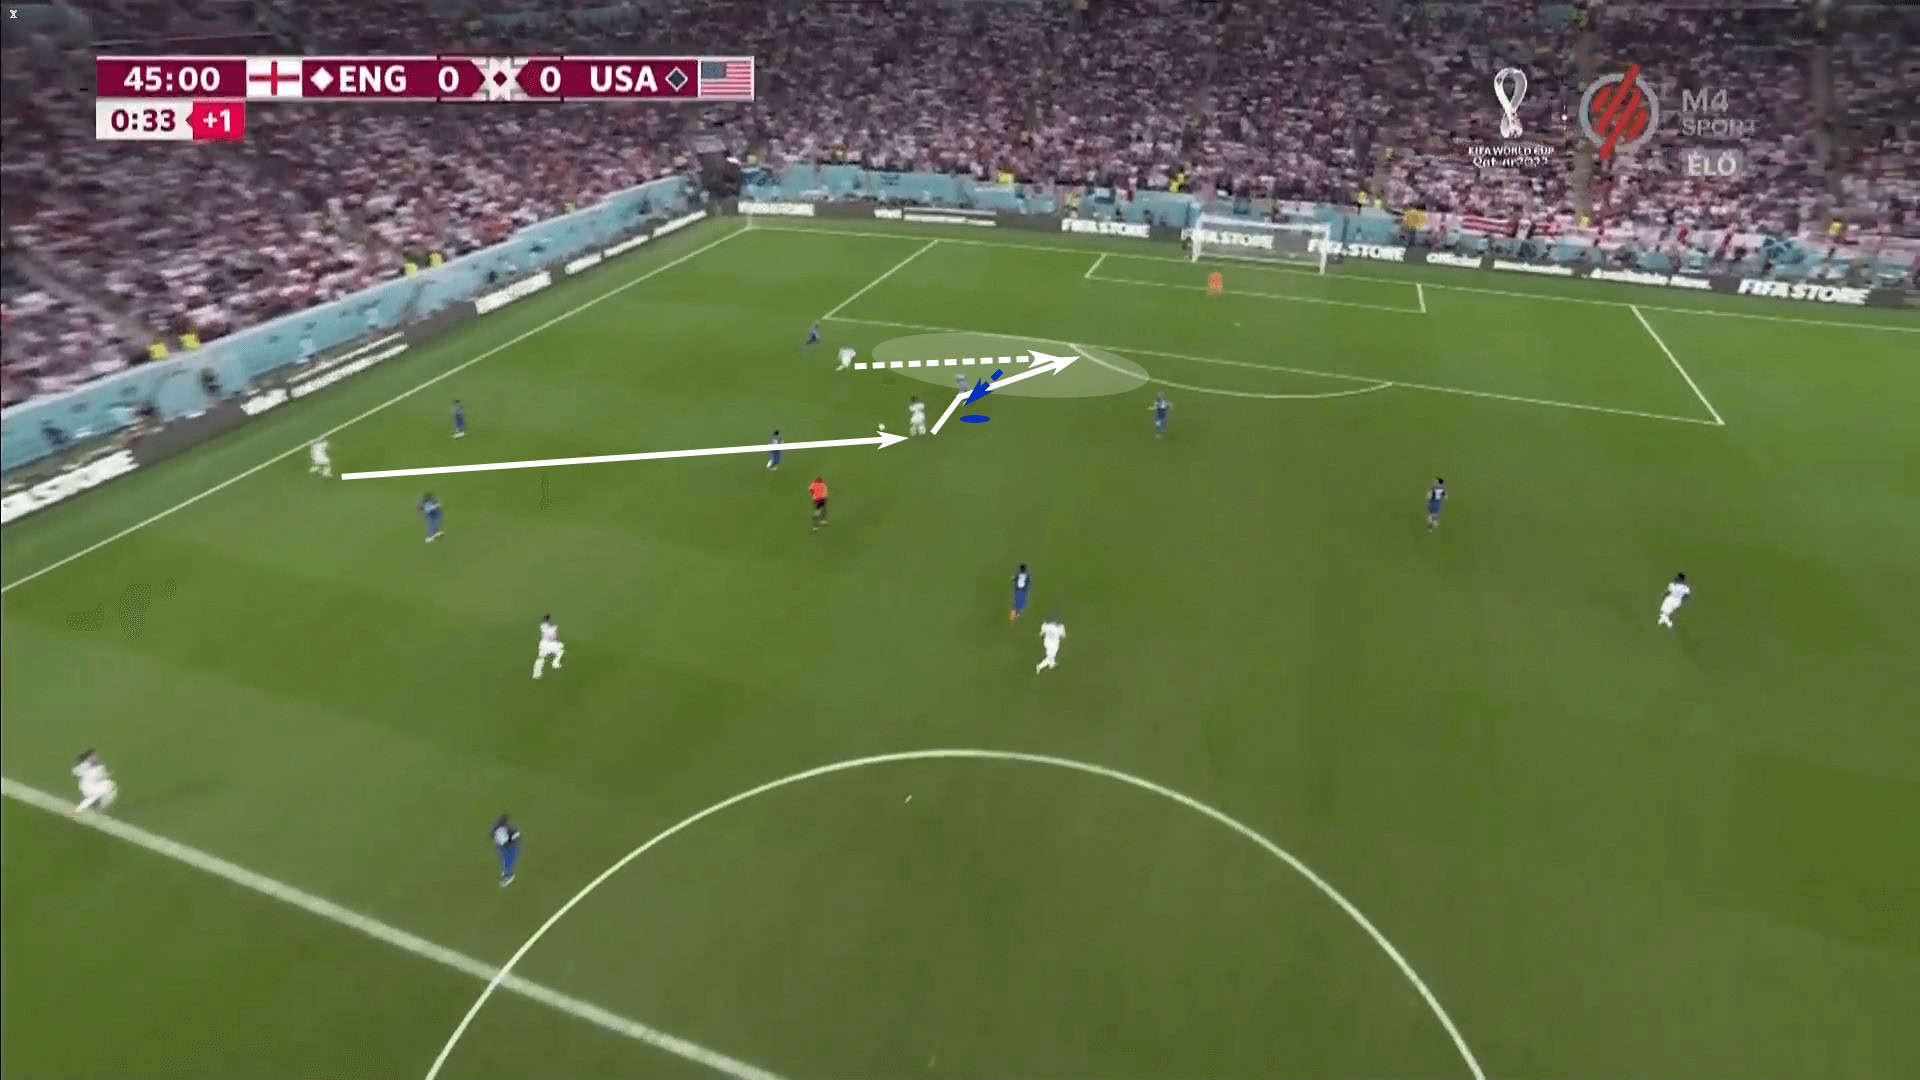
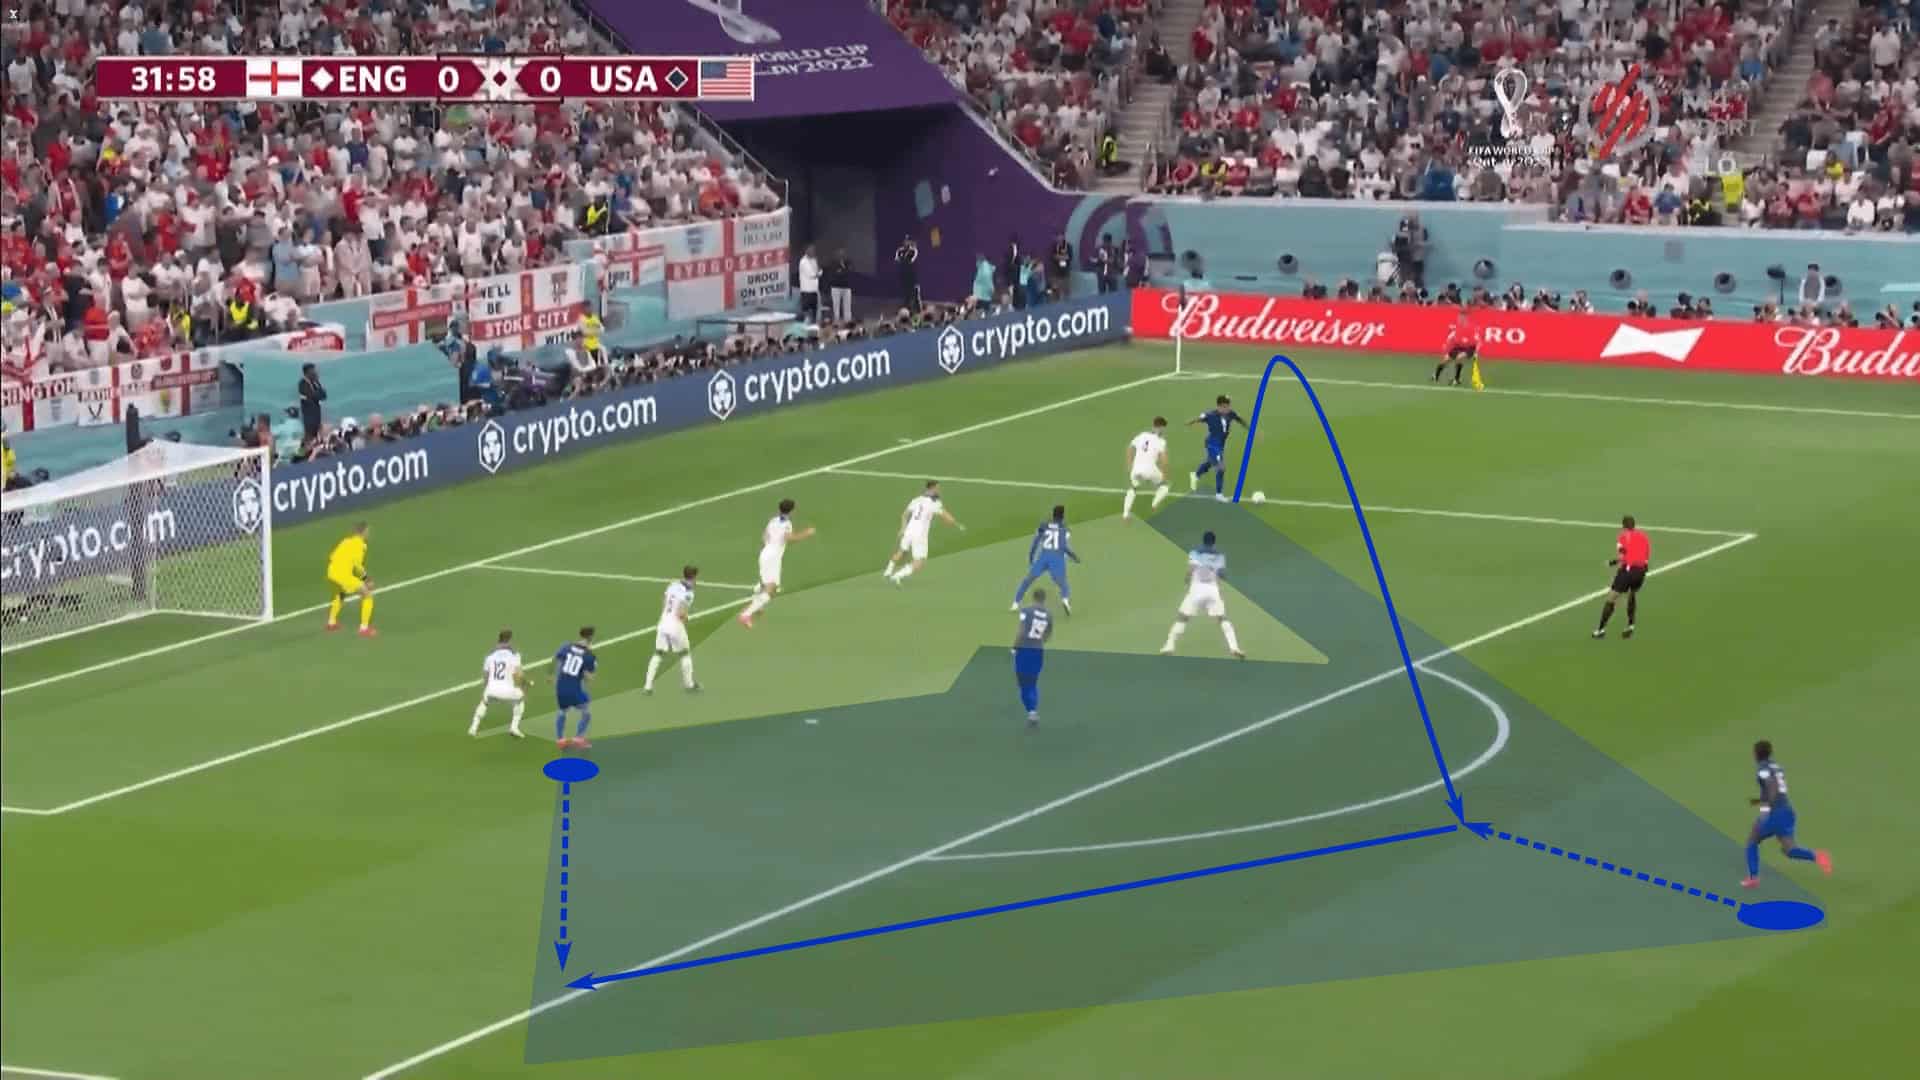
The second sequence was perhaps their best of the night. The USA’s left-sided possession through Robinson forced England to slide to their right. As the English became unbalanced near the ball, the American midfield found excellent pockets of space between the lines. Two simple passes allowed the Americans to switch the point of attack.
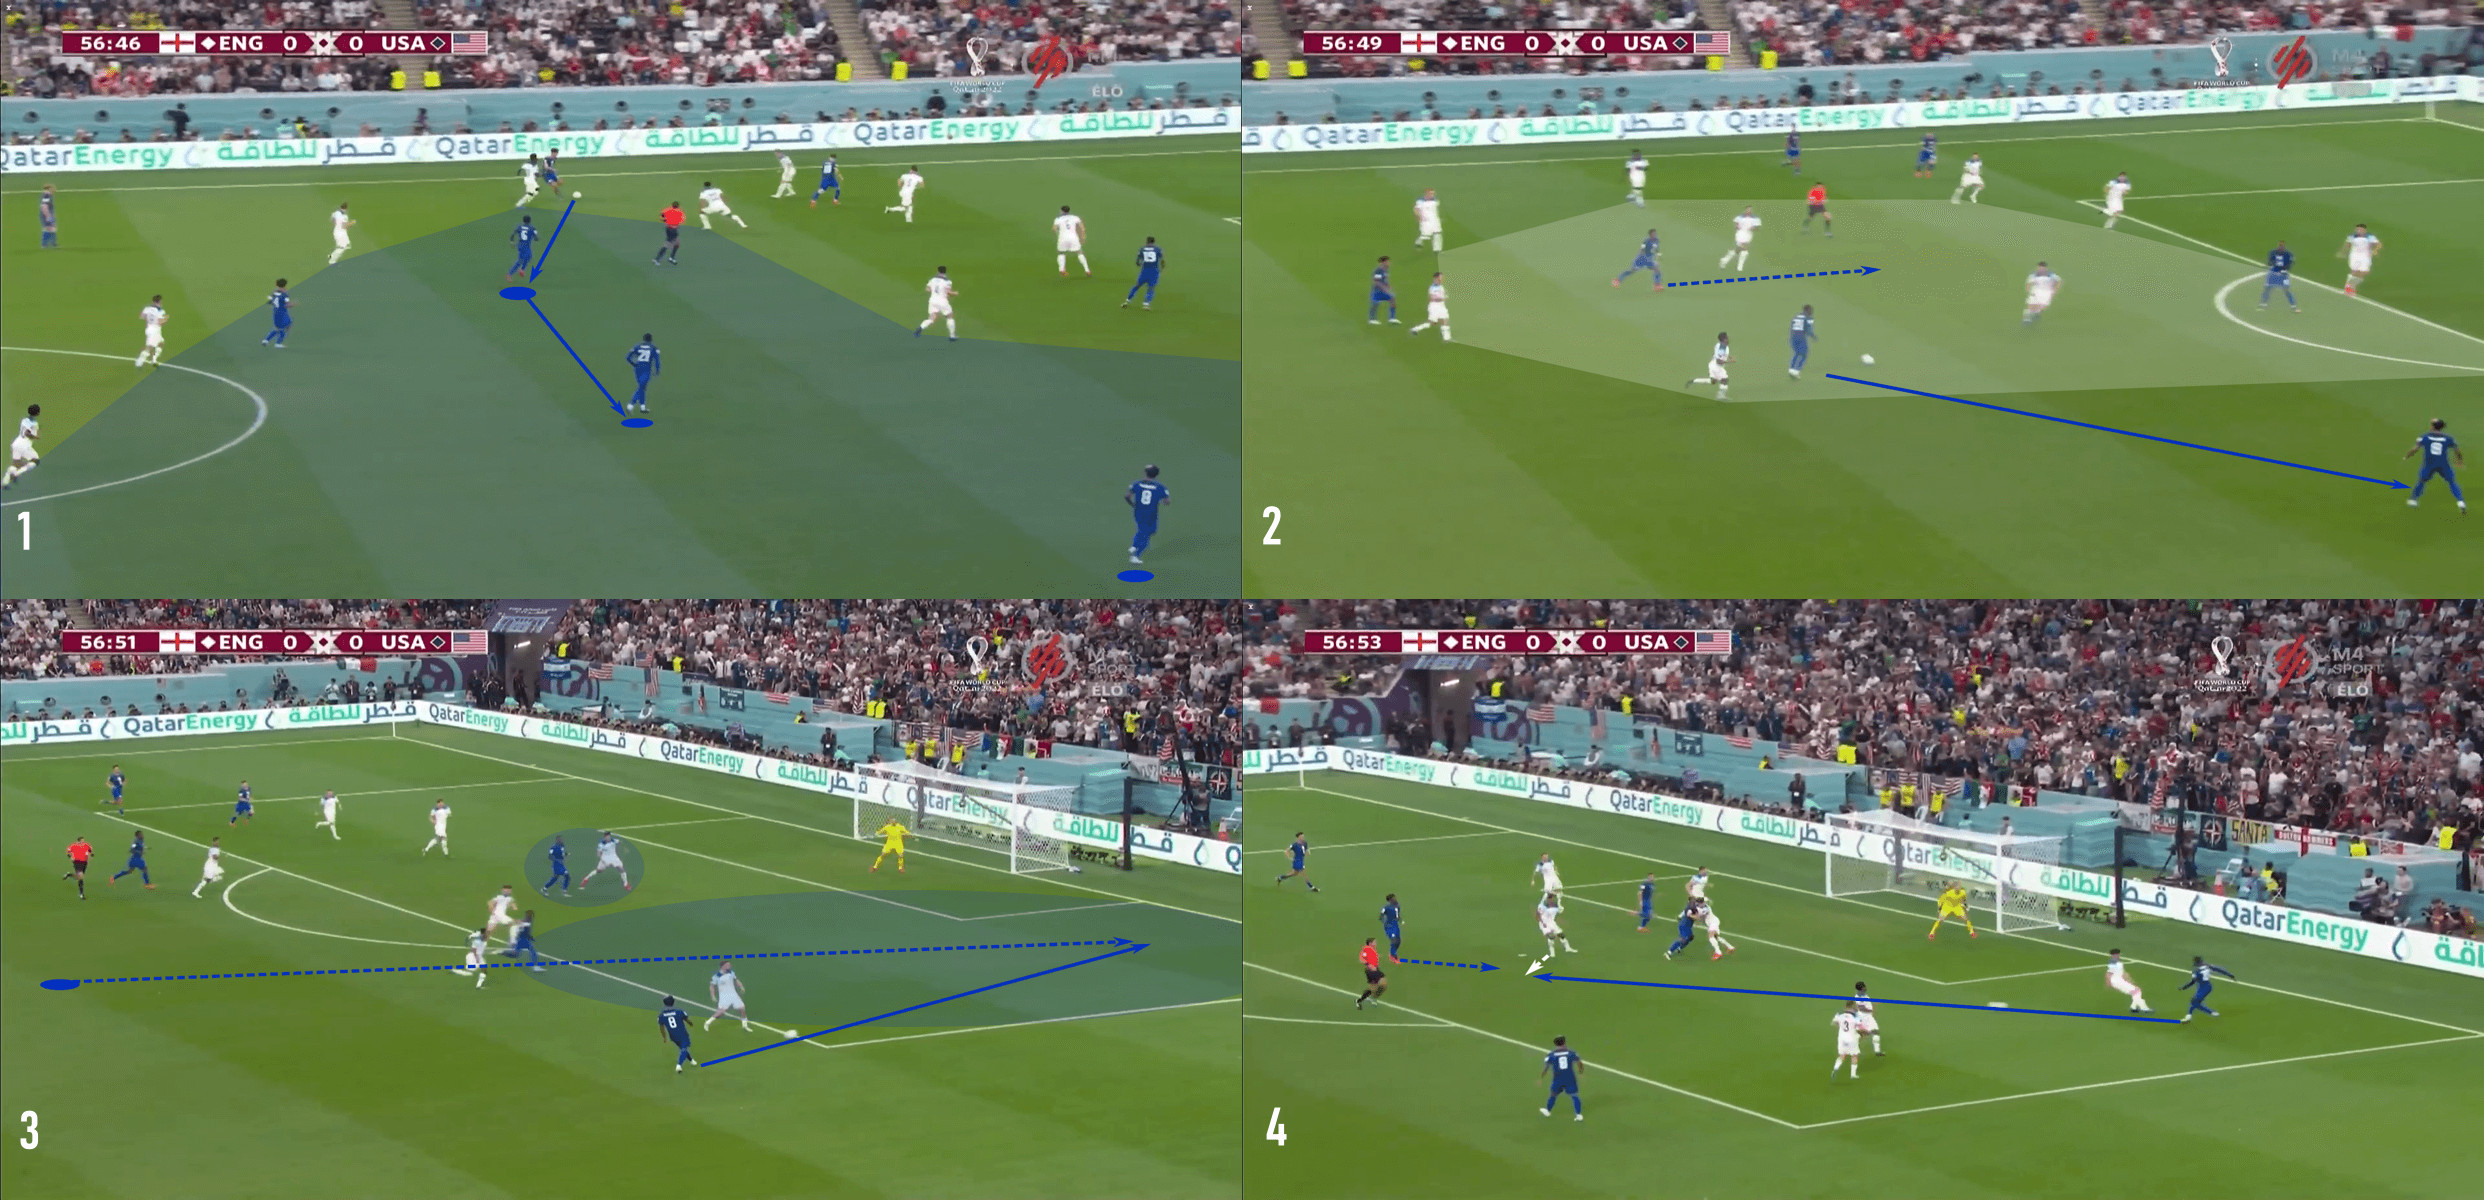
Weah played the second pass to the right, then started his run behind the backline. Wright did well to keep McGuire central. With Shaw defending against McKennie, Weah saw his opportunity to run behind the backline. McKennie’s pass was well-weighted, allowing Weah to play a negative cross towards the penalty spot. Musah was a couple of steps behind the play leading to an English clearance, but the movement was textbook, which Berhalter will find pleasing.
As for Southgate’s England, their play was generally positive in the first 20 minutes of the game. We saw in the previous section how they used an outside-in pattern to advance into the middle third and attack the box. They managed to do so a few times in the first 20 minutes but struggled in the final 70.
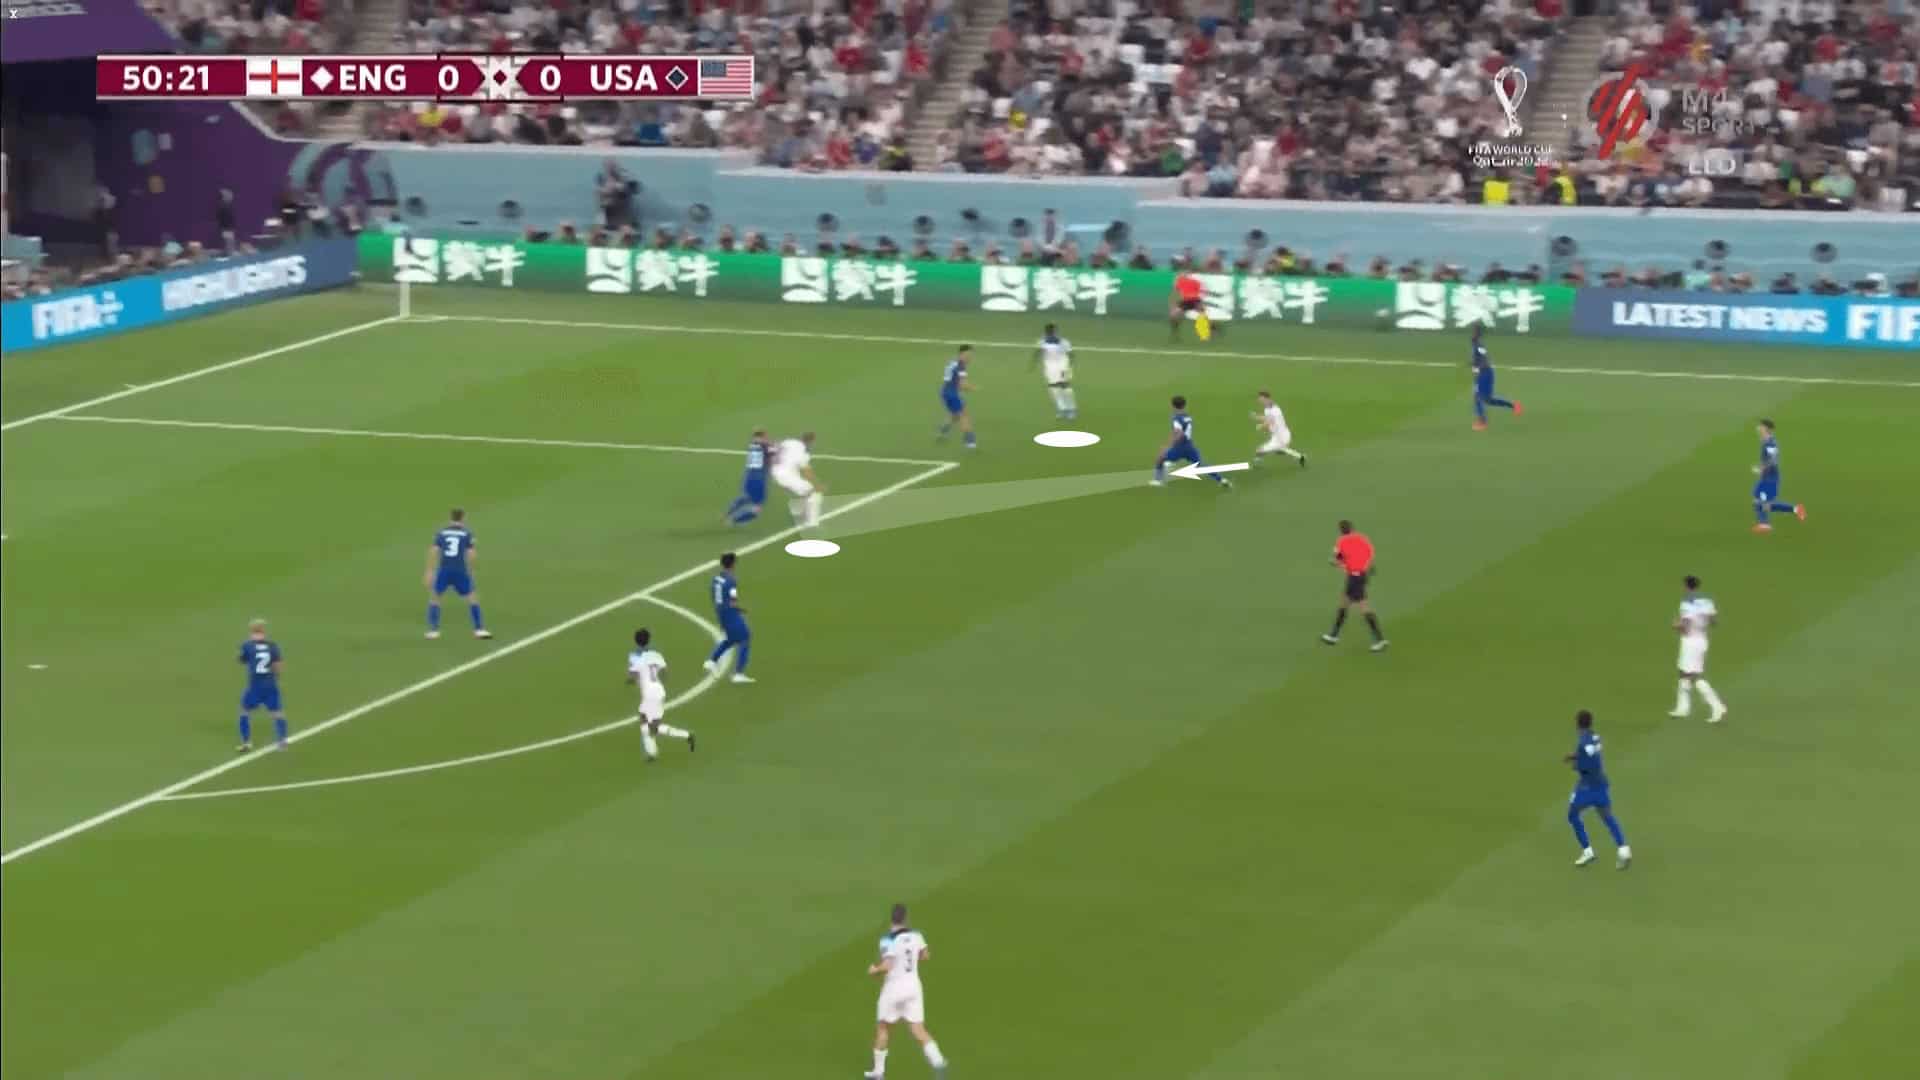
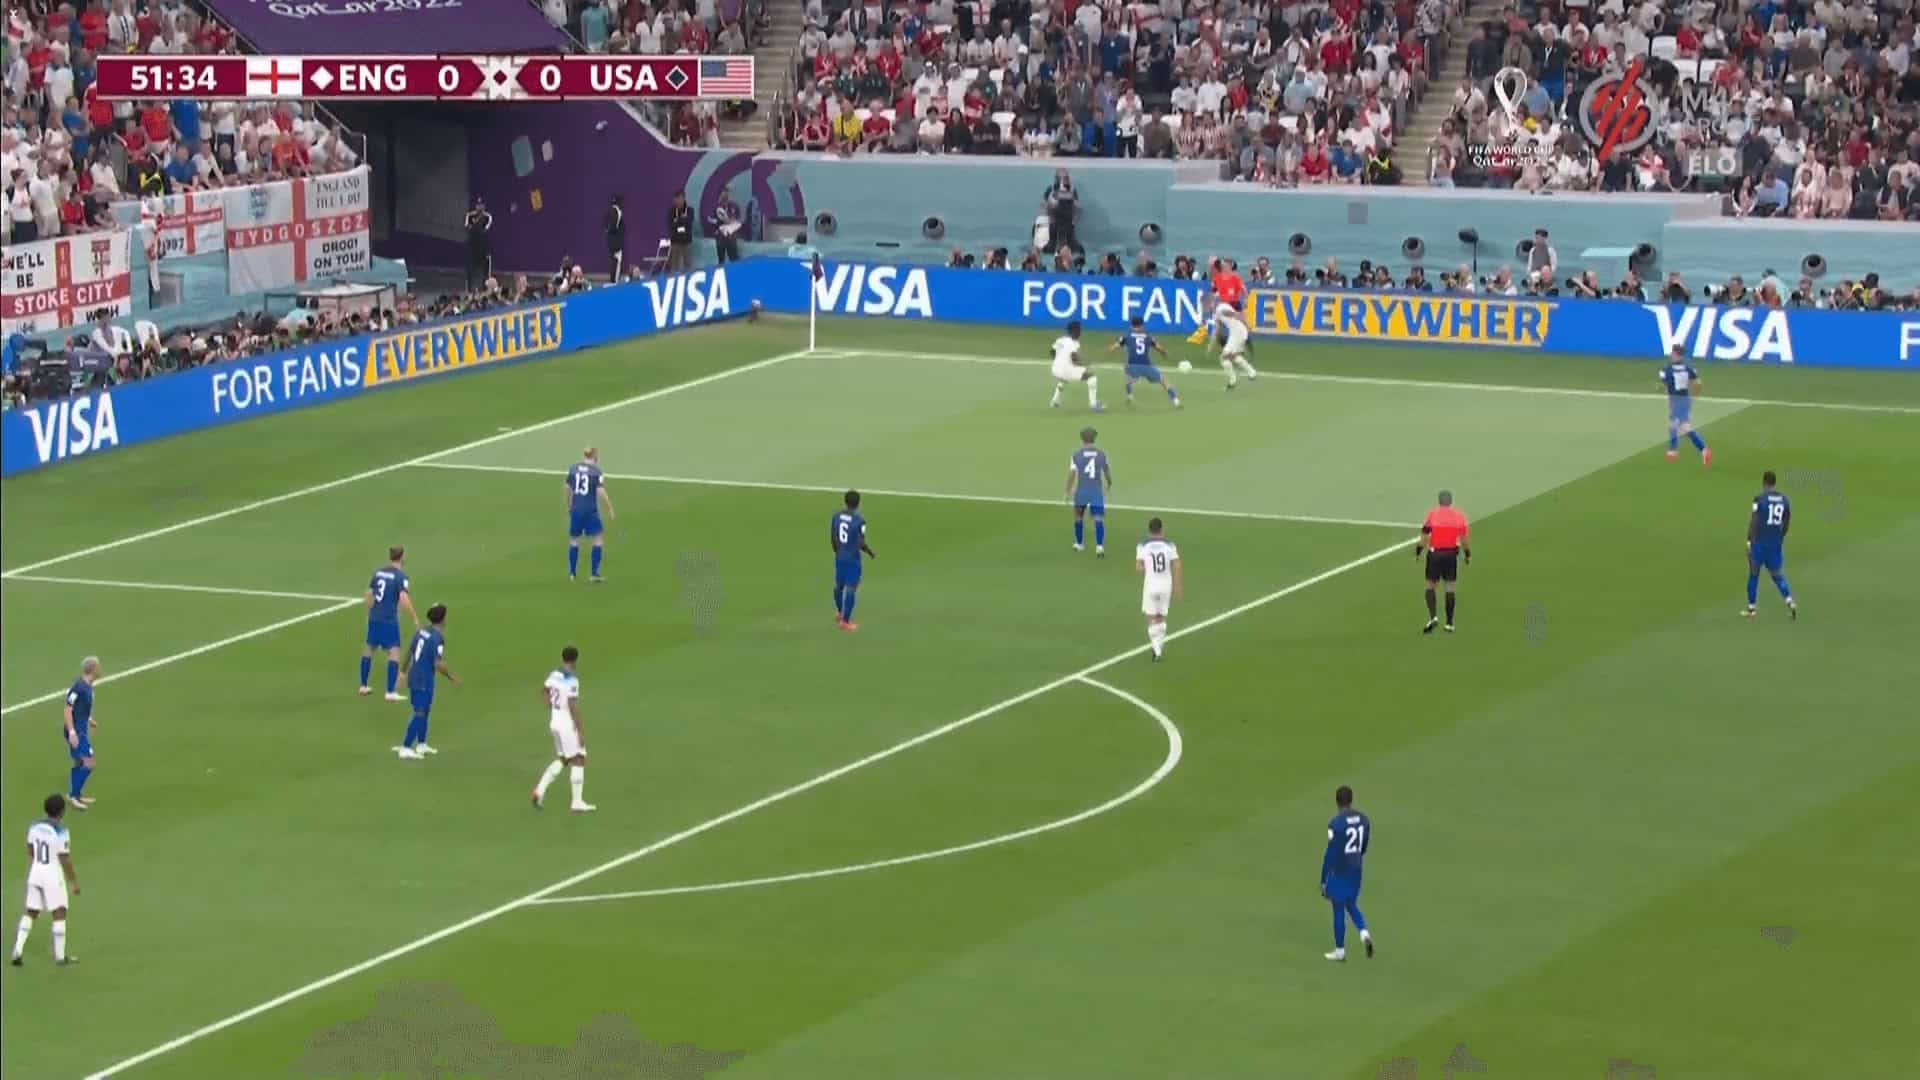
To get a sense of where the issues came from, we’ll look at a few attacking third sequences. The first comes in the 51st minute. As England looks to attack in the box, Mount is driving forward in a 3v3 scenario. The players ahead of him, Kane and Saka, are in front of their defenders asking for the ball to their feet. Kane is playing back to goal with Ream right behind him, but the passing lane into the big striker is blocked by Adams. Ultimately, the two forwards are offering the same kind of pass with the same limited window. The lack of diversity of movements stunted this attack, leading to Adam’s easy interception.
When England was able to play behind the backline, they struggled to produce meaningful opportunities on goal. In the instance below, they got into the box with the outside-in pattern, but the first touch was poor, allowing the United States to get numbers behind the ball once again. England’s final third frustrations were a mixture of poor positioning and movement, as well as a lack of execution.
Even in simple scenarios like a 2v1 from a throw-in, they still struggled to find solutions. Kane’s throw-in was played into Saka’s chest. The youngster try to chest pass the ball back to the Tottenham #9, but didn’t get enough on it. To make matters worse, he then stood directly behind the isolated Robinson. The lack of movement slowed Kane’s next action, allowing Robinson to exploit the striker’s indecision.
The first 20 minutes were positive as England managed to produce a few quality scoring opportunities, but those moments were few and far between in the remaining 70 minutes.
Failure to take advantage of attacking transitions
If there is an upside to England’s possession advantage and wary attacking tactics, it’s that the Americans struggled to generate quality goal-scoring opportunities from the counterattack. The downside is that neither team was particularly good in attacking transitions. Progressing the ball up the pitch wasn’t much of an issue. However, execution in the final third, particularly when attacking the box, hurt both teams.
Since we’ve just finished our conversation on England’s final third woes from open play, let’s look at examples from attacking transitions. Looking at the image below, we don’t need an in-depth analysis to figure out what went wrong in the sequence. Each run is identical. The players are running on a straight line with no variation, no positional rotations and, ultimately, not attacking or creating space. Since the runs were strictly vertical, so were the USA’s defensive adjustments. Simple movement patterns lead to simple defending. This counterattack was so poor that Adams managed to end it himself.

England didn’t have many opportunities to counterattack, mostly due to their advantage in possession. When they did, the execution was a big issue.
For the USA, they often found their way into the box but then struggled with the final pass or shot selection. Let’s focus on the ball progression first.
In the sequence below, we have Pulisic making a run inside to connect with Musah. A simple up-back-through pattern springs Robinson behind Trippier. The pass was played behind the Fulham man, but it did eventually lead to a cross that’s won by England.

A few minutes later, another USA counterattack got them into the box. Wright carried the ball into the box from the left wing and drove inside to set up a right-footed shot. The position looks threatening, at least until you saw the white wall of defenders who were essentially shielding Wright’s shots from the goal. The pass to Weah was available earlier but went unnoticed. There was a second opportunity to release the ball, finding the run of McKennie, but right couldn’t pick out the Juventus man either. A shot was taken and ultimately deflected into McKennie’s path, but poor decision-making in the box limited the productivity of this attack.

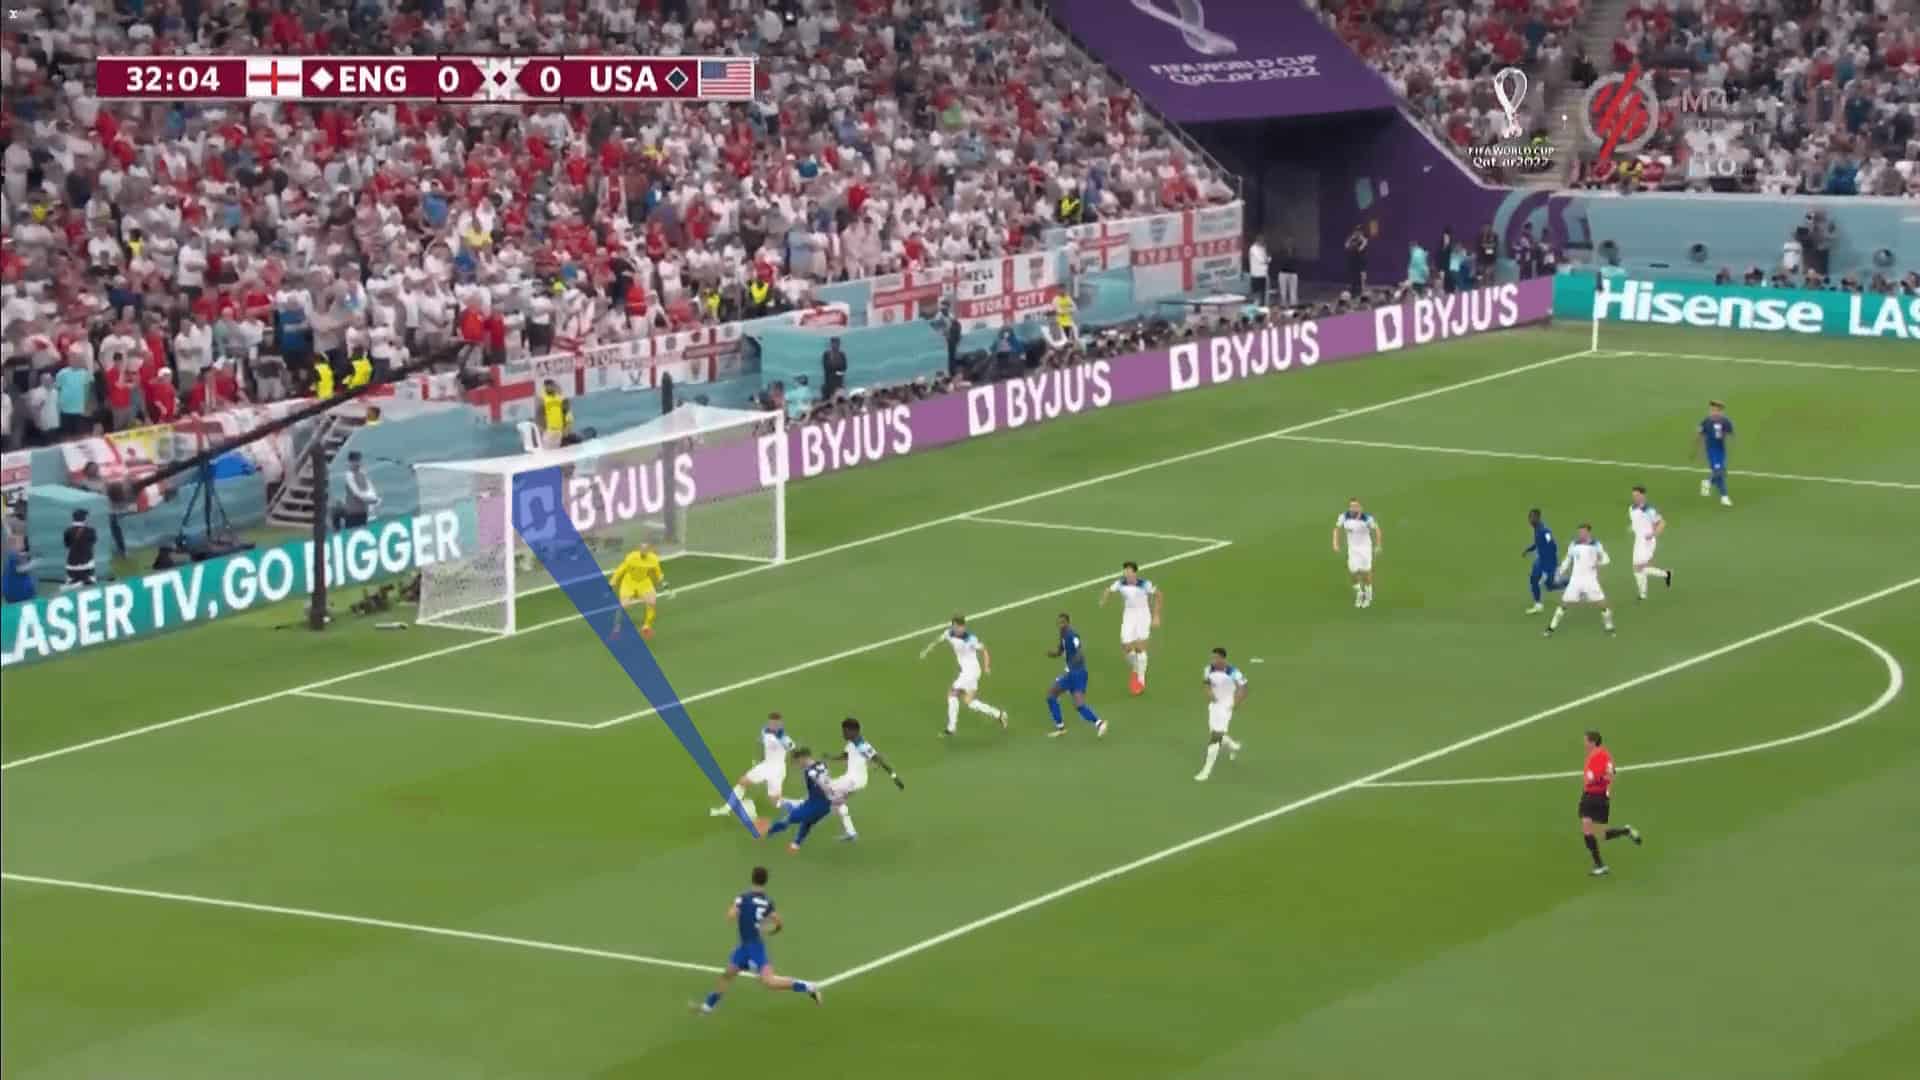
Finally, we have the Pulisic shot that rattled the goal. To their credit, England recovered with six players defending in the box. However, it’s the late run of Musah from midfield that creates the path forward. McKennie chipped the ball back to the young La Liga star, who then set the ball to Pulisic on the left.
The last image shows the shooting window available to the Chelsea man. It’s a tight one on his weaker foot. To beat Pickford from that range would require a near-perfect hit. And Pulisic nearly pulled it off.
Each team managed to produce a few good opportunities. For England, those came through open attacks after a change in tempo. The USA had some success in the flow of play, but they were also dangerous in transition. Decision-making in the box limited the success of their attacking transitions, but the progression into the box was certainly there.
Conclusion
Another 0-0 score line for the tournament, but this was certainly an enjoyable match, at least for the American fan base and neutrals.
Despite the disappointing draw and performance, England does maintain their lead at the top of the group, sitting on four points. Their spot in the next round is fairly secure with only a total collapse against Wales standing between them and the knockout rounds.
The USA sits third in the group, needing a win against Iran to progress to the Round of 16. It’s a difficult matchup against the Asian champions, but the performance against England renews hope that the US can get the job done. They’ll have to improve their production in the final third, especially if Iran concedes possession and plays with the deep line of confrontation, as is expected.
Group B is primed for an exciting finish next week. England is nearly assured a spot in the knockout rounds, leaving USA vs Iran as the showcase game of Match Day 3. We’ll have our answers next Tuesday.