FIFA World Cup 2018: Morocco Vs Iran
Morocco and Iran went into their World Cup opener knowing that victory was a necessity if they were to have any real hope of progressing to the knockout stages. Drawn in Group B with Spain and Portugal, whoever lost this match would face an uphill task in their next two fixtures.
Both teams entered the tournament with belief having had outstanding qualifying campaigns. However, confidence and form only get a football team so far. Fortunately, these two sides also have clear tactical approaches and some exceptional individual players. Consequently, their clash was one of genuine quality, with some positive attacking, pressing and counter-attacking play.
TEAM NEWS
Morocco went with their favoured 4-2-3-1 system, with goalkeeper Munir protected by a centre-back duo of Mehdi Benatia and Romain Saiss. The selection of Saiss at the heart of defence may have raised some eyebrows in England – he has, after all, spent most of his time in midfield at Wolverhampton Wanderers. However, his appearance in a deeper role here was done to enable better quality build-up for Morocco.
Natural winger Nordin Amrabat started at right-back, while Real Madrid’s Achraf Hakimi played on the left of the back four. The former’s selection in a full-back role again showed the attacking intent of a Moroccan outfit coached by Herve Renard.
The midfield five was fairly fluid. Karim El Ahmadi generally stayed deep, though his central midfield partner, Mbark Boussoufa, was given licence to push forward both defensively and offensively. Further on, the attacking midfield trio of Hakim Ziyech, Younes Belhanda and Amine Harit played with a great deal of positional freedom behind lone striker Ayoub El Kaabi.
Carlos Queiroz lined his Iran side up in a more defensive 4-5-1 system. Sardar Azmoun acted alone up front, though support did come from Alireza Jahanbakhsh and Karim Ansarifard in the wide areas. In central midfield, Masoud Shojaei and Vahid Amiri took on more active pressing outer roles, while Omid Ebrahimi covered centrally.
Behind them, goalkeeper Alireza Beiranvand was shielded by a solid back four made up of right-back Ramin Rezaeian, centre-backs Morteza Pouraliganji and Rouzbeh Cheshmi, and left-back Ehsan Hajsafi.
MOROCCO’S ATTACKING MOVEMENTS
Morocco’s attacking structure was fluid, with positional rotations between the central midfielders and attacking midfielders occurring frequently throughout the match. A common move would see Boussoufa move up the field during build-up, attempting to drag an Iranian midfield marker with him and create space that Ziyech, Belhanda or Harit could drop deep in to receive possession.
However, while the intentions behind Boussoufa’s movement were positive, as he looked to manipulate the man-orientations in Iran’s central midfielders, this didn’t always work. Often, it would simply result in Boussoufa making himself inaccessible behind the Iran midfield line.
Morocco’s build-up generally involved the two centre-backs, plus one or two midfielders – El Ahmadi being one of them. They found it difficult to play through a packed centre, however, so were often left circulating the ball amongst themselves before relying on a dangerous dribble through pressure or a long ball to progress the attack.
At times, Iran capitalised on sloppy build-up to launch counter-attacking raids that nearly led to goals, though generally, Morocco were able to establish control of possession thanks in part to the position and body shape of their midfield receiver. Below is an example of this. Belhanda moves into space diagonally in front of Benatia, positioning himself so his back is not to goal. From this stance, he can both receive the ball comfortably and see oncoming pressure.

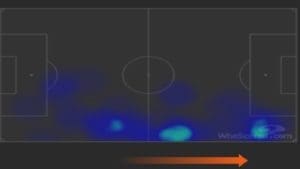
One of the most noticeable aspects of Morocco’s attacking play was the advancement of their full-backs down their respective flanks early on in build-up. Amrabat took up a particularly high position, acting as more of a right-winger than a right-back for much of the match. See his WhoScored heat map below for evidence. These high positions were taken up to offer an option for long diagonal balls from the centre-backs or quick switches of play either to get around Iran’s compact defensive block, or simply to stretch their block horizontally and create space within their back line.
The full-backs’ advancements also allowed Morocco’s nominal wingers to drift infield and take up positions between Iran’s defence and midfield lines in the hope of offering a penetrative vertical passing option, or to drop back in their channel, receive possession and open up Iran’s block with a dribble or pass.
Ziyech, Harit and Belhanda were also more able to combine with one another thanks to their movements inside, as seen in the below graphic. Here, Ziyech drifts to the centre to receive a pass inside from Harit, who has peeled away from the frontline to escape Iran’s man-marking. Ziyech could then play a through ball to Hakimi, who is seen advancing down the left-wing.

Despite a bright start, Morocco struggled to build effective attacks as the match wore on. This was no doubt down to the defensive approach of Iran, which will be discussed in more detail further on in this article. A decrease in dynamism meant Renard’s men became increasingly reliant on long balls, though they had little success with this ploy up against a resolute and aerially strong Iranian defensive line.
IRAN’S MAN-ORIENTED PRESSING
Iran defended in a 4-5-1 medium block with a focus on maintaining compactness within their shape. Azmoun often took up a position in and around the centre circle with the aim of obstructing or discouraging forward passes into midfield from Morocco’s centre-backs, while the wingers were tasked with keeping tabs on Morocco’s advancing full-backs.
With Azmoun dropping back, Iran’s defensive shape was vertically compact; there was little open space between the lines for Morocco to exploit. Additionally, with Ansarifard and Jahanbakhsh tracking back, the Iranian full-backs could then tuck in and form a horizontally compact back four with their centre-backs. An example of this shape, and the central congestion it created, is seen below (Iran’s wingers are highlighted).

Iran deployed a man-oriented midfield press that saw one of their central midfield three – usually Shojaei or Amiri – move up to apply pressure on the ball when it came to the man in their zone in and around the halfway line. They were happy to simply close down their opposite man, cutting his time in possession and restricting his options, however, they were very quick to pounce on pressing opportunities when their opposite man received the ball with his back to goal.

Iran’s pressing led to good counter-attacking opportunities. Not only would they win the ball just inside the Moroccan half, but they would do so with just two centre-backs and two central midfielders – at best – to get past on their route to goal. In these moments they were decisive and fast, utilising their own compactness to their advantage. Azmoun’s defensive positioning became helpful in attacking transitions, as he was close to the ball-winner and therefore immediately available to pick up loose balls or receive passes. From there he, along with runners on each side, could attack the Morocco centre-backs.
Queiroz’s side were highly physical in their pressing approach, committed in 50/50 situations and unafraid to foul if it meant disrupting Morocco’s possession game. This was done to frustrate their opposition, as the manager himself discussed after the match.
“Our strategy was from the first minute to create a mental collapse in the Morocco players, we tried to do that by creating frustration and blocking the playmakers.”
In the latter stages of the second half, Iran found it difficult to press with the same intensity in midfield, which led to the team taking up a deeper defensive block. As a result of all this, they were also less able to instigate quick counter-attacking opportunities in high areas.
Ultimately, they would score the only goal of the game through an own goal from a free kick in the fourth minute of second-half stoppage time. Some may dispute whether they deserved all three points, but Iran’s defensive effort was well worthy of at least one.
FINAL NOTES
Morocco’s defensive approach was different to Iran’s. Their 4-2-3-1 became a ball-oriented 4-1-4-1 defensively, with El Ahmadi covering and Boussoufa pushing up to join the second line of pressure. The striker, El Kaabi, was more active than Azmoun. He ran and positioned himself to force Iran’s build-up wide, while the wingers – Ziyech and Harit – positioned themselves in the inside channels, looking to intercept passes from Iran’s centre-backs to their full-backs or simply to pressure the full-backs.

Iran weren’t particularly invested in building possession from the back, however. Indeed, they were comfortable avoiding the risk of giving the ball away deep in their own half altogether, playing long balls to Azmoun or one of the wingers. From there they would look to win the second balls and cause chaos high up the pitch.
Morocco will be deeply disappointed that their fast start and nice spells of possession led to nothing. They must now avoid defeat against both Spain and Portugal if they are to have a serious chance of making the second round. As for Iran, they can look forward to frustrating their other two group stage opponents.
if you enjoyed this, then check out our analysis or Russia Vs Saudi Arabia and Egypt Vs Uruguay.