Qatar have successfully retained their AFC Asian Cup crown on home soil, overcoming a determined Jordan side by three goals to one in Saturday’s final.
Though the fact that Qatar’s three goals all came from the penalty spot may not leave us all with the most satisfaction after a final, there was a lot they did right from a tactical and technical perspective during the game that helped to ensure they came away from Saturday’s game with the trophy and winner’s medals.
This tactical analysis piece is going to highlight one element of coach Tintín Márquez’s tactics that successfully hindered their opponents throughout the context — their mid-high block pressing and its effectiveness at stifling Jordan’s ball progression into the final third.
Our analysis will also highlight how Jordan perhaps could’ve done a better job from a tactical and technical perspective, at times, with their ball progression in spite of their opponents’ out-of-possession organisation and energy.
Lineups and formations
Before getting into our analysis as described, we’ll run through each of our two teams’ respective lineups.
Tournament hosts Qatar lined up in something of a 4-2-3-1 shape with Meshaal Barsham in goal behind a back four consisting of right-back Tarek Salman, right centre-back Almahdi Ali Mukhtar, left centre-back Lucas Mendes and left-back Mohammed Waad.
Ahmed Fathi played as the left-sided holding midfielder with Jassem Gaber on the right behind Hassan Al-Haydos as the ‘10’, who featured in between left-winger (and hat-trick hero from the penalty spot) Akram Afif and right-winger Yousuf Abdurisag. Finally, Almoez Ali led the line from the centre-forward position.
As far as substitutions go, Qatar made four of them over the 90 minutes, the first two of which came in the 53rd minute. Abdulaziz Hatem replaced Al-Haydos in attacking midfield, while Ali Asad was introduced at the right-sided holding midfield position in place of Gaber.
Another 10 minutes into the second half, Ismail Mohamad came on at right-wing in place of Abdurisag, and Qatar’s final change occurred in the 81st minute when Boualem Khoukhi came on for Almahdi Ali Mukhtar in the centre of defence.
As for Hussein Ammouta’s Jordan side, the 54-year-old former Al Sadd SC boss set his team up in a 3-4-3 shape with Yazeed Abulaila in goal behind a back three of Abdallah Nasib on the right, Yazan Al-Arab in the middle and Salem Al-Ajalin on the left.
Ihsan Haddad started at right wing-back opposite Mahmoud Al-Mardi, who provided width on the left. At the same time, Nizar Al-Rashdan played at left central midfield alongside his partner in the middle, Noor Al-Rawabdeh.
In attack, Ammouta went for Musa Al-Taamari of Ligue 1’s Montpellier on the right, Yazan Al-Naimat — who scored Jordan’s only goal of the game — in the centre and Ali Olwan on the left.
The tournament runners-up made just two changes during the game, the first being the replacement of Al-Mardi at left wing-back with Saleh Rateb, a more attack-minded player, in the 80th minute. After that, in the dying moments of the game Anas Al Awadat came on as a stoppage time substitute for Olwan in attack, but that change was not enough to make a difference so late on.
Jordan’s final third threat
Jordan posed a considerable threat to Qatar once in the final third. Despite losing by three goals to one, the runners-up generated a far higher non-penalty xG (1.86) than the champions (0.22). When they made it into the chance creation phase, they were very likely to successfully get the ball into a decent goalscoring area and have a pop — and this rang true even when they were dispossessed in the final third thanks to their top-notch counterpressing and Qatar’s struggles to clear the ball effectively.

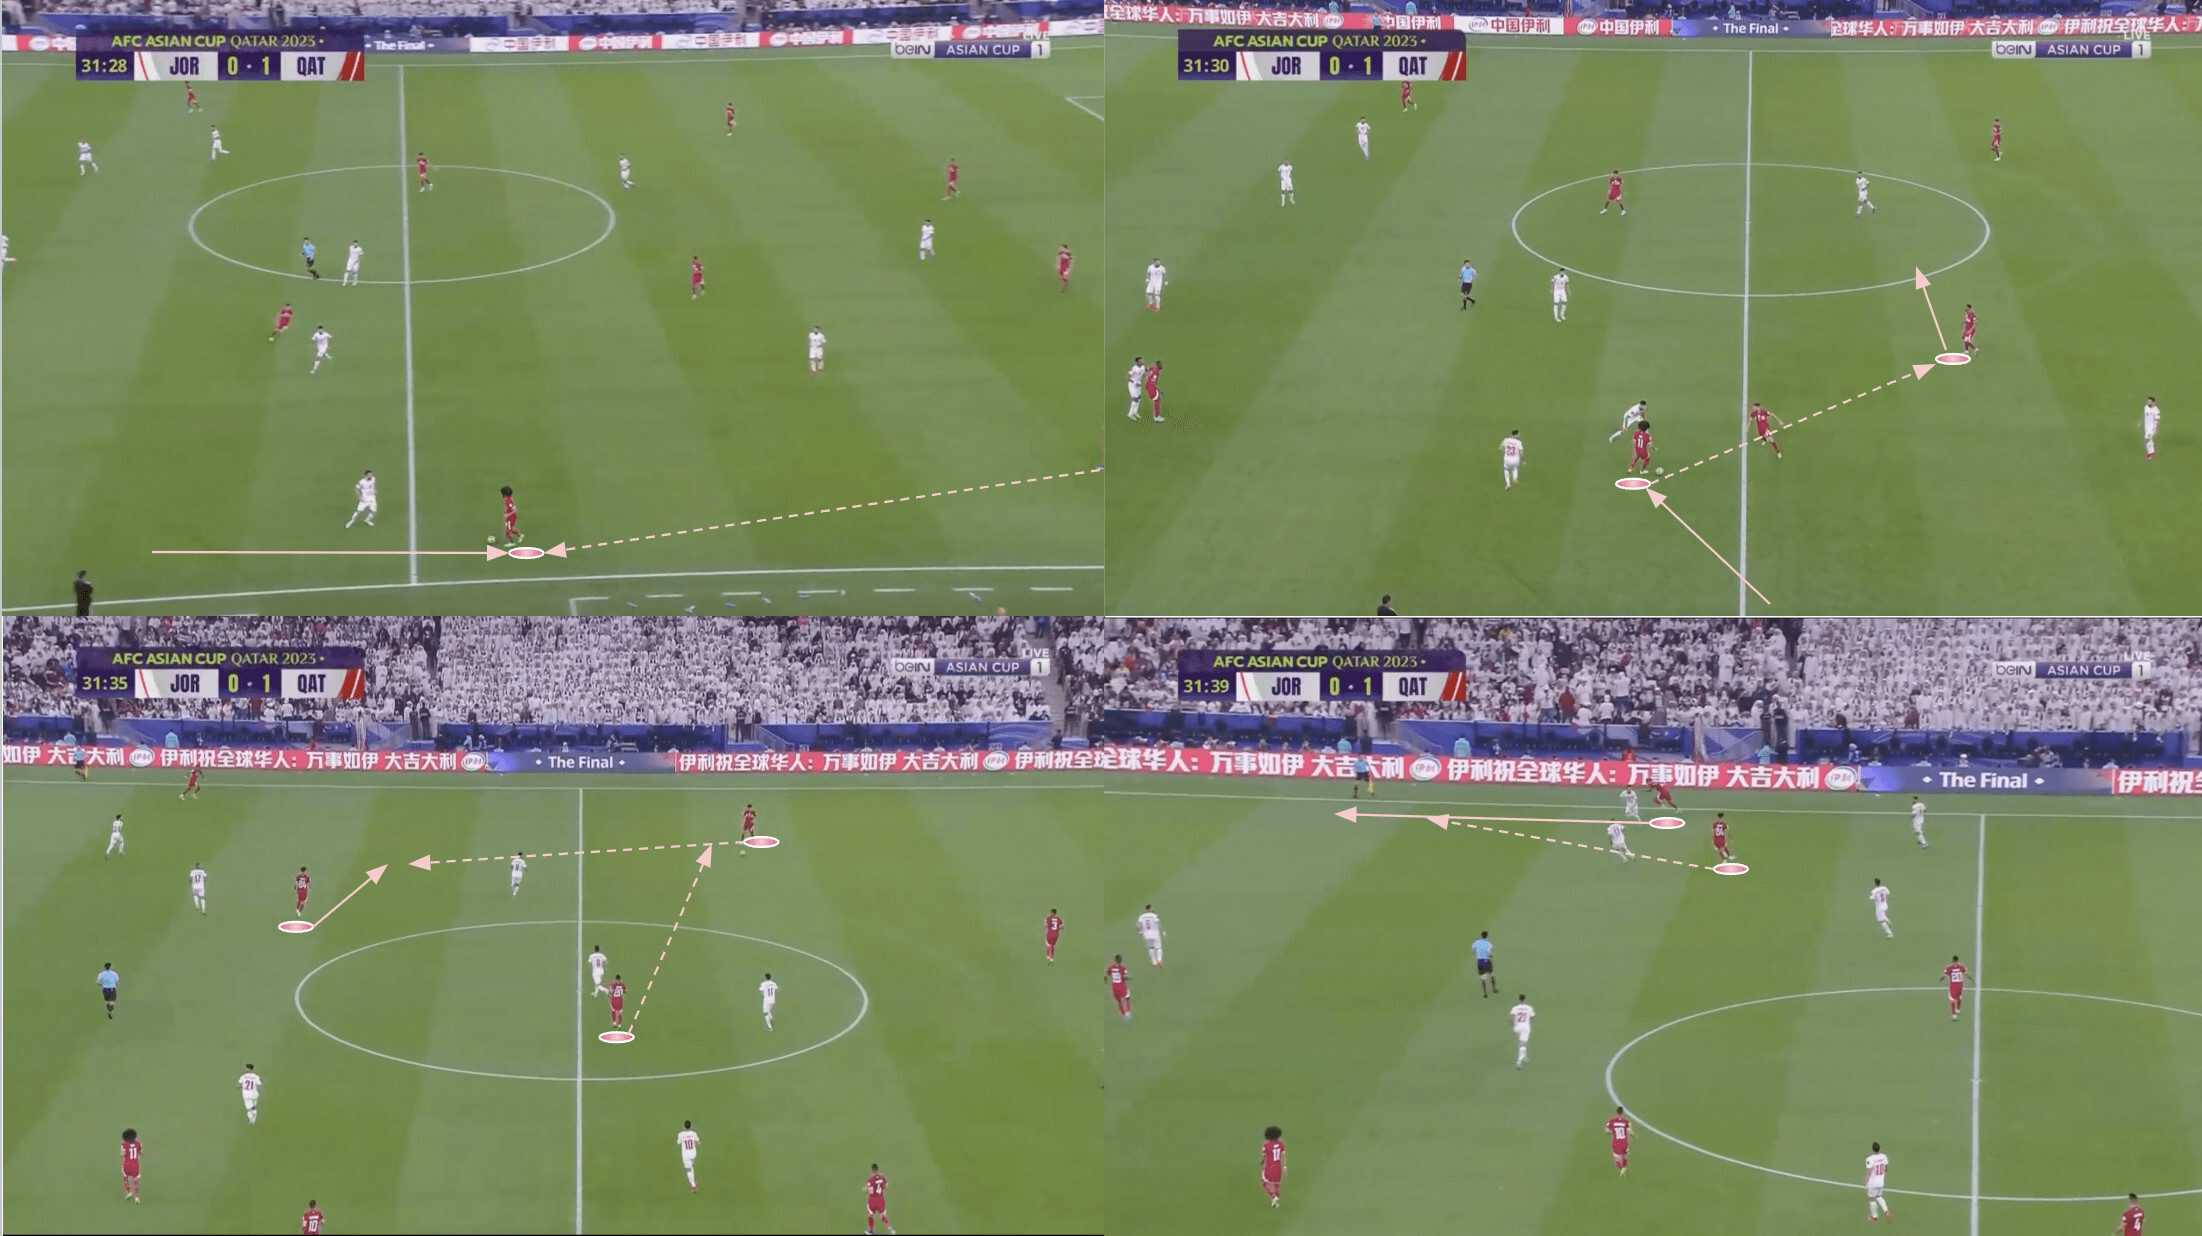
Turning our attention to figure 1 above, we can see an example of Jordan forcing a turnover in the final third via their aggressive and energetic counterpress.
Qatar liked to try and play through the thirds even after just winning the ball back and being on the edge of their box. This played into Jordan’s hands to an extent, as Ammouta’s side excelled in transition and were set up very well to force high turnovers when the opposition were in possession inside their own third, whether that was via a regular high press in a settled phase of play or in a transitional phase, the latter of which we see above.
After regaining possession on the edge of the box, Jordan worked the ball into the danger zone from high on the wing as they did so often during Saturday’s final, setting an attacker up for a strike at goal.
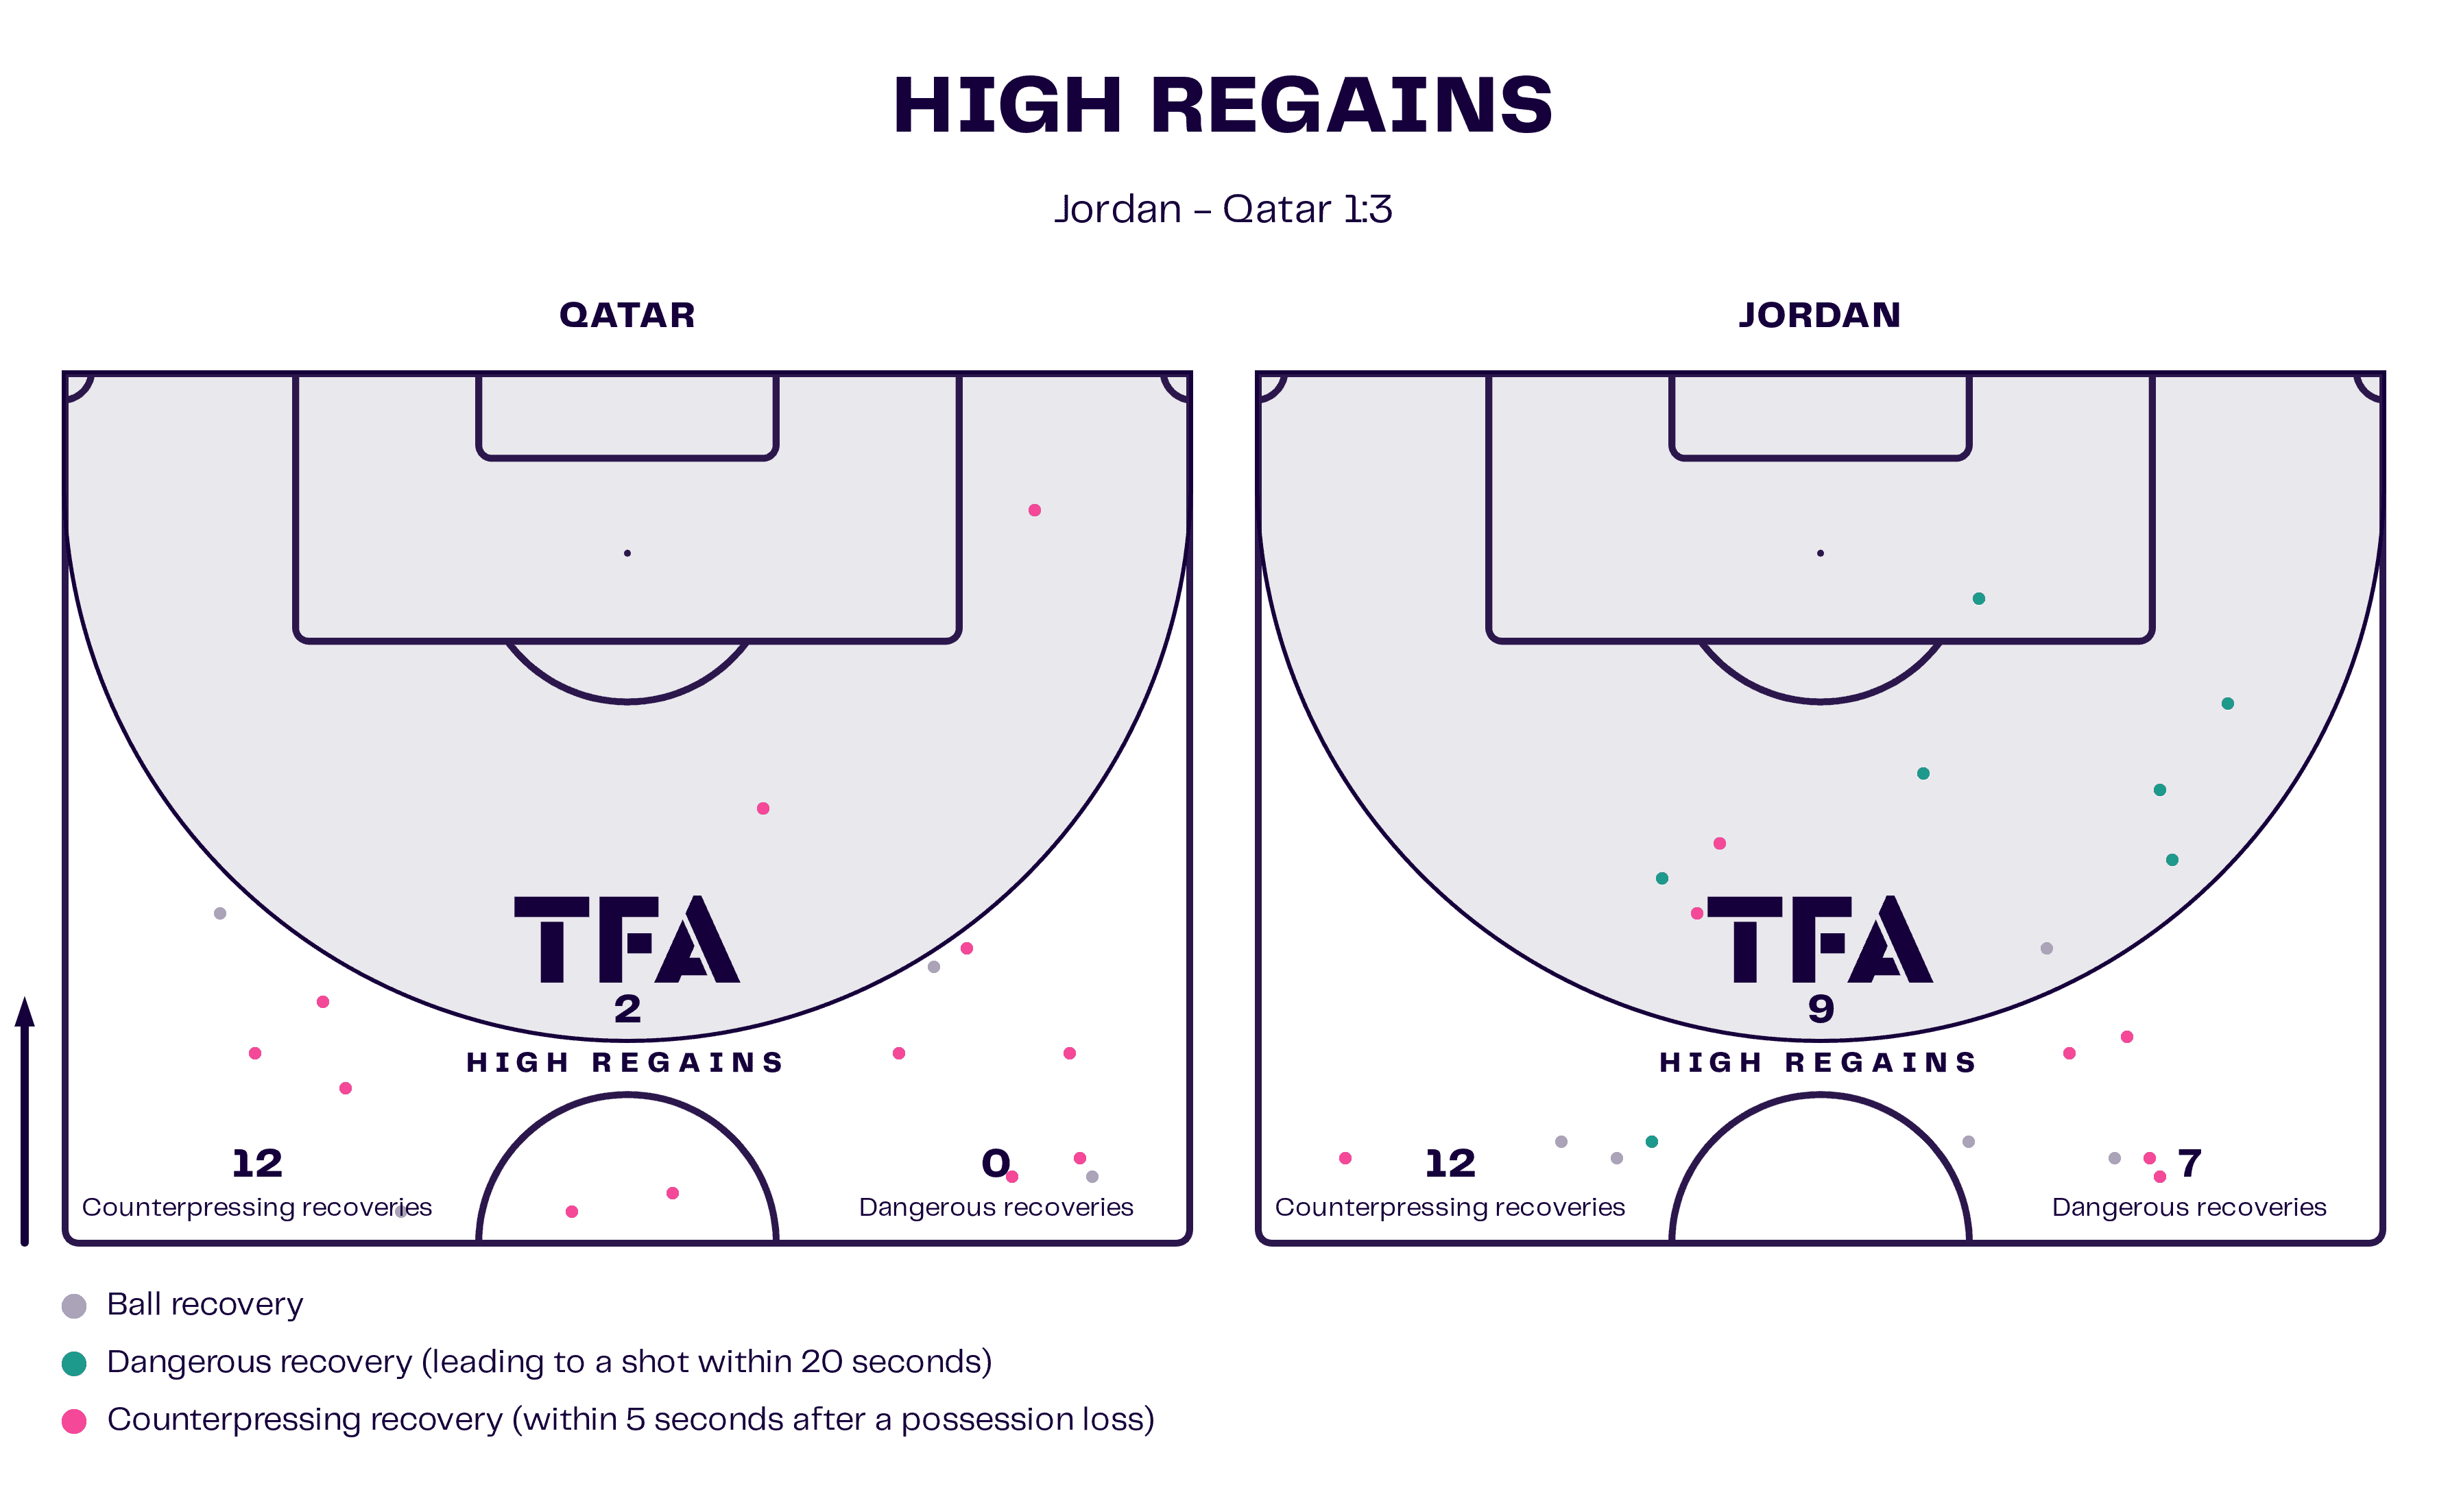
As figure 2 displays, Jordan were far better at generating high regains than the eventual winners in Saturday’s clash, and they were much better at quickly converting their turnovers into goalscoring opportunities, with seven dangerous recoveries to their name compared to Qatar’s zero.
When the ball was in Qatar’s third, whether it was at Qatari feet or Jordanian, these were the occasions when Jordan appeared as though they could realistically come away from the game with the trophy. They dominated their opponents in this part of the pitch with and without the ball, excelling in the high press and chance creation phases.
Qatar’s successful methods of preventing Jordan from entering the final third
So, how, then, did Qatar end up winning the game? One of the key tactical battles they won was the battle in the high-mid block phase and how it stifled Jordan in the ball progression phase.
While Jordan were excellent inside Qatar’s third, the champions did well to prevent their opponents from entering that area, keeping them pinned inside their own half at times, denying Jordan pathways through the centre of the pitch and either forcing them out wide where Márquez’s team would typically increase their pressing intensity with the sideline there to help them out as an additional defender or forcing them into a riskier long pass which Qatar dealt with very well on most occasions.

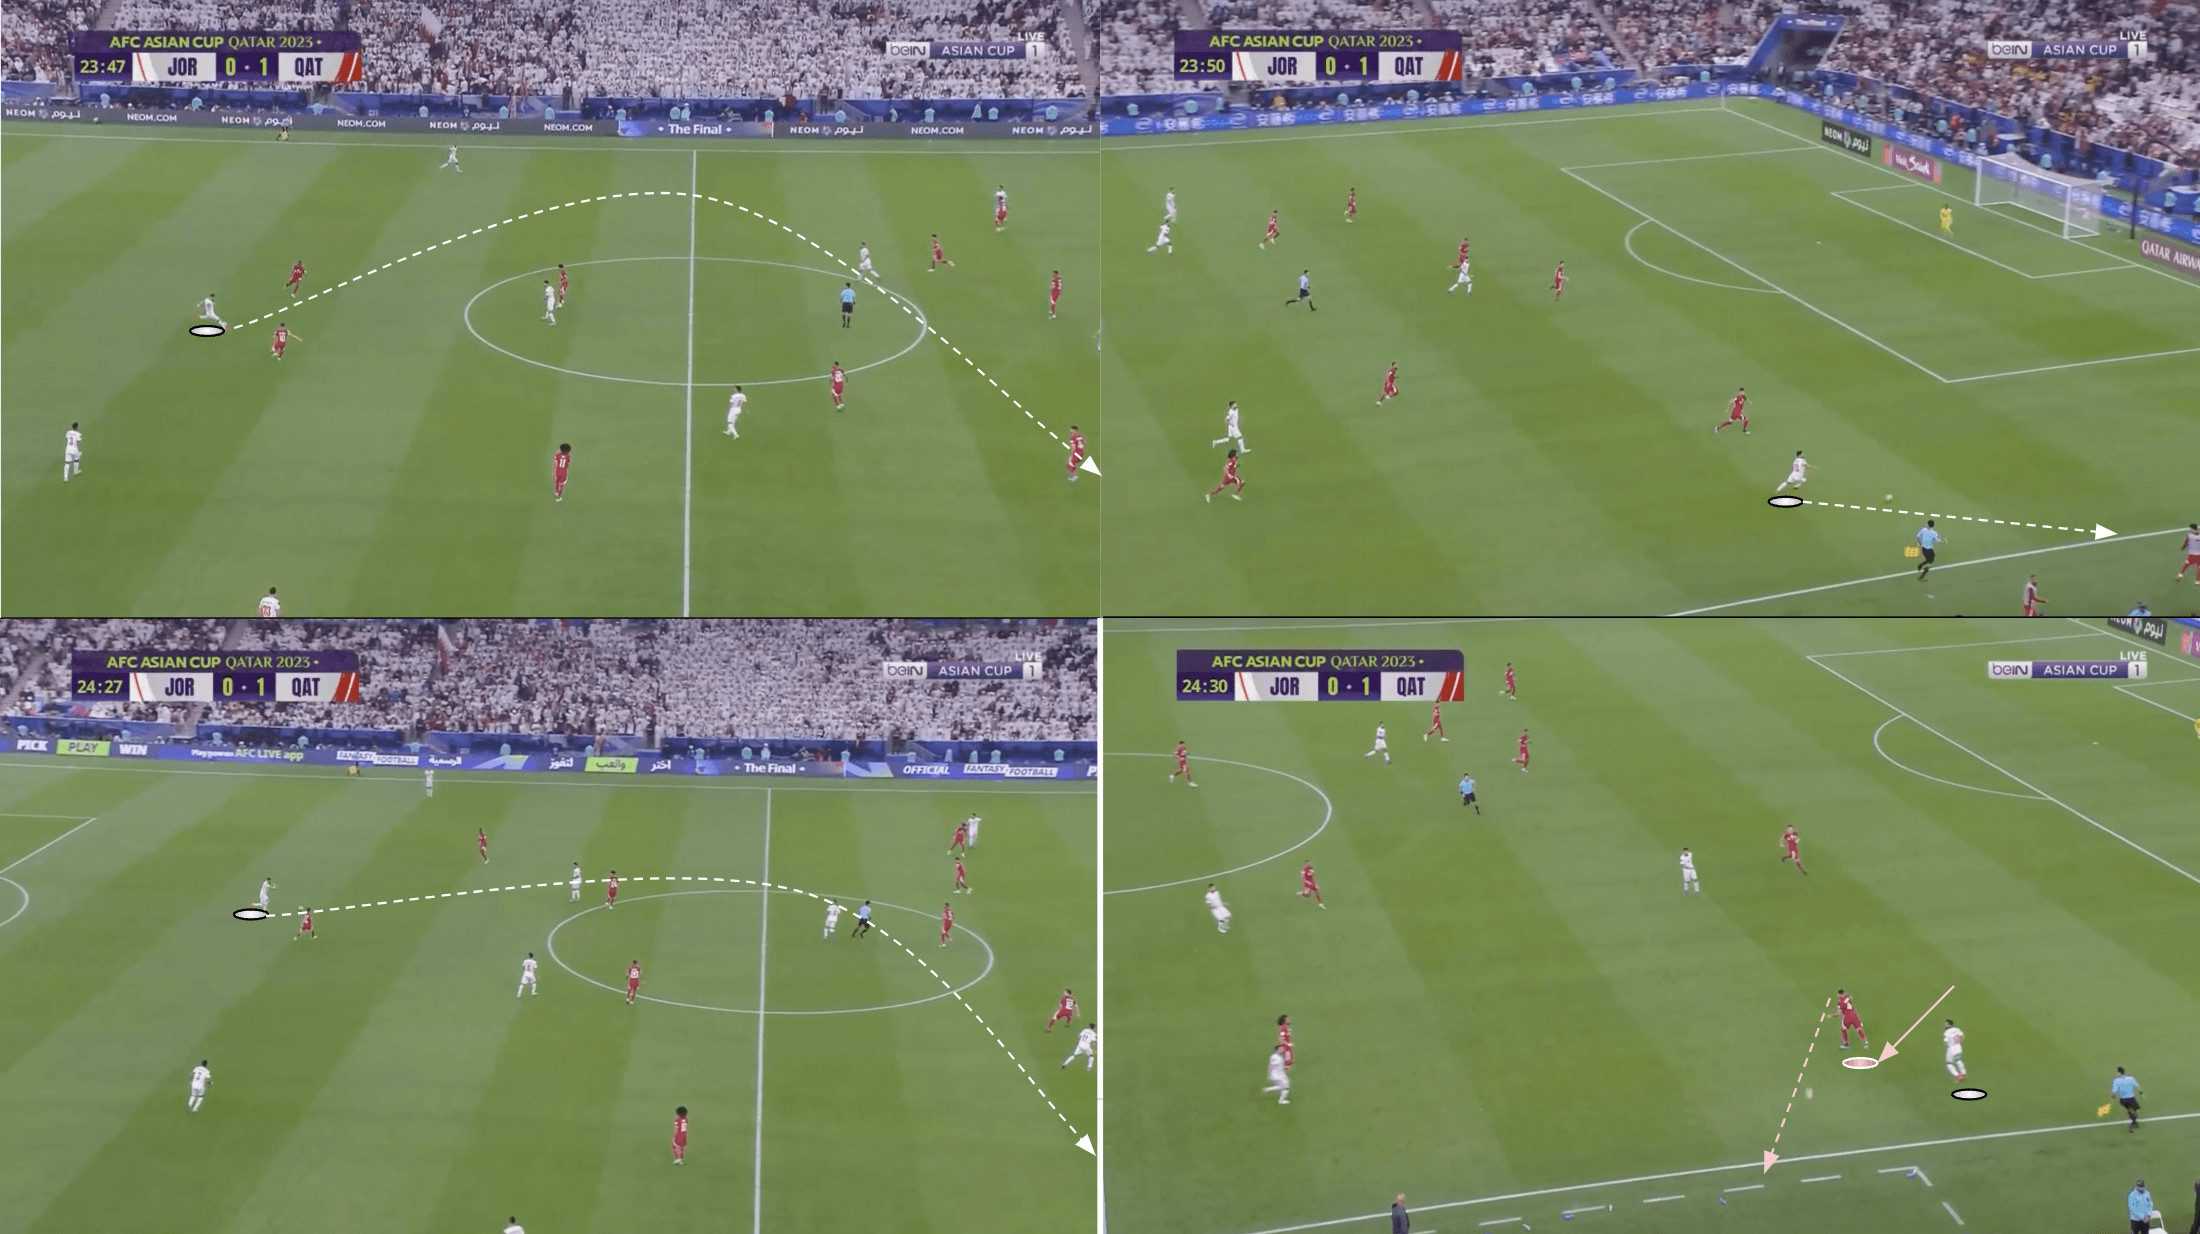
By deploying a 4-2-3-1 versus Jordan’s 3-4-3, Qatar could match up evenly with Jordan’s central midfield duo by having their two holding midfielders marking them tightly. This freed up the ‘10’ to press higher, so we often found him alongside the centre-forward in this phase of play, as shown in figure 3 above.
This was crucial to 1. Ensuring Qatar won the battle for control in the middle of the park, and 2. Providing Márquez’s side with easy access to the opposition centre-backs at all times while still being able to press any players dropping out wide via the wingers quickly.
A winger could move from the narrower position to the wide area to cover a dropping Jordanian player, allowing the full-back to remain deeper. Qatar could retain a 3v3 advantage against Jordan’s back three thanks to the ‘10’ advancing as cover on one of the centre-backs while the other winger and the centre-forward retained access to the other two.
As the centre-backs played the ball across the backline, searching for a progressive passing opportunity, there was always a Qatari shirt immediately closing them down, giving them no time to get their head up and pick a pass.
On this occasion from figure 3, as the centre-back receives, the ‘10’ closes him down aggressively. With all near passing options also marked tightly, the ball carrier is forced into a long ball, which Qatar’s backline is prepared to deal with, as is the goalkeeper, who leaves his line and sweeps up the danger.
This passage of play provides a glimpse of what was so common throughout this contest: how Jordan were routinely denied paths to progression upfield from the back by Qatar’s aggressive pressure from the mid-block, along with the fact that the resulting long balls were usually unsuccessful.
One potential solution for Jordan’s progression problems was that their wingers could have dropped into the half-spaces to receive to feet more often and provide more progressive passing options.
For instance, in figure 4, we see how Qatar’s left-winger Afif was able to drop into his own half, receive to feet and carry into the centre to the point where he attracted more Jordanian bodies from the middle of the park, thus freeing up his midfielder who could then switch the focus of the play to the right of the pitch where Tarek Salman had time and space to play the ball forward, moving Márquez’s men through the central third, ultimately into the final third.
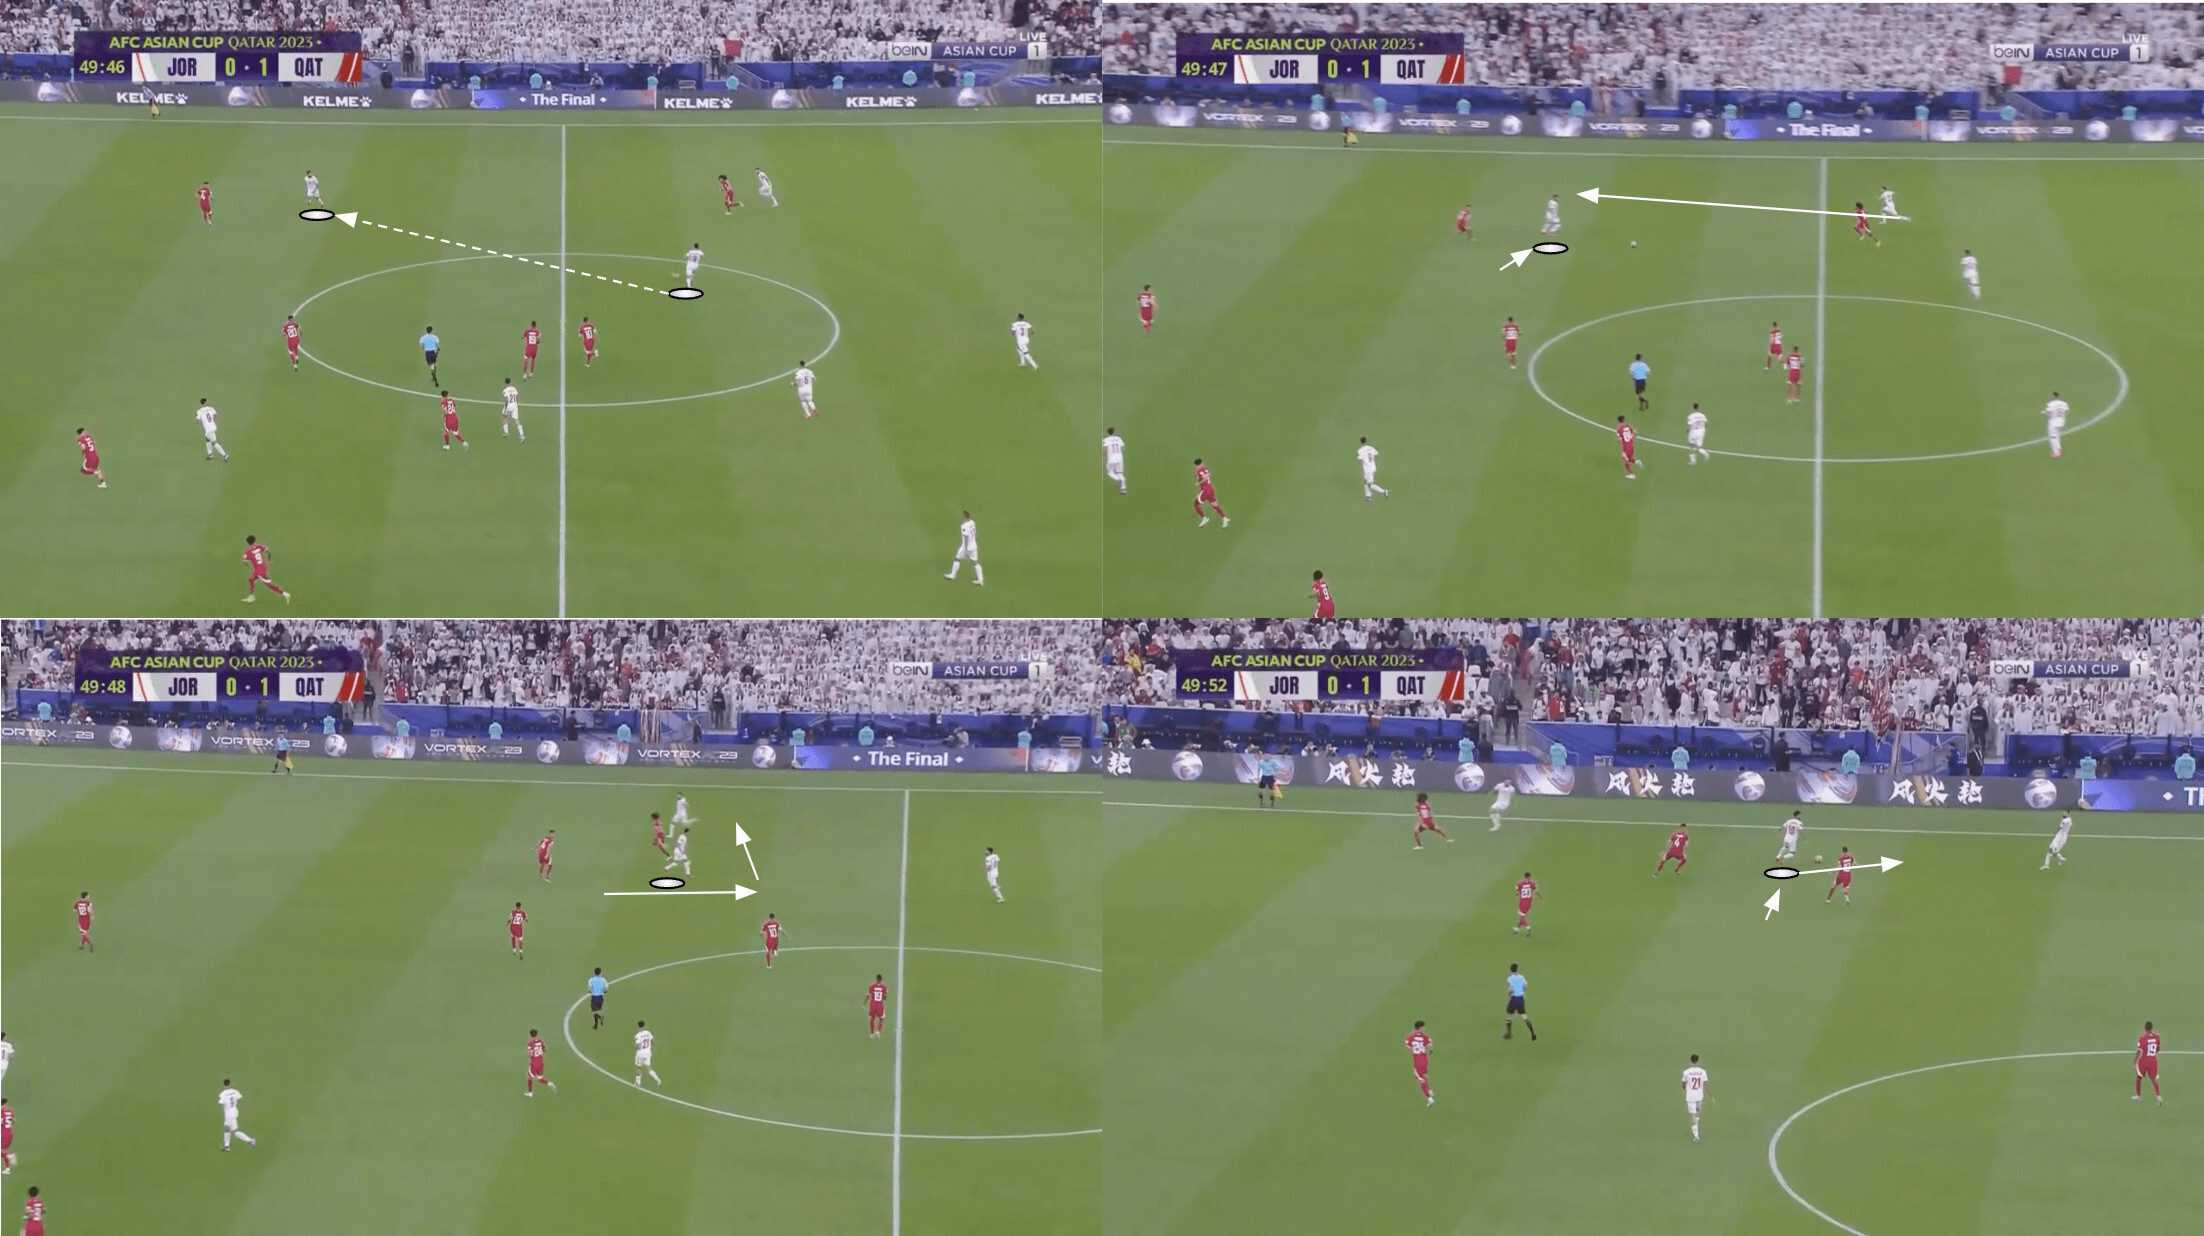
Jordan’s wingers usually stayed high, looking to be played in behind Qatar’s defensive line. The two major problems with this were that, firstly, even when the long passes met their target, the receiver often lacked the technical skill to take the ball down, as we see in the top two sections of figure 5, resulting in a heavy touch sending the ball to a Qatari shirt or even out of play.
Additionally, Qatar’s backline did a great job of dealing with Jordan’s long balls, winning most of their aerial duels emphatically, making plenty of interceptions and effectively protecting the space behind to ensure there were no issues from these passes.
As a result, the long balls that Qatar often forced from the opponent were essentially harmless. The only times they really hurt Márquez’s side were when Jordan were able to successfully press the second ball and keep play in Qatar’s third. However, this didn’t happen enough to secure victory.
Even on occasions when Jordan’s wingers did receive to feet, they didn’t always make the most of their time with the ball and continue their team’s movement upfield.
For example, in figure 6, we see Jordan’s right-winger, Musa Al-Taamari, receiving to feet despite his body shape initially indicating he wanted the ball played in front of him; he readjusts and receives to feet but receives with a closed body shape, taking a negative touch backwards, missing the opportunity to link-up with an overlapping runner and eventually ending up being forced to play the ball to the centre-back anyway, as Qatari pressure builds and ultimately prevents him from turning.
This was a technical issue Jordan suffered with in the ball progression phase throughout the game — they were unable to receive on the half-turn much and string some passes together to progress upfield as we saw Qatar doing back in figure 4.
Receiving with an open body is essential to playing through the thirds, and Jordan were unable to do so enough, mostly due to Qatar’s constant pressing energy.
As a result, Hussein Ammouta’s team struggled to play through the thirds throughout this match and ultimately couldn’t get the ball into the final third, where they proved they could be so effective on enough occasions to change the result.
Conclusion
In conclusion, though Jordan excelled in Qatar’s third, the hosts did enough to protect this area via their out-of-possession approach and high pressing intensity to get the job done and win a second consecutive AFC Asian Cup trophy.
While Jordan owned Qatar’s third of the pitch, the Asian champions controlled the other two thirds with and without the ball, which made enough of an impact that they could generate the necessary amount of final third entries to put themselves in a position to earn their penalties and subsequently take their opportunities.