Two years on from achieving promotion to the second tier, SJK Akatemia came within touching distance of the Veikkausliiga Playoff Final versus IFK Mariehamn, who finished second-from-bottom in Finland’s top tier.
SJK’s first team earned a third-place finish in Finland’s regular season before falling to fourth in the Playoff rounds. We analysed how their now-37-year-old coach, Joaquín Gómez, flourished, especially towards the beginning of the campaign, with the youngest squad in the league; they ended 2023 with an average squad age of 23.9.
Likewise, SJK Akatemia had the youngest squad in Finland’s second tier, ending the campaign with an average squad age of just 20.3 — emphasizing how impressive their achievement of nearly reaching the Playoff Final was, just a couple of years after entering the second tier.
SJK Akatemia were led by 36-year-old Stevie Grieve from Perth, Scotland. From analysing their approach throughout the 2023 campaign, we can identify an overarching trend of tactical flexibility permeating their performances.
Tactical flexibility is a highly desirable trait in a modern coach. Back in 2018, during a campaign in which they earned 97 points, Liverpool boss Jürgen Klopp commended his side’s tactical flexibility, stating: “We are not that stubborn system-wise, we were never… We try to use the players in the best way and give them the position where they can shine.”
Here at Total Football Analysis, Cameron Meighan identified ‘tactical flexibility’ as a major trend within the football coaching landscape in 2020, explaining:
“There are two ways of looking at tactical flexibility, with the first one being a team’s ability to perform within a different number of shapes, formations and roles… [and the second being] decision making and a player’s/team’s ability to solve a problem in a variety of ways.”
Football can sometimes be analysed as if the coach orchestrates each minor movement. Ultimately, a coach cannot prepare instructionally for every single dual and single problem a player comes across within a 90-minute game. Every game will present unique challenges, and within a certain framework the coach sets up to put players in the best possible ‘position’ and ‘role’ to showcase the best of themselves and shine against that particular opponent, they must be prepared to think and solve the problems presented to them by the opposition.
At the same time, the coach will, of course, identify certain weaknesses and strengths in each opposition and prepare their team accordingly. However, a significant portion of a coach’s worth lies in how they develop their players’ minds and prepare them to solve the unique problems they will encounter in the upcoming game.
In this tactical analysis piece, we will provide an in-depth analysis of SJK Akatemia’s 2023 campaign through the lens of tactical flexibility. We will provide examples of how Grieve’s side displayed tactical flexibility throughout their impressive campaign, highlighting the strengths and reasons behind different approaches they used on other occasions; this, ultimately, will shine a light on the benefits of being a tactically flexible team.
Early Possession Phases
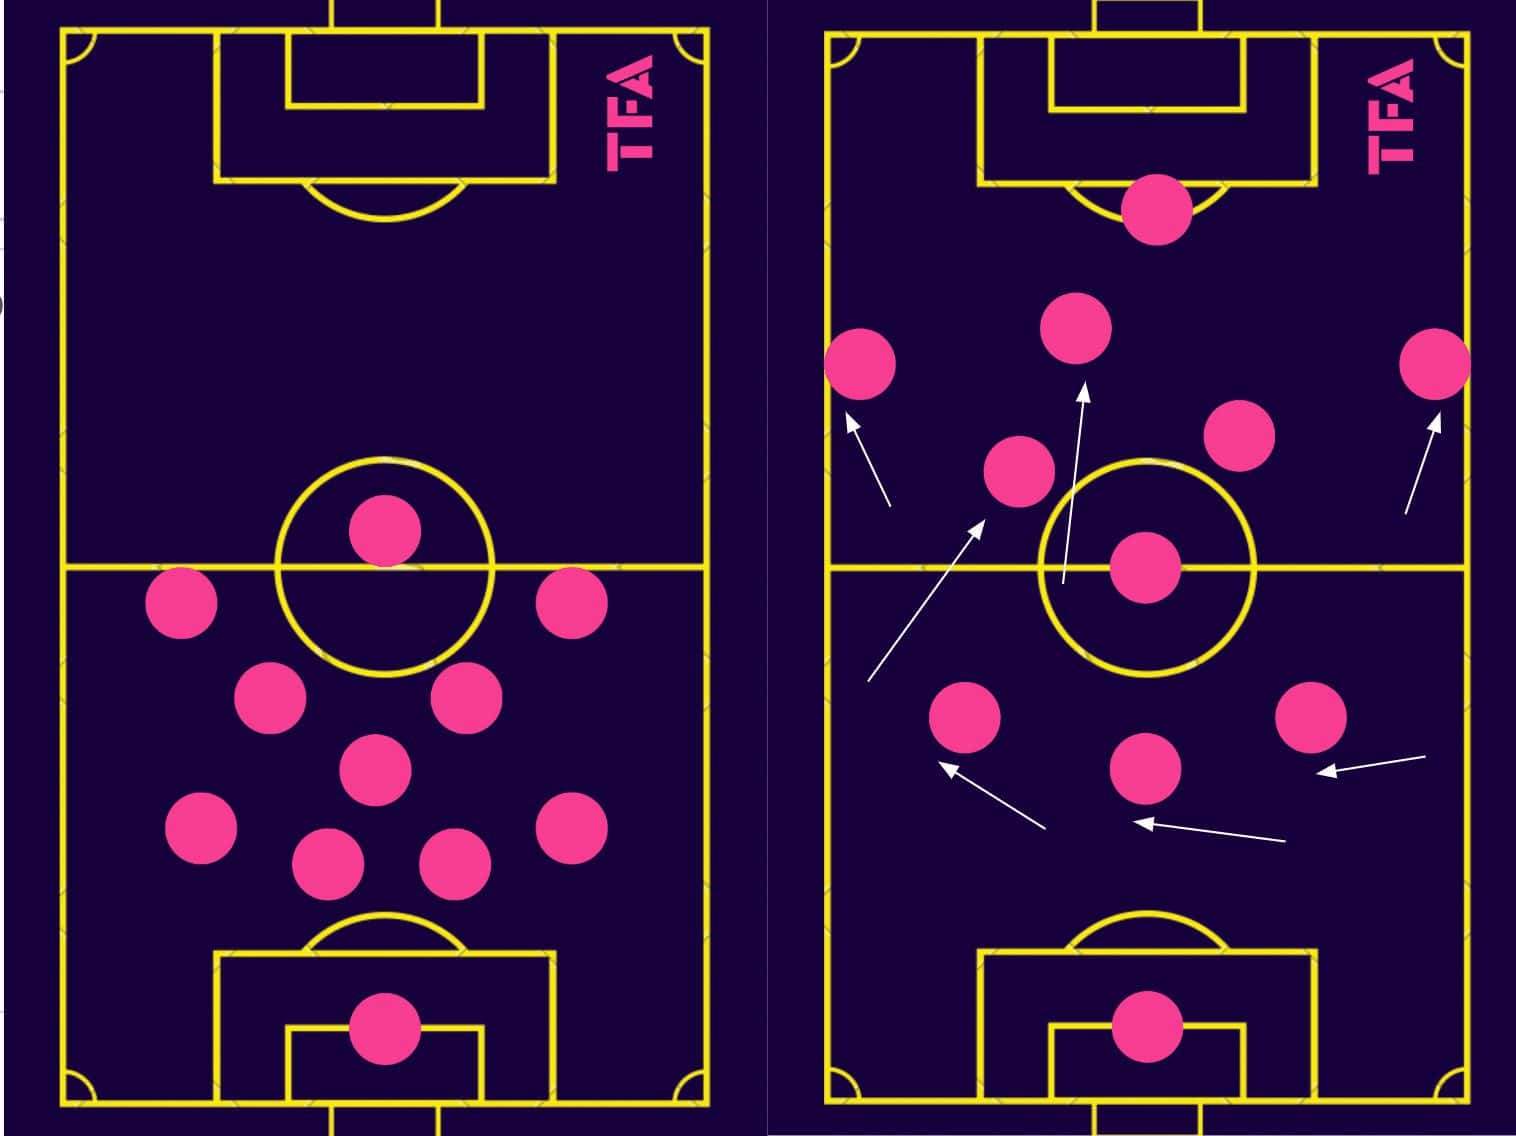
We’ll start our analysis by examining SJK Akatemia in the early possession phases — specifically, the build-up and ball progression phases of play. The first thing to note is that Grieve’s side does not subscribe to any particular shape or ‘formation’ at all, as will become clear as we proceed through this section.
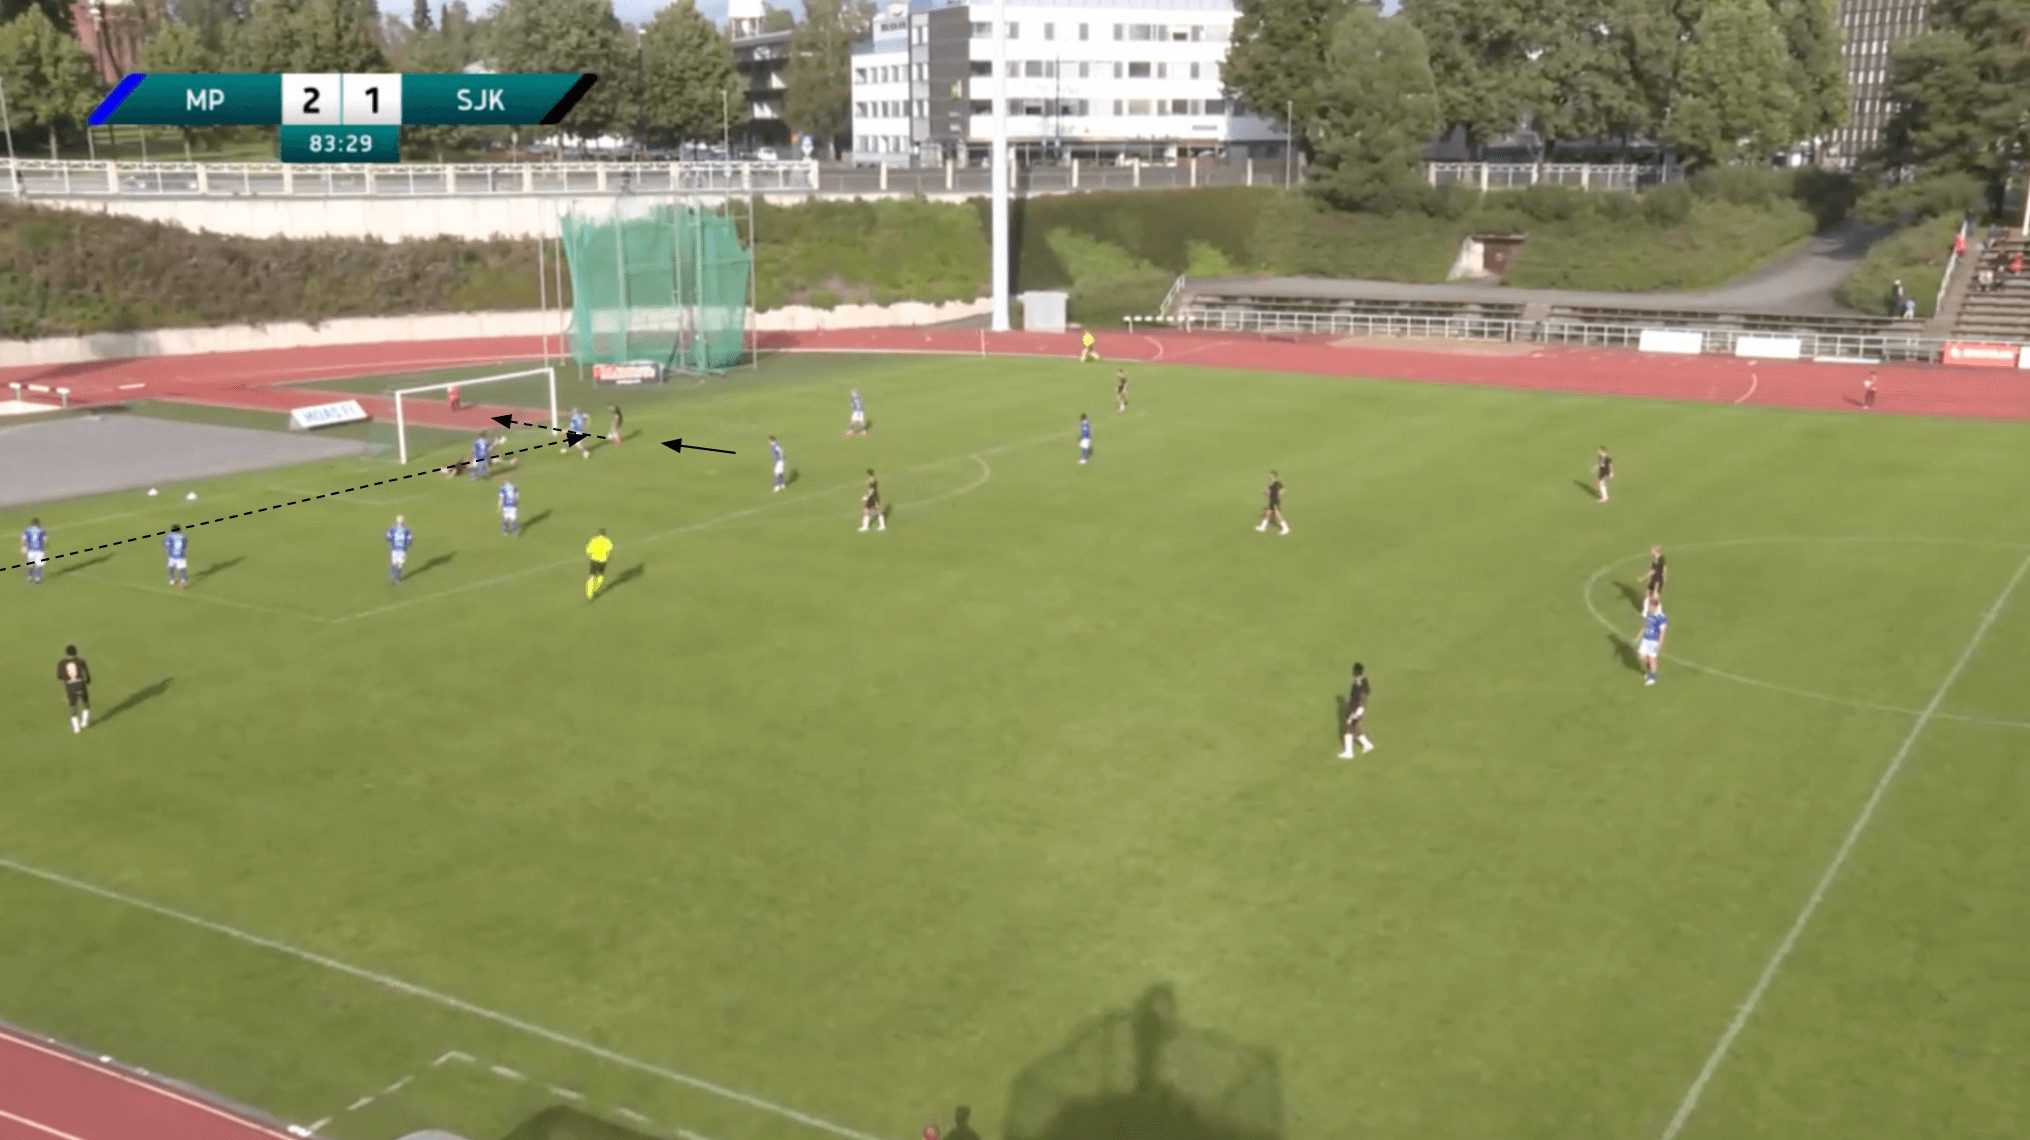
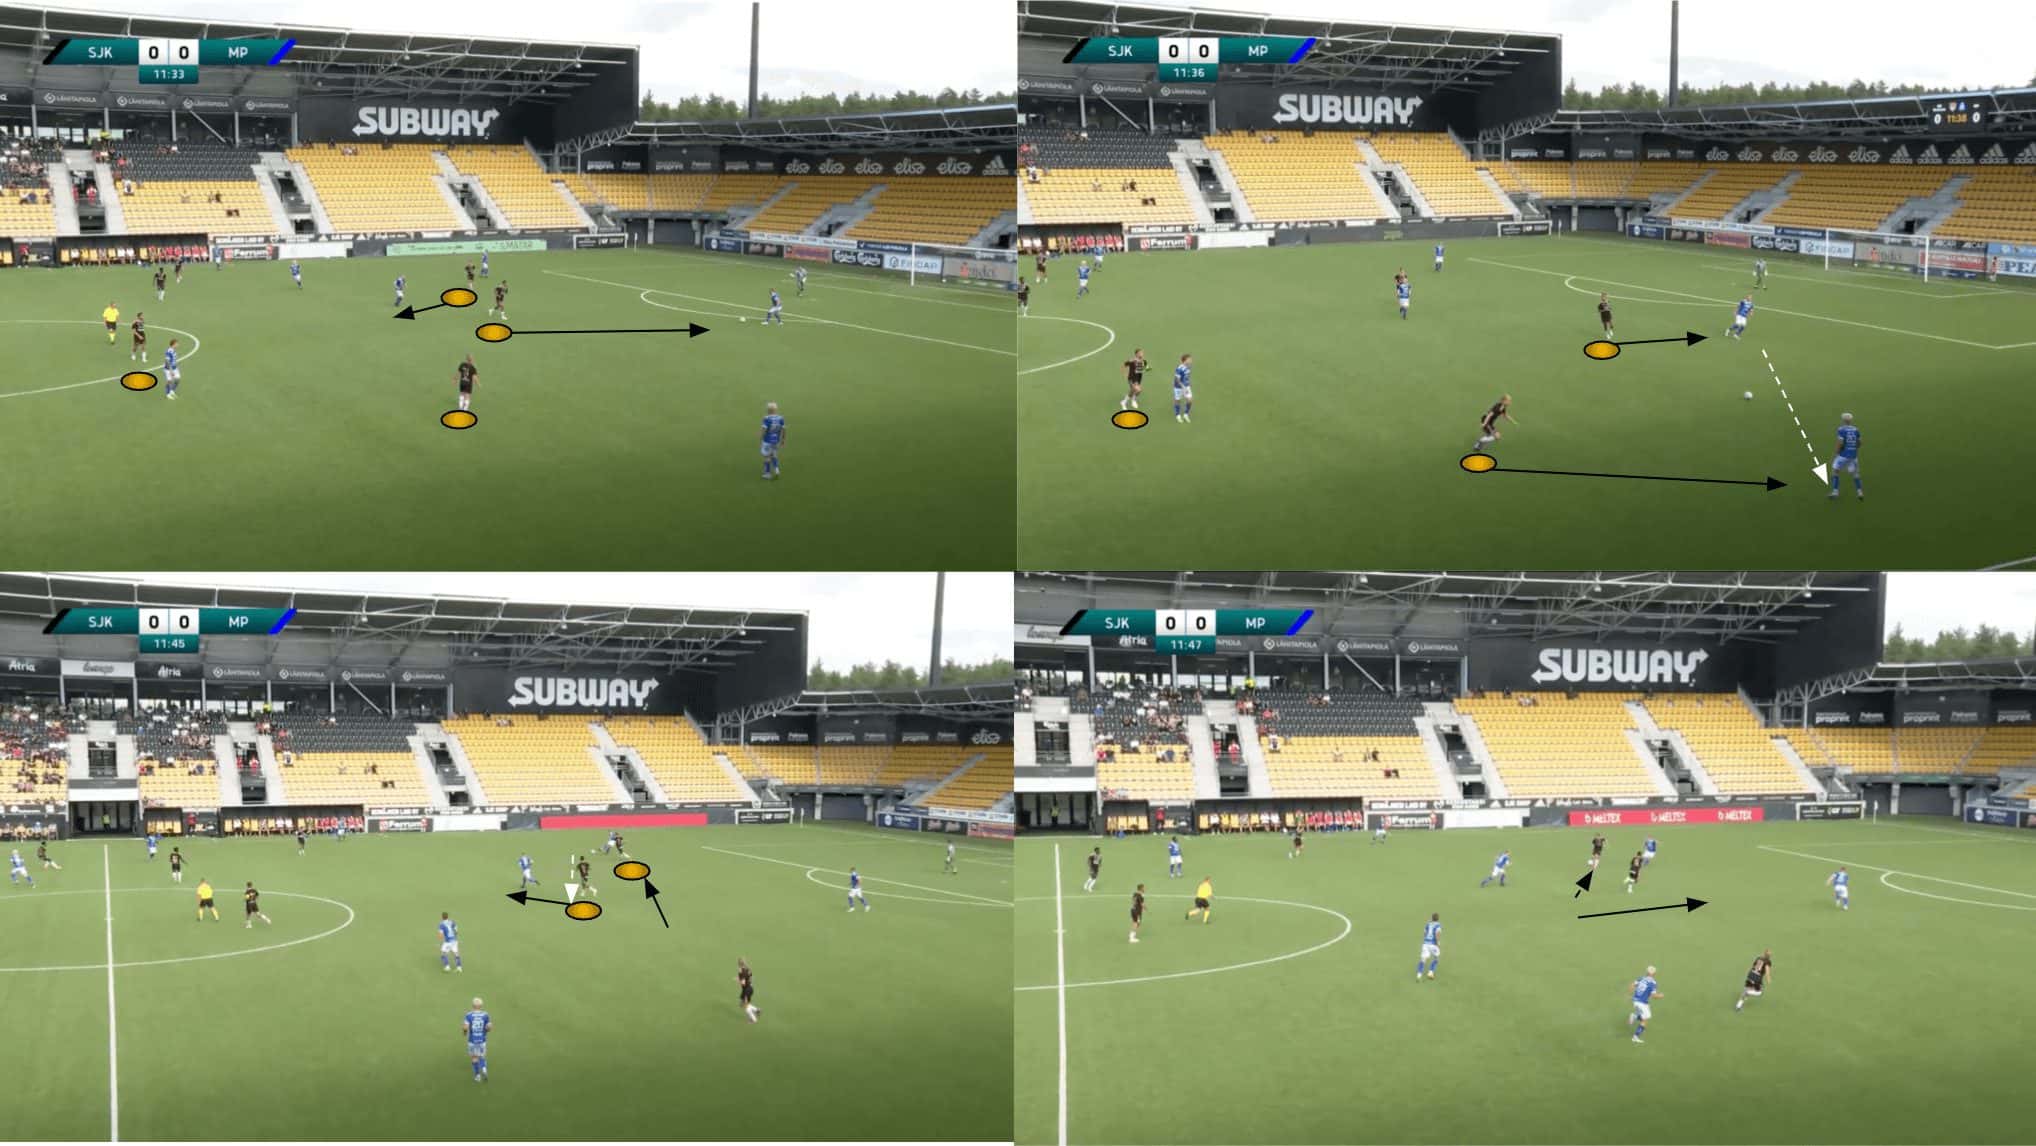
Firstly, analyzing their clash with MP Mikkeli on August 5, we find an example of SJK Akatemia playing in a 3-2-4-1 shape in possession while deploying a 4-4-1-1 formation out of possession.
A notable point regarding SJK Akatemia in the 3-2-4-1 formation this past season is that they demonstrated a variety of different ways to create this shape in different games, depending on the shape they were transitioning from without the ball, the opponent they were playing against, and the players they had on the pitch.
Again, a fundamental principle of creating the in-possession structure is putting players in positions that best utilise their unique skill sets. As a result, depending on the players on the pitch and what weaknesses existed in the opponent that they wanted to target, the shape could be created in different ways.
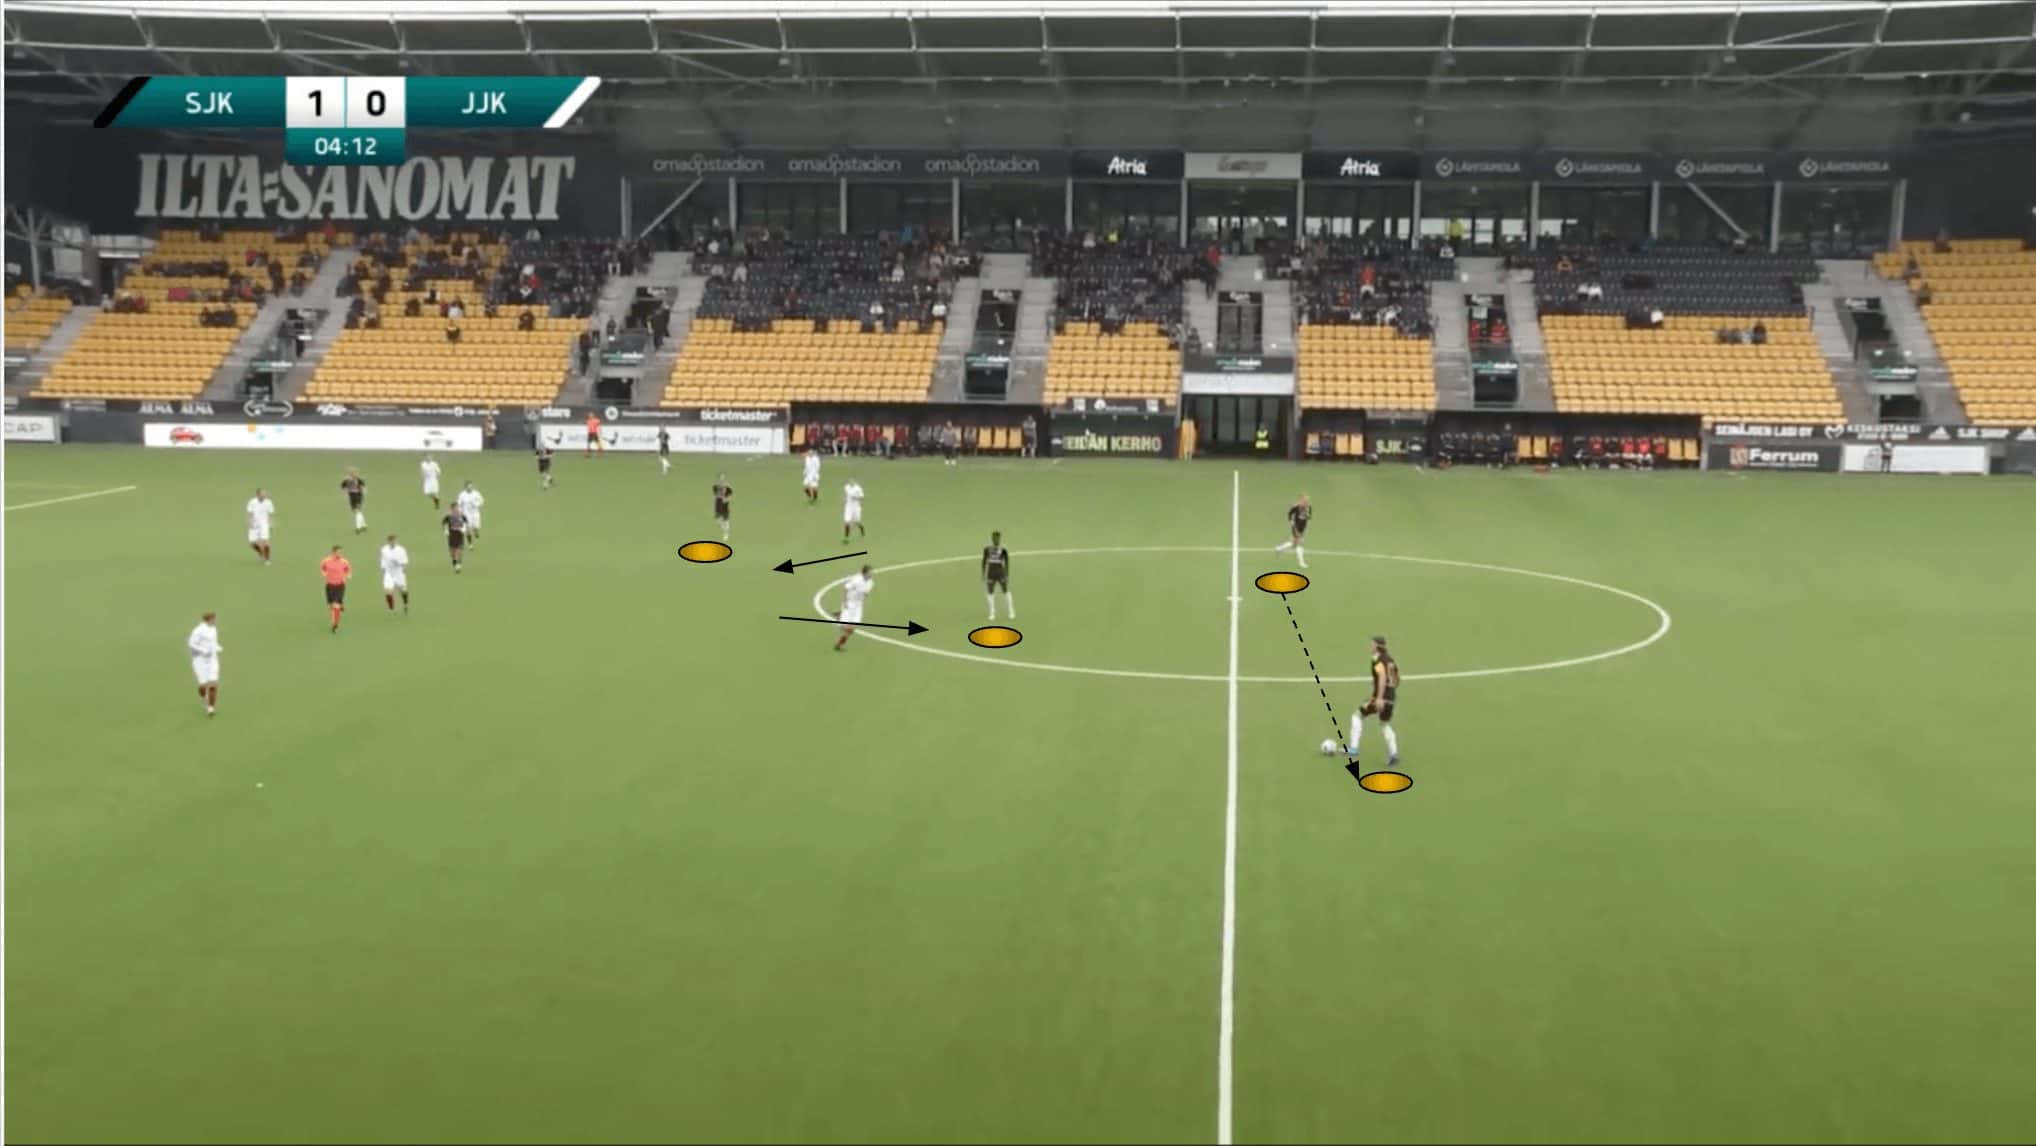
Against MP, we saw them shifting the right-back inside to form a back-three behind the two central midfielders. Meanwhile, the left-back advanced to provide the width inside the final third, alongside the left-winger who moved into the half-space, the ’10’ who shifted slightly to the right, and the right-winger who remained out wide.
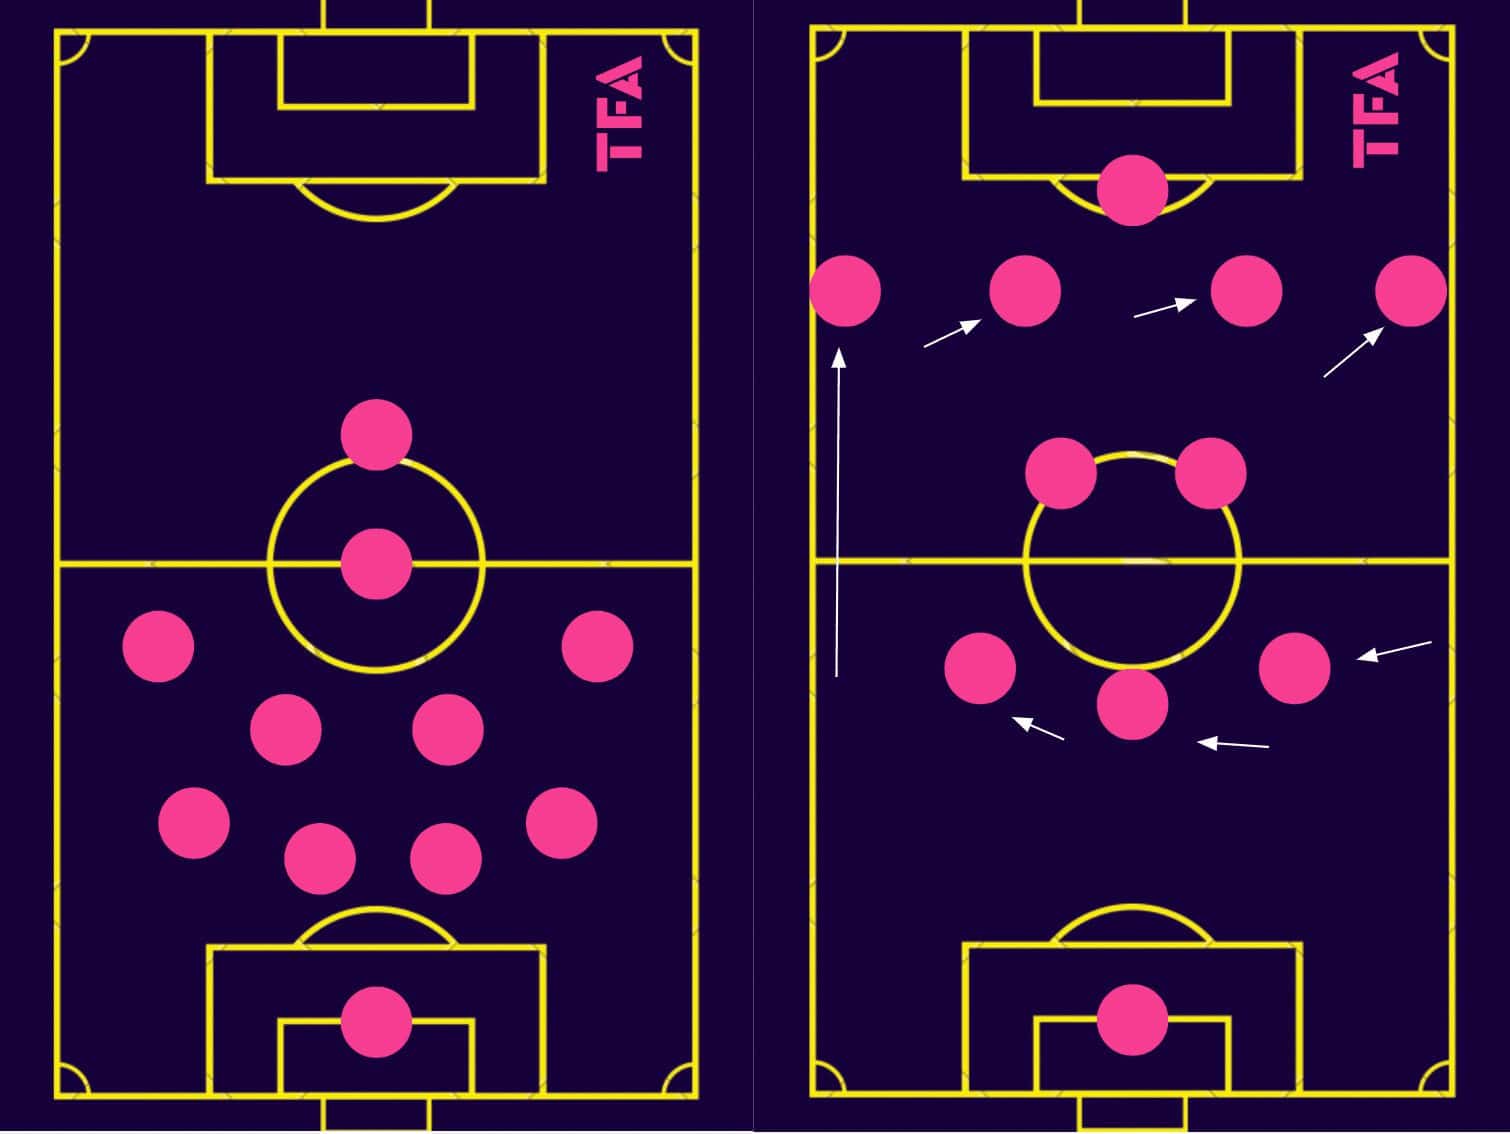
Expecting an aggressive press from the opponent’s front three, they created a structure that offered good passing angles into midfield, where the double-pivot would be prepared to receive, turn, and get their team moving forward into the next line.
They’d look to draw the opposition’s press via their initial short passing play, creating space behind those aggressive forwards that they could exploit.
If they didn’t get that aggressive pressure, the midfielders could drop off slightly to become available in a somewhat deeper area, as was the case in Figure 2.
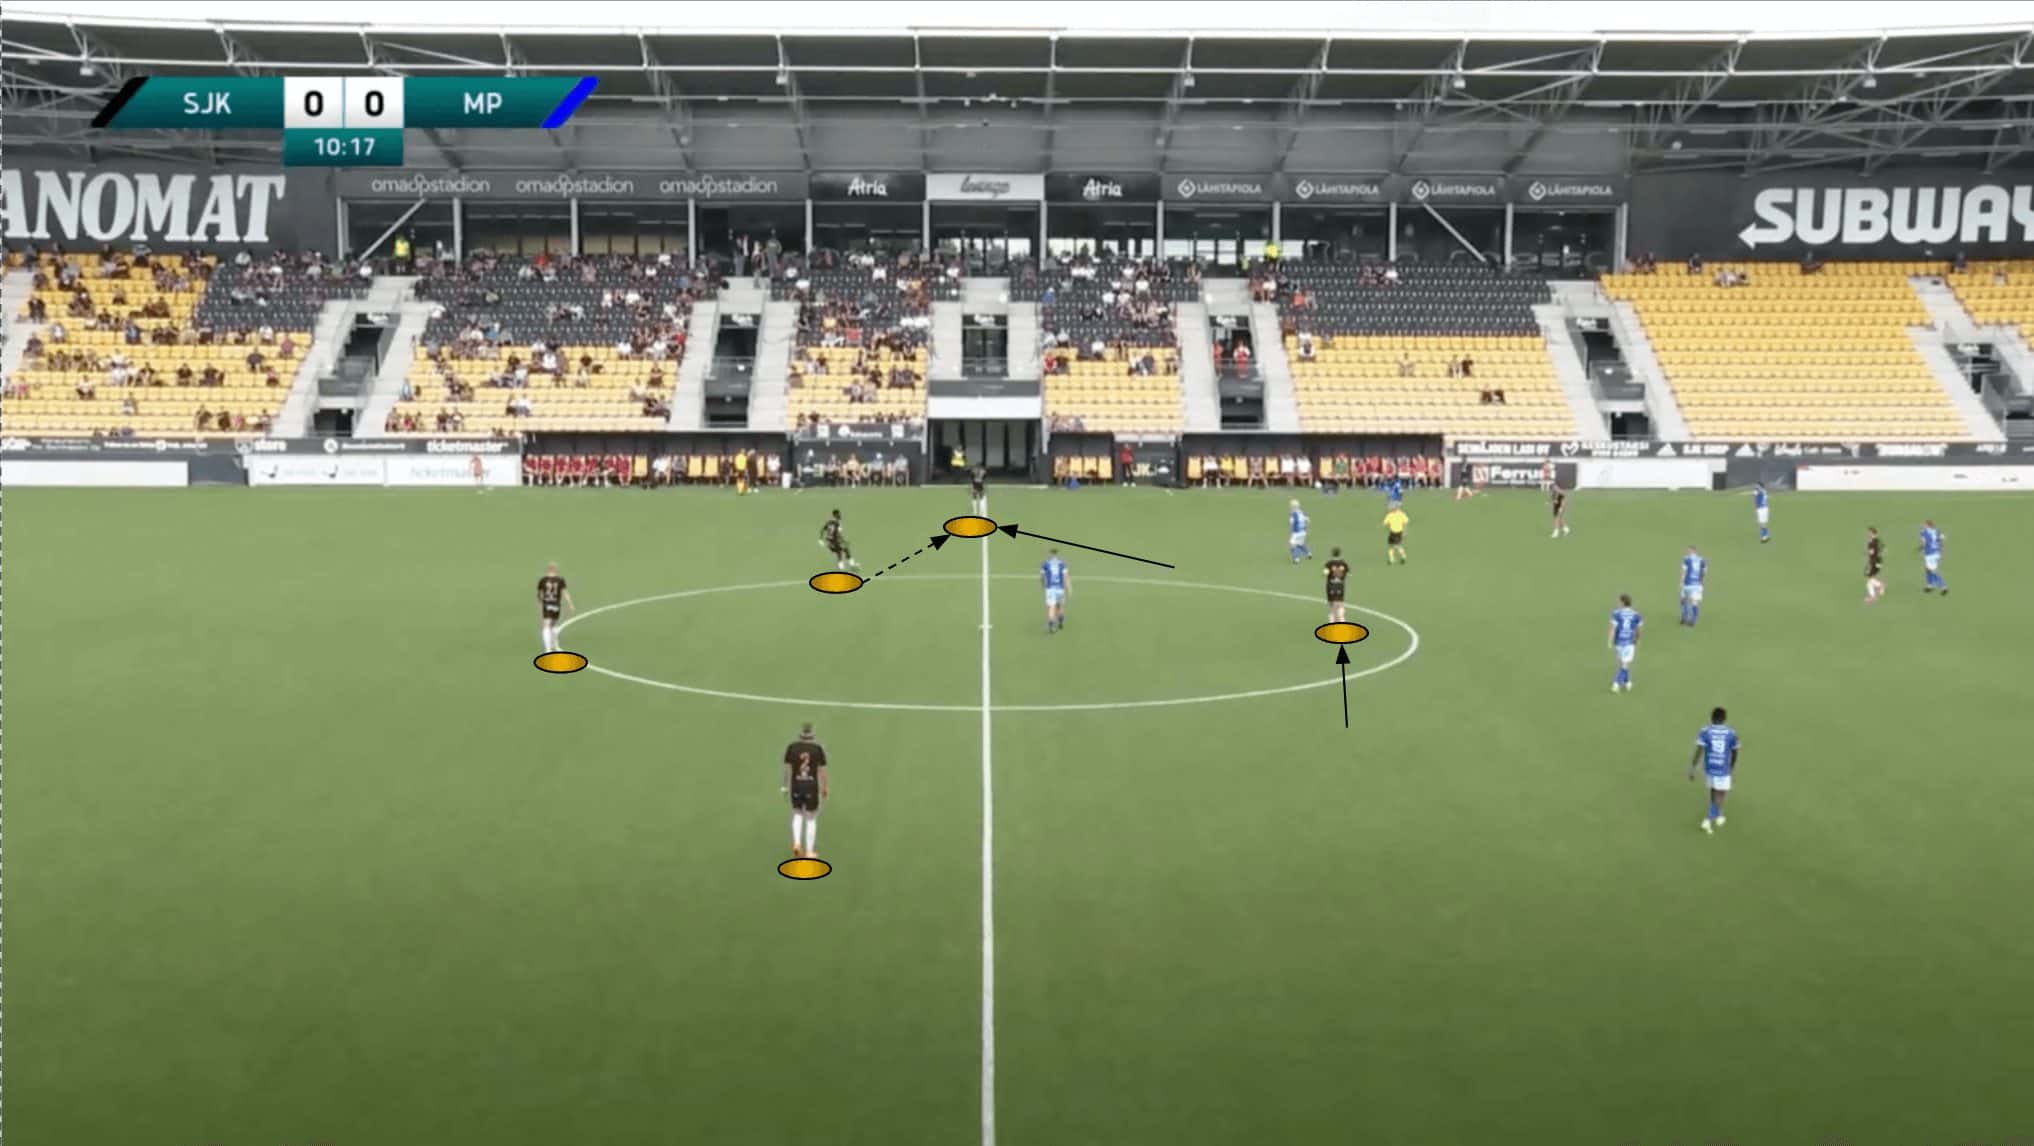
In this instance, the left central midfielder saw some space to invade to the left of the back three, where he could evade opposition pressure at this moment, get his head up, and pick out a decent progressive pass.
After receiving, he spots the left-winger in the half-space and takes the opportunity to break the opposition’s midfield line, playing the ball to feet and heating things up in an attacking sense.
The primary objective with this shape was to overload the opposition’s press, allowing for progression through midfield while occupying five lanes across the attacking line, thereby simultaneously overloading the opposition’s back four.
If the opponent got very narrow to protect against the ball into the half-space, the wide men would be crucial. At the same time, if the opposition were dragged very wide at the back, the men in the half-spaces would enjoy space to receive and create from valuable positions.

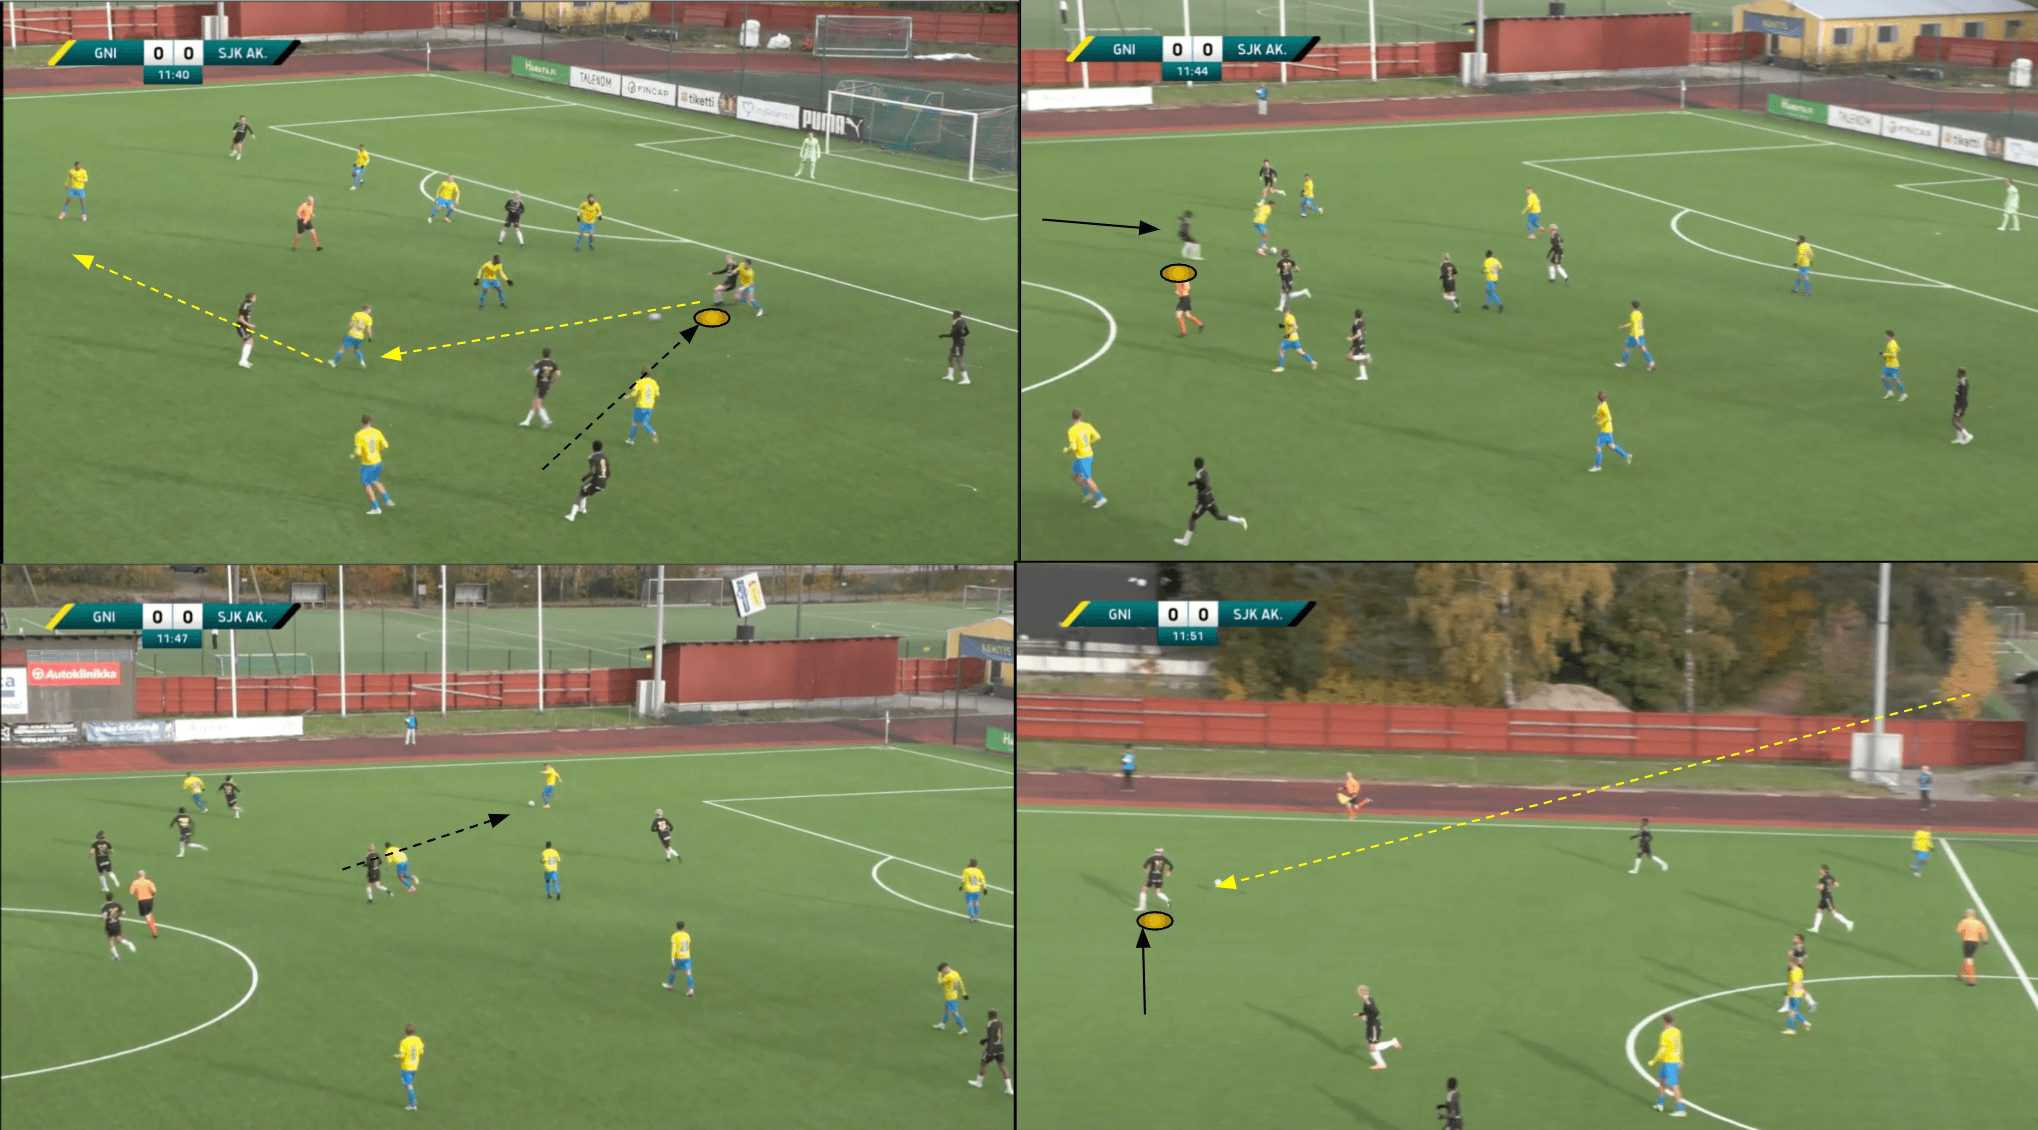
On September 26th, against eventual league winners Ekenäs IF, Grieve set his side up to defend in a 4-1-4-1 formation and transition into a 3-3-3-3 (3-D-3) in possession.
Against EIF, they anticipated a fairly aggressive press with a man-marking scheme in midfield. As a result, they opted to use the full-back to create a tight four-man midfield, rather than a three-man midfield, in an attempt to create a free man in midfield to play through the opponent.

Our analysis shows that Grieve’s full-backs could be referred to as something akin to a Swiss army knife within the side. They need to be very well-rounded players — even more so than those occupying other positions — because they may be required to play several different roles depending on the plan.
Already, we’ve seen how the right-back is often required to slide across and act as a third centre-back in possession. In contrast, we’ve seen how the left-back may be required to bomb on and become a wide outlet in the final third or may be required to invert and act as an auxiliary central midfielder.
Within a philosophy of tactical flexibility, all players must be prepared to assume different roles at various times. Still, the full-backs, in particular, have been fun to watch within this SJK Akatemia side due to the varied roles they’ve been tasked with performing in different games.
As well as creating a free option in midfield, we can observe how this 3-D-3 shape creates an opportunity for SJK Akatemia to naturally go man-to-man with the opposition’s defence via their front three and the ’10’ who would frequently push up and join them in advanced positions.
Against JJK Jyväskylä on the fourth of July, we saw SJK Akatemia utilising a 4-4-2 without the ball and a 4-2-2-2 with the ball.
Against a slightly more passive press, in this case, they sacrificed one body in the deeper areas to get the full-backs high and wide, ready to receive to advance and penetrate the final third. In this case, again, the versatile full-backs were given different tasks — to be more of a direct weapon, receiving from the centre-backs or midfielders forming the 2-2 base in a high position, and turning and attacking.
With the wingers coming narrow, Grieve’s side could overload the opposition centrally. This could serve to draw opposition players into narrow spaces, making the high and wide full-backs a decent passing option, especially off the end of a switch after overloading via a period of possession on the other side of the pitch, creating the opportunity to isolate the full-back with an opposing defender.
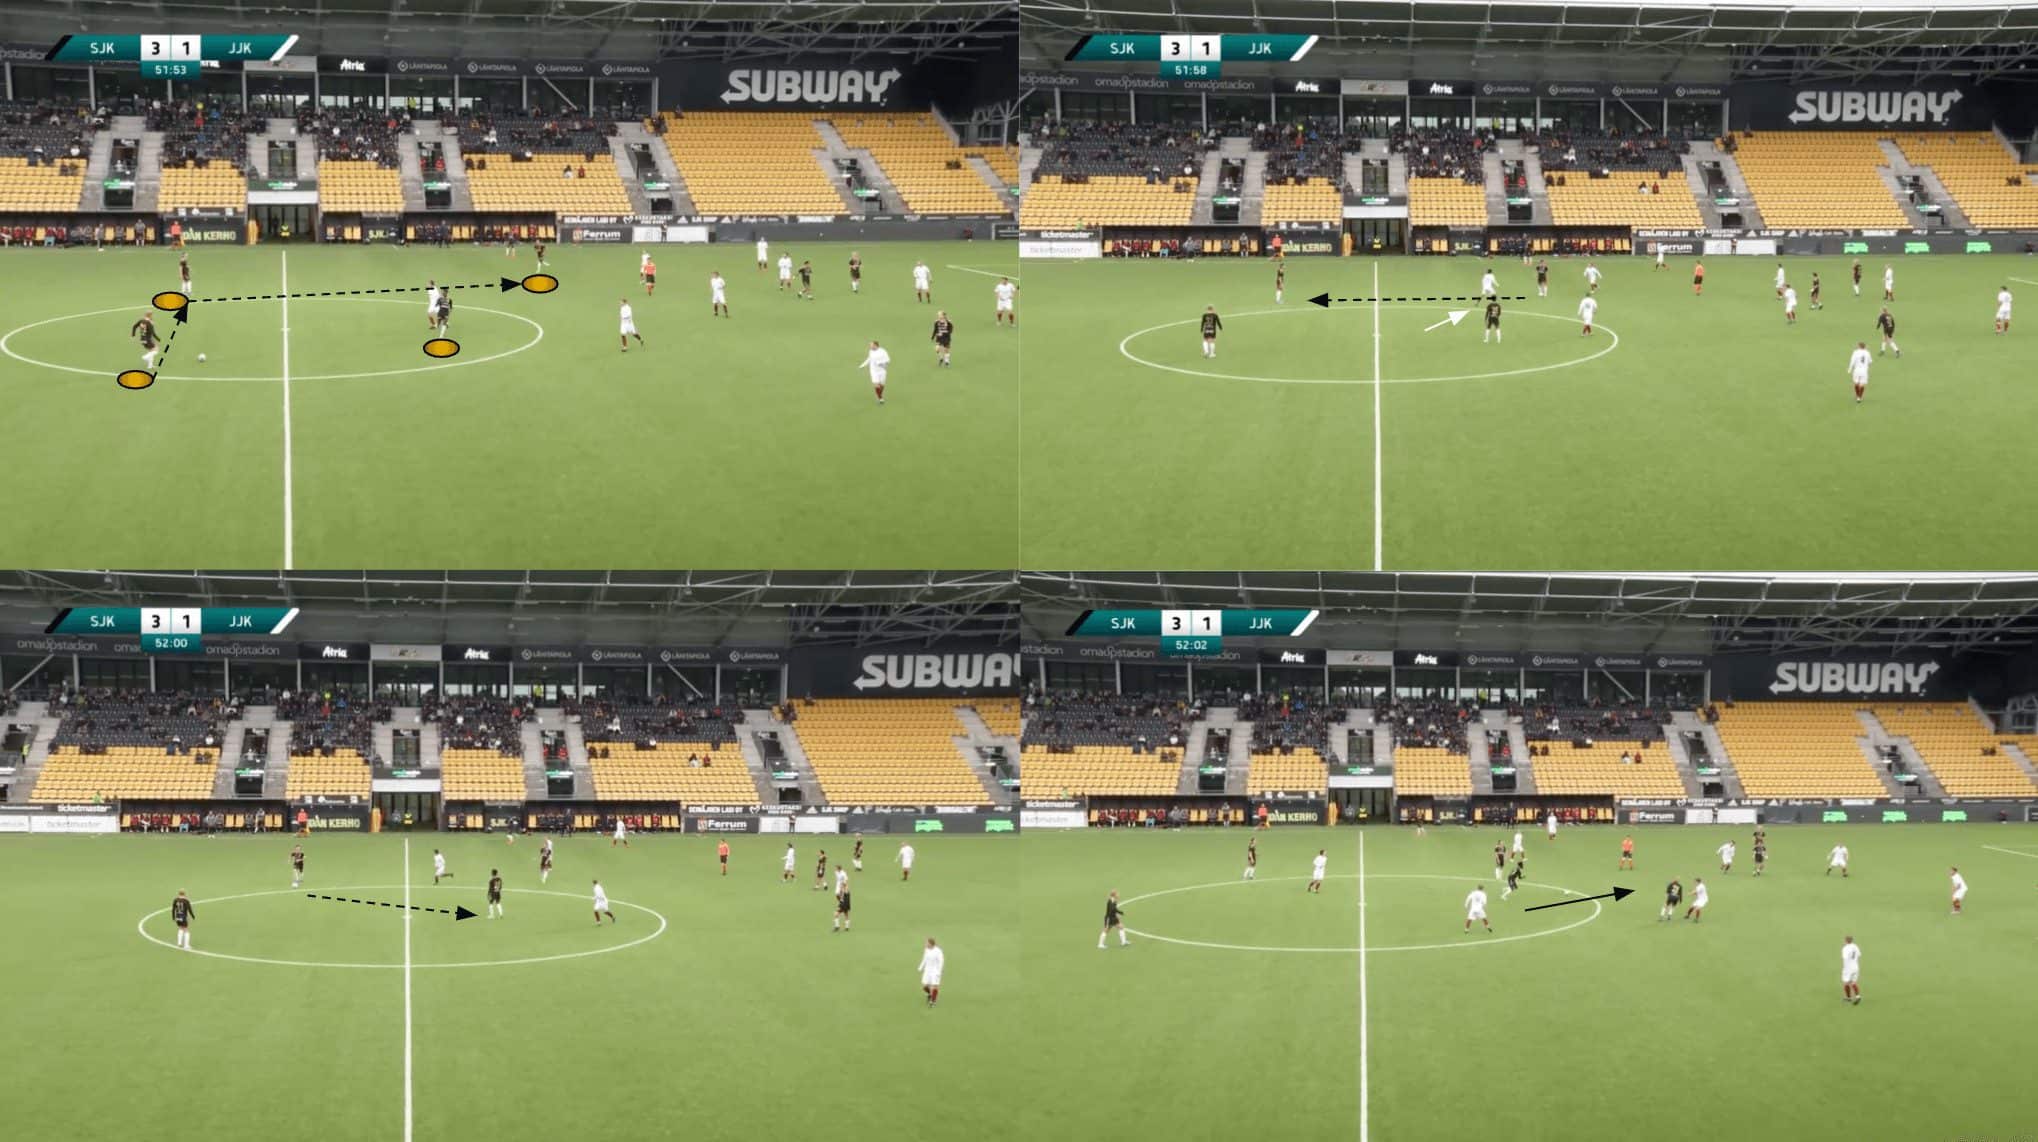
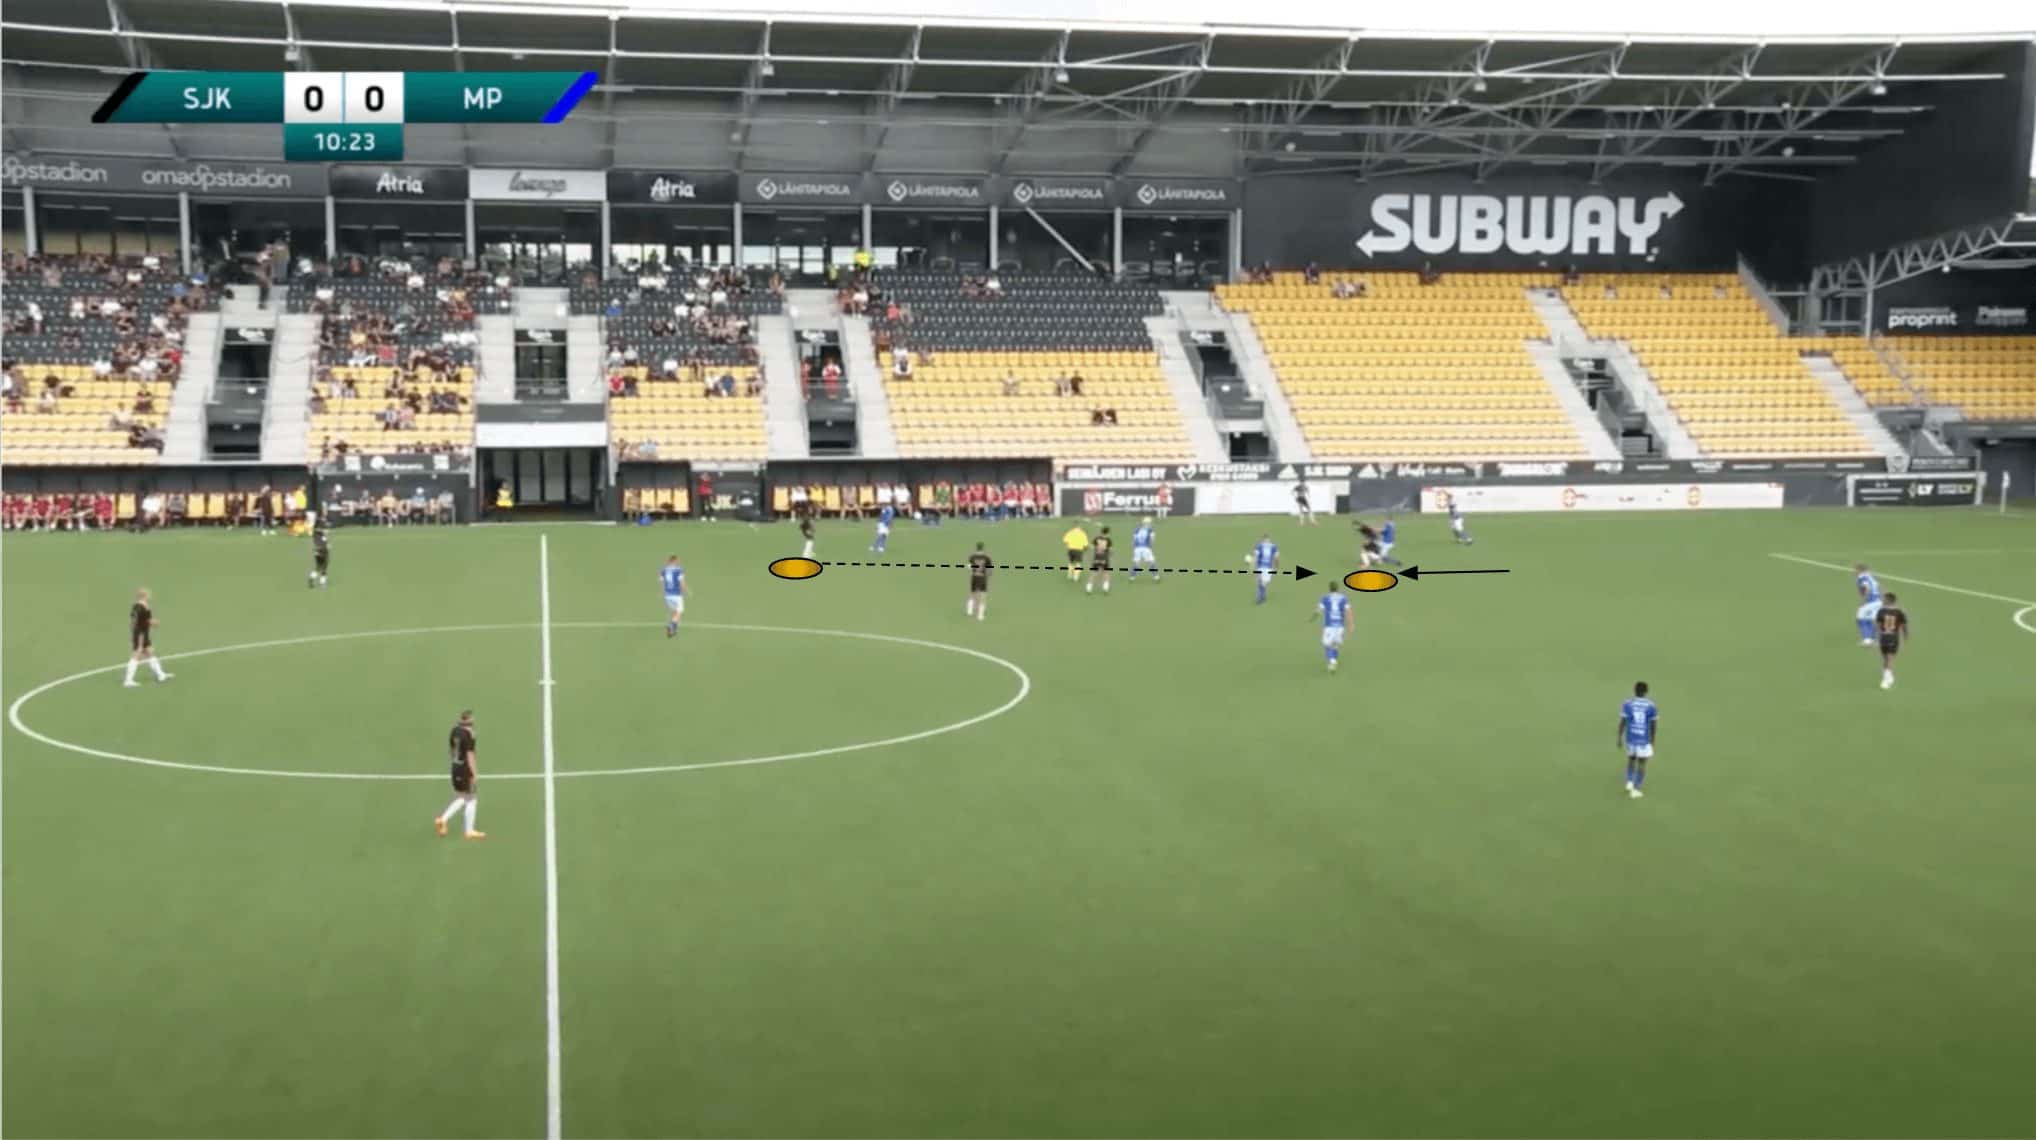
It was possible for SJK Akatemia to play past the opposition’s press with their four-man base structure and the intelligent passing sequences they pulled off. In this case, we see in the bottom-left how the centre-back’s body shape before releasing the ball disguised his intention of playing to the right central midfielder, allowing that player to receive on the half-turn with space behind him to drive into, progressing his team forward through the middle of the park.
The central midfielders enjoyed plenty of flexibility within this system as well; they were not tied to a particular position or to each other, for that matter, with one frequently pushing higher and the other often dropping back to a slightly deeper position just in front of the centre-backs.
This gave the opposition’s forwards a big challenge in terms of marking and controlling the midfield duo. At the same time, the midfielders’ movement ensured they continuously created fresh passing angles for the centre-backs and kept dragging opposition players around to potentially open up passing lanes to players positioned even further upfield.
Here, as the right centre-forward dropped into some space that had just opened up between the opposition’s midfield line and defensive line, he was able to receive and link up with a free man next to him after dragging a centre-back out, creating a massive gap to be exploited in the opponent’s backline.
So, we can see how this 4-2-2-2 structure served to create plenty of central overloads thanks to players’ positioning, freedom of movement and intelligent passing choices, all while the full-backs maintained a constant wide threat on the wings.
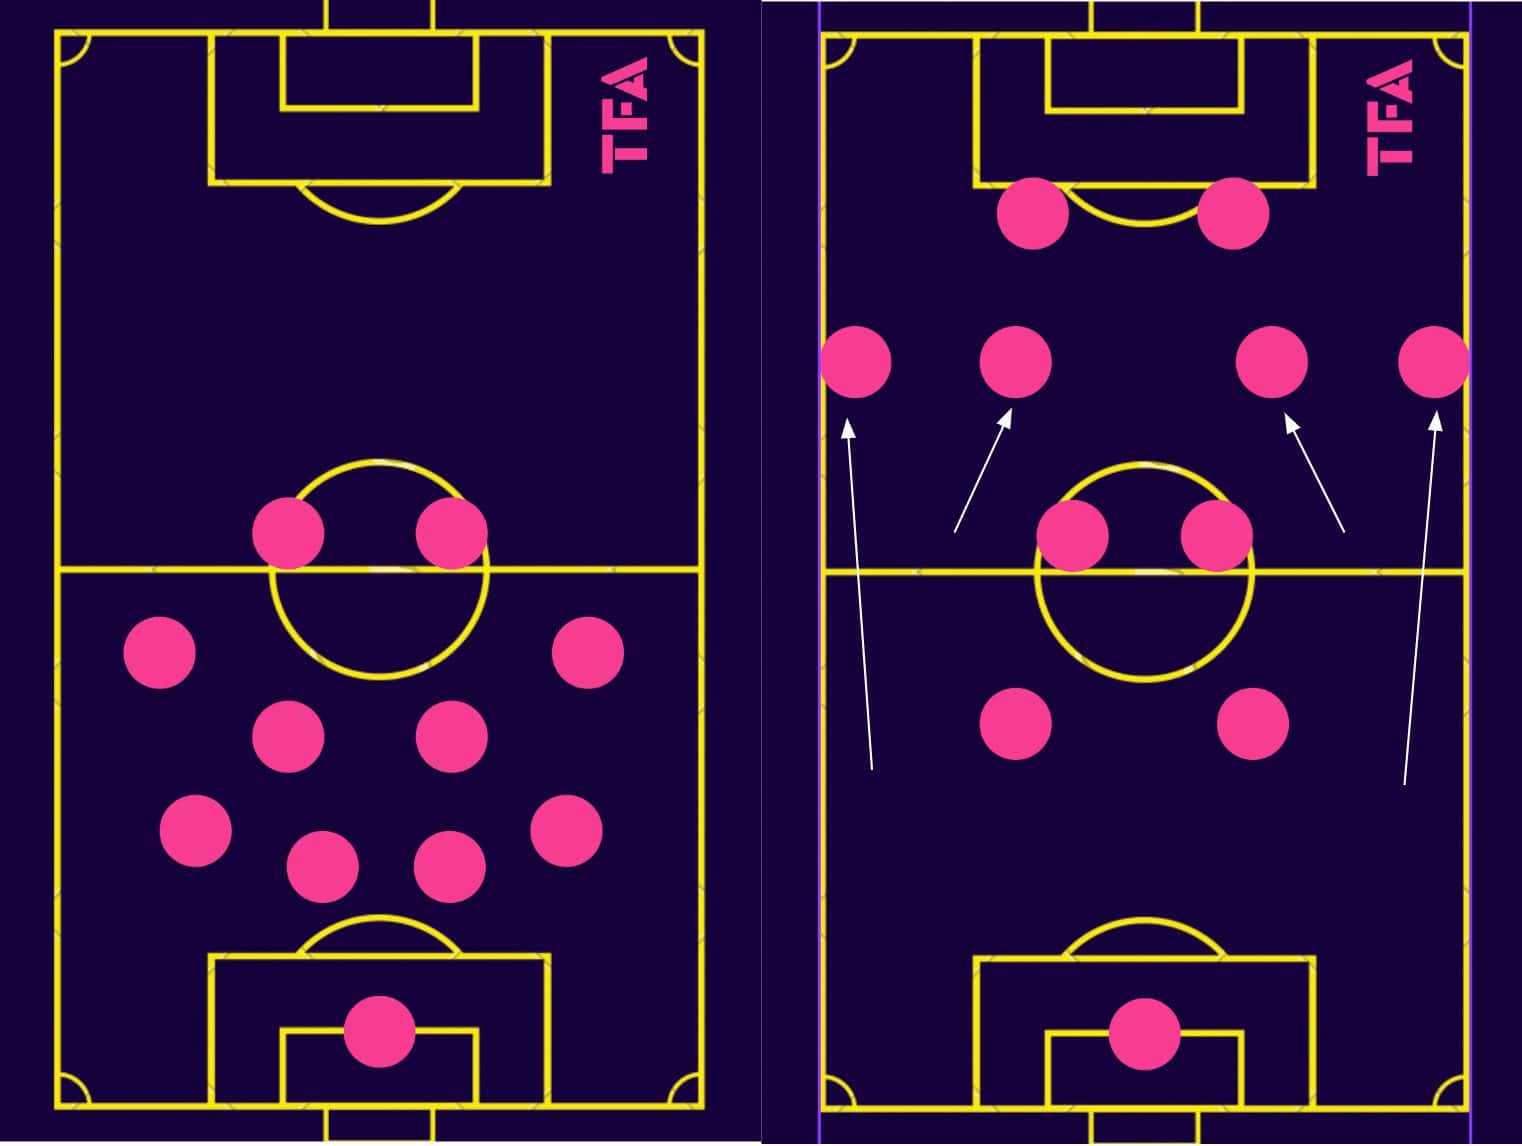
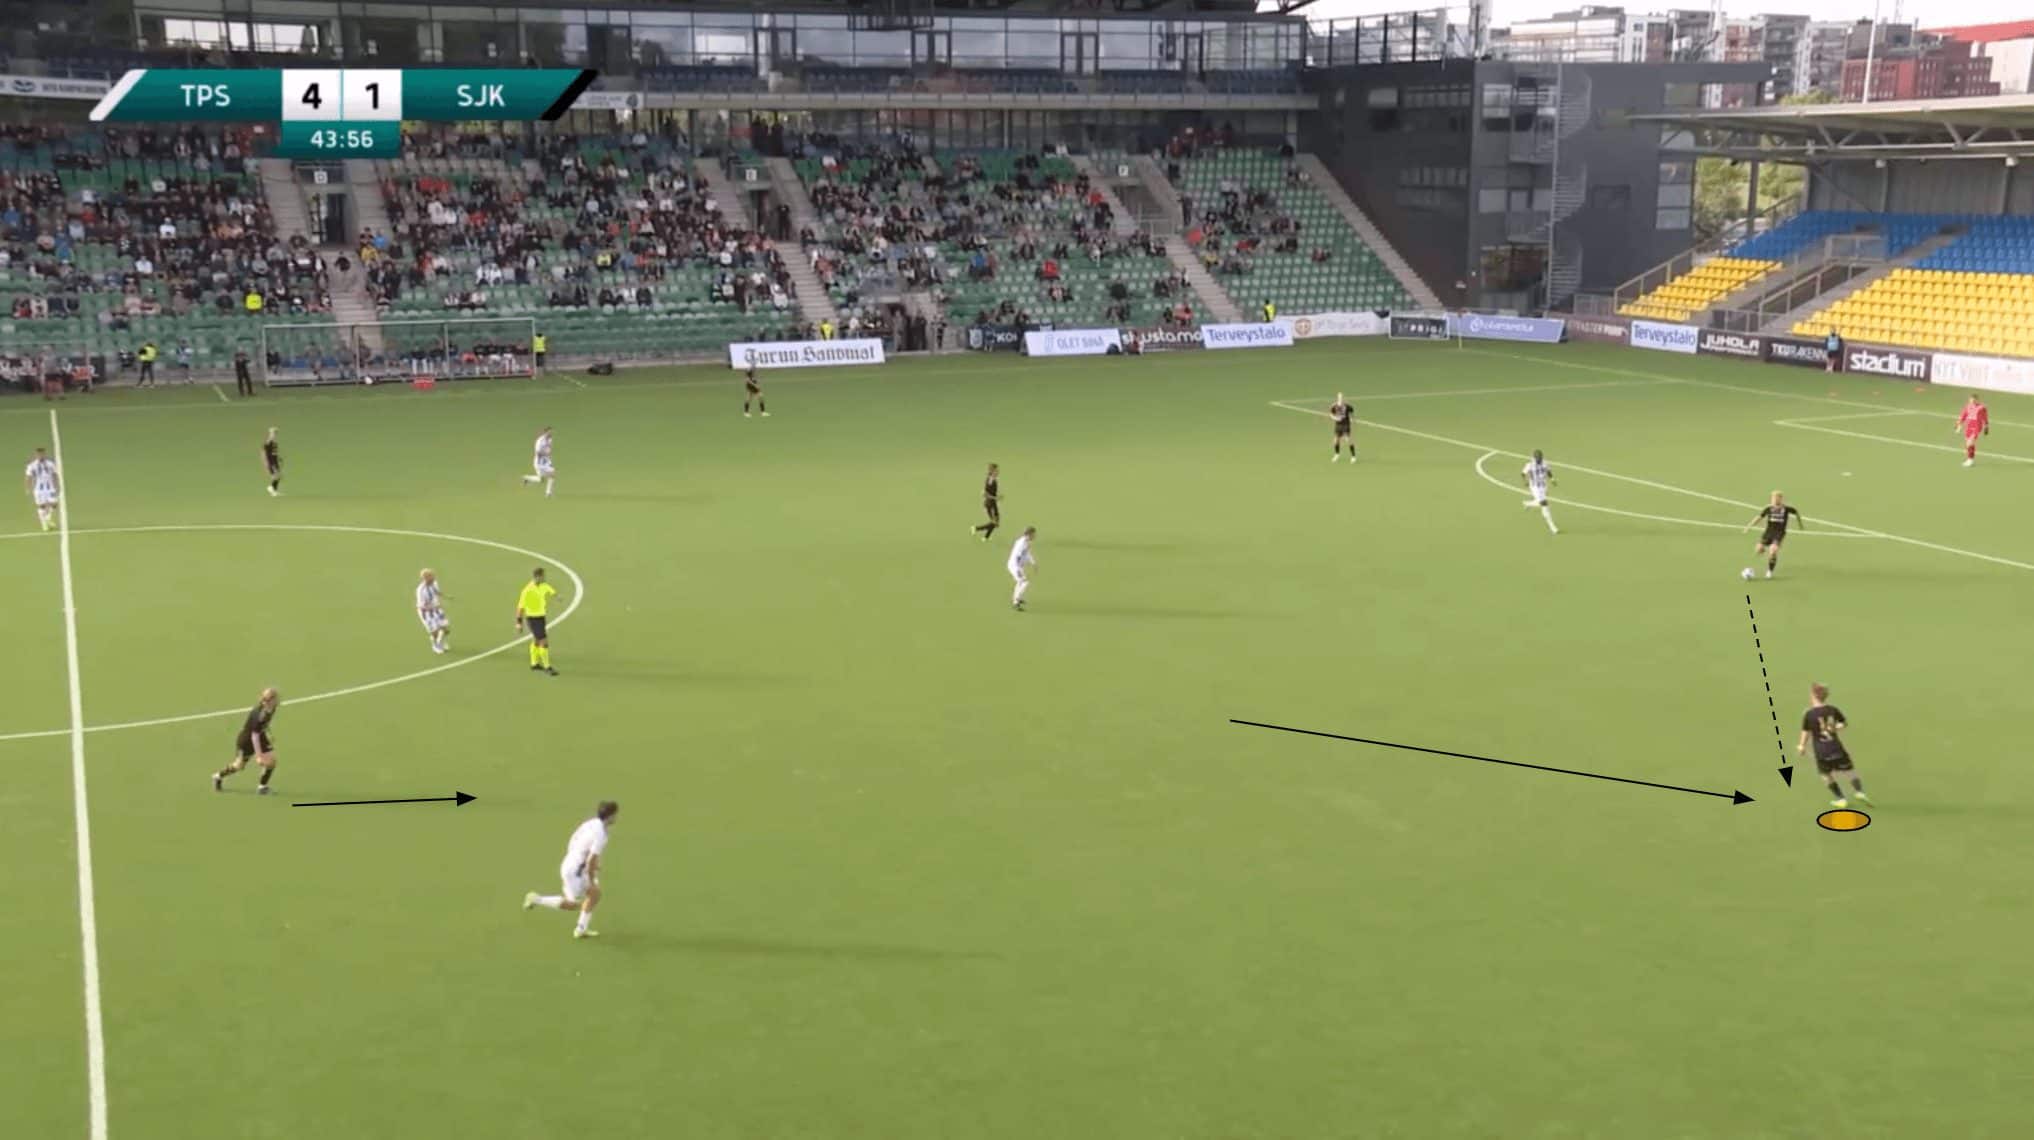
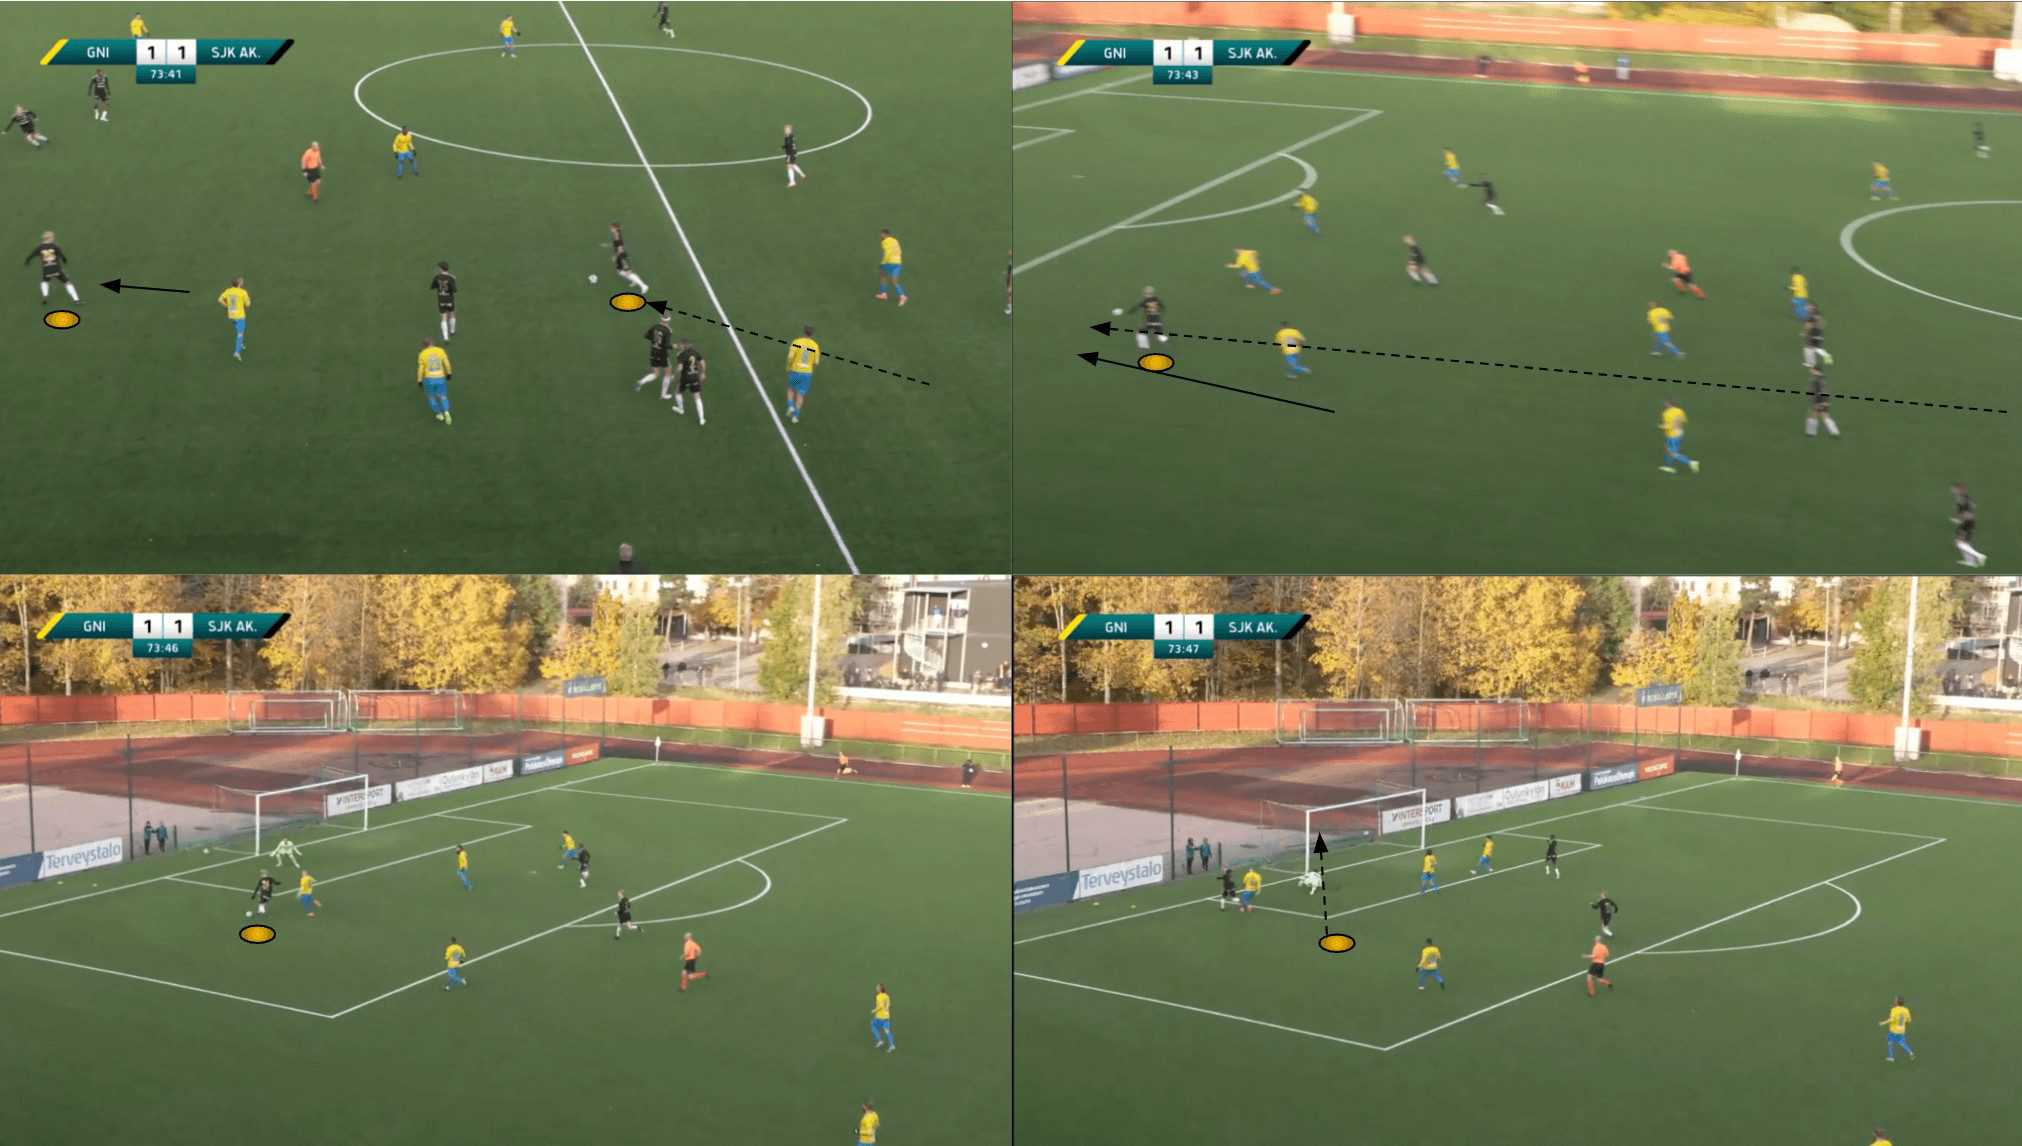
The fourth and final unique structure we’ll focus on in this section is the 4-3-3 out of possession into a 3-3-3-1 in possession formation, which SJK Akatemia used in their away clash with TPS Turku on July 31.
To form this shape, the right-back once again shifted across to form a back three, while the central midfielders, especially the one deployed on the left, pushed forward. The wingers remained high and wide, leaving some space for the left-back to invert.
With the central midfielders, striker and wingers staying as high as possible, forcing the opposition defence back, space is created in the deeper area for the left-back to exploit, and he frequently found that space in something of a left central midfield position in this game, behind the opposition’s first line of pressure, becoming a free man and great passing option for his deeper teammates.
Yet again, we find the full-backs, in particular, experiencing a lot of variation within their roles.
One benefit of this 3-3-3-1 shape was that it created plenty of passing options for each player, helping SJK Akatemia to carve their way through the opponent as they made their way to the danger zone.
Yet again, players’ movement was critical to the success of these tactics. Firstly, if we look at figure 11, we see the left central midfielder actually dropping off from his higher position, offering to receive the ball at his feet.
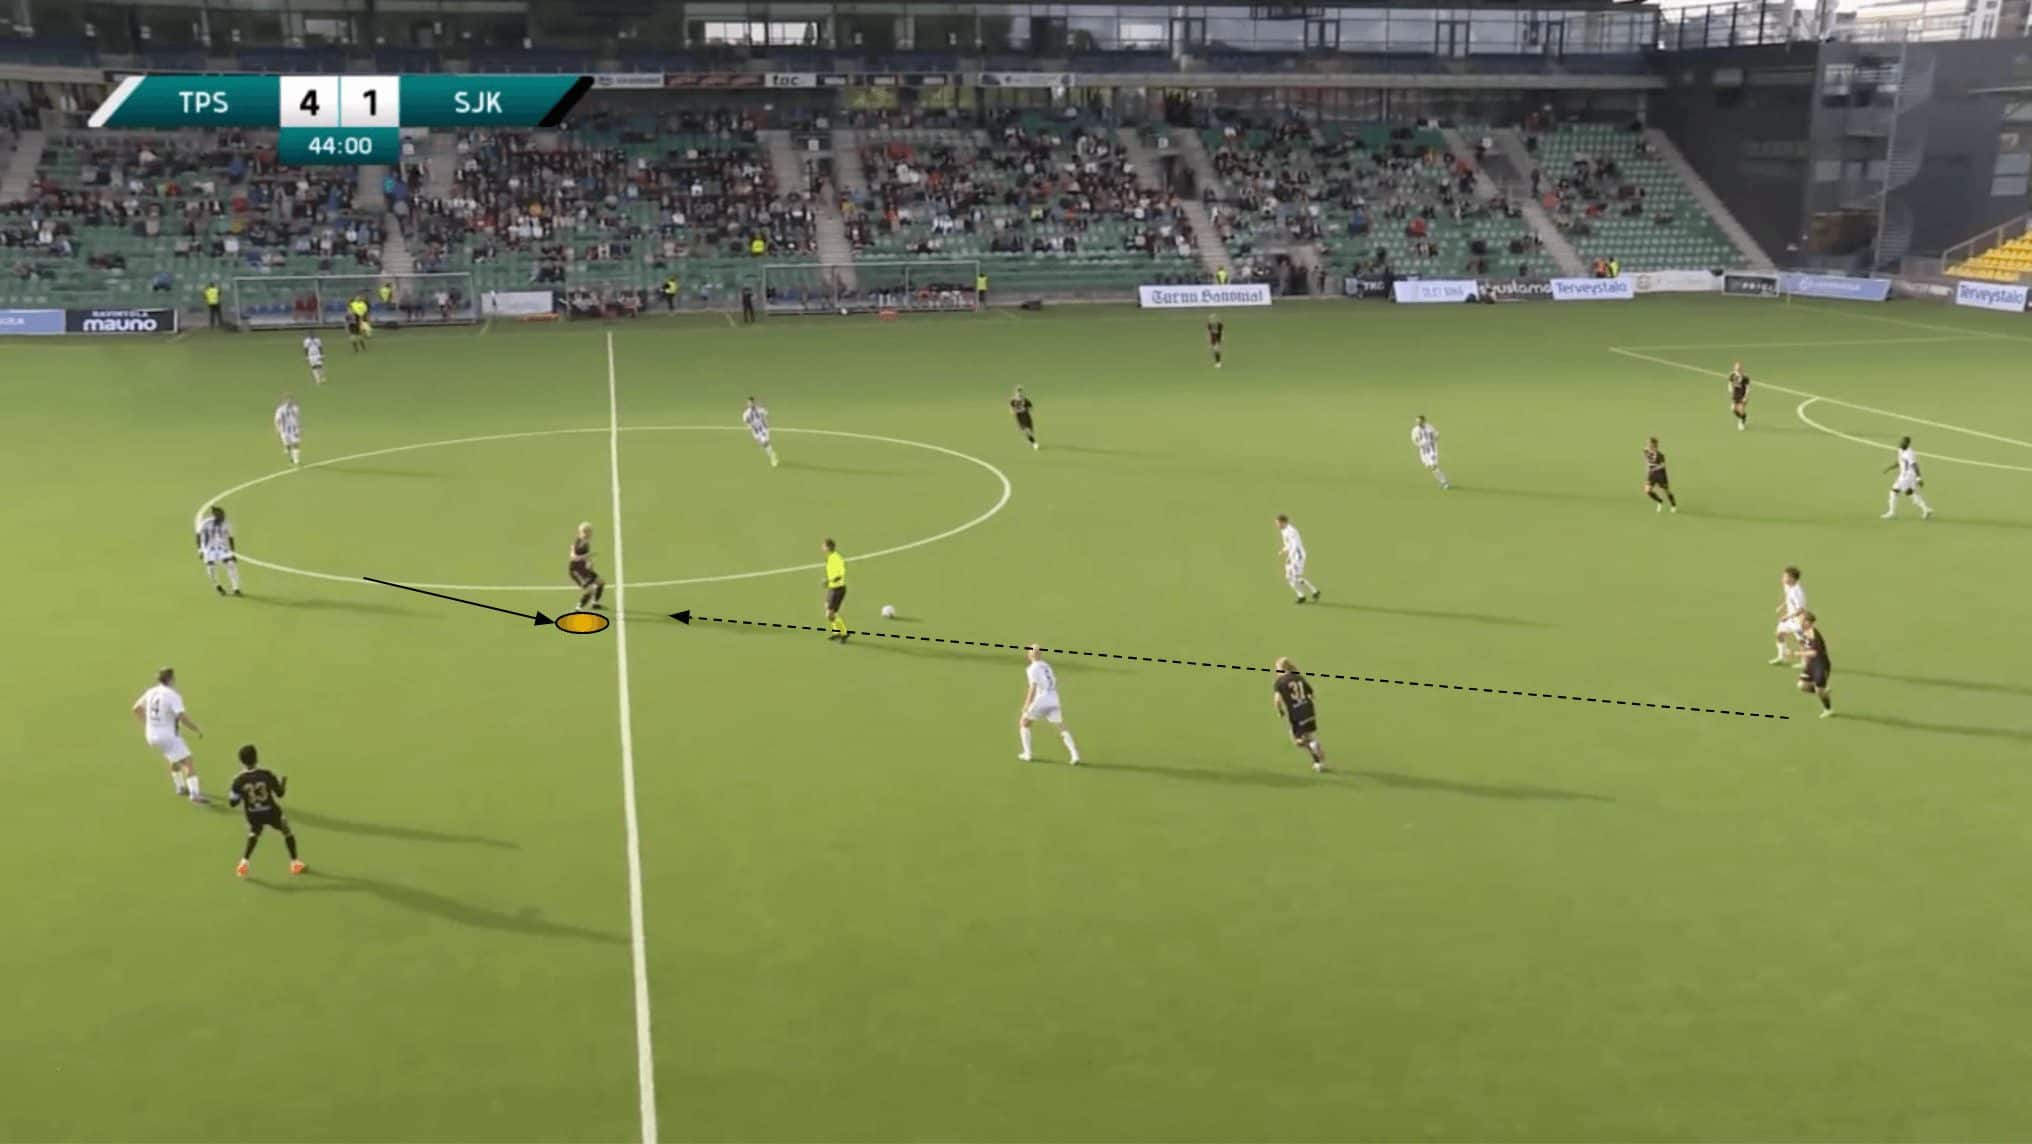
By doing so, he drags the opposition’s right central midfielder too high and too wide, leaving ample space for the centre-forward to drop in and receive to feet. On this occasion, the opposition centre-back doesn’t follow the striker into midfield, meaning he has time and space to turn and run at the defence or pick out a pass to the other attackers who will undoubtedly be looking to penetrate in behind.
Attacking The Goal
This brings us nicely into our second section of analysis — SJK Akatemia’s play within the final third or, as we’ve titled it, their methods of ‘attacking the goal’.
Of course, we’ll see different actions and combinations within the final third, depending on which attacking structure they use. However, there are some constants within their attacking game that must be touched upon.
Firstly, regardless of structure and shape, we’ll generally find plenty of direct movement and runs from the attackers within the final third.
Grieve’s side doesn’t dilly-dally when it comes to chance creation. The midfielders are constantly searching for penetrative passing options, and they don’t generally need to spend a long time looking for them thanks to the way in which the forwards know that they need to constantly be looking to provide options in behind via their active, vertical runs like we see in figure 13.
Here, the team manage to find a creative midfielder peeling away off the opposition midfielder’s shoulder in a dangerous playmaking position. After receiving, he turns and spots the left-winger’s penetrative run in behind on the right-back’s blind side. The ball ends up in the back of the net as a result of a combination of the midfielder’s intelligent movement and passing quality, along with the attacker’s run and finishing quality.
SJK Akatemia’s forwards understand that they must be direct and attack the box with these kinds of runs. They know they’ll get service as long as they make runs like this frequently. Grieve wants his side to look forward at all times, constantly threatening to put the opposition’s backline — and goal — under pressure, which is what we see exemplified here.
Another constant within SJK Akatemia’s final third play is that they’ll always look to have maximum width provided in one way or another — be that via the wingers staying wide or the full-backs pushing up on the outside.
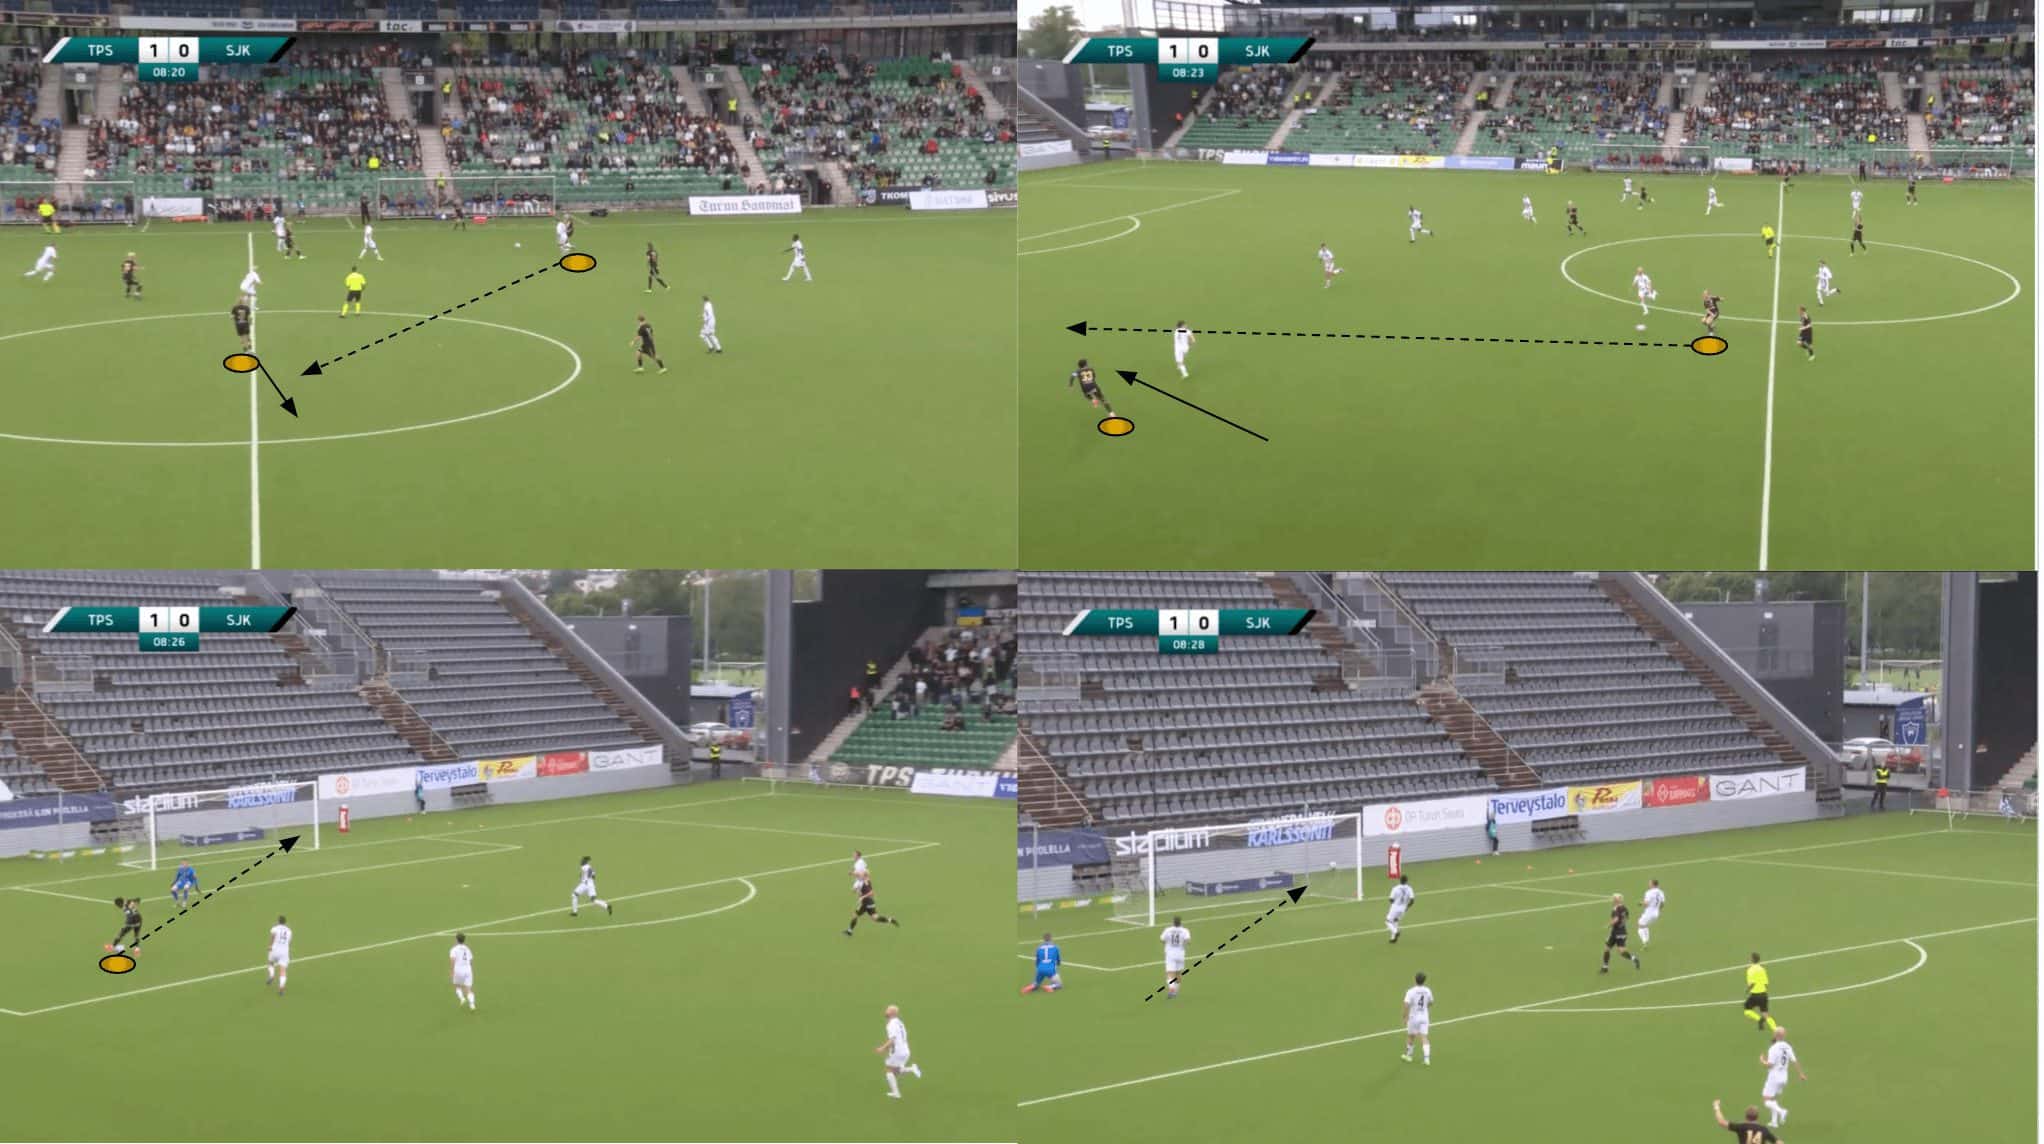
With wide threats constantly looking to exploit space outside the opposition’s backline and attack the full-back with a carry inside towards the box, they need something to aim for inside the box. This brings us to Figure 14 and SJK Akatemia’s principle of attacking the six-yard box.
The wide men know they can deliver a ball towards the six-yard box, and they should have at least one person there to meet it. From here, if they manage to meet a teammate, a goal is highly likely, as the player will simply need to make slight contact with the ball to direct it goalward from a position that would make it challenging for the goalkeeper to react adequately.
In this case, the forward at the back post meets the low cross from the left-back and sends it into the net after the other forward, and all defenders failed to make contact with the ball.
Indeed, Grieve wants one or two players constantly attacking the six-yard box, but that doesn’t mean they should be the only threats in the box, nor does it mean this is the only way they’ll look to attack from wide in the final third.
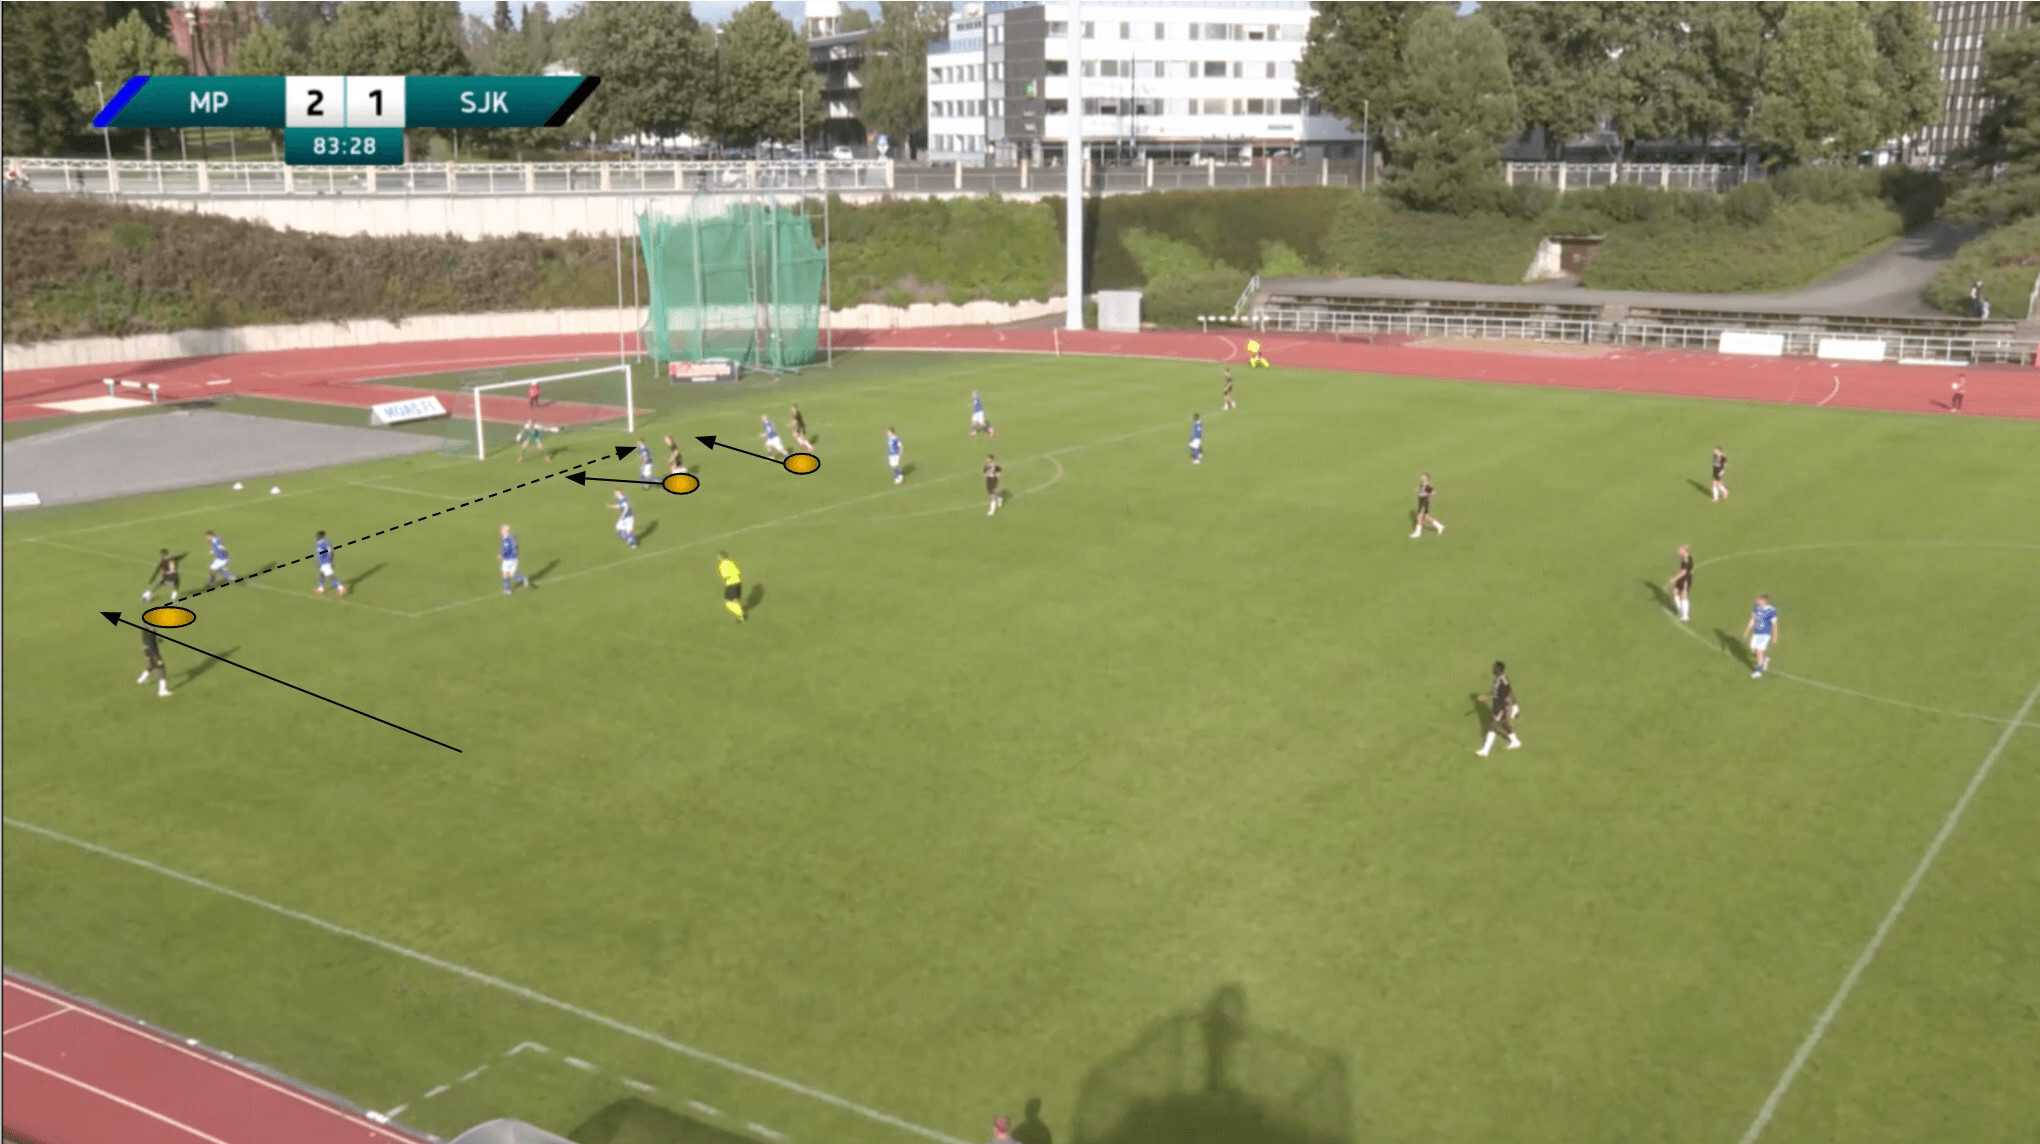
SJK Akatemia essentially hoped to flood the penalty area once in the final third, getting plenty of bodies in there in different positions. They would always want the ball, with a far winger coming in to provide an option outside the six-yard box but still within the penalty area, or a midfielder arriving late to threaten a rebound or provide an option for a cutback, for instance.
By encouraging the production of various goal threats in the penalty area, Grieve’s side could remain quite unpredictable in the final third and ensure they retained a high chance of getting onto the end of any ball sent into the box.
Pressing And Counterpressing
A significant part of SJK Akatemia’s game is counterpressing; they typically seek to quickly regain possession after an attack ends and eliminate any momentum that an opposition counterattack might gain.
The aforementioned structures in the build-up and ball progression phases serve to protect against counterattacks just as much as they aid their own ball progression, including the central positioning often found from at least one of the full-backs.
Grieve requires commitment from all players without the ball, including the moments immediately after a turnover occurs. He wants to see all players near the ball supporting the quick regain, and others quickly getting back to support the defensive transition and ensure no weaknesses get exploited.
At this point, we can briefly note a crossover between this section and the last, which is that after winning the ball, SJK Akatemia proved extremely dangerous because of their attackers’ tendency to make probing runs in behind and their midfielders’ tendency to constantly look to take opportunities to spring those attackers in behind the backline.
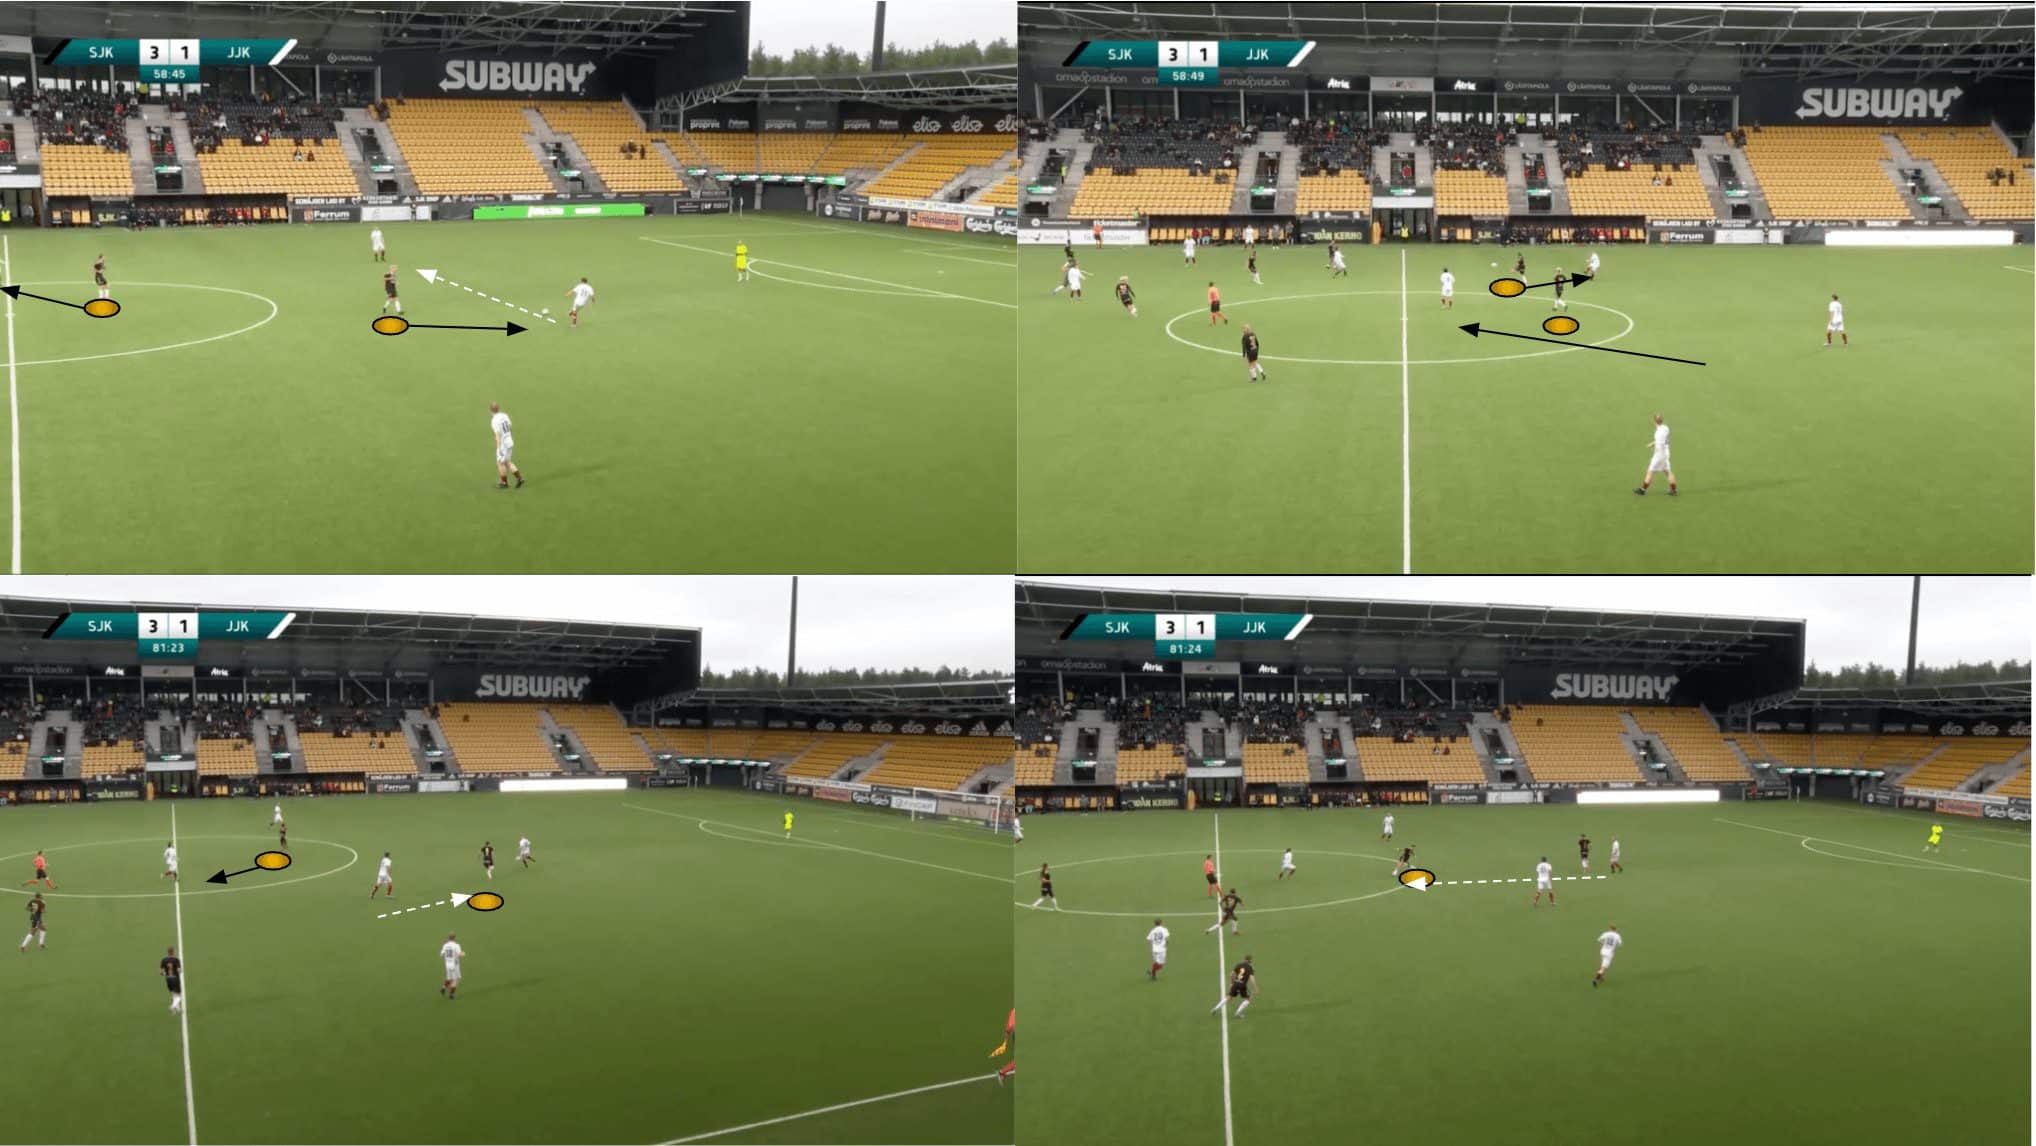
There’s also a large degree of flexibility and variance within their defensive approach. However, when pressing with two centre-forwards in a 4-4-2 formation or with a centre-forward and a ’10’, it’s common to see those two players alternating their press, with one pushing higher and closing down the ball-near centre-back, while the other drops back onto the holding midfielder/ball-near central midfielder.
If two midfielders position themselves behind the pressing forward as viable passing options, one of SJK Akatemia’s central midfielders will press higher, given the license to do so to aid the press.
It’s common to see Grieve set up his central midfielders in a man-to-man marking system, while the forwards press the ball carriers, looking to prevent any play through the centre.
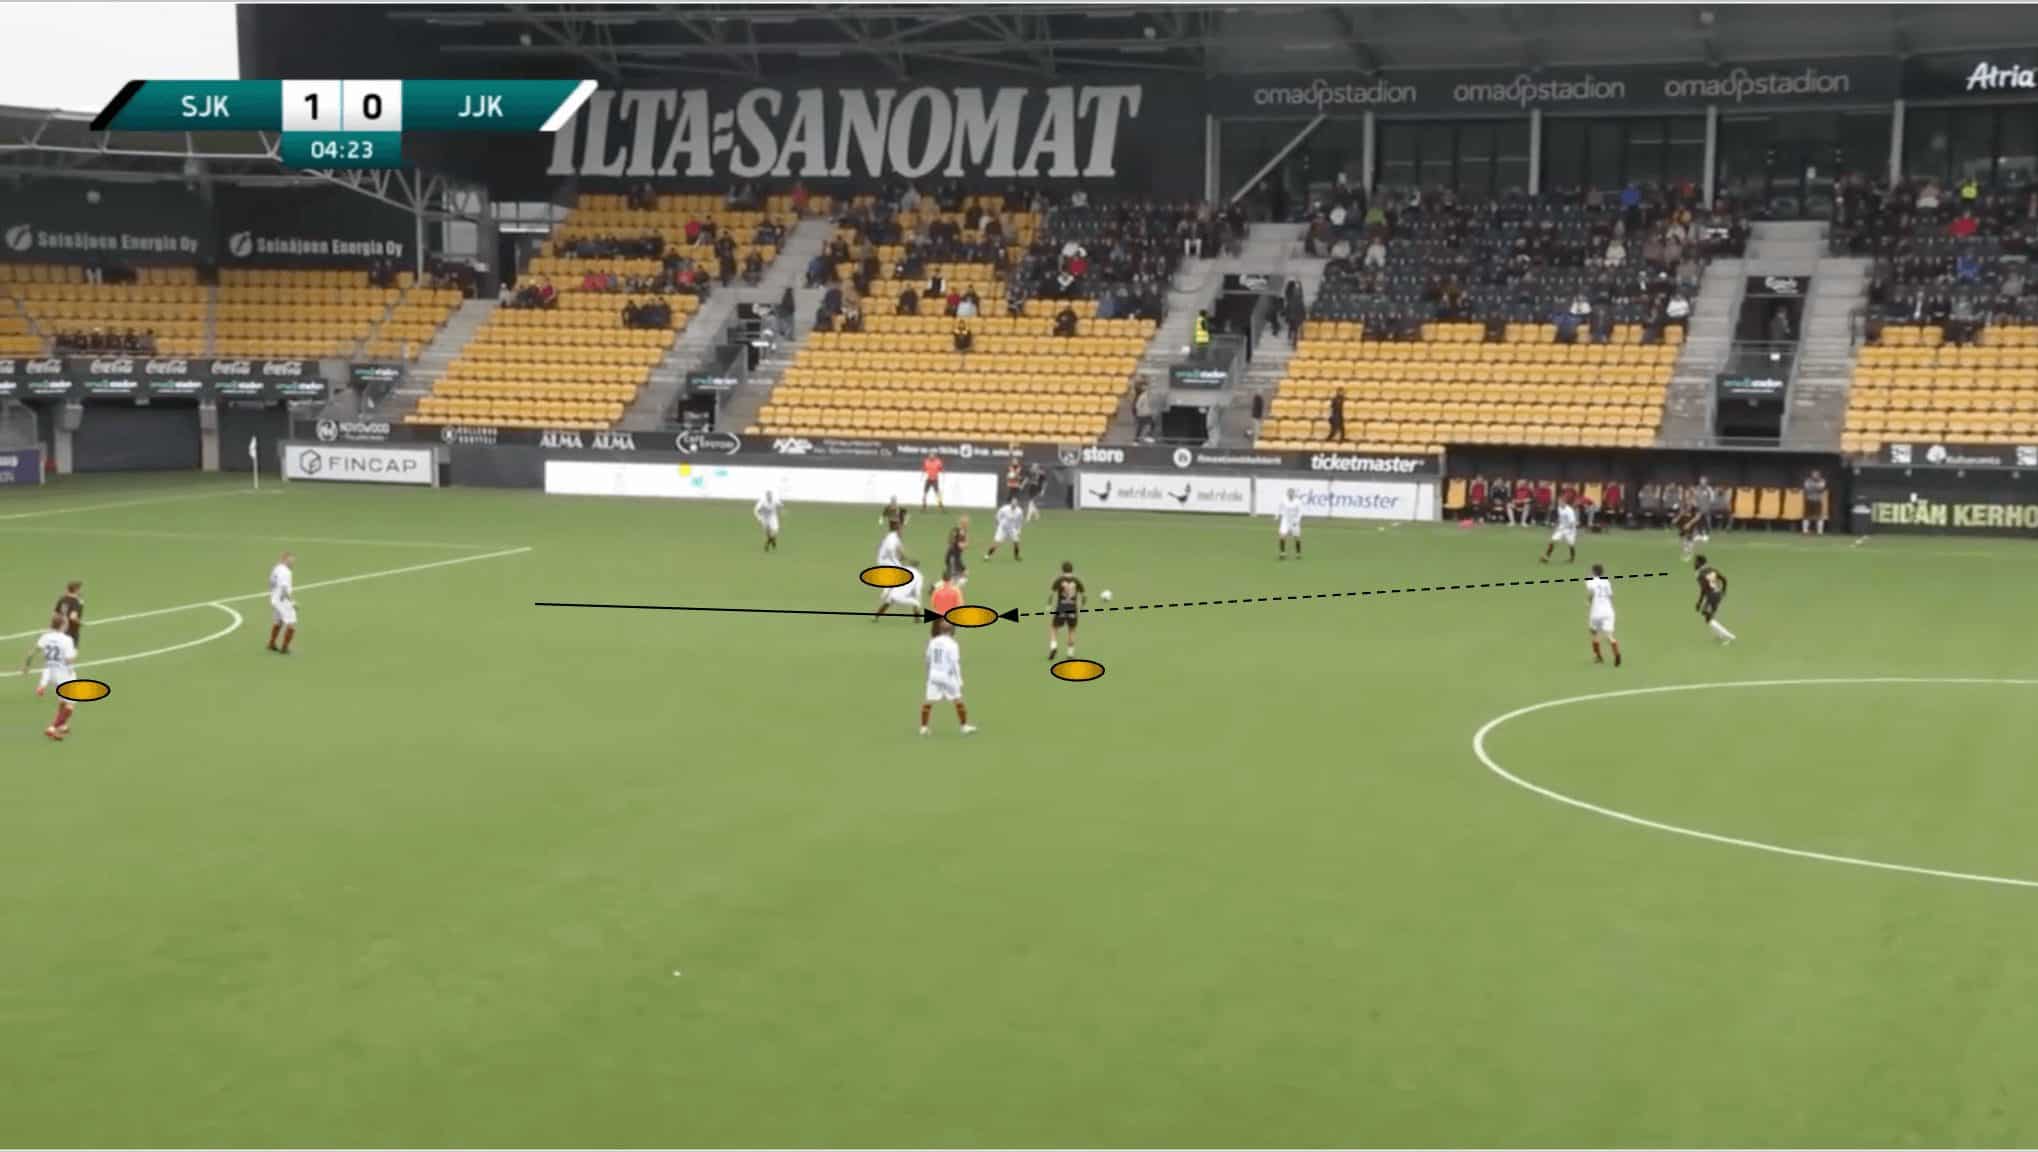
By alternating the forward who presses and the one who tries to retain access to the holding midfielder, SJK Akatemia can force high turnovers, as was the case in figure 19 — a piece of defending on the edge of the final third that created a good goalscoring opportunity for Grieve’s side.
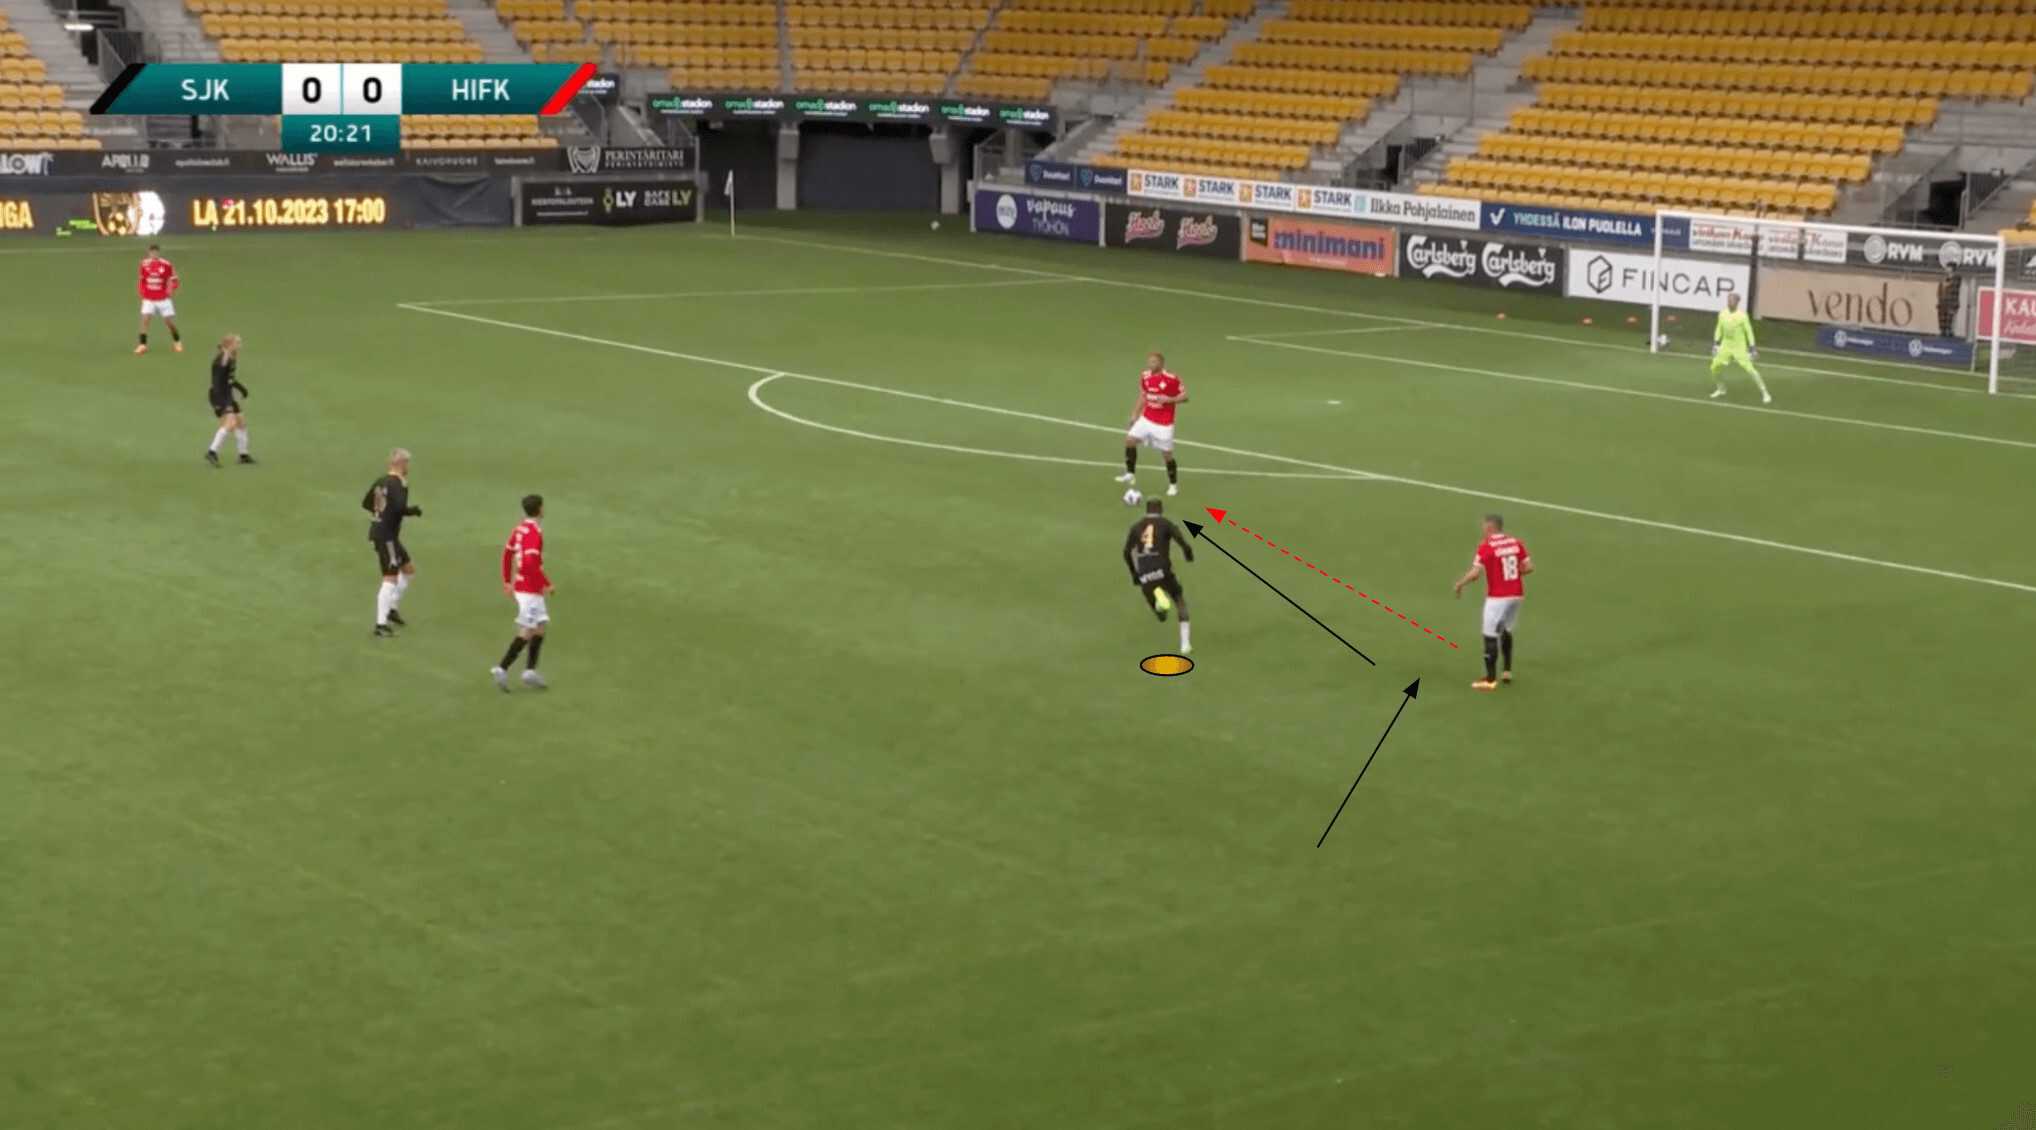
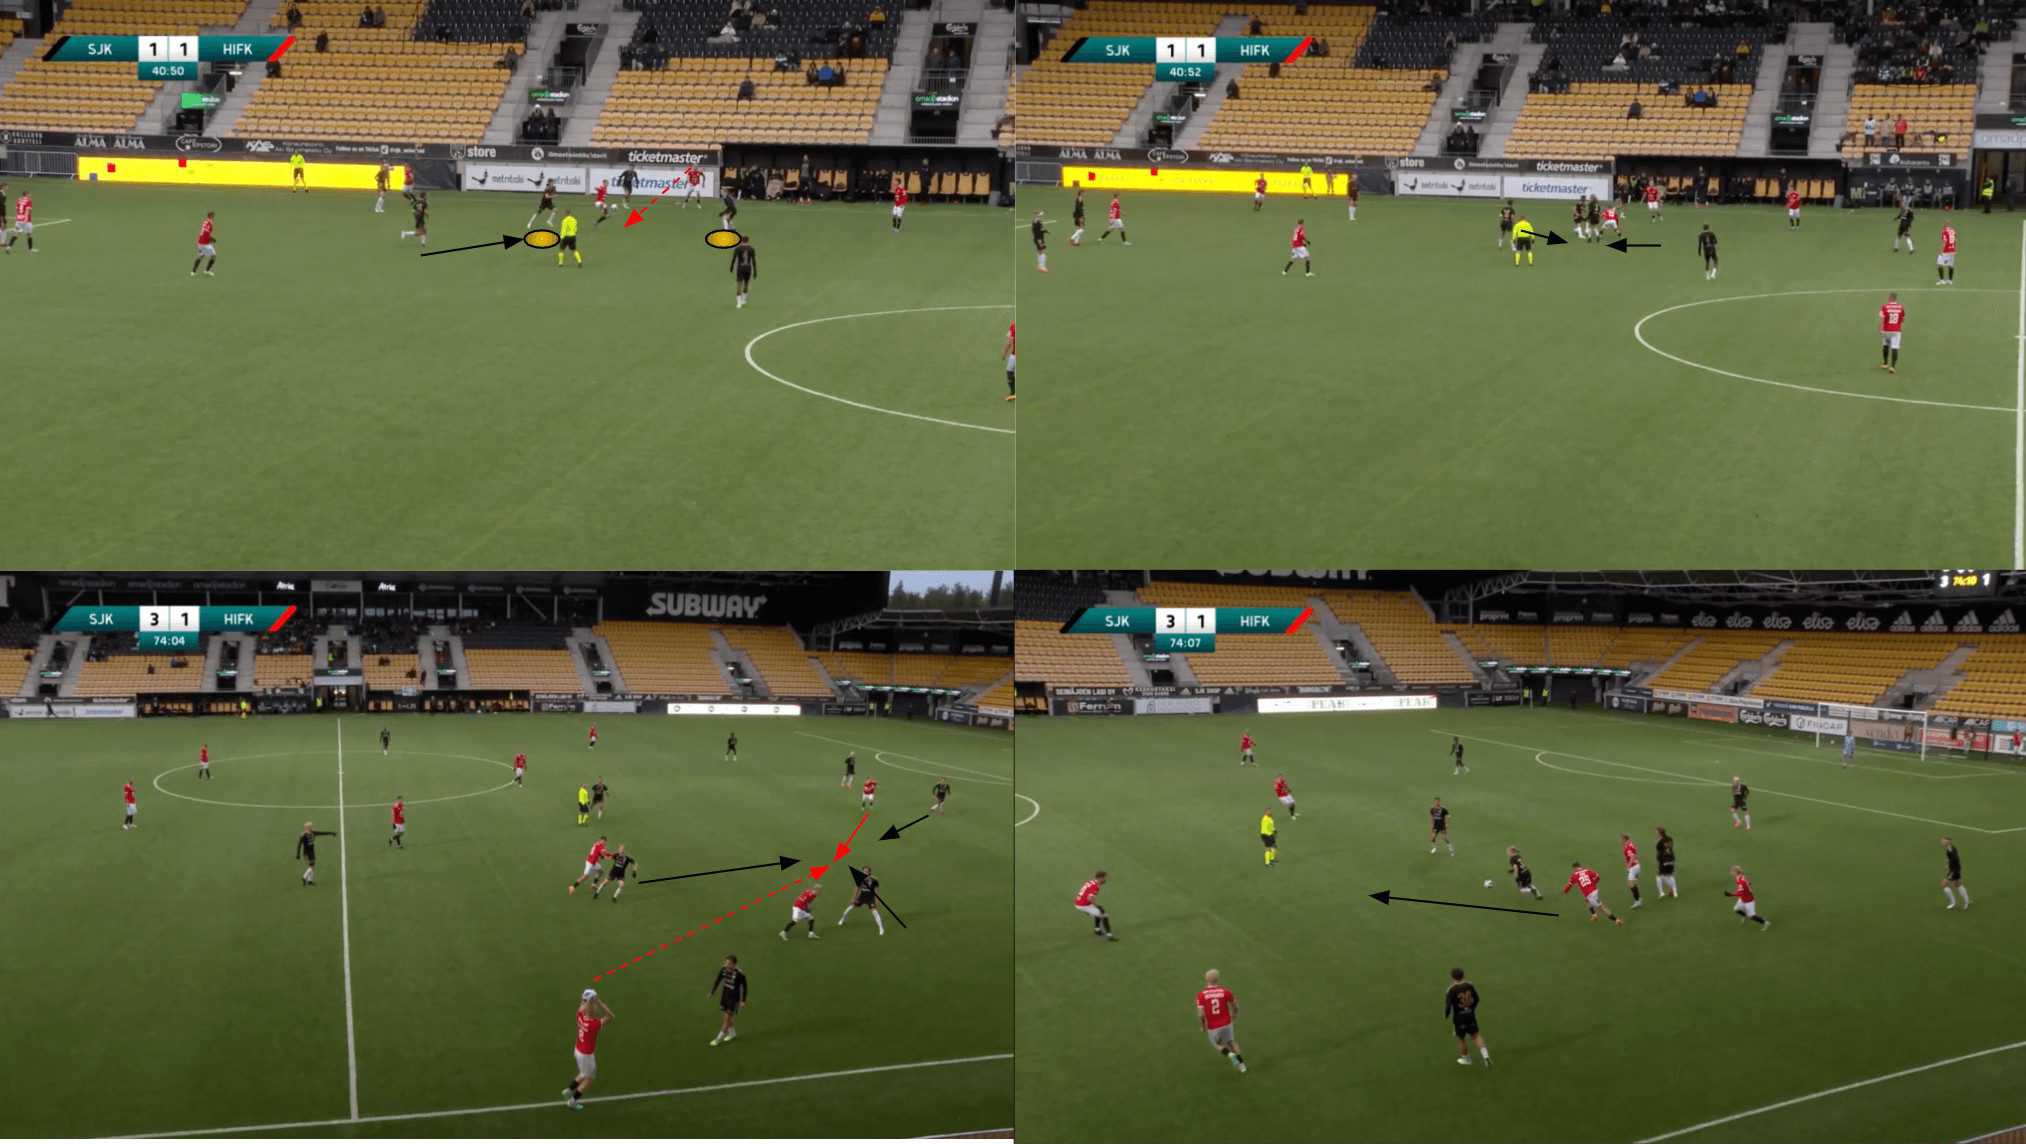
Grieve’s tactical nous is evident from some of his side’s defensive displays throughout the 2023 campaign. Take this clash at home, for instance, against HIFK. Identifying weakness in the opposition’s level of technical quality and wanting to put their central midfielders under pressure, they played very aggressively without the ball and set up an effective pressing trap to generate high regains and severely stifle the opponent’s possession play.
Above, we see the right-winger pressing from out-to-in on the left centre-back as they receive the pass; we observe the same from the left-winger on the opposite side as the ball makes its way across the backline just a few seconds later.
The opposition target the midfielder, dropping in behind the aggressive winger with the pass, managing to find a way beyond SJK Akatemia’s first line of pressure.
However, we can see how their aggressive man-marking in central midfield prevents the receiver from turning on the ball and quickly results in a high turnover in favour of the home side.
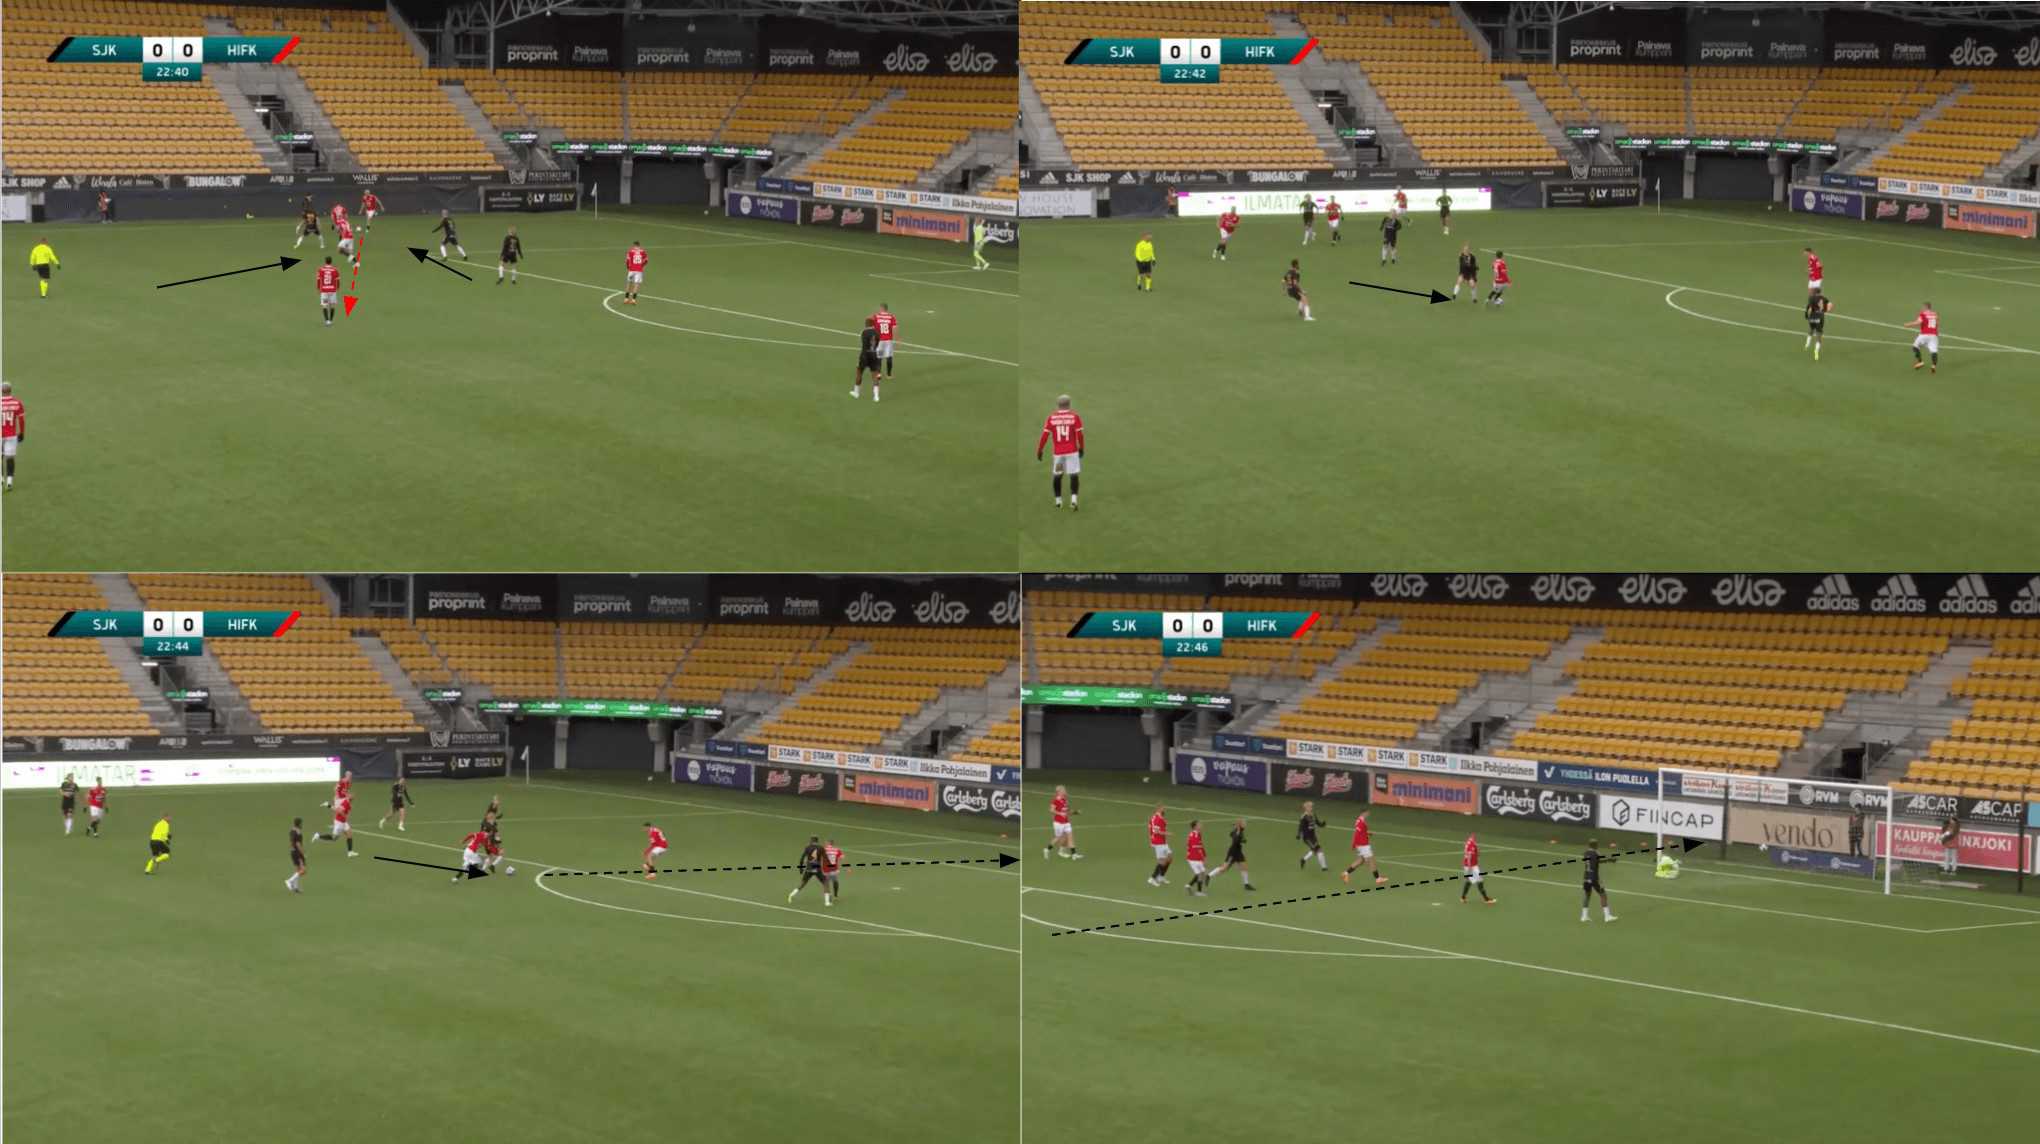
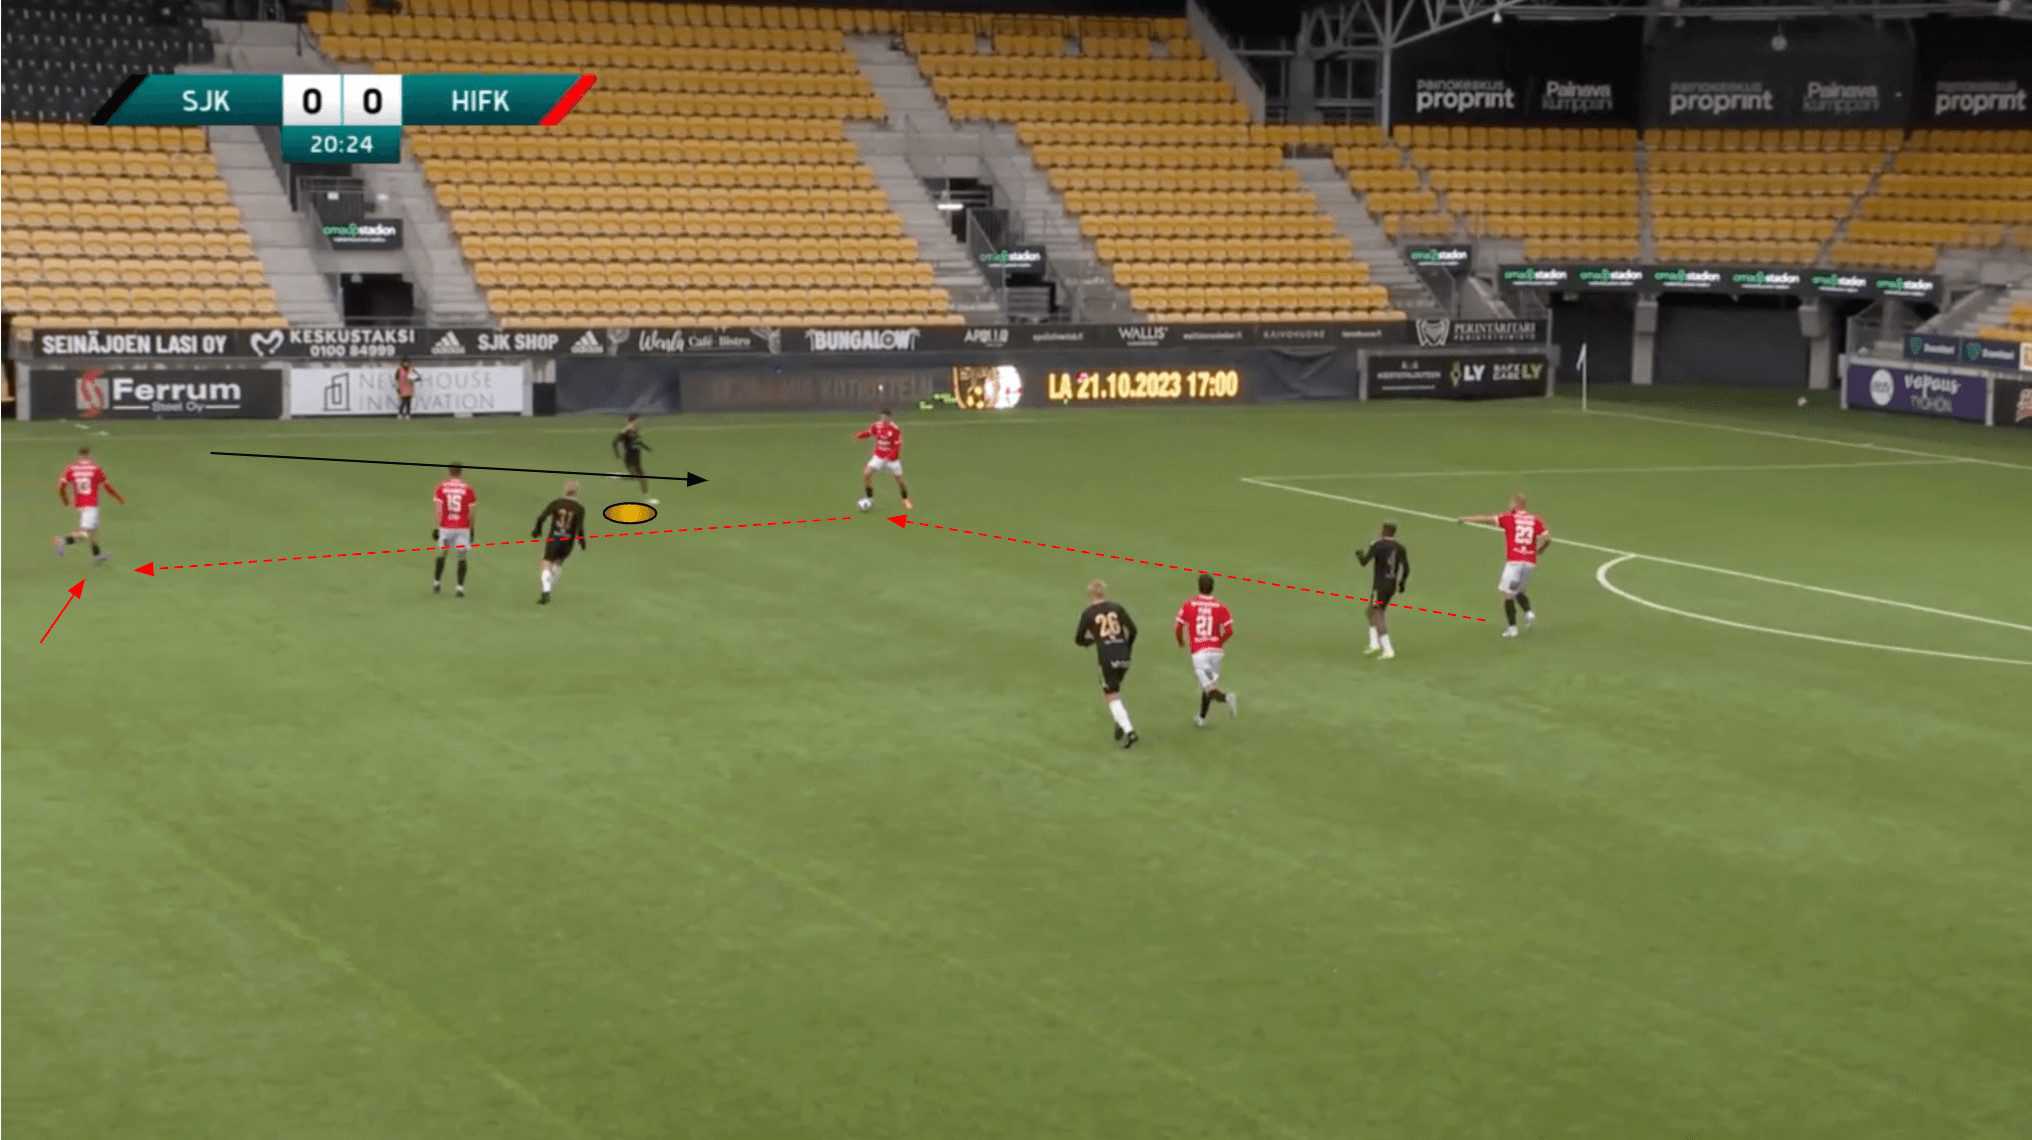
Just a couple of minutes later in that game, we came across another example of Grieve’s side pressing the backline aggressively, giving them very little time to think and forcing a rushed execution that led to a free man in midfield who was immediately hounded by defensive bodies smelling blood in the form of a high turnover.
In this case, the result was a goal for the hosts.
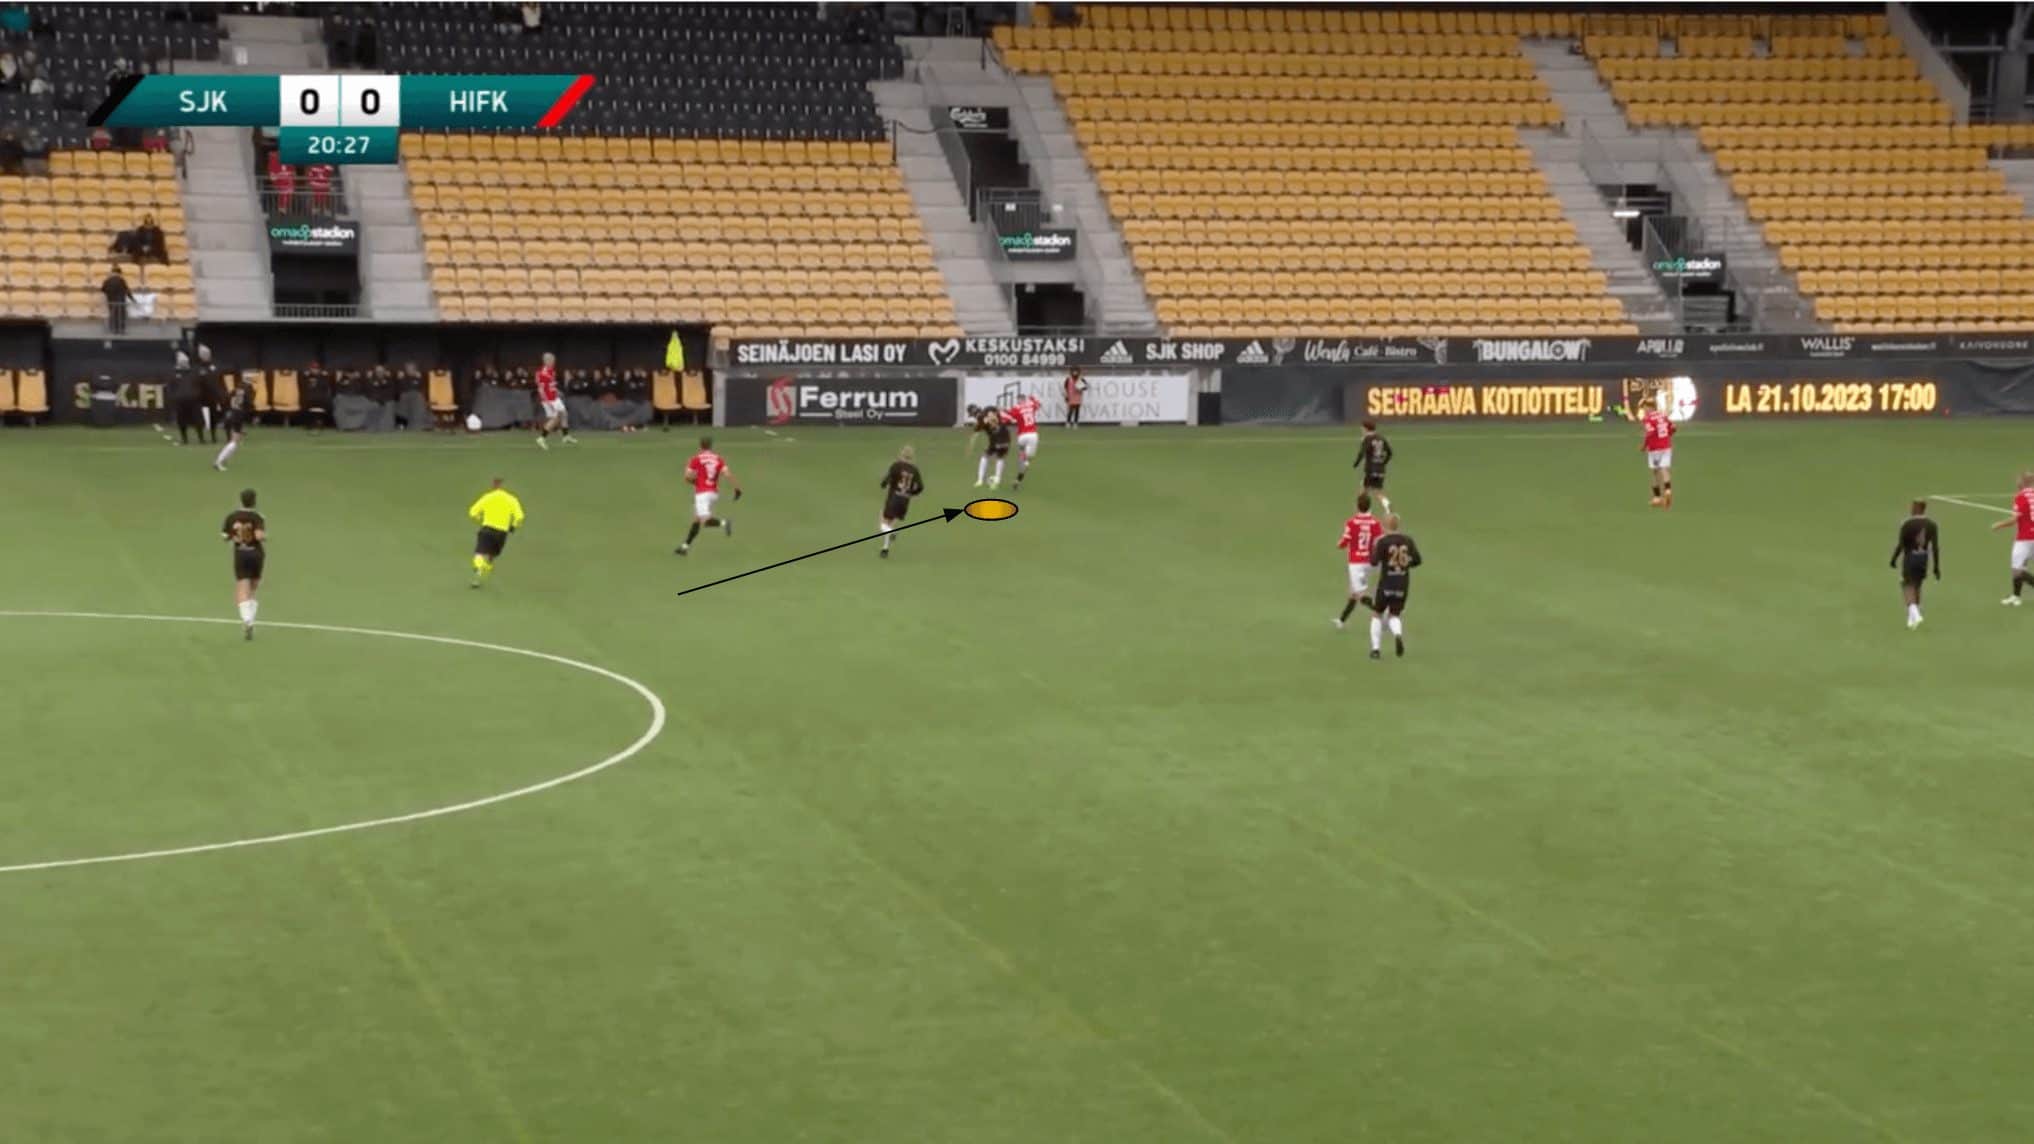
Again, versus HIFK, there was a clear effort on the part of SJK Akatemia to apply aggressive goal-side pressure to the receiver from throw-ins, likely with the aim of again exploiting that perceived lack of comfort on the ball under pressure. We observe a couple of instances where this generated turnovers in favour of the hosts in Figure 24.
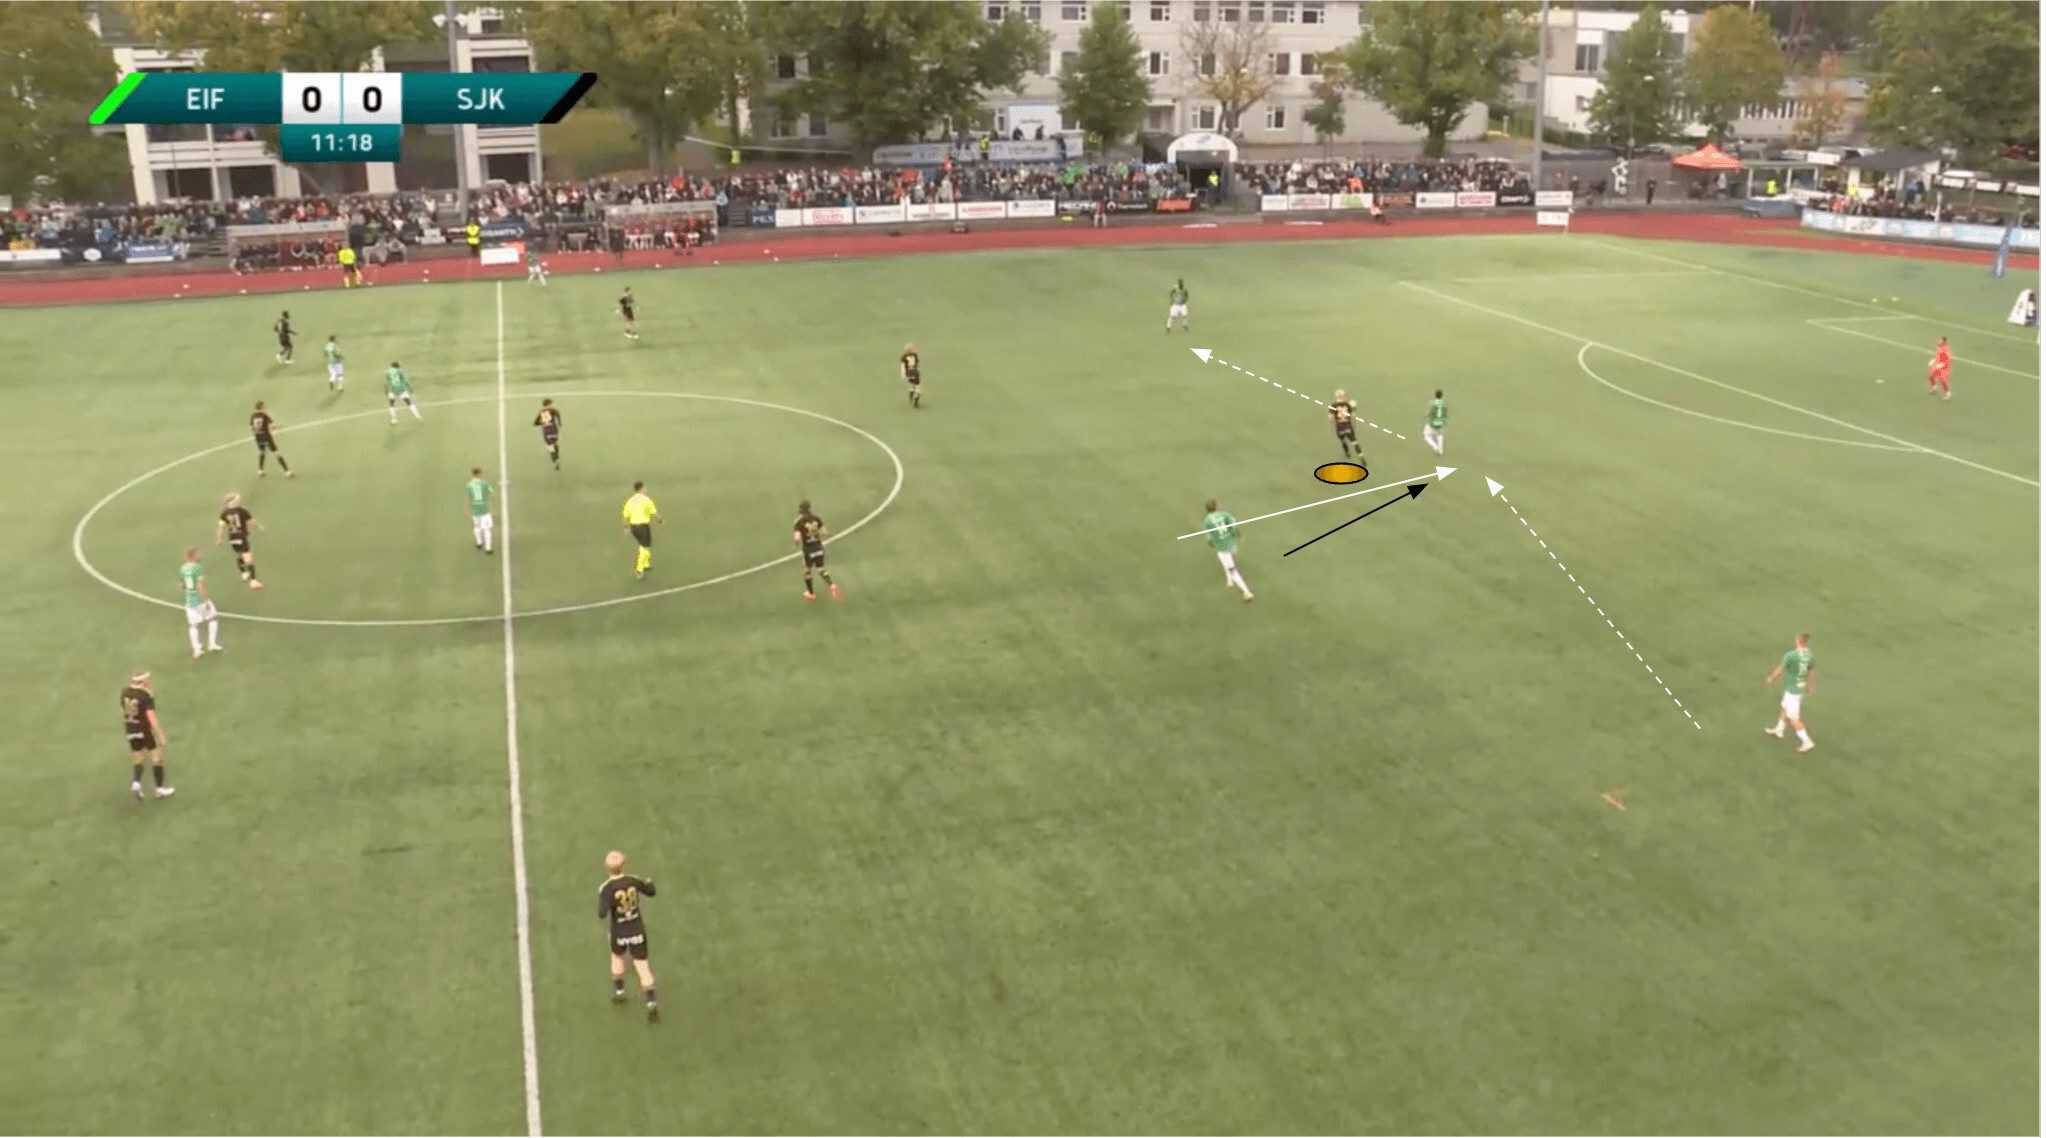
Versus EIF, SJK Akatemia astutely noted the opposition’s tendency to drop the holding midfielder into the backline and rely heavily on him for progression. The centre-forward(s) was then tasked with hounding that player and ensuring they couldn’t pull the strings from deep.
When he did drop into the backline as anticipated, the striker was there to prevent him from playing forward and block any return passes.
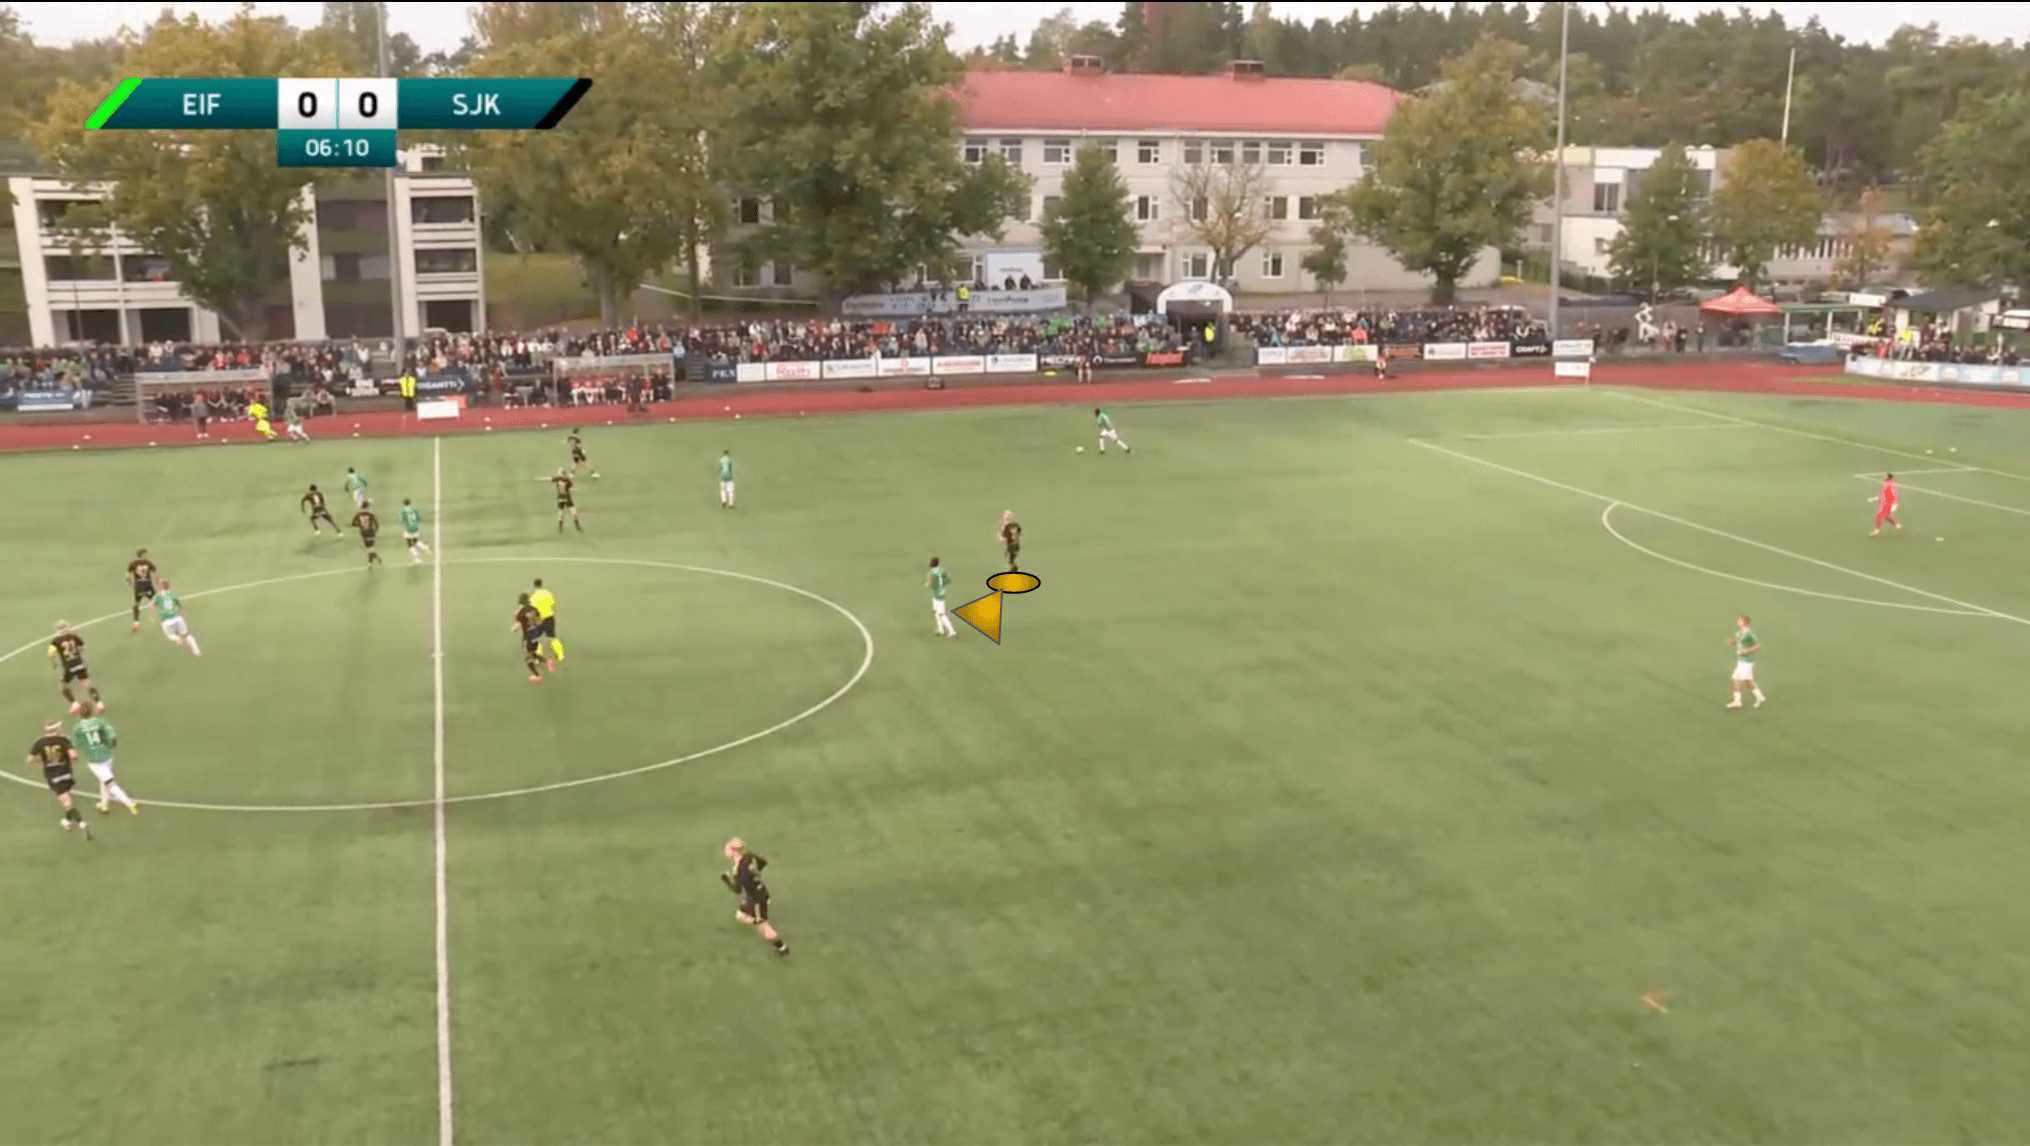
On other occasions, when the holding midfielder remained a bit higher, the striker ensured he remained in his cover shadow.
As the game continued, we saw the striker acting more aggressively and pressing higher up the field. At the same time, the ’10’ focused on the holding midfielder in these kinds of positions, but the idea remained the same — exploit the opponent’s reliance upon this player and deny them the opportunity to play through them, forcing them to alter their gameplan and try to find alternative solutions that may not be as fruitful.
These examples emphasize how Grieve will apply opposition-specific defensive instructions, depending on identified weaknesses, to facilitate their overarching goal of generating numerous turnovers that create counterattacks, allowing them to exploit the dangerous runs from the forwards.
Conclusion
To conclude this tactical analysis, Stevie Grieve’s SJK Akatemia — the youngest squad in Finland’s second-tier — achieved impressive results in their division primarily due to their tactical flexibility and versatility throughout the campaign.
While some key principles were ever-present as discussed, they adjusted from game to game to create a more significant challenge for each specific opponent based on weaknesses identified within their respective games.
This match-to-match adaptability to react to the opponent and become what’s needed to defeat them is a vital reason why ‘tactical flexibility’ is such a coveted trait in a manager; Stevie Grieve’s SJK Akatemia provide an excellent case study for this from 2023.