Ligue 1 got back to business this past Friday evening as their three-week mid-season winter break came to an end. A compelling clash between Ligue 1’s second and third-placed teams announced the return of France’s top tier, as Rennes hosted Marseille.
Second-placed Marseille will be delighted to have come away from Friday’s game with all three points. They’ve now managed to stretch their lead over third-placed Rennes to eight points, with the caveat of having played one more game than Les Rouge et Noir. Furthermore, Marseille now sit just five points behind league leaders PSG, having also played one game more.
The tactics deployed by both sides in this fixture provided a lot of talking points in this game. In this tactical analysis piece, we will analyse the major tactical decisions which influenced this game and which resulted in André Villas-Boas’ Marseille side leaving Roazhon Park with all three points.
Lineups and formations

The home side started this game in a 4-4-1-1 shape. Their midfield and defensive lines generally remained quite close together in the first half. However, in the second half, Rennes pressed much higher. This resulted in a much higher defensive line and much more space between these two lines.
In addition to that, Rennes also committed more men forward, both in attack and defence, as this game unfolded. This resulted in slight alterations in shape throughout this game, particularly in attack.
Centre-forward M’Baye Niang, wingers Raphinha and Benjamin Bourigeaud, and attacking midfielder Romain Del Castillo all offered a lot of tactical flexibility throughout this game for the hosts.
As a result, all four of these players played in a variety of different roles throughout this game. This resulted in each of these players occupying a variety of different positions as Rennes’ tactics altered throughout this contest.
Meanwhile, the visitors lined up in their usual 4-1-4-1 shape for this fixture. Hiroki Sakai was the only notable omission from the Marseille side who started this game. Bouna Sarr and Jordan Amavi started at the full-back positions in his absence. This allowed Nemanja Radonjic, who had been enjoying a spell of good form prior to the winter break, to start this game at right-wing.
Marseille retained this 4-1-4-1 shape throughout this contest. Their midfield and centre-forward were generally given license to attack, with Sarr also occasionally making overlapping runs forward. Holding midfielder Boubacar Kamara and their defence denerally anchored their midfield.
Marseille also pressed quite aggressively from the front throughout this contest. As a result, they generally defended with quite a high line.
Boubacar Kamara’s screening job between the lines
Marseille’s holding midfielder Kamara played an important role for the visiting side in this game. As Marseille generally pressed quite high, Kamara was crucial for preventing Rennes’ from exploiting space between the lines. Kamara was particularly effective at preventing Rennes from advancing into Marseille’s half in the first half of this game.
Kamara played a particularly important role in man-marking the Rennes player occupying the ‘10’ position. This generally meant that Kamara marked either Del Castillo or Raphinha, as these players frequently switched roles. Kamara was integral at preventing Rennes’ creative players from playing and preventing Rennes from enjoying possession in the first half.
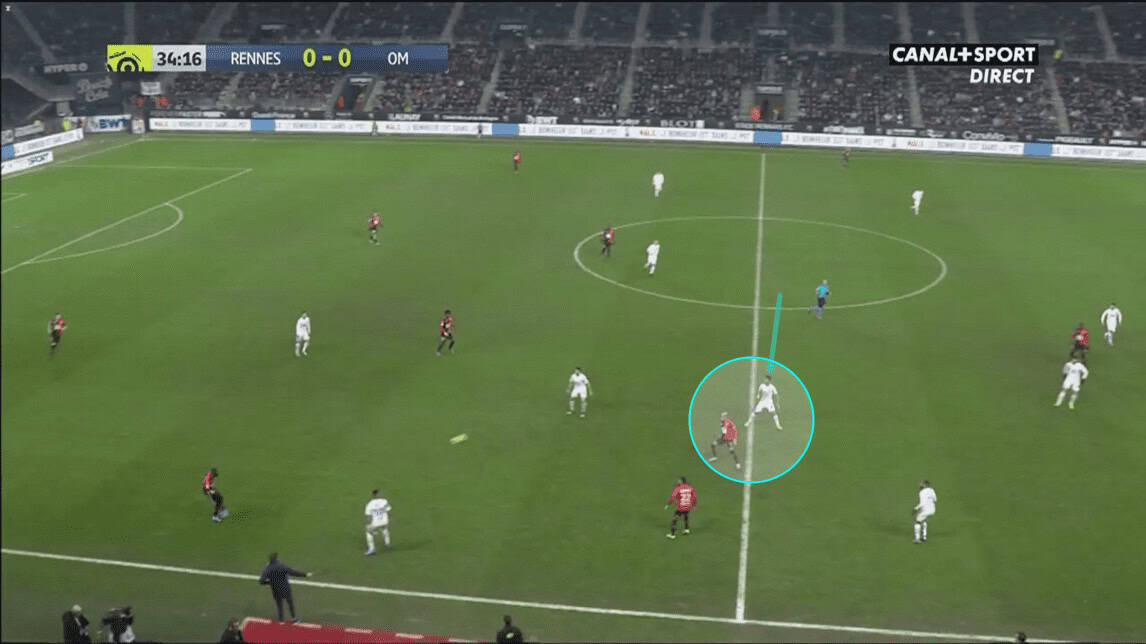
This image above shows us an example of Kamara operating between the lines. As we can see, there is a large amount of space between Marseilles’ back four and their midfield four. However, Kamara’s presence at holding midfield bridges this gap and prevents Rennes from exploiting it effectively.
As we can see in this image, Rennes’ right-back Hamari Traoré is in possession of the ball here. Raphinha, who had been occupying the ‘10’ position at this time, has made his way from the centre of the pitch over to Rennes’ right-wing in order to offer Traoré a short-passing option.
However, we can also see that Kamara diligently tracks Raphinha over to the right-wing. This makes Raphinha a risky passing option and Traoré opts for the long-ball to centre-forward Niang. This long-ball is ineffective on this occasion, which allows Marseille to win back possession.

This image shows us another example of Kamara vacating his central position in order to man-mark Raphinha. On this occasion, Kamara also advances up the pitch, beyond his position between the lines. He has advanced beyond Marseille’s other two central midfielders on this occasion.
Kamara’s marking is effective as it prevents Rennes’ ‘10’, Raphinha, from enjoying time and space on the ball. Kamara’s body positioning here prevents Raphinha from playing the ball centrally. Instead, he forces the attacker out wide.
Raphinha carries the ball up the left-wing here. As he does, Kamara tracks him all the way. In doing so, Kamara is successful at preventing Raphinha from finding space. He subsequently manages to force Raphinha to misplace a pass, helping Marseille force a turnover.
It is clear that Kamara’s defensive midfield role was crucial in preventing Rennes’ creative players from enjoying time on the ball. Furthermore, Kamara’s role was crucial in forcing turnovers of possession.
The first example above shows us how Kamara, along with Marseille’s press, was effective at minimising Rennes’ passing options. Meanwhile, the second example shows us how Kamara was also effective at pressing the ball carrier into losing possession.
Rennes were unable to overcome this problem in the first half. As a result, they ended the first half with just 39% possession. However, in the second half of the game, Stéphan altered his tactics in order to reduce Kamara’s effectiveness. We will discuss this tactical switch and its impact further on in this piece.
Marseille’s positional freedom on the left-wing
Fluidity and a degree of positional freedom have shown to be a recurring theme for Marseille this season. This was no different in this past Friday’s fixture, as Marseille’s attackers roamed about in-possession in order to manipulate Rennes’ defensive shape to create gaps.
Marseille displayed a lot of positional freedom on the left-wing in this game. This was particularly evident in the first-half when Rennes pressed less aggressively. Left central midfielder Morgan Sanson’s outward, diagonal runs were important to this aspect of Marseille’s tactics in-possession in the first half.

The image above shows us an example of the fluidity of Marseille’s shape. Just prior to this image, left-winger Dmitri-Payet had dropped deep into his own half to pick up the ball from the goalkeeper. He was allowed to carry the ball further up the pitch, helped by the overlapping run of left-back, Amavi. Payet subsequently played the ball into the feet of centre-forward Darío Benedetto, who had dropped deep.
Payet’s deep positioning created space on the left-wing for Sanson to exploit. Payet’s positioning attracted right-back Traoré towards him. This left a gap at Marseille’s left-wing, which is circled in this image. Sanson subsequently probed into this space from his midfield position.
As Benedetto drops deep, he attracts Rennes’ right centre-back, Damien Da Silva, with him. We can see Da Silva just behind Benedetto in this image. This was successful in creating further space for Sanson. As Da Silva was out of position, he would not be able to simply shift over to the left to cover the space left by Traoré. This allowed even more space for Sanson to attack.
The movement of all three of these players creates a triangle. As Benedetto receives the ball from Payet, he quickly returns it to the Marseille playmaker, as we can see above. Payet then plays the ball through to Sanson.
Fortunately for Rennes, right centre-back Jérémy Morel is successful in covering for his defensive partners and shifts across quickly. This allows his team time to recover and successfully prevents Marseille from creating a clear cut chance.
This movement was a common theme of Marseille’s tactics, in-possession. Payet could frequently be seen dropping to create from a deeper position. In doing so, Payet’s movement also successfully created space for these dangerous runs from Sanson.
Similarly, Benedetto also frequently roamed about the attack, as seen above. Benedetto’s movement helped his side to overload the wings, drag the opposition centre-backs out of position, and create dangerous passing angles for his teammates.
Marseille’s fluidity and the movement of their attackers particularly helped them to create chances in the first half. However, as the game progressed, Rennes began to press higher this allowed Marseille less possession and less time to build out of their half. We will discuss this at greater length further into this analysis.
Rennes alter tactics in the second half to overload Kamara
As we discussed previously, Kamara was an extremely effective tool for Marseille in the first half of this game. He played his role between the lines effectively, preventing Rennes from enjoying much of the ball possession and preventing them from supplying their creative players with the ball.
However, Rennes entered the second half with a plan to work around Kamara and reduce his effectiveness. Stéphan’s tactical alterations were effective at helping his side to build attacks more successfully, as well as helping his side to win the midfield battle in the second half.
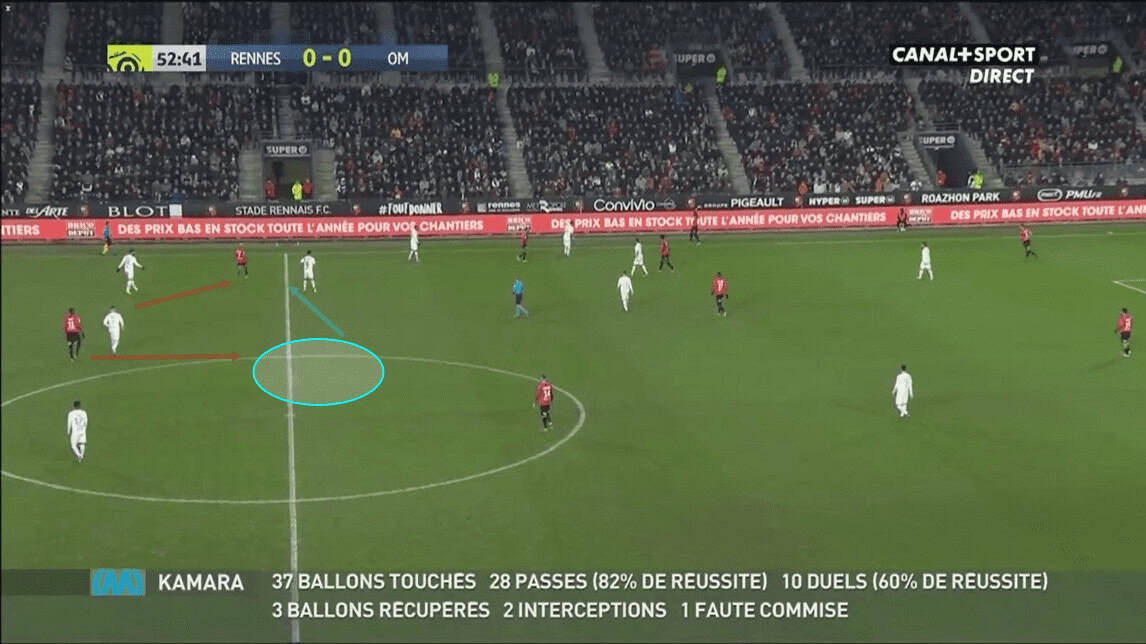
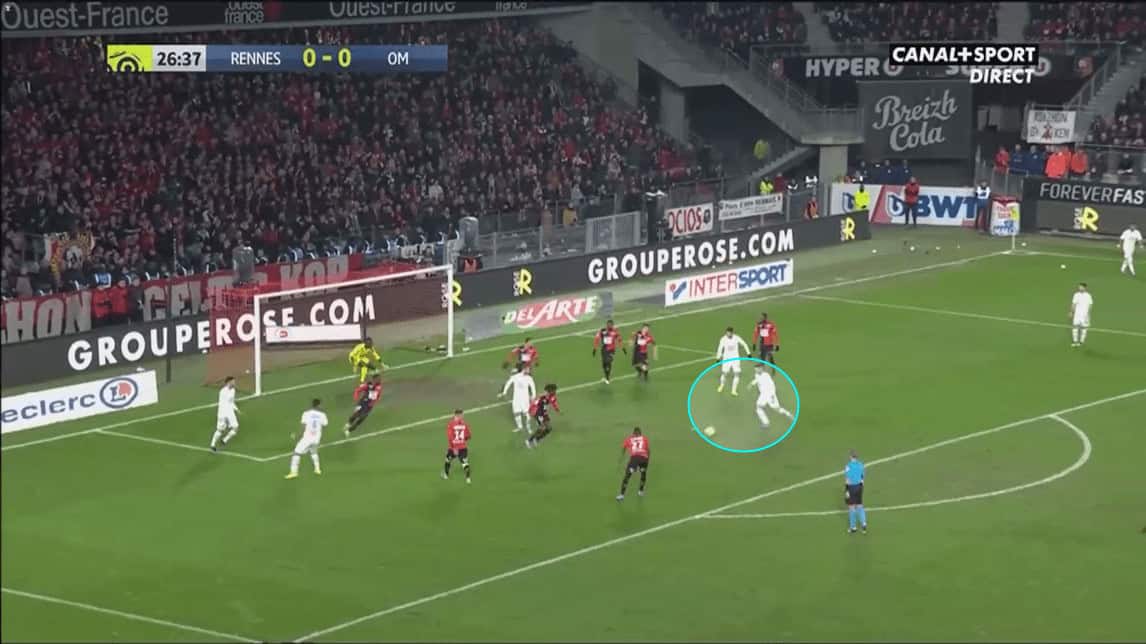
Rennes were successful at manipulating Kamara’s positioning in the second half in order to advance possession into the attackers. We can see an example of this in the image above. Raphinha had been sitting in line with Niang just prior to this image. However, as Raphinha dropped deeper, he attracted Kamara to Marseille’s left-wing.
As Kamara moved to the left side of Marseille’s defence, he left his central position unoccupied. This allowed Niang to drop deep and offer a free passing option to his teammates. Niang receives the ball to feet as this passage of play unfolds. He is subsequently able to advance the ball out to Raphinha on the right-wing, who is able to go on and create a chance from there.
Rennes’ tactical alterations were evident from the very beginning of the second half. They intended to drag Kamara out of position by attracting him away from the centre with one player, while another player would then move into the central space between the lines to create.
At the same time, Niang was given more freedom to drop deep, rather than sit on Marseille’s defensive line. On this occasion, both of these tactical tweaks worked together effectively. As Raphinha dragged Kamara out of position by momentarily dropping deep, Niang moved into Kamara’s central position to collect the ball and advance the attack for his team.
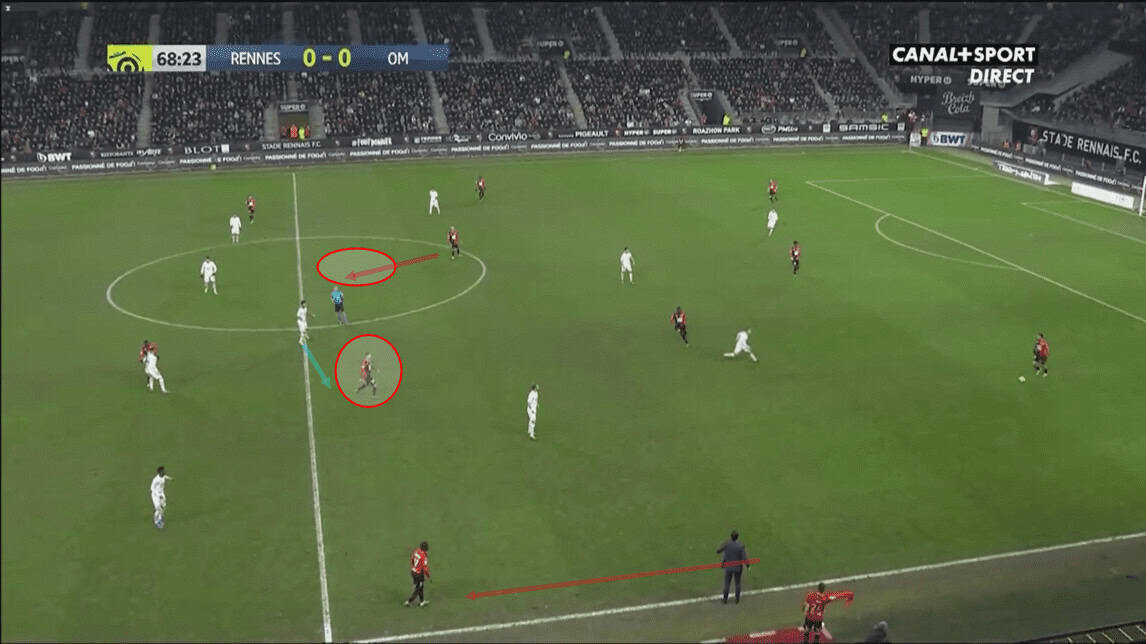
This second image shows us another example of Kamara’s position being manipulated by Rennes’ attackers. On this occasion, Niang is the one who attracts Kamara away from the centre of the pitch. In doing so, he creates space for substitute attacker Adrien Hunou to attack.
This image is taken just a moment before Niang receives possession. His run from deep is reminiscent of Benedetto’s movement in the first half. Niang’s movement pulls right centre-back Álvaro González out wide, along with Kamara.
As Niang receives the ball, he is able to quickly play it centrally to Hunou, who exploits the significant space created by Niang between Marseille’s centre-backs. Hunou is subsequently able to carry the ball forward, creating a goalscoring chance for Rennes.
This third image shows us one more example of Rennes creating a numerical advantage versus Kamara. On this occasion, we can see an example of how high Rennes deployed their full-backs in the second half. In the first half, only one of Rennes’ full-backs appeared to attack with regularity. However, both full-backs frequently roamed forward during the build-up phase in the second half.
The advanced position of Rennes’ full-backs allows their wingers to play more centrally. We can see left-winger Bourigeaud, circled, playing in the left half-space in this image. Bourigeaud attracts Kamara towards him. However, this leaves space for Raphinha to exploit in the centre.
As this passage of play unfolds, the ball is played long to Niang, who manages to head it into the central space for Raphinha to gain possession and continue to attack.
While Kamara was effective at preventing Rennes from creating much in the first half, it’s clear that Rennes were successful at playing around the Marseille holding midfielder in the second half. This was a major factor which helped them to control the midfield in the second half of this game.
Rennes press more aggressively in the second half
Rennes committed more men higher up the pitch, both in-possession and out-of-possession in the second half. The home side pressed Marseille much more aggressively in their own half in the second half of this game. This was effective at preventing Marseille from building from the back, as they were generally afforded less time on the ball.
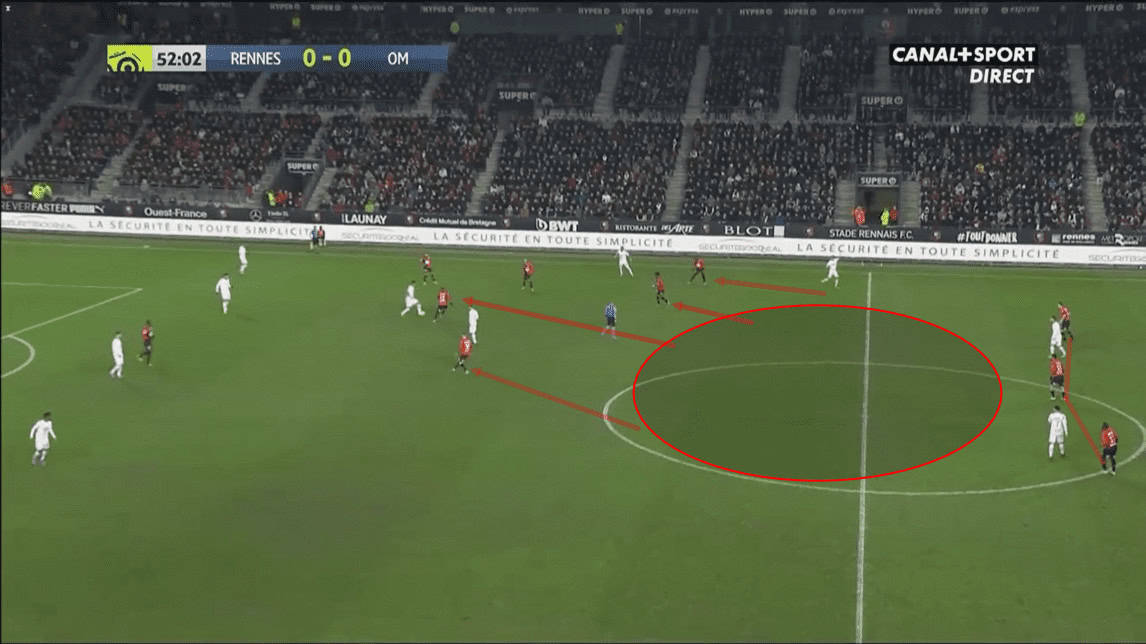
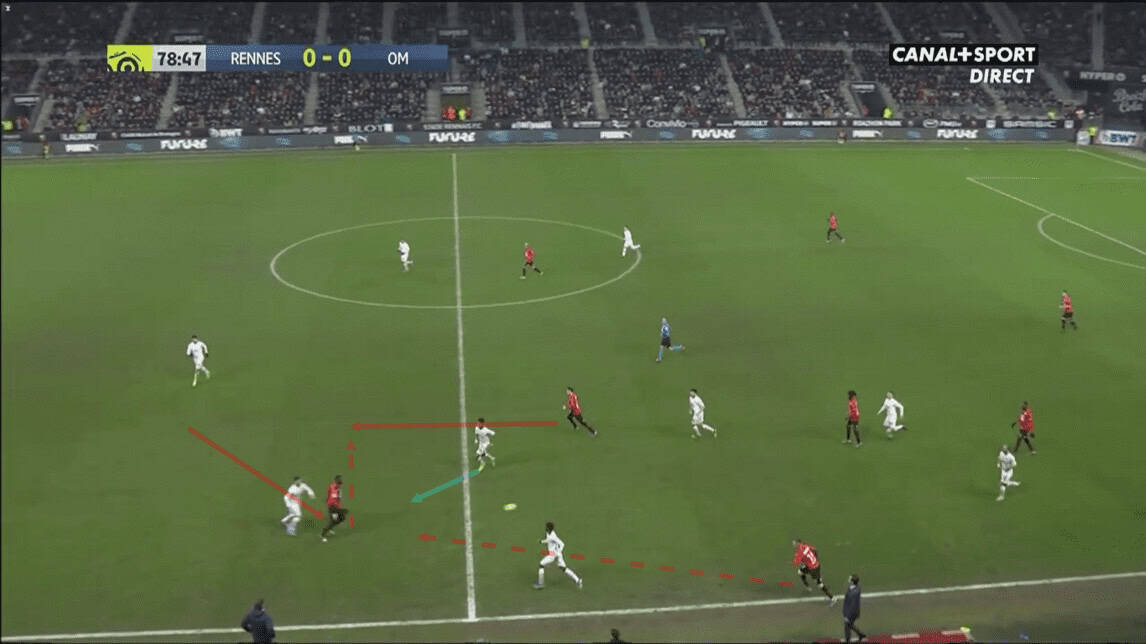
The image above shows us an example of the depth at which Rennes typically pressed Marseille in the second half. We can see that there is a much larger gap between Rennes’ defensive line and midfield line here than they typically allowed in the first half.
All of Rennes’ midfield four can be seen pressing well beyond the middle of the pitch in this image. Central midfielder James Léa Siliki can be seen playing as high as Raphinha in this image. Léa Siliki is pressing Kamara in this image, as Marseille attempt to build through their midfield.
We can also see right-back Traoré playing much higher than the rest of Rennes’ defensive line in this image. Traoré can be seen remaining tight on Payet here to prevent him from enjoying the time and space to create which he enjoyed in the first half.
We can see that this allows space at Marseille’s left-wing for Sanson to probe into once again. However, Sanson doesn’t receive the ball on this occasion as Rennes force Marseille to restart by giving away a free-kick, in a non-dangerous position.
This image provides us with just one example of Rennes’ effective high press. Rennes deployed this tactic throughout the second half of this game. They were successful at forcing turnovers high up the pitch as a result of this defensive tactic.
Rennes’ PPDA (passes per defensive action) statistic dropped from 11.0 in the first half to just 4.6 in the second half. This statistic illustrates Rennes’ increased pressing intensity in the second half. This means, on average, Rennes allowed Marseille to play just 4.6 passes before committing a defensive action in the second half.
Rennes’ increased pressing intensity, along with the tactical alterations we discussed previously, helped them to control the game in the second half. They enjoyed a healthy total of 59% possession in the second half. This was a 20% improvement on the 39% of possession which they accumulated in the first half.
Rennes’ zonal set-piece defending allows Marseille second-ball regains
Marseille’s biggest chances in this game came as a result of set-pieces. Rennes set out to defend set-pieces zonally in this game. However, they struggled and gave away clear-cut chances while defending against set-pieces.

This image shows us an example of Rennes’ defensive set-up as they prepare to defend against a Marseille corner. Rennes’ zonal defence is clear in this image. We can see one man-marking the area just in front of the goalkeeper. Just ahead of him, we can see three man-marking the six-yard box. Lastly, Rennes have positioned three more men just outside the six-yard box, in line with the previous three.
We can see Duje Ćaleta-Car making a run towards the front of the six-yard box in this image. Payet manages to find Ćaleta-Car who flicks the ball onto Kamara, circled in this image. Kamara manages to get a shot off, which is blocked by Bourigeaud, who charges from the back of the six-yard box. However, the danger was not cleared yet.
This second image shows us the immediate aftermath of Kamara’s blocked shot. As Rennes’ defence gets back into position following the corner, Kamara’s blocked shot finds its way to Benedetto at the penalty spot.
As nobody is marking Benedetto or that zone, following the set-piece, it leaves Benedetto with a clear shot at goal. Benedetto’s shot ultimately strikes the post here as Rennes are let off with some poor marking.
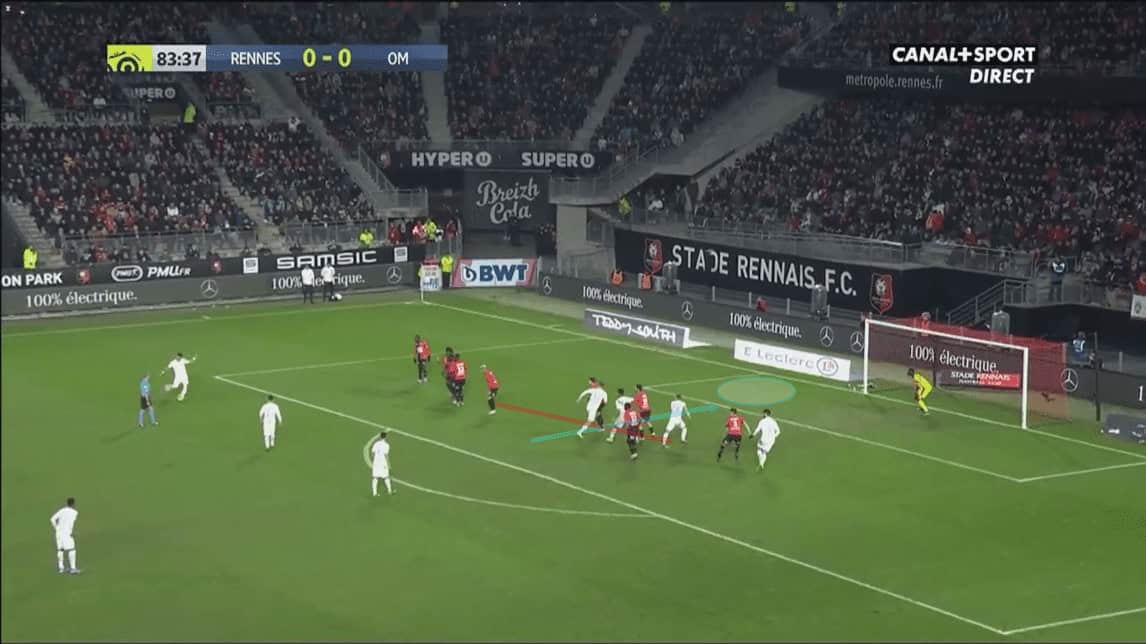
This third image shows us another example of Rennes defending a set-piece poorly. However, on this occasion, they were punished by Marseille. Rennes’ defence, once again, defended zonally for this free-kick.
As Marseille’s attackers run towards the goal to try and collect a rebound, Rennes’ defenders remain stationary. Only Da Silva at the back post followed his man into the box.
Substitute Kevin Strootman makes a run towards the front post and is left unmarked when Payet’s free-kick rattled the post. Strootman is subsequently able to tuck away the rebound as Marseille score the only goal of this game.
Conclusion
Despite turning the tide around and controlling the game in the second half, Rennes were unable to secure a win. Their defensive weaknesses at set-pieces were evident in the first half and remained evident in the second half.
Their defence failed to track Marseille’s runners, which ultimately cost them this game., along with some poor individual decision making and finishing in front of goal.
Marseille dominated possession and put together some excellent attacking sequences in the first half of this game. However, as we saw in this analysis, Rennes tactical alterations helped them to turn things around. Rennes’ performance was much more aggressive and effective in the second half. While they played well, they were unfortunate to concede against the run of play.