The beginning of a new decade brought us an English Premier League matchup between bottom half teams AFC Bournemouth and West Ham United. Days earlier West Ham brought back former manager David Moyes to reinvigorate an underperforming squad and employ a healthy dose of winning tactics. Bournemouth are in a similar situation of underperformance, but like the last eight years, they continue to place their trust in Eddie Howe. After analysis, we see that West Ham came away from the match with a big boost of confidence heading into the new year.
How did West Ham inflict such a jolting loss on Bournemouth? This tactical analysis will look at exactly how it was done.
Lineups

West Ham: out of possession
West Ham entered the match anticipating that Bournemouth would build-out of the back when in possession. To counter Bournemouth’s attacking tactics, Moyes set West Ham in a 4-4-1-1 when out of possession. While in this formation, West Ham prioritized restricting central passing options and using specific pressing triggers to initiate a full unit press. This proved to be quite effective
West Ham did not press at all times but employed two main pressing triggers of a) a Bournemouth defender commits a bad first touch and b) a Bournemouth defender receives the ball with their back to the field. By pressing as a unit in these specific moments, West Ham set themselves up to pressure the Bournemouth players when the conditions were favourable. When pressing triggers did not present themselves West Ham were content to retain their compact 4-4-1-1 shape and allow the Bournemouth centrebacks to possess the ball.
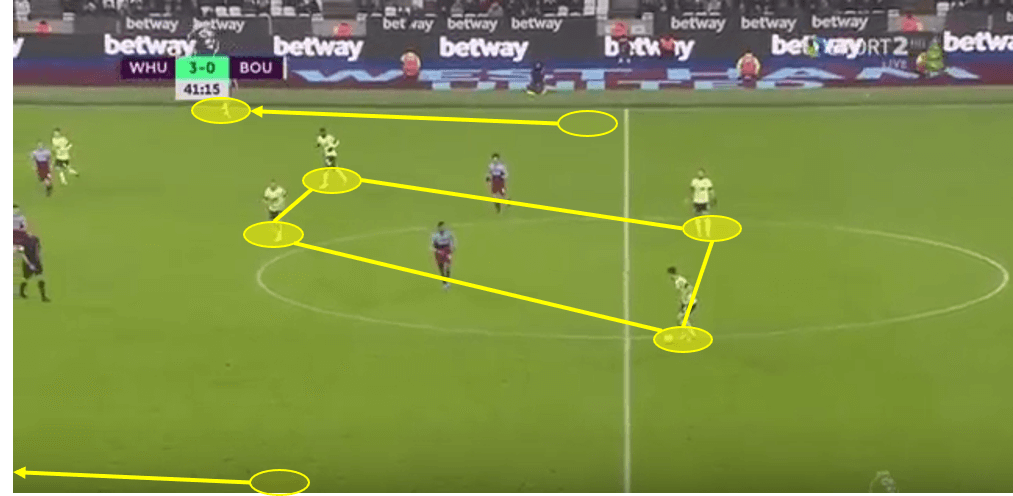
In the twenty-second minute, we saw West Ham successfully act on a pressing trigger in Bournemouth’s defensive third of the pitch. Bournemouth’s right-back Simon Francis has received the ball with his back to the field and is also moving towards the Bournemouth goal to receive the ball. West Ham immediately break out of their 4-4-1-1 shape to press as a unit and man-mark all nearby passing options.
As Francis moves to receive the ball, West Ham left-midfielder Pablo Fornals breaks out of his position to aggressively close down Francis. In this moment, West Ham’s Felipe Anderson moves to man-mark the current Bournemouth pivot midfielder, Jefferson Lerma. Fellow West Ham forward Sébastien Haller moves to a high position in an attempt to create a defensive cover shadow over both the Bournemouth centre-back Steve Cook and goalkeeper Aaron Ramsdale. Simultaneously, West Ham right-midfielder Robert Snodgrass also pushes forward and centrally to cut out any Bournemouth access to their left side of the pitch.

Although West Ham have positioned themselves well to constrict the space around the Bournemouth ball carrier, Cook breaks into space to receive the ball. West Ham react quickly and aggressively to Cook’s movement. By the time Cook receives the ball, he is being pressured by both Haller and Anderson. This lack of time and space forces Cook to receive the ball with his body facing the sideline as opposed to upfield. This leads to an awkward and rushed aerial pass upfield to the Bournemouth midfield line.

West Ham are well prepared for the incoming pass. Central midfielders Mark Noble and Declan Rice have slid to the left flank and halfspace to block any forward passes. Noble is already moving towards the oncoming ball as Cook plays the pass forward. Noble easily retrieves the ball and immediately initiates a West Ham counter-attack.

By remaining patient and initiating a team press on specific pressing triggers, West Ham were able to severely hinder Bournemouth’s forward progression when in possession. This leads us to look at how Bournemouth adapted to West Ham’s out of possession tactics.
Bournemouth: struggle to build out of the back
Throughout the first half, Bournemouth slowly adapted their team shape when building out of the back to allow for clean progression through the defensive, middle and final thirds. Although by the time Bournemouth had their first shot at goal in the forty-fifth minute, they were already down by three goals
Initially, Bournemouth positioned themselves with a single midfield pivot player and allowed centre-midfielder Dan Gosling to move forward in an attempt to receive between the West Ham defensive and midfield lines. The Bournemouth centre-backs would line up in the central channel and halfspaces while the full-backs would move to the flanks, on the same horizontal line as the midfield pivot (Lerma)
As we can see below Bournemouth have a central triangle with access to the flanks through the full-backs. West Ham’s forwards remain compact and centrally located to restrict access to Lerma. Off-screen the West Ham outside-midfielders are ready to immediately initiate 1v1 pressure on the Bournemouth fullbacks as they receive the ball.

At this point, forward passes to the full-backs or Lerma are immediately pressured and nullified. Bournemouth began to play passes to players upfield who were positioned behind the West Ham midfield line. Gosling drifts across the field as the ball is circulated horizontally and attempts to drop into space to receive a pass directly from the centre-backs. When this pass occurs, the West Ham midfield line immediately closes in on Gosling and takes away any chances for him to cleanly advance upfield. Most forward passes are either lost or returned back to the defensive line. 
Shortly after the twenty-fifth minute, Eddie Howe initiated a change in offensive tactics. Gosling was to no longer find space between the lines upfield, but drop in as a second pivot player to aid in clean progression from the defensive third. By creating a box of four in the central channel, Bournemouth were able to better manipulate and move past the West Ham forward players. Gosling and Lerma were now able to receive the ball in space with less pressure.
Although this was a step forward for Bournemouth, they now had a 6v2 overload in the build-up stage. This left the forward Bournemouth players severely outnumbered up the pitch. Bournemouth now found themselves with the ability to build out of the back, but with little access to the final third of the field.

One more change was needed. Howe saw that the Bournemouth double pivot and two centrebacks could outplay the two West Ham strikers in a 4v2 situation. This then freed up the Bournemouth full-backs to push higher up the pitch and aid in progression into the attacking third.
Although Howe was able to adapt to West Ham’s out of possession tactics and pressing triggers, it was too little too late. By the time Bournemouth were able to consistently progress to the attacking third, West Ham had a three-goal lead and were content with sitting back and absorbing pressure.
West Ham: goals from the right flank
West Ham chose to focus their attacks through the flanks. This led to their first three goals coming from play on the right flank in the attacking third (one of them leading to a penalty kick). The first goal came from the use of a cutback into the box. Bournemouth’s adaptation to the cutback goal set the stage for West Ham’s eventual second goal.
By playing the ball wide and drawing the Bournemouth defensive unit out of shape, West Ham were able to quickly take the lead and put themselves in position to dictate the flow of the match.
In the seventeenth minute, we see that West Ham have played the ball deep into the right flank. West Ham have also allowed Anderson form his central position to aid in the retention of the ball. We can see that by positioning three attacking players in the right flank, West Ham have drawn over four Bournemouth players. In this moment, Haller recognizes that with a forward attacking run, he can drag the last Bournemouth midfielder out of the space in front of the defensive line.

As Snodgrass dribbles to goal from the right flank, Haller moves toward the six-yard box. This draws all Bournemouth players away from the top of the box. Snodgrass’ choice to dribble along the out of bounds line also serves to draw the vision of all nearby Bournemouth players. Noble, due to Snodgrass’ dribble, is now on the blind side of the Bournemouth unit. Noble then moves to the top of the box to await a cutback pass from Snodgrass
Snodgrass enters the eighteen-yard box and then releases the ball into the now open space at the top of the box. Noble quickly moves onto the ball and smashes it home for the first goal of the game.

Less than ten minutes later, West Ham once again have possession deep in the right flank. This time, Bournemouth are more careful to not lose control of the central area in front of the defensive line. They allow West Ham to possess the ball in the flank and choose not to heavily pressure the ball carrier.
Haller, again, makes an off the ball run toward the six-yard box. Having just fallen for Haller’s off the ball run, the Bournemouth midfielders allow him to make the run at the defensive line and hold their position at the top of the box.
West Ham send in a cross to Haller, who is now in a 1v1 situation with Bournemouth’s centreback, Cook. Haller wins the aerial 1v1 battle and acrobatically launches the ball past the goalkeeper.

Within a ten minute window, West Ham were able to score from similar situations on the right flank. In each of these moments, West Ham were able to take full advantage of Bournemouth’s player positioning within the box.
A penalty kick earned from a dribble from the right flank eventually gave West Ham an insurmountable lead in the thirty-fifth minute.
Conclusion
In the end, West Ham were able to take control and put away the match before Bournemouth had time to adjust and correct their tactics. West Ham move forward hoping that David Moyes’ dominant first match will not be a flash in the pan, but a positive sign of things to come. Bournemouth’s performance paired with Aston Villa’s narrow win against Burnley see them drop into the relegation zone.

If you love tactical analysis, then you’ll love the digital magazines from totalfootballanalysis.com – a guaranteed 100+ pages of pure tactical analysis covering topics from the Premier League, Serie A, La Liga, Bundesliga and many, many more. Buy your copy of the December issue for just ₤4.99 here