Total Football Analysis
Once.Sport
  • Football Analysis
    • Data Analysis
    • Formations
      • 2-2-4 Formation
      • 2-3-5 Formation
      • 3-1-4-2 Formation
      • 3-2-2-3 Formation
      • 3-2-4-1 Formation
      • 3-1-6 Formation
      • 3-3-4 Formation
      • 3-4-1-2 Formation
      • 3-4-2-1 Formation
      • 3-4-3 Formation
      • 3-5-1-1 Formation
      • 3-5-2 Formation
      • 4-1-4-1 Formation
      • 4-2-2-2 Formation
      • 4-2-3-1 Formation
      • 4-2-4 Formation
      • 4-3-1-2 Formation
      • 4-3-3 Formation
      • 4-4-2 Formation
      • 4-5-1 Formation
      • 5-3-2 Formation
      • 5-4-1 Formation
      • 6-3-1 Formation
    • Head Coach Analysis
    • Match Analysis
    • Player Analysis
    • Recruitment Analysis
    • Set Piece Analysis
    • Tactical Theory
    • Tactical Preview
    • Team Analysis
    • Training Analysis
    • Tactical Analysis
    • Scouting Report
  • Competition
    • ALL Competitions
    • English Premier League
    • Champions League
    • La Liga
    • Bundesliga
    • Serie A
    • Ligue 1
    • Eredivisie
    • EFL Championship
    • FIFA World Cup 2022
    • WEURO 2022
    • Women’s Super League
    • NWSL
    • Belgian First Division A
    • A-League
    • Liga Profesional de Argentina
    • Austrian Bundesliga
    • Campeonato Brasileiro Série A
    • DFB Pokal
    • 1. HNL
    • Danish Superliga
    • EFL League One
    • EFL League Two
    • FA Cup
    • EFL Cup
    • Indian Super League
    • K-League
    • J1 League
    • Liga MX
    • Copa América 2021
    • Copa del Rey
    • MLS
    • Eliteserien
    • Euro 2020
    • Primeira Liga
    • Scottish Premiership
    • Allsvenskan
    • Europa League
    • UEFA Nations League
    • Liga AUF Uruguaya
  • Coaches
    • All Coaches
    • Alfred Schreuder
    • Ange Postecoglou
    • Antonio Conte
    • Arne Slot
    • Bo Svensson
    • Brendan Rodgers
    • Bruno Lage
    • Carlo Ancelotti
    • Christophe Galtier
    • Claude Puel
    • Claudio Ranieri
    • David Moyes
    • Dean Smith
    • Diego Simeone
    • Domenico Tedesco
    • Frank Lampard
    • Eddie Howe
    • Edin Terzić
    • Emma Hayes
    • Erik ten Hag
    • Ernesto Valverde
    • Gennaro Gattuso
    • Gerardo Seoane
    • Gian Piero Gasperini
    • Giovanni van Bronckhorst
    • Graham Potter
    • Igor Tudor
    • Imanol Alguacil
    • Jesse Marsch
    • Jonas Eidevall
    • Jorge Sampaoli
    • José Bordalás
    • José Mourinho
    • Julen Lopetegui
    • Julian Nagelsmann
    • Julien Stéphan
    • Jürgen Klopp
    • Luciano Spalletti
    • Lucien Favre
    • Manuel Pellegrini
    • Marcelo Bielsa
    • Marco Rose
    • Marco Silva
    • Massimiliano Allegri
    • Mauricio Pochettino
    • Maurizio Sarri
    • Mikel Arteta
    • Niko Kovač
    • Nuno Espírito Santo
    • Oliver Glasner
    • Patrick Vieira
    • Paulo Fonseca
    • Pep Guardiola
    • Peter Bosz
    • Rafa Benítez
    • Ralf Rangnick
    • Ralph Hasenhüttl
    • Roger Schmidt
    • Roy Hodgson
    • Sean Dyche
    • Sérgio Conceição
    • Simone Inzaghi
    • Sonia Bompastor
    • Stefano Pioli
    • Steffen Baumgart
    • Steven Gerrard
    • Thiago Motta
    • Thomas Frank
    • Thomas Tuchel
    • Unai Emery
    • Vincenzo Italiano
    • Xavi
  • Teams
    • ALL Teams
    • AC Milan
    • Ajax Amsterdam
    • Arsenal
    • AS Monaco FC
    • Atalanta
    • Atlético Madrid
    • FC Barcelona
    • FC Bayern Munich
    • Borussia Dortmund
    • Celtic FC
    • Chelsea FC
    • Everton F.C.
    • Inter Milan
    • Juventus F.C.
    • Leeds United F.C.
    • Liverpool FC
    • Manchester City
    • Manchester United FC
    • Paris Saint-Germain
    • Rangers FC
    • RB Leipzig
    • Real Madrid CF
    • Tottenham Hotspur
    • West Ham United
  • Players
    • ALL Players
    • Alisson Becker
    • Bukayo Saka
    • Erling Haaland
    • Harry Kane
    • Jack Grealish
    • John Stones
    • Julián Alvarez
    • Kalvin Phillips
    • Kevin De Bruyne
    • Kyle Walker
    • Kylian Mbappé
    • Lamine Yamal
    • Lionel Messi
    • Luis Díaz
    • Mohamed Salah
    • Phil Foden
    • Virgil Van Dijk
  • Contact
  • Write For TFA
No Result
View All Result
No Result
View All Result
Total Football Analysis
No Result
View All Result
Home Teams Chelsea FC

Premier League 2018/19: Chelsea vs Fulham

Daniel Garai by Daniel Garai
December 5, 2018
in Chelsea FC, Match Analysis, Maurizio Sarri, Premier League
0
Premier League 2018/19: Chelsea vs Fulham Tactical Analysis Statistics

Chelsea hosted Fulham in the Premier League last weekend. This intense match gives us a perfect material to take a look at this interesting battle. The following analysis will show both sides’ strategy. 

Chelsea vs Fulham Premier League Tactical Analysis

Chelsea played in their usual 4-3-3 system, however, Giroud returned to the starting line-up and Pedro got chance this time instead of Willian. On the other hand, in the absence of Vietto and Schürrle Fulham formed in a narrow 4-3-1-2 shape which will be important later. Sessegnon positioned alongside Mitrovic in the front line. Whilst Cairney featured as a connection between the midfield and forward line. Behind them, Seri took the holding midfielder role and Chambers and Johansen played as a #8s.

As the match started, it has become clear that both teams were aiming to quick progress and attack. This sometimes created situations where quick transitions occurred. One team attempt to turn into counter-attack after stole the ball this led to another lost ball which gave the opponent to counter-attack. By the way, the first goal also scored through a counter-attack. Kante’s tackle initiated the attack, but Pedro put the ball into the net.

Due to Fulham’s centre-oriented formation, they tried to match-up and compete with Chelsea’s midfield trio. Therefore, Ranieiri primary target was executing fairly high press and cut of Chelsea’s progression. 

Fulham’s pressing scheme

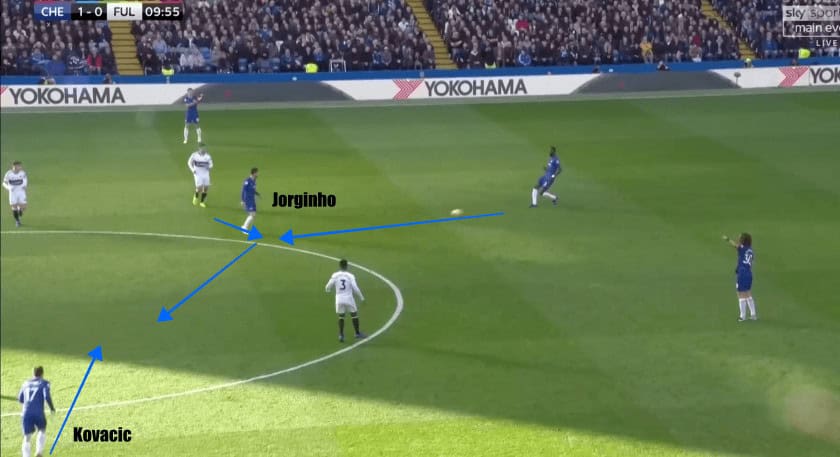
The front line – Mitrovic and Sessegnon – protect the centre then pressing the centre-backs with a diagonal run. Cairney took the responsibility to mark Jorginho, and Johansen and Chambers were pairing with Kante and Kovacic. This often forced the ball wide. When this happened, the ball-sided striker moved out to press the respective fullback.

Chelsea vs Fulham Premier League Tactical Analysis

Chelsea vs Fulham Premier League Tactical Analysis
Fulham’s well-organised pressing scheme

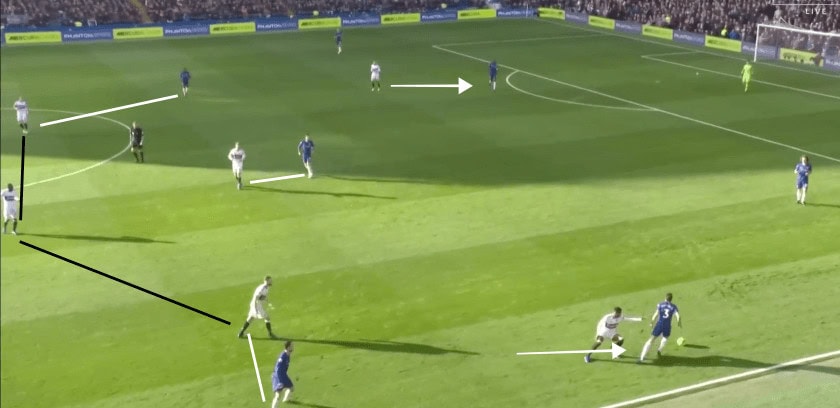
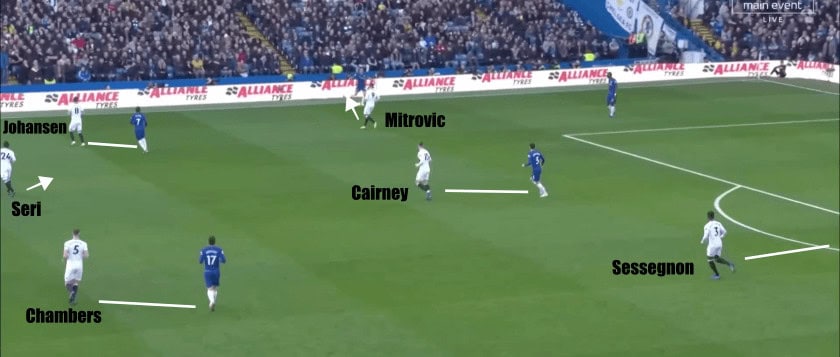
As the instances show above, not just the striker shifted to the ball-side but also the centre-midfielders. The ball-near #8 followed the opposite #8. Cairney stuck to Jorginho, while Seri moved out to cover the space behind Johansen. Theoretically, this set-up would force the opponent into long balls or give it up. However, this was not the case with Chelsea. Firstly, with Luiz on board, it was easier to escape the pressure. Secondly, the intensity and the big amount of movement appeared in the build-up too. Sometimes Hazard featured as a connection to the further area which also helps them to progress from deep.

Chelsea vs Fulham Premier League Tactical Analysis
After Hazard dropped to the halfway line to receive a ball, he launched a diagonal pass to the other side of the field.

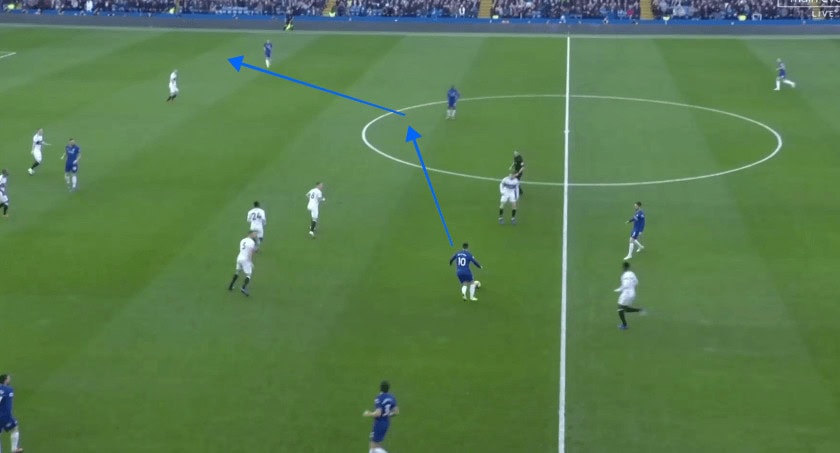
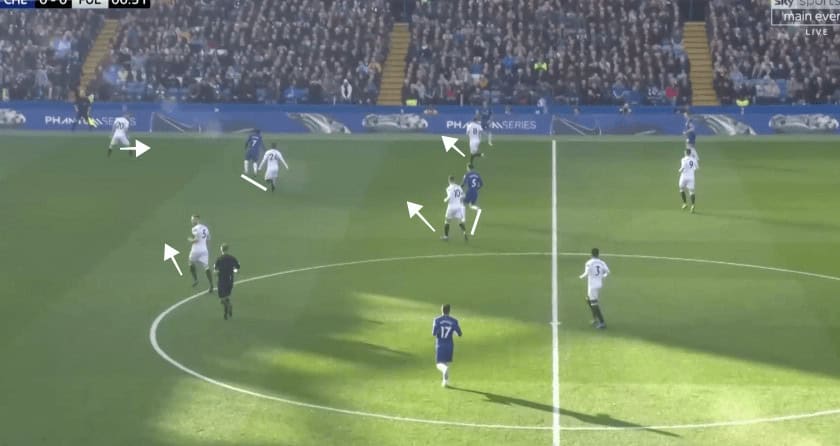
Moreover, if Fulham got lazy and did not mark tightly the key players from the home side, Chelsea would able to bypass the press.

Chelsea vs Fulham Premier League Tactical Analysis
Kante received a pass when he surrounded with Fulham players.
Chelsea vs Fulham Premier League Tactical Analysis
Then he played the ball wide

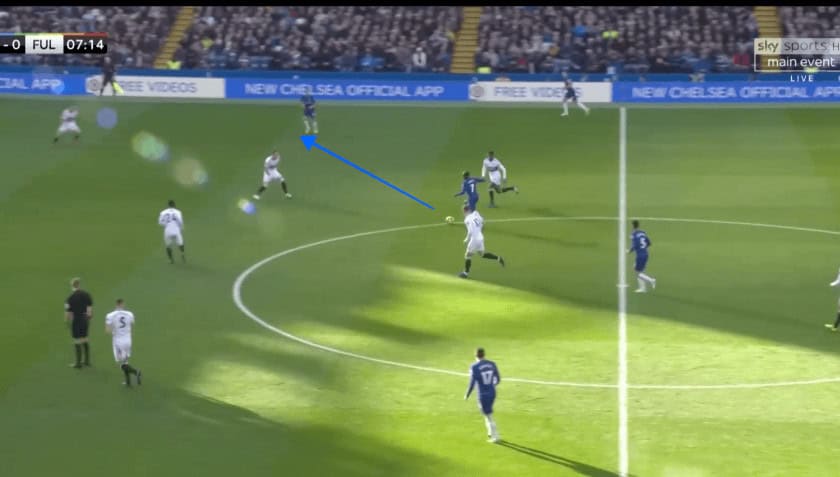
And probably the best scenario. Jorginho got the ball during his movement and due to Kovacic launched his movement before Jorginho even received the pass, he was able pass immediately towards Kovacic.

Chelsea vs Fulham Premier League Tactical Analysis

When Chelsea reached the opponent’s half, Fulham tried to close down on them. the adjustment also appeared in the defensive movement. Johansen moved out to press the ball-carrier winger and Seri also occupied a position in the flank in order to mark Kante.

Chelsea vs Fulham Premier League Tactical Analysis

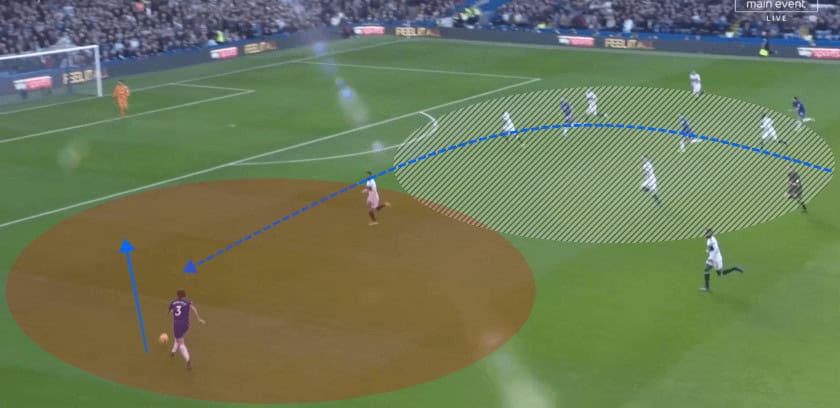
Alonso as a target man

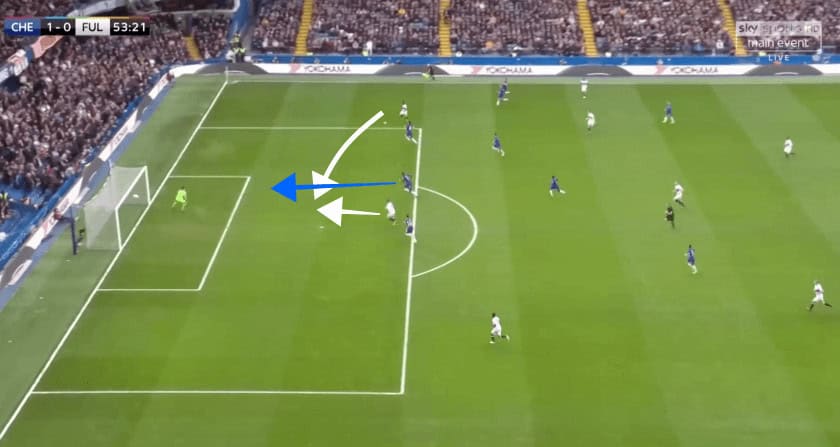
One of the most dangerous patterns that Chelsea used in this match was that passing wide. After overloading an area which attracts Fulham’s defence Chelsea played a through ball to the wing. These mostly targeted Alonso.

Chelsea vs Fulham Premier League Tactical Analysis

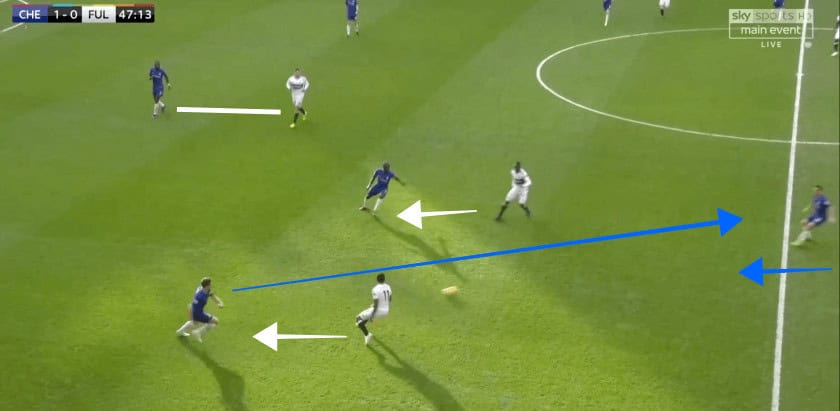
Furthermore, as I said earlier, Fulham played in a narrow formation, thus Chelsea was able to target the area next to Fulham’s midfield trio. There were not enough protection in the halfspaces, therefore Chelsea could pass there. These line breaking passes made between Chambers and Sessegnon and also targeted Alonso.

Chelsea vs Fulham Premier League Tactical Analysis
Due to Hazard’s positioning, the fullback had to occupy a narrow position. This created more space for Alonso.

Chelsea vs Fulham Premier League Tactical Analysis

Chelsea’s dynamic space occupation continued to work 

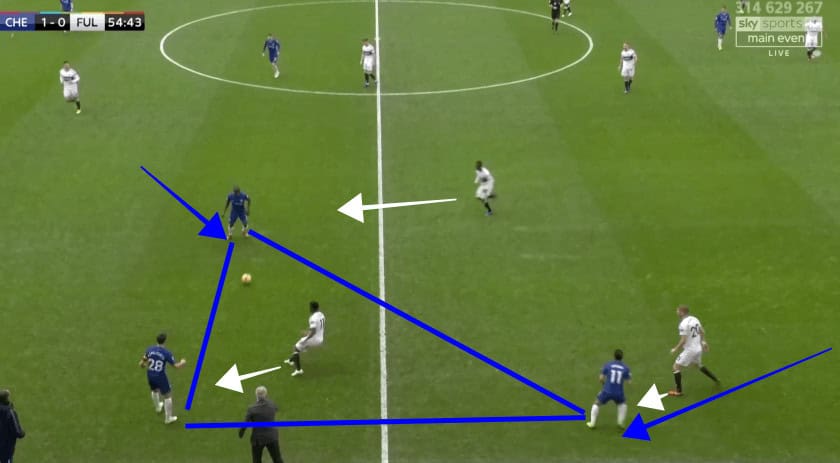
With quick combinations and lots of movements that Chelsea used in their play, they managed to break through Fulham’s defence in the second half too. Forward players often dropped to create a good passing connection with teammates. This attracts Fulham’s man and ball-oriented defence, therefore it constantly drags away Fulham’s defenders. An area often became overloaded where Chelsea could bypass with combinations or quickly played the ball to other areas. Thus the defensive scheme often became unsettled and a little bit chaotic. 

Chelsea vs Fulham Premier League Tactical Analysis

Chelsea vs Fulham Premier League Tactical Analysis

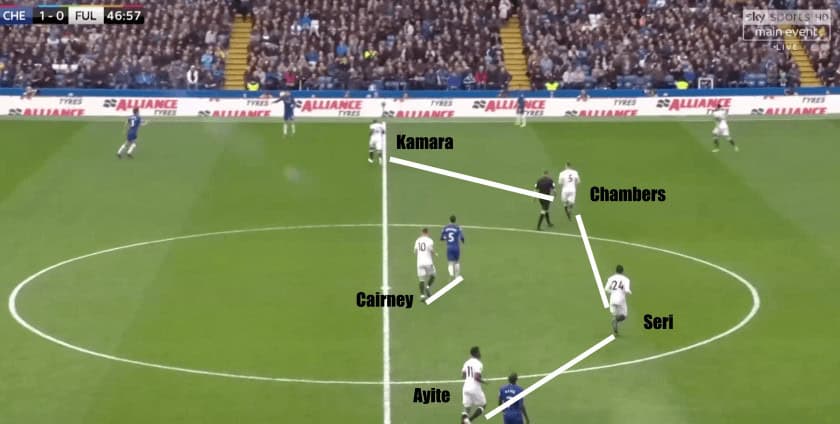
However, Ranieri tried to change things during the break, so Ayite and Kamara were introduced for the second half. This, of course, affected the formation. With the two new wing-oriented players Fulham switched to 4-2-3-1 in the attack. Ayite responsible for the left side and Kamara for the right wing. Seri and Chambers created a double pivot in the centre. 

Chelsea vs Fulham Premier League Tactical Analysis
In defence, the formation fluctuated between 4-4-2 and 4-4-1-1.

Despite the fact that this system was wider than the previous one Fulham still suffered in the game. Chelsea was able to continue his dominant and dangerous play, they lacked scoring chances. On the other hand, Fulham had a few promising chances. With a better finishing, they could equalise the result. 

Chelsea vs Fulham Premier League Tactical Analysis
Fulham’s most chances in the second half occurred from the right wing. In this situation, Rüdiger made a great and needed clearance.

Conclusion

Fulham was not able to score they had chances though. Whilst Chelsea showed a more cruelty in finishing in scoring chances. Although this was not a big victory rely on the two goals, Chelsea could dominate most parts of the match due to a higher possession rate and quick attacking style. The focus on attacking through lots of movement worked very well. Sarriball seemed a well-organised system which had big potential and a high threat to the opponents, although it still not perfect. 


If you love tactical analysis, then you’ll love the new magazine from totalfootballanalysis.com – 118 pages of pure tactical analysis covering topics from the Premier League, Serie A, La Liga, Bundesliga and many, many more. Get your copy today for just £4.99 here!

Previous Post

Premier League 2018/19: Liverpool vs Everton

Next Post

Bundesliga 2018/19: Borussia Dortmund vs Freiburg

Next Post
Bundesliga 2018/19: Borussia Dortmund vs Freiburg Tactical Analysis Statistics

Bundesliga 2018/19: Borussia Dortmund vs Freiburg

  • About Total Football Analysis
  • Contact Total Football Analysis
  • Write For Total Football Analysis
  • Advertise
  • Privacy Policy
  • Cancellation / Refund Policy
  • Resources
  • Terms Of Service

© 2026 Total Football Analysis

No Result
View All Result
  • Football Analysis
    • Data Analysis
    • Formations
      • 2-2-4 Formation
      • 2-3-5 Formation
      • 3-1-4-2 Formation
      • 3-2-2-3 Formation
      • 3-2-4-1 Formation
      • 3-1-6 Formation
      • 3-3-4 Formation
      • 3-4-1-2 Formation
      • 3-4-2-1 Formation
      • 3-4-3 Formation
      • 3-5-1-1 Formation
      • 3-5-2 Formation
      • 4-1-4-1 Formation
      • 4-2-2-2 Formation
      • 4-2-3-1 Formation
      • 4-2-4 Formation
      • 4-3-1-2 Formation
      • 4-3-3 Formation
      • 4-4-2 Formation
      • 4-5-1 Formation
      • 5-3-2 Formation
      • 5-4-1 Formation
      • 6-3-1 Formation
    • Head Coach Analysis
    • Match Analysis
    • Player Analysis
    • Recruitment Analysis
    • Set Piece Analysis
    • Tactical Theory
    • Tactical Preview
    • Team Analysis
    • Training Analysis
    • Tactical Analysis
    • Scouting Report
  • Competition
    • ALL Competitions
    • English Premier League
    • Champions League
    • La Liga
    • Bundesliga
    • Serie A
    • Ligue 1
    • Eredivisie
    • EFL Championship
    • FIFA World Cup 2022
    • WEURO 2022
    • Women’s Super League
    • NWSL
    • Belgian First Division A
    • A-League
    • Liga Profesional de Argentina
    • Austrian Bundesliga
    • Campeonato Brasileiro Série A
    • DFB Pokal
    • 1. HNL
    • Danish Superliga
    • EFL League One
    • EFL League Two
    • FA Cup
    • EFL Cup
    • Indian Super League
    • K-League
    • J1 League
    • Liga MX
    • Copa América 2021
    • Copa del Rey
    • MLS
    • Eliteserien
    • Euro 2020
    • Primeira Liga
    • Scottish Premiership
    • Allsvenskan
    • Europa League
    • UEFA Nations League
    • Liga AUF Uruguaya
  • Coaches
    • All Coaches
    • Alfred Schreuder
    • Ange Postecoglou
    • Antonio Conte
    • Arne Slot
    • Bo Svensson
    • Brendan Rodgers
    • Bruno Lage
    • Carlo Ancelotti
    • Christophe Galtier
    • Claude Puel
    • Claudio Ranieri
    • David Moyes
    • Dean Smith
    • Diego Simeone
    • Domenico Tedesco
    • Frank Lampard
    • Eddie Howe
    • Edin Terzić
    • Emma Hayes
    • Erik ten Hag
    • Ernesto Valverde
    • Gennaro Gattuso
    • Gerardo Seoane
    • Gian Piero Gasperini
    • Giovanni van Bronckhorst
    • Graham Potter
    • Igor Tudor
    • Imanol Alguacil
    • Jesse Marsch
    • Jonas Eidevall
    • Jorge Sampaoli
    • José Bordalás
    • José Mourinho
    • Julen Lopetegui
    • Julian Nagelsmann
    • Julien Stéphan
    • Jürgen Klopp
    • Luciano Spalletti
    • Lucien Favre
    • Manuel Pellegrini
    • Marcelo Bielsa
    • Marco Rose
    • Marco Silva
    • Massimiliano Allegri
    • Mauricio Pochettino
    • Maurizio Sarri
    • Mikel Arteta
    • Niko Kovač
    • Nuno Espírito Santo
    • Oliver Glasner
    • Patrick Vieira
    • Paulo Fonseca
    • Pep Guardiola
    • Peter Bosz
    • Rafa Benítez
    • Ralf Rangnick
    • Ralph Hasenhüttl
    • Roger Schmidt
    • Roy Hodgson
    • Sean Dyche
    • Sérgio Conceição
    • Simone Inzaghi
    • Sonia Bompastor
    • Stefano Pioli
    • Steffen Baumgart
    • Steven Gerrard
    • Thiago Motta
    • Thomas Frank
    • Thomas Tuchel
    • Unai Emery
    • Vincenzo Italiano
    • Xavi
  • Teams
    • ALL Teams
    • AC Milan
    • Ajax Amsterdam
    • Arsenal
    • AS Monaco FC
    • Atalanta
    • Atlético Madrid
    • FC Barcelona
    • FC Bayern Munich
    • Borussia Dortmund
    • Celtic FC
    • Chelsea FC
    • Everton F.C.
    • Inter Milan
    • Juventus F.C.
    • Leeds United F.C.
    • Liverpool FC
    • Manchester City
    • Manchester United FC
    • Paris Saint-Germain
    • Rangers FC
    • RB Leipzig
    • Real Madrid CF
    • Tottenham Hotspur
    • West Ham United
  • Players
    • ALL Players
    • Alisson Becker
    • Bukayo Saka
    • Erling Haaland
    • Harry Kane
    • Jack Grealish
    • John Stones
    • Julián Alvarez
    • Kalvin Phillips
    • Kevin De Bruyne
    • Kyle Walker
    • Kylian Mbappé
    • Lamine Yamal
    • Lionel Messi
    • Luis Díaz
    • Mohamed Salah
    • Phil Foden
    • Virgil Van Dijk
  • Contact
  • Write For TFA
  • Login

© 2026 Total Football Analysis